Radretireddad
-
Posts
531 -
Joined
-
Last visited
Content Type
Profiles
Forums
Events
Gallery
Everything posted by Radretireddad
-
Welcome, welcome, welcome Michael. Sounds like you have an impressive stash!
-
Moebius F250 steel wheel widening
Radretireddad replied to Radretireddad's topic in Tips, Tricks, and Tutorials
Thanks Mike. I’m glad you liked it. -
Moebius F250 steel wheel widening
Radretireddad replied to Radretireddad's topic in Tips, Tricks, and Tutorials
You’re very welcome John. -
Moebius F250 steel wheel widening
Radretireddad replied to Radretireddad's topic in Tips, Tricks, and Tutorials
You’re quite welcome Stef, I’m very happy you found this useful. Thanks for the compliments on the mock up. I know I need to get around to finishing some of these kits but car show season is in full swing and that’s when the lovely lady in my garage tends to cut into my modeling time. I’ll be scanning the finished builds section for pics of your plow/tow truck build so be sure to post plenty of them. -
Agreed! I own one of every version of the still decent Revell/Monogram kits and the most glaring flaws I see in them are that the ride height is too high, which is easily corrected, and the engines are too wide. They make better 351 Windsors than 289’s. The R/M kits are also the only source for a convertible, a ‘65 Shelby GT and R versions. I do like how the newly tooled Round2 bodies and interiors look and other updates like the 2 piece headlights, but they really need to be combined with the chassis and drivetrain from a Mueller era ‘67 kit to properly elevate them. As far as the Willys go, you still need to buy two kits if you want both versions in your collection so it seems to me like a wash.
-
I know. The previous releases I bought years ago included parts for both versions in the same kit. The pickup version is still in Round2’s lineup though.
-
It fits with a little trimming.
-
Moebius F250 steel wheel widening
Radretireddad replied to Radretireddad's topic in Tips, Tricks, and Tutorials
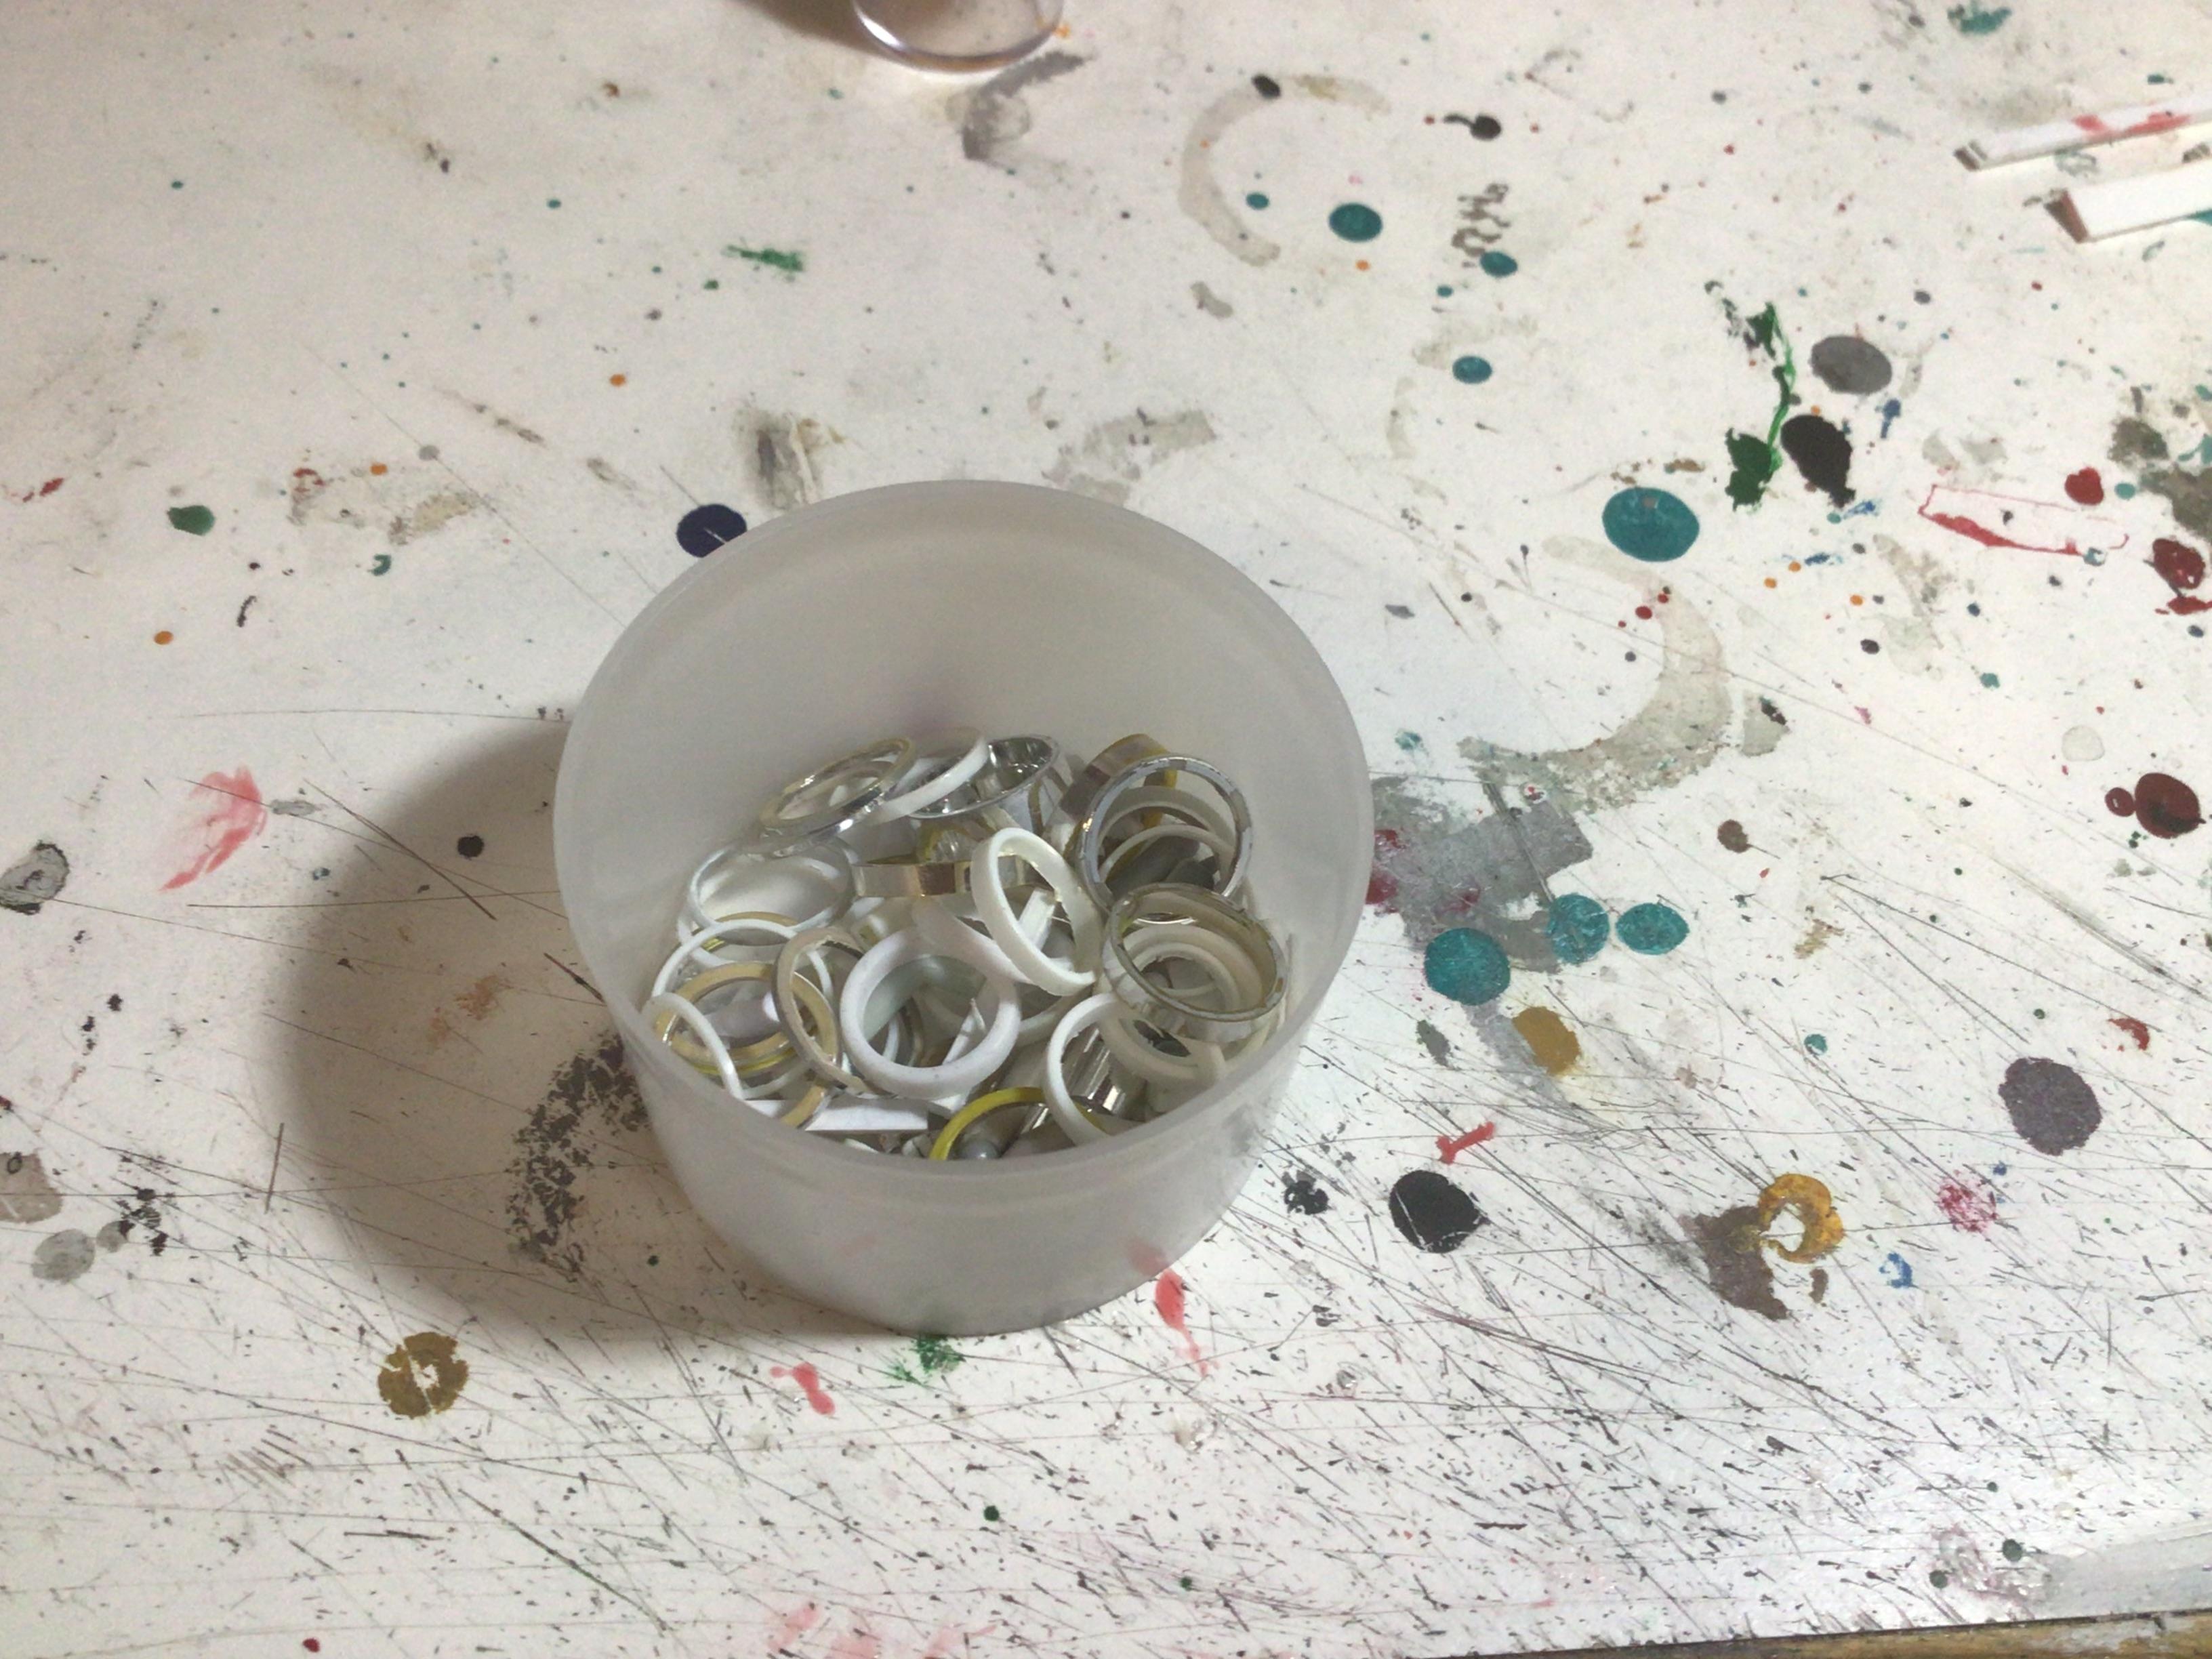
In this case yes. Since I already had 4 extra wheels on hand that weren’t going to be used anywhere else, it wasn’t a problem. Knowing I had those extra wheels was what inspired me to do it for this kit. I narrow more wheels than I widen and when I do, I keep the removed wheel sections for use with other wheels I may want to widen in the future. The only other source I can think of is tubing, but finding some in the right dimension may be difficult.
-
Moebius 1971 Lifted Ford F250 4x4 announcement
Radretireddad replied to Erik Solie's topic in Truck Kit News & Reviews
Ok, I posted a tutorial in the tips, tricks, and tutorials section. You can post anymore questions there. -
Moebius F250 steel wheel widening
Radretireddad replied to Radretireddad's topic in Tips, Tricks, and Tutorials
-
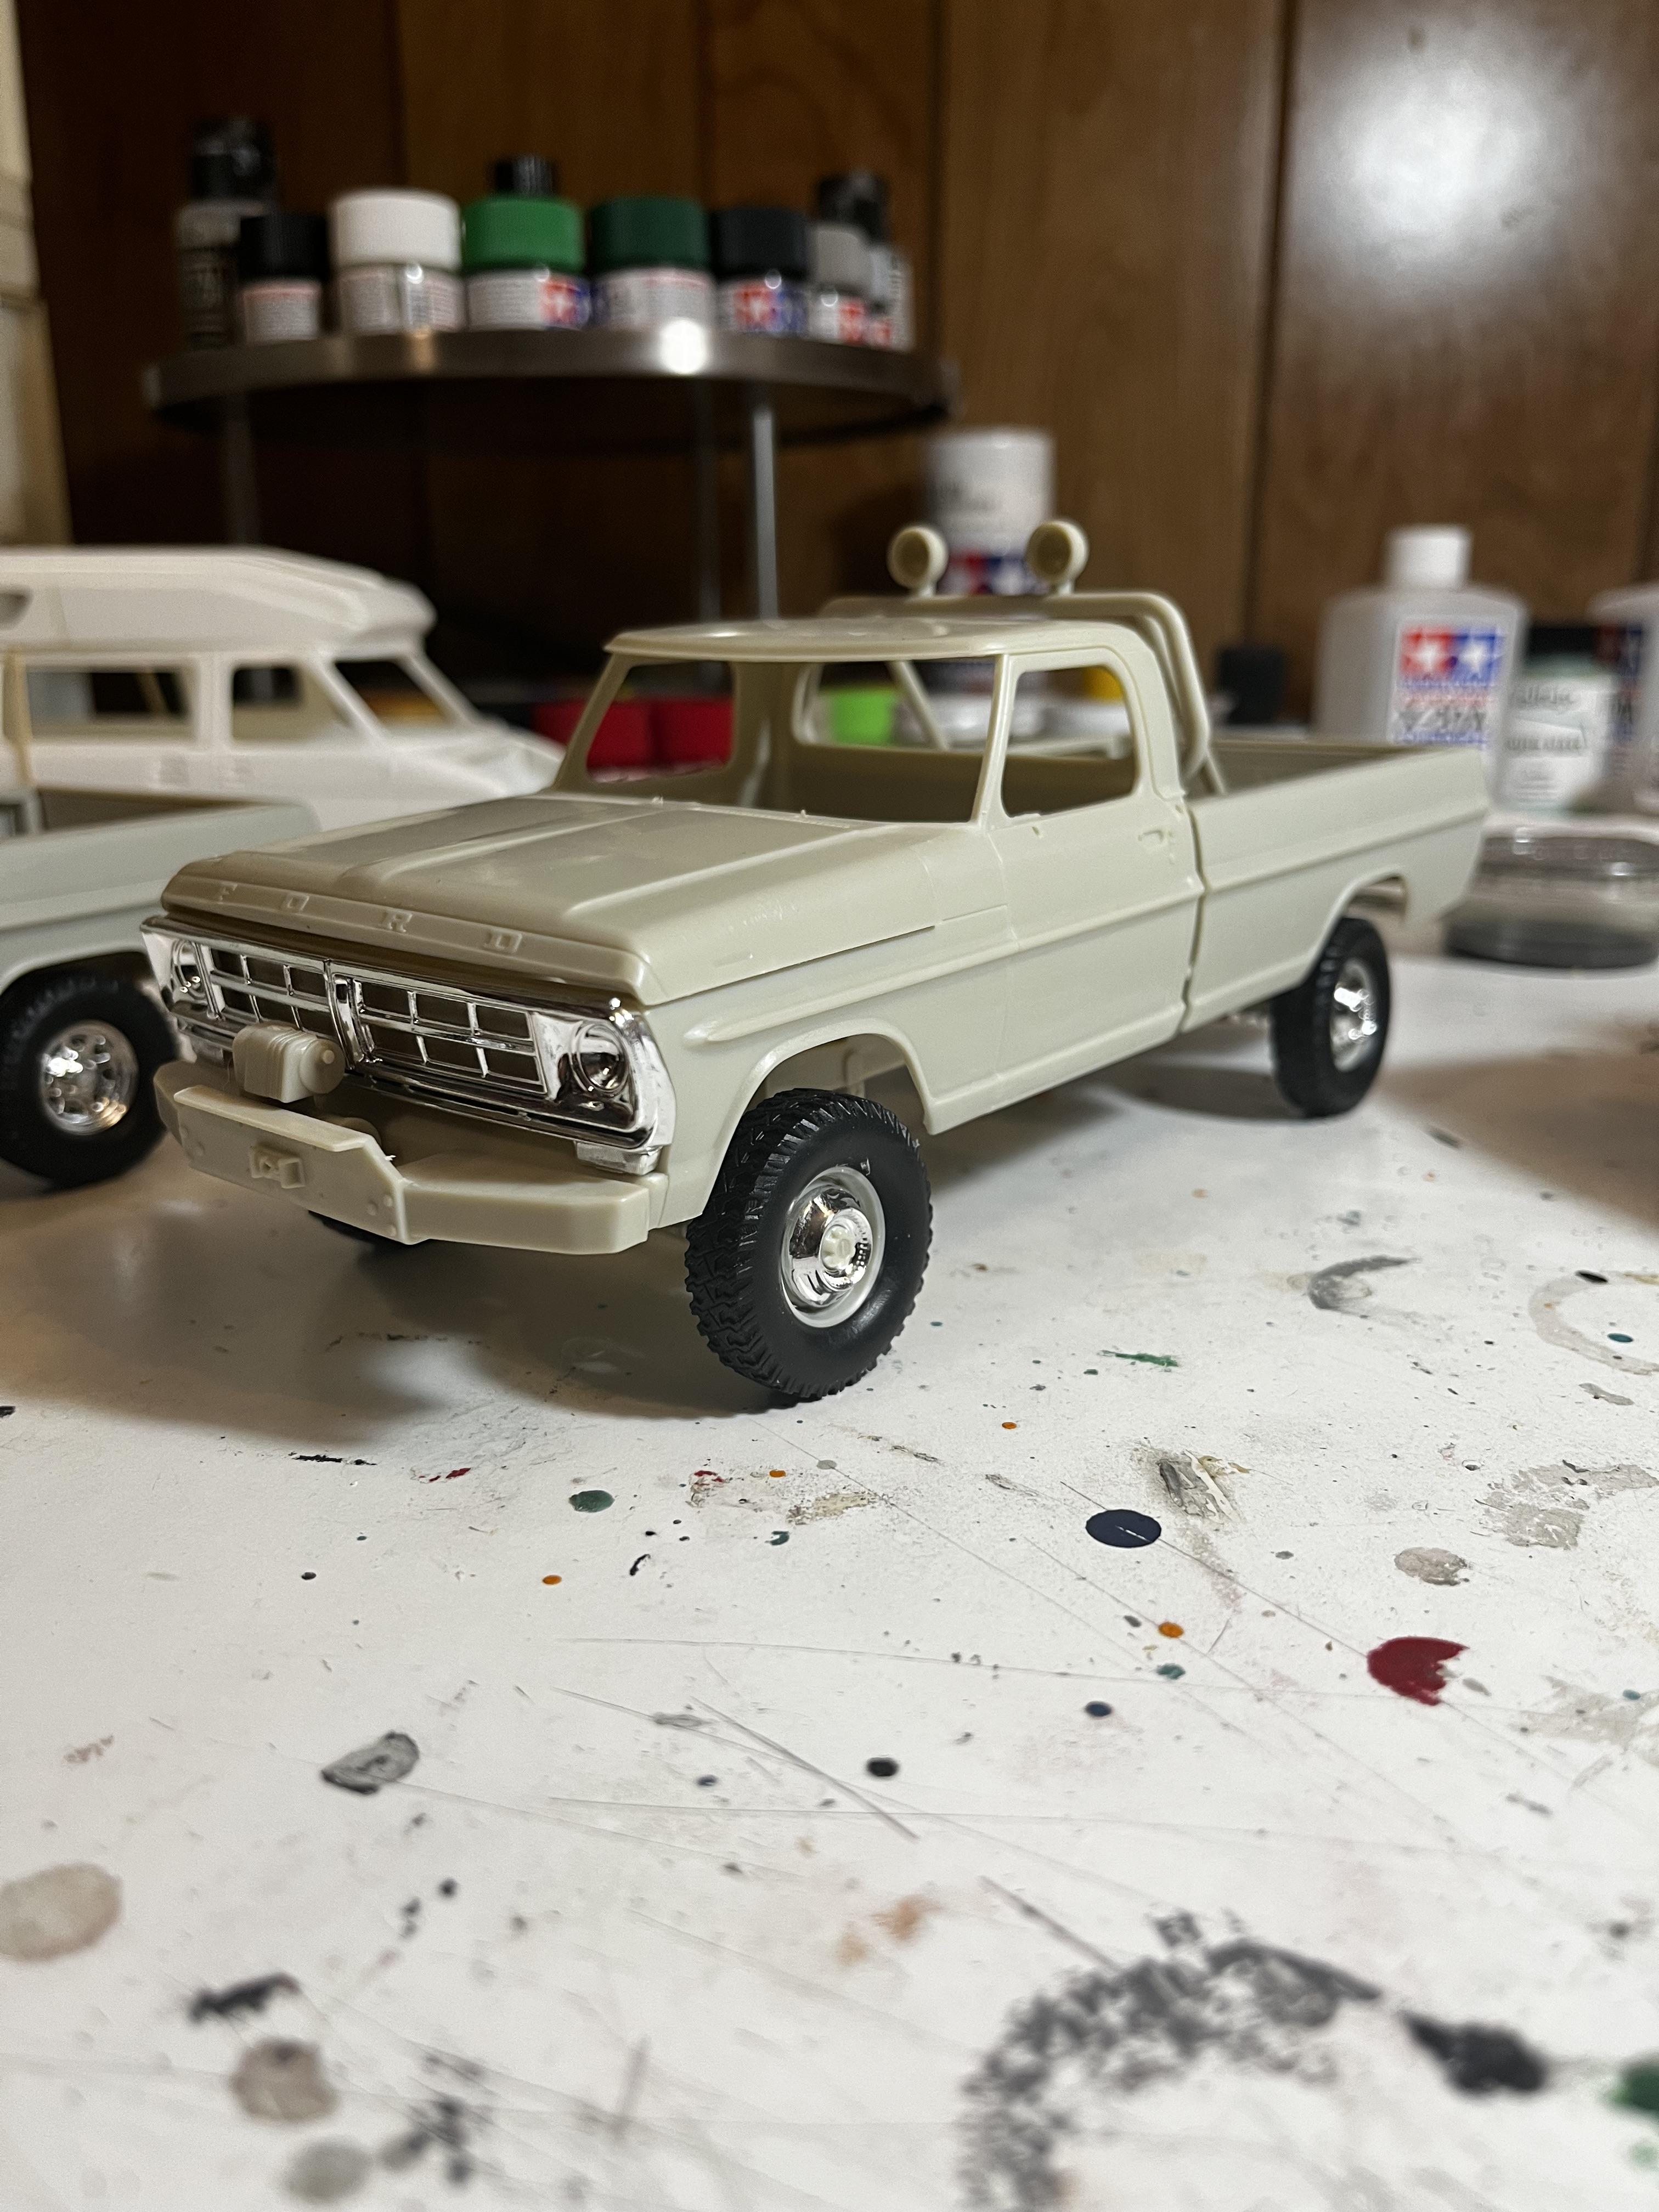
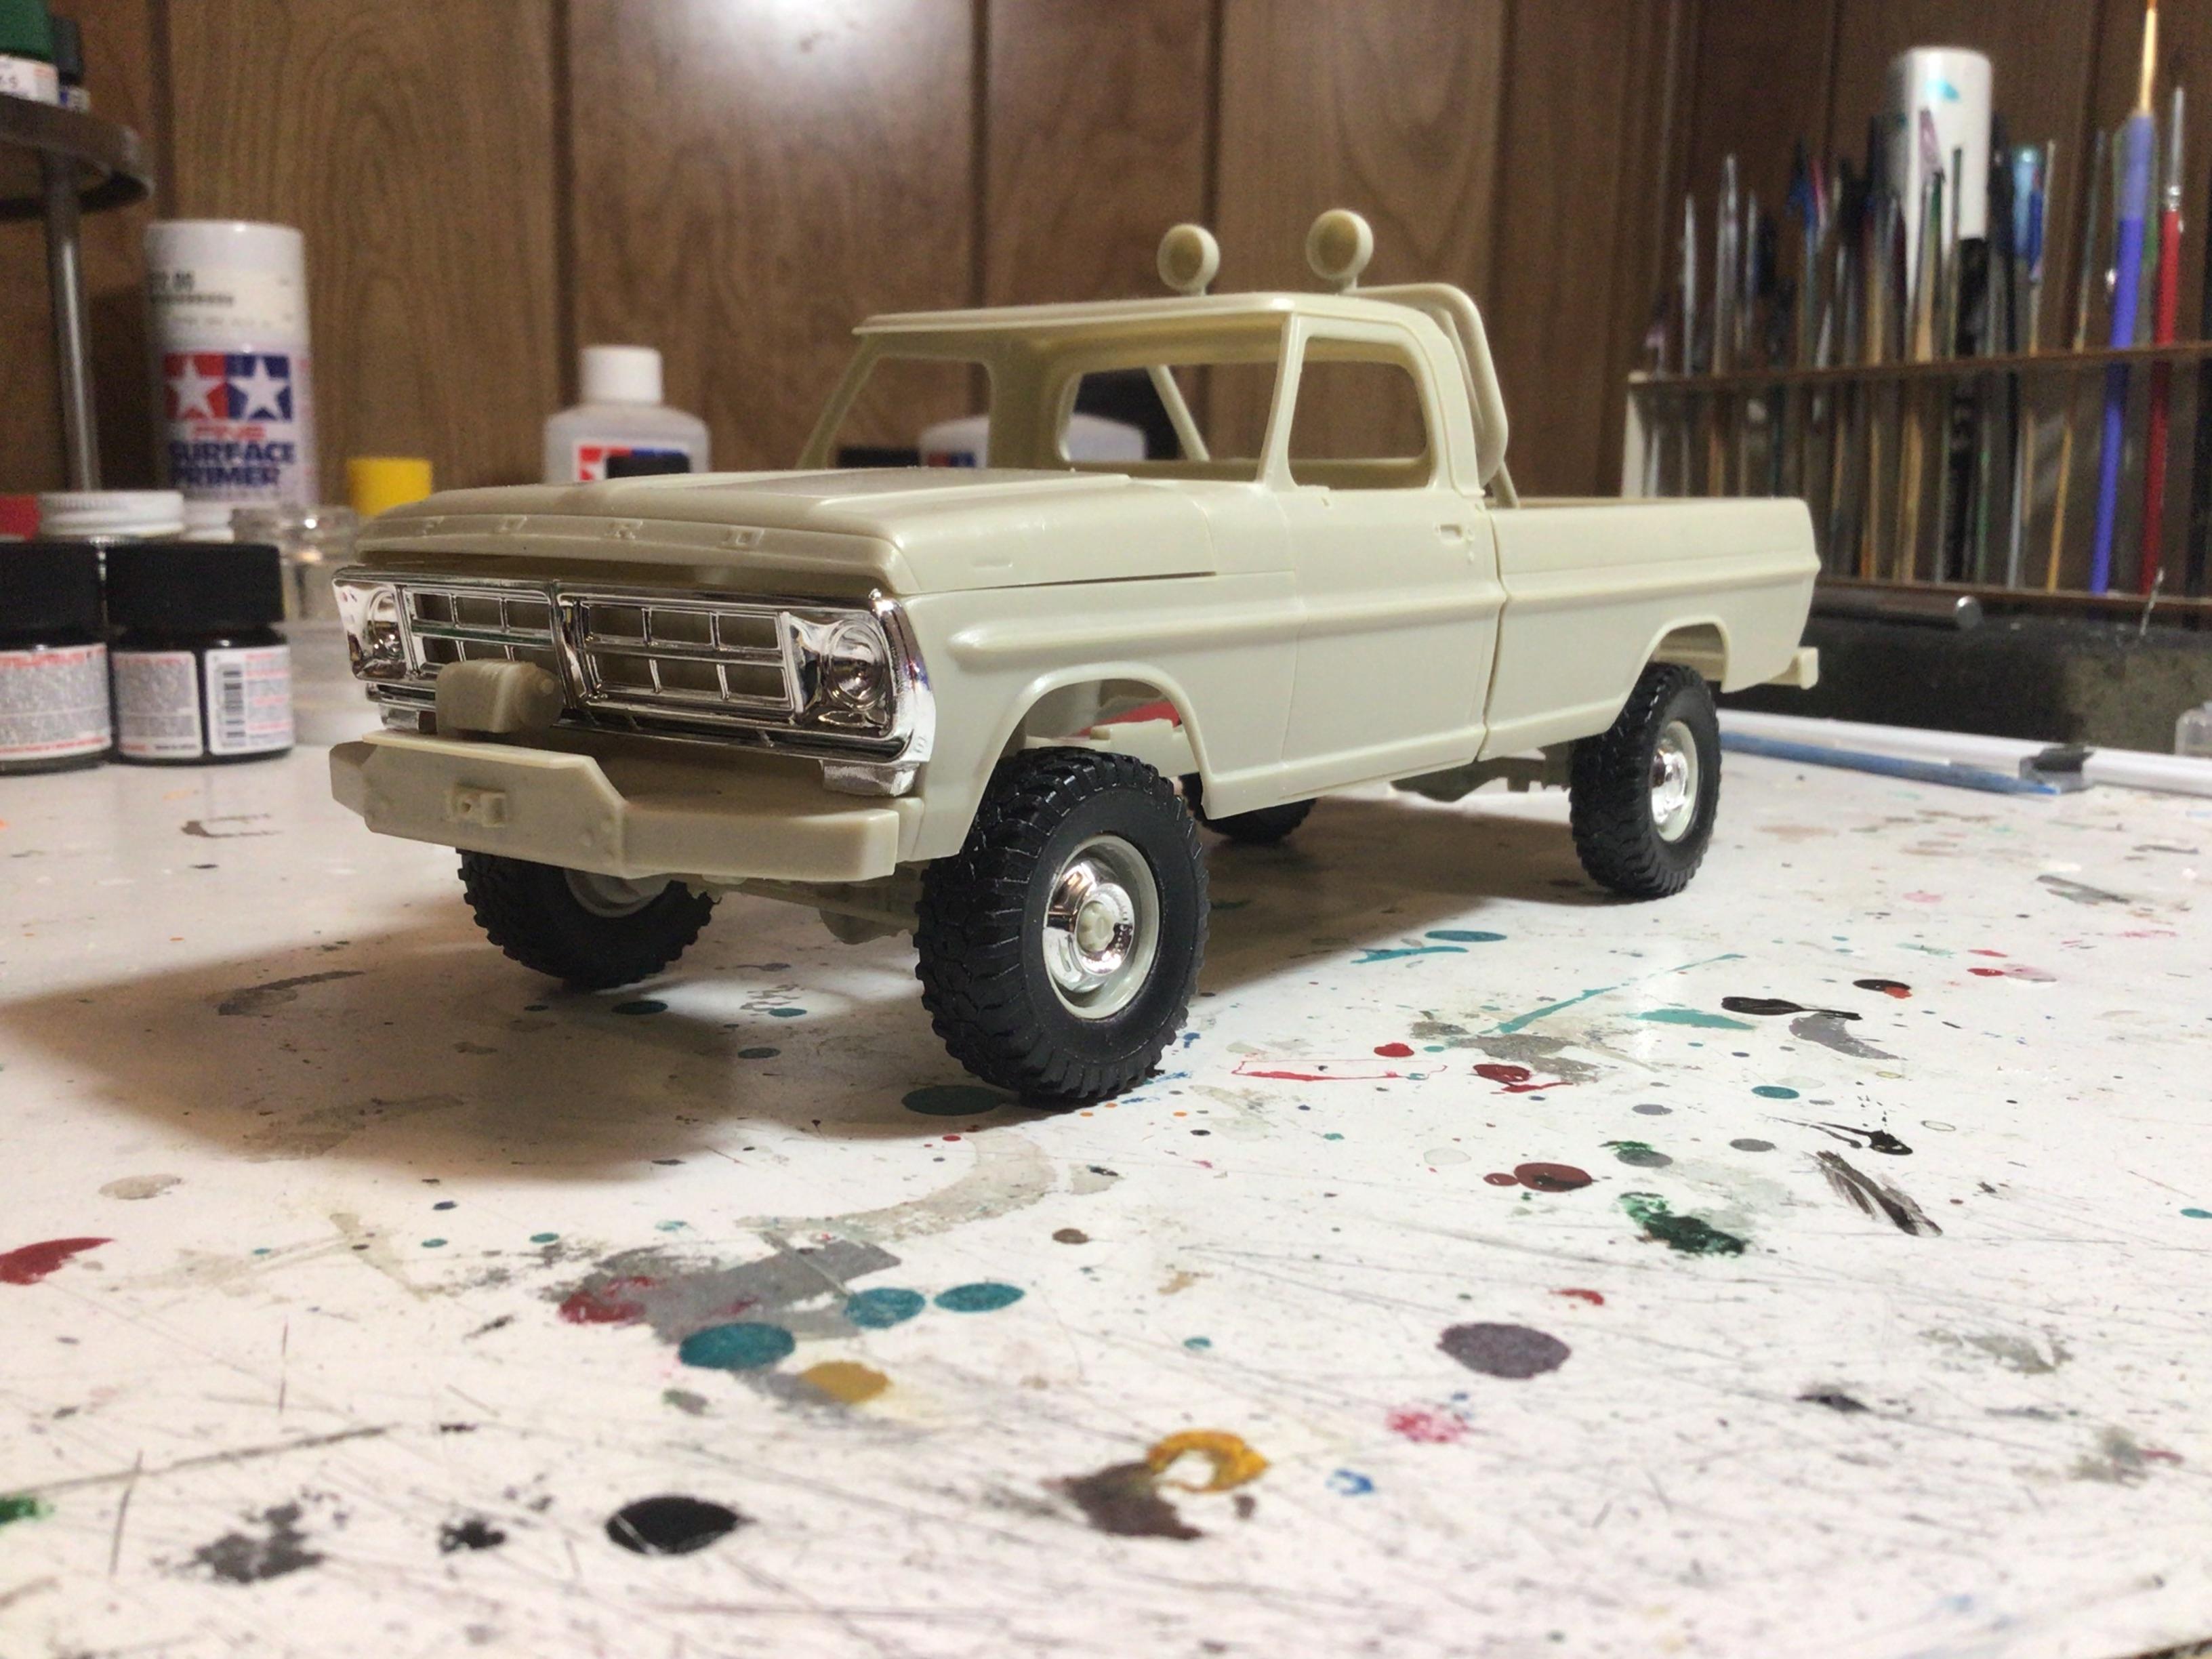
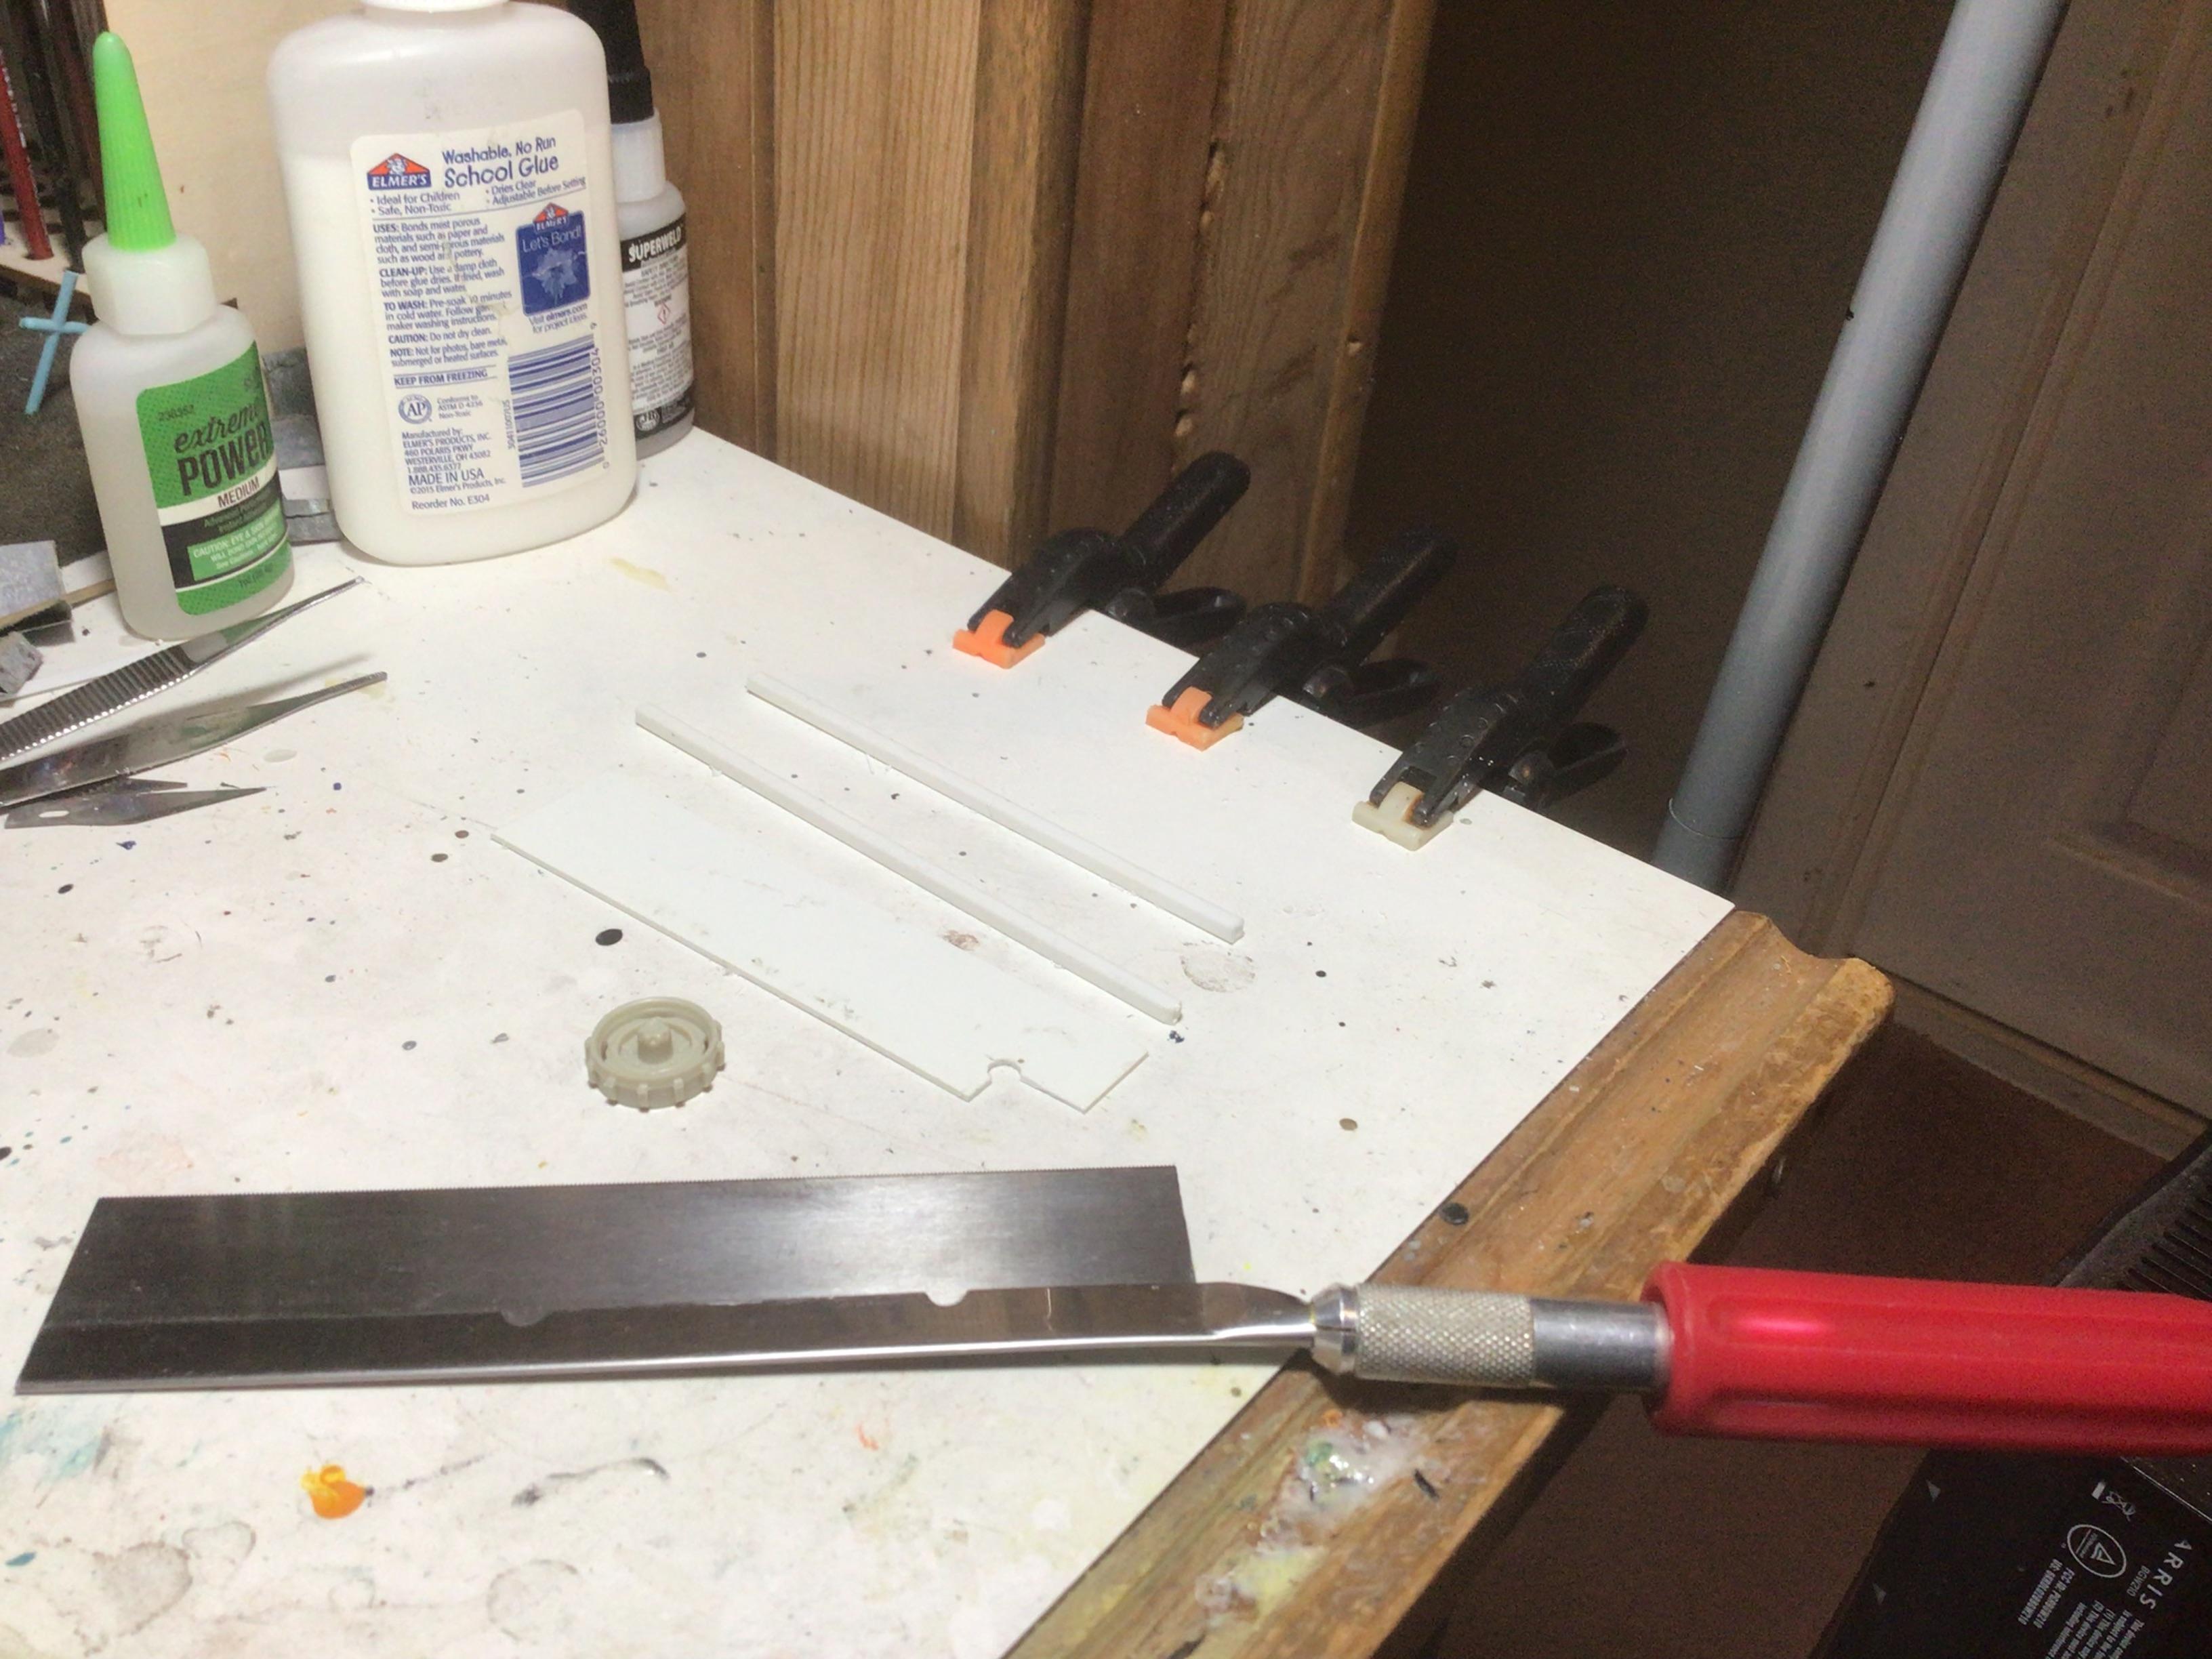
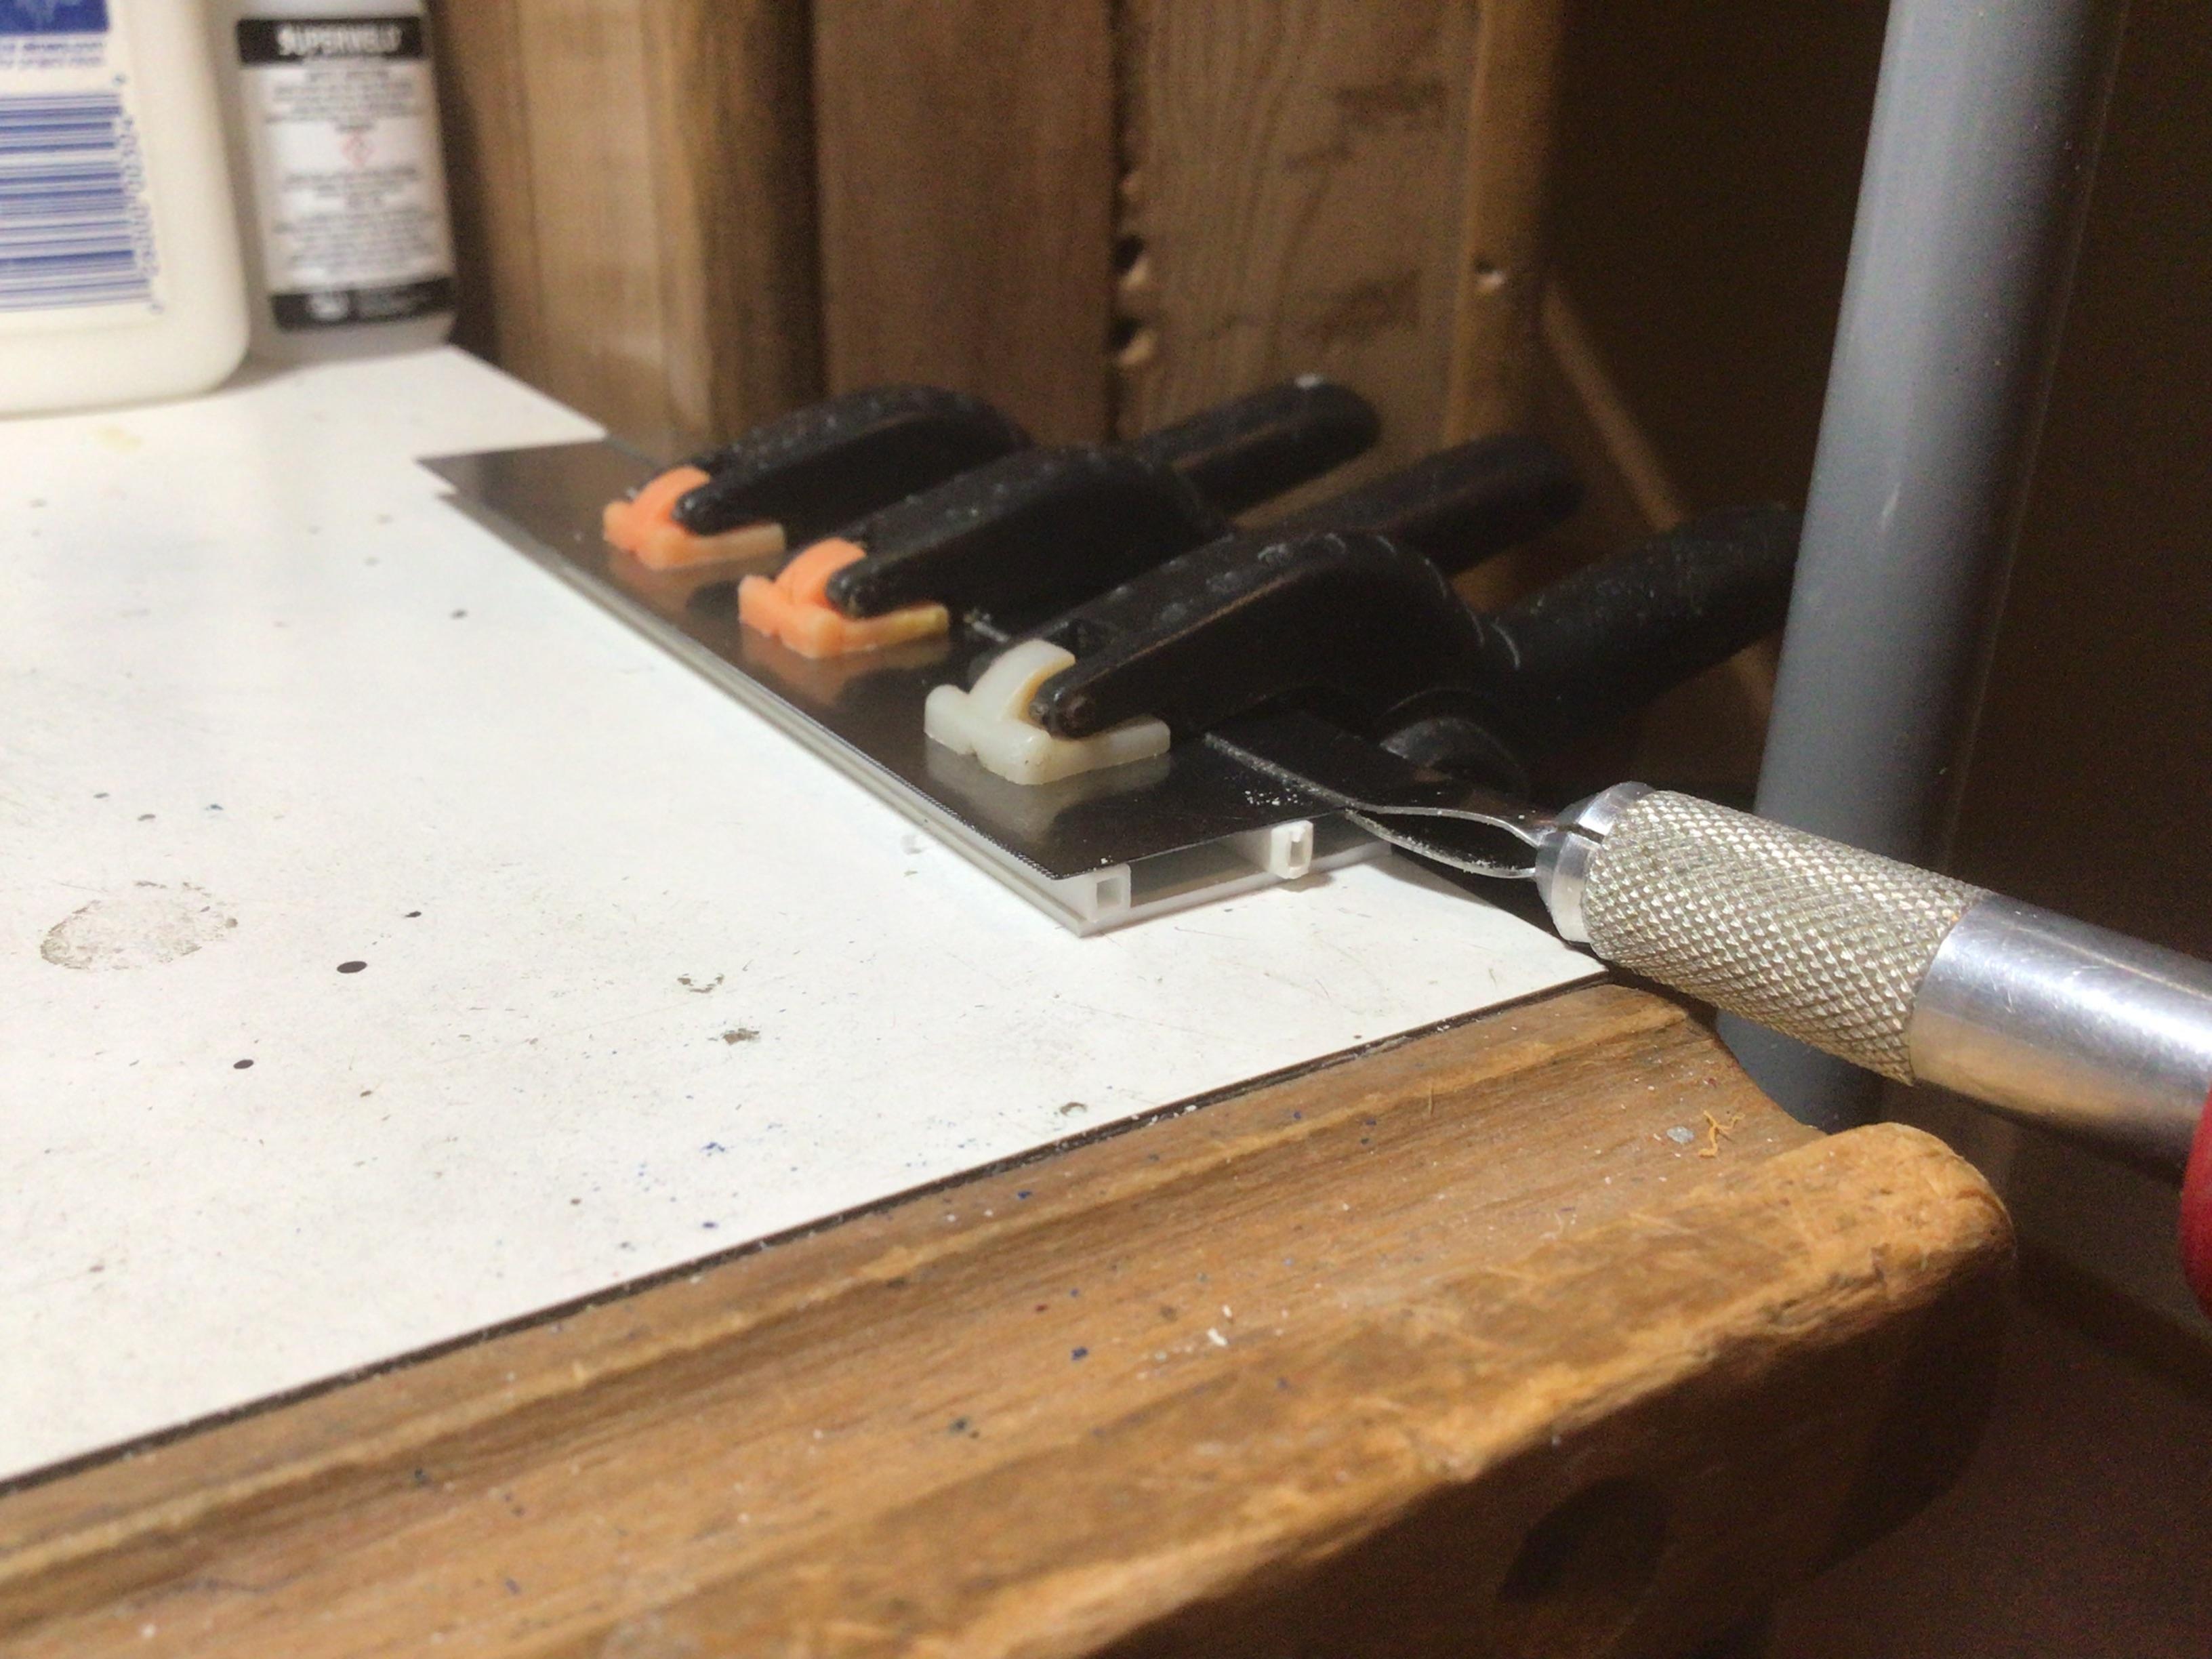
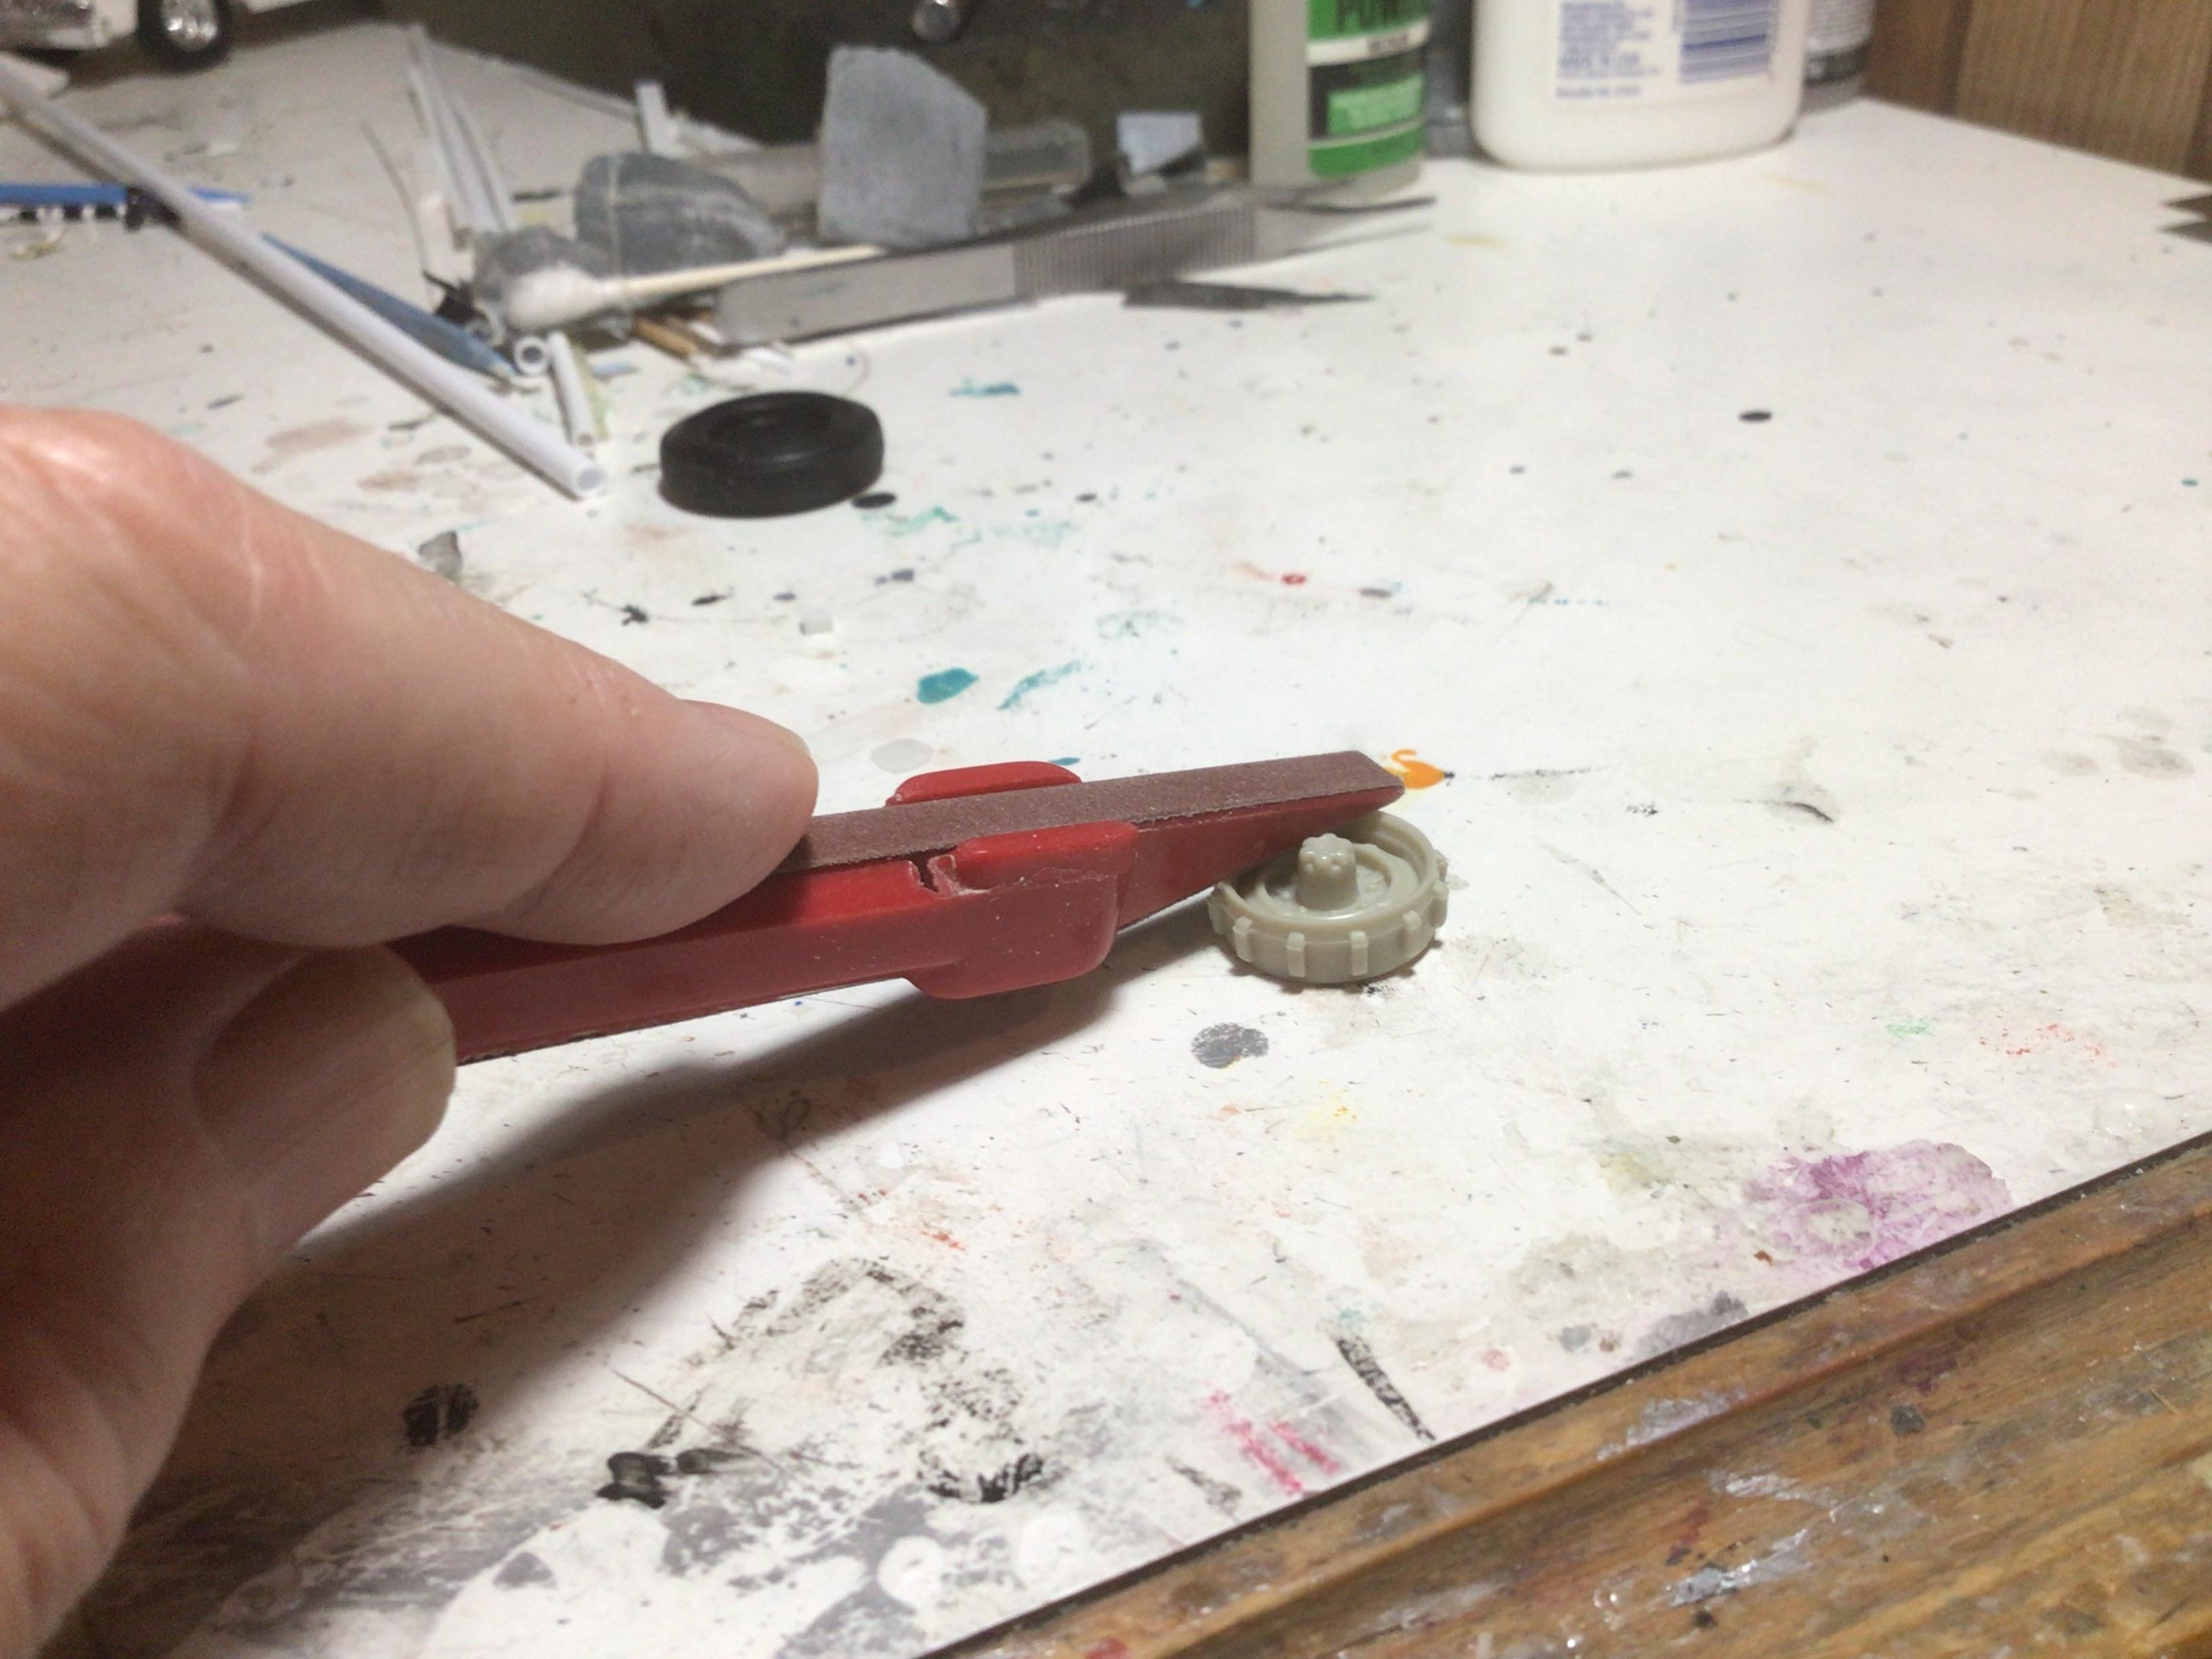
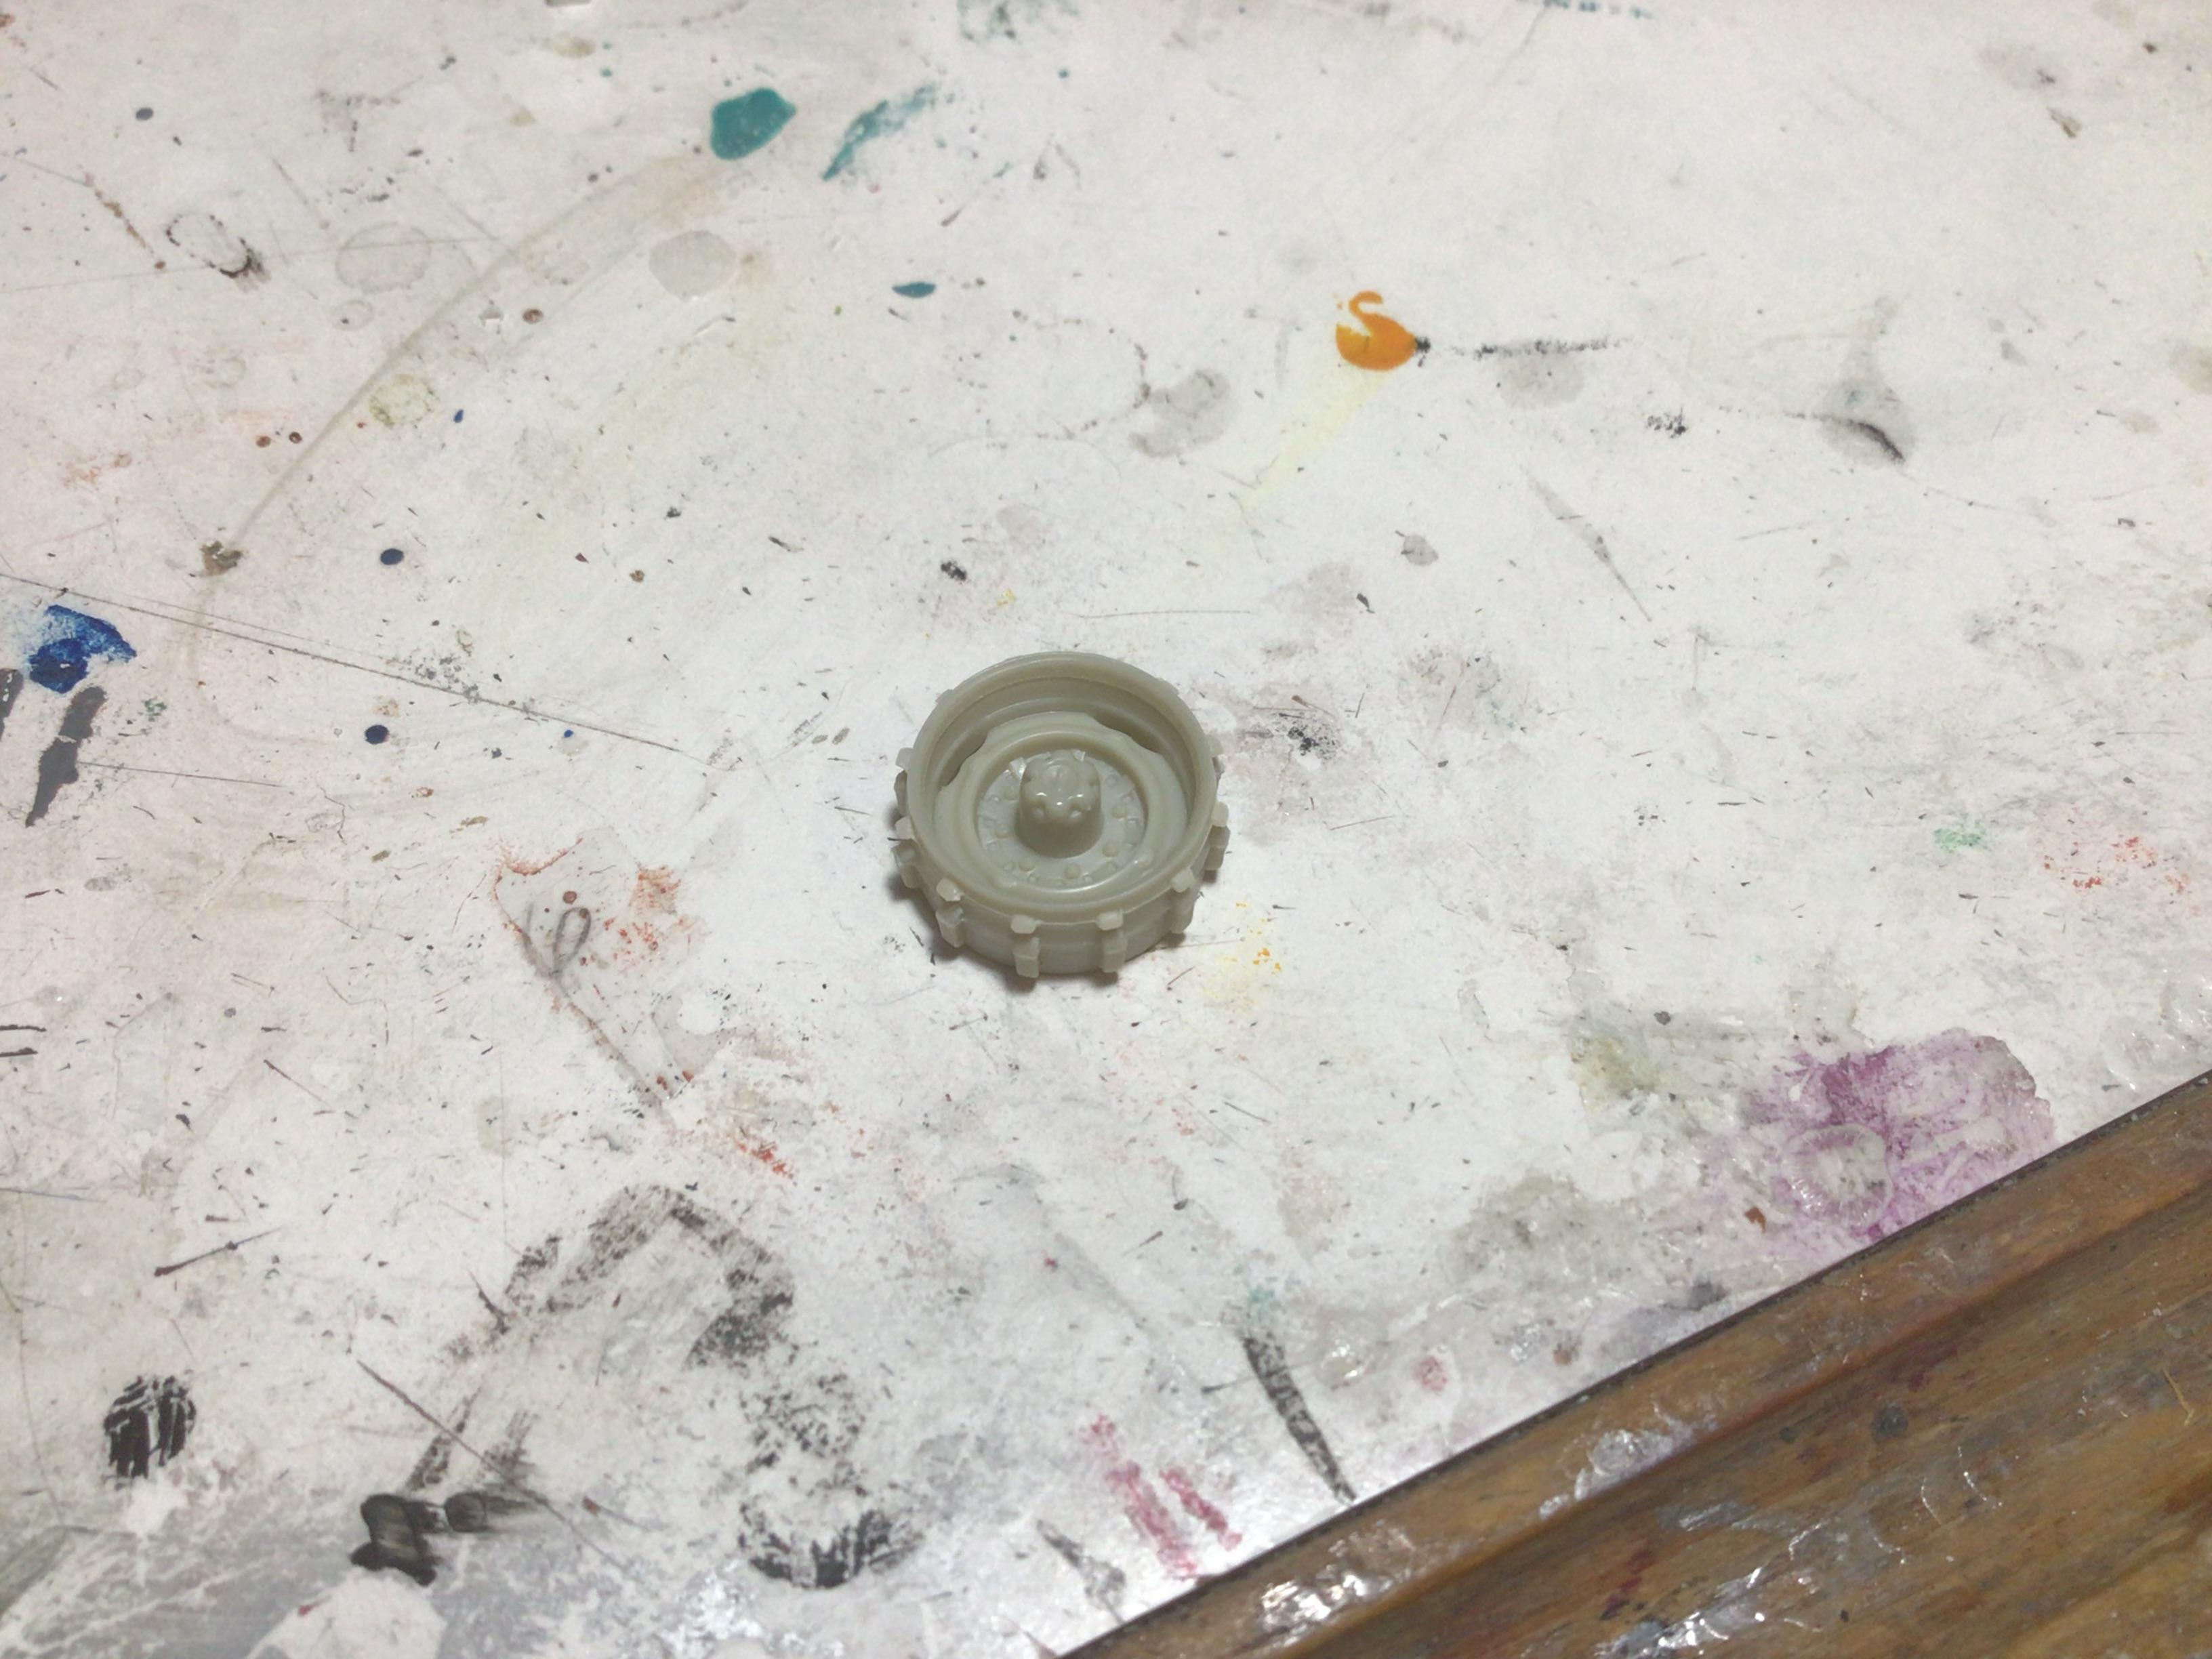
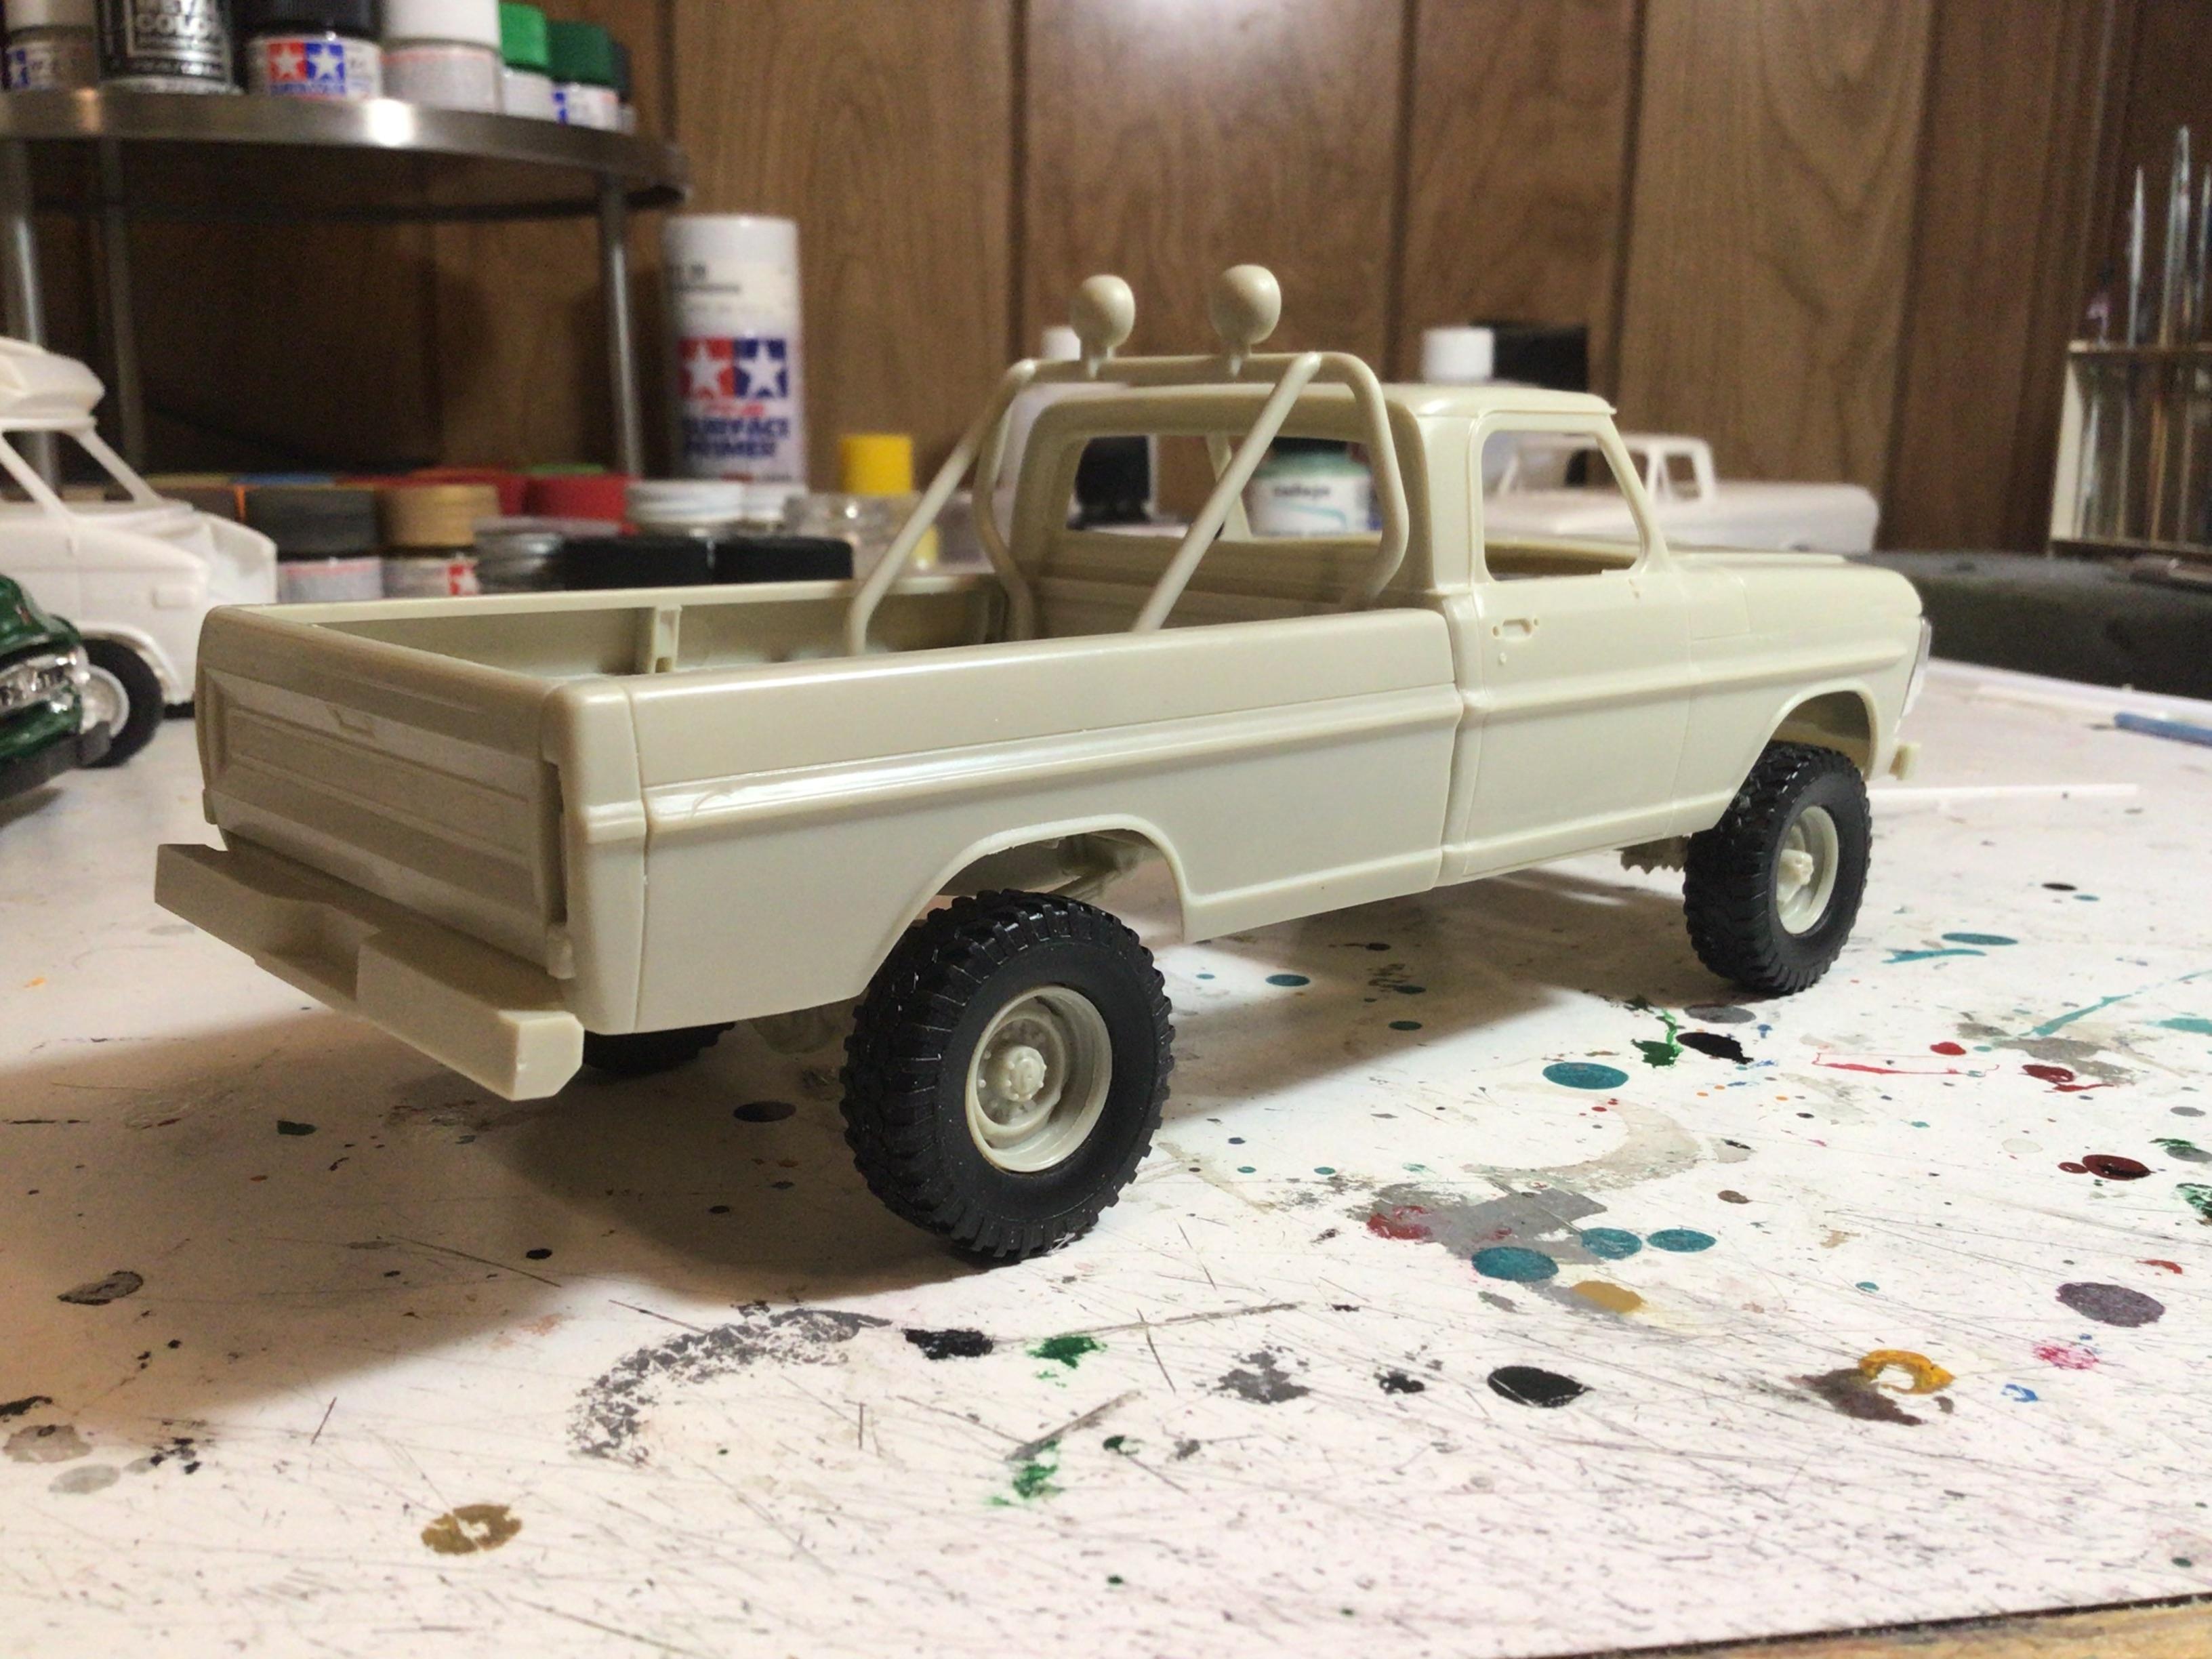
I discovered the tires from the Moebius lifted F250 truck fit over the stock wheels in the F250 plow truck but the wheels just needed to be widened a little to accommodate the additional tire width. You can see the before and after results in the pics. I used the same technique I explained in a previous thread linked below. This method works on any wheel and will yield a perfect set of wheel sections that are all exactly the same width and the cut line start and stop points will always line up perfectly. Something that’s hard to achieve consistently when attempting to use your drill as a lathe. To accomplish this with the plow truck wheels you’ll need 4 extra scrap wheels, 2 pieces of 1/8” square evergreen tube about 4-1/2 to 5 inches long, a piece of .040” thick evergreen sheet stock, some strong clamps, a smooth working surface and your trusty razor saw. The scrap wheels I used were the unused front 4wd wheels from two Moebius ‘68 F250 2wd kits I previously bought. Any unused F250 spare wheels can also be used. If you don’t have extra’s of these, Erik Solie may have spares available through the Moebius customer service email. You can also use other spares you may have that match the dimensions of the plow truck wheels. Stack the two pieces of square tubing on top of the evergreen sheet as shown and clamp the razor saw on top. Make sure to allow the cutting edge of the saw to overhang the plastic. Also ensure there is no foreign material under the plastic sheet. Hold the first scrap wheel down on the surface of the table and drag it along the cutting edge of the saw while rotating it until you cut through. Warning. This step is hard on the old fingertips so you may want to don some leather gloves to protect them. Once separated, lightly sand the cutting burr off the ID of the wheel section. Next, lightly sand the edge of mating surface on the wheel you’re using on the truck and carefully glue the two together. The ID of the lifted truck tires are slightly larger than the OD of the plow truck wheels so there’s a slight gap that’s barely noticeable. Paint, assemble and you’re done.
-
55 Chevy Bel Air Street Machine 2N1.
Radretireddad replied to Oldschool297's topic in Model Building Questions and Answers
It’s an ancient, hopelessly outdated kit that for some strange reason, still has a devoted fan base. -
Reading about what Sir Goldman is hinting at has me all tingly with excitement 🤩! Man do I wish I could be a fly on the wall where he works.
-
I kit bashed my ‘66 notchback kit body and interior with the chassis and engine compartment from the ‘67 fastback kit. It’s an easy swap that really improves the accuracy.
-
The Shelby Mustang kit and the current ‘66 Mustang GT kit are modified and upgraded versions of the old AMT ‘66 Mustang notchback kit. The body and interior look good but it still has the old slab chassis which isn’t anywhere near accurate. Those kits can be bashed pretty easily with the chassis from the AMT ‘67 Mustang GT kit. The next question is why go to all that trouble and expense when you can just build one of the old but still pretty decent Monogram kit versions that Revell sells? Other than the fact that it’s 1/24 vs. 1/25 scale, it may not seem worth the effort and expense of buying an additional kit. The Willys coupe is the upgraded version of the companion pickup with much better new wheels and tires and a way better decal sheet. I could use those for both the older kit versions I have in my stash but with the current cost of kits, I’ll be scouring my parts bins for alternatives instead.
-
Moebius 1971 Lifted Ford F250 4x4 announcement
Radretireddad replied to Erik Solie's topic in Truck Kit News & Reviews
Just to be sure I’m understanding you, the tires in the lifted kit are too small for that kit but I’m suggesting they’re a great upgrade for the stock plow truck kit. If you want to put larger tires on the lifted kit, you only need to find some that fit over the kits chrome wheels. The ones I used on my lifted kit are an old set from American Satco which is no longer in business. Mr Mopar has kindly offered some alternatives from other off the shelf kits. Your only other source is going to be 3D printed. What I’m offering is to show how I widened the steel wheels on the stock plow truck and fitted the tires from the lifted kit. Is that what you want to see? -
Moebius 1971 Lifted Ford F250 4x4 announcement
Radretireddad replied to Erik Solie's topic in Truck Kit News & Reviews
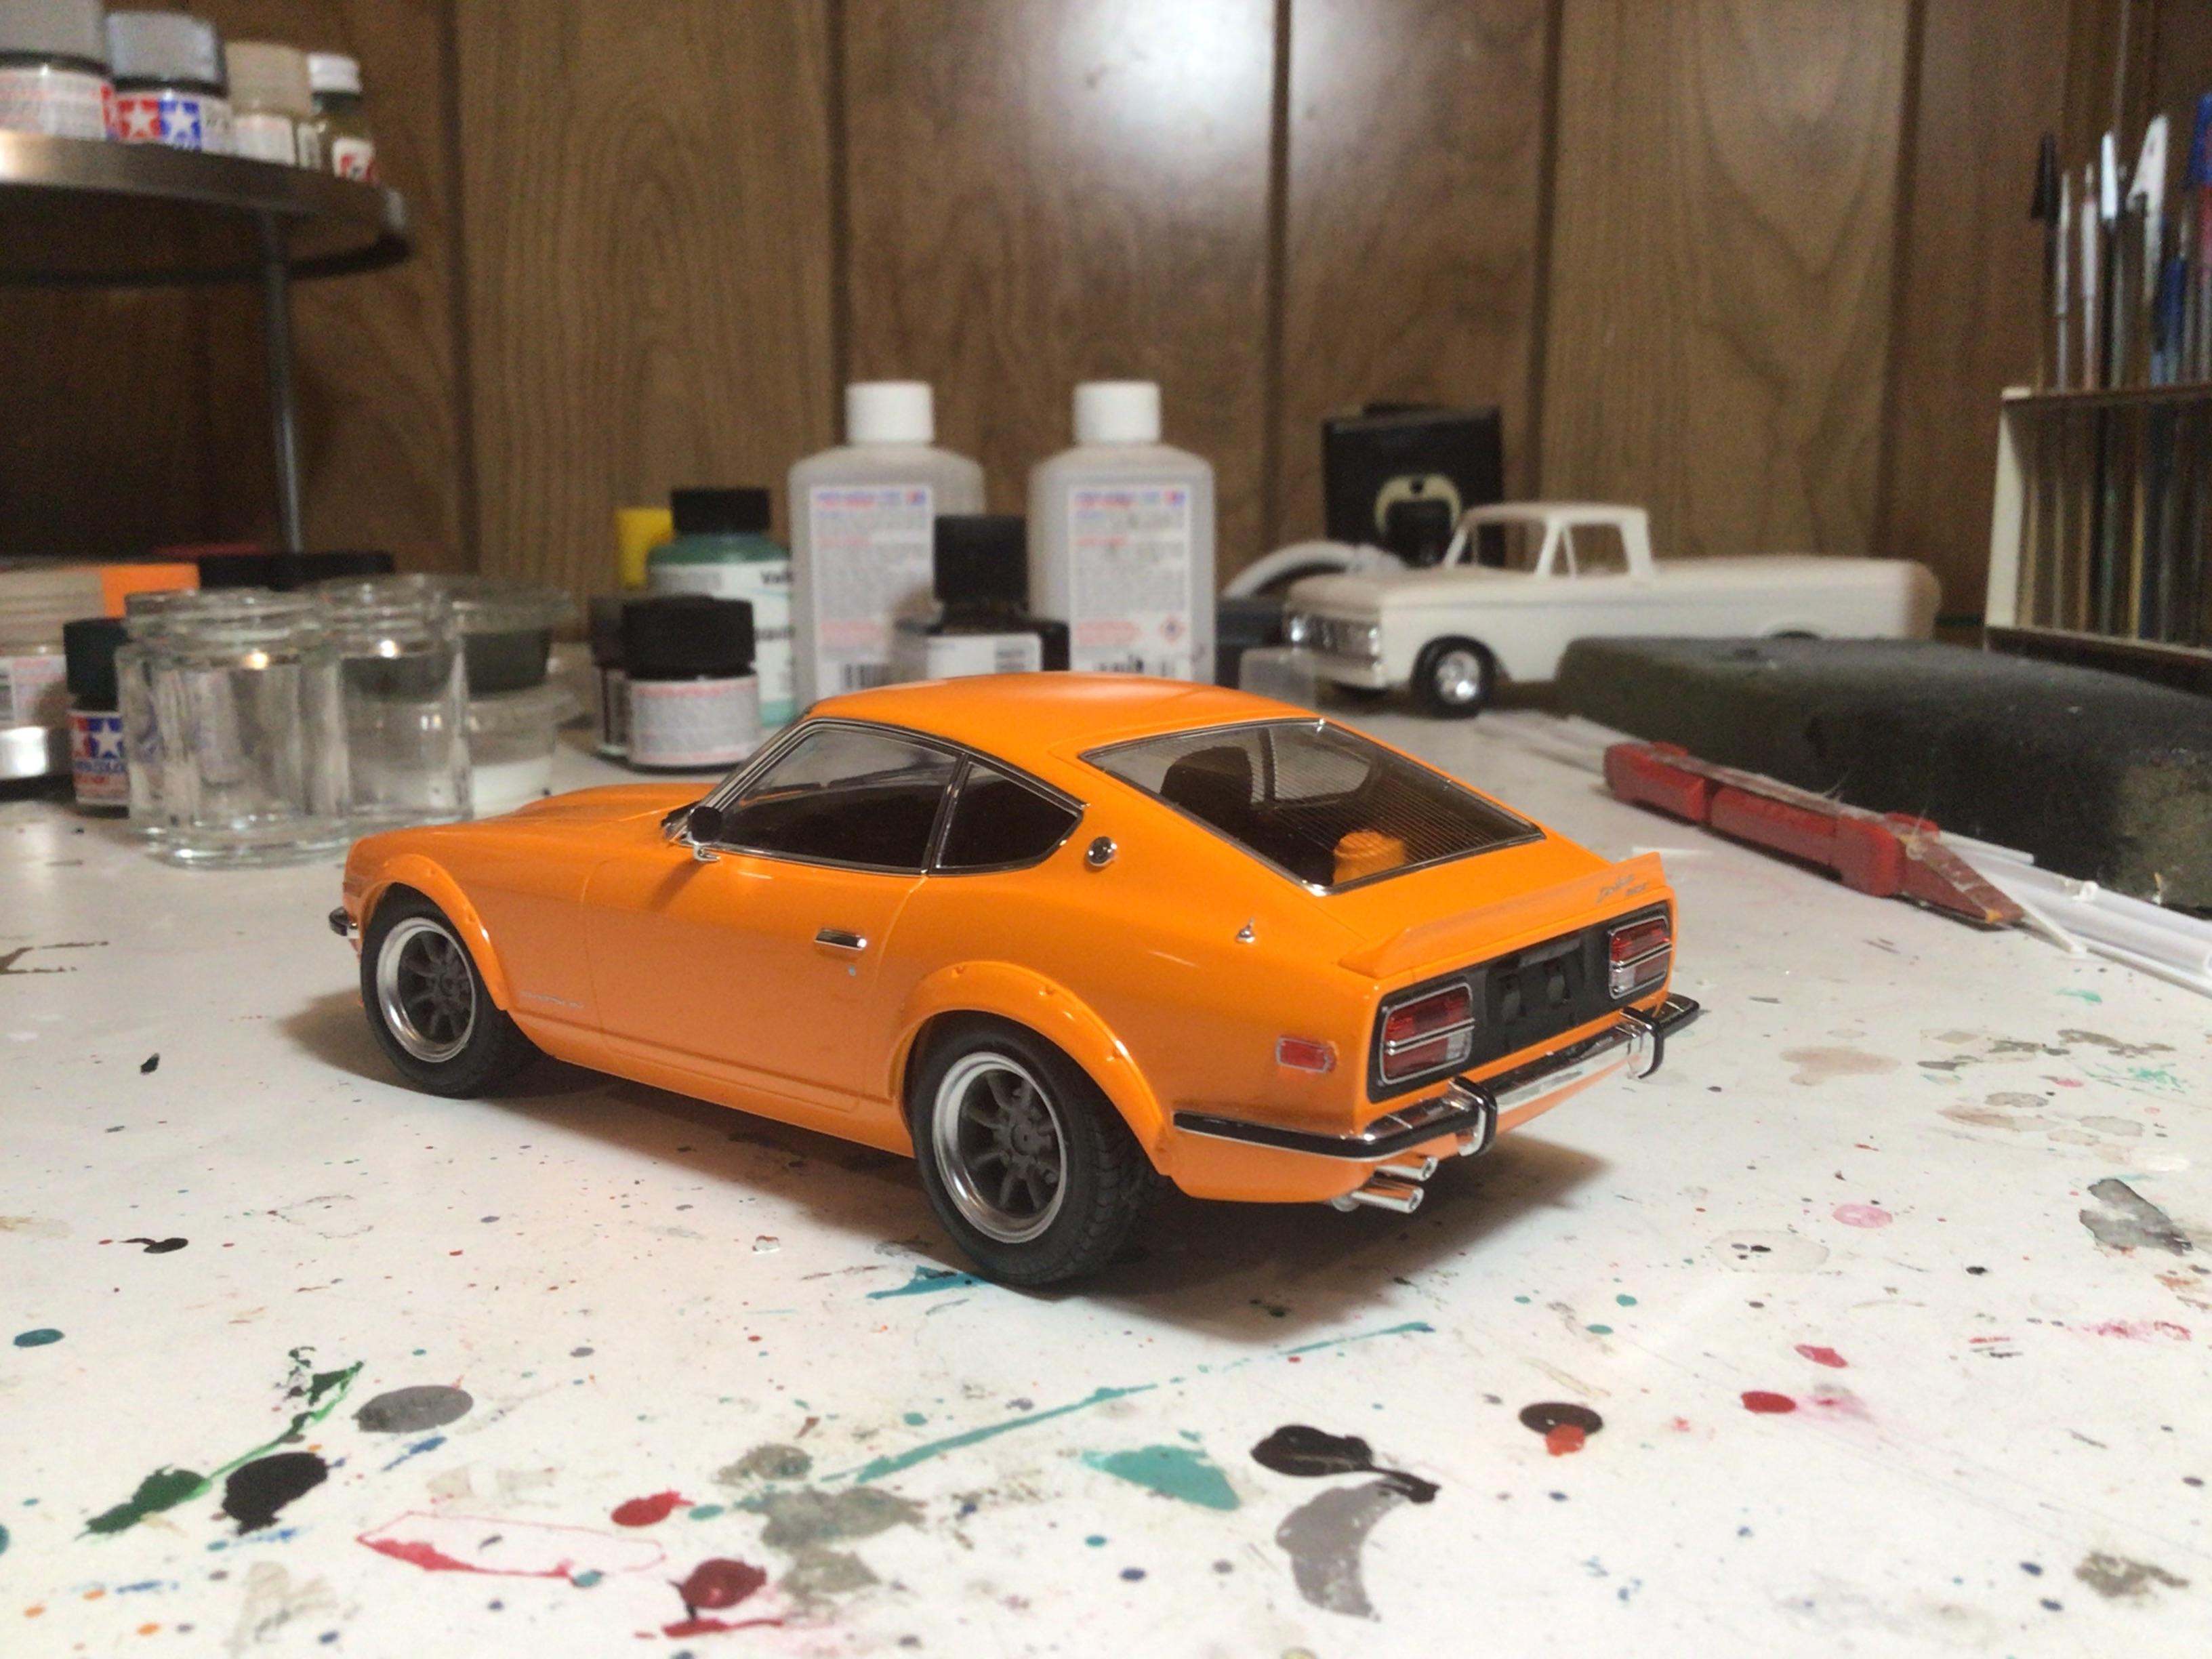
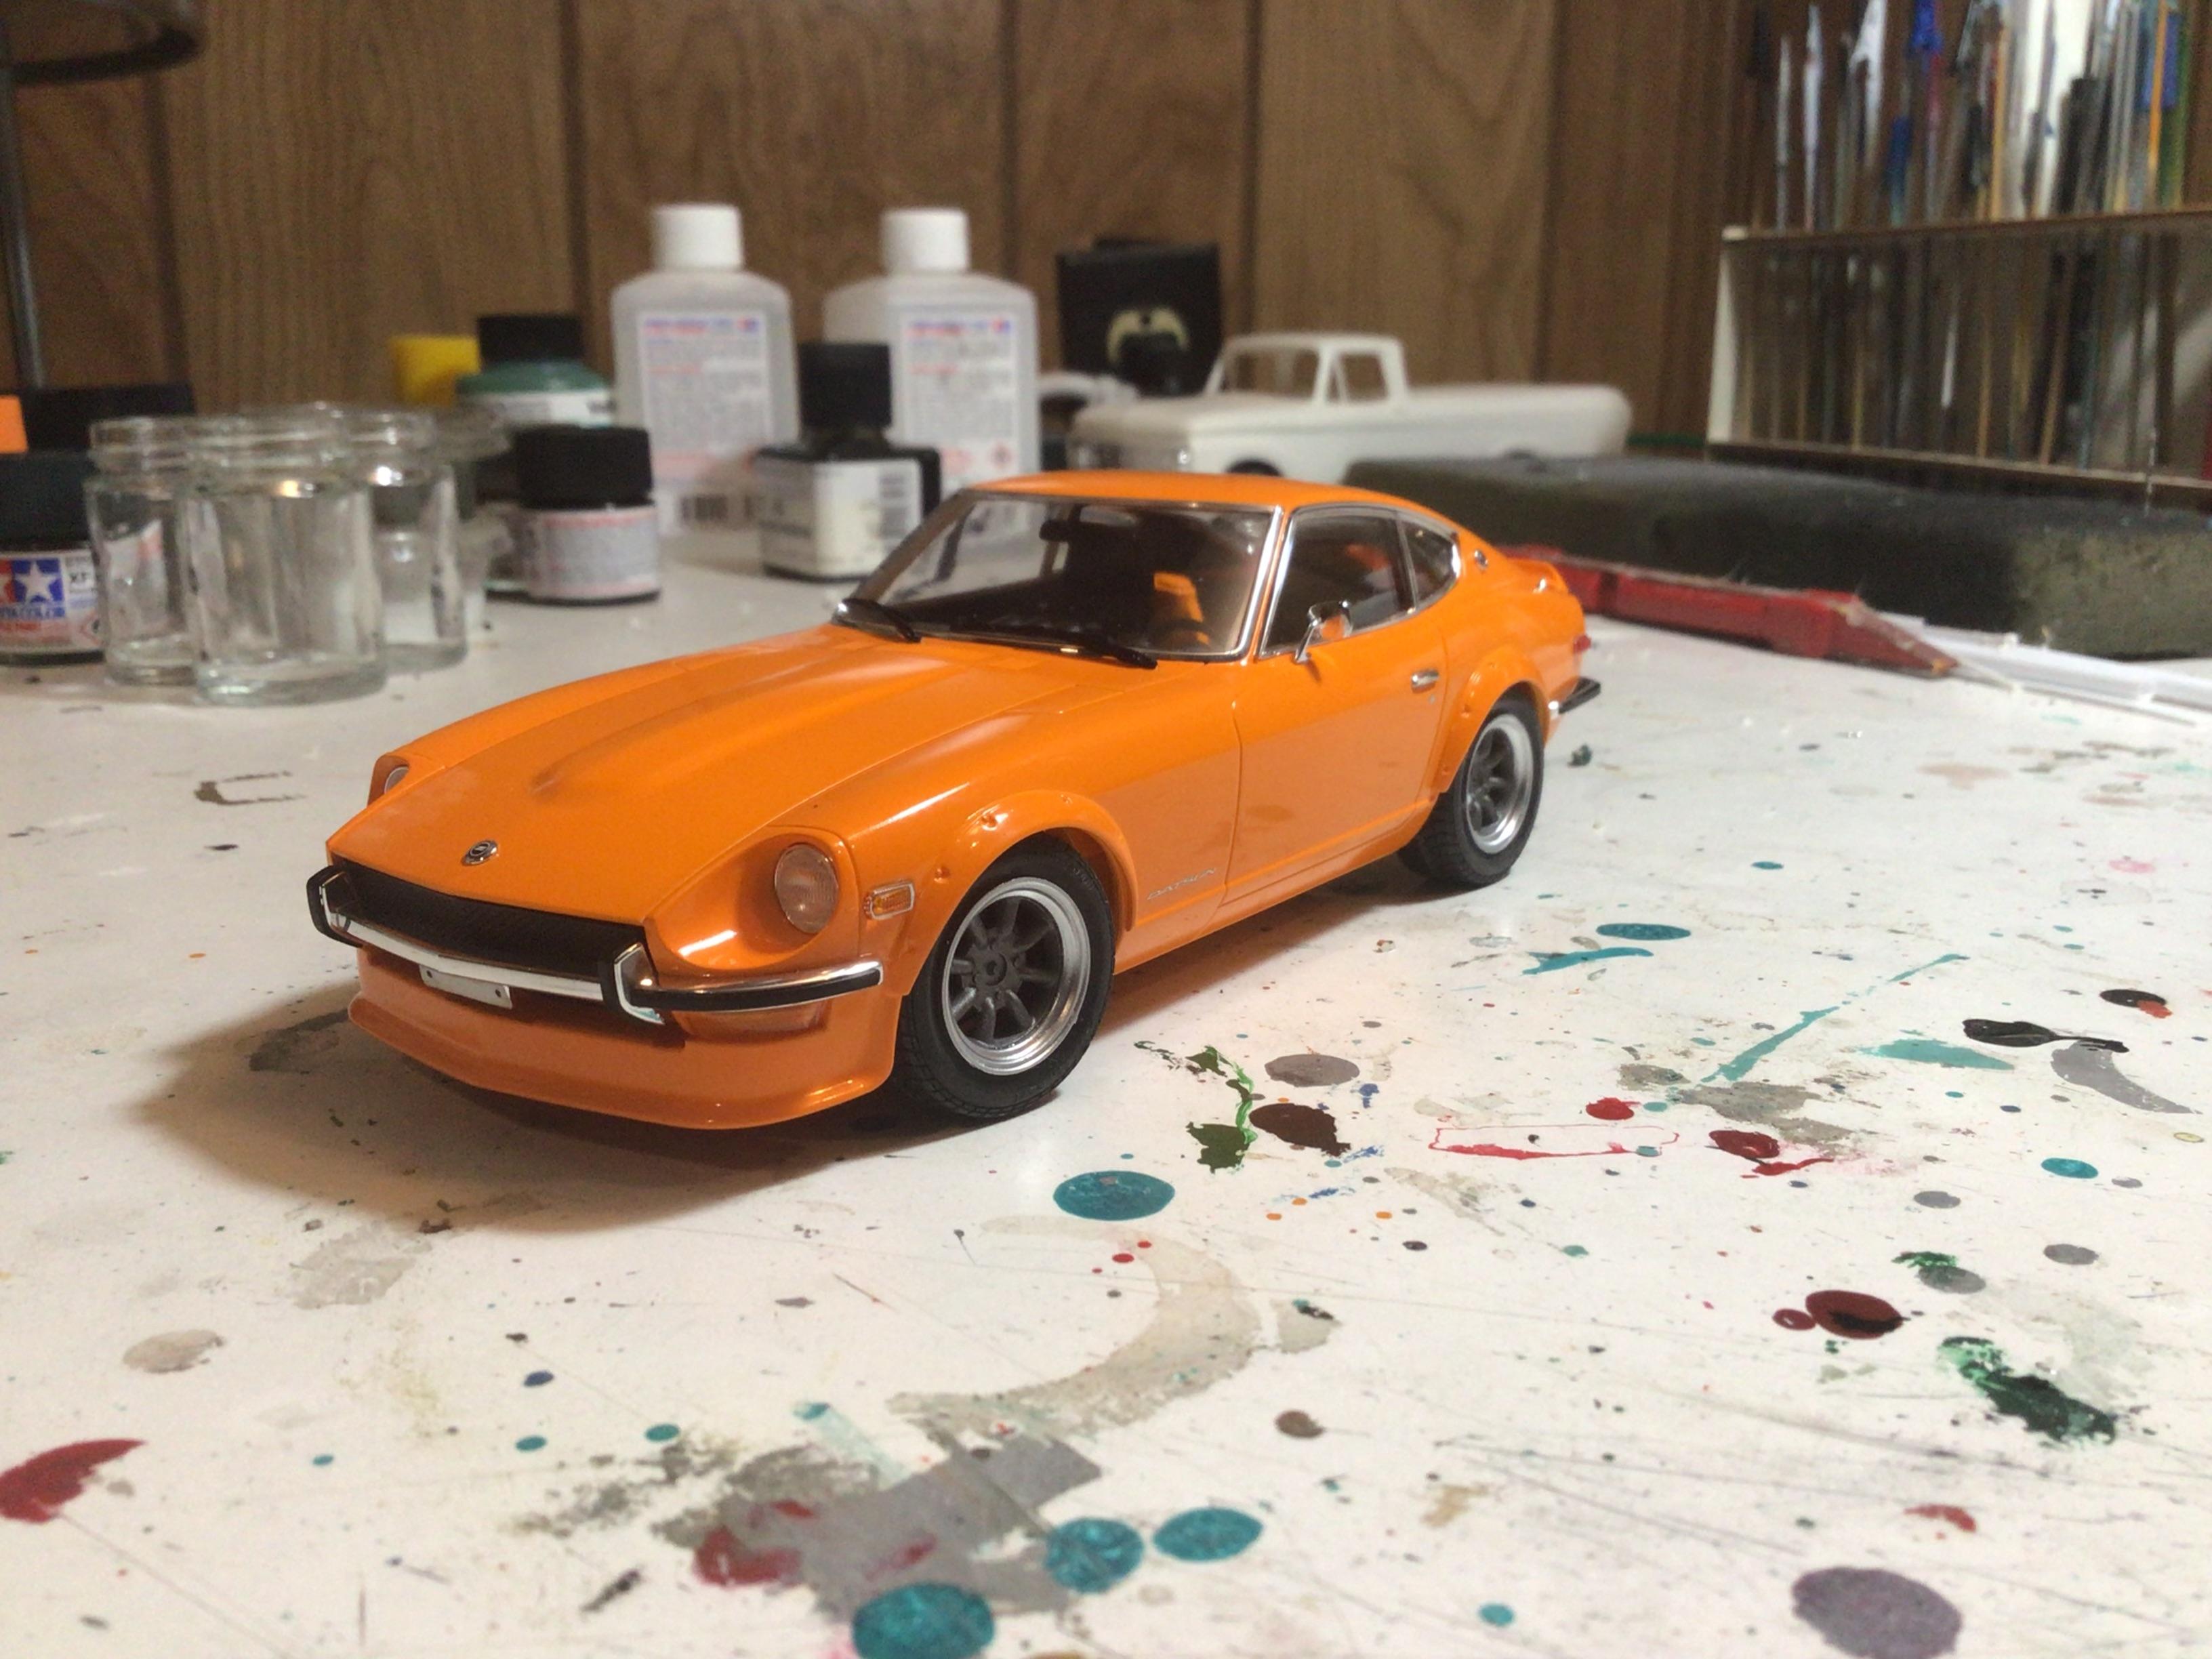
This is indeed the plow truck with the widened steelies and the lifted kit tires. Let me know if anyone would like to know how I did it. -
Moebius 1971 Lifted Ford F250 4x4 announcement
Radretireddad replied to Erik Solie's topic in Truck Kit News & Reviews
I widened the steel wheels on the stock F250 plow truck and substituted the tires from the lifted truck kit. This looks absolutely perfect to me.
-
What did you see on the road today?
Radretireddad replied to Harry P.'s topic in General Automotive Talk (Trucks and Cars)
Everything from behind the wheel of my lovely lady.
-
There’s not much mini left in it.
-
Moebius 1971 Lifted Ford F250 4x4 announcement
Radretireddad replied to Erik Solie's topic in Truck Kit News & Reviews
All I had to go by were pictures of actual trucks. I searched but couldn’t find any front or rear axle width specs. -
This is Createx 5310 Pearl white and 5604 clear thinned with only Tamiya thinner. I’ve found the Createx to be more opaque and requires several more thin coats to build up the color.
-
I’ve gotten excellent results using Tamiya, Createx, and various craft store acrylics exclusively. They’re all locally available, priced very economically, can be thinned and cleaned up using Dollar store isopropyl alcohol. Although Tamiya’s pallet is somewhat limited, I’ve had no problem custom mixing what’s available to get any factory color not available in a premix. Createx’s color pallet is very comprehensive. Enamels, lacquers and the required primers and sealers are more expensive, require more steps to get right, and are way too toxic to use without a respirator.
-
Between coats, I clear my airbrush with a shot of isopropyl alcohol that I keep a small cup of in my spray booth. I also use it to thin out the paint that’s been standing out for a while.
-
My main objective is fantastic results with a minimum of work and expense. This is two coats of Tamiya white primer sprayed from the can, and three coats of Tamiya X-5 orange 50% thinned and sprayed using my ancient Badger 200 followed by a little Meguiars Plastix polishing compound. That’s it. No multiple coats of toxic automotive primer, No multiple coats of toxic automotive lacquers and clears, followed by additional cutting and buffing. No toxic lacquer thinners or reducers needed for cleanup. I do hope you’ve been using a respirator. You say “without a lot of rigmarole” and then you describe a process involving multiple stages of primer, color, and clear followed by cutting and buffing. That doesn’t sound like a minimum of rigmarole to me. In my experience, lacquer is far from being the only choice.