
sak
-
Posts
672 -
Joined
-
Last visited
Content Type
Profiles
Forums
Events
Gallery
Everything posted by sak
-
Help with making this trim piece
sak replied to loudcherokee's topic in General Automotive Talk (Trucks and Cars)
For next time, what you could do is glue the wire first, before paint, before anything else. Then paint and simply polish the paint off the metal wire, which will be ever so slightly raised higher. -
Need painting help with 7-11 GTP
sak replied to knightyo's topic in General Automotive Talk (Trucks and Cars)
I think what I would do is just paint the stripes over the plastic. Don't bother painting whats going to be white if its white already, once you paint the stripes, add decals and clearcoat, you or nobody else will know its just the white plastic they see. -
Need painting help with 7-11 GTP
sak replied to knightyo's topic in General Automotive Talk (Trucks and Cars)
Why don't you do this color scheme. It would be easier and it's still correct, I would assume. http://farm2.static.flickr.com/1008/145688...5d4a3b4.jpg?v=0 -
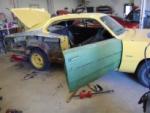
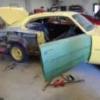
Is it ok to show some non car related stuff? Did not want to put this is finished works. But something I was working on during winter months.
-
My ride (73 plymouth)
-
Gimmie tha old NASCAR racing
sak replied to lilsquirt's topic in WIP: Stock Cars (NASCAR, Super Stock, Late Model, etc.)
Can somebody tell me exactly how much difference there is in the engines themselves. I understand that there are all the same displacement, but are the teams free to use whatever types they choose( overhead cams, superchargers ect.) -
Awesome job. Only thing I suggest would be to bare metal foil the drip rail. That would be the icing on the icing.
-
The stuff they used to dissolve the rust is interesting in itself, check the before /after pics, If it isn't photoshopped, its pretty impressive stuff. And yeah, it wouldn't been that bad if the vault had been kept dry. It wasnt only a few feet of water, it was almost completely submerged.
-
its a 72 plymouth and I was planning on only painting the tanks and the support. I had it re-cored and the person that painted it did a rather shoddy job. Alot runs in the paint. They didn't even take the overflow hose off before they painted it. Its mainly the steel side supports that I want to paint, where they painted over the surface rust and its starting to flake off, but while I am at it, I want to paint the tanks as well. Perhaps I will invest in some high heat paint, can't hurt. Thanks for the advice Jeff
-
Would anybody know just what kind of paint is ok for a full scale radiator? I have some krylon, but I noticed some high temperature tremclad paint at home depot. Would this be nessecary? Thanks
-
That is absolutely stunning, good job.
-
I have to agree with Harrypri on this one. Although I have no knowledge of Chip Foose original works, I do watch overhauling as much as I can and his methods are quite formulaic and predictable. Not trying to belittle his talents as they are quite formidable, but his approach seems to be to take a vintage car, add a two tone paintjob, wicked wheels and some leather Foose embroidered seats and call it a day. But of course, I would never complain if it was my car that was being used as the canvas. My biggest beef is the celebrity episodes where he fooses cars whos owners actually have the money to pay for his services but are seemingly uninteresting or too preoccupied to have had the car taken in and have the custom work done.
-
I recently bought a sheet of the new improved bare metal foil. No cracks, and sticks well, but its still garbage in my opinion. It leaves grooves in thin pieces. like a chromed rebar effect, which will not rub smooth. It does not pull evenly from the backing as my guess is that the adhesive is not evenly applicated to the foil. The orange peel that is on most sheets cannot help either. I recommend using tin foil. So far I had good luck with it. Spray some elmers on a small sheet and let it sit in a box, away from dust for a few hours then carve it to the basic shape you want and apply carefully but only burnish down where you want it. seal it with some future around the edges and you should be fine. Save the bare metal foil for small jobs. Jeff
-
Would anybody happen to know anything about this. Part number DM-2585. Emailed Detail master aboutits dimensions 3 weeks ago and have not gotten an answer. No close up picture on the website. Thanks
-
"Its looking real good Chris. Keep in mind, this board has lots of nascar haters so you wont get but a lick and a promise!!! " I suppose I am one of those nascar haters, but I cannot deny that this is completely off the hook. Amazing detail and craftsmenship and cannot wait for final product.
-
Unbeleivable bro. I have to ask, where do you get all that miniature stuff, particularly all those little gears and that stuff of the roof of your painkiller charger?
-
Oh well, I guess maybe in 2010 it'll get rebranded as the Chevy III. Chevy III is too sixties. They will call it the chevy v3.0
-
IS IT ME? or are people crazy
sak replied to oldman23's topic in General Automotive Talk (Trucks and Cars)
Not a terribly bad job, but not worth that amount but all the power to him. I would try to do the same. Sidenote, amazing to me nobody that builds this kit notices or attempts to fix the missing trim behind the quarter glass. This trim should continue and wrap a round the curve in the pillar and connect to the trim above the doors. -
Newsflash! GM will kill Pontiac!
sak replied to Harry P.'s topic in General Automotive Talk (Trucks and Cars)
Not the best of news, but I won't shed any tears. If the future of pontiac was rebranded v8 powered, RWD holdens, there were bound to doomed sooner or later. For every car nut thats demanding these cars, theres probably 5 secretly wanting something that gets 30+miles per gallon. Think people, pice of petrol is never going to go down, its only going to go up,up,up.Pontiac is indeed a historic marque but I am no fan of modern transportation and pontiac is no exception. The pontiacs of today share little in common with the pontiacs of old. Perhaps a nosepeice with a split grille and an orange triangle. If I was to see shaded in silohettes of all the 2008 GM models, other than the solstice, I could not pick out the pontiacs. Altough I do know what a pontiac sunbird looks like because I owned one. Worst car I ever had, done in by a burnt out ignition coil, brillaintly located UNDER the intake manifold, with no protection against road salt and requiring rubber arms to replace. . But basically what I am tryin to say is that this is a sign of the times and If pontiac had any groundbreaking concepts, I sure GM won't let them go to waste and when things improve, who says GM can't bring pontiac back. Hopefully also those pontiac assembly plants will continue to be used for other brands. -
Stellar !!! So far everything thing is perfect. That color is by far my favorite. Don't care how much I see it used. Awesome.
-
My 1:1. 318, 2 barrel. 46,000 original miles. Hopefully, next year I can afford a full repaint. Also planned is a 8 3/4 rear axle. Looks silly as is, front wheels have a wider wheelbase than the back with a 7 1/4 axle. Not sure why Chrysler did this rediculous thing but it was not noticeable until I had wider tires and wheels put on.
-
Where did you find the gigantic penny?
-
'69 GTO Headlight Buckets Source?
sak replied to Casey's topic in General Automotive Talk (Trucks and Cars)
It is a amt 1966 442 kit. The catch is I don't have the headlight lenses. -
'69 GTO Headlight Buckets Source?
sak replied to Casey's topic in General Automotive Talk (Trucks and Cars)
I think i have those headlamps buckets from the 442 kit if you need. -
How Do I Achieve this Paint Job?
sak replied to hungry4knowhow's topic in Tips, Tricks, and Tutorials
The car in the first photo looks like it was painted first in a burgundy, then was placed some chicken wire on top, then sprayed in a lighter shade, then cleared. As for getting the effect of the second car, you would probly need to create decals. Perhaps print a pattern on decal paper and apply one panel at a time.