
sak
-
Posts
676 -
Joined
-
Last visited
Content Type
Profiles
Forums
Events
Gallery
Everything posted by sak
-
Thought I would update my WIp a little. Only have a few hours a week to work on these things.
-
Personally , I think those taillights should have stayed in the box, but overall, its spot on !!! Beautifull
-
Wow, that is absolutely gorgeous. I would have looked at that engine bay and made it as a curbside with all that molded in detail, but you make it look awesome. Well done. Jeff
-
Thats badass. What did you uswe to make that dividing in the seat cushions?
-
What's Your Favorite Looking Domestic Engine
sak replied to Raul_Perez's topic in General Automotive Talk (Trucks and Cars)
Yeah those Cadillac motor tops everything out there I think. I wonder was a NOS set of the valve covers would go for? But my choice is the buick nailhead. -
Radiator delete car? Wicked car dude. I am beside myself. Now if only somebody would build this in 1 to 1 scale. Jeff
-
Bought this at a yard sale for only a few dollars, planned to just use the body shell for airbrush practice but have now decided to build this entirely. Wasn't impressed with it as it has issues. The ends of the stabilzer bars are cast into the inner fenders and just seem to fade out from there and the frame is hollow and leave a visible groove that can be seen on the inside of the car. Crude steering rod assembly. Also the firewall forms part of the floorpan as well, leaving a gap that will have to be puttied up before any flocking is done. But I made new stabilizer bar ends and filled the groove in the floorpans and made a little less crude steering assembly that looks better to my eyes anyway. http://www.modelcarsmag.com/forums/uploads/post-2559-12678516811459_thumb.jpg Hopefully I can match the pictures up with these words. I hollowed out the exhaust tips. That thing in front is what is supposed to pass as the steering. Also no steering gear in this kit. Big pet peeve. http://www.modelcarsmag.com/forums/uploads/post-2559-1267851835225_thumb.jpg The steering wheel that I found in a junk box. looks like a grant classic spoke so I will use it. Could not find the belt so I made a pulley for the alternator and will make a belt from some thin styrene. http://www.modelcarsmag.com/forums/uploads/post-2559-12678519833954_thumb.jpg The firewall was atrocious with almost no detail whatsover, so I will use one from a cutlass, looks close enough for me, and also I oppened the opening in the front bumper and the gauge cluster in the dash. I never have luck detailing chevlle dashboards because of the strange shape so I cut out the gauges and will print out gauges I made in paintshop and glue that to a peice of styrene and put that behind the dash. I plan to open the front grille up too, just trying to concieve a way to fabrictae a grille. http://www.modelcarsmag.com/forums/uploads/post-2559-12678522994524_thumb.jpg A picture of the steering. The kit has poseable wheels so the tie rod ends rest on pins cast into the lower control arms. I removed them and made new ones and attached them to the spindle where they should be. I took the steering from my junk box(from a skylark I think) and I made tie rods. Not perfect but once its painted, it will look better. Also glued on a flange so the idler arm has a place to attach to. I will add the steering gear from the cutlass, just have to shim it so it fits right. Thats all for now, comments, criticism is always welcome. Thnaks Jeff
-
What do I use to clean the airbrush, the same reducer that I thin the paint with or laquer thinner. The laquer thinner doesn't harm my badger. Jeff
-
Urethanes or acrylic you say? Execellent. Thanks. So in you're opinion what is the best choice for an airbrush. Thanks Jeff
-
Over the weekend, I went into a local autobody supply store and was asking questions about automotive paints. But seemed to leave only a little less confused. The guy told me that he could mix me a small touch up jar of any color I wanted which I would then thin with basecoat reducer. He mentioned something about acrylic enamel while \i was looking at the paint chips bout It did not sink in. In the past, I have used whatever paint I can buy in hobby shop so when I hear enamel paint, I think of those little square testors bottles. And when I see acrylic, I think about something water based or craft paints. So I can't understand the concept of acrylic enamel paint. I suppose my question is, does basecoat refer to a specific type of paint or the process and do these basecoats require hardeners?
-
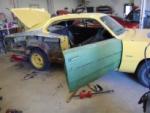
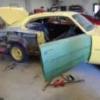
Heres a few more, not sure the year, only that its a mustang. It appears to be grey primer. When it comes to chassis, I would paint it in a manner that is appealing to me, regardless of correct or not. There seems to be alot of variation of color schemes of chassis and there doesn't seem to be a formula for getting the proper chassis color for any particular model/color combo. Every kit manual I have seem simply says to paint them satin or flat black even though I have seen samples to the contrary. JEFF
-
Any good hobby shops in Mesa area
sak replied to sak's topic in General Automotive Talk (Trucks and Cars)
Thanks again danno and tuffone. One more question, I arrived last night and I spotted a Hobbylobby sign on the way from the airport to mesa. Ithink I was on freeway 60, not far from this superstition shopping mall. I can't find a listing in the phone book. How is this place? Jeff -
Any good hobby shops in Mesa area
sak replied to sak's topic in General Automotive Talk (Trucks and Cars)
Thank you very much, I will be sure to check them out. Jeff -
A little short notice, but does anybody know of any hobby shops in the Mesa area. Something well stocked. Going there on vacation on saturday. Any leads would be greatly appreciated. Jeff `
-
Get down to an electronics supply store and look for wire wrapping wire. Where I bought mine, has 30 gauge and I beleive it comes in slightly larager gauges too, which would make good battery cables. Comes in red, yellow and black. It is only very slightly larger than the race ignition wire from detail master, maybe only 1 drill bit size larger. Use the phone wire for the boots. Jeff

-
Prius G Sports Series1
sak replied to Joe Handley's topic in General Automotive Talk (Trucks and Cars)
Wssn't referring to driving thru the redlights. Where I am the redlight cameras have radar built in to issues speeding tickets as well. Just don't see how accelerating to the residential speed limits, slowing down,stopping, accelerating etc etc, could be that much more fun in a sportscar. On the open highway, or on some winding backwoods road, perhaps. Jeff -
Prius G Sports Series1
sak replied to Joe Handley's topic in General Automotive Talk (Trucks and Cars)
I drive a Corolla and honestly, its one of the best cars I ever owned. Boring styling ...yeah, but reliable also. Toyota may have removed the fun from driving, but even if they don't, the local police department is more than capable to doing that. With all the red light cameras and mobile photo radar units, you could get dinged for half of you're paycheck without having to even talk to a cop. But about the skirts..I am sure that that they are not trying to fool anybody into thinking its a cadillac. Knowing Toyota, theres a practical reason for them. For instance, if they resulted in even a fraction of a mile more a gallon, they should not be mocked, they should be on every car, as ugly as they are. Jeff -
I noticed that too. I think it used to be called chrome bumper paint I beleieve. And if you mist light coats over a shiny black base, it makes a great stainless steel look.
-
Lowslow, would you say the enamel thinner works better than even acetone? Jeff
-
And apparently he is not to bad too, he just got promoted to level 4 ogre. And he has well over 500 super dragon breath points!
-
Thst looks like its going to to be OFF THE CHAIN !!!!! Doesnt appear to be too cheesy, minus the part of the guy that shoots down the fighter jet in a tank turret of a tank thats floating to earth on a parachute, after the plane it was in exploded. But serious , this has the potential to be one of the better tv to mivie addaptations, even better than Miami vice.
-
Truly amazing stuff. I would very much like to see a tutorial someday on how you do this stuff with basic tools, especially the U-joints. And also where you find that super small gauge wire.
-
Nice!!!! Looking good. Is that bare metal foil around the trim in photo number 1 ?
-
Pic is a lil small, but looks great to me.Good job !
-
I was just wondering if there is some kind of formula for determining the proper color of a chassis. I understand 50's era cars used were sprayed with red oxide. Up to what point was this done? After unibody construction I would assume the subframe would have not been this color. But on my 73 plymouth the chassis and subframe are both yellow, same as body color, the subframe being heavily oversprayed with flat black paint from the engine bay. I thought that mopar chassis were grey primer oversprayed with body color only at the rockers. And on Gm cars, when would the chassis be body color, if at all. Or is flat or semi-flat the correct choice? I don't suppose anybody out there knows of a assembly line image database. I tried ebay, but full chassis shots are few and far between. I sent a picture of the coronet that I am working on, and I doubt its correct and thats ok for me, but for future reference.
