OldNYJim
-
Posts
249 -
Joined
-
Last visited
Content Type
Profiles
Forums
Events
Gallery
Everything posted by OldNYJim
-

Dr. Krook Patient Pending custom show rod.
OldNYJim replied to Silvercreeker's topic in WIP: Model Cars
This is awesome - really enjoyed watching this come together! -
Thanks fellas! Thank you! Glad you found it useful!!! YESS!!! I was hoping someone would spot the connection! That’s the only game I like playing on my wife’s Xbox…there’s actually a bunch of cars on there that I’d like on my shelf! Mine’s not a replica, but definitely VERY heavily influenced anyway…. Thank you! I’ve been watching UK oval and banger videos on YouTube a lot lately - I like the historic (and modern) saloon stockcars, the 3-wheelers and the old ‘hot rod’ hahchbacks…there are a few replicas I’d like to build at some point. Plus there’s a printable Formula 1 V8 stockcar (the sprint-car looking kind) that I’d like to purchase and add to my collection. So much cool stuff to learn about ‘across the pond’! I never saw that car - will check it out…thank you!!! Tiny bit of progress worth sharing (besides it being primer week, whereby we turn white parts temporarily gray) - laid down, and subsequently ruined some race numbers and a stenciled slogan on the body, and worked through some more rust and weathering: Nothing super complex or exciting, but it’s fun working that delicate balance of “well, this would be pretty messed up by now, but this part shouldn’t be, but now this part looks too clean, but now I went too far and I need to dial it back…” and so on. I suspect I’ll keep tweaking the weathering and rust until this build is on the shelf, but I’m happy with where it’s heading anyway. Next job, painting (and then ruining) the frame…thanks for looking, more soon, soon as I’ve done more!

-
They have them every other week now, and you can buy as many kits as you like rather than just one use of the coupon. I think I like it better now!
-
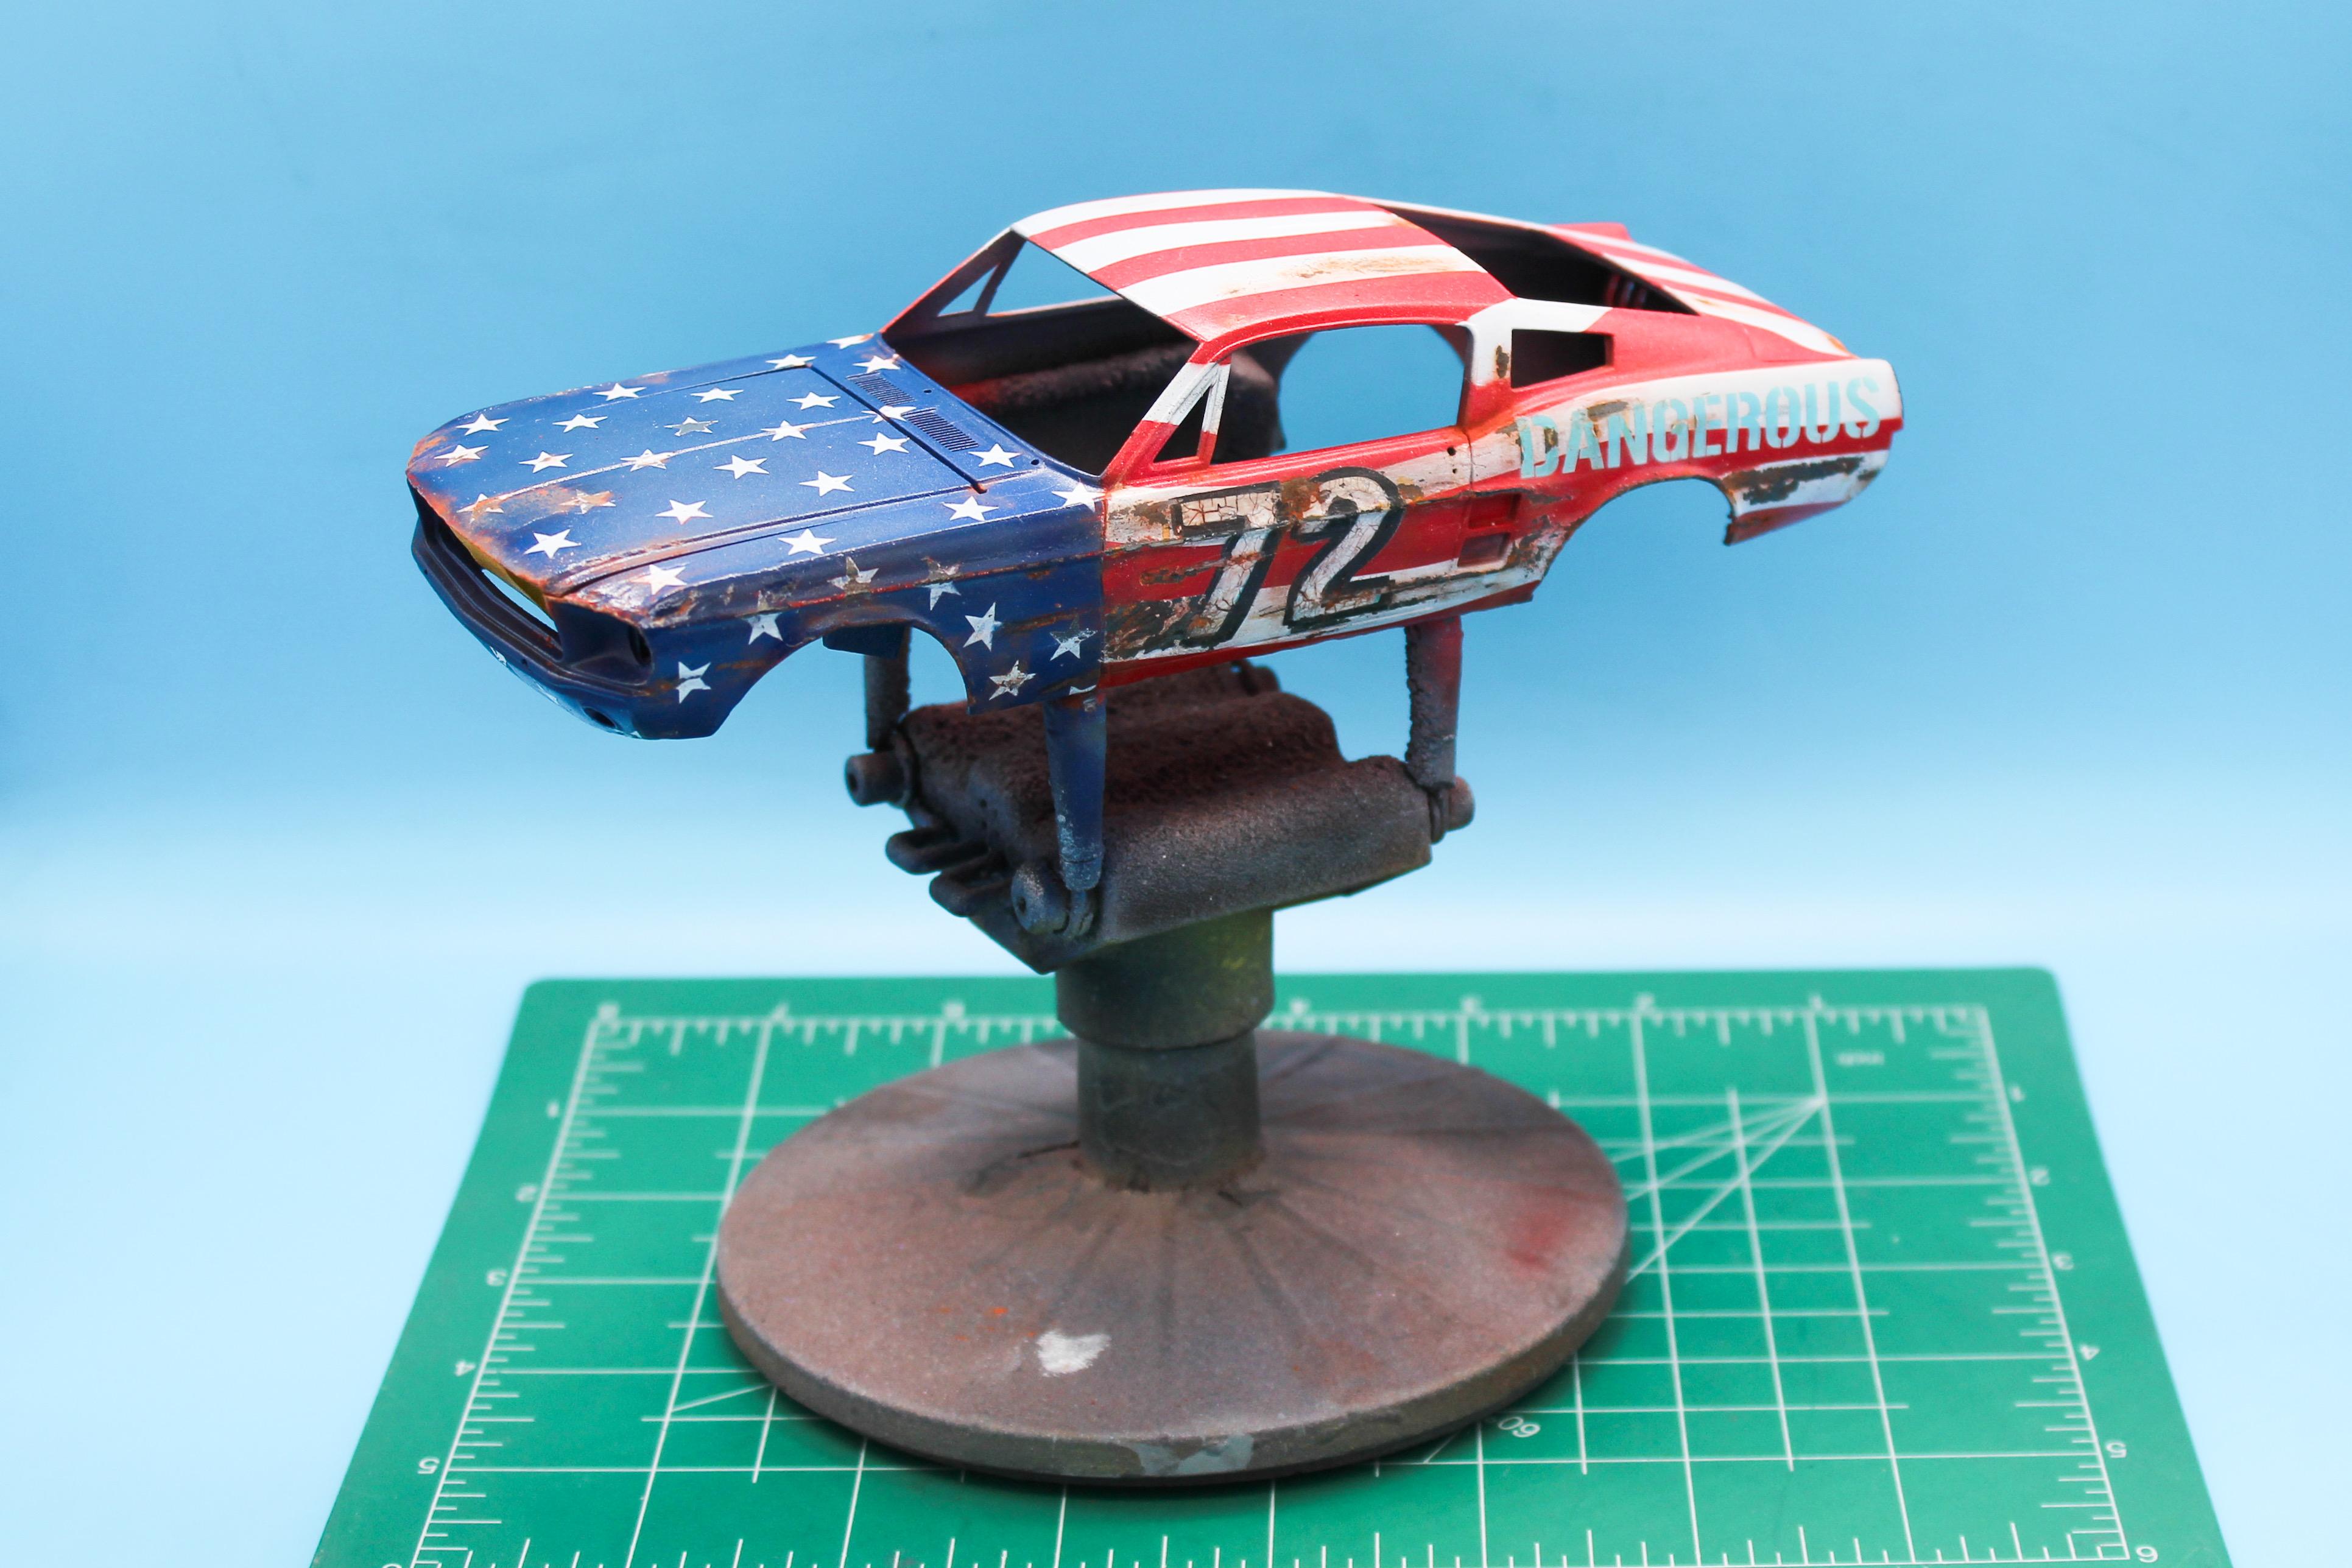
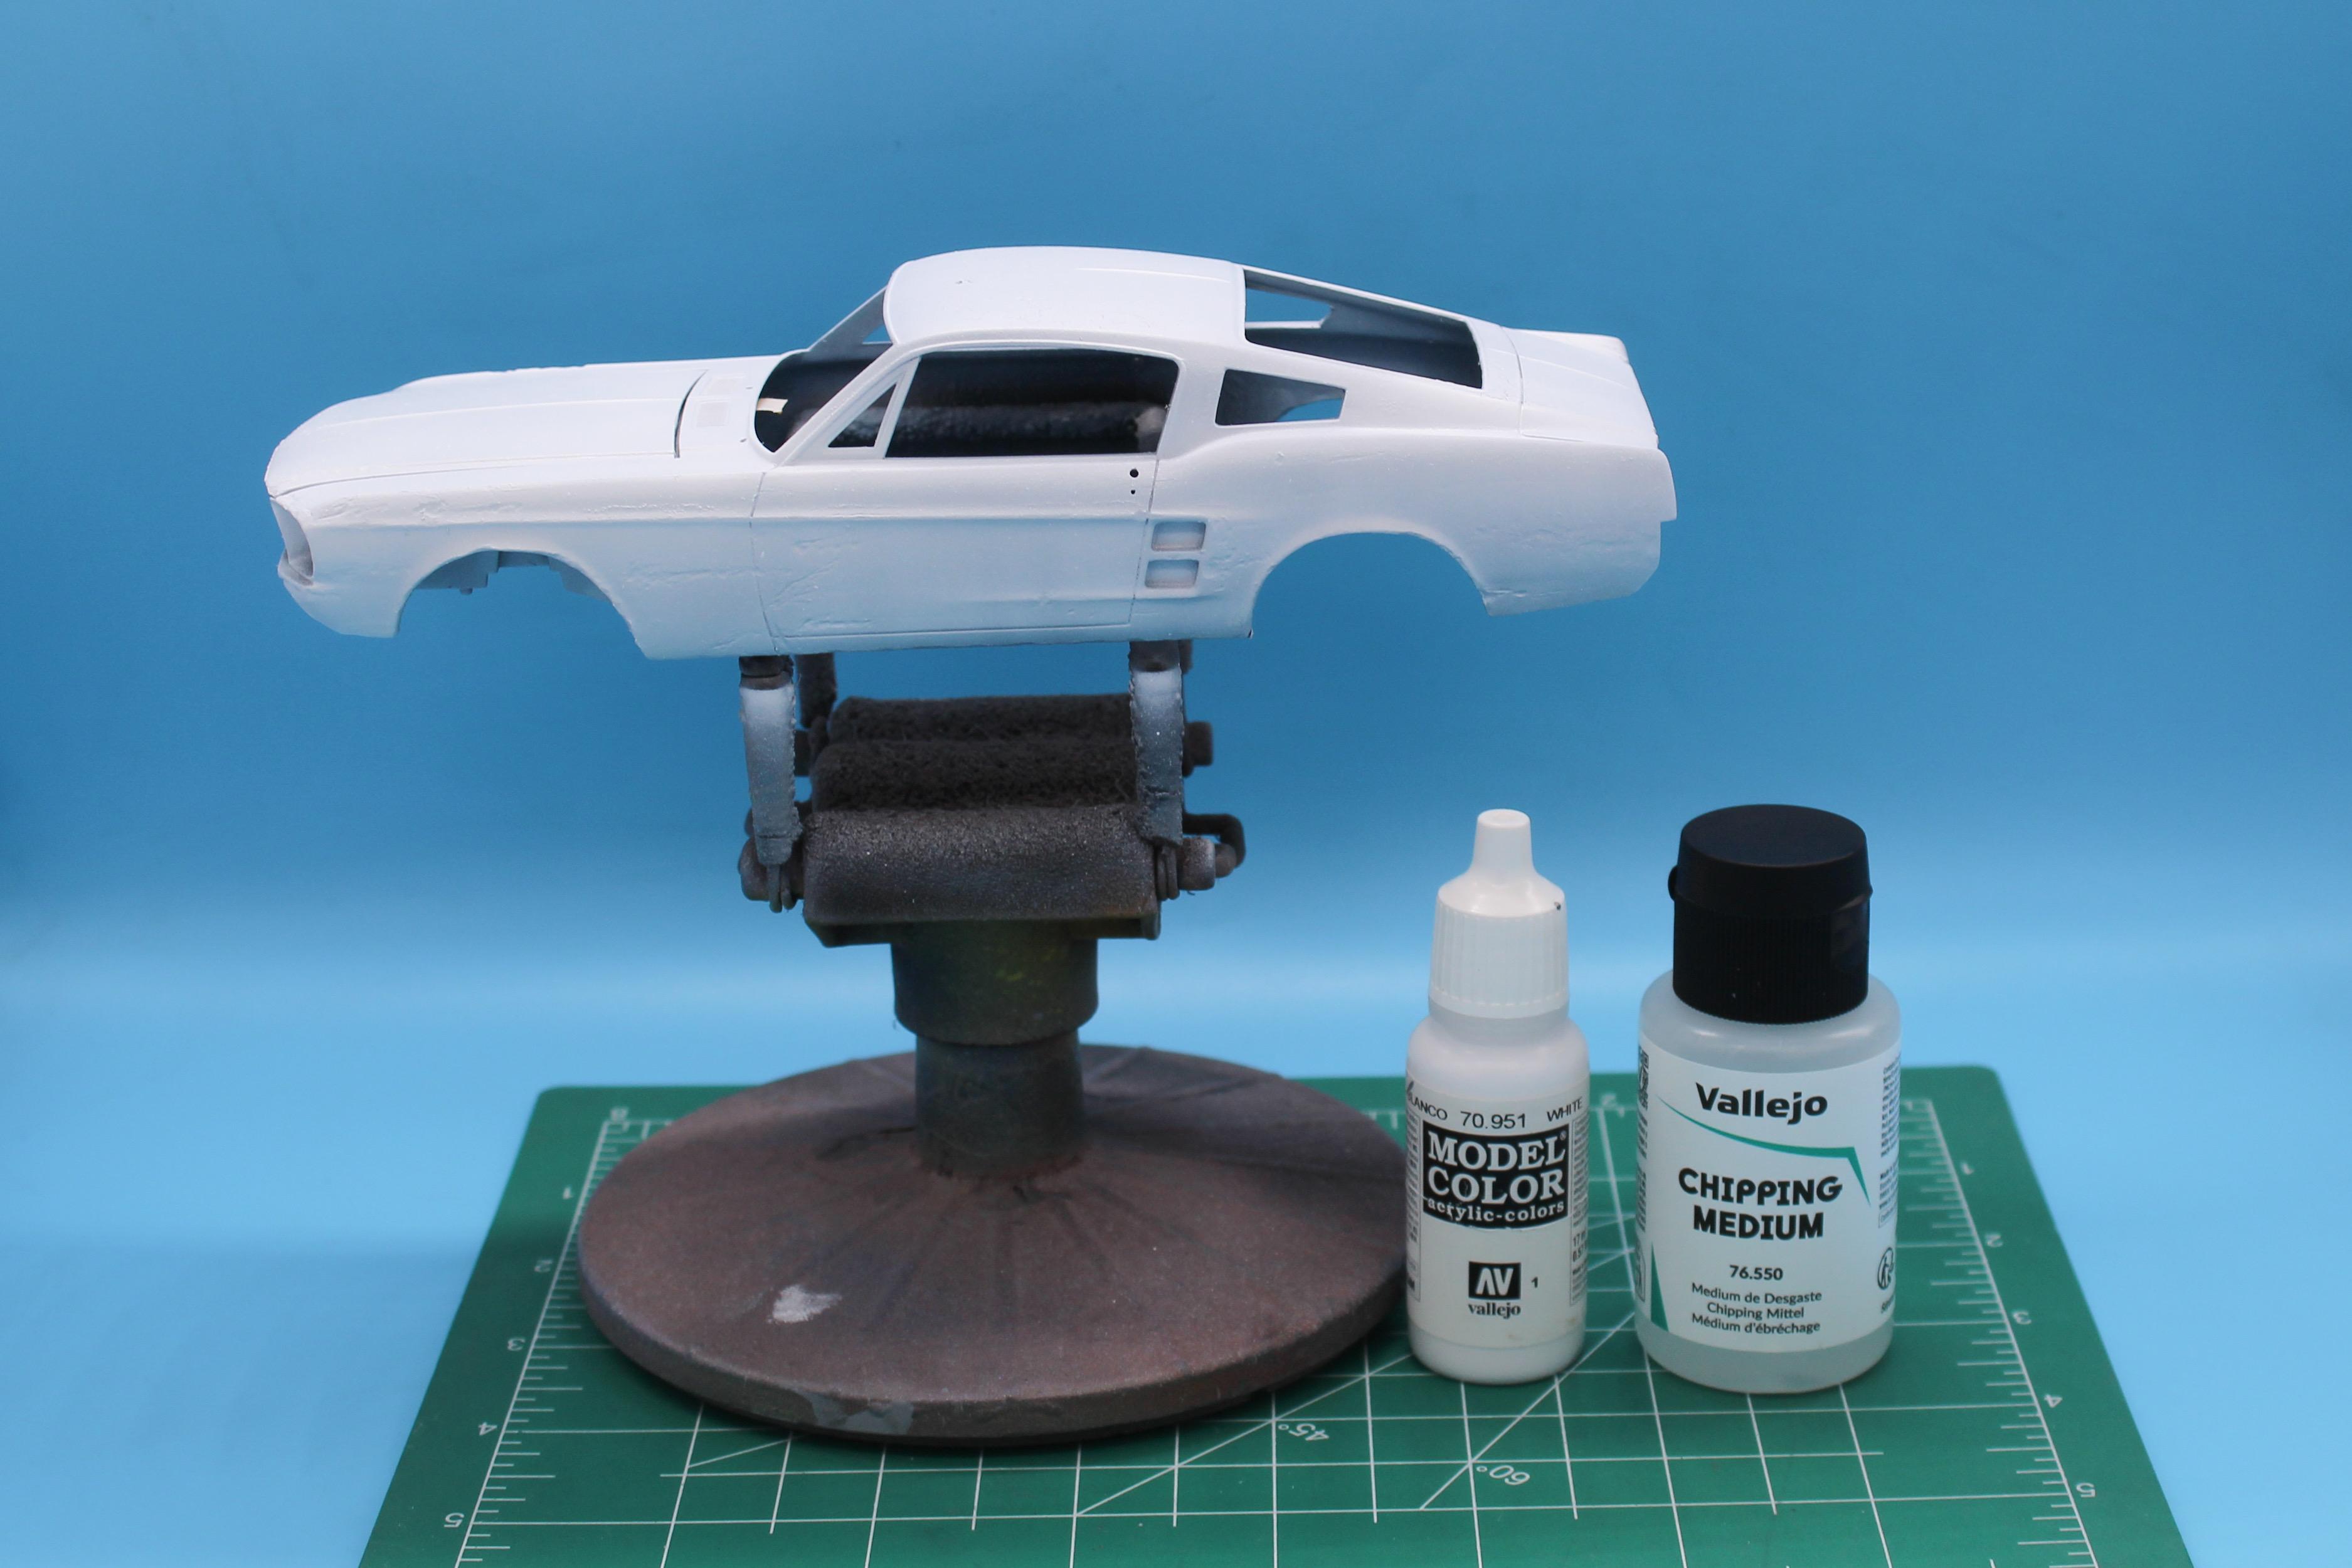
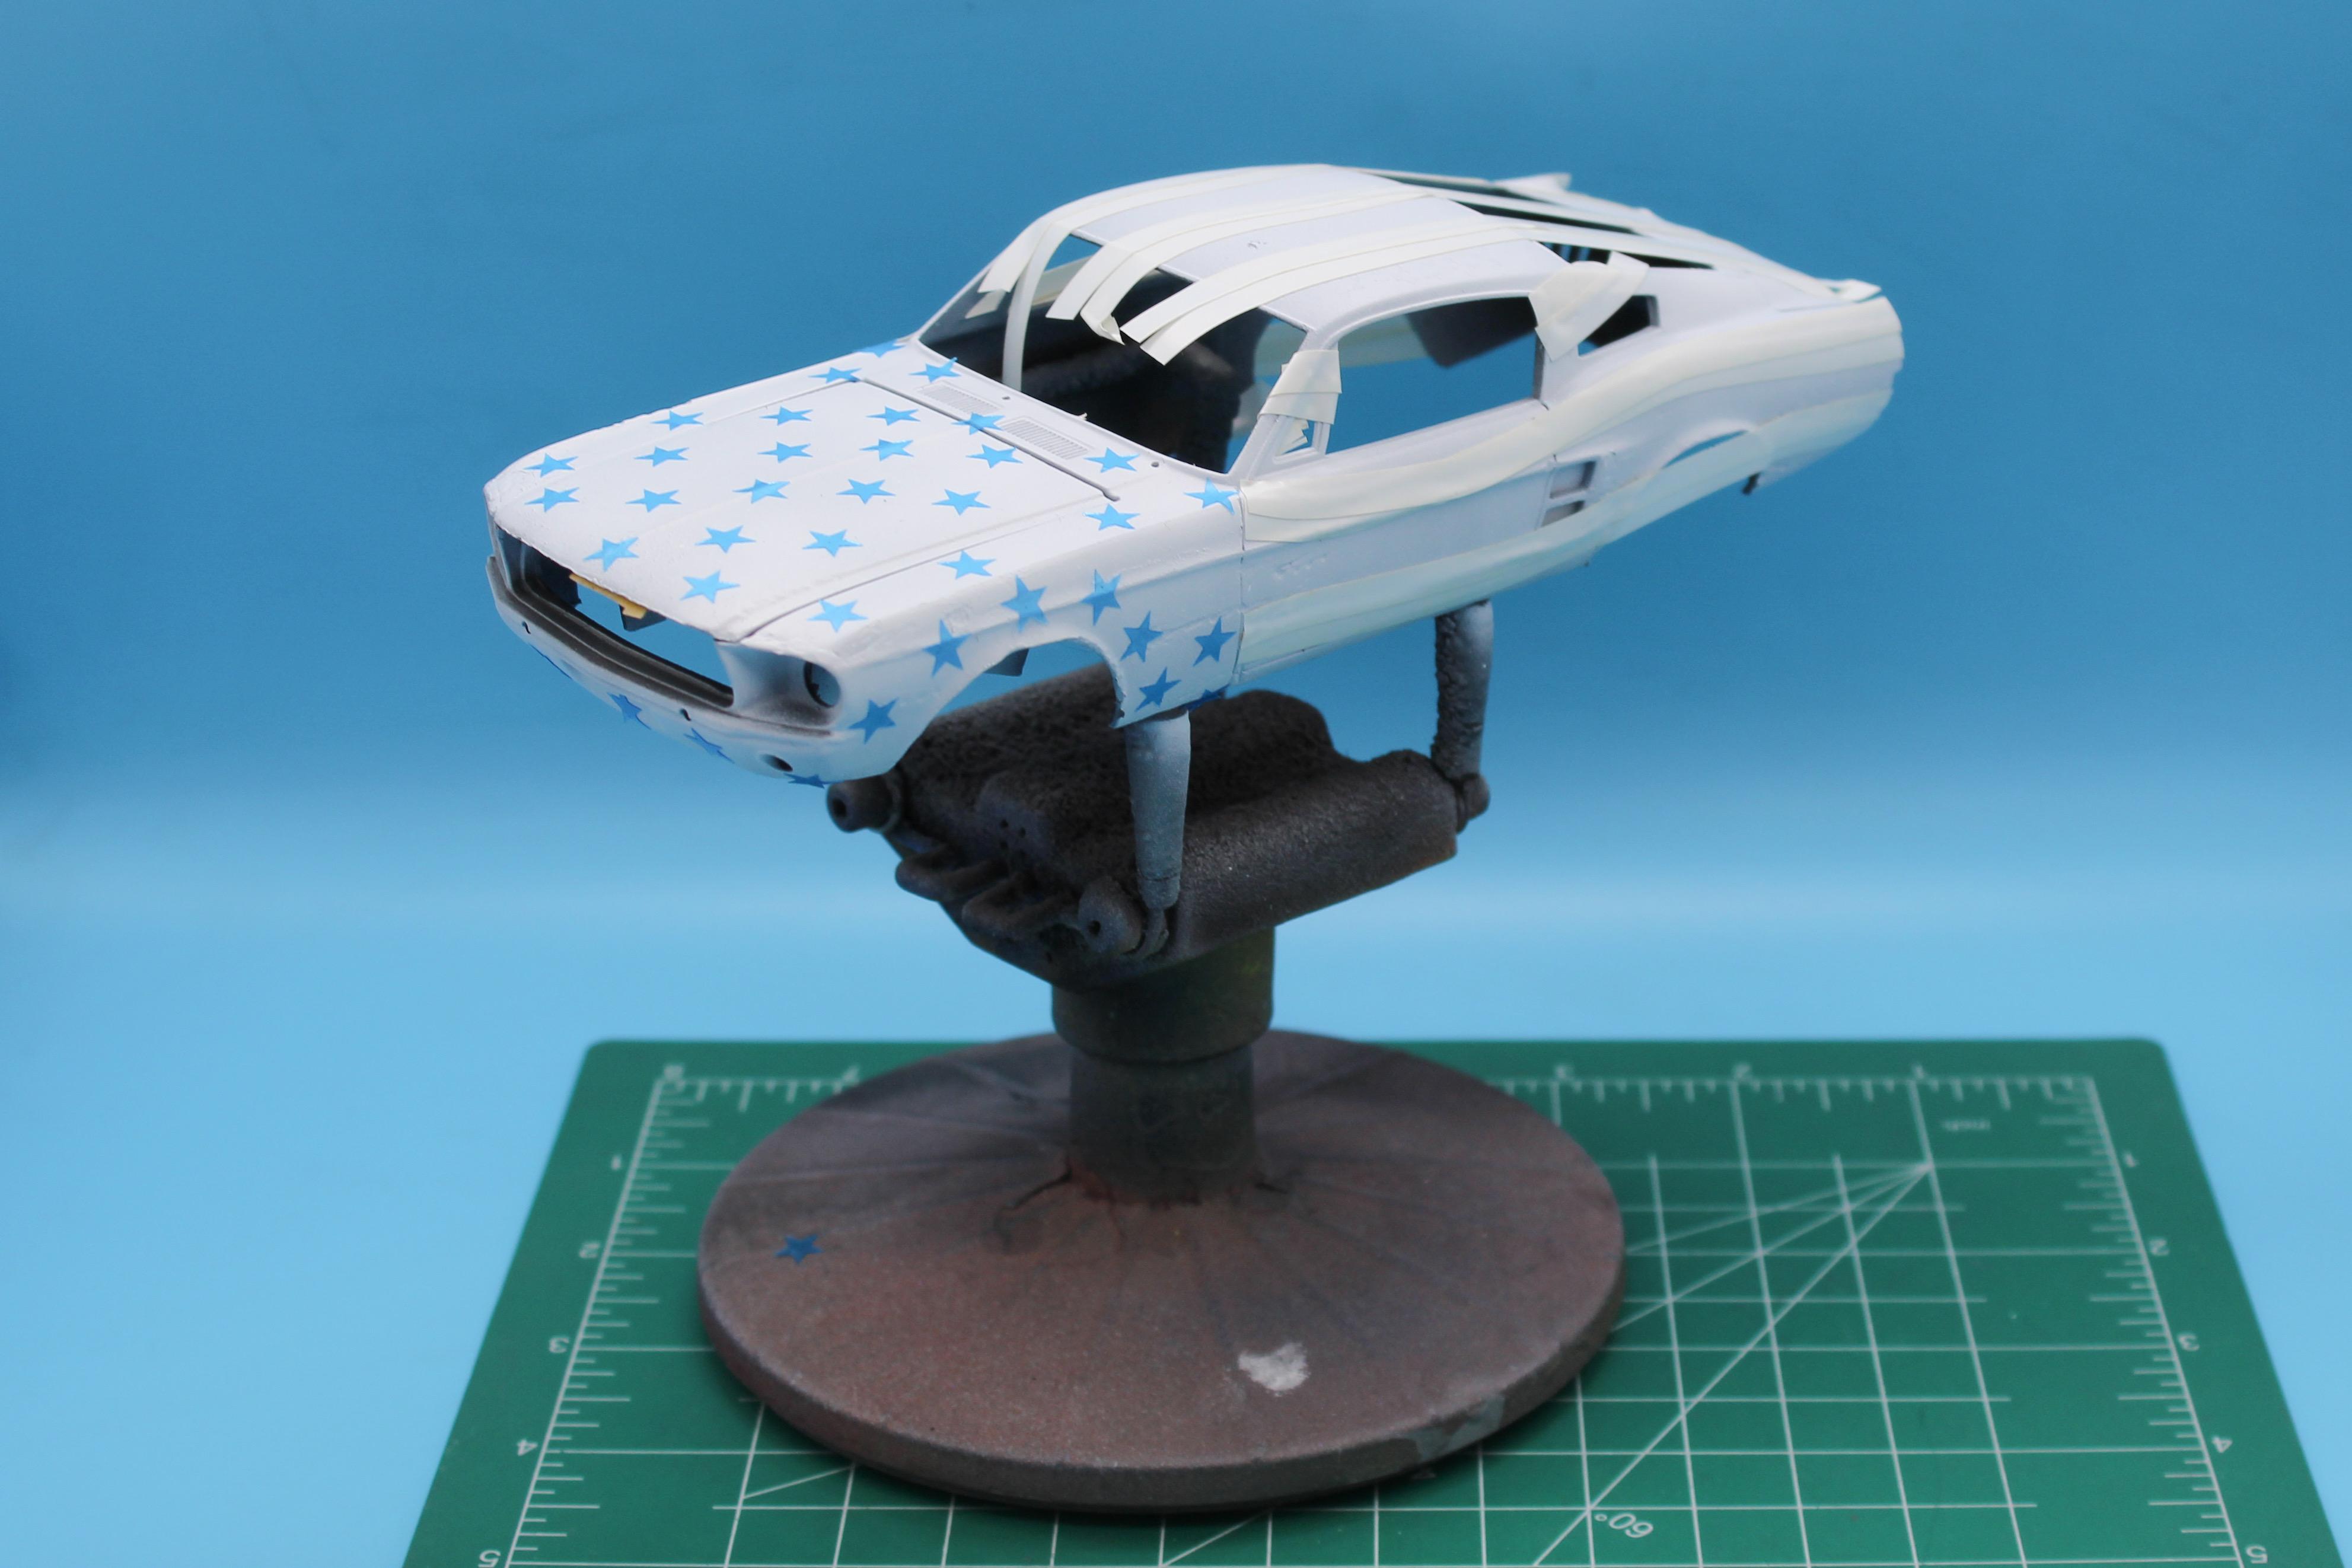
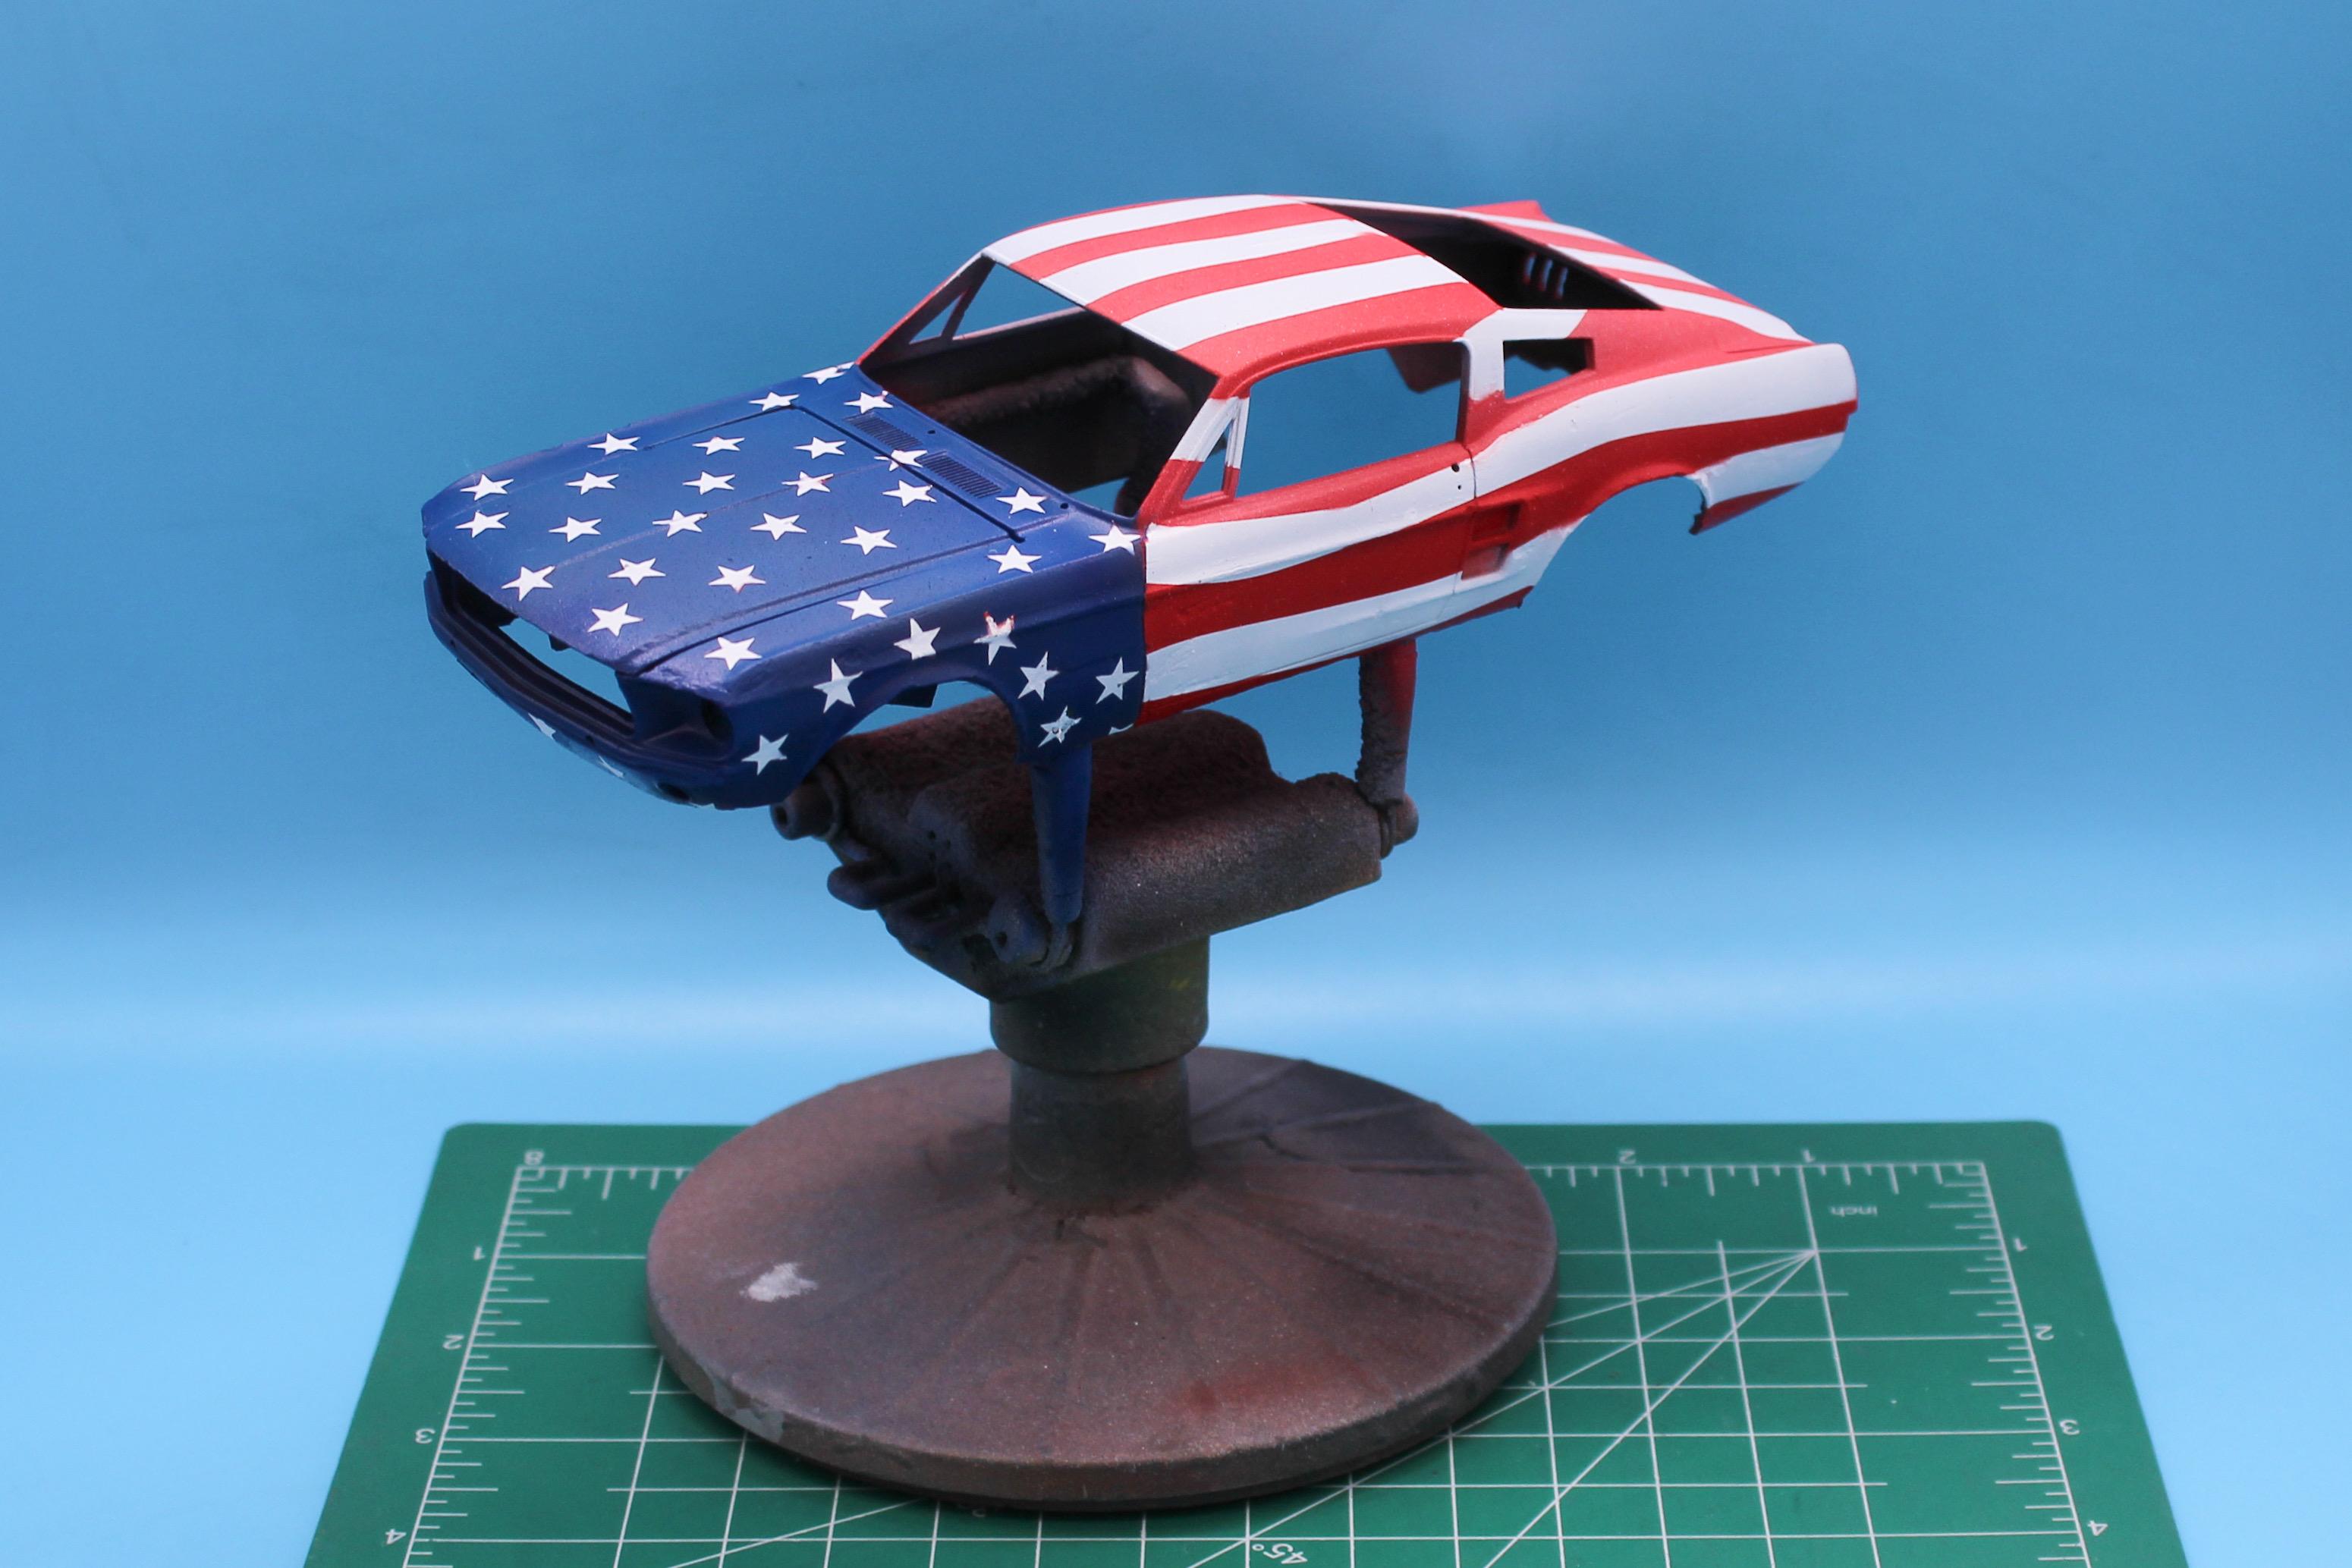
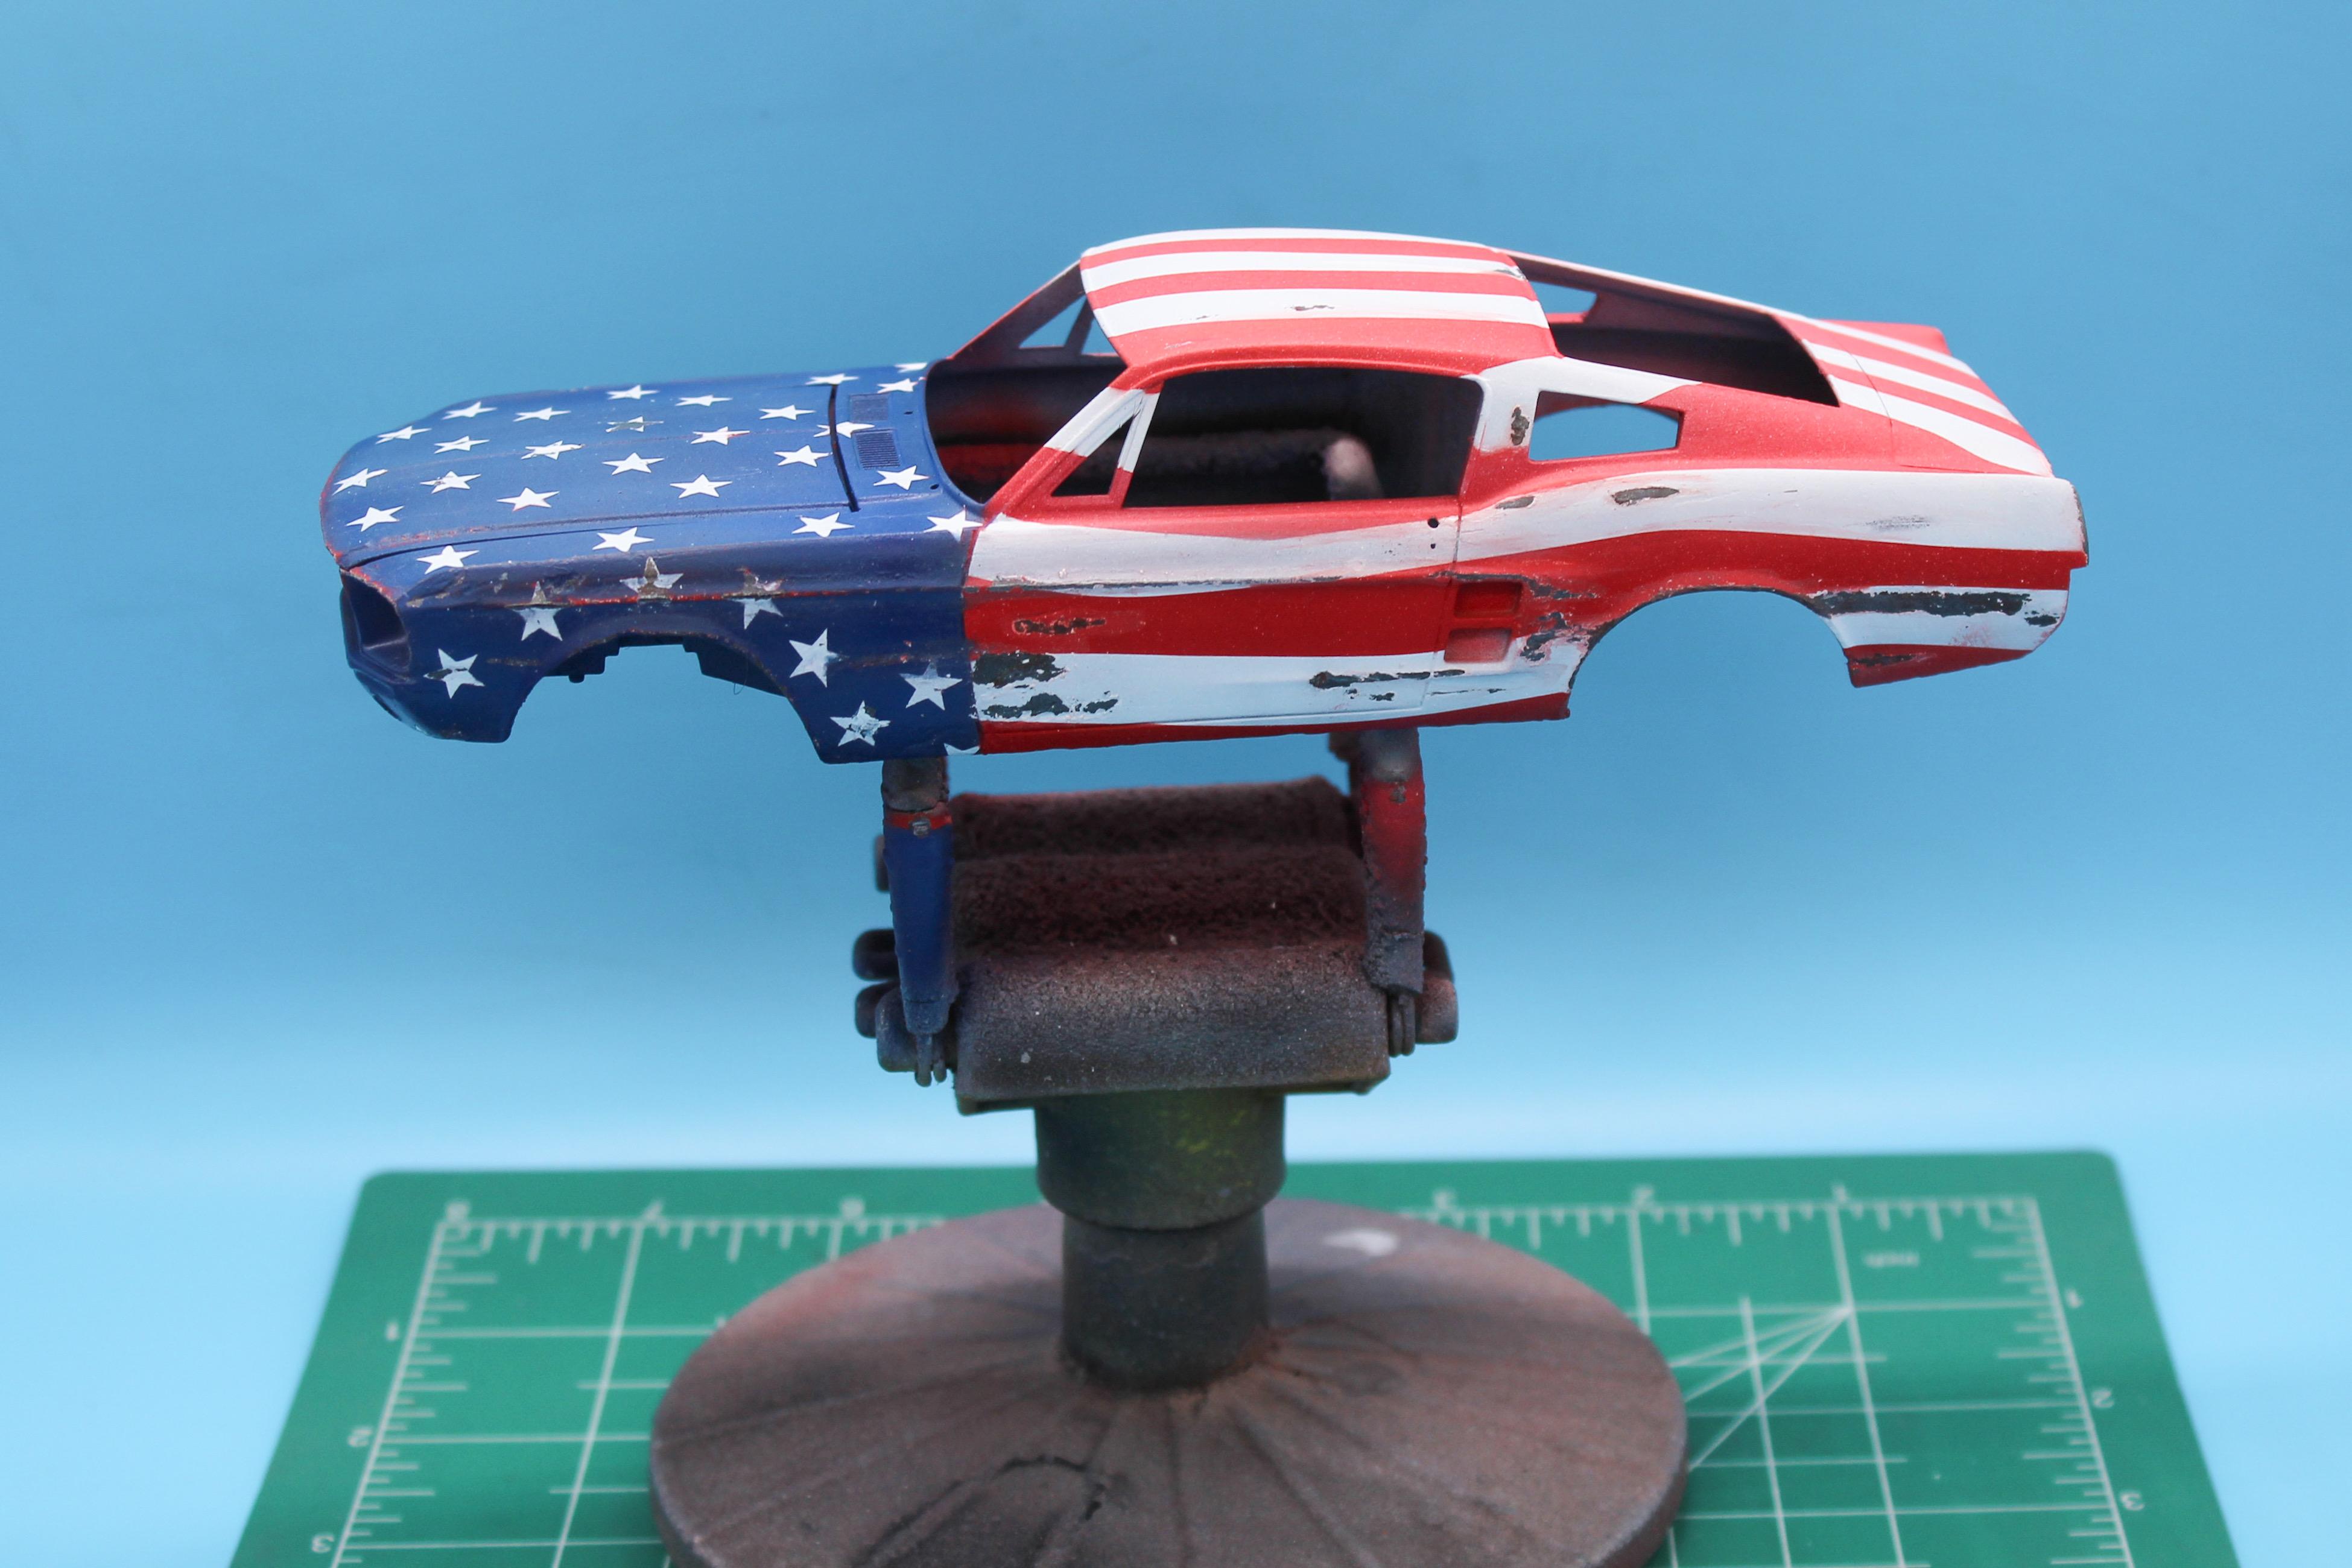
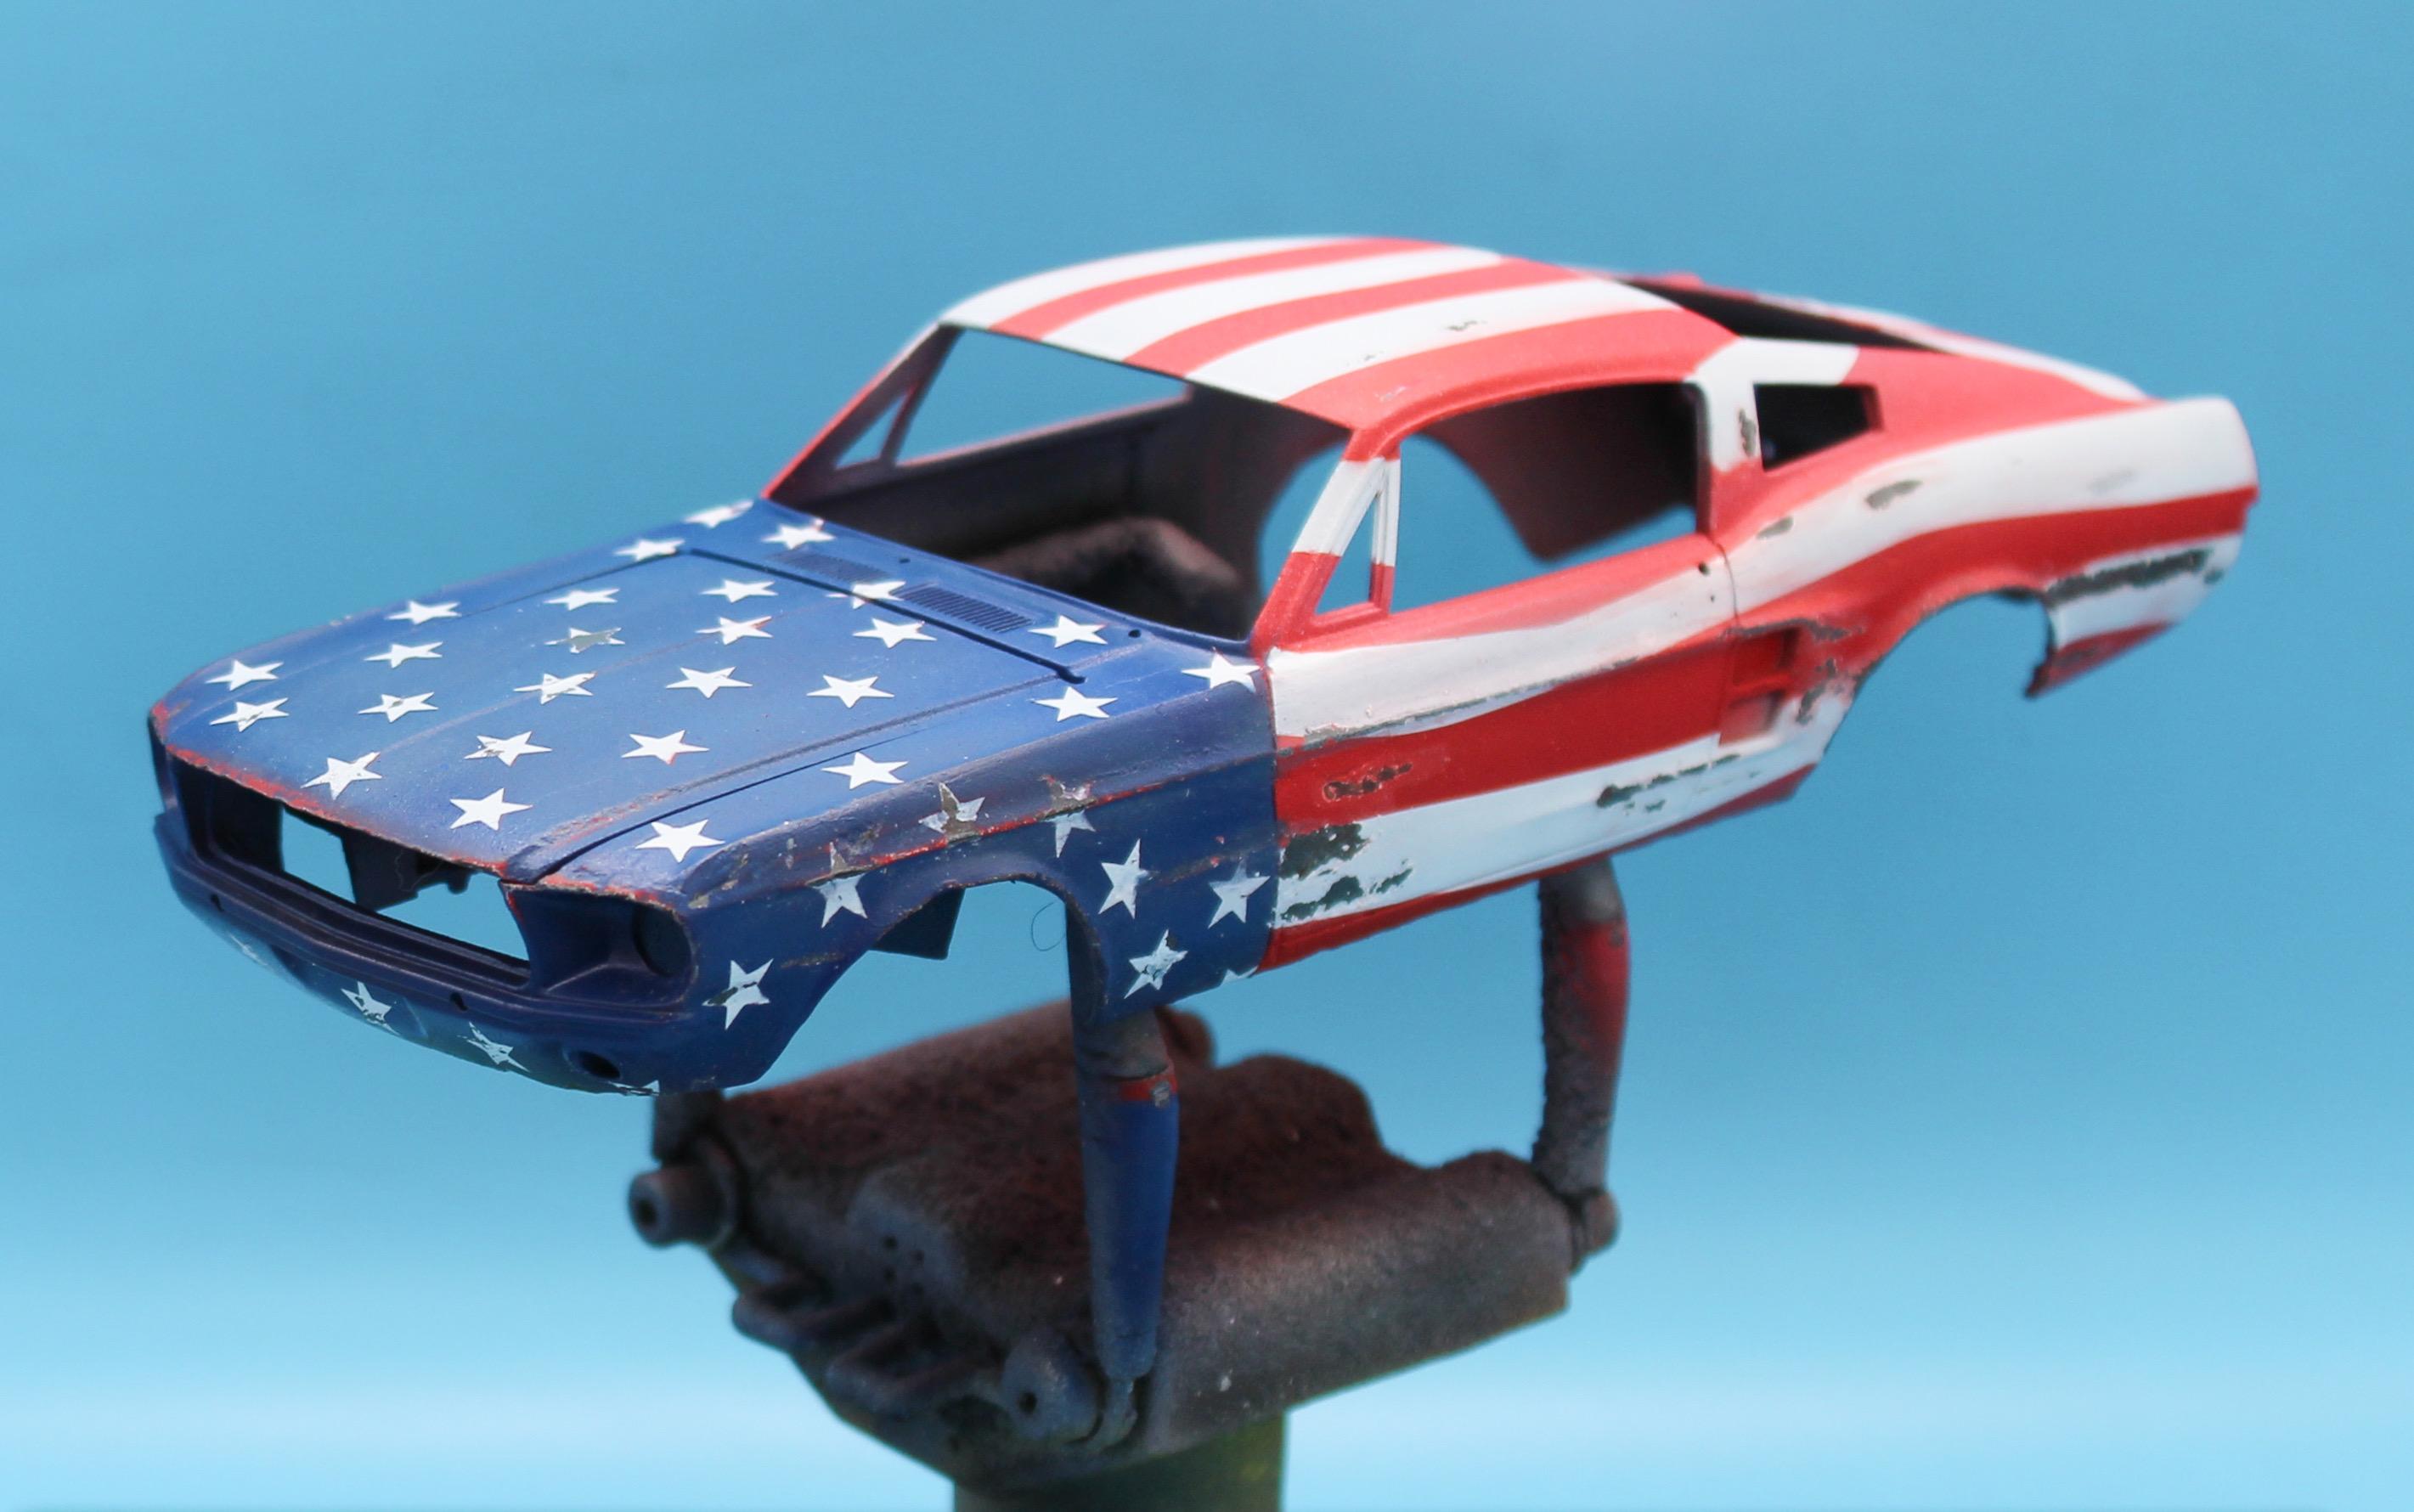
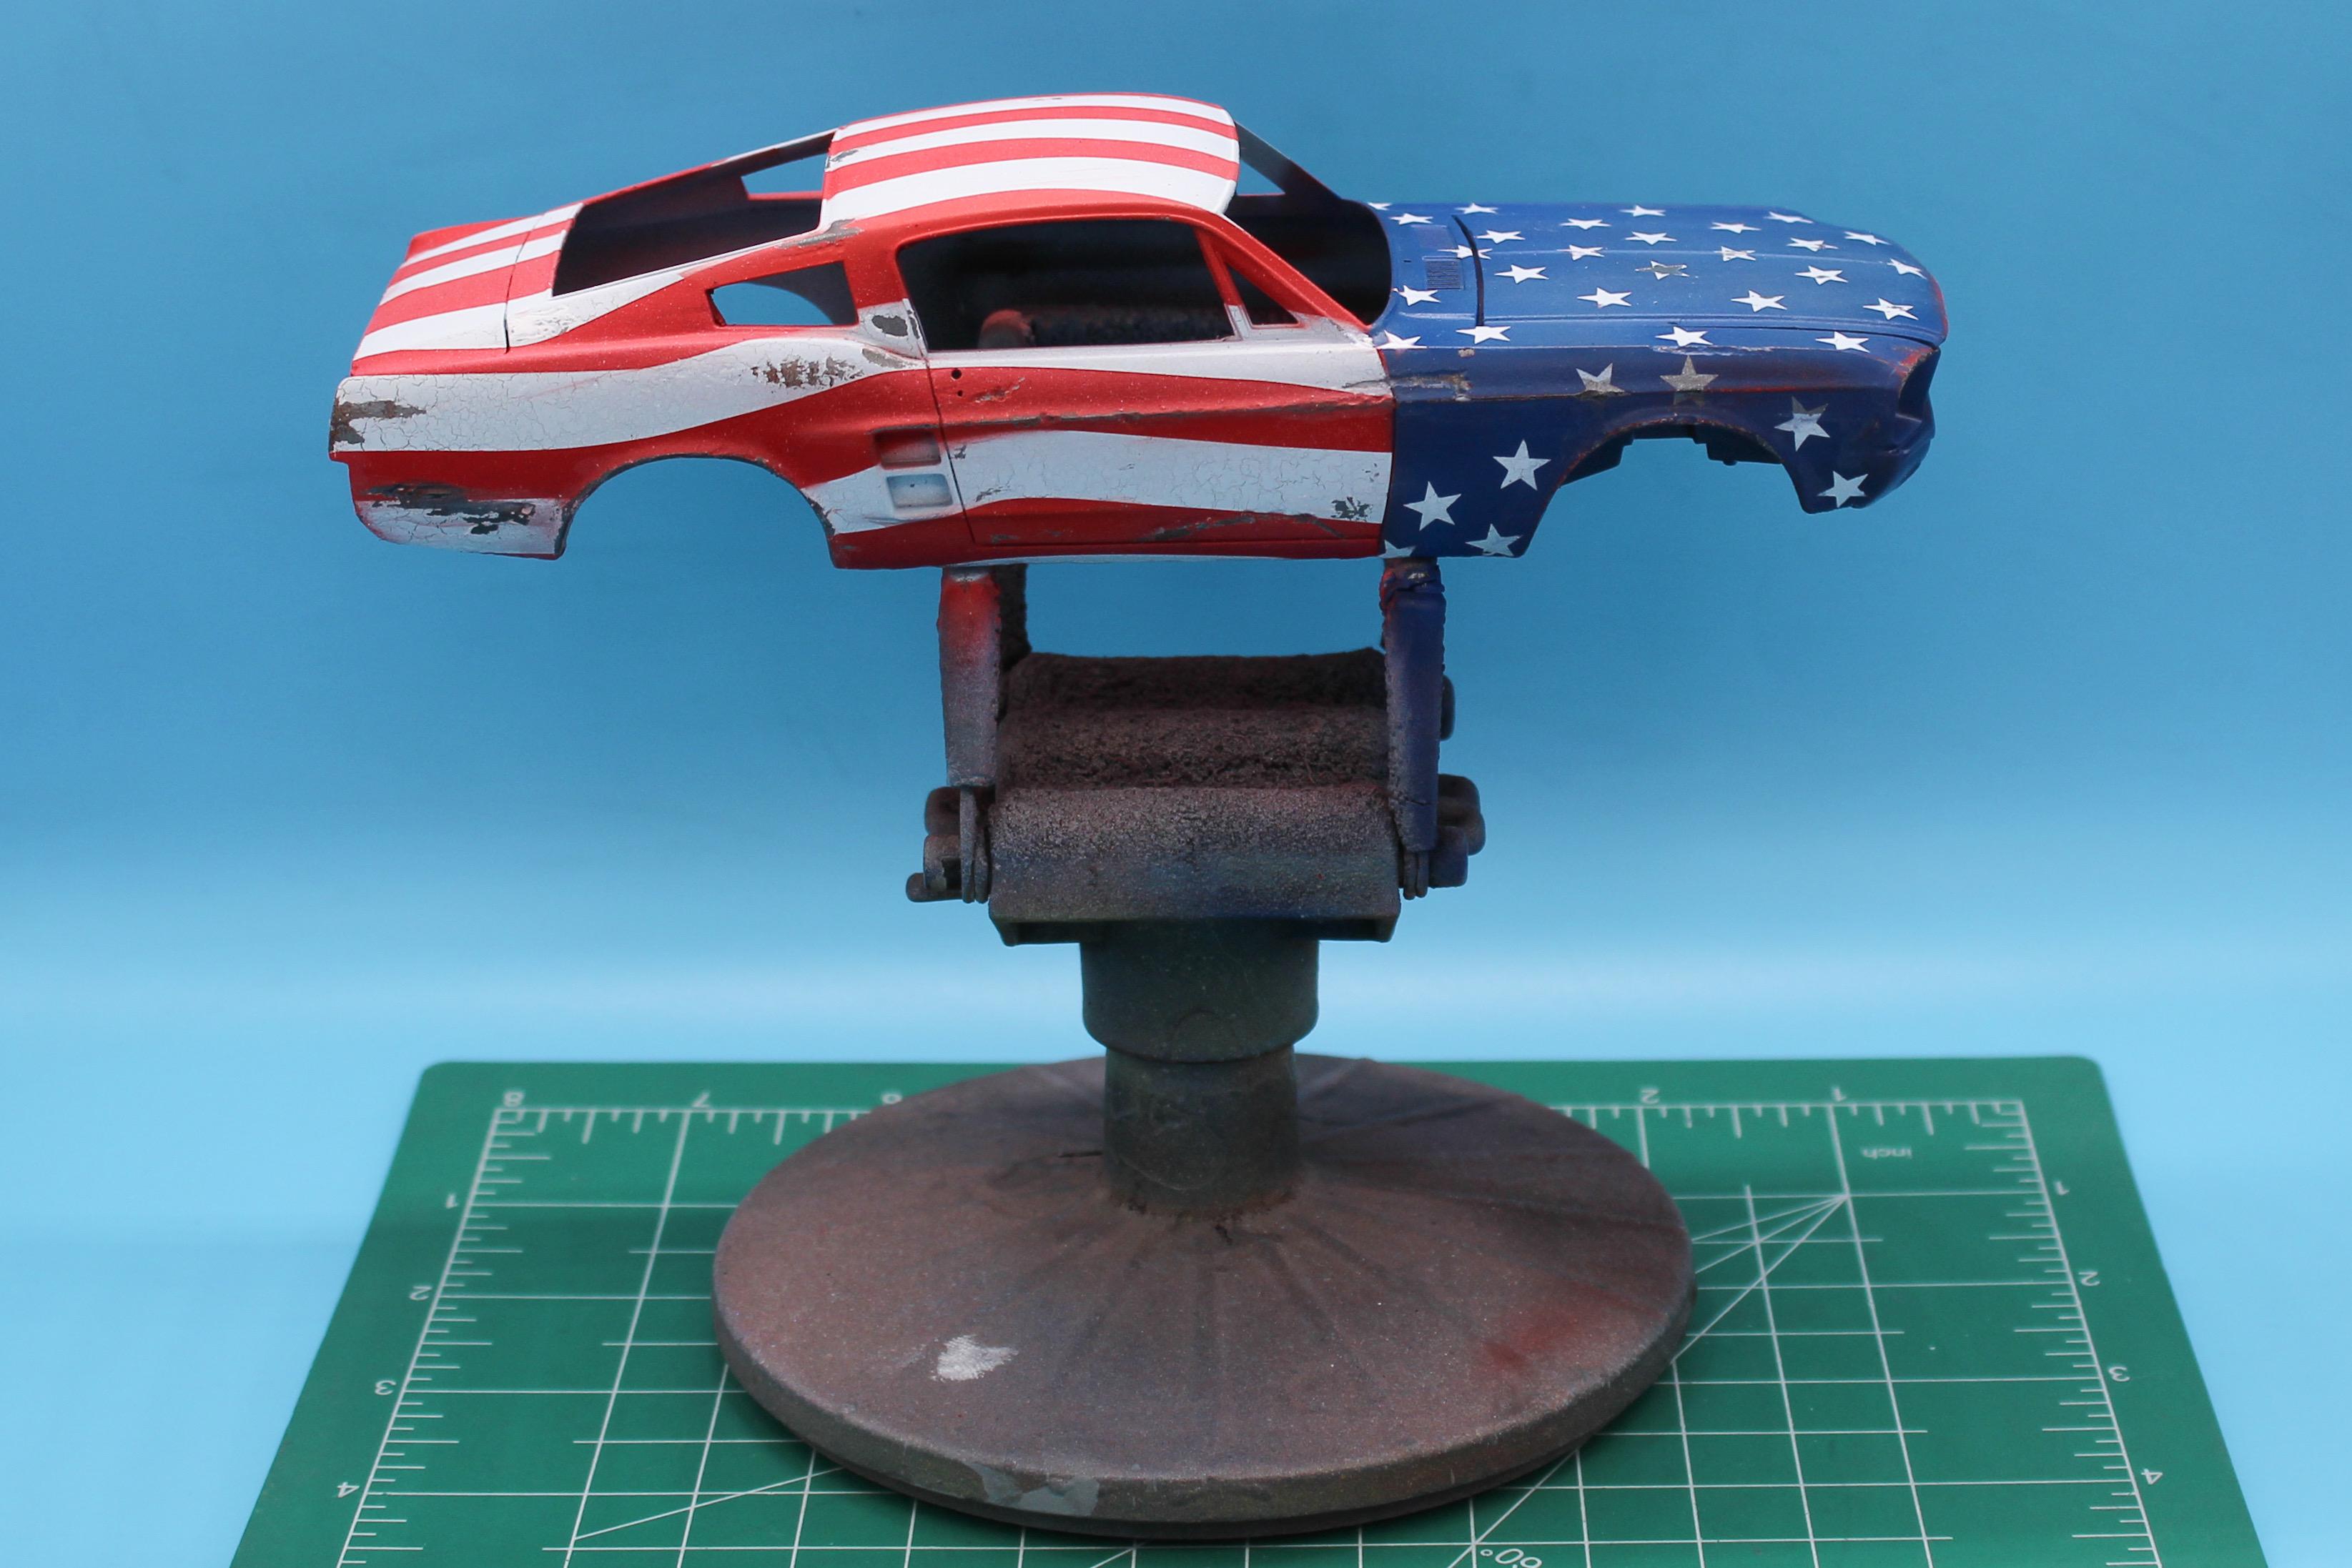
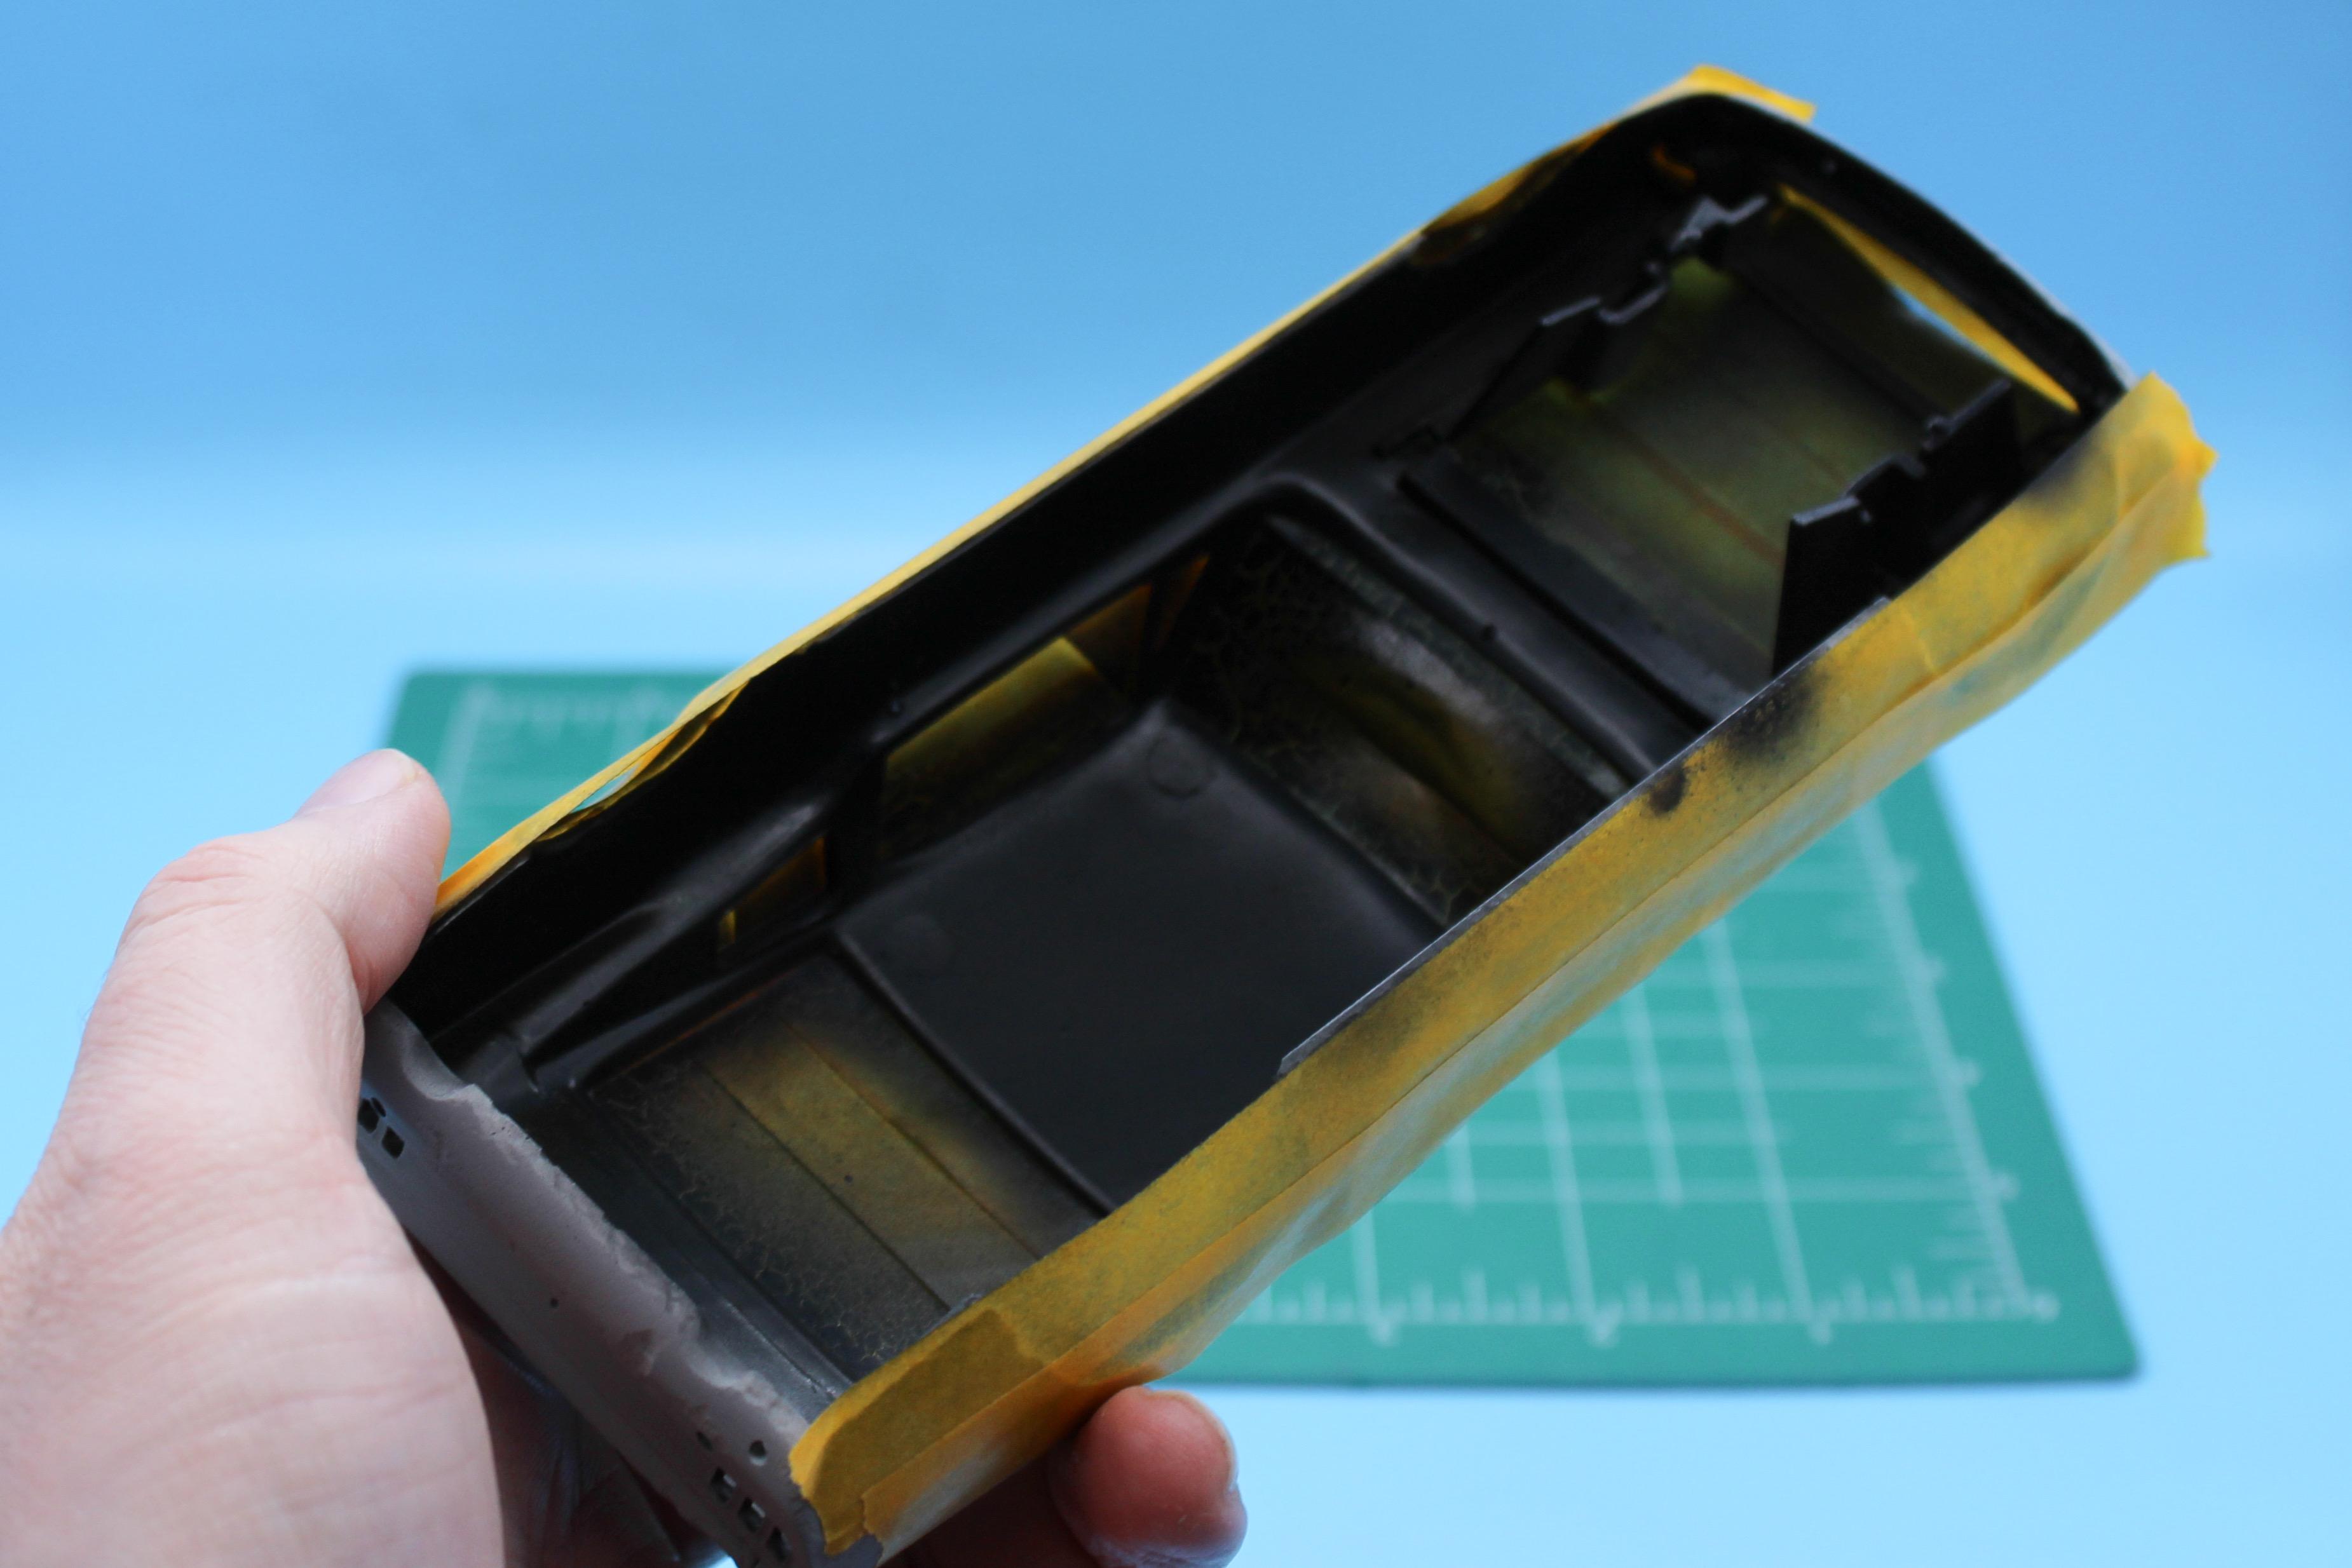
Thanks fellas! Made some good progress on ruining this thing today 😬😂 First up, a little light rusting over the bare steel in some of the spots that have already sustained some damage: As with the steel finish itself, 99% of this will be hidden once this is done, but it’s good practise if nothing else… Next up, I shot a coat of chipping medium (a clearcoat that allows paint damage while sealing in the layer below it) followed by a base color of white: Once that dried for a couple of hours, cut some stars on my Silhouette cutter, laid down a bunch of them plus some stripes with Tamiya vinyl tape (which is good for this task because it will bend and curve nicely) Next up, shoot the whole thing star spangled red with some burgundy lowlights on the bottom of the quarters, plus a little red + white on the roof and upper surfaces to give the effect of dull sun-bleached paint just a little: Then, remasked and shot with dark blue plus some lighter blue on the upper portions for the same reasons: Remove masks, and here’s where we’re at: And now’s my chance to use some of those chopping medium’s properties and start to burn through the upper layers to expose some steel and rust and distress the plant a little: The chipping medium works best with acrylic paints…you use some water and a toothpick, brush, q-tip, whatever and just reactivate the paint over top and then just remove any of the layers that came AFTER you applied it: In this case I wanted plenty of exposed steel and rust on the sides to signify some serious ‘combat damage’ but then also some scuffs as shown above the front wheel arch where the lower paint layer is showing a little but we’re not QUITE back to bare metal. The leading edge of the hood got the same treatment…probably plenty of gravel and dirt and debris would catch the leading edge with less damage as we move backwards: I’ve got plenty more to do on this body still, and actually ran out of time this evening before I was at all ready to call time on the fun I was having…but more adventures with paint tomorrow! Thanks for looking!
-
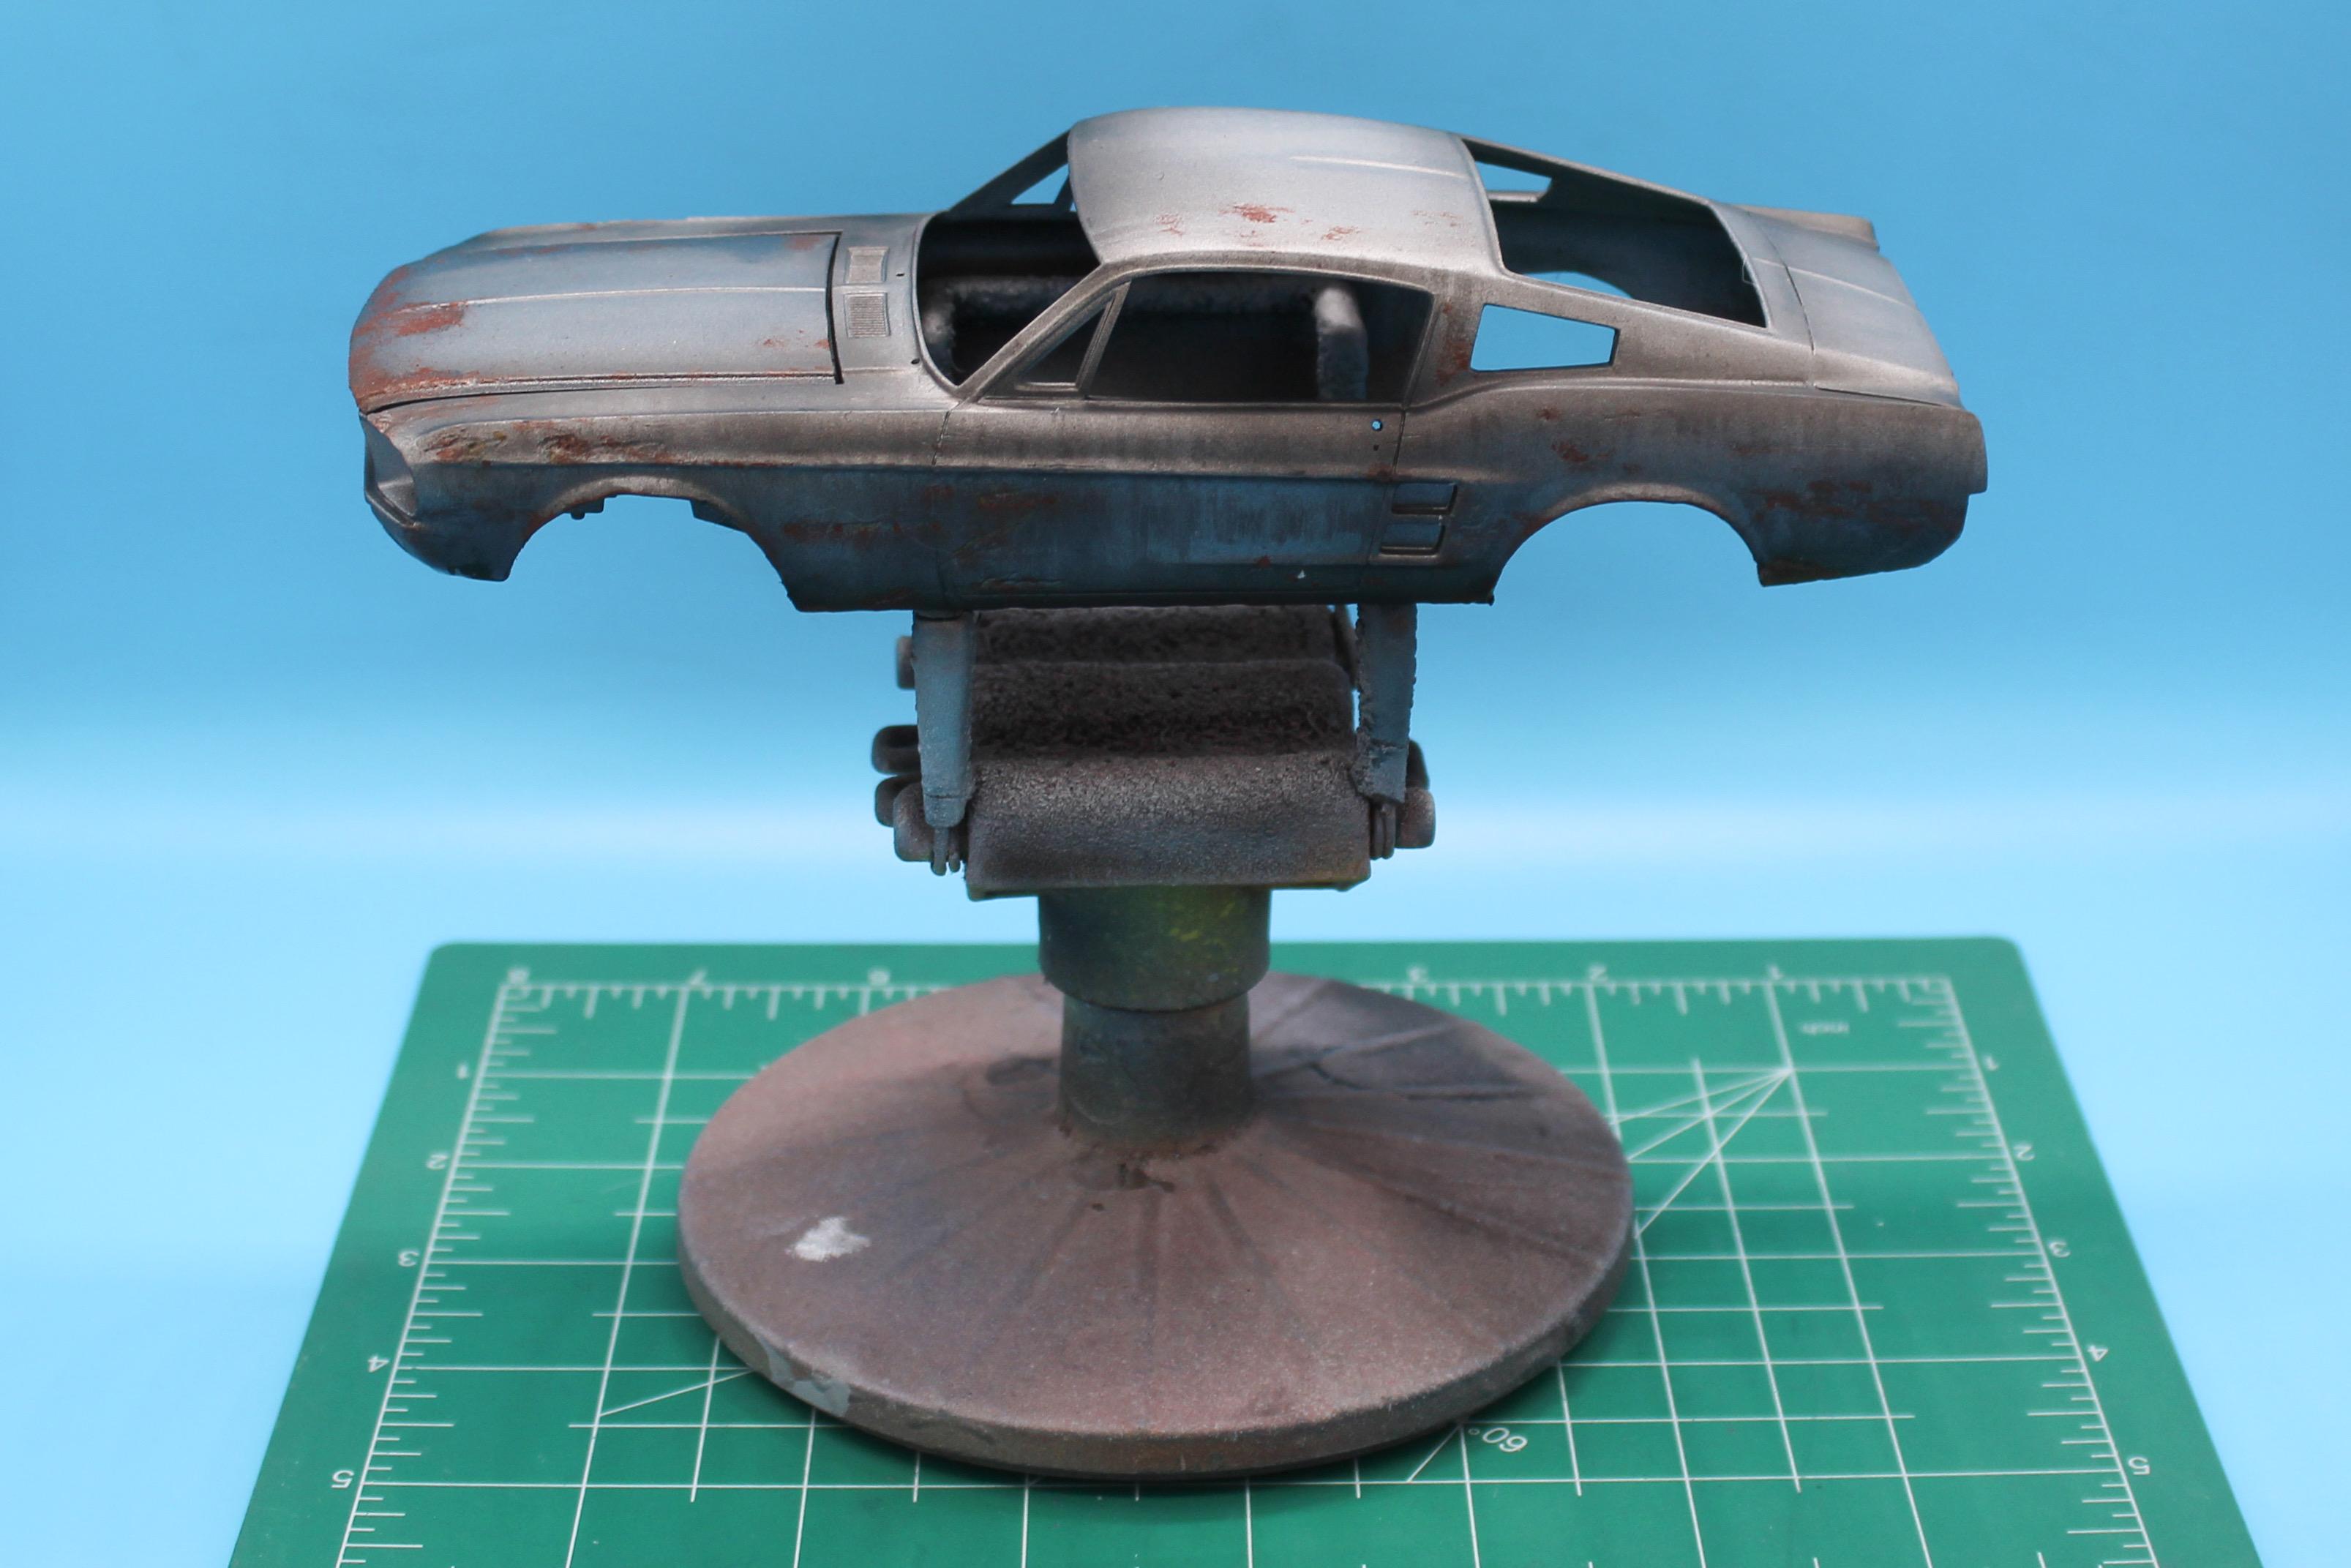
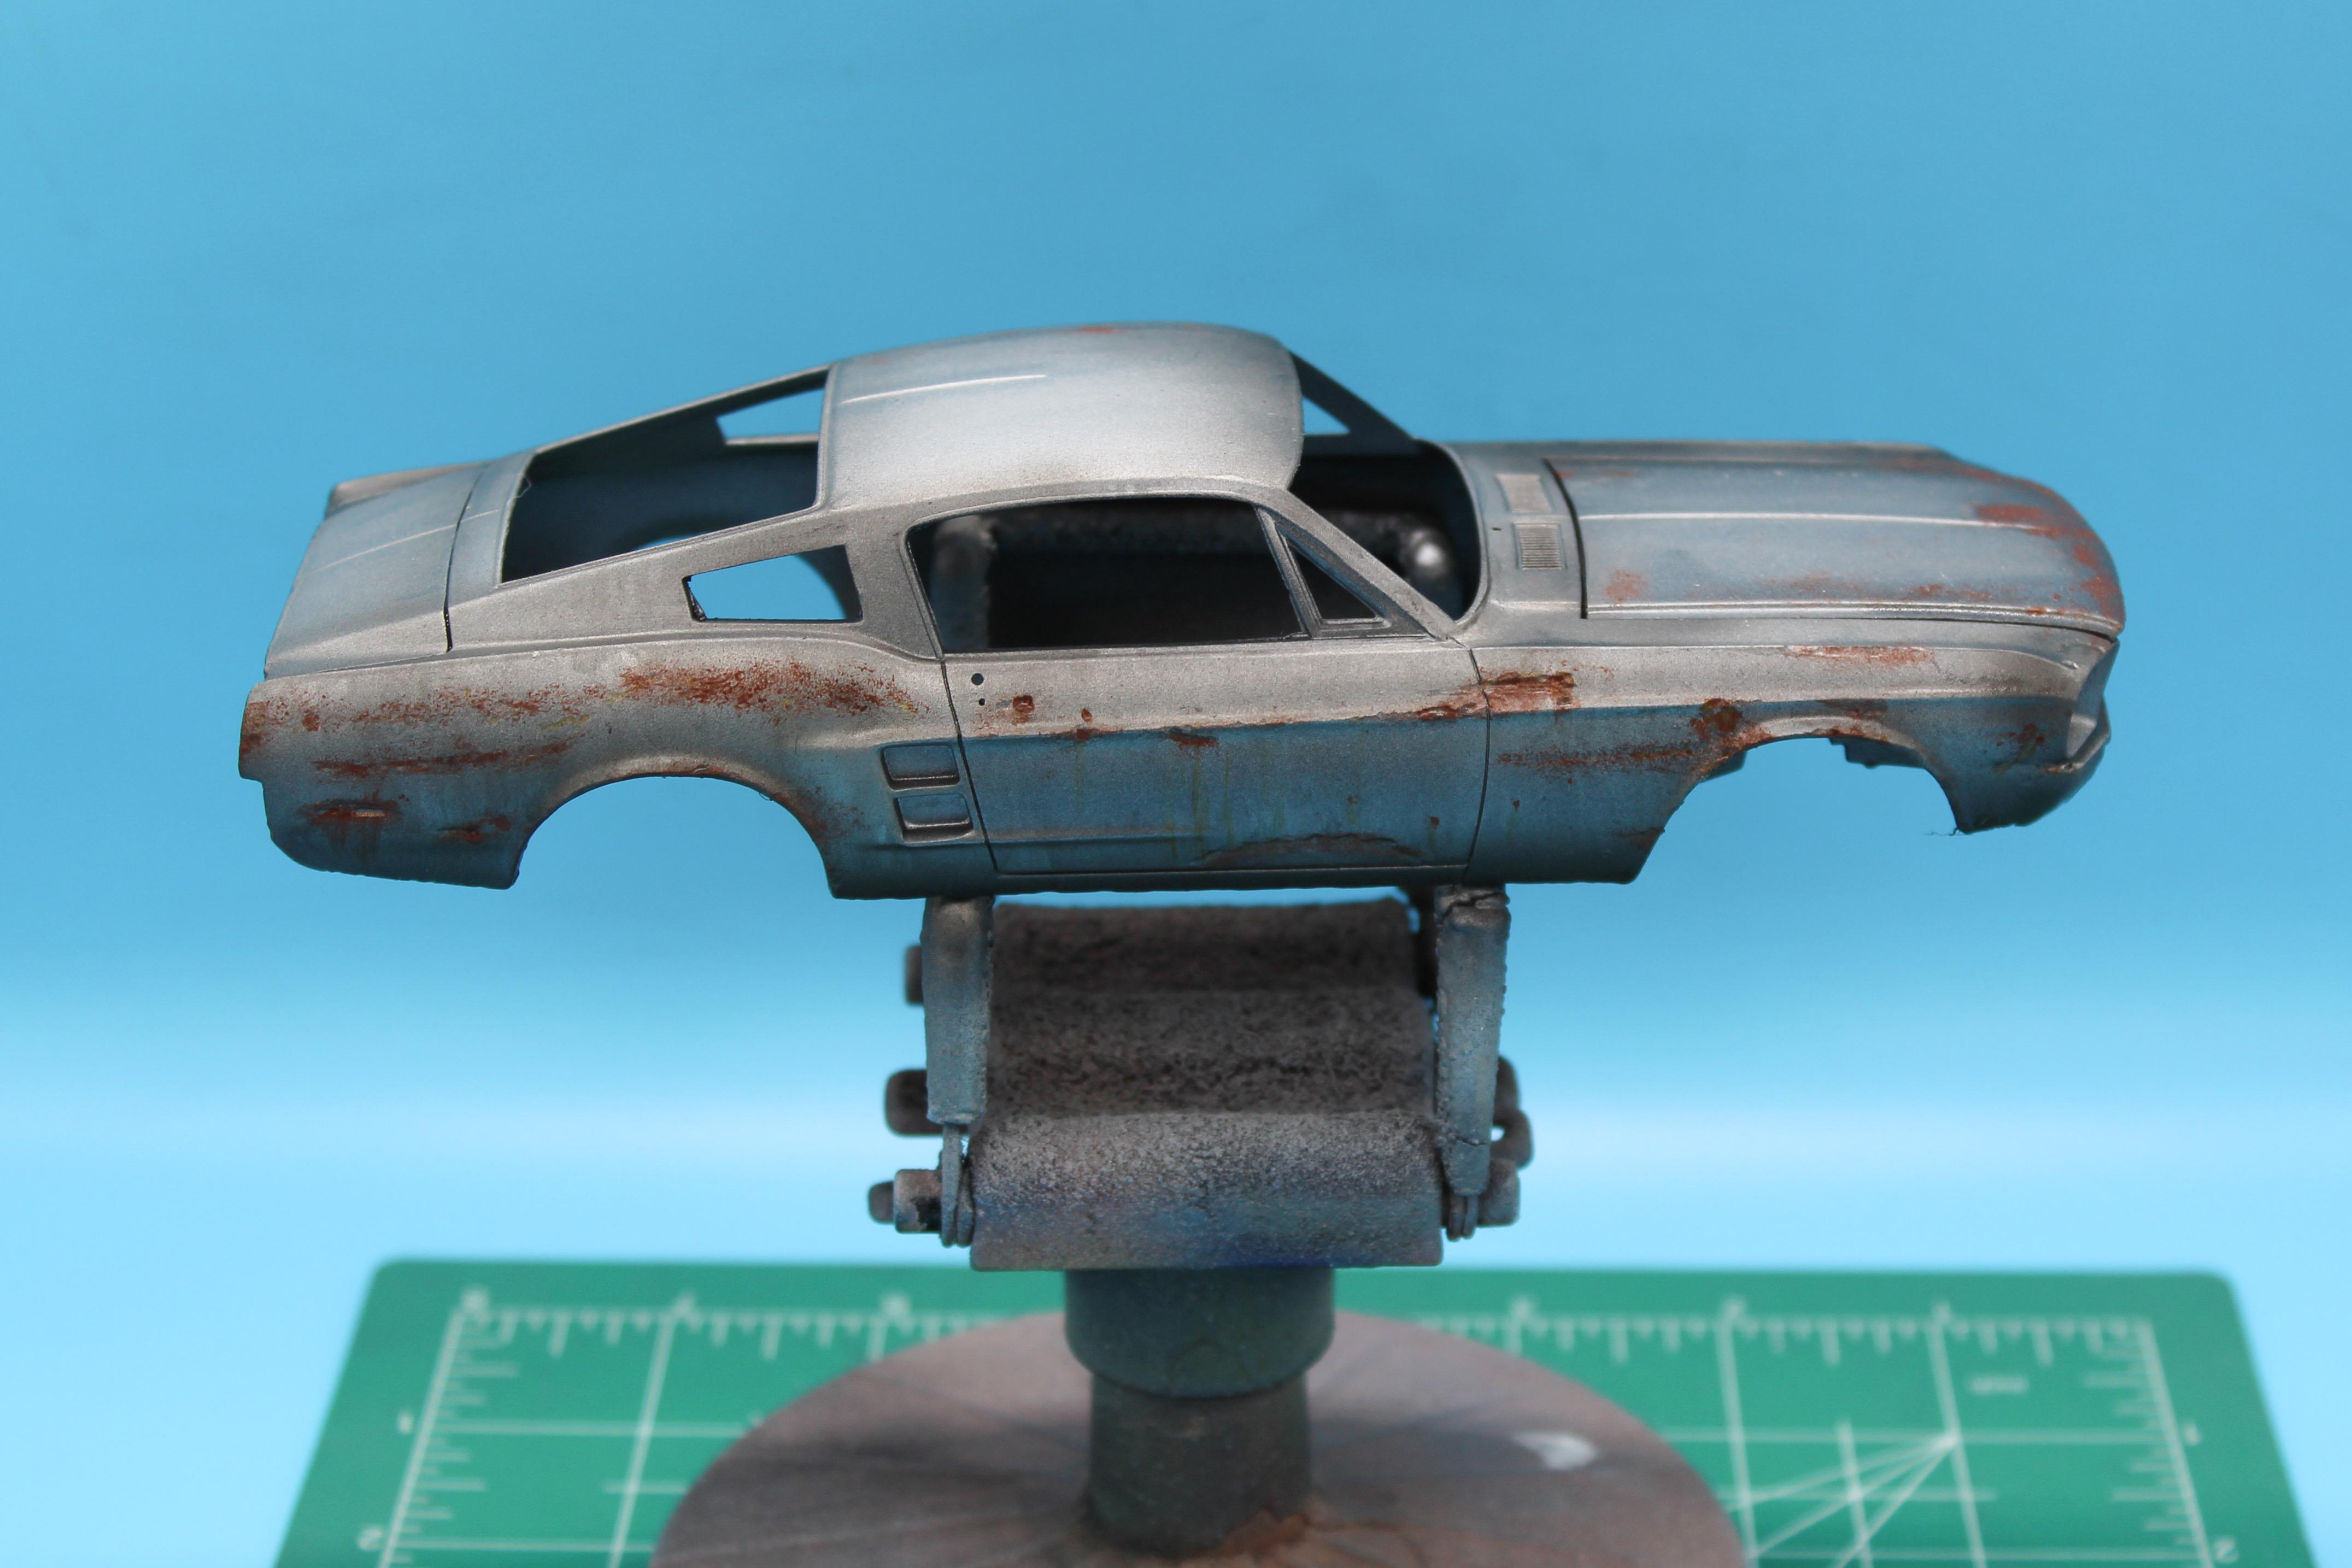
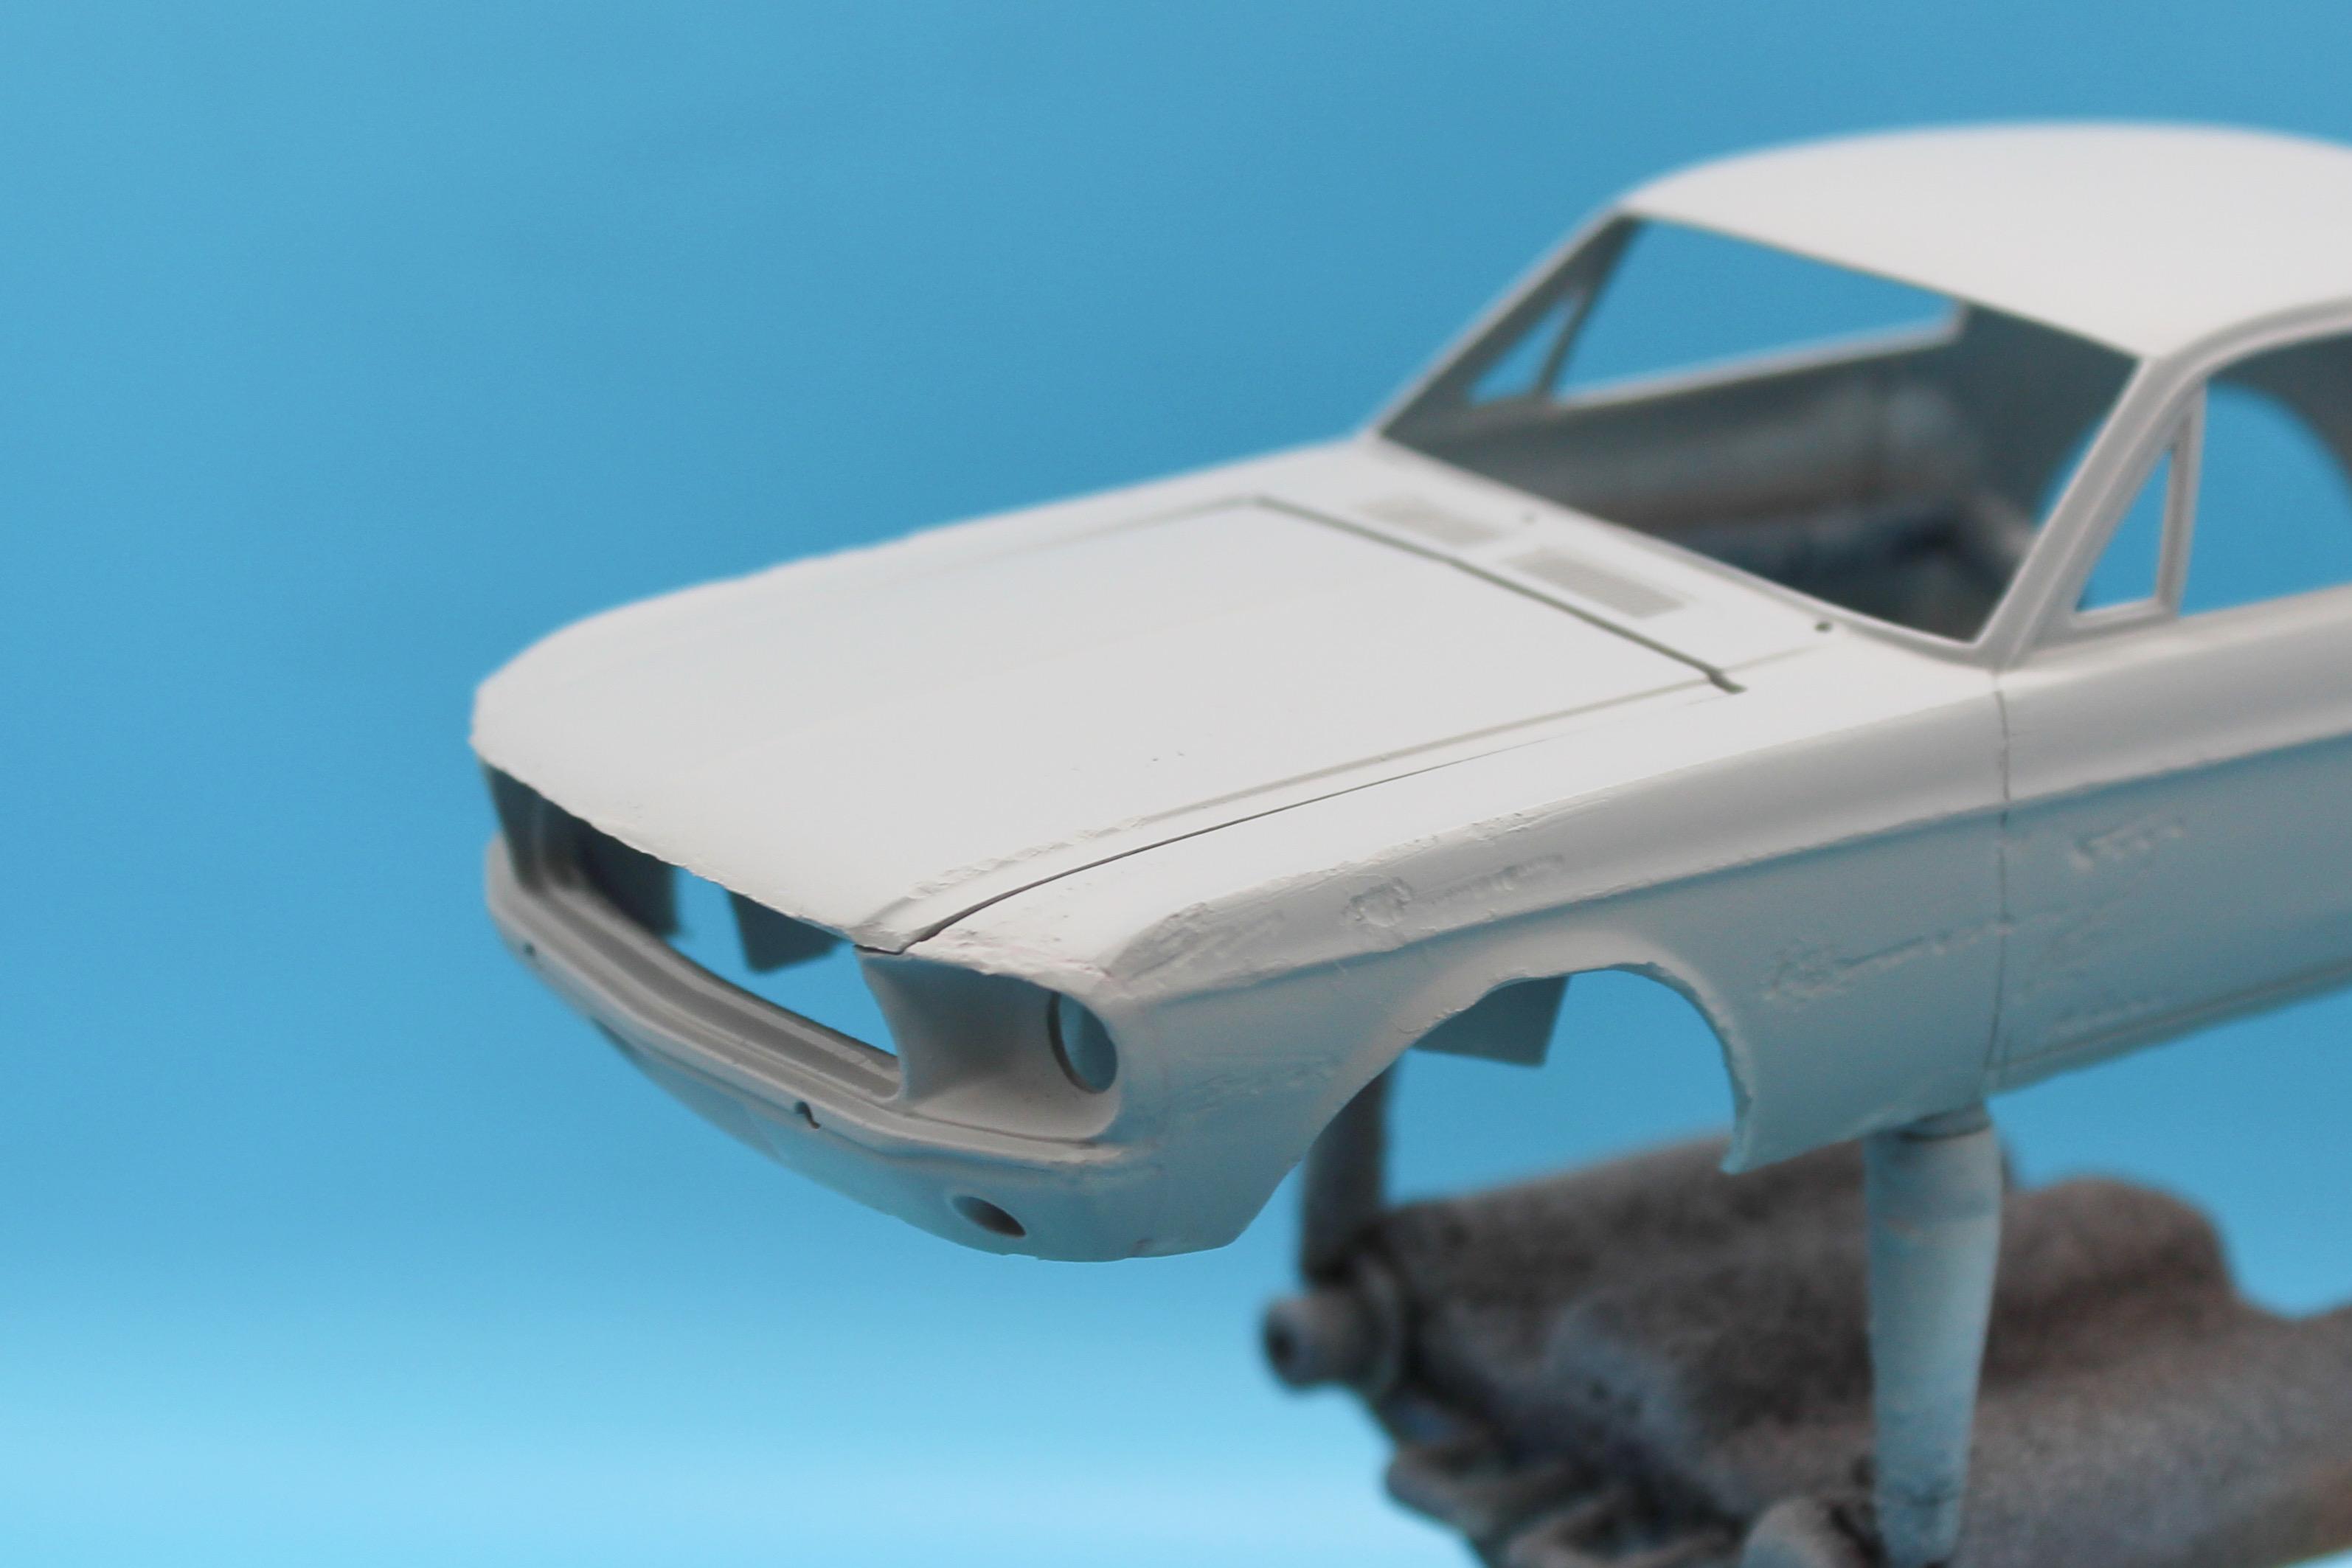
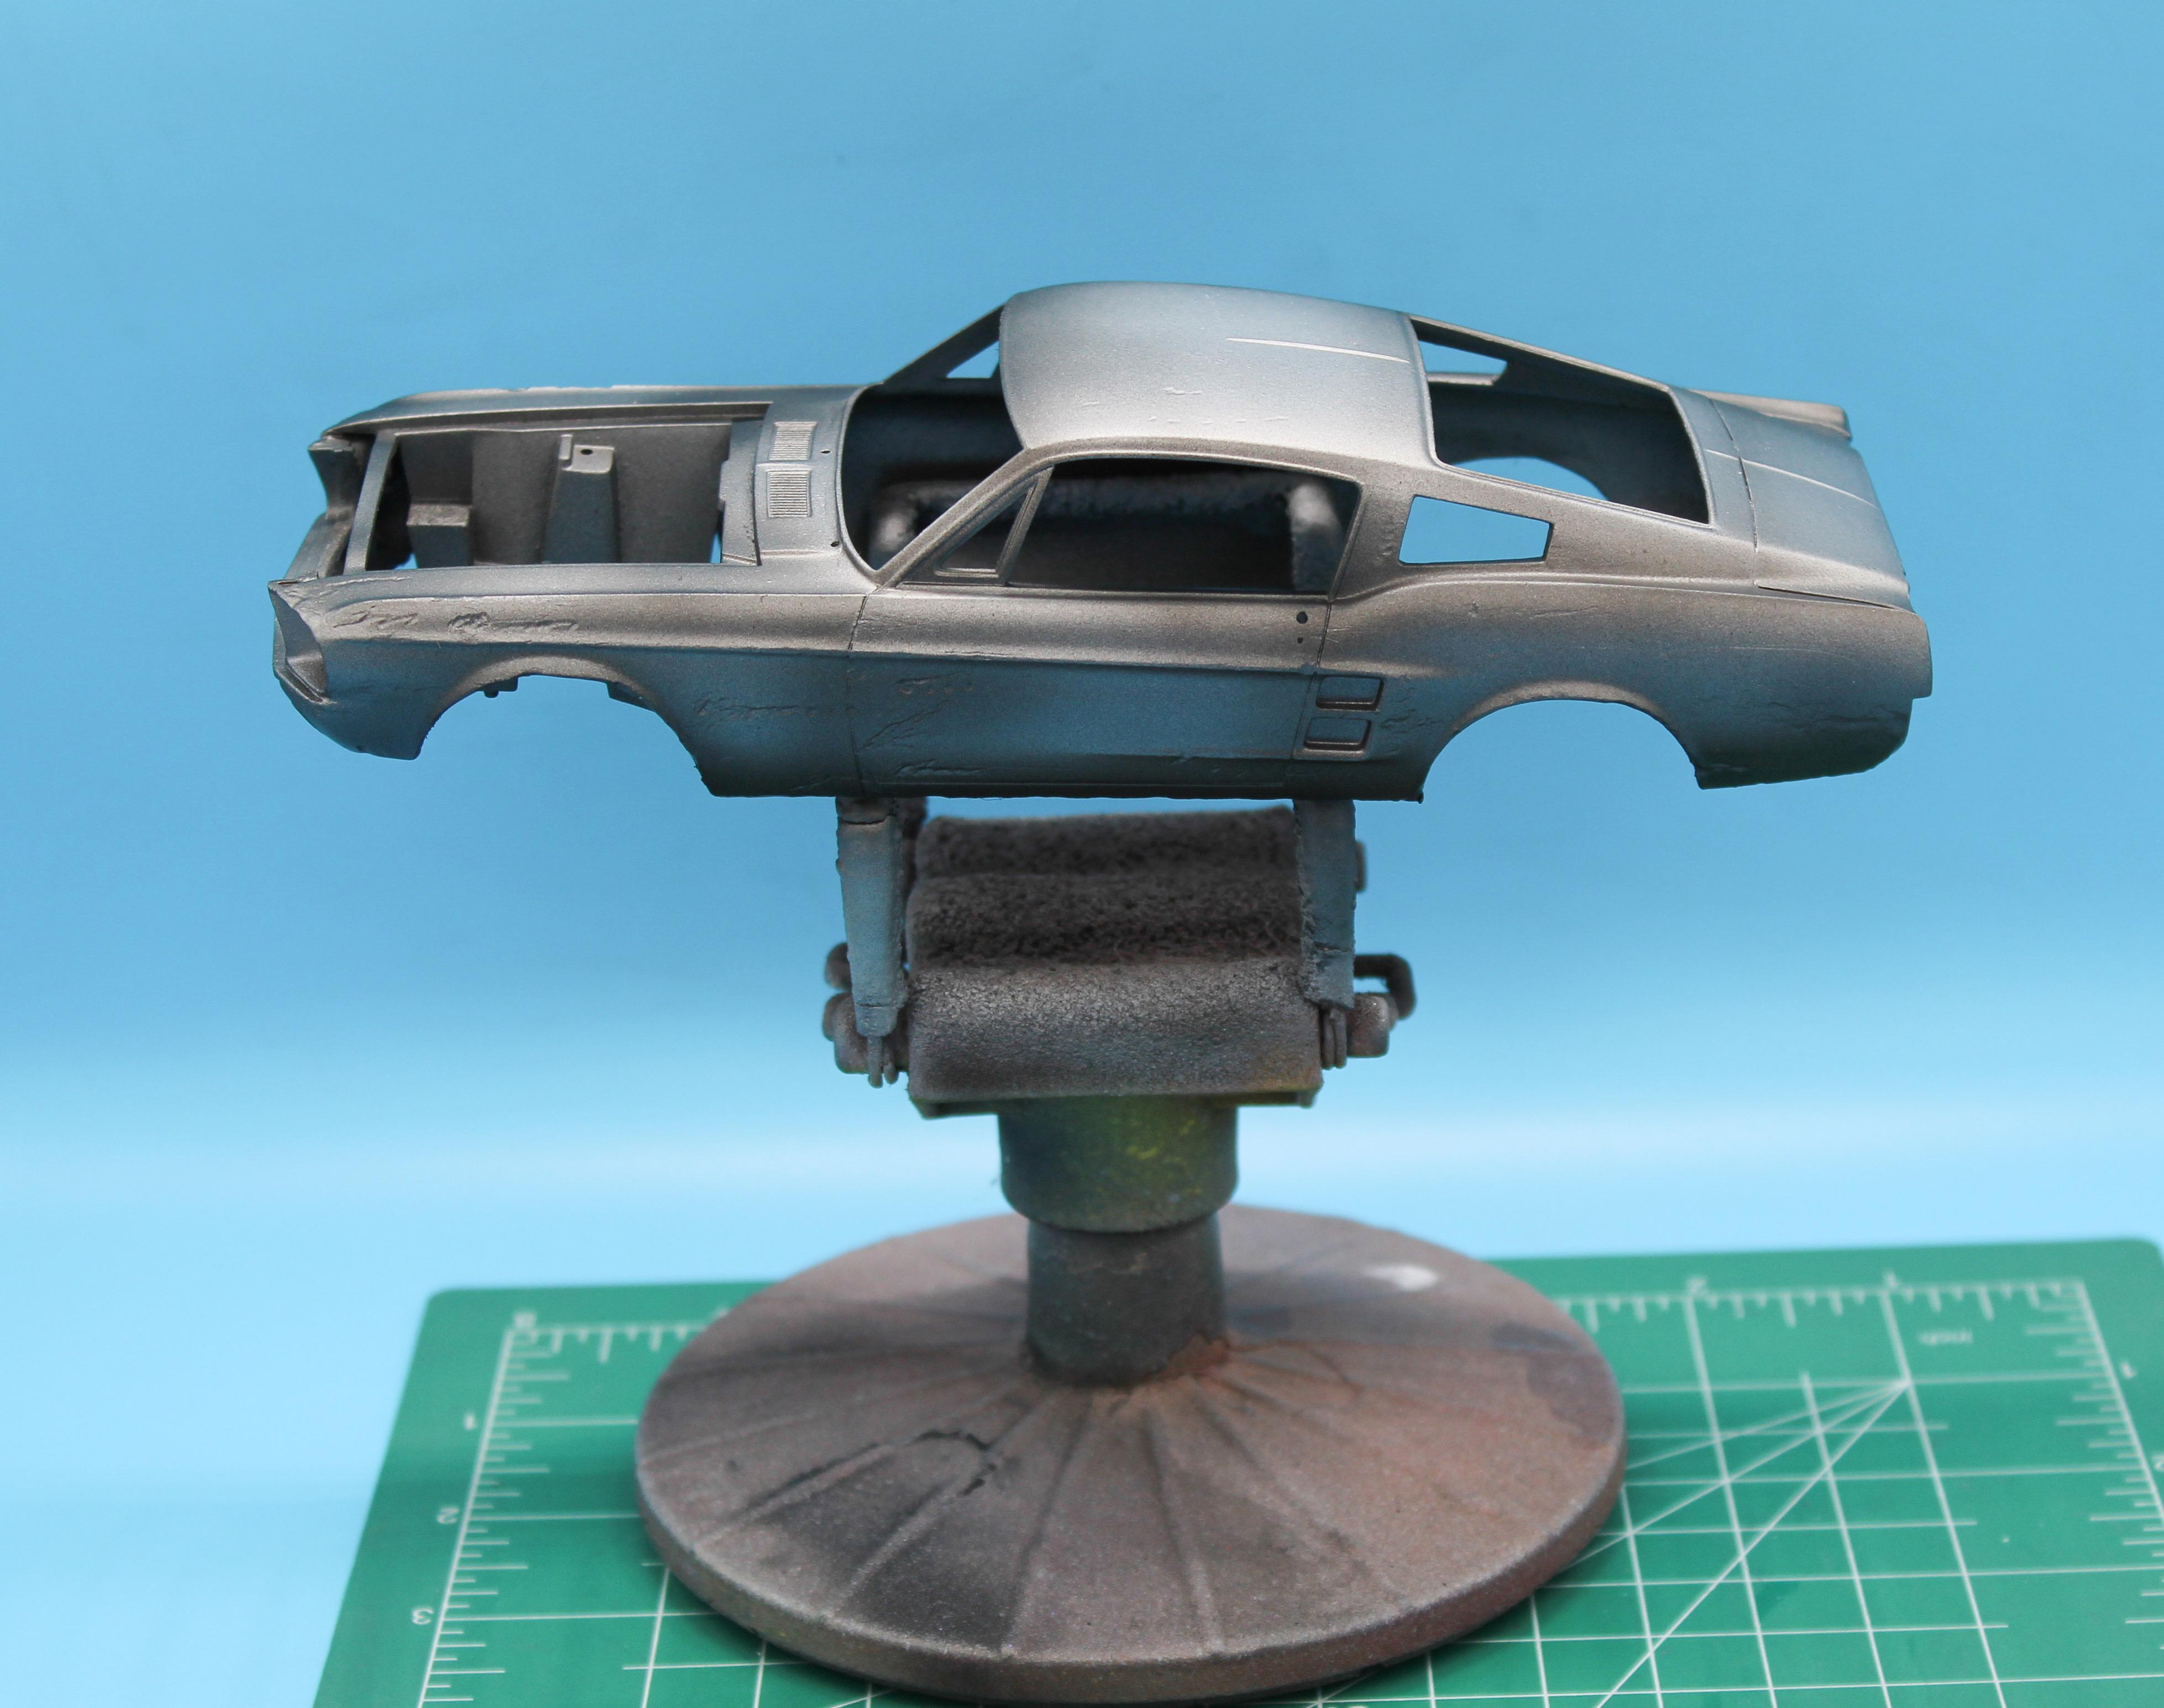
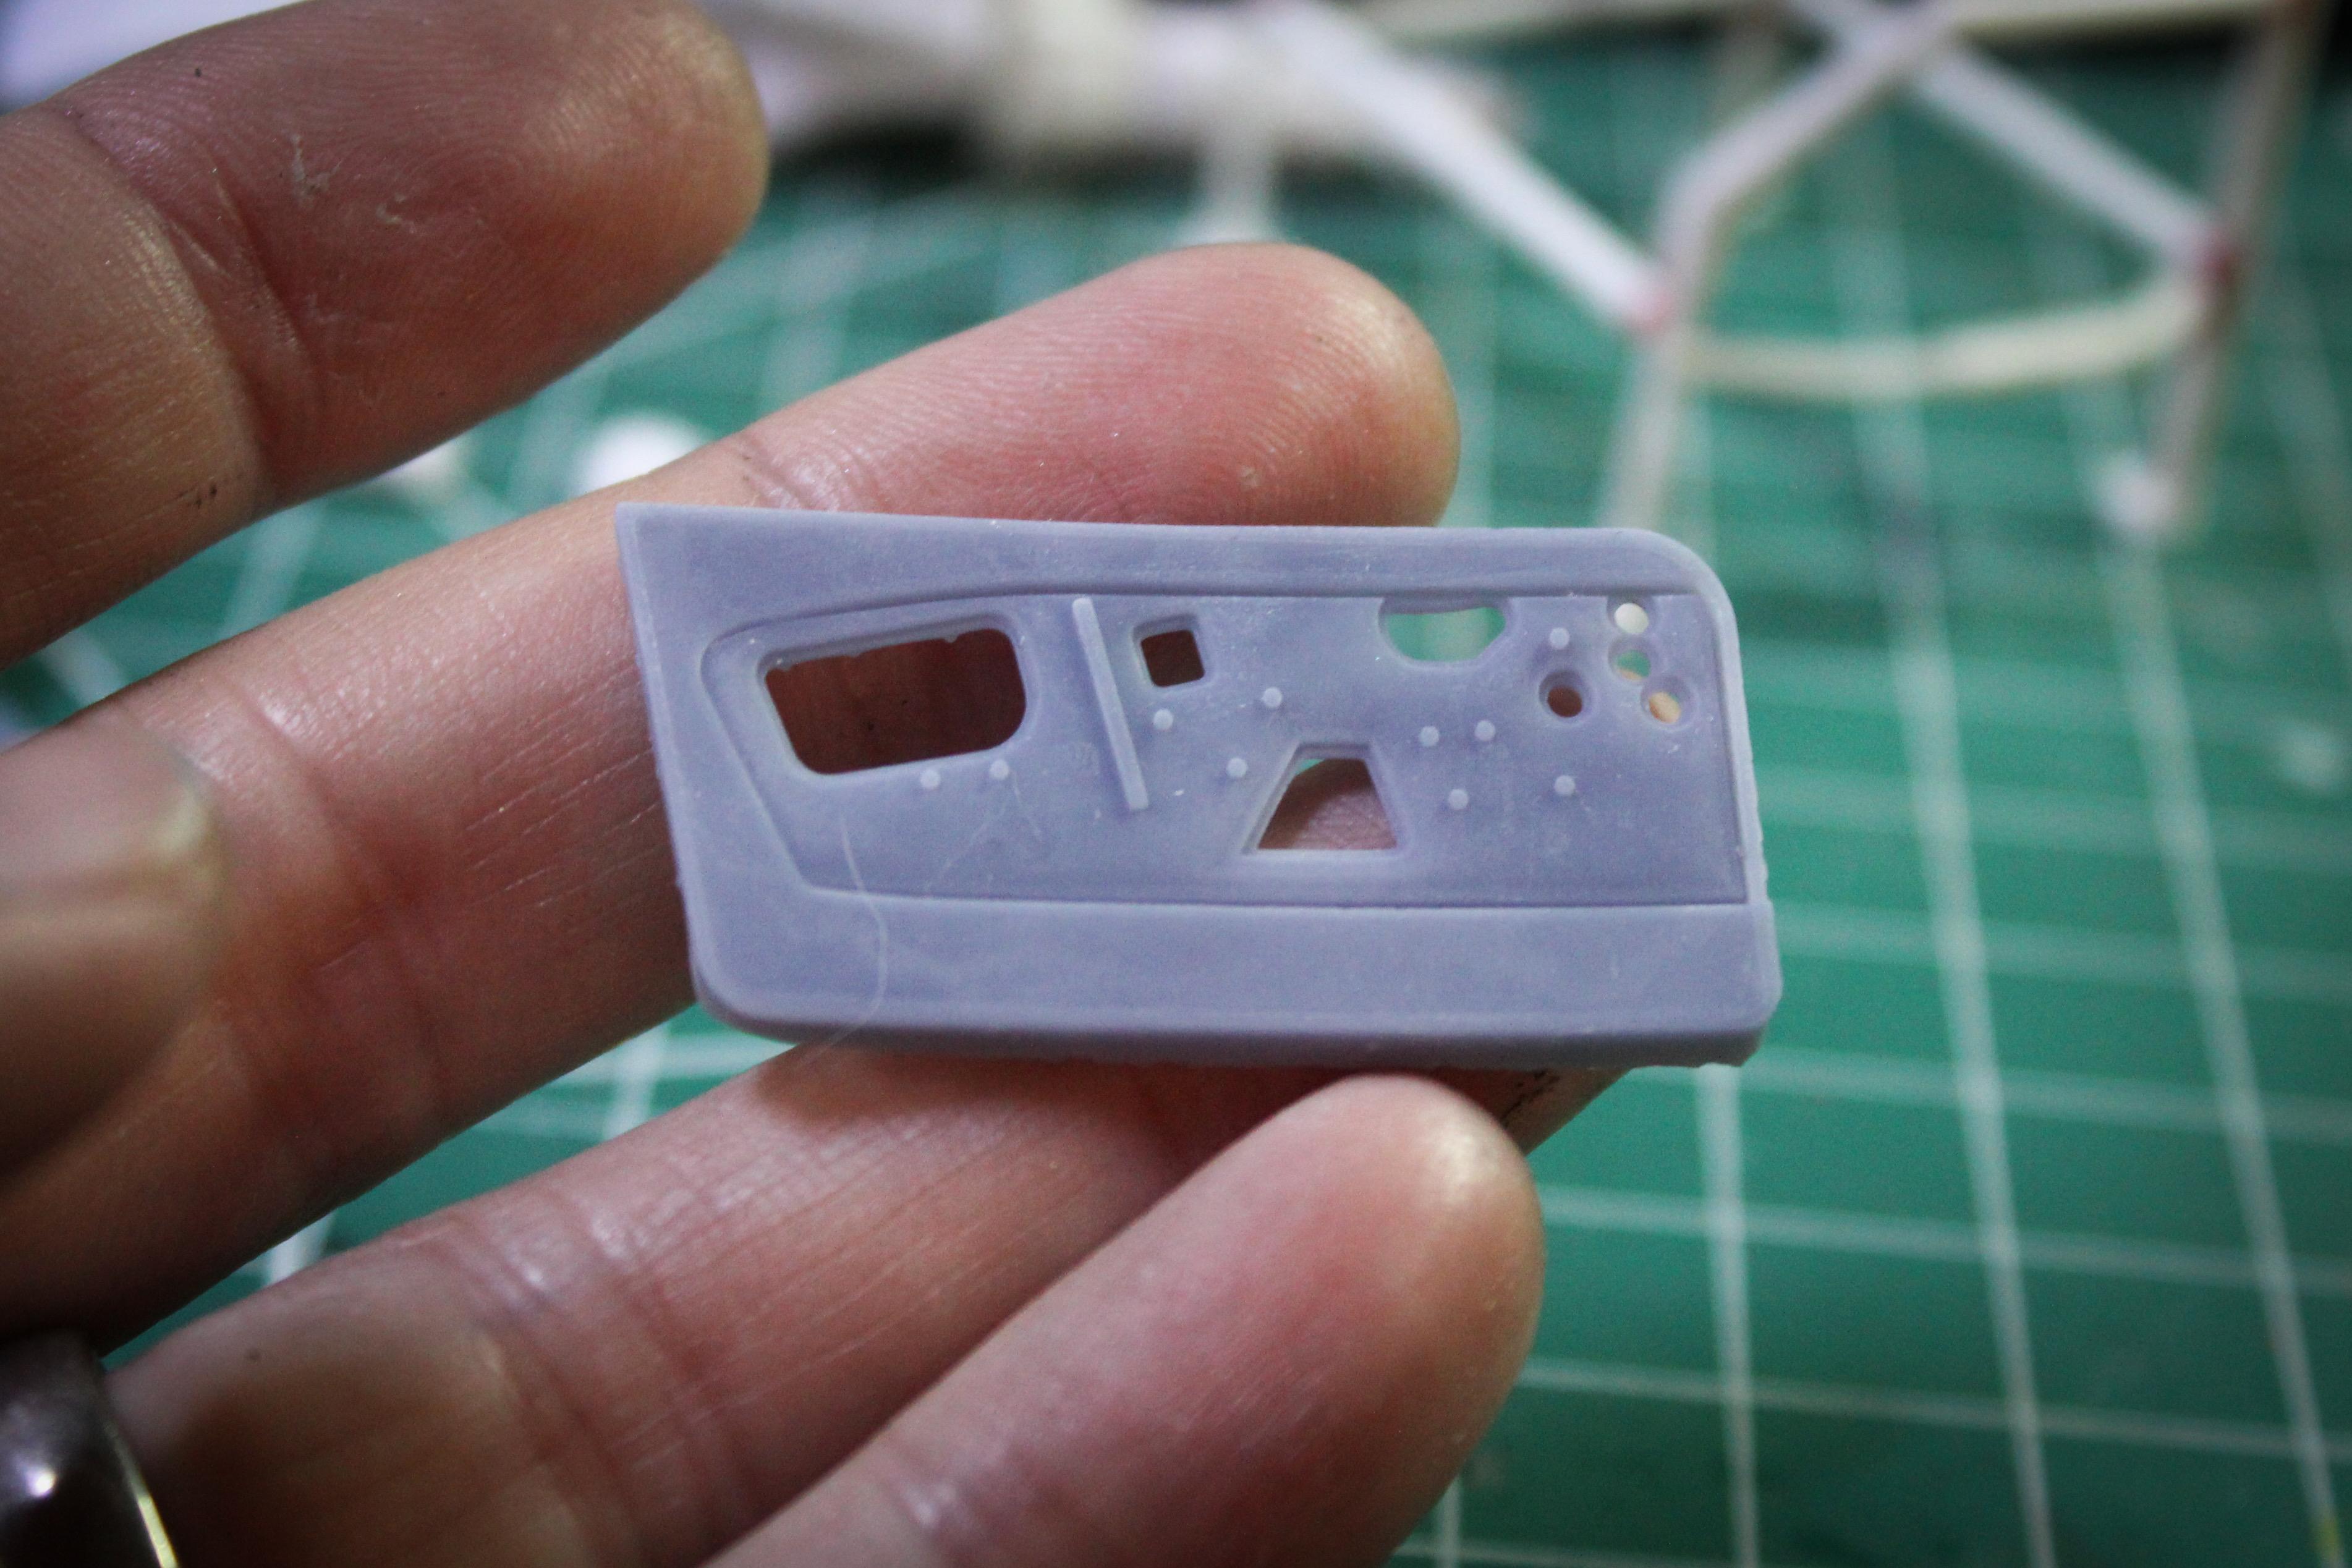
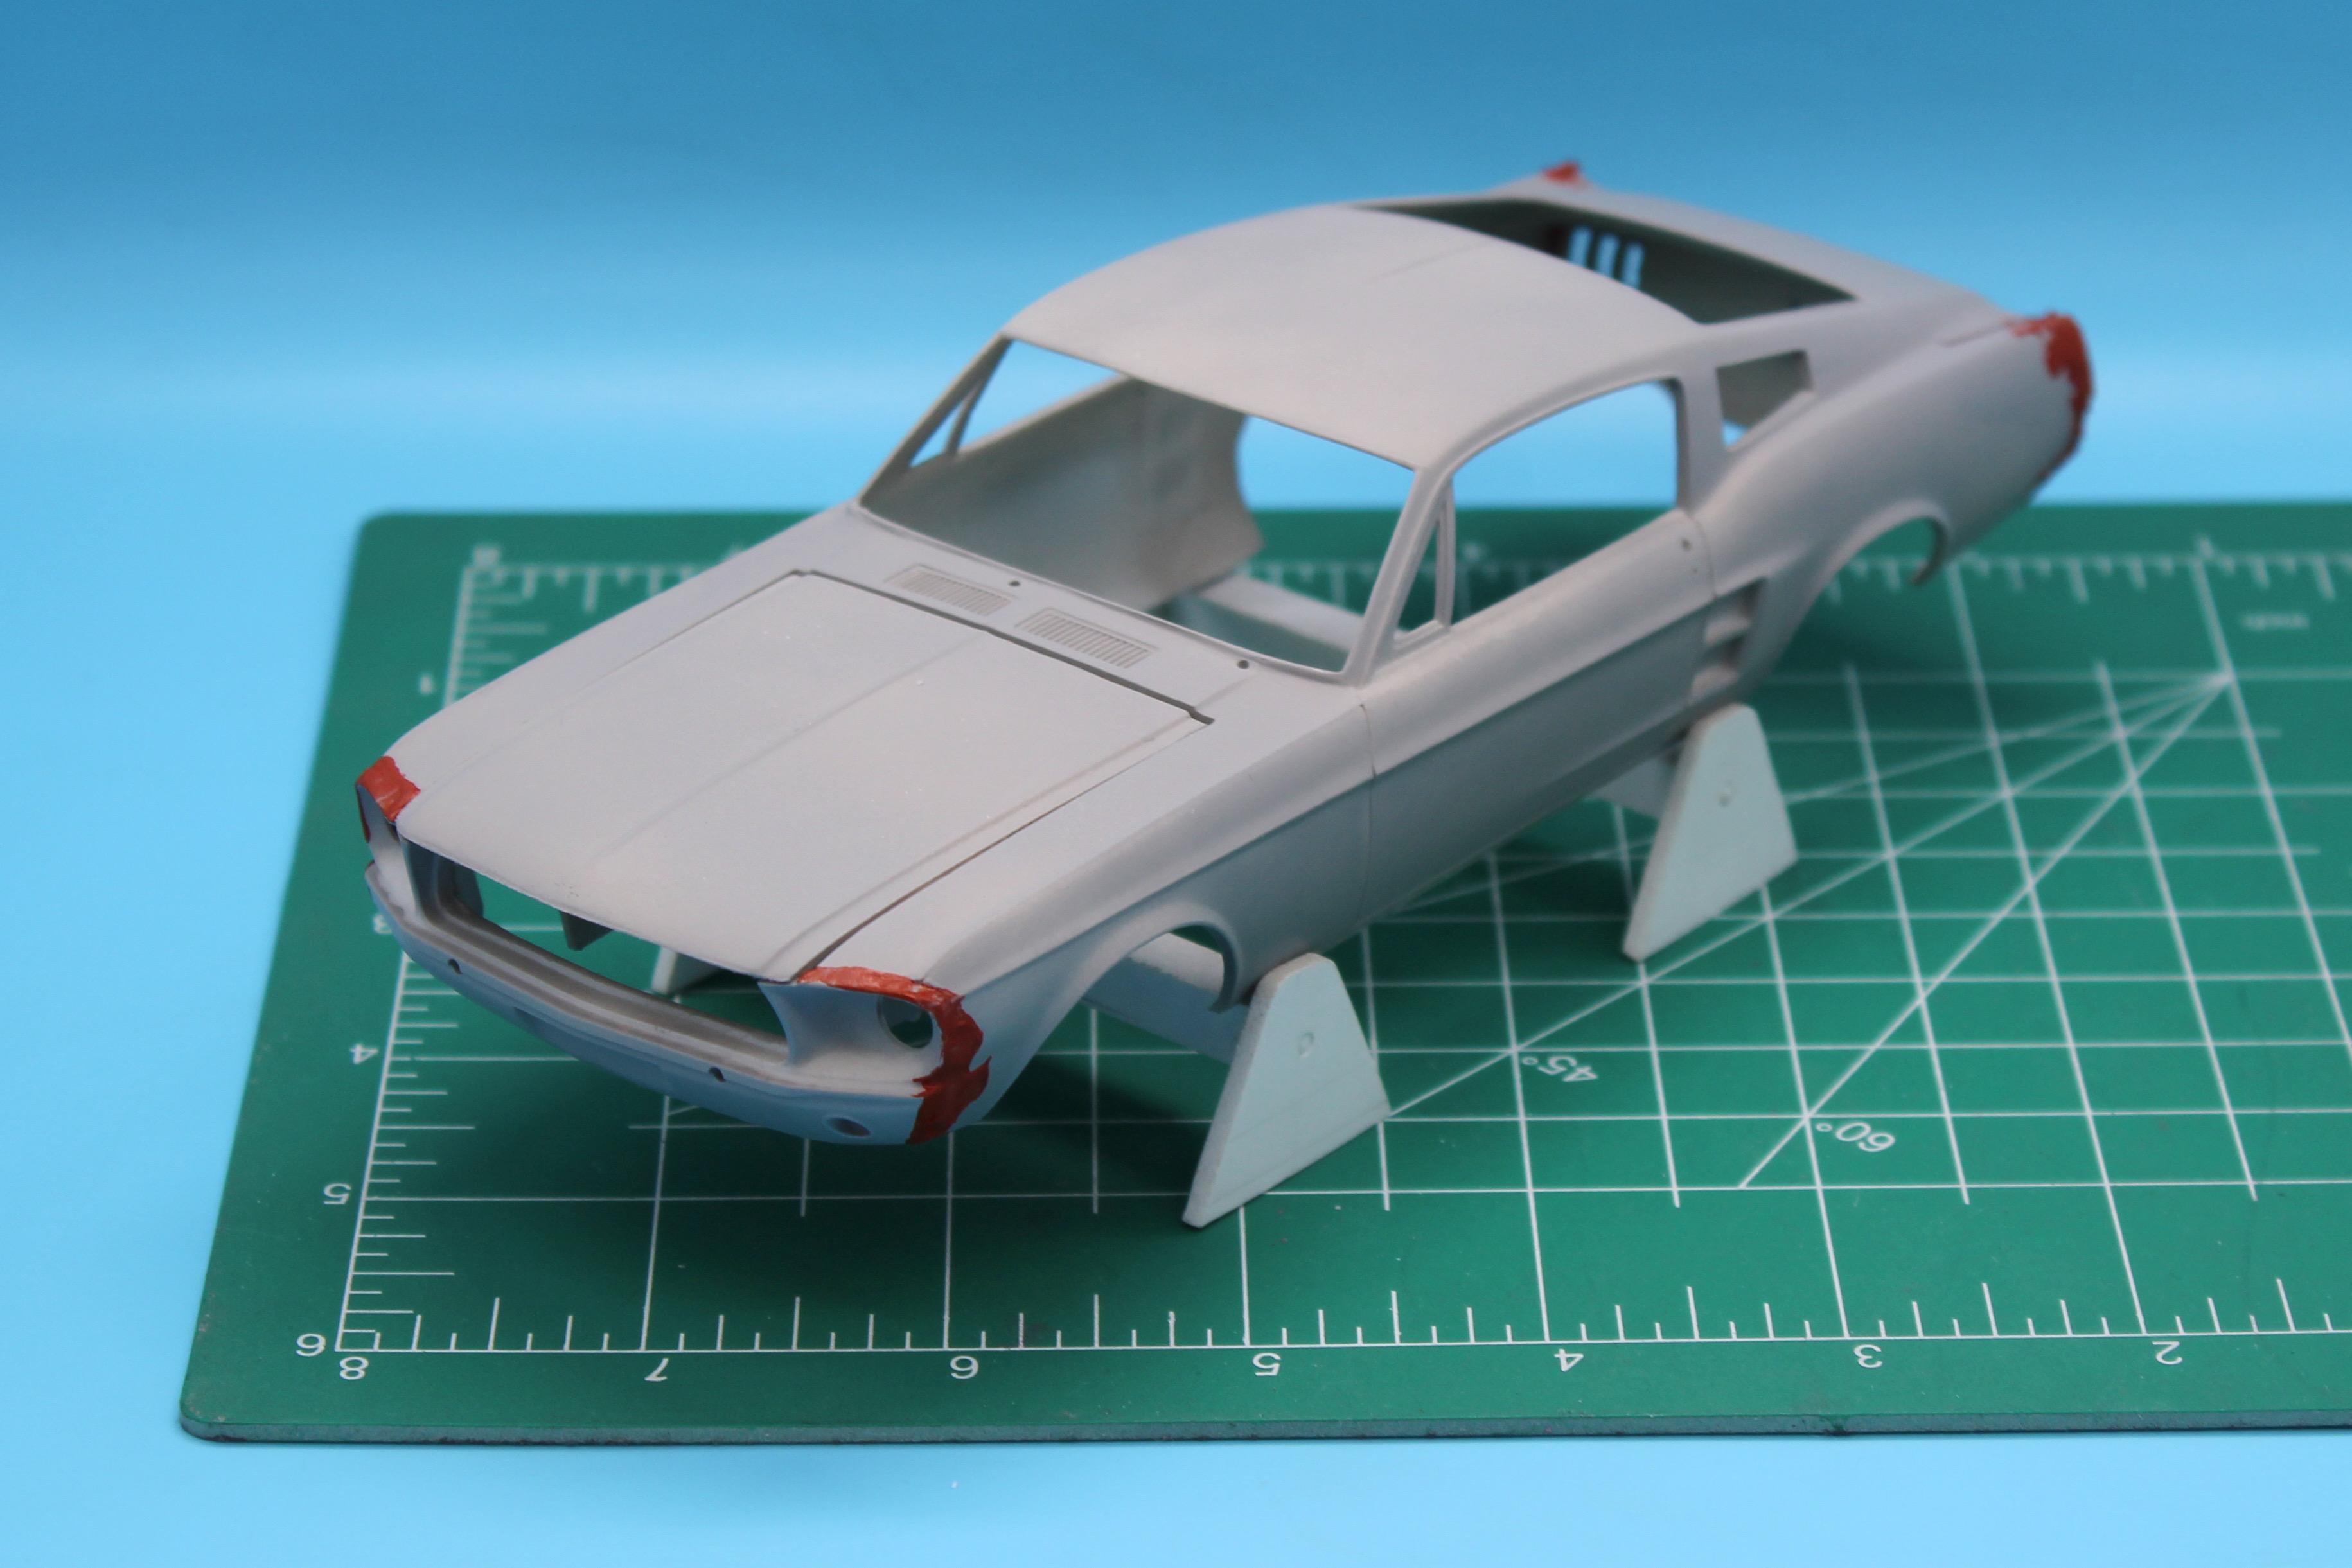
Saturday bench-day! Some more progress… With the body in primer, time to add some little scuffs and flaws to the surface before paint. I’m not intending for this thing to be hanging-by-a-thread ruined; but it’ll have some flaws: This stuff won’t be super noticeable under the finished paintjob, but just a few imperfections to stop it looking TOO perfect: Then I did future-me a solid and painted the inside of the body black now rather than after I’ve done 15 layers of paint that I’m scared to mask over: When I get further into the exterior paint, I’ll be buffing and chipping back through the layers to expose the finish underneath, so the next step is laying down some bare steel: Not a great natural-metal finish on it’s own, but 99.8% of this will be covered in paint anyway when we’re done… While that dries overnight, I modeled and printed some Mustang inner door metal to emulate the look of a stripped-down race car interior without the door cards in place: And tomorrow, I get to play with rust, chipping medium and the first color of the ACTUAL paint job! Thanks for looking…more soon, soon as I’ve done more!
-
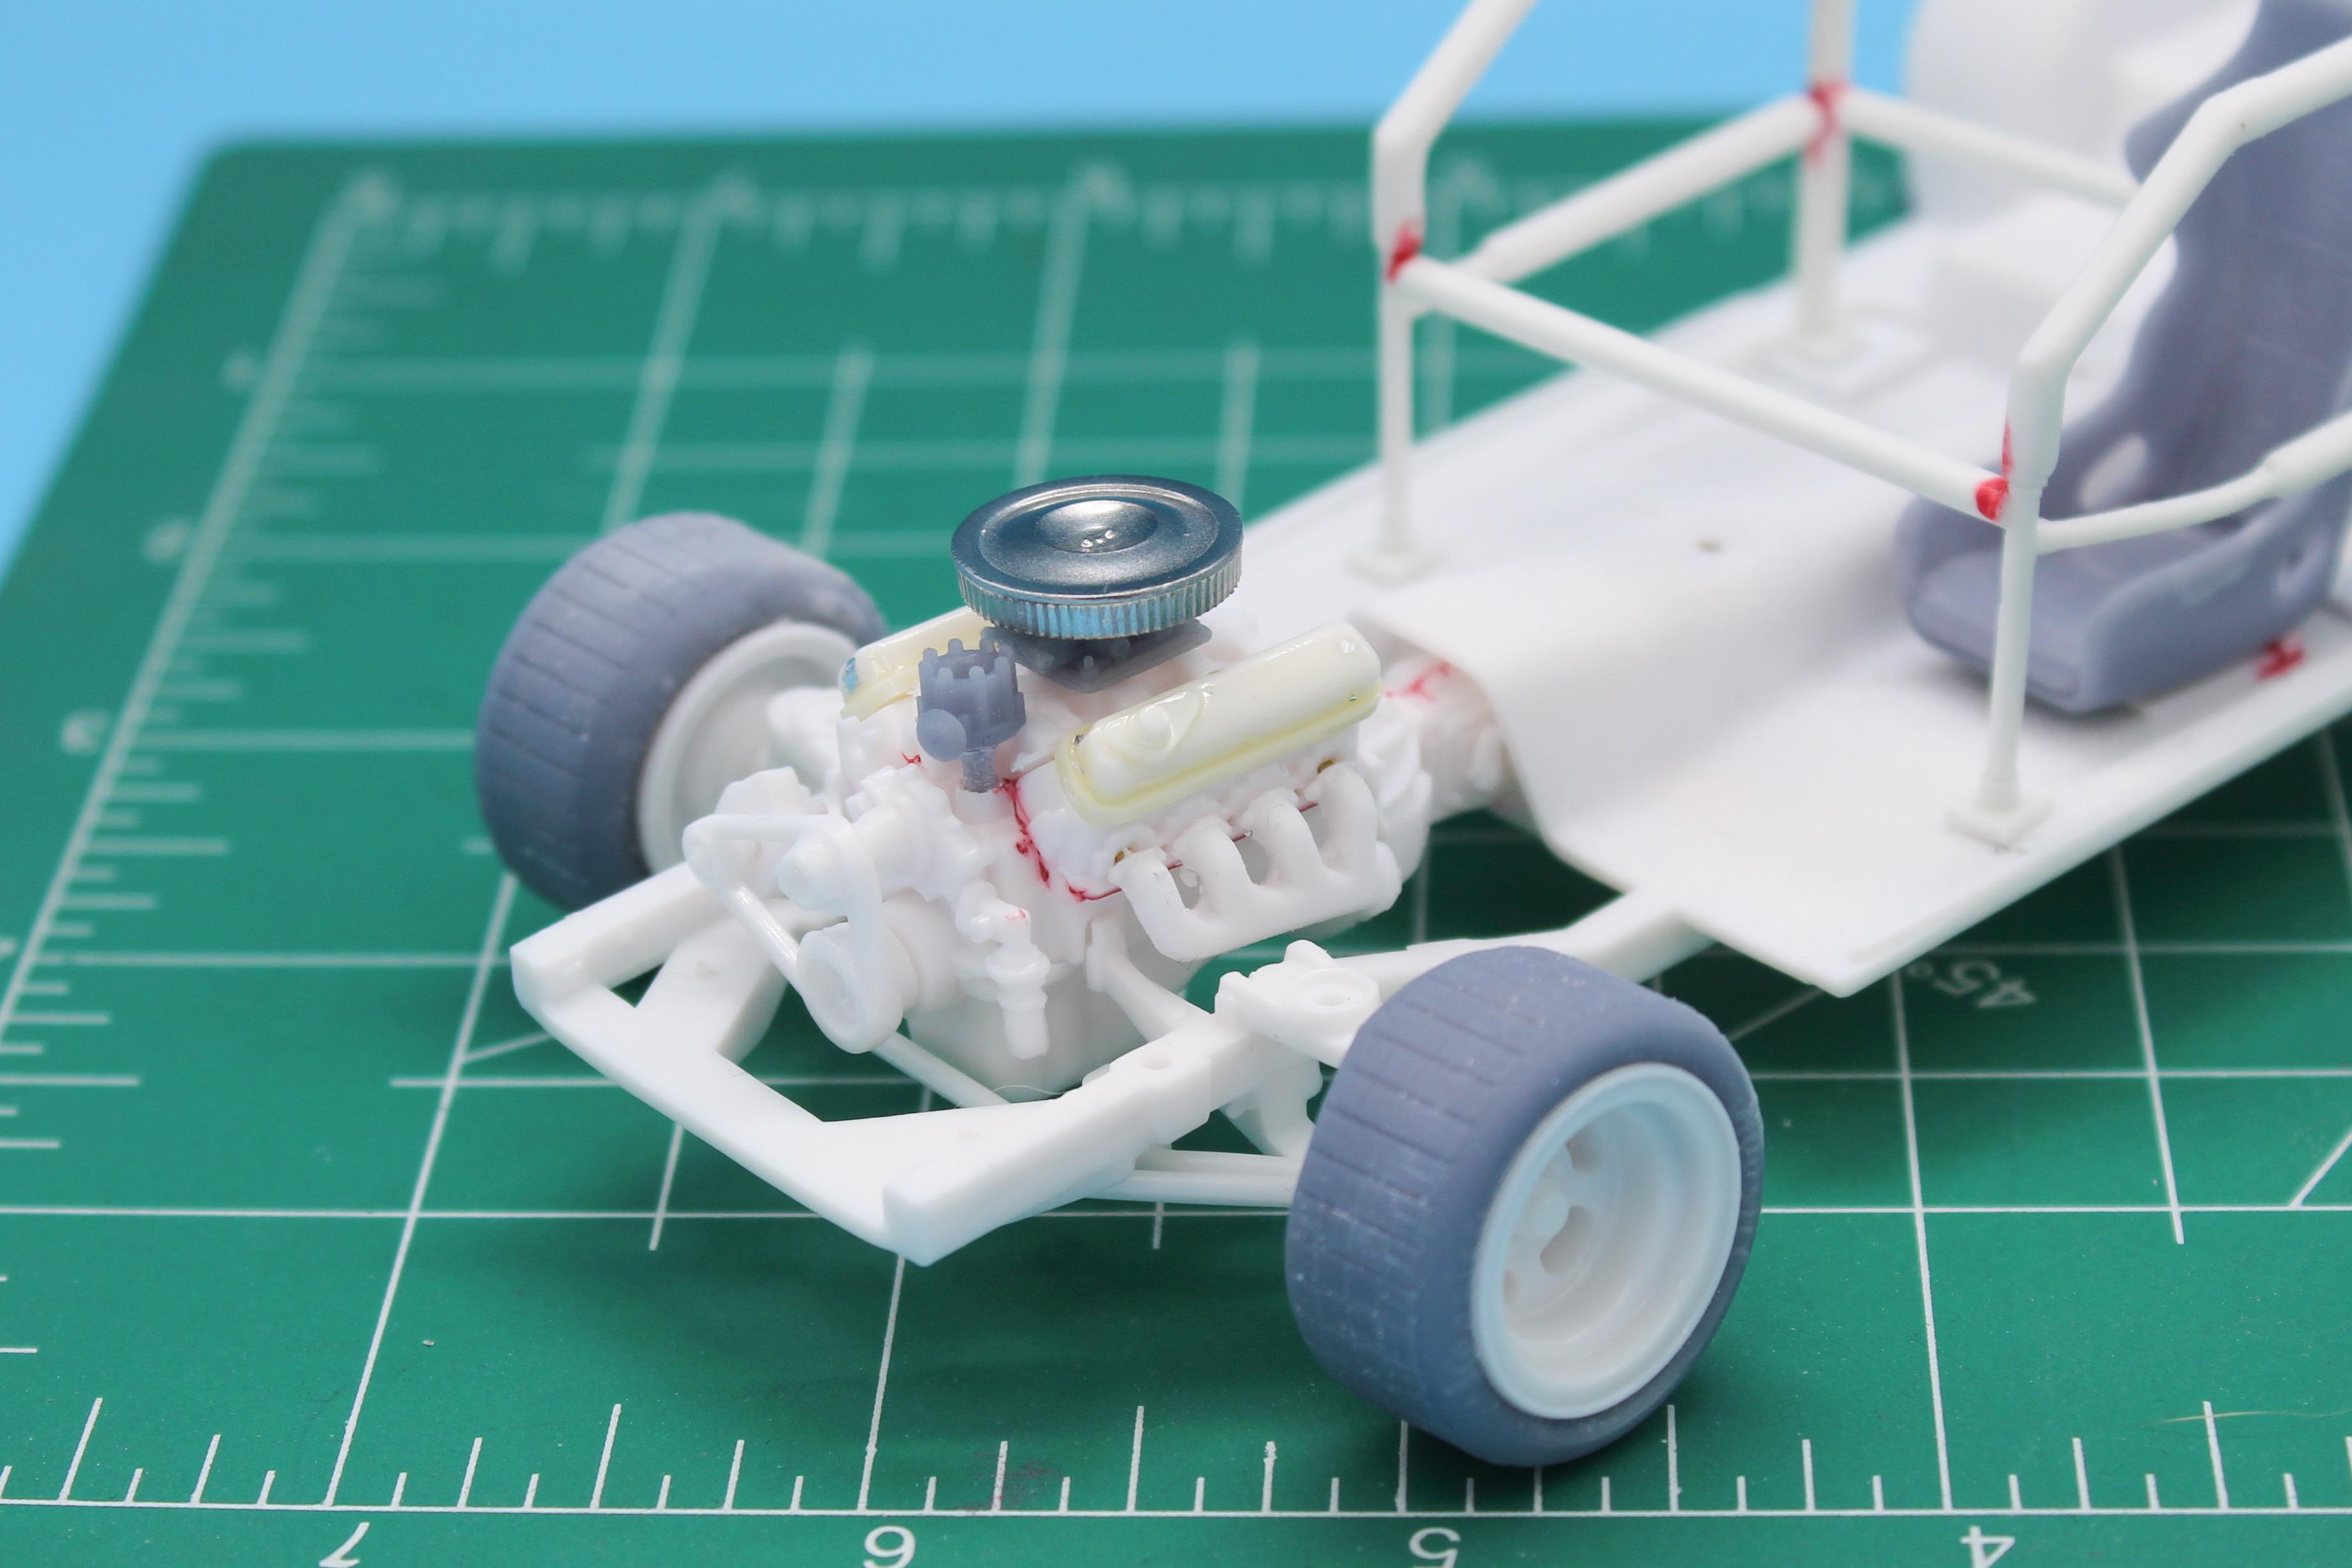
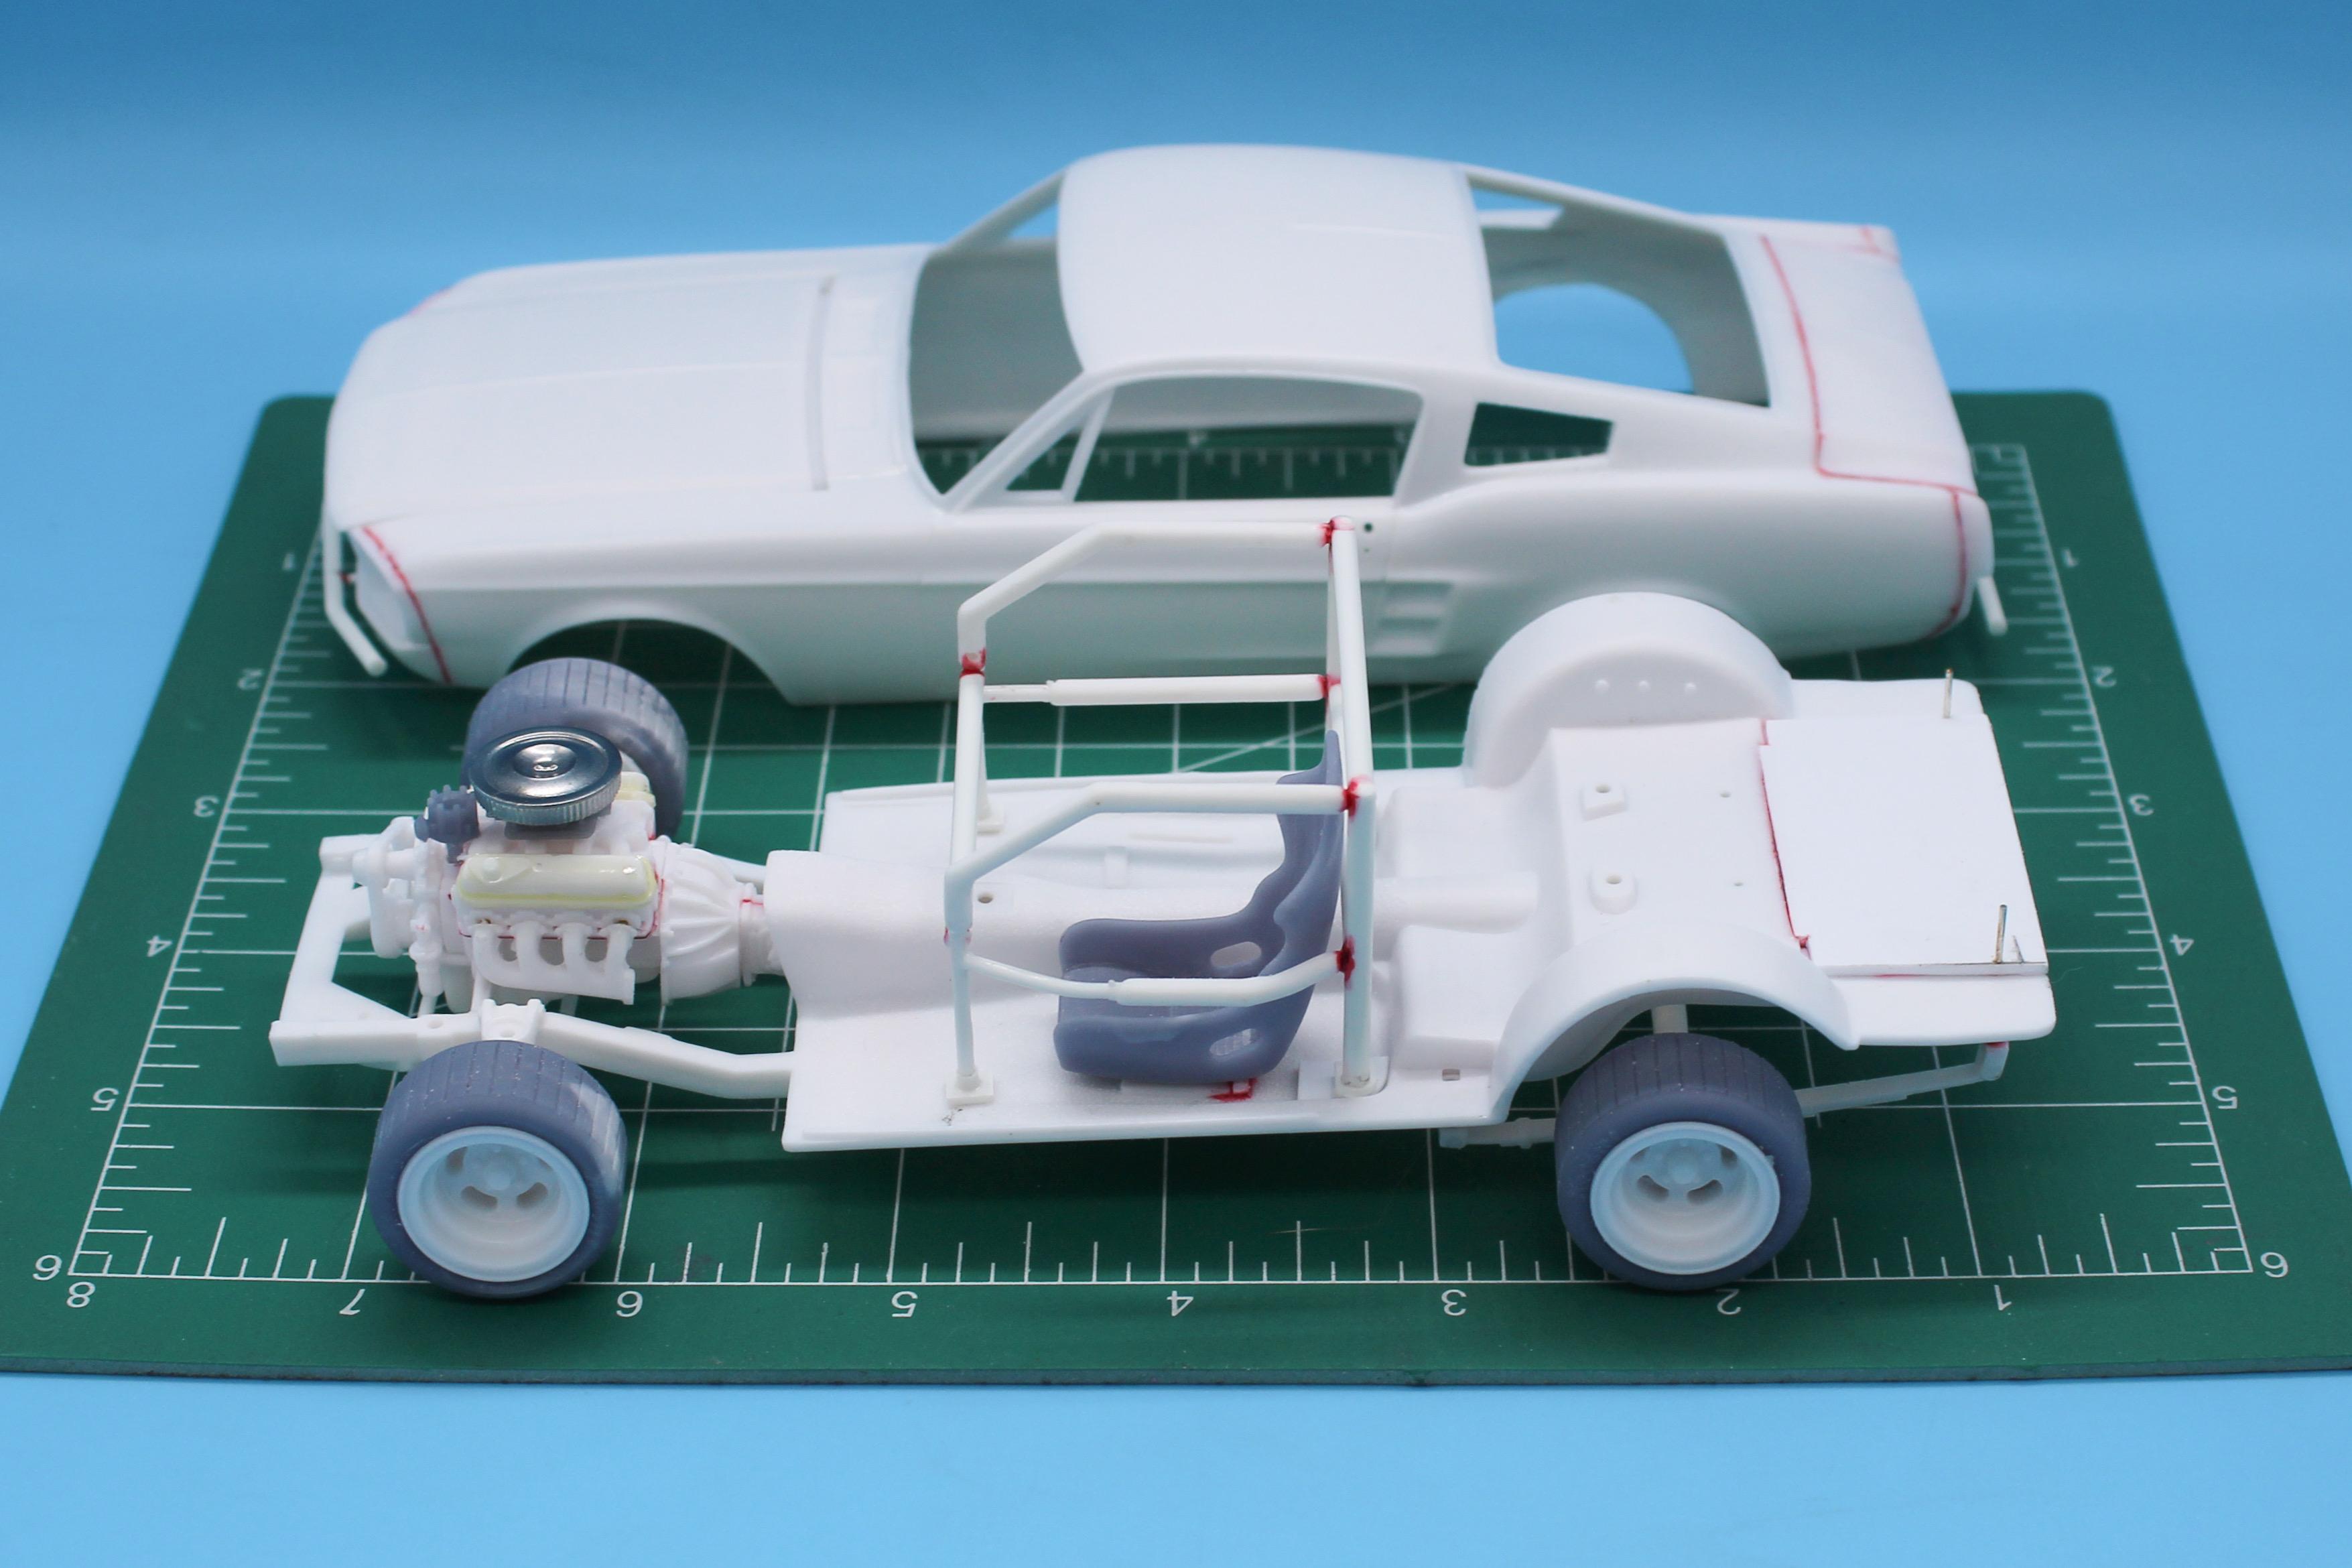
Thanks fellas! A little more work on this the last few days… Got the engine mocked-up. Per the rules of the class I’m building it for, engine will be stock aside from whatever our racer can get past the tech guy: Rules call for a roll cage, so I did what I’d do in real life and found one that isn’t quite right for the car, but good enough for the car it’s going in 😂 One of the bigger elements to this project will be redoing the stock interior with something more stripped-out looking, but in the meantime printed a Recaro race seat and got that installed too The paint on this one is going to be a little involved, so I’m getting the body prepped and ready nice and early…removed the wipers (no windshield, don’t need them), door handles (doors are welded inside for strength so they don’t open) and any other ‘street car’ stuff and got it into primer, then laid down a little Bondo tonight just to help me fix a few little seams that shouldn’t be there: Now, I’m going to be beating up on this body a LITTLE, but it’s going to be far from trashed…probably a little TOO straight to be raced, but a long way from perfect too…the paint will be time consuming on this project so I’m getting that part started as soon as I can And a quick mock-up with roll-cage in place to make sure it still fits together… Excited to get to do some weathering and light ‘battle damage’ on this one…more soon - thanks for looking!
-
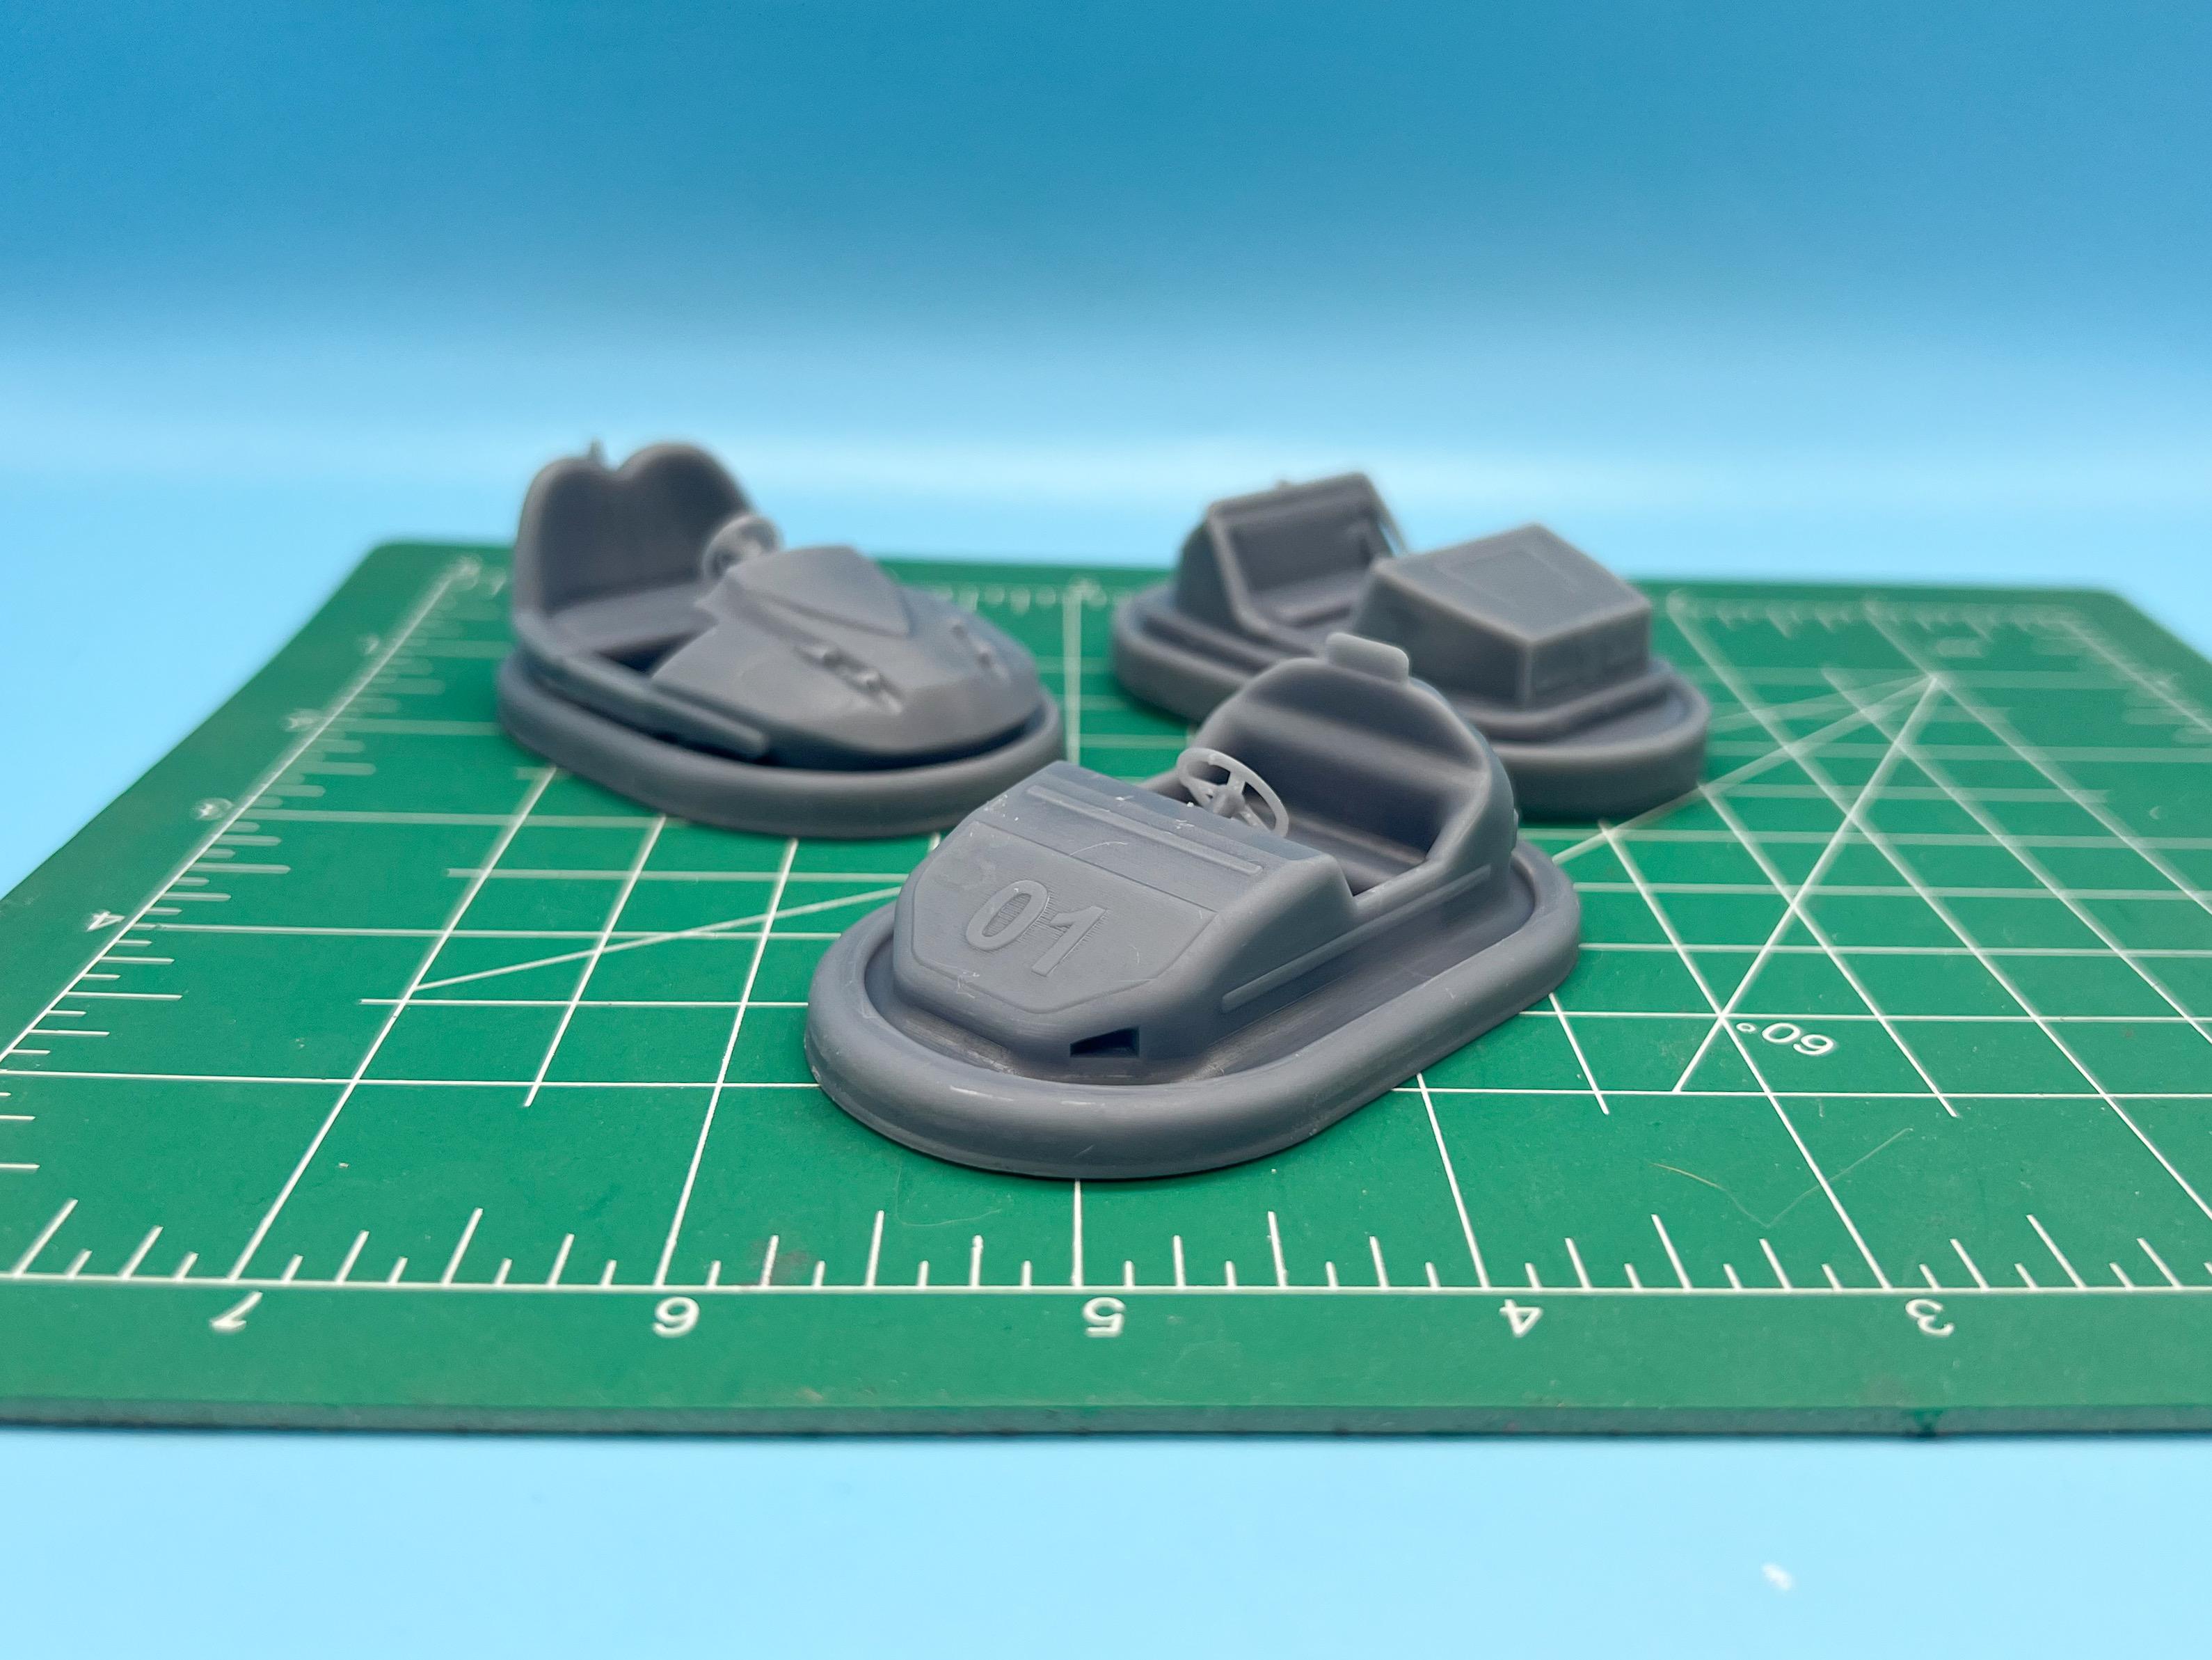
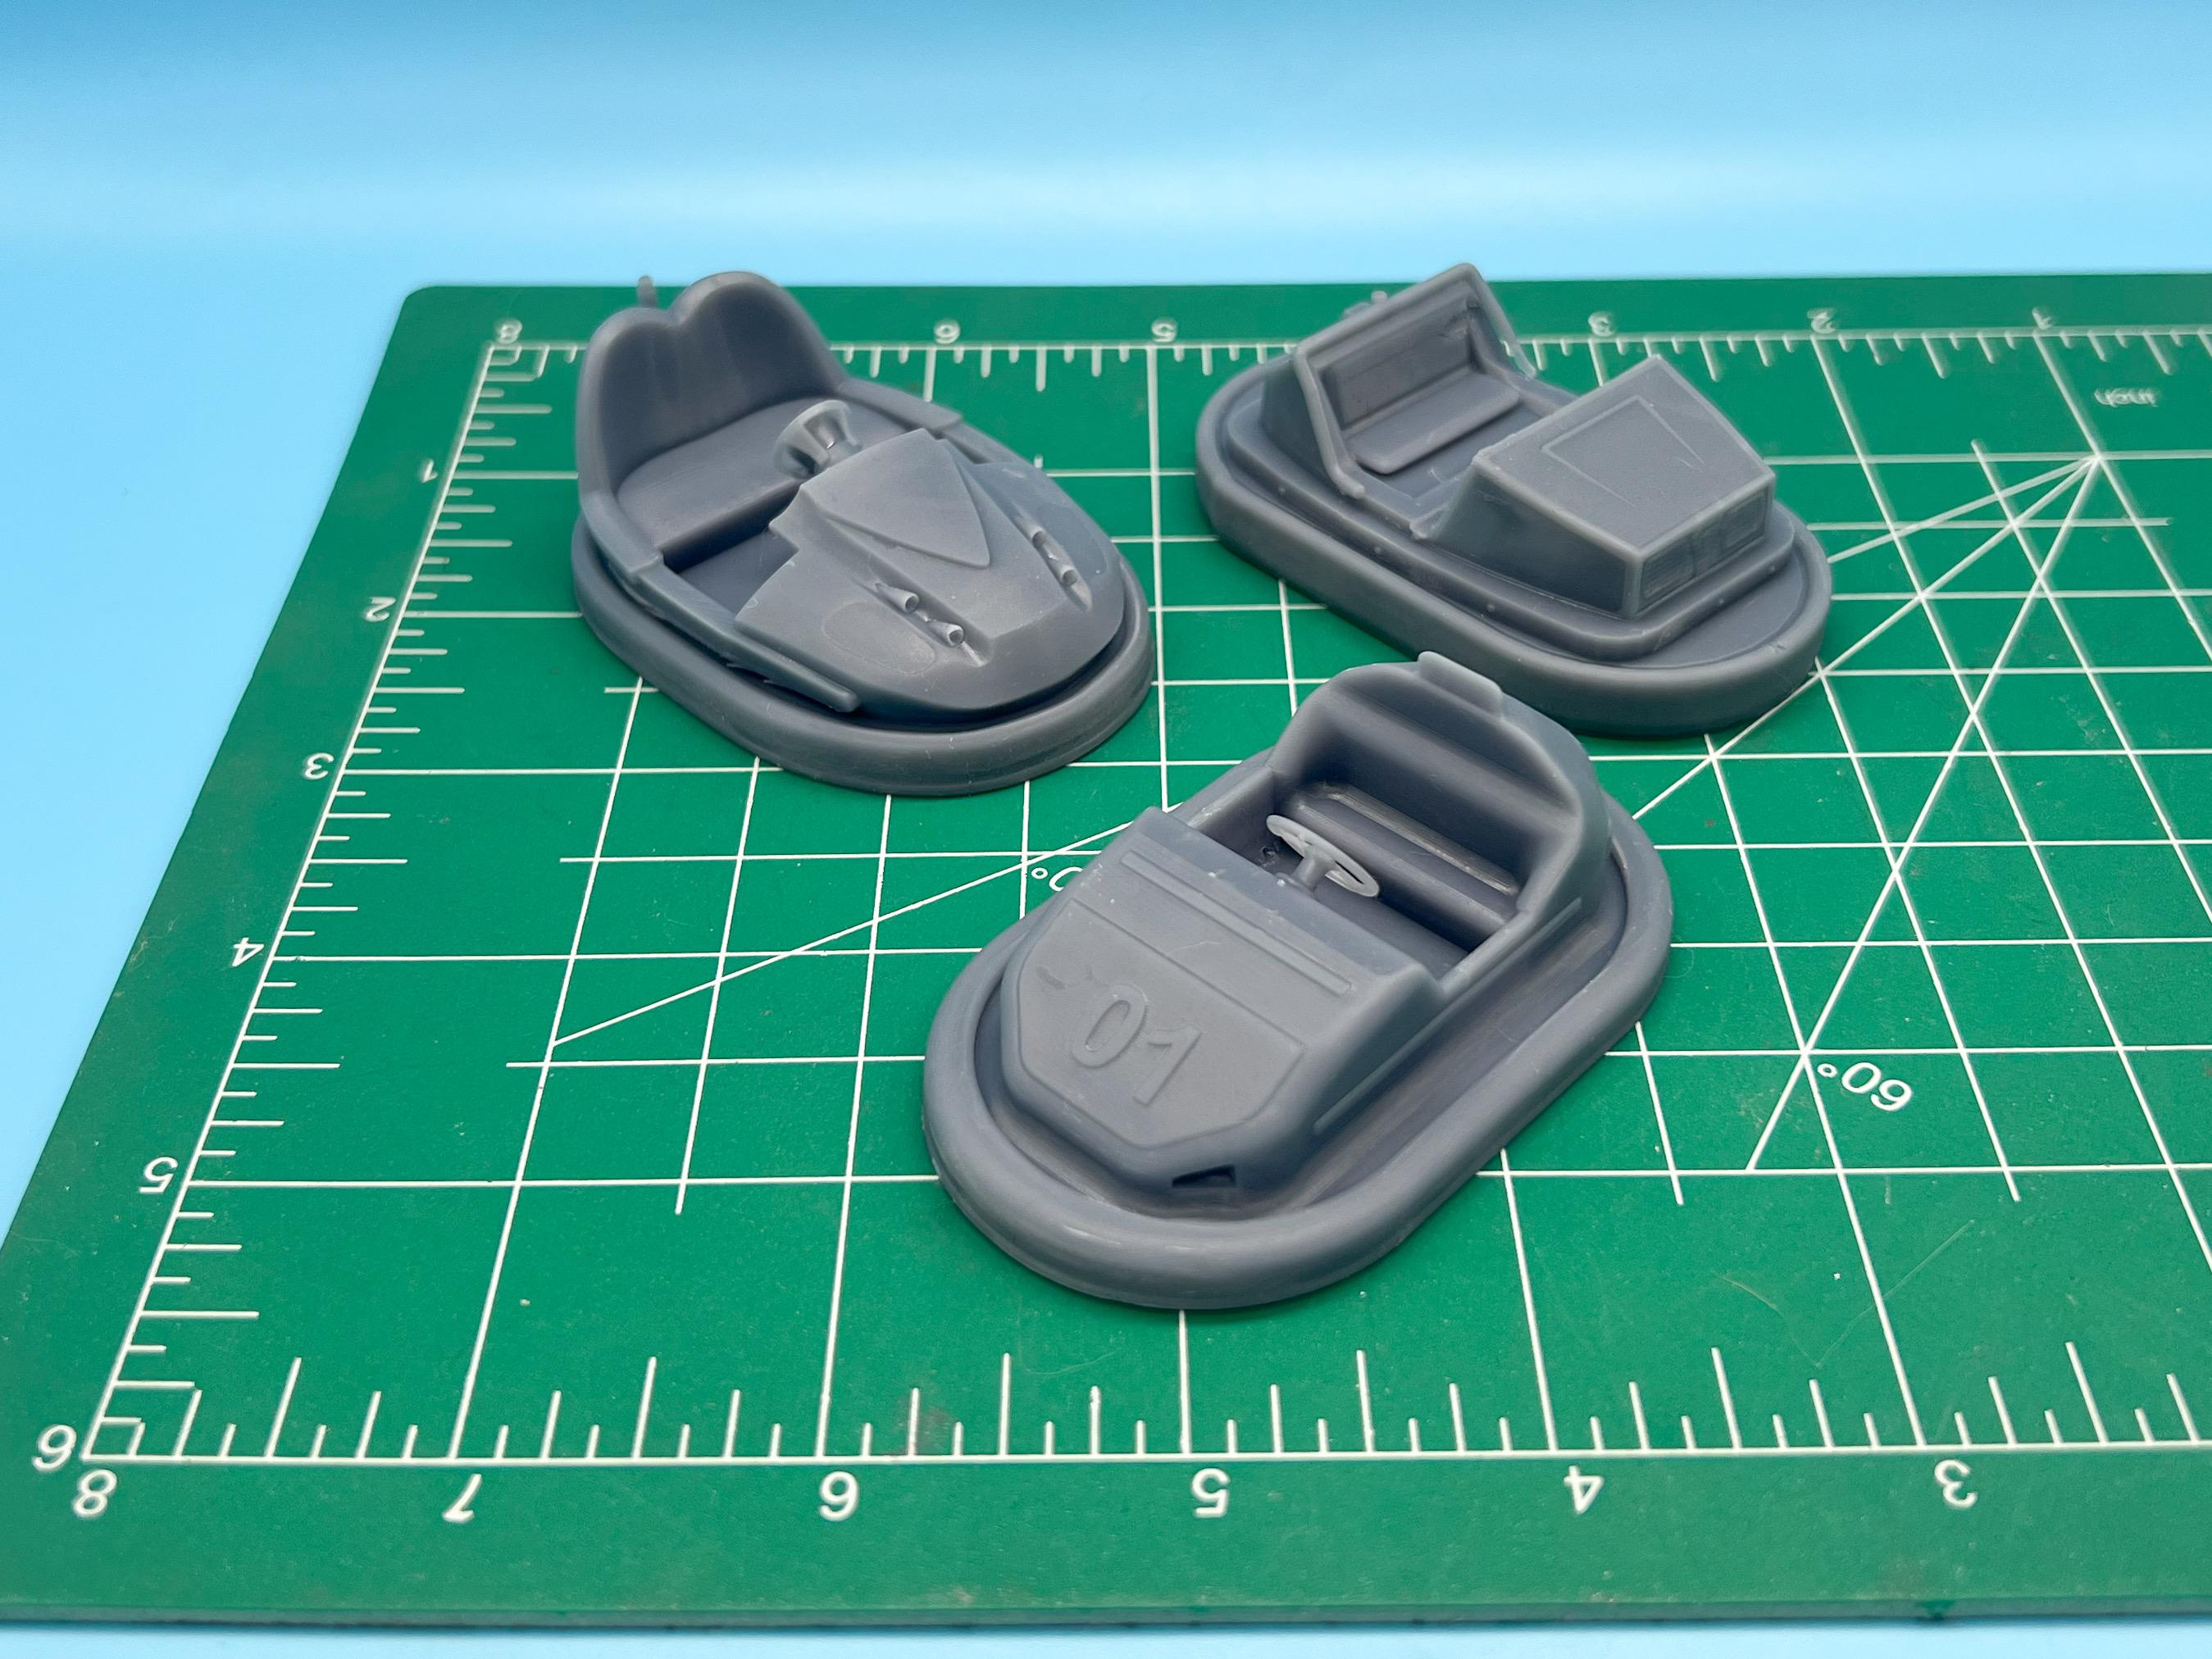
Printed some bumper cars There’s a flaw in the file on the vintage one at the back (which is a pity because that’s my favorite) but I’ll figure something out I’m sure…
-
Same ‘shipper’ at my local store today:
-
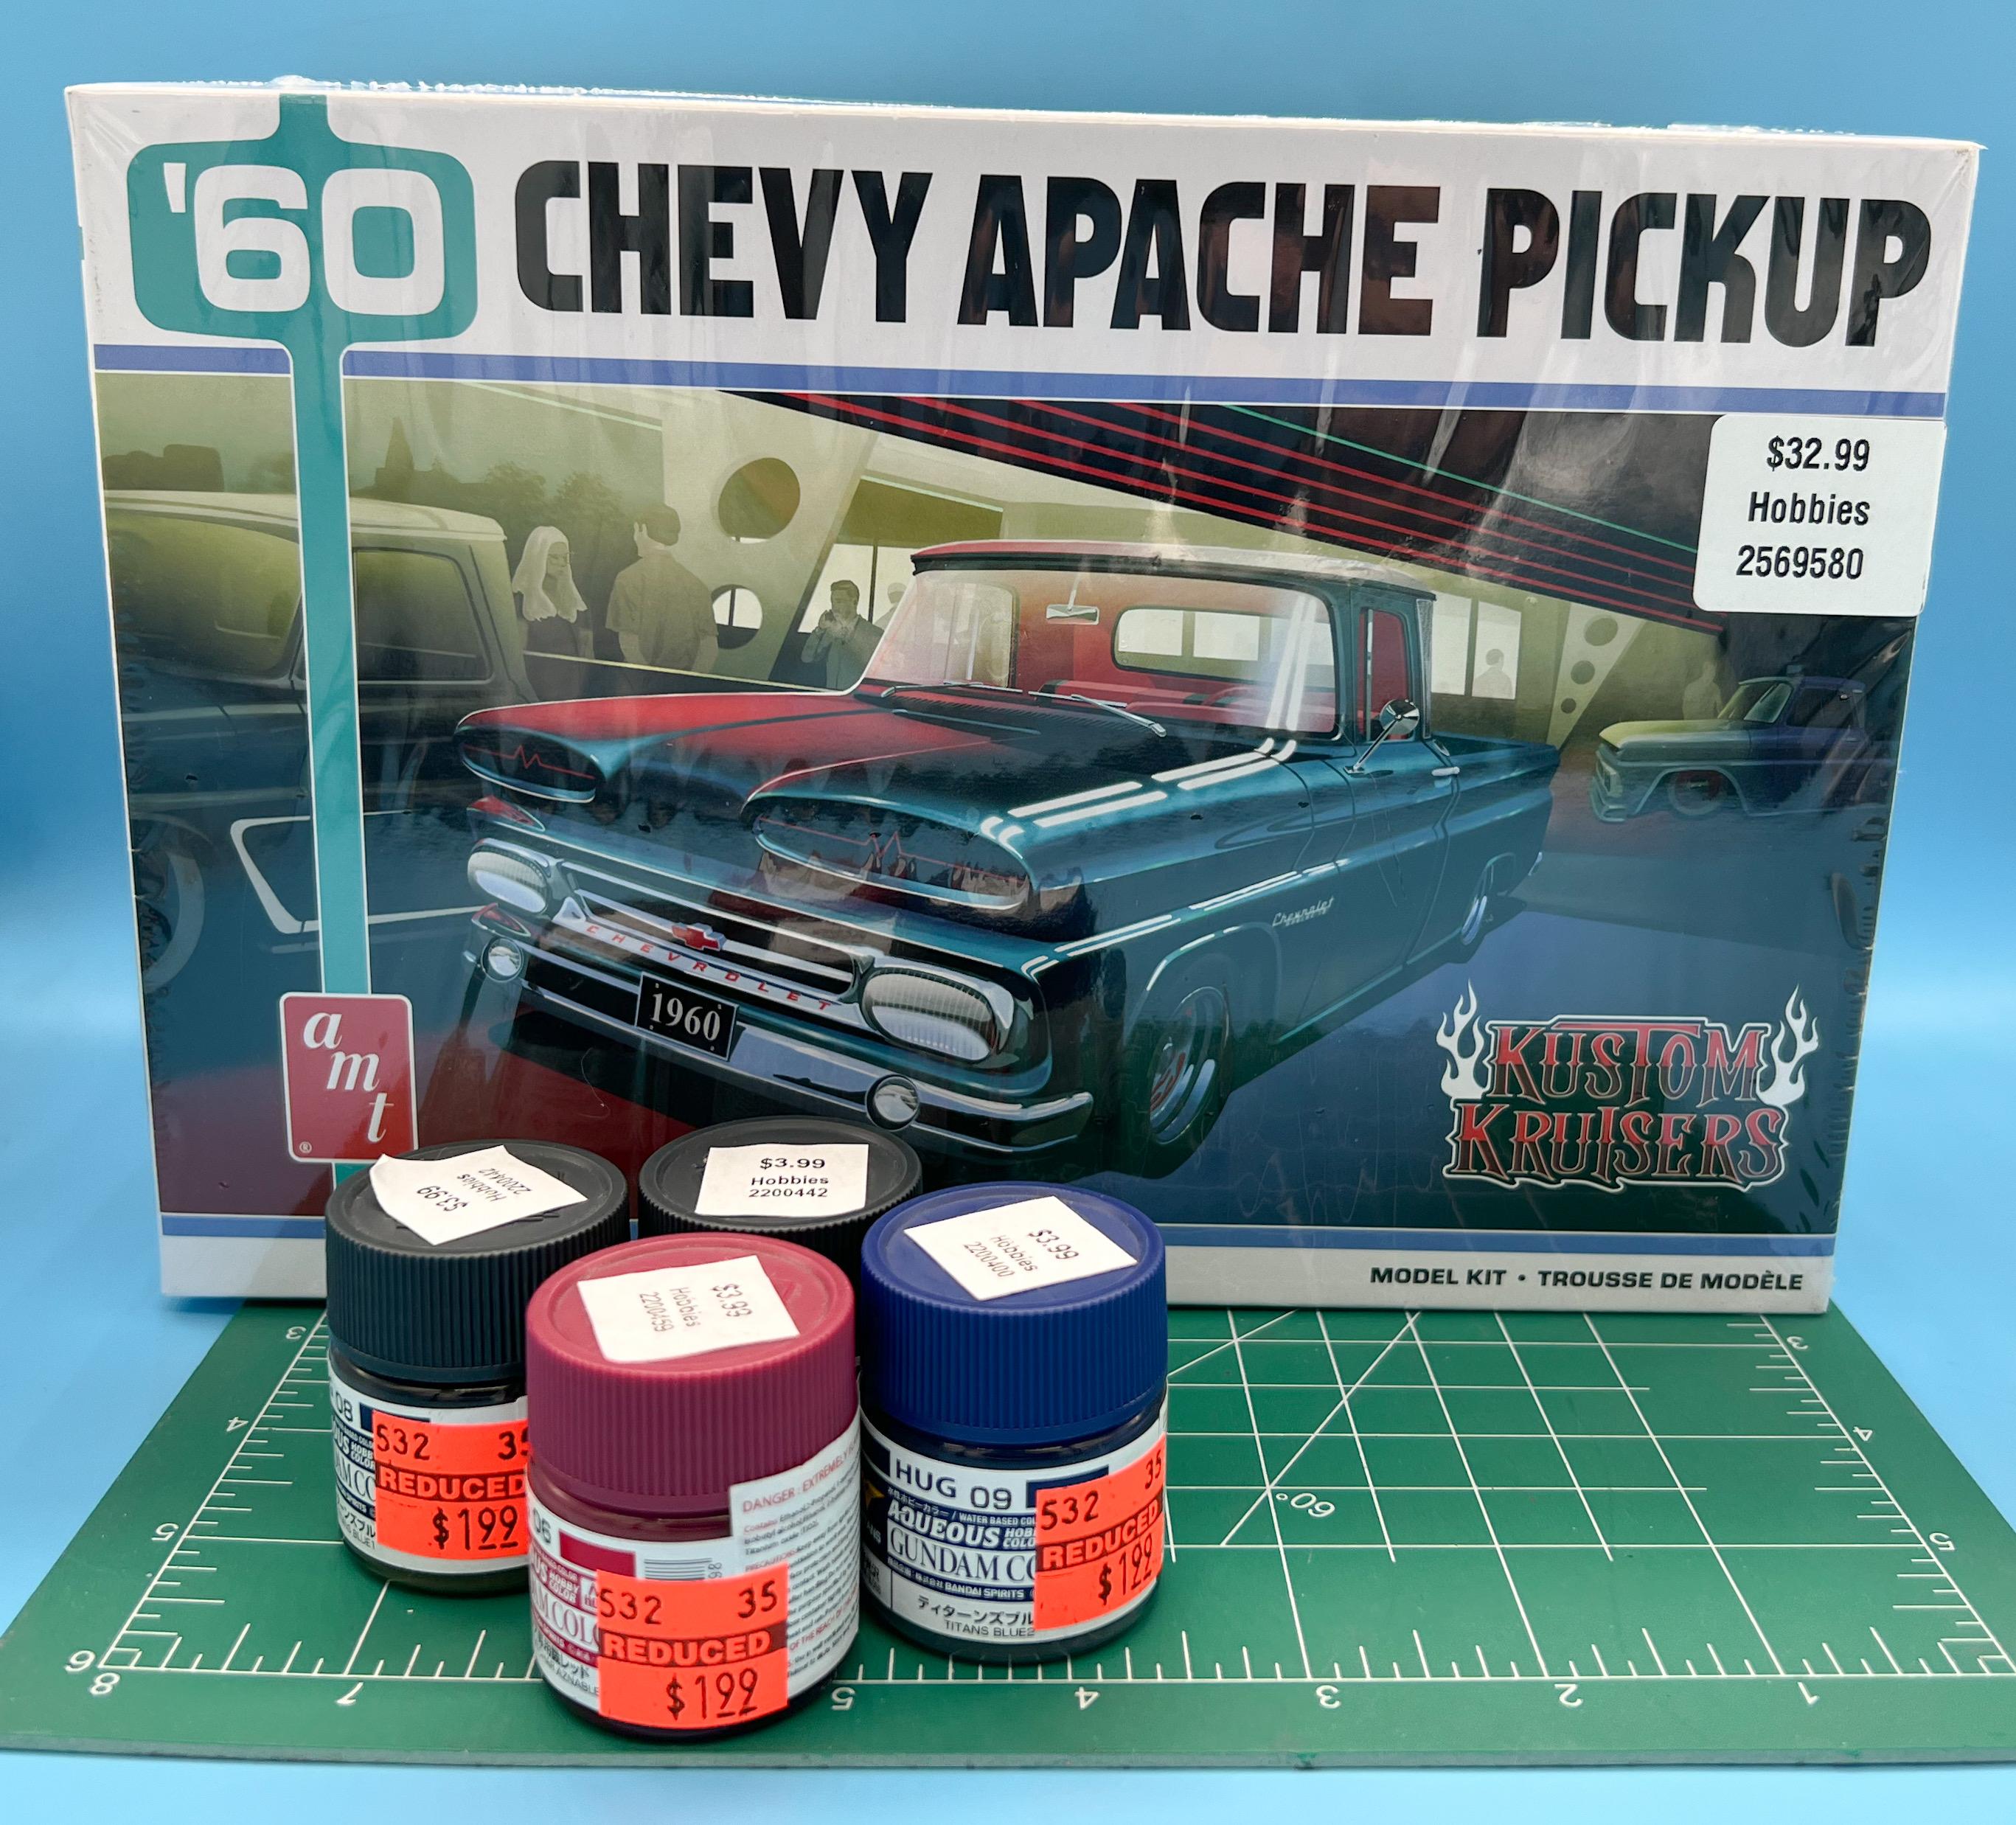
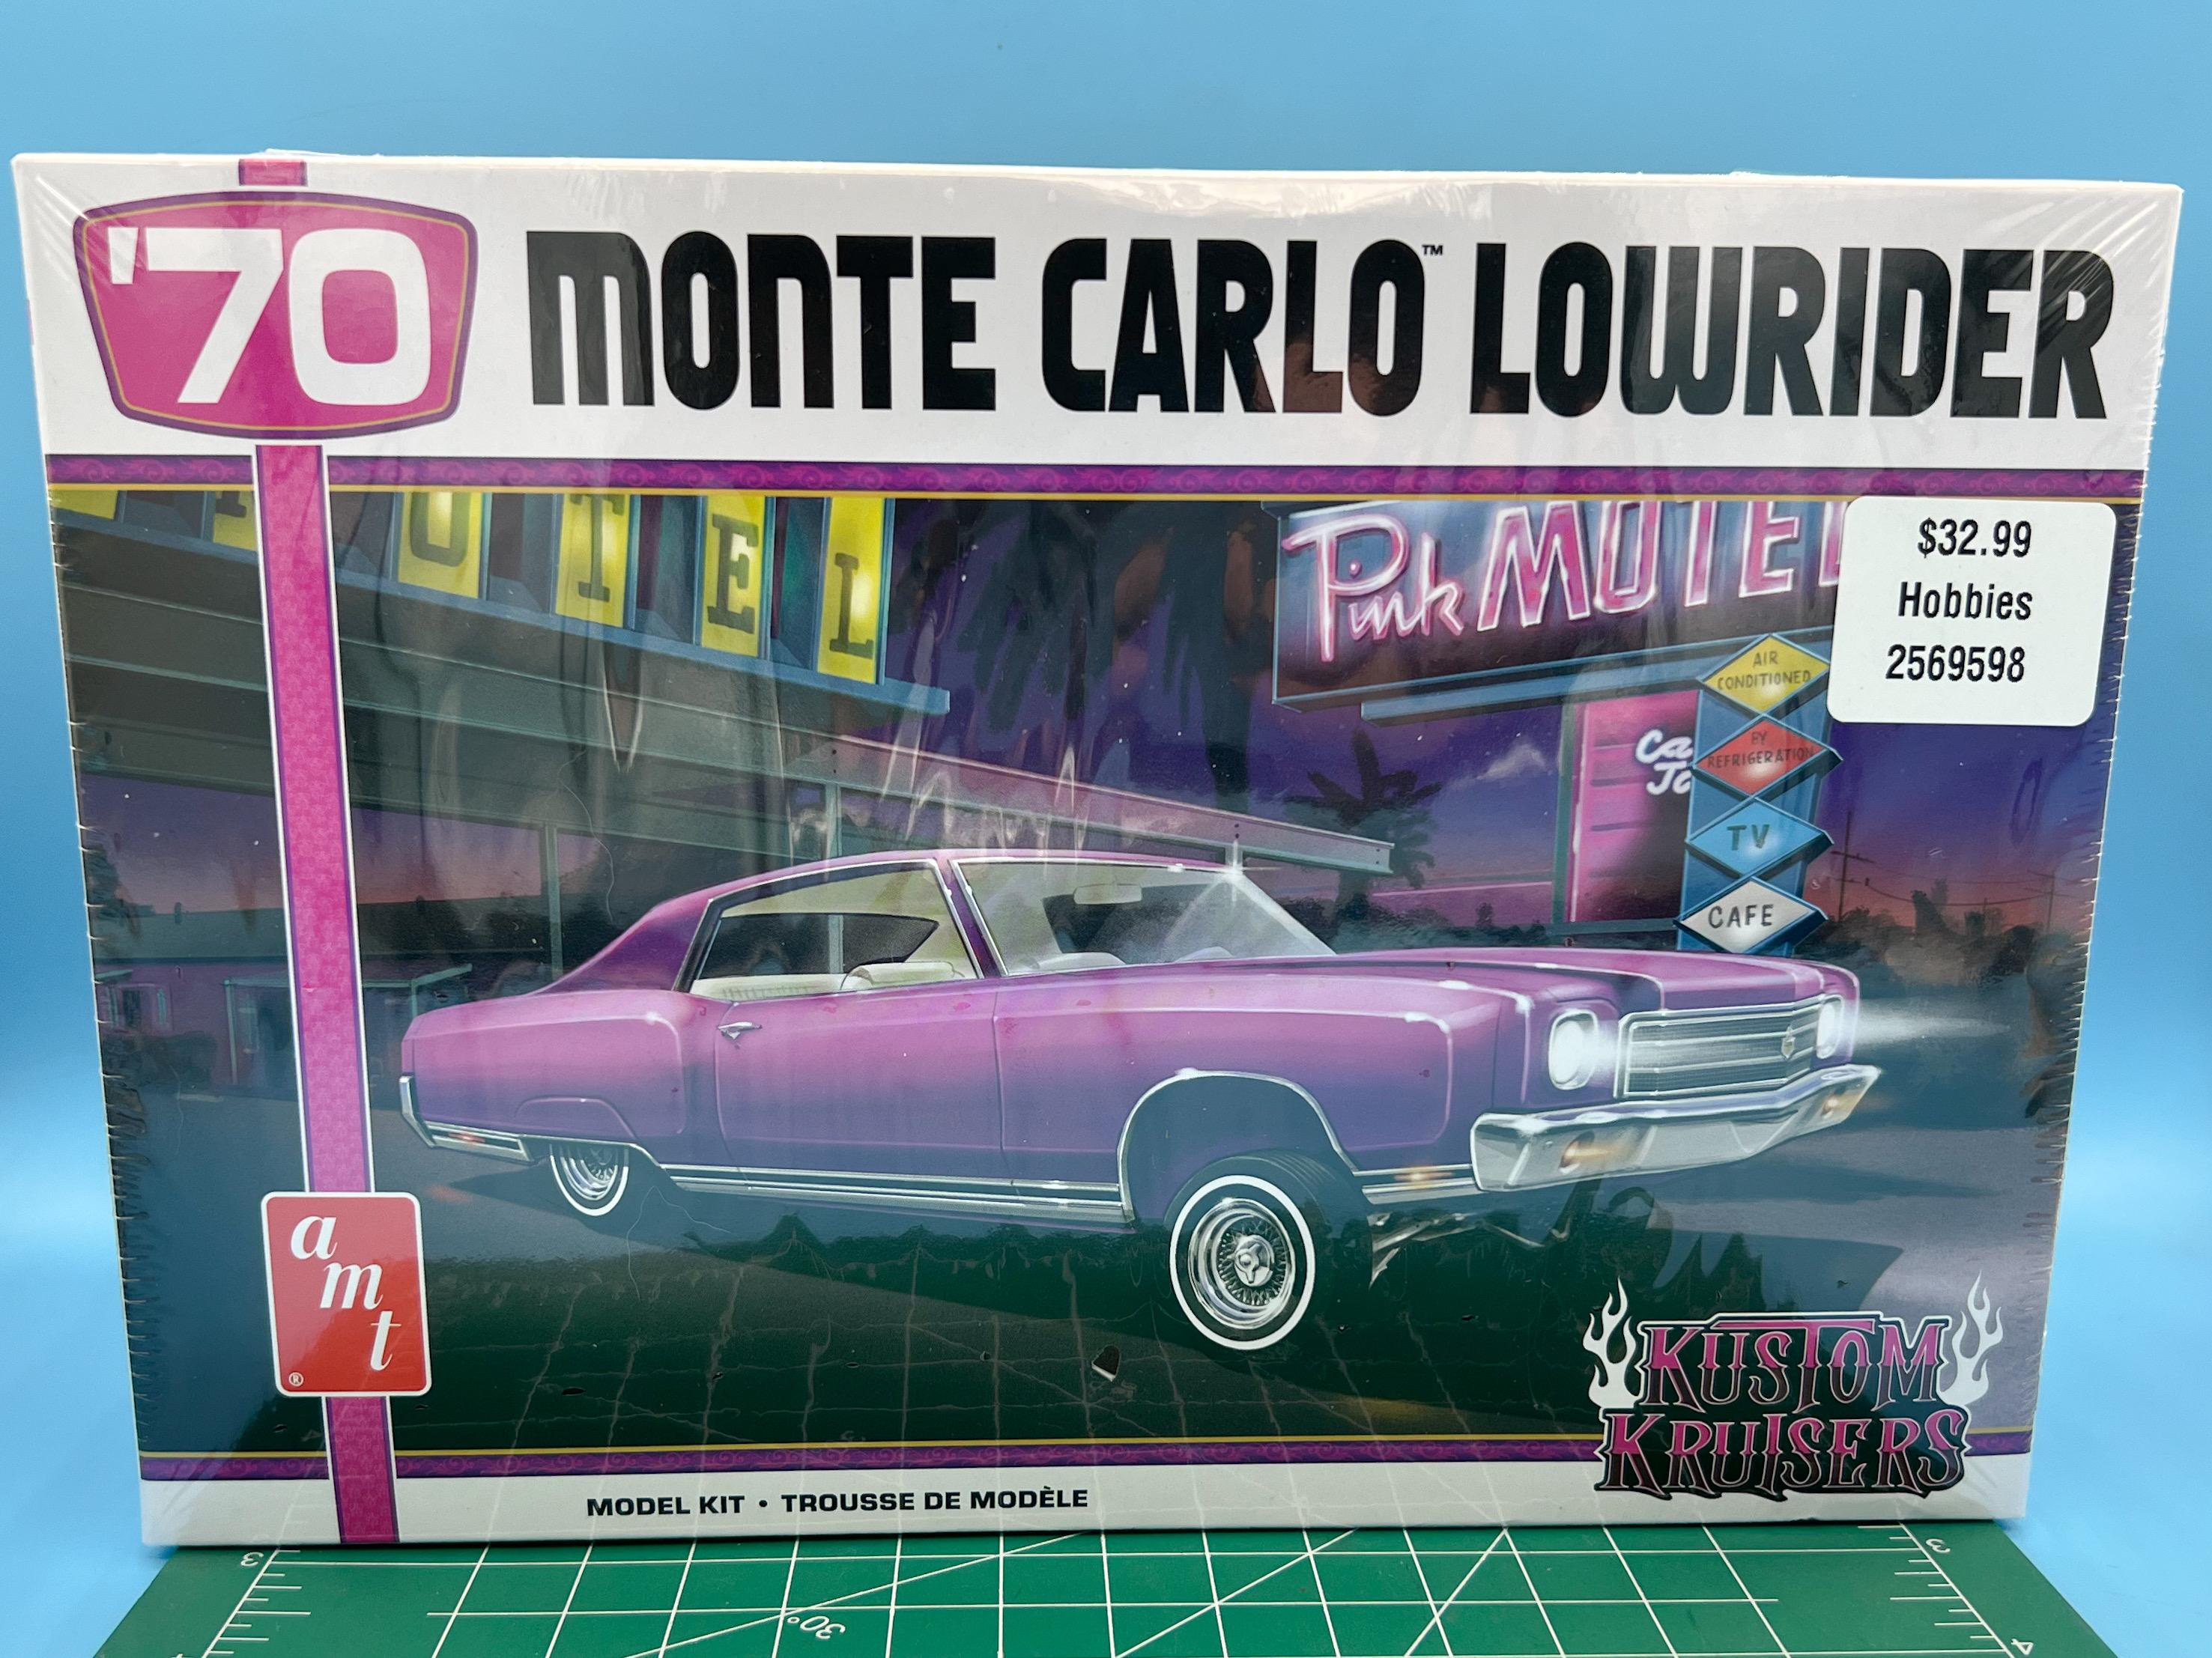
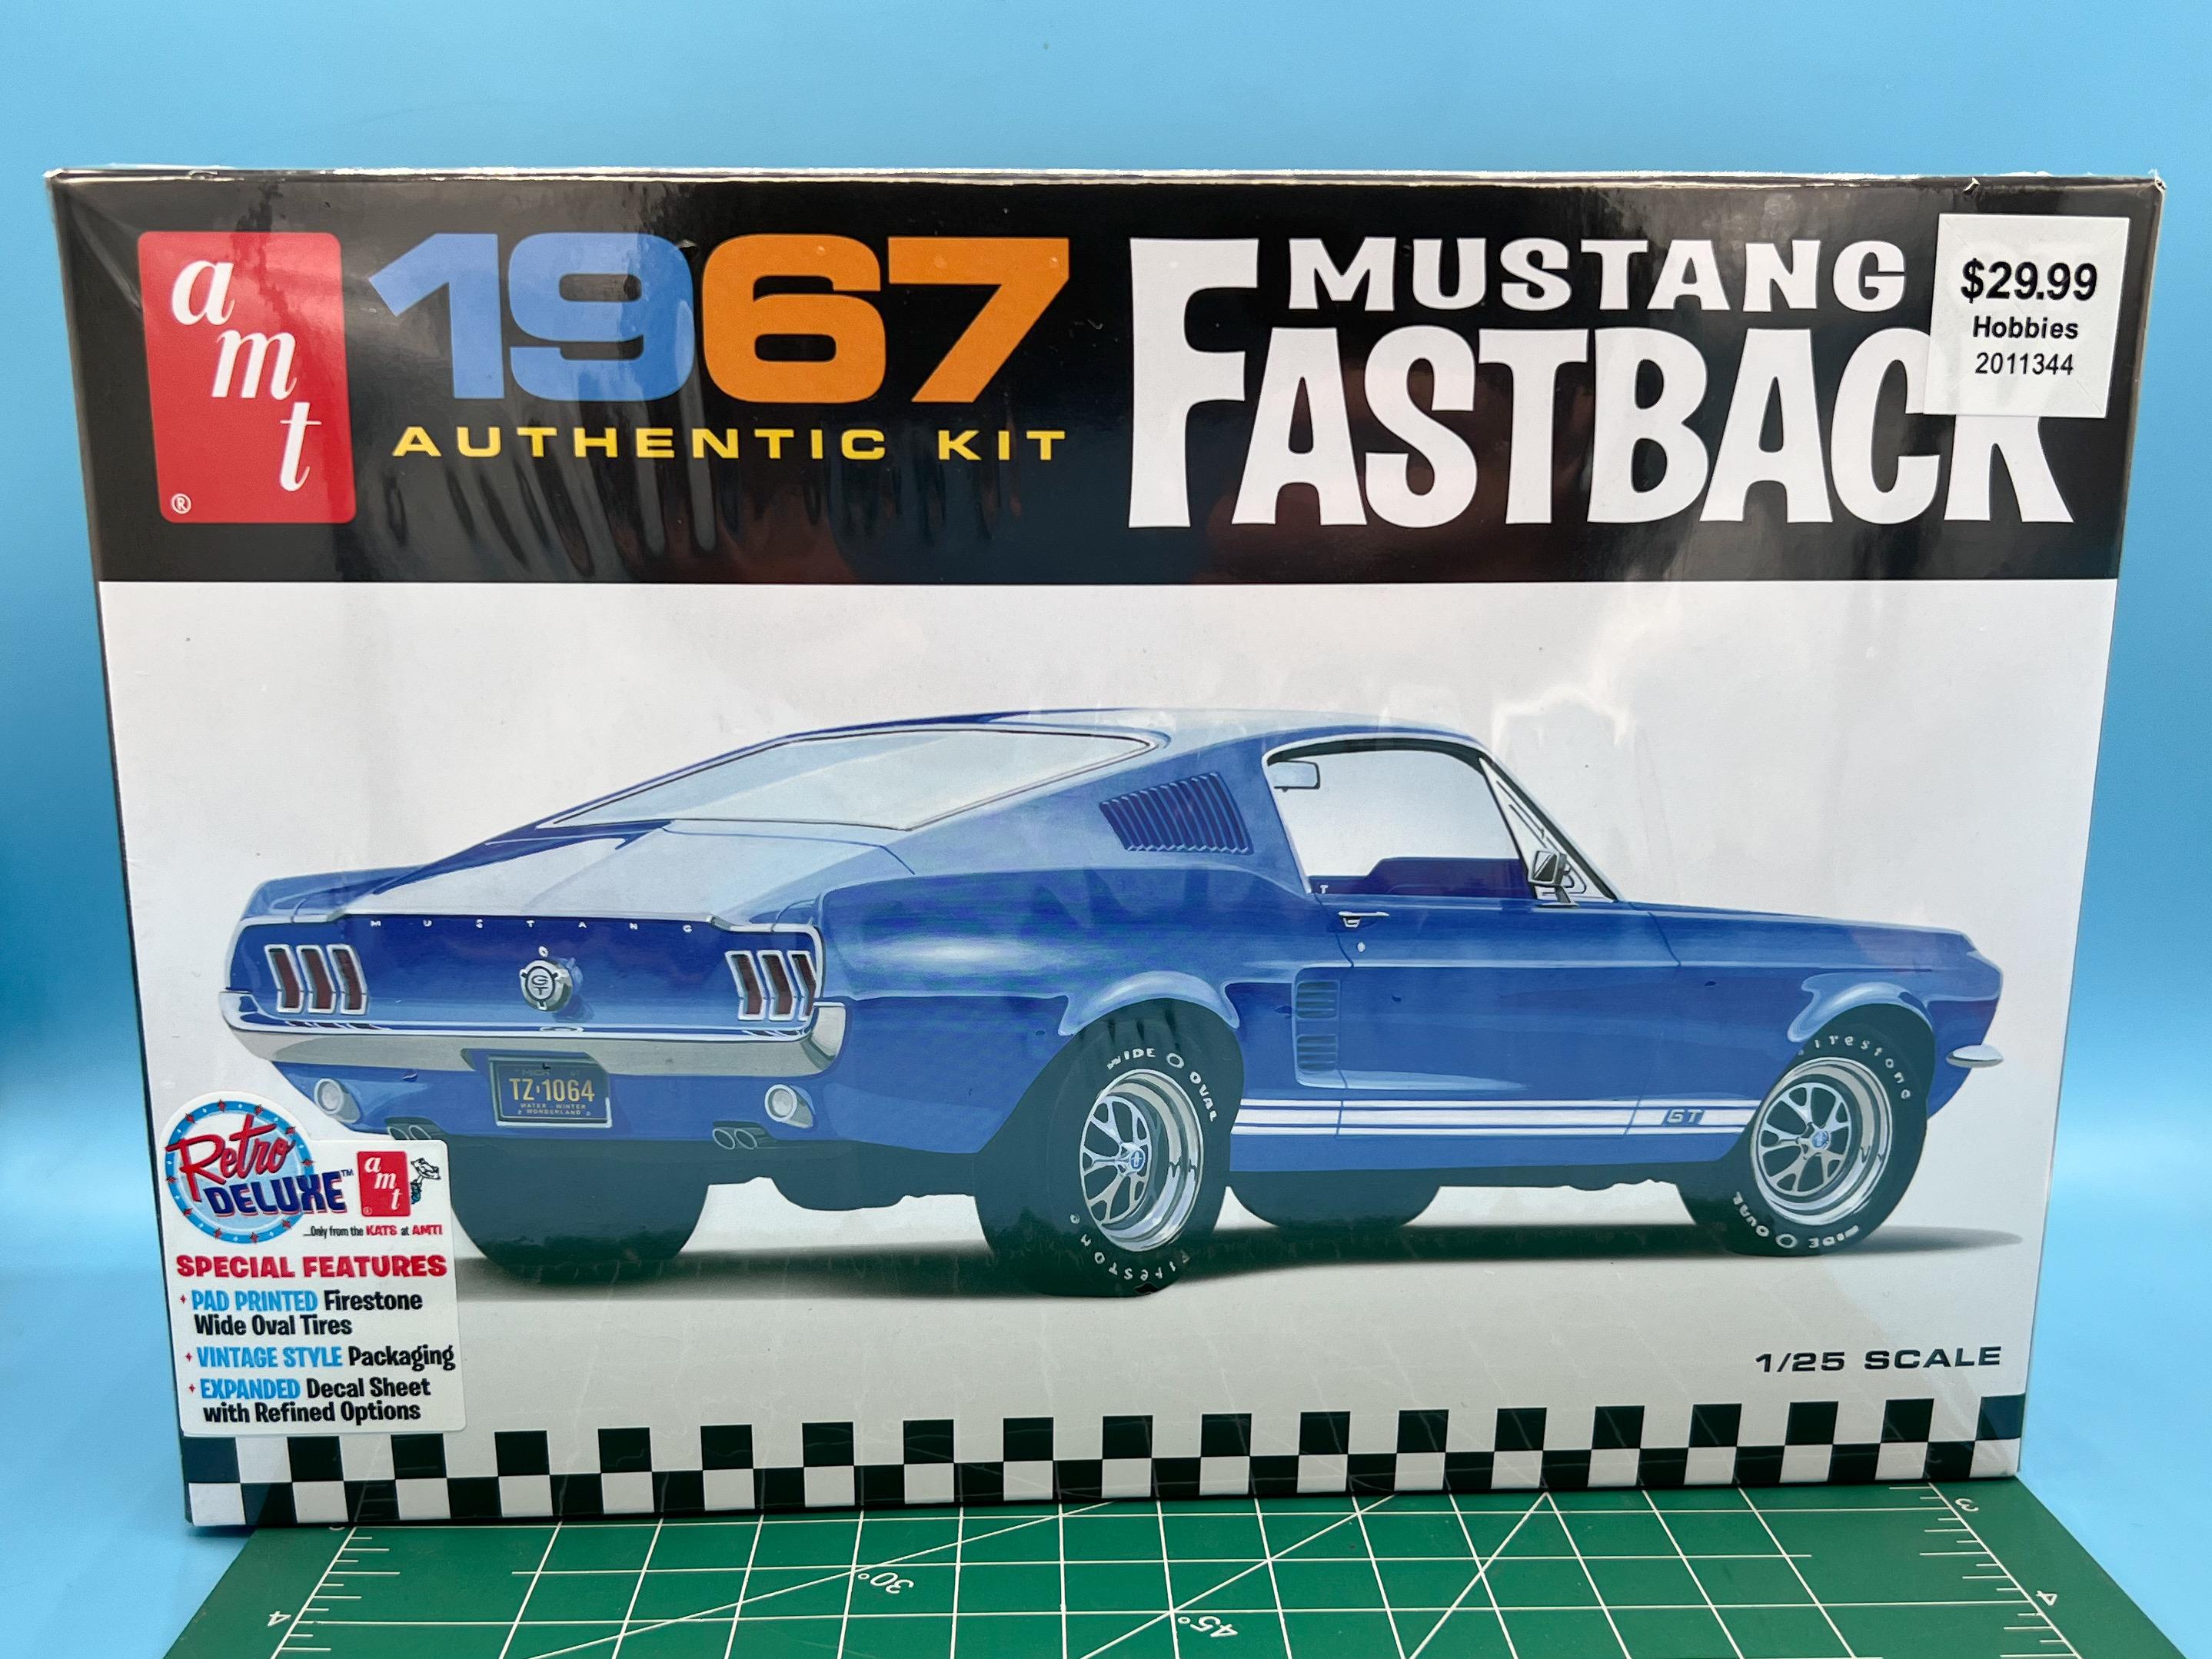
Took a trip to the Lobby of Hobby this morning, to see if they’ve filled any of the gaps in their shelves…and actually, they have! A few anyway… Picked up this newbie…I THINK this is the same as the other 60 that they sell, but without the go-kart? Maybe shoulda got the one with the kart (but I didn’t compare yet) - plus some discounted acrylics: Needed this for my latest build: And I hadn’t seen this one before, and I’d like to build a lowrider so it followed me home: Nice to see some new stuff there anyway!
- 38,868 replies
-
- 6
-

-
- johan
- glue bombs
- (and 1 more)
-
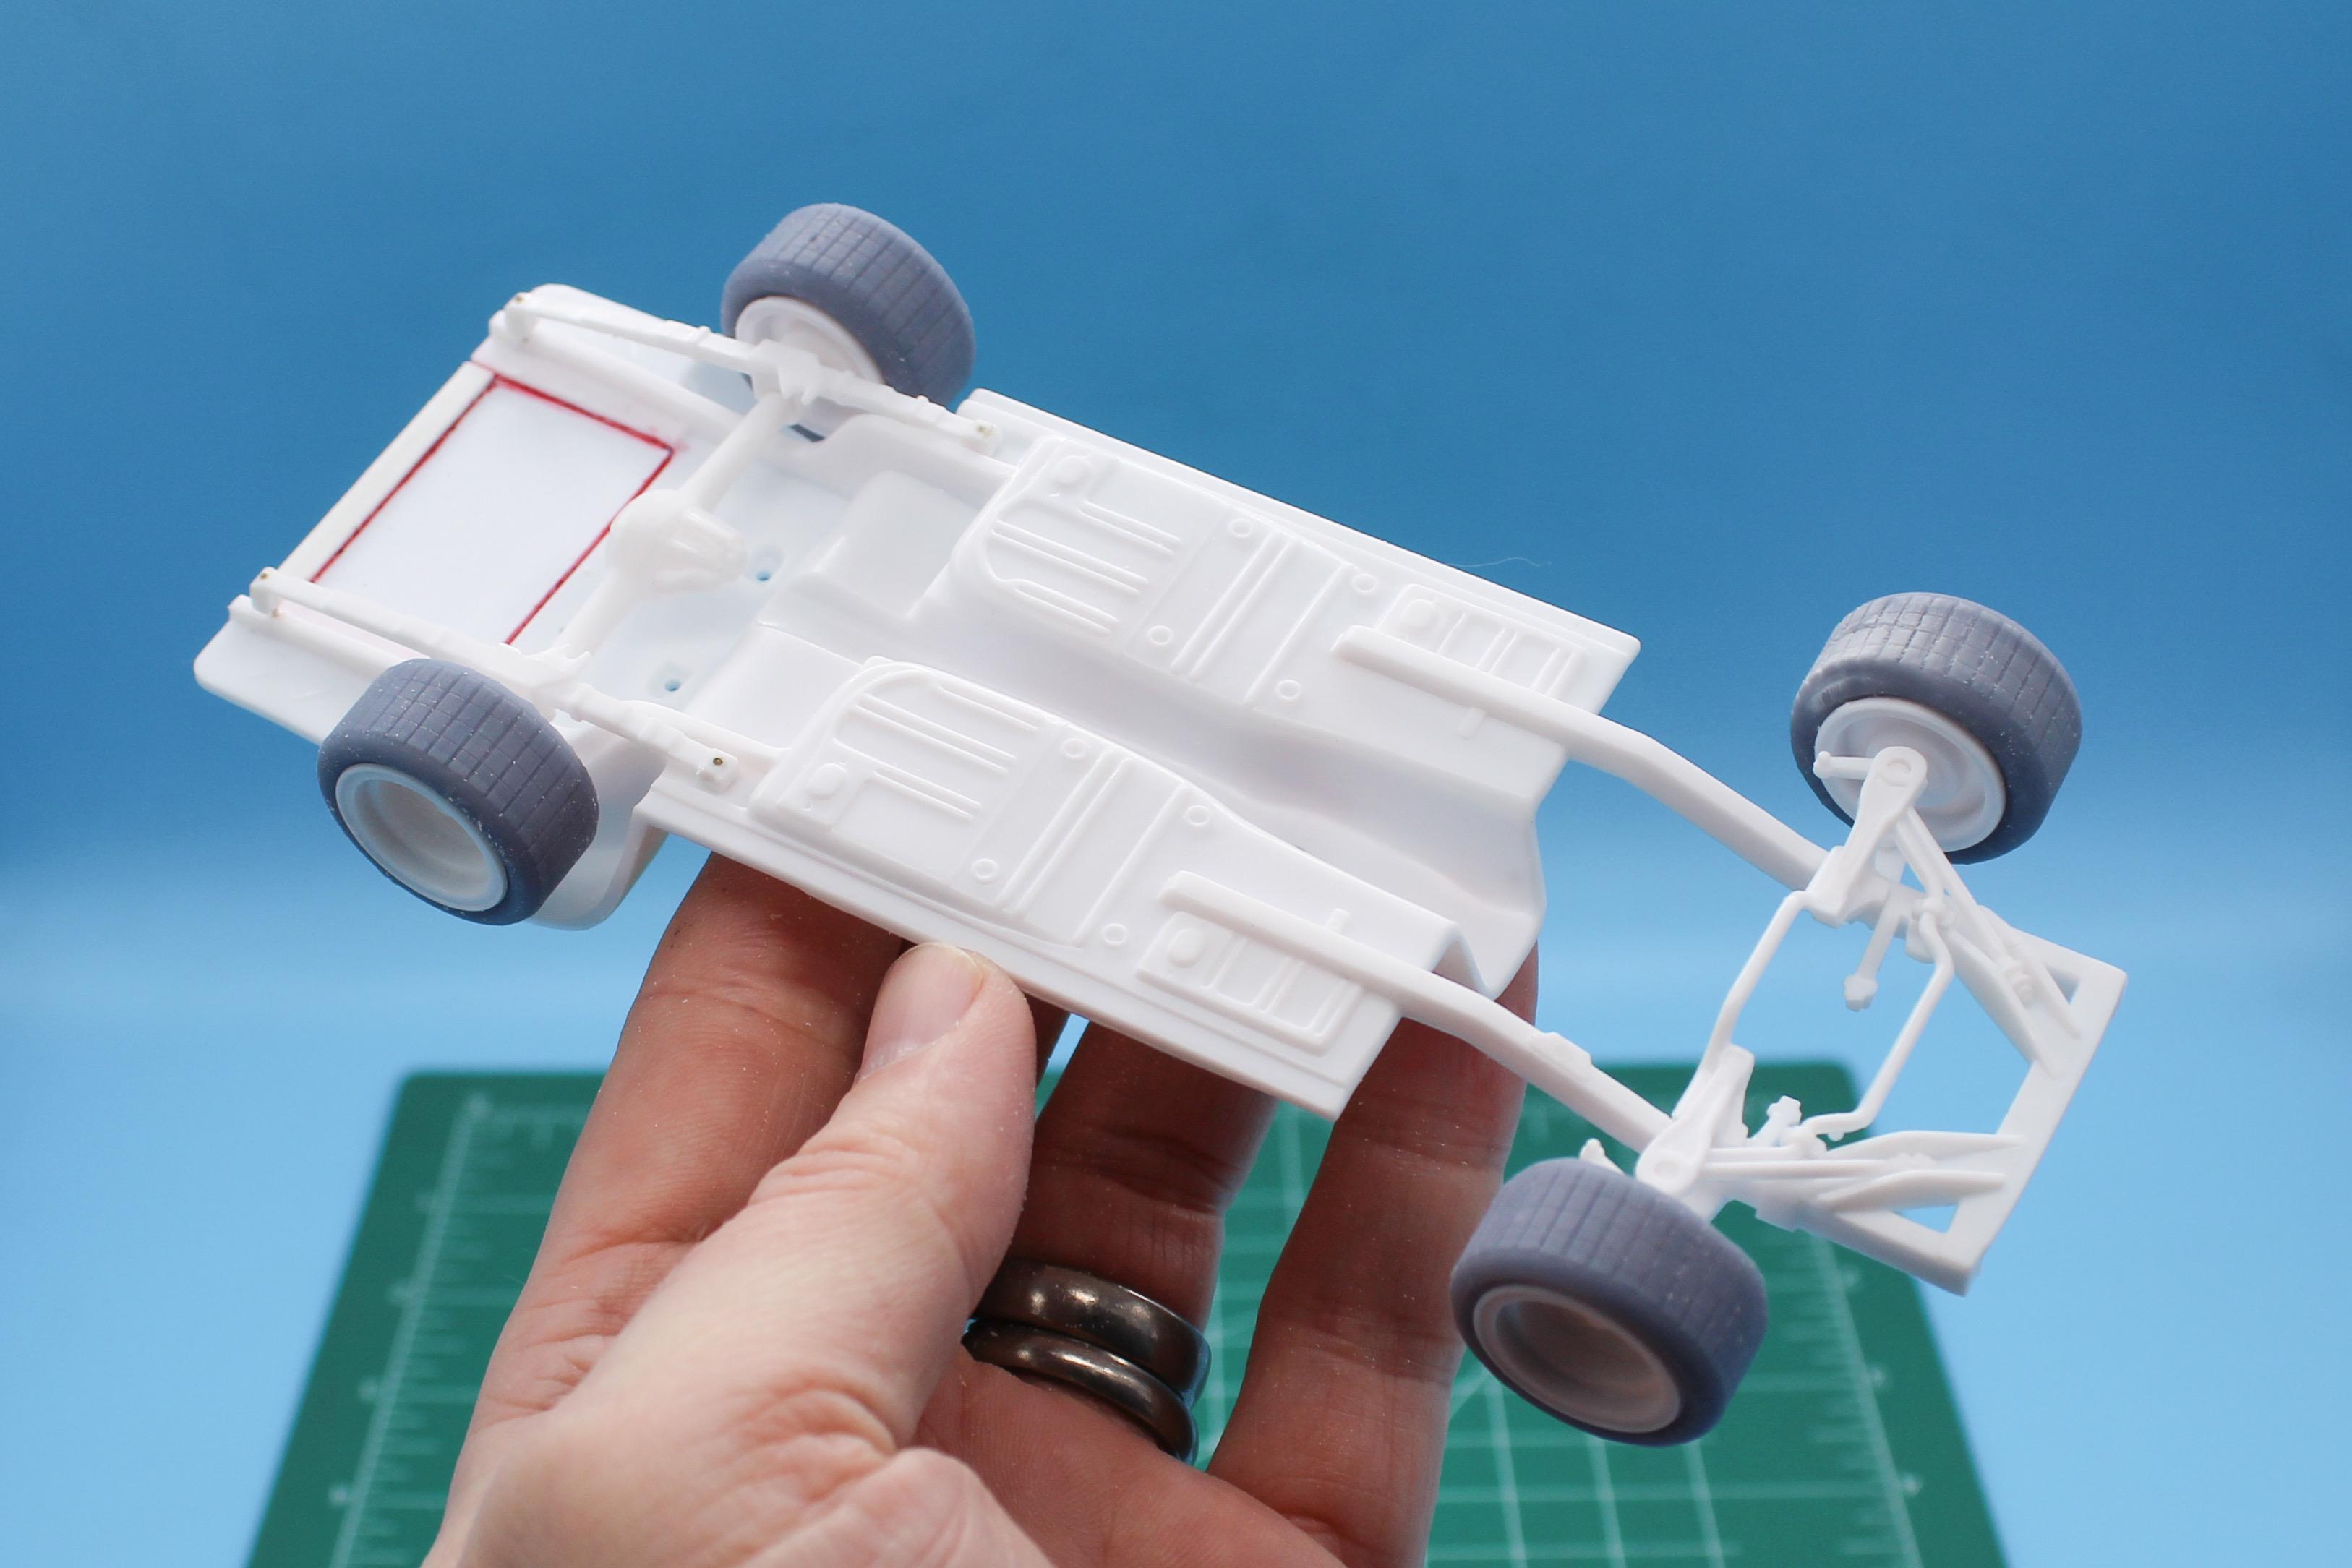
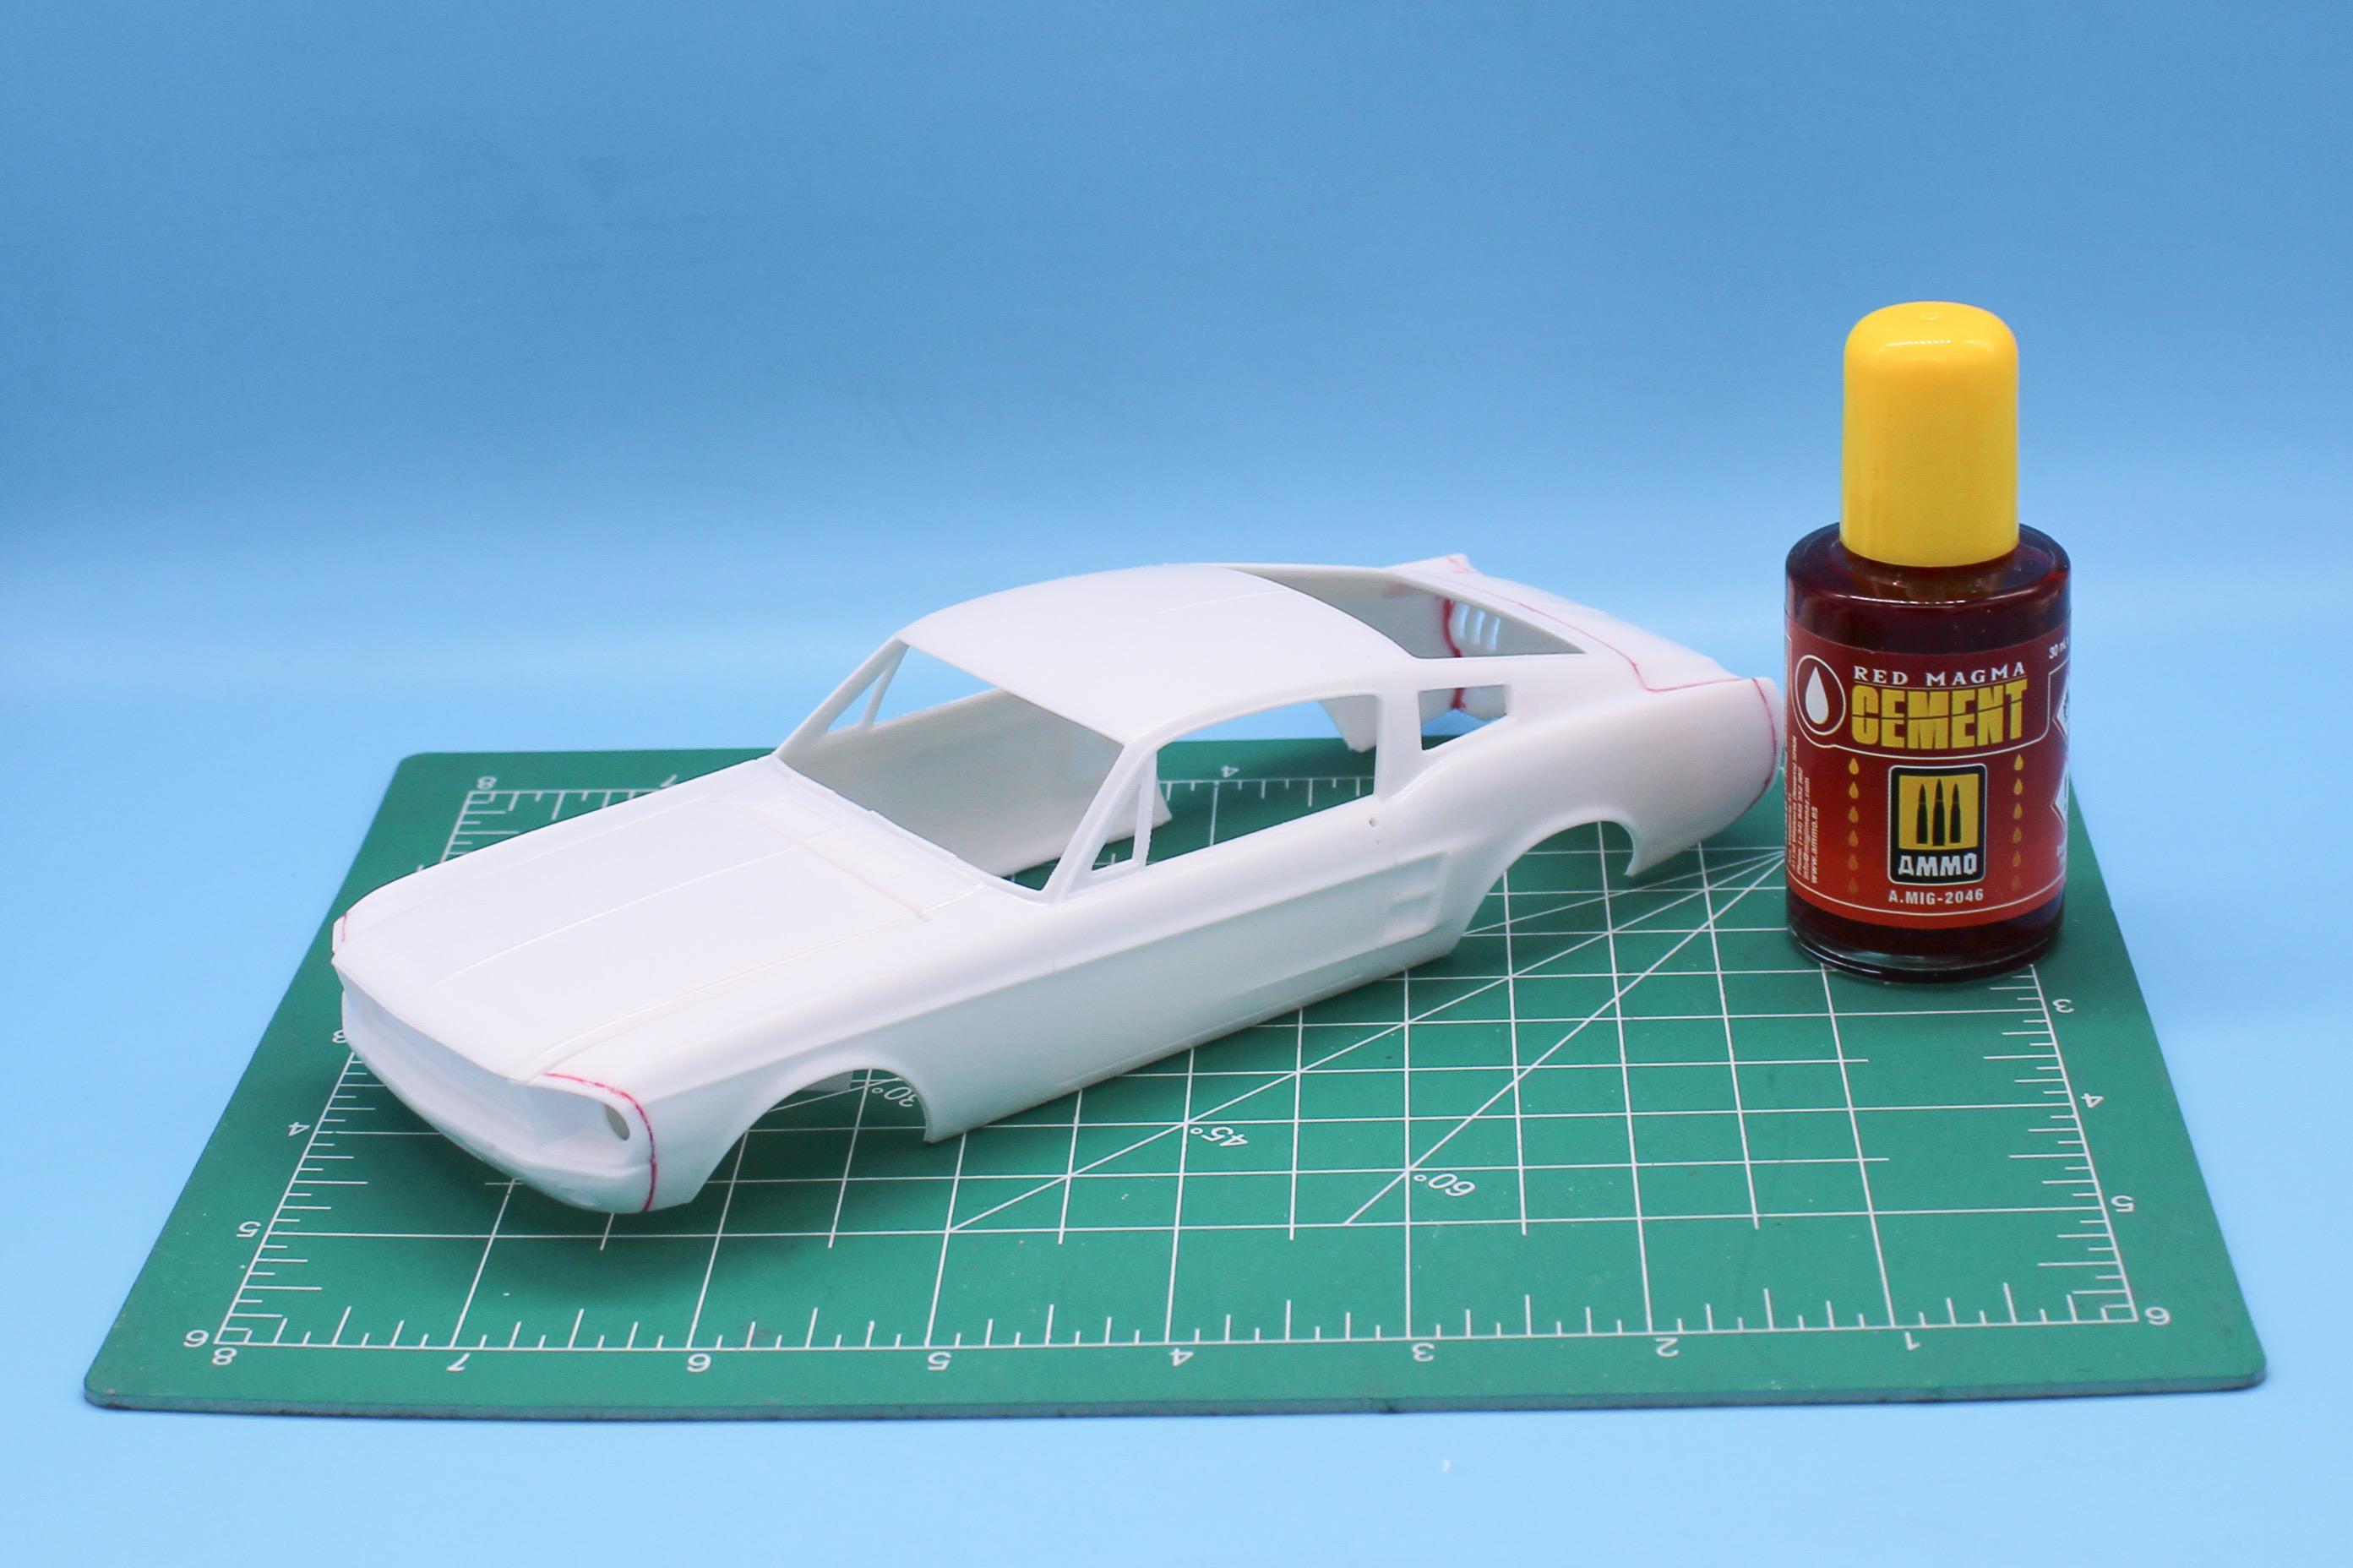
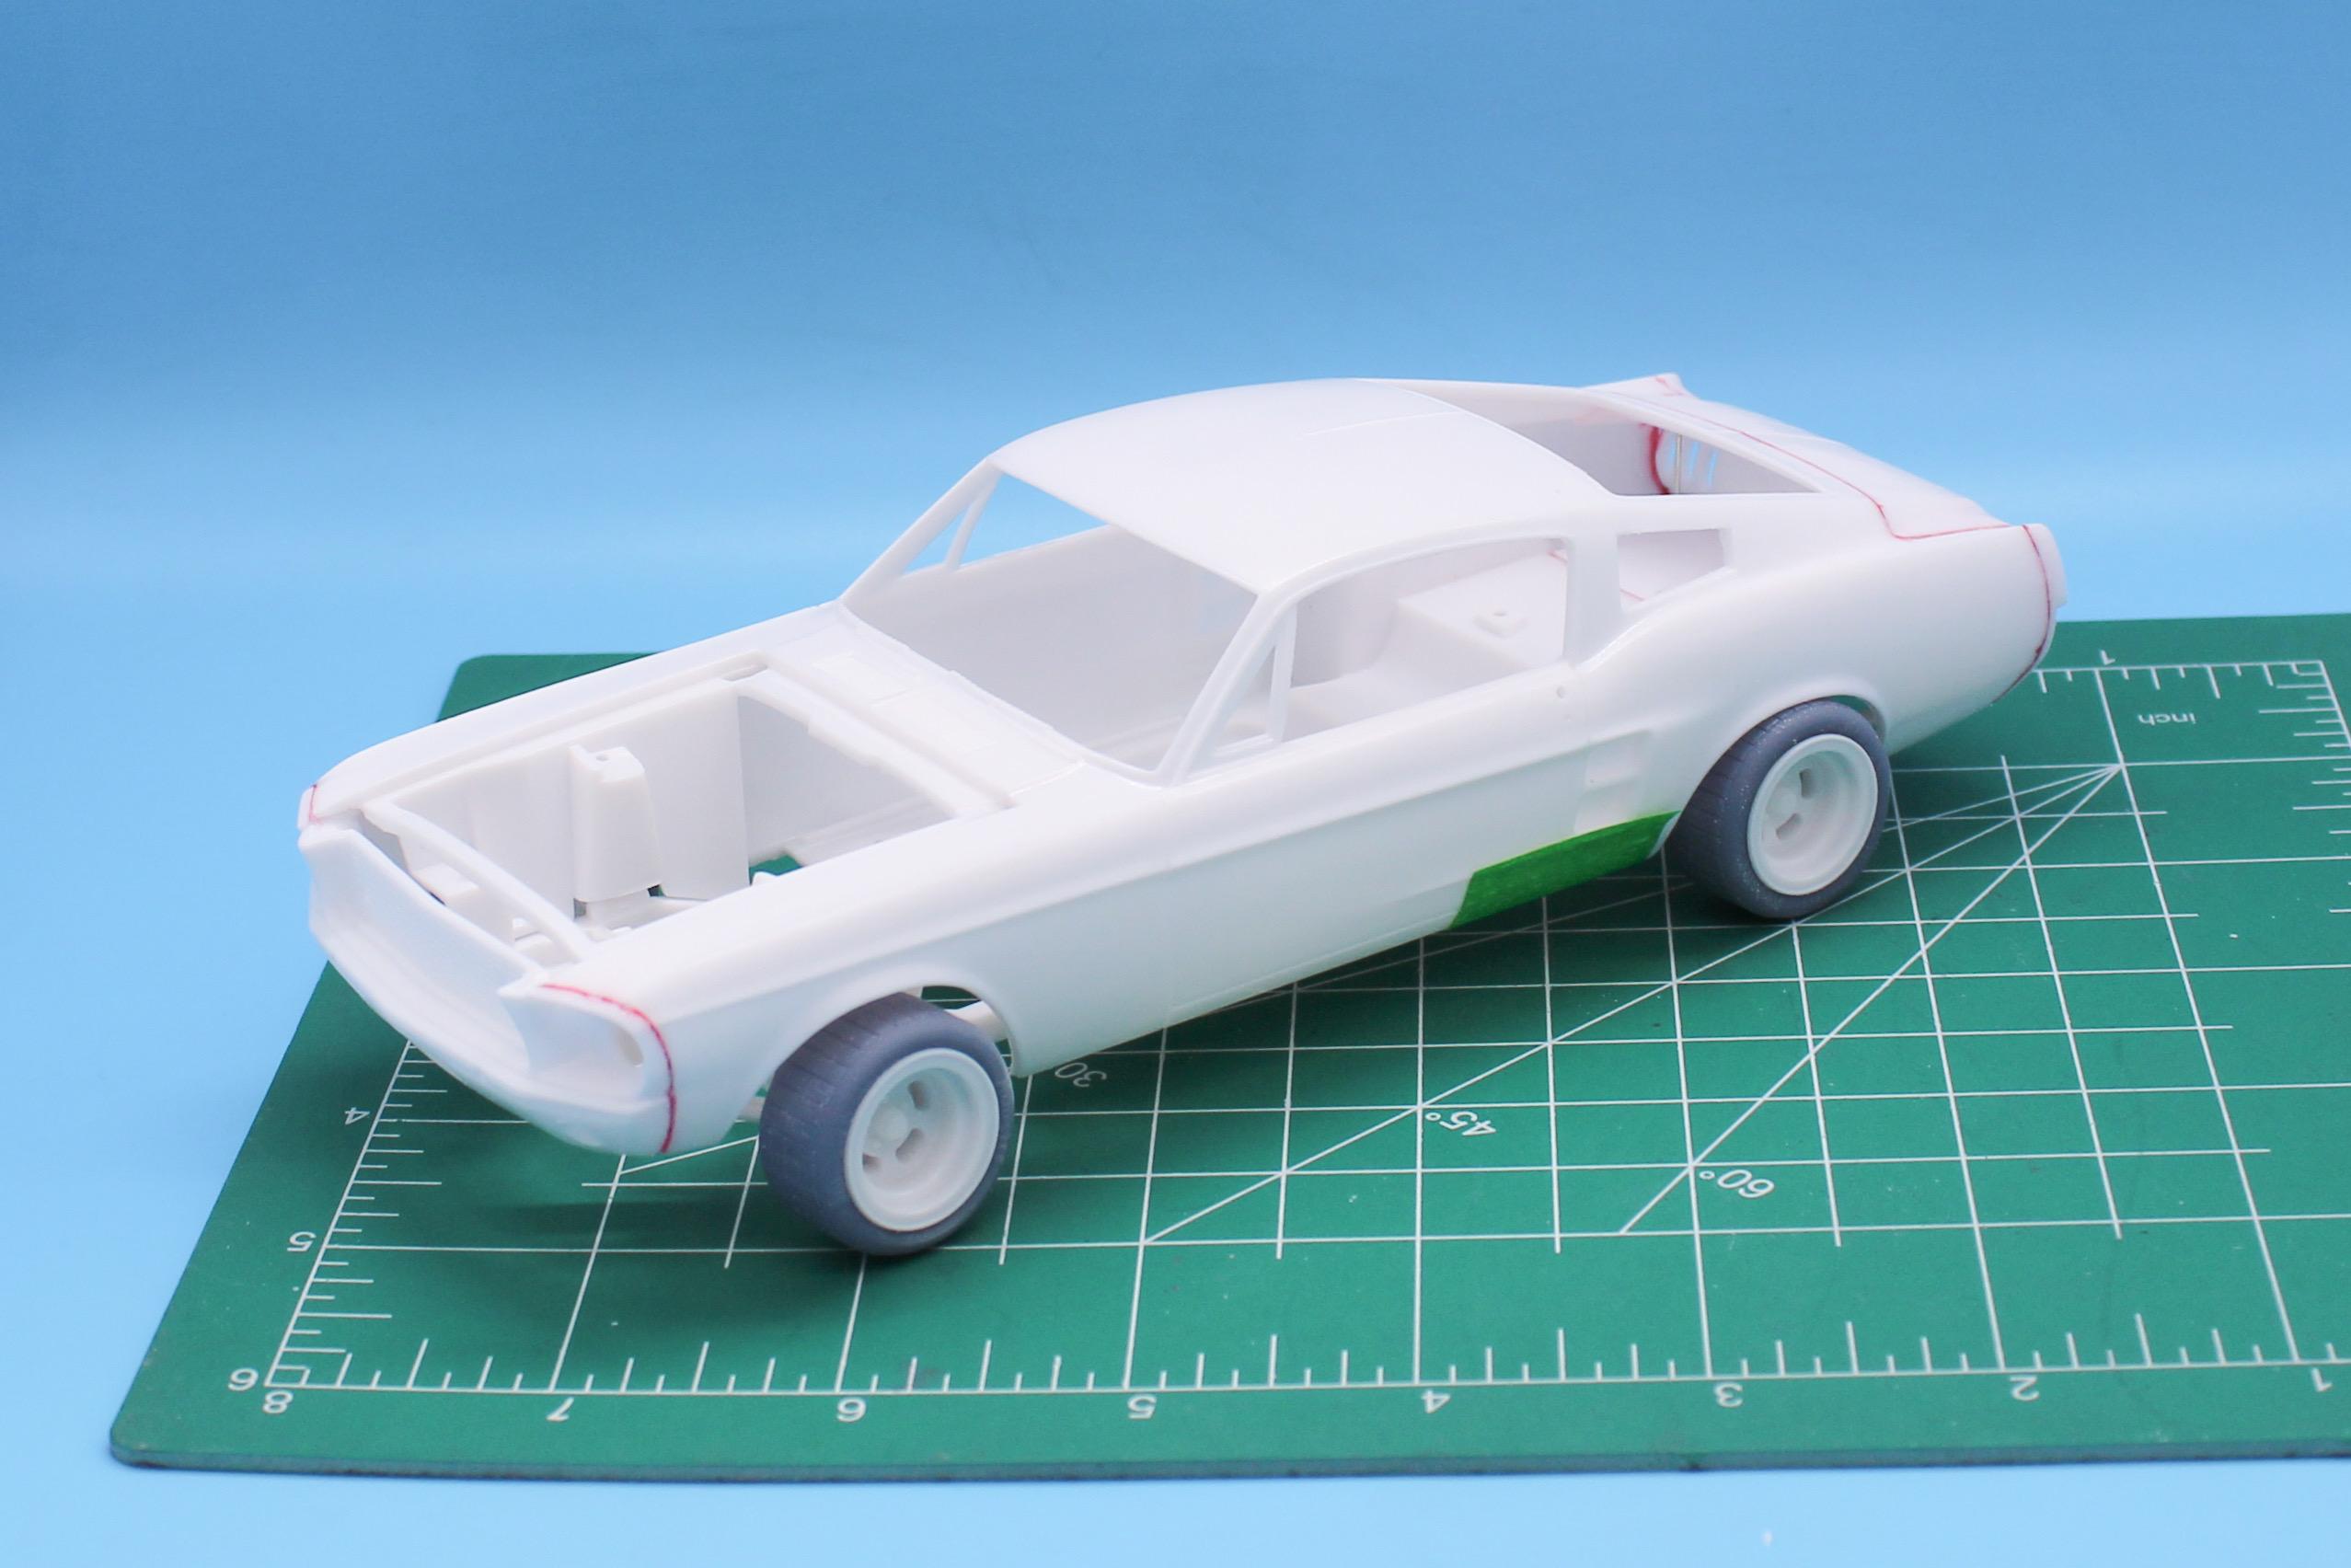
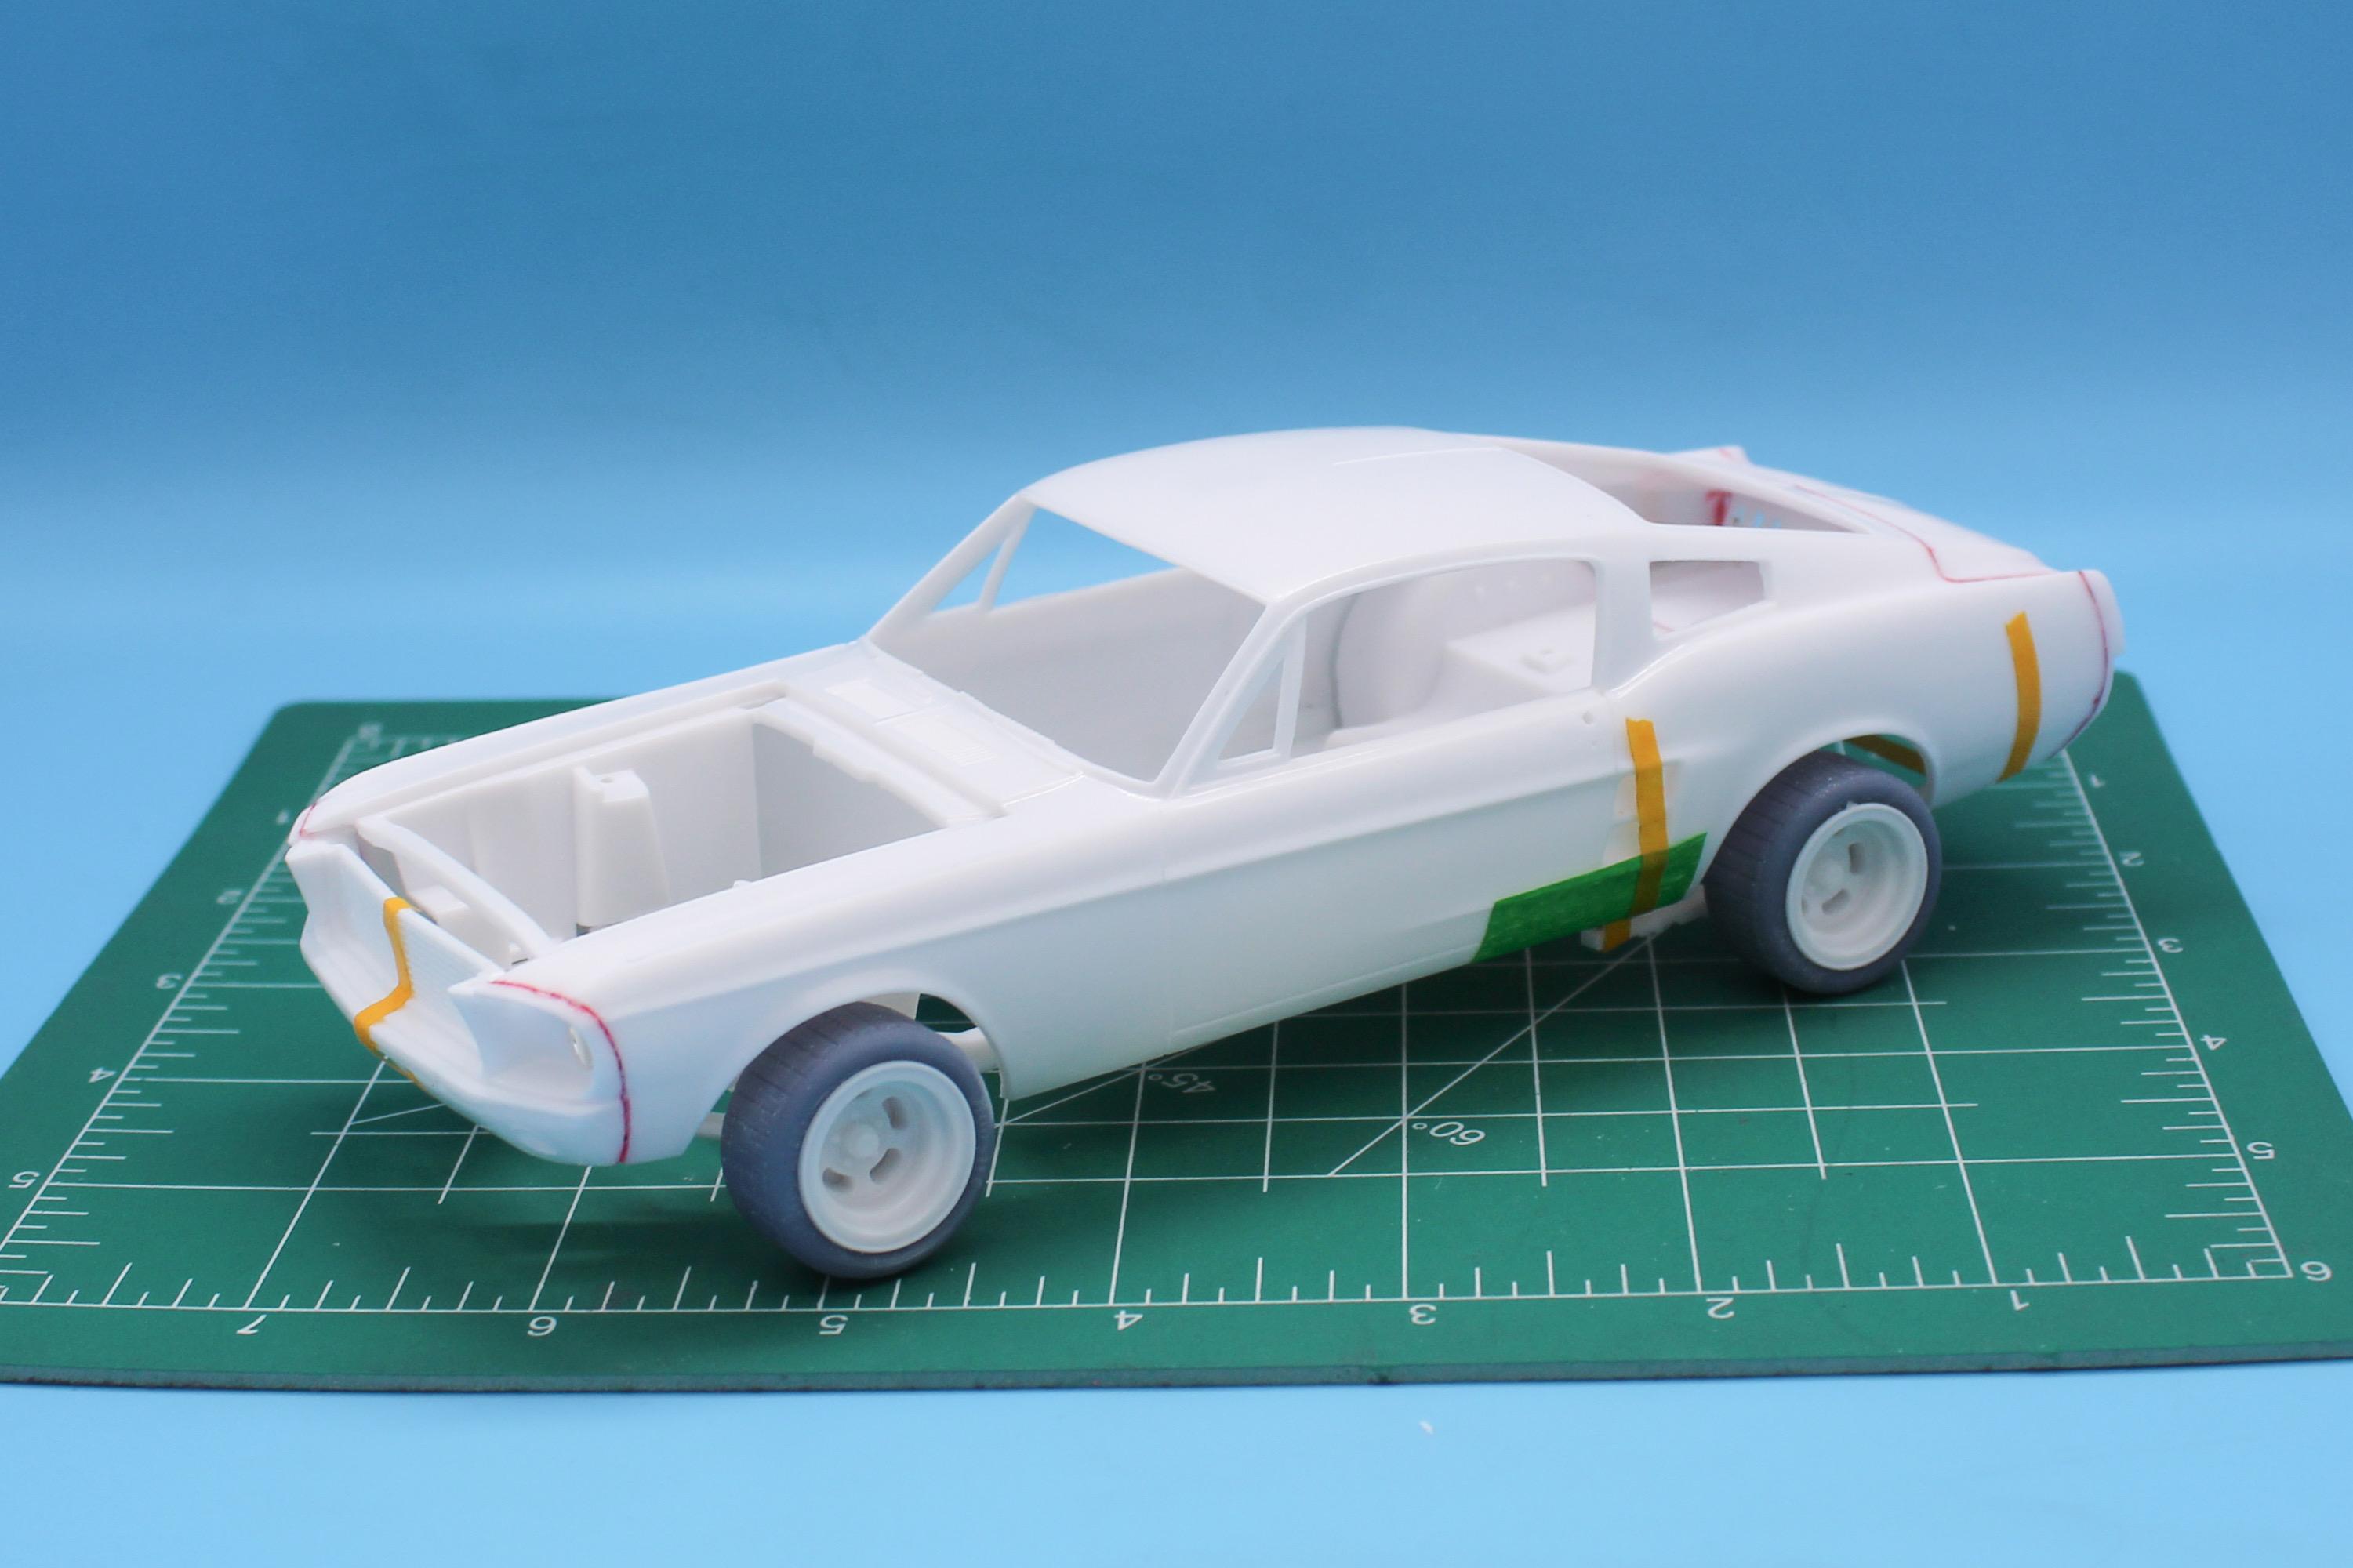
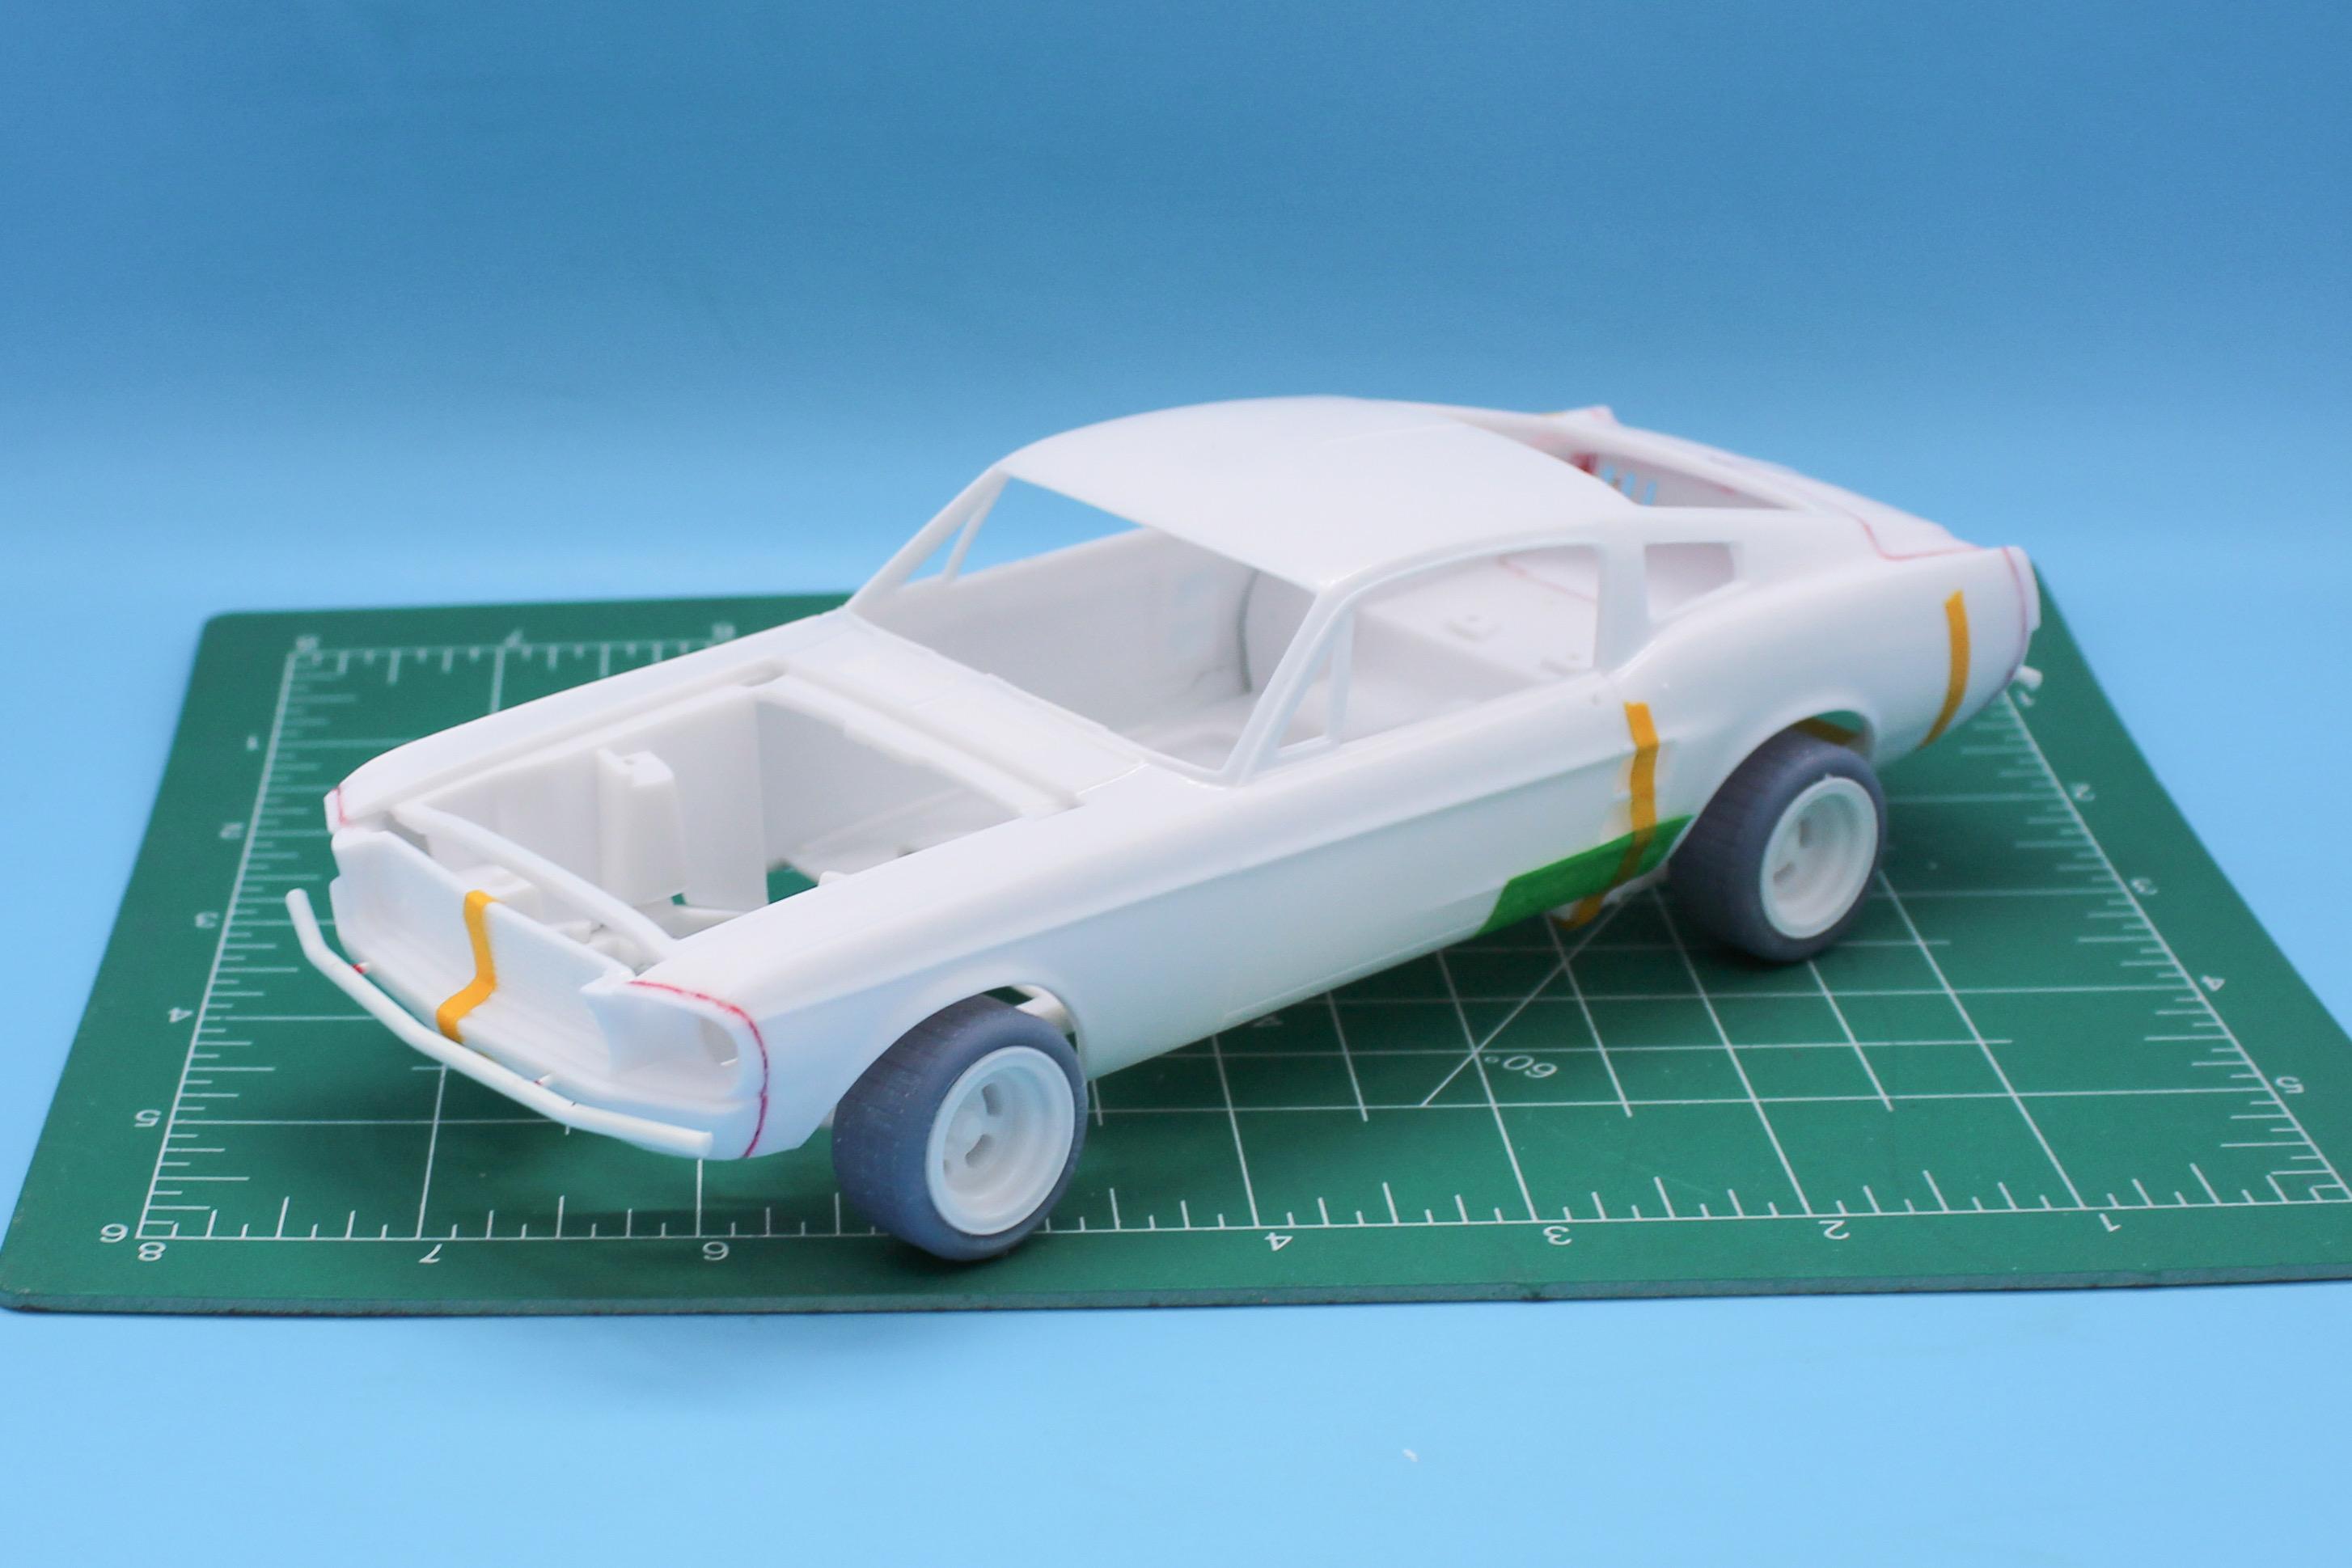
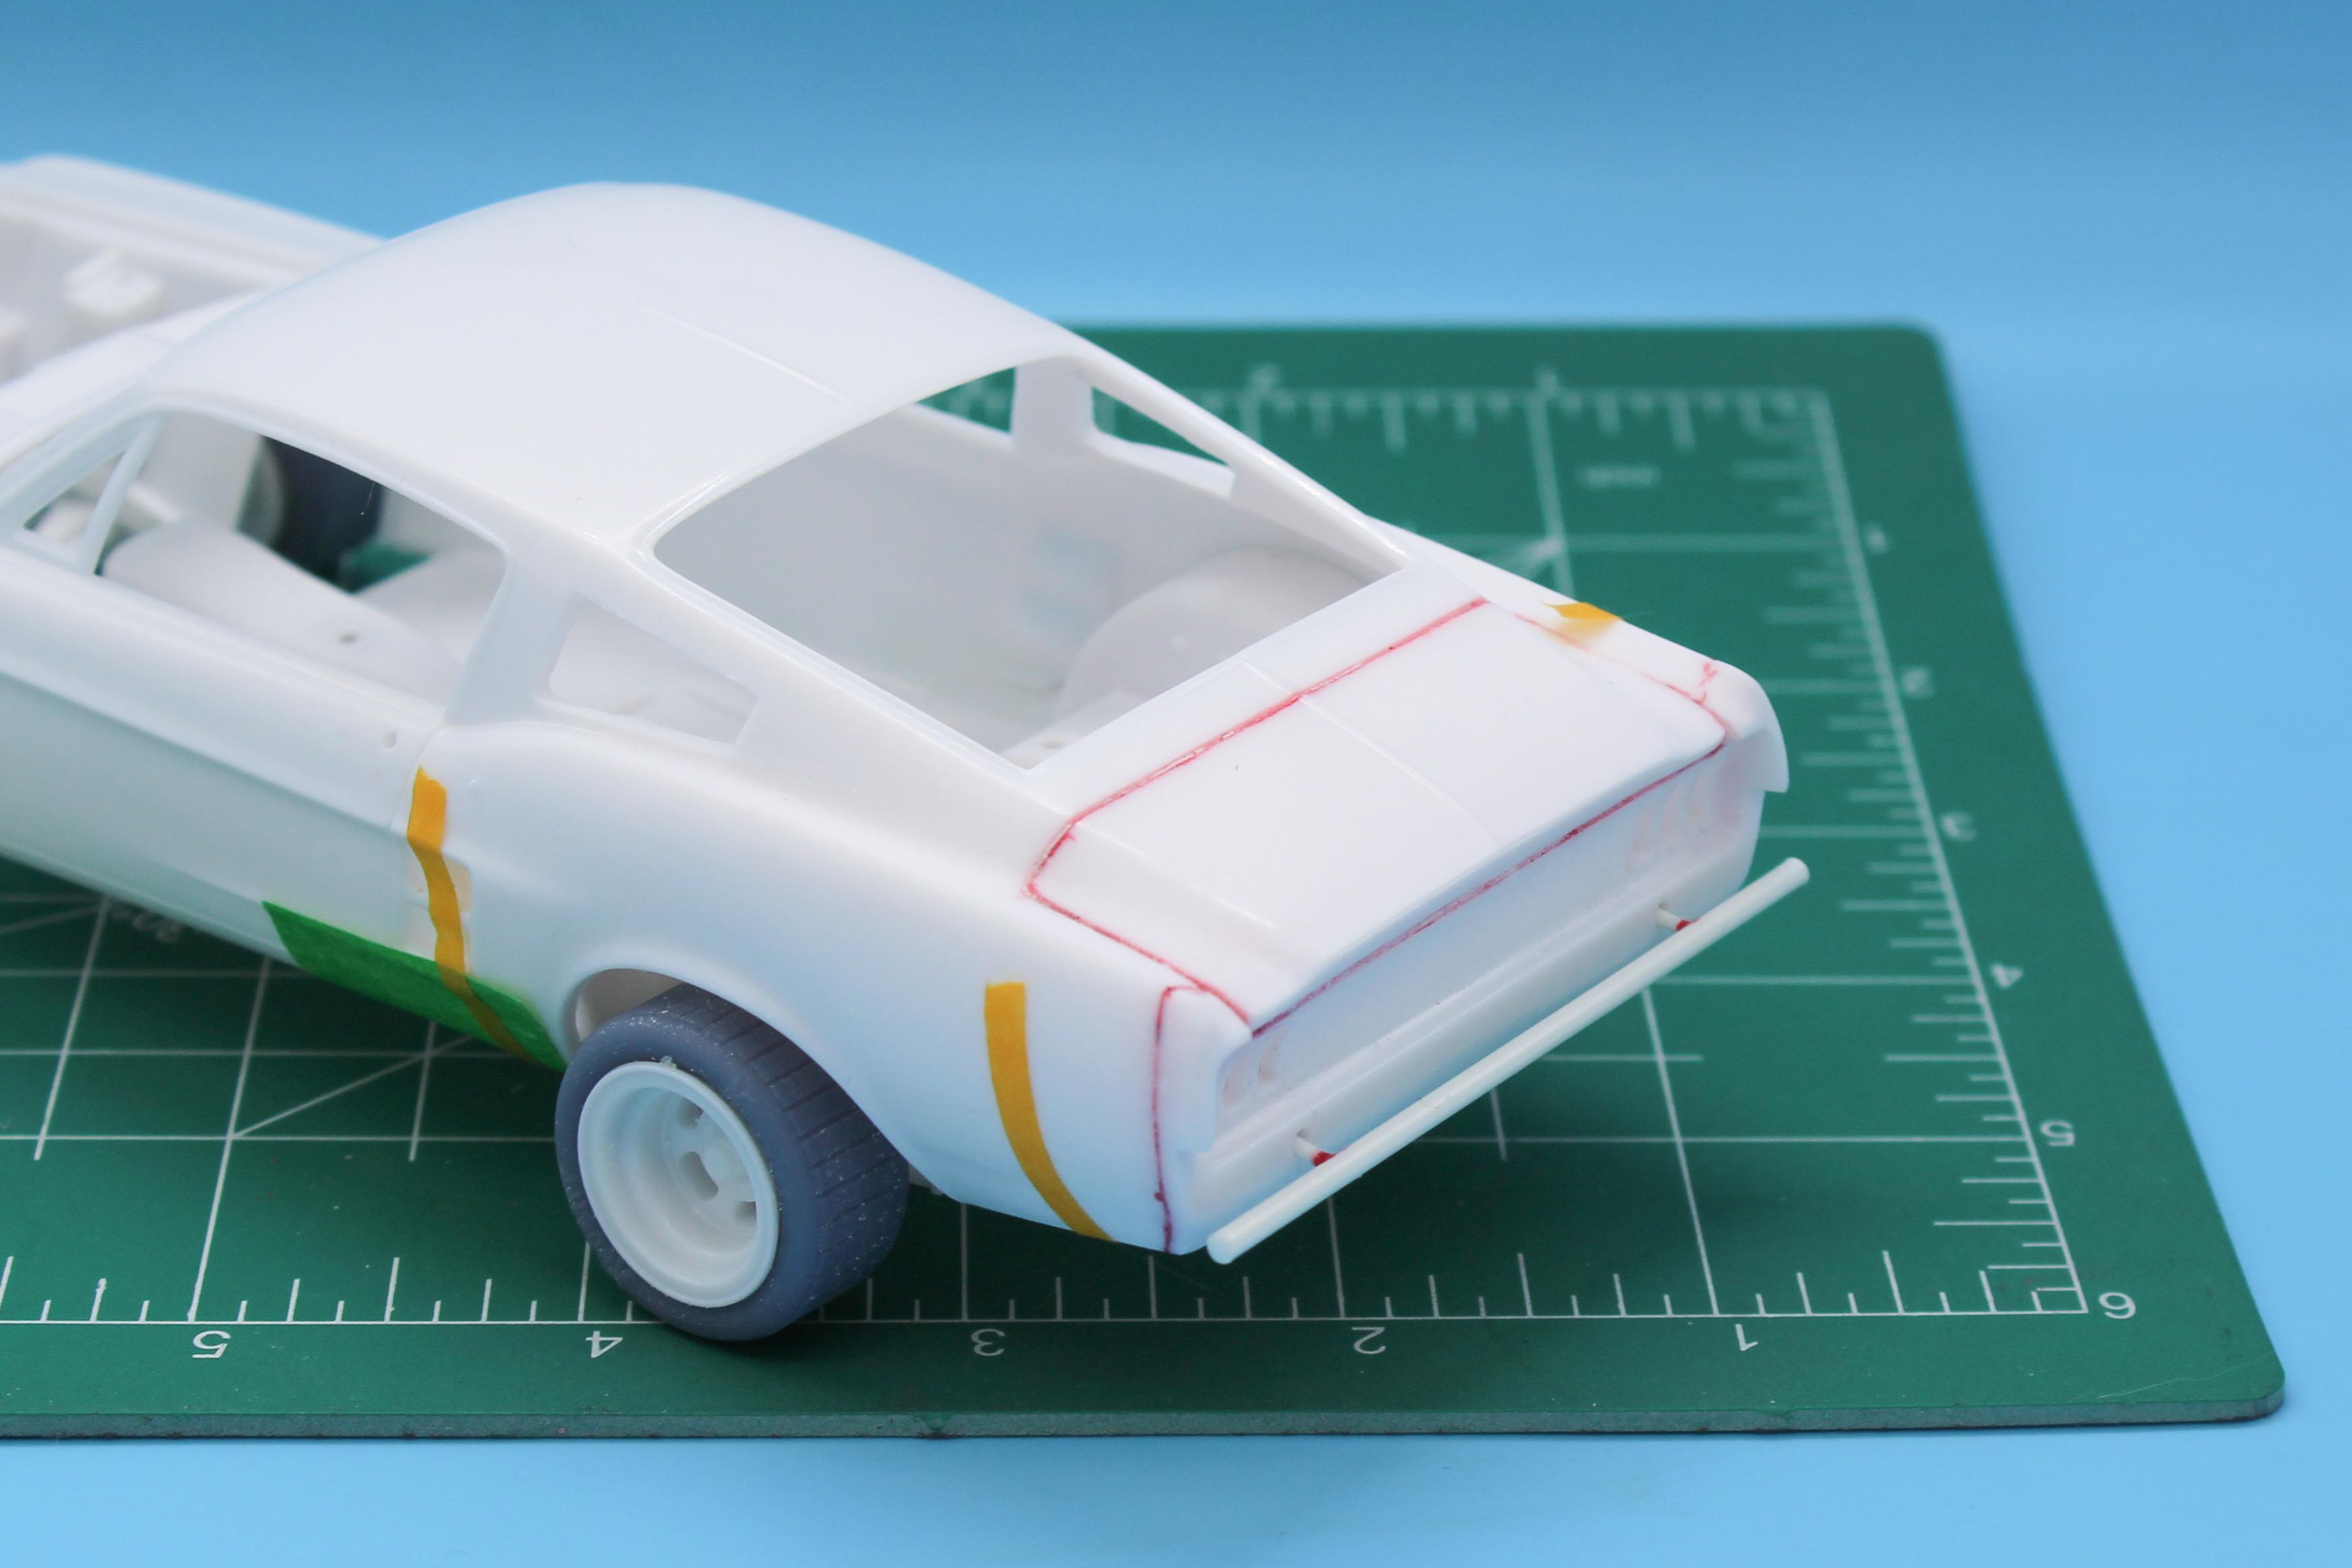
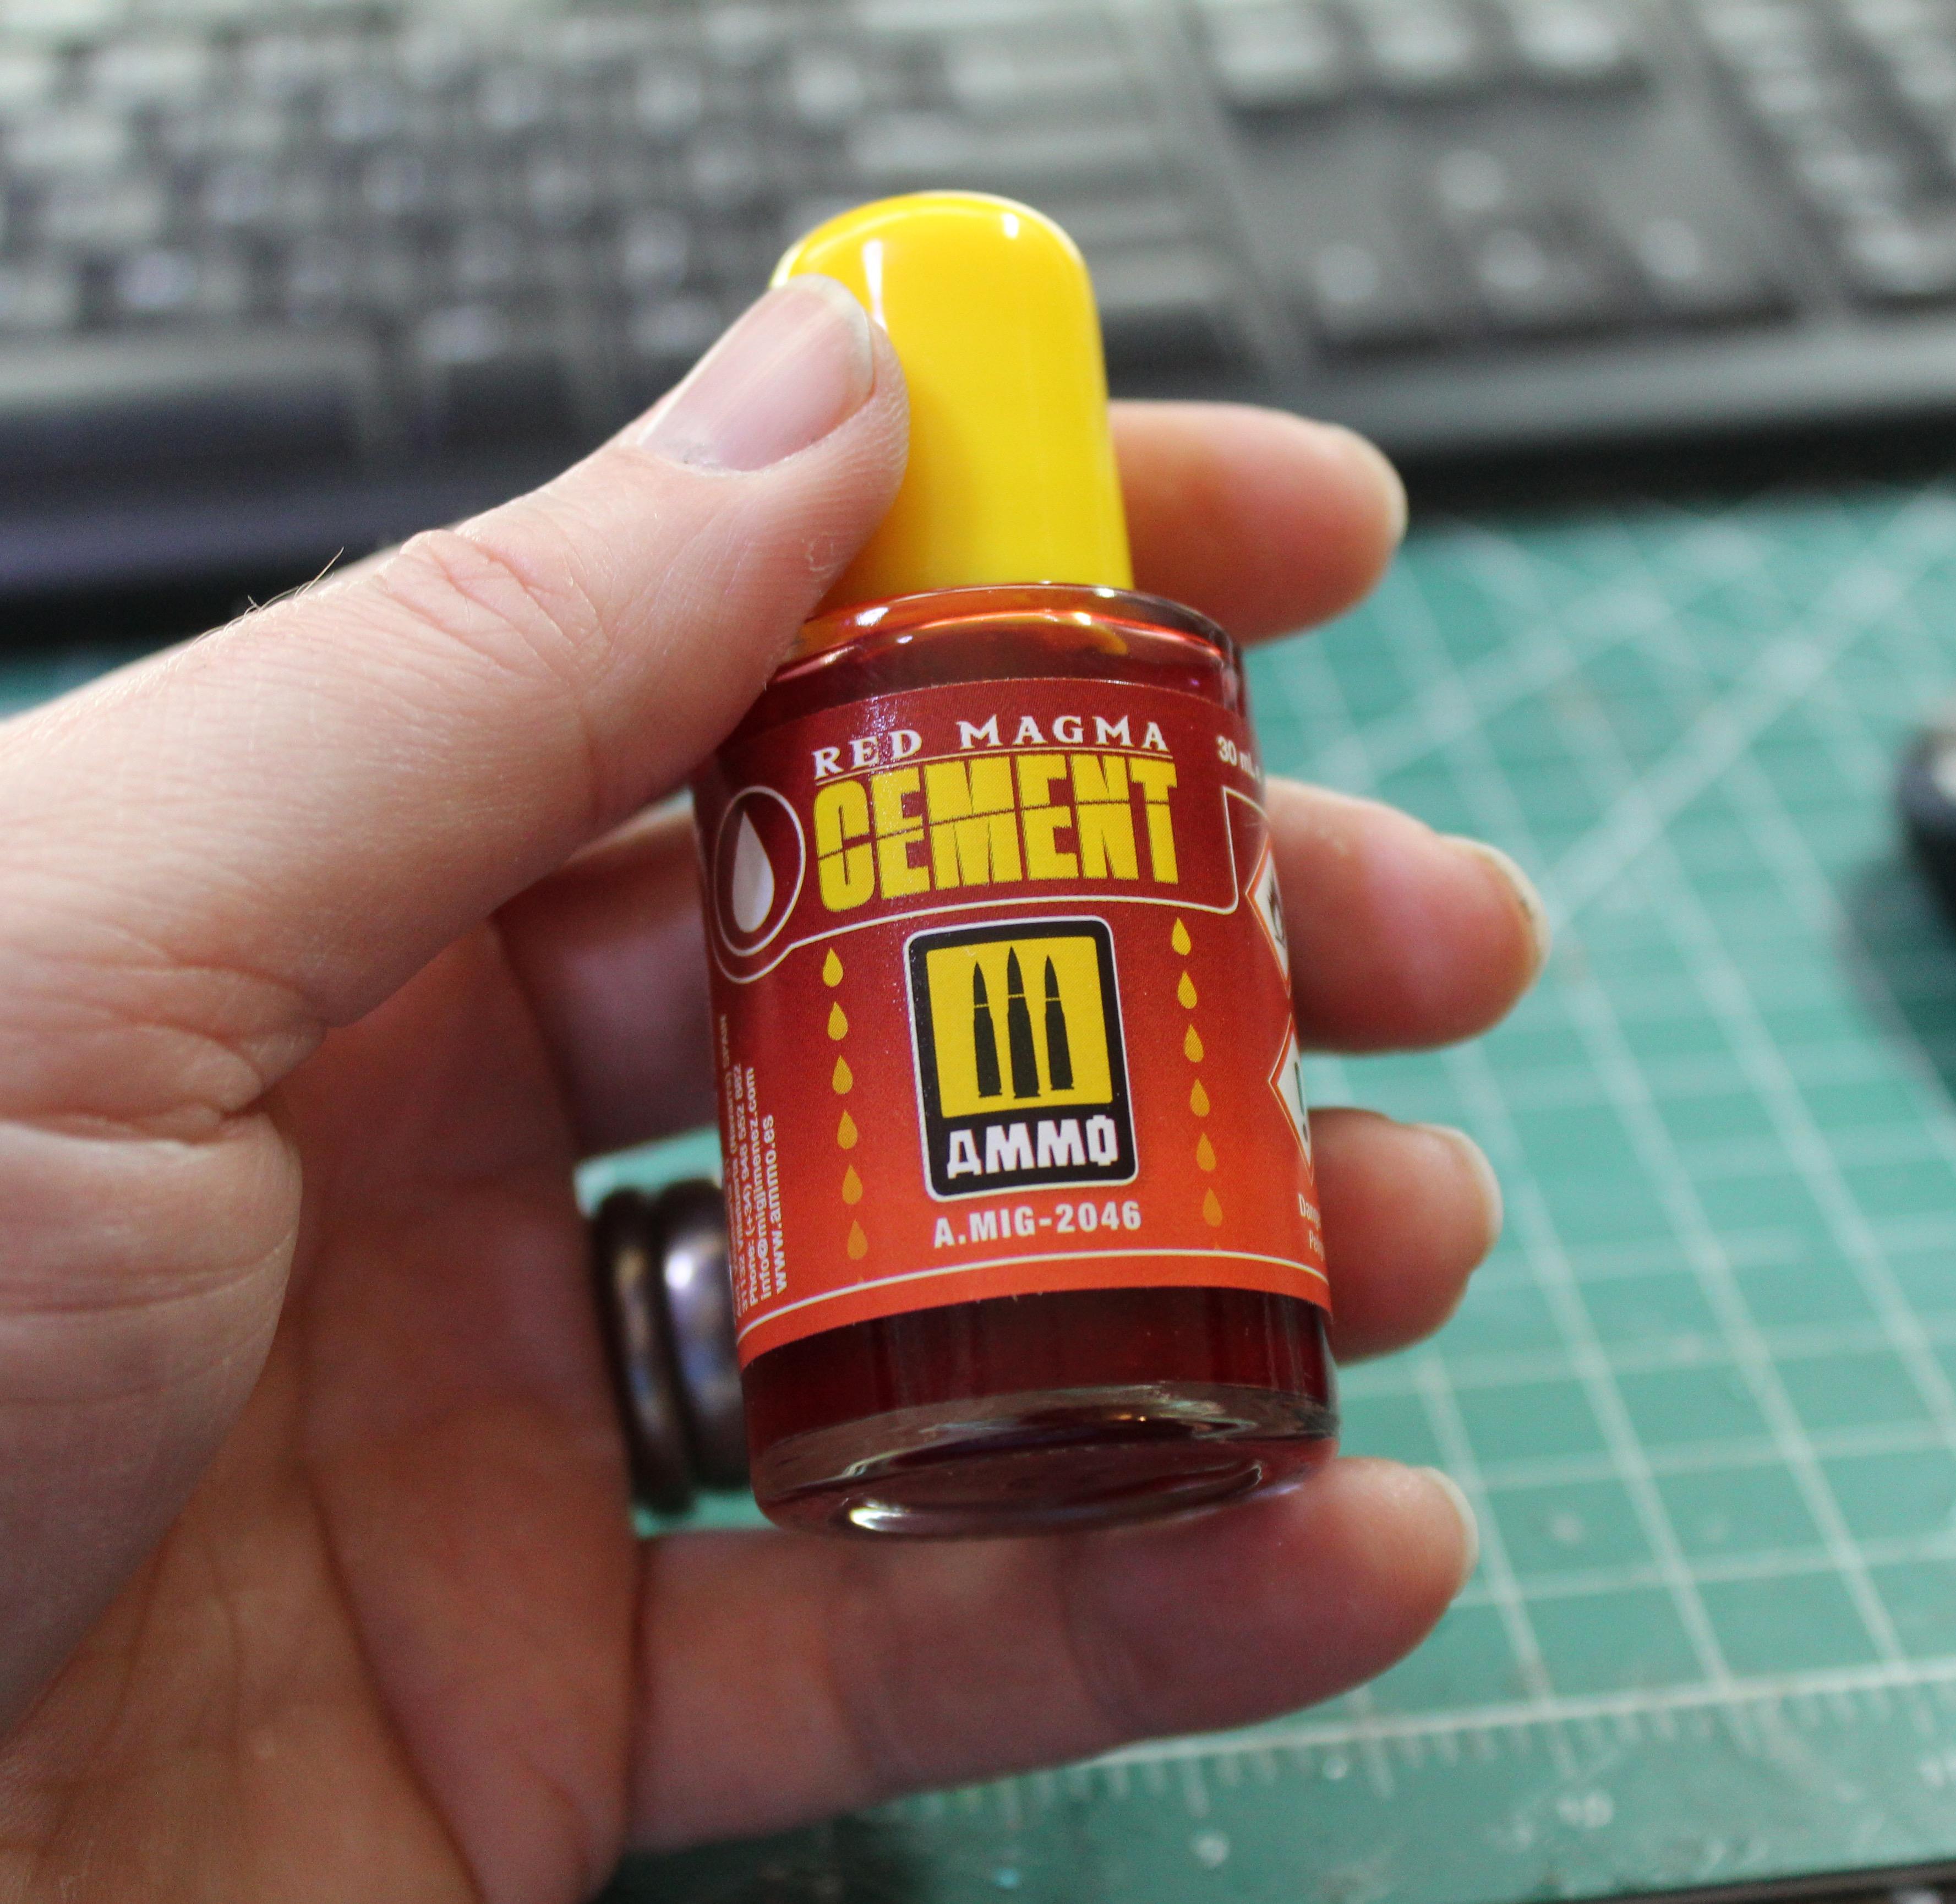
I actually started a project just like this last year, but then a slot-car guy offered me a STUPID price to buy the airbrushed body I had done…so here goes again. I got inspired by the super-short-track grass-roots racing at my local County Fair last year and already built a Crown Vic for their mostly-stock low-contact dirt oval class that they run once a year. The track is a tiny tiny oval, hard packed sun-baked dirt and the class is mostly-stock cars with a few minor tweaks for safety and race-ability. Of course, there were some definite ringers out there taking it more serious than others, and this is going to be that kind of build I think… First up, trip to Hobby Lobby to choose a Mustang: Went with this…probably still too nice of a car in 1:1 what I’m going to do with it, but about what I had in mind: Per my local event’s rules, the running gear is going to be mostly stock (ish), so the biggest change to the frame will be removal of the gas tank out back, to be replaced with a fuel cell in the cabin somewhere: Those tires are printed replicas of the smallest cheapest Hoosier dirt oval tire - one of the standard picks for most entry-level classes currently. They’re a little smaller than the stock tires, so I’ll need to tweak the suspension SLIGHTLY to stop this thing completely sitting in the dirt (literally) but this particular kit seems to always sit high in the front anyway so I’ll tweak accordingly as I go… Some assembly on the body so I can test fit to the frame and see how it’ll look: Incidentally, I’m trying this Ammo tinted styrene cement…I like the idea that it makes it super easy to see where you’re applying it, and the brush is awesome - super skinny and long like a pinstriping brush. One of my things that I’m trying to improve is getting my glue application really neat and clinical, and this stuff REALLY shows if I’m not doing well at that… Mock-up with the body and stock suspension: As expected, nose sits too high, rear too low (especially with these smaller but wider tires). A little tweaking later: Better…still a little high in the front but I can tweak a scale inch out of there by playing with the front spindles a little. Then, because I had a few minutes of benchtime left, scratchbuilt a couple of simple (and intentionally fairly subtle) bumper…the class at my local Fair is ALMOST non-contact, but some gentle nudging is allowed so a simple round-tube front and rear bumper that don’t ruin the look I have in mind would probably be sensible: And that’s my first afternoon’s progress…thanks for looking!
-
Picked up the new Ammo colored styrene cement: Premise is, you can see a little easier your glue joints to make sure you got ‘em as good as you’d like I guess. Pretty sure it’s a gimmick, but I wanted to try it anyway…
- 38,868 replies
-
- 1
-
-
- johan
- glue bombs
- (and 1 more)
-
This is killer - really nice work on not-the-best kit
-
Have You Ever Needlessly Ordered Anything?
OldNYJim replied to Bill Anderson's topic in Model Building Questions and Answers
For a while, our local Hobby Lobby was, for some reason, putting one on the shelf every week it seemed like. I think I ended up going there every week for months, back when the 40% voucher worked every week 😂 -
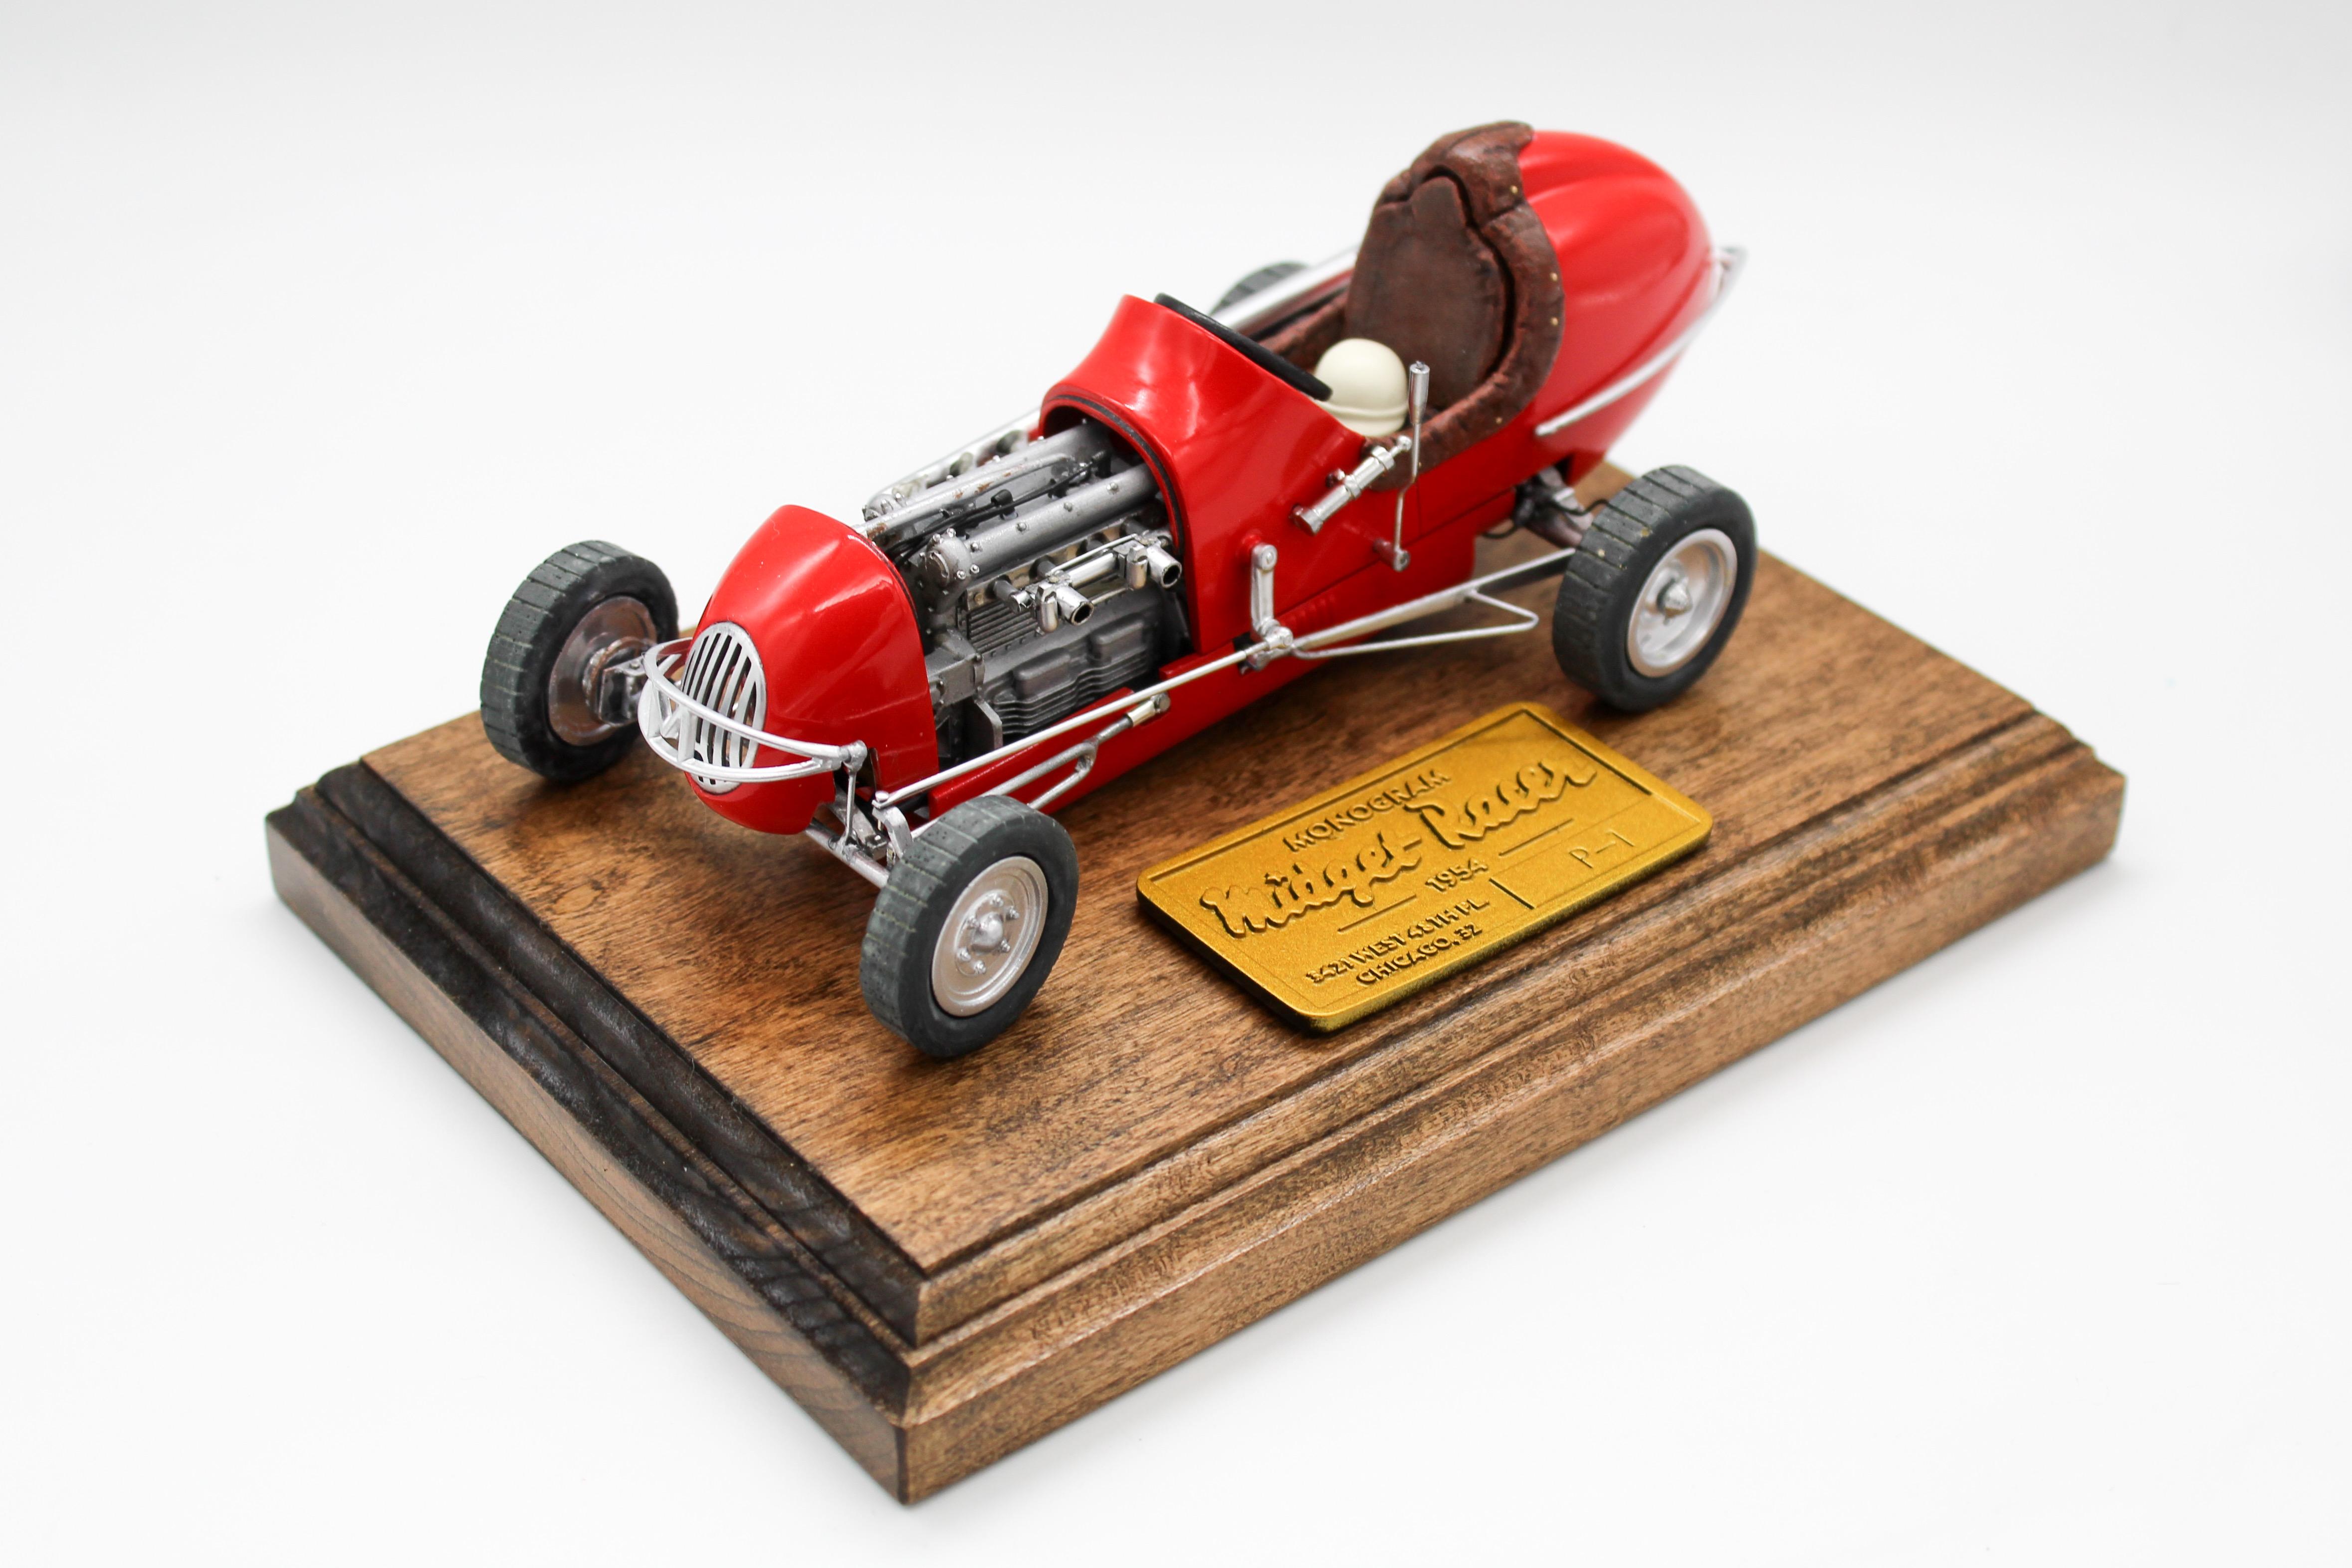
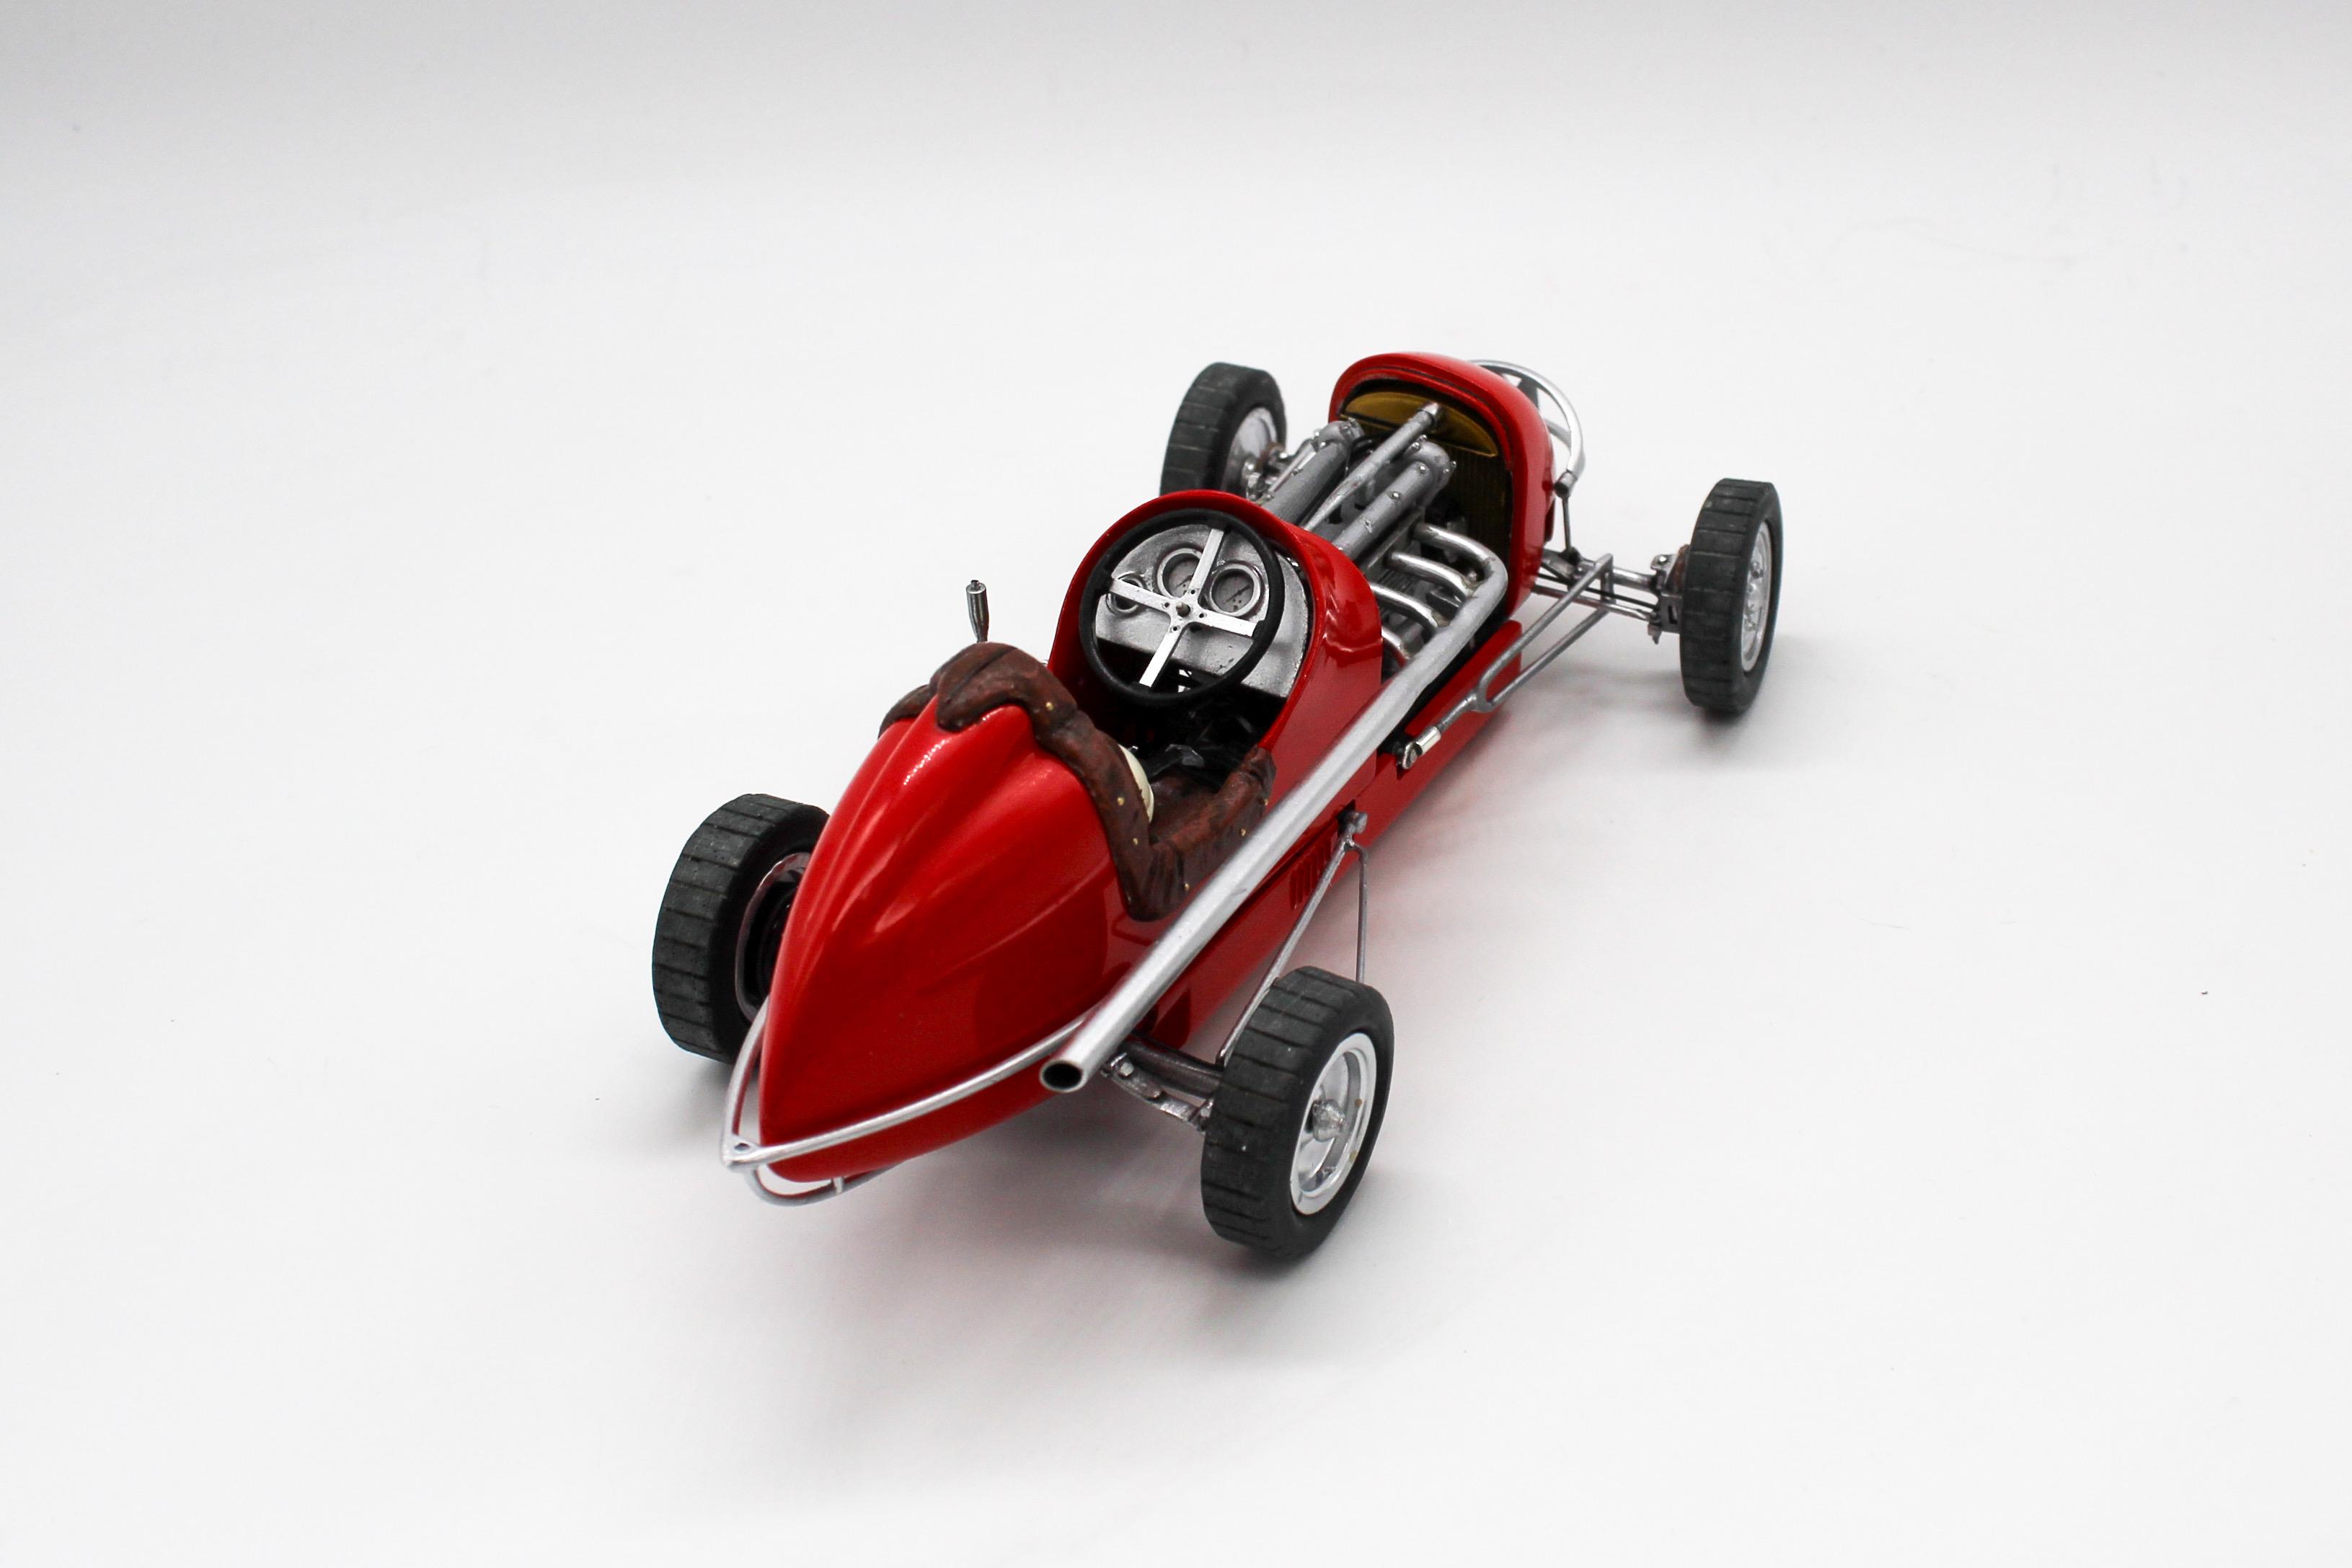
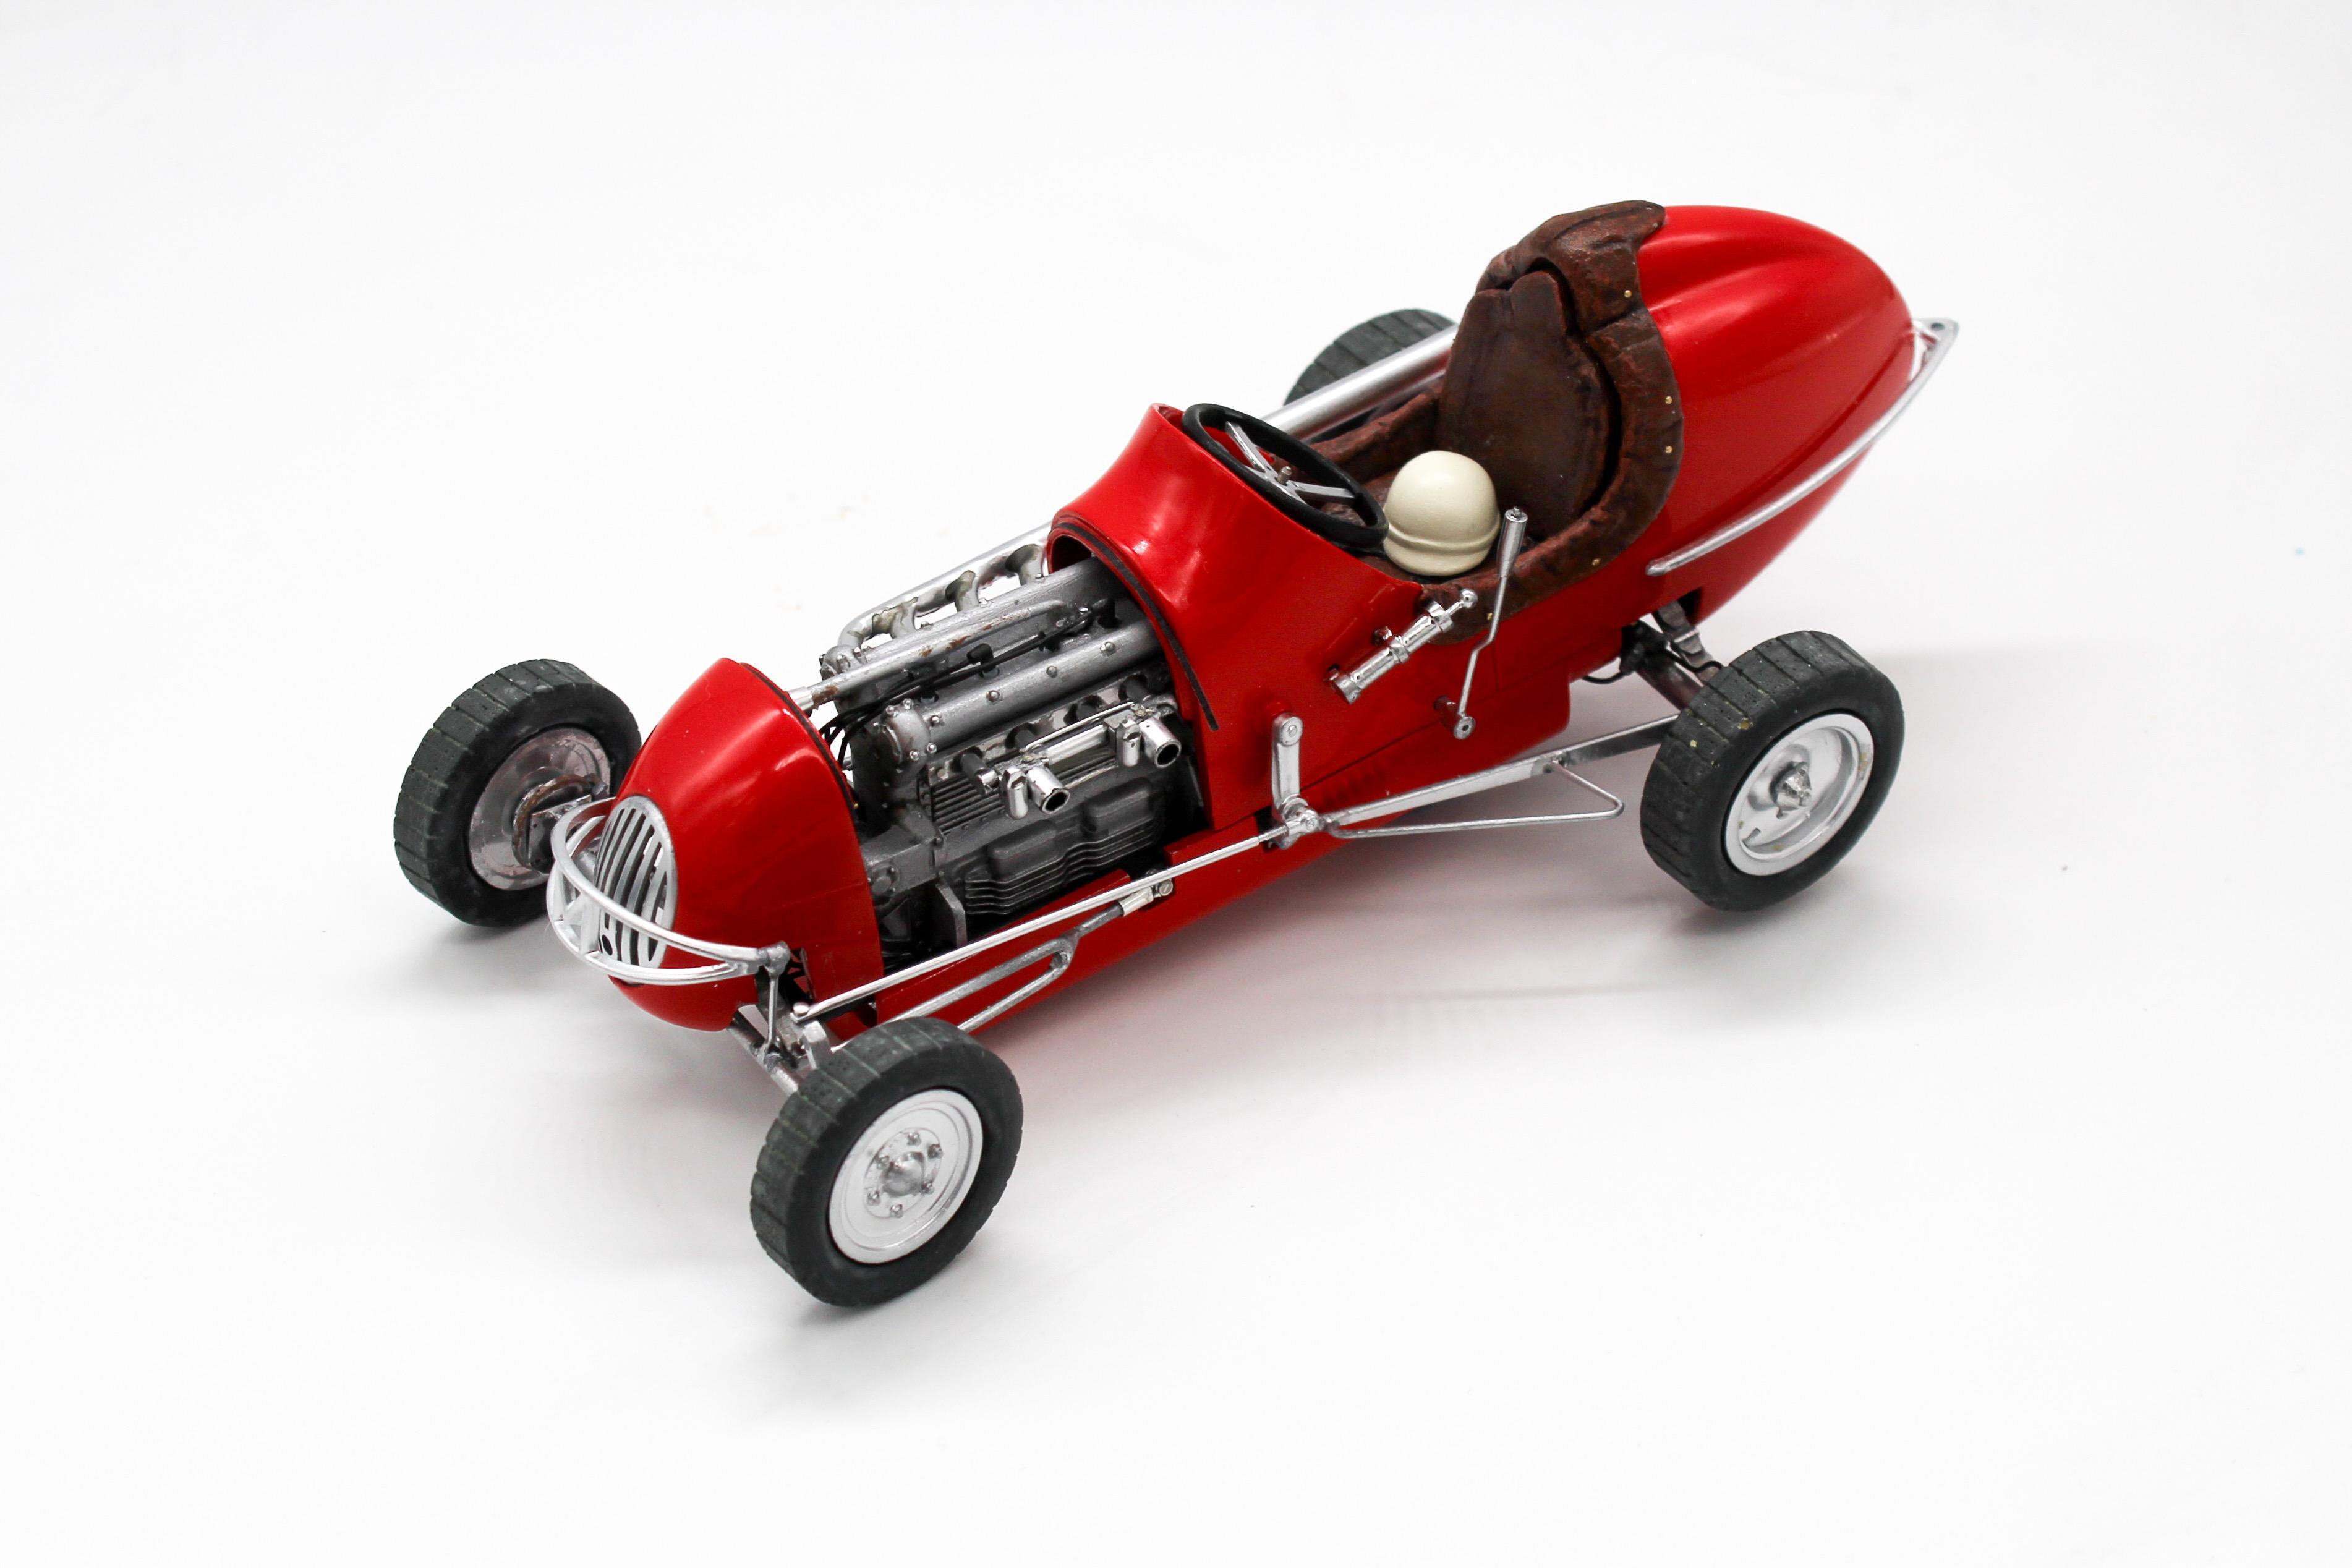
Thank you both! Mostly this one up last night…few little details added, painted the plaque for the base (same shade as the brass rad) and it’s ready for the display case: And a few off the base: Thanks to all who followed along…onto the next one 😂
-
Thank you sir! Some more progress this weekend…most of which was assembly so not a tonne of interesting processes to share - just don’t screw it up 😂 Spent the morning plumbing brake lines, adding fuel lines and carb linkages and all that stuff: Now I don’t need access to the underside anymore I can fit the belly pan: The tires got a very light glaze of Vallejo dust, just to get a little in some of the cracks and crevices. Next up, wheels and tires attached… …and then nerf bars to the body and frame - plus that hand fuel pump and brake lever: And it’s ALMOST done! Quick mock-up with the body in place…some more little details to add and I need to paint the plaque and do some touch-ups and then I can get this thing on it’s wooden base and under glass: Thanks for looking - more soon!
-
That’s a beautiful (and well done) tribute!
-
Nice work so far - and you did a great job on those leaf springs!
-
OBS Monster Truck
OldNYJim replied to Valvefloat's topic in WIP: Model Trucks: Pickups, Vans, SUVs, Light Commercial
Color is cool! What is that? -
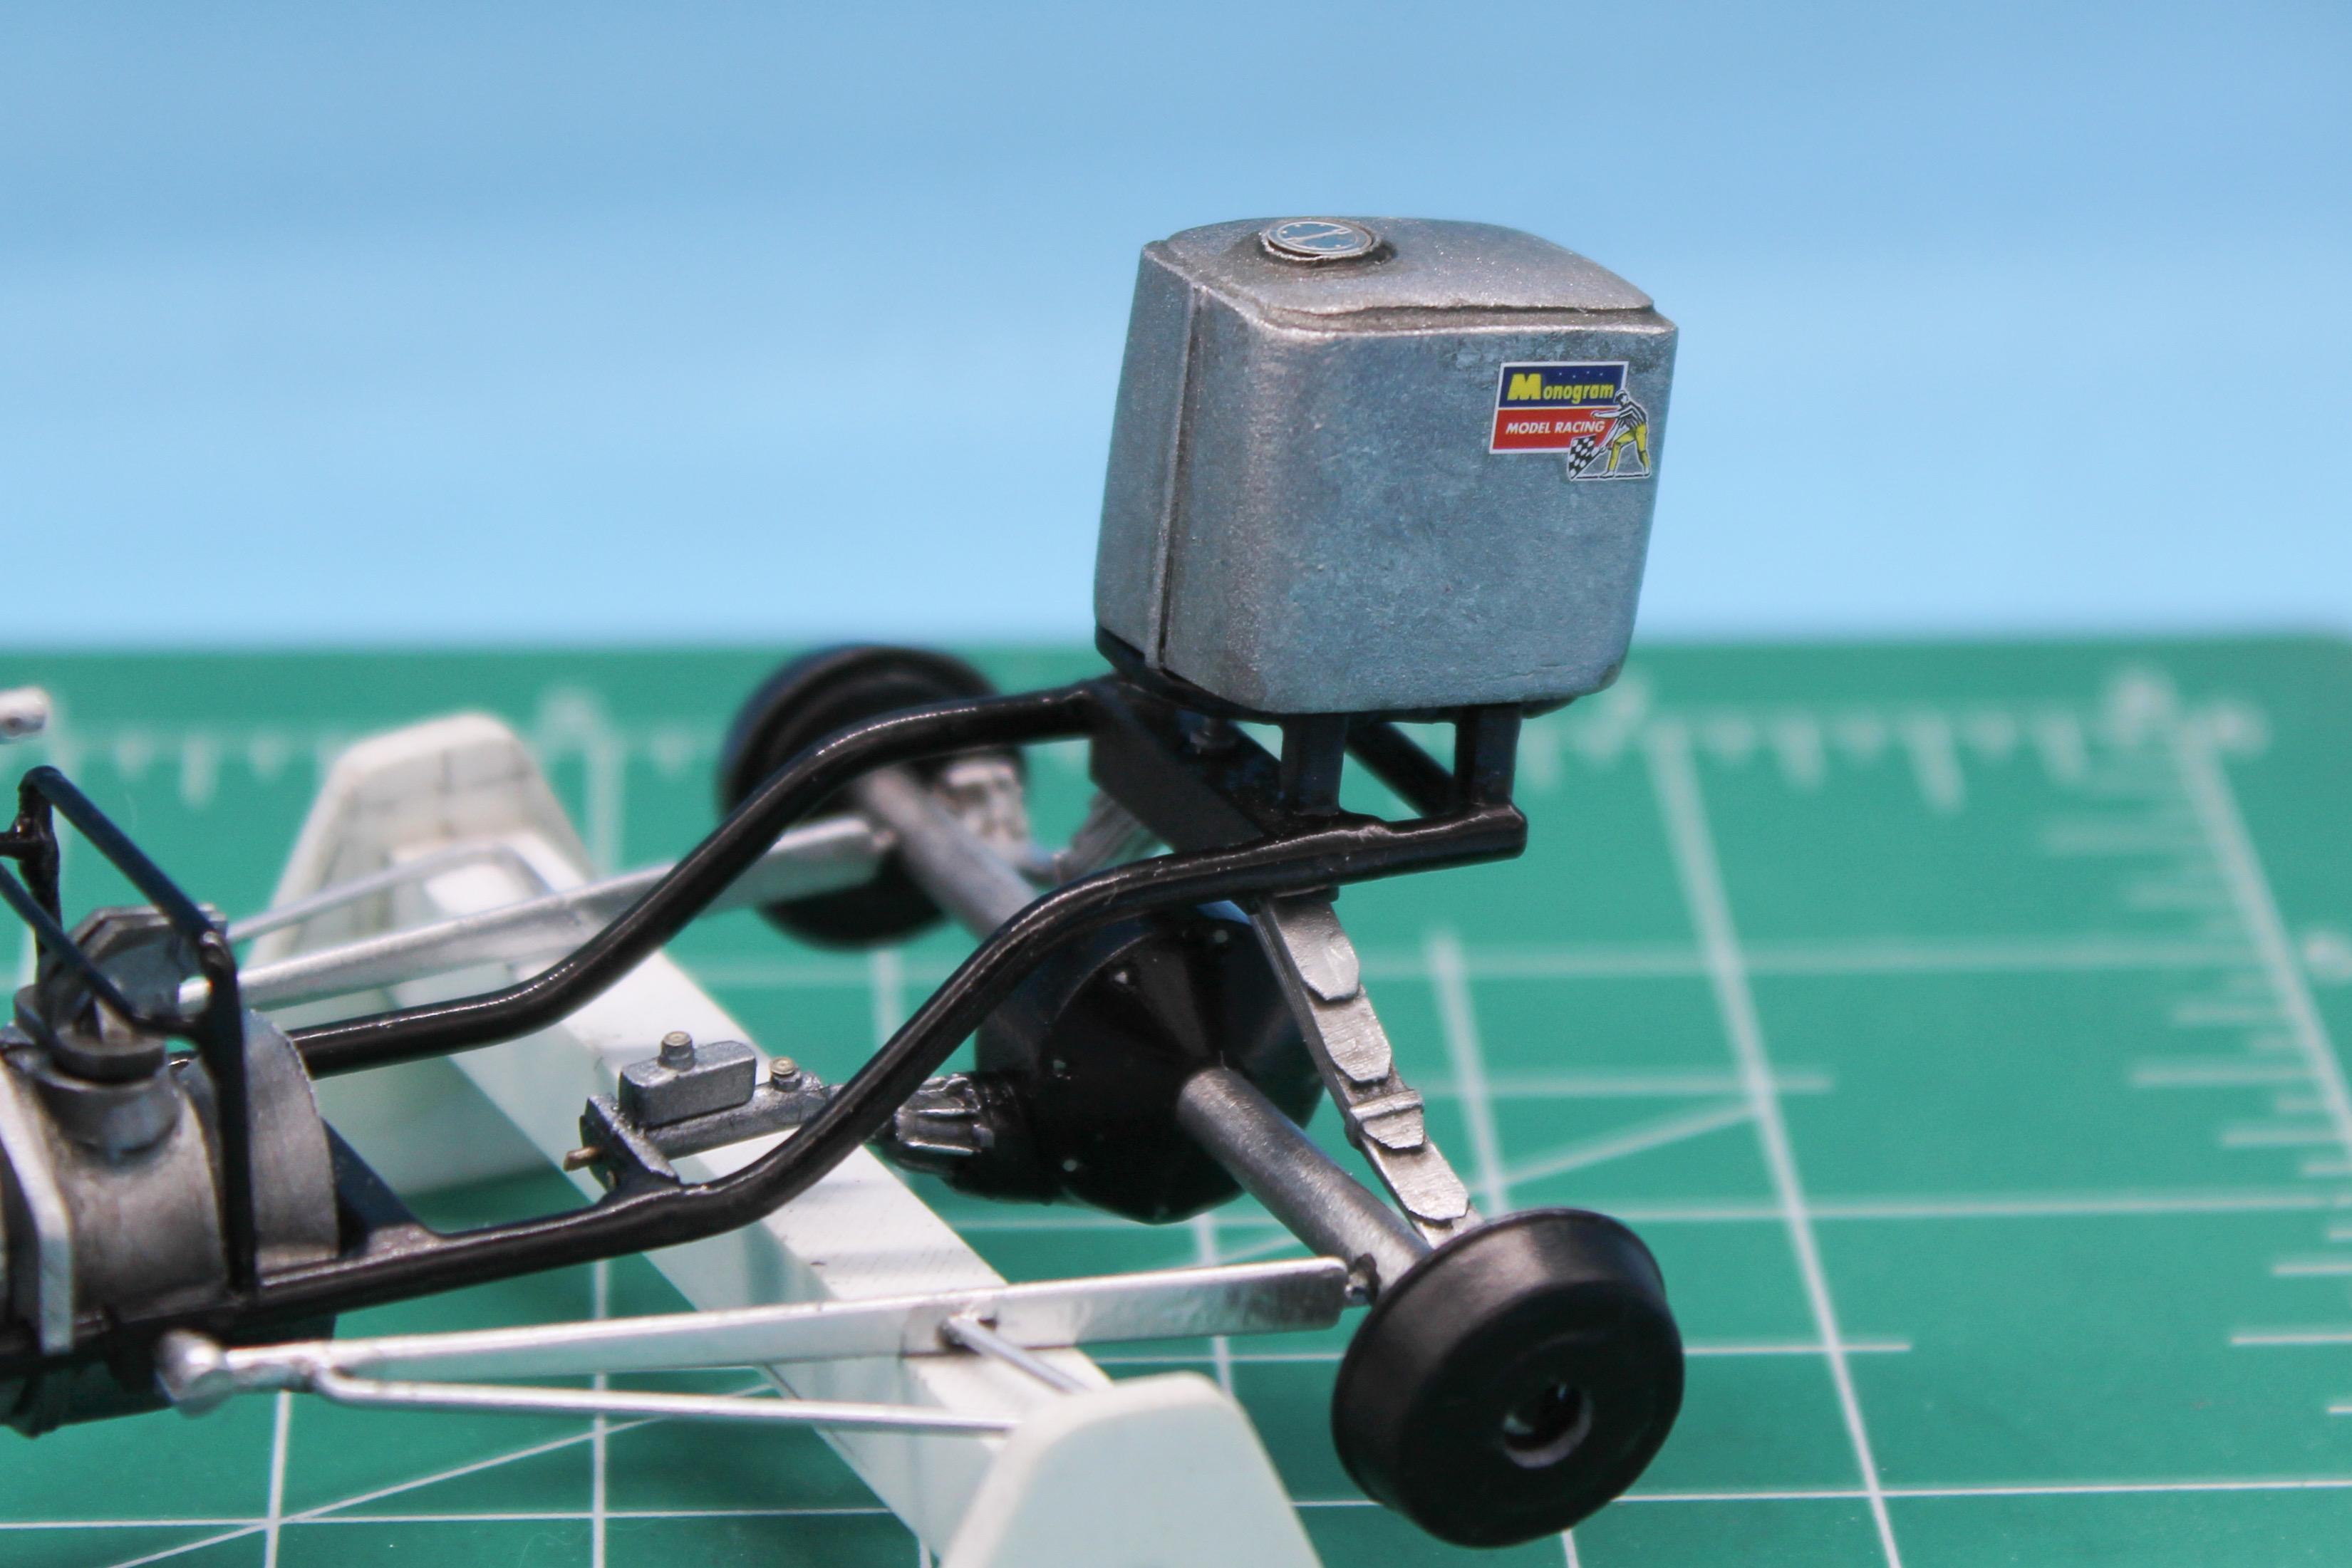
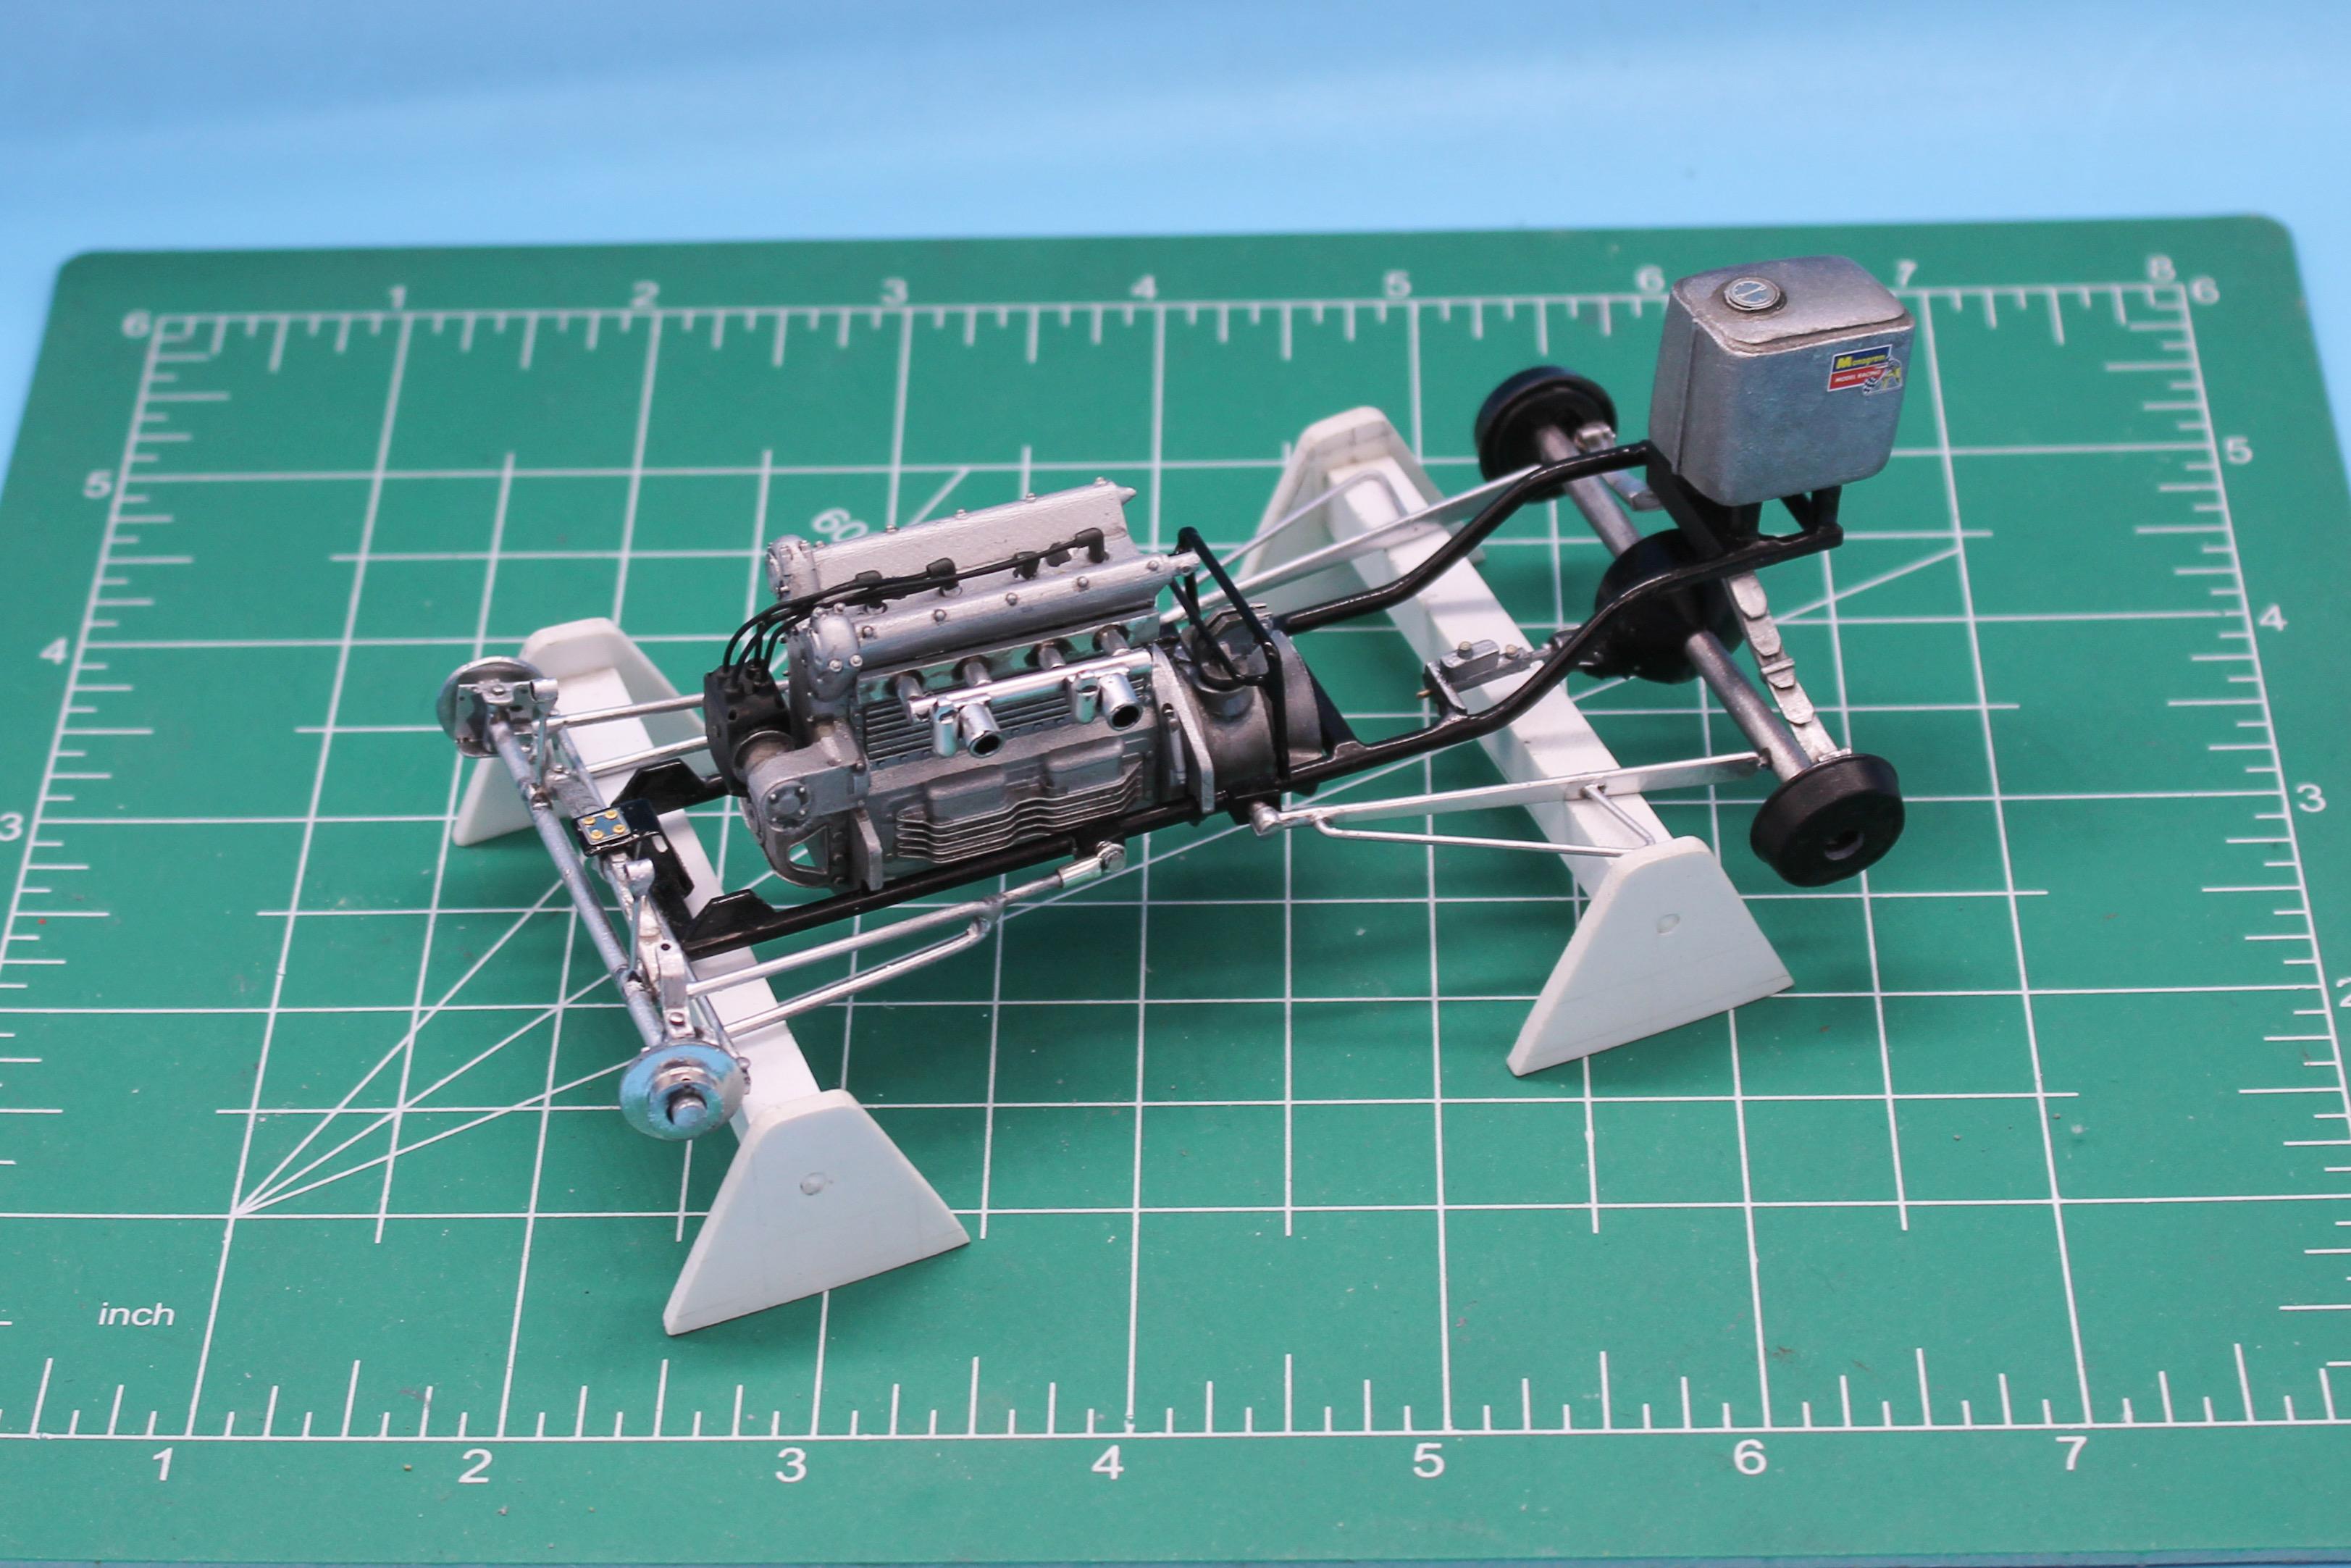
Thanks fellas! Pierre - I’m enjoying your Nova build! A little more progress this week…printed some plug boots…I have a technique to make these with wire, but I haven’t got it down to where they’re perfectly consistent like the printer can achieve… Some Vallejo tire-black is a really good finish for rubber parts like this: And while I had a couple of drops in the airbrush I did a little shading on the tires to add some interest to the Testor’s black enamel that I had shot previously: And then this evening, wired the engine: Still need to plumb the carbs and add linkages, but there’s relatively few bells and whistles that I need to add to this engine to have it where it’s relatively accurate and feasible. Meanwhile, speaking of fuel, finished work on the bare metal finish on my gas tank. This is the largest metal piece bar the engine, and I wanted to give it a fairly realistic look despite the fact it’s virtually impossible to see on the finished car from about any angle besides upside-down. Still, gave it my best effort anyway, and added a slightly-too-late-design Monogram logo, for my own amusement: Another couple of evenings work, another couple of parts closer to being done (but my to-do list is still plenty long - ha!) Thanks for looking - more soon!
-
Dr. Krook Patient Pending custom show rod.
OldNYJim replied to Silvercreeker's topic in WIP: Model Cars
Awesome, thank you! Great build so far! -
Issue 226 is On Its Way
OldNYJim replied to Dave Ambrose's topic in Model Cars Magazine News and Discussions
…and in NW Indiana today! -
Dr. Krook Patient Pending custom show rod.
OldNYJim replied to Silvercreeker's topic in WIP: Model Cars
This is awesome! Nice work! Did you print the Richard Carroll looking tires? Would love to know where you found the file for those! -
White Createx is tough to airbrush - it’s not their most user friendly color. If you have a store near you that stocks Vallejo, what I would do in this situation is pick up some of THEIR white, or optionally the Tamiya acrylic white, mask the blue areas that need to stay blue, and reshoot the white Both of those white acrylics are super easy to spray, very opaque, and save a complete strip & redo
-
34 ford
OldNYJim replied to johnyrotten's topic in WIP: Model Trucks: Pickups, Vans, SUVs, Light Commercial
The realistic weathering on this one, coupled with the stance and super-rare blower are knocking this one out of the park. Nice work! -
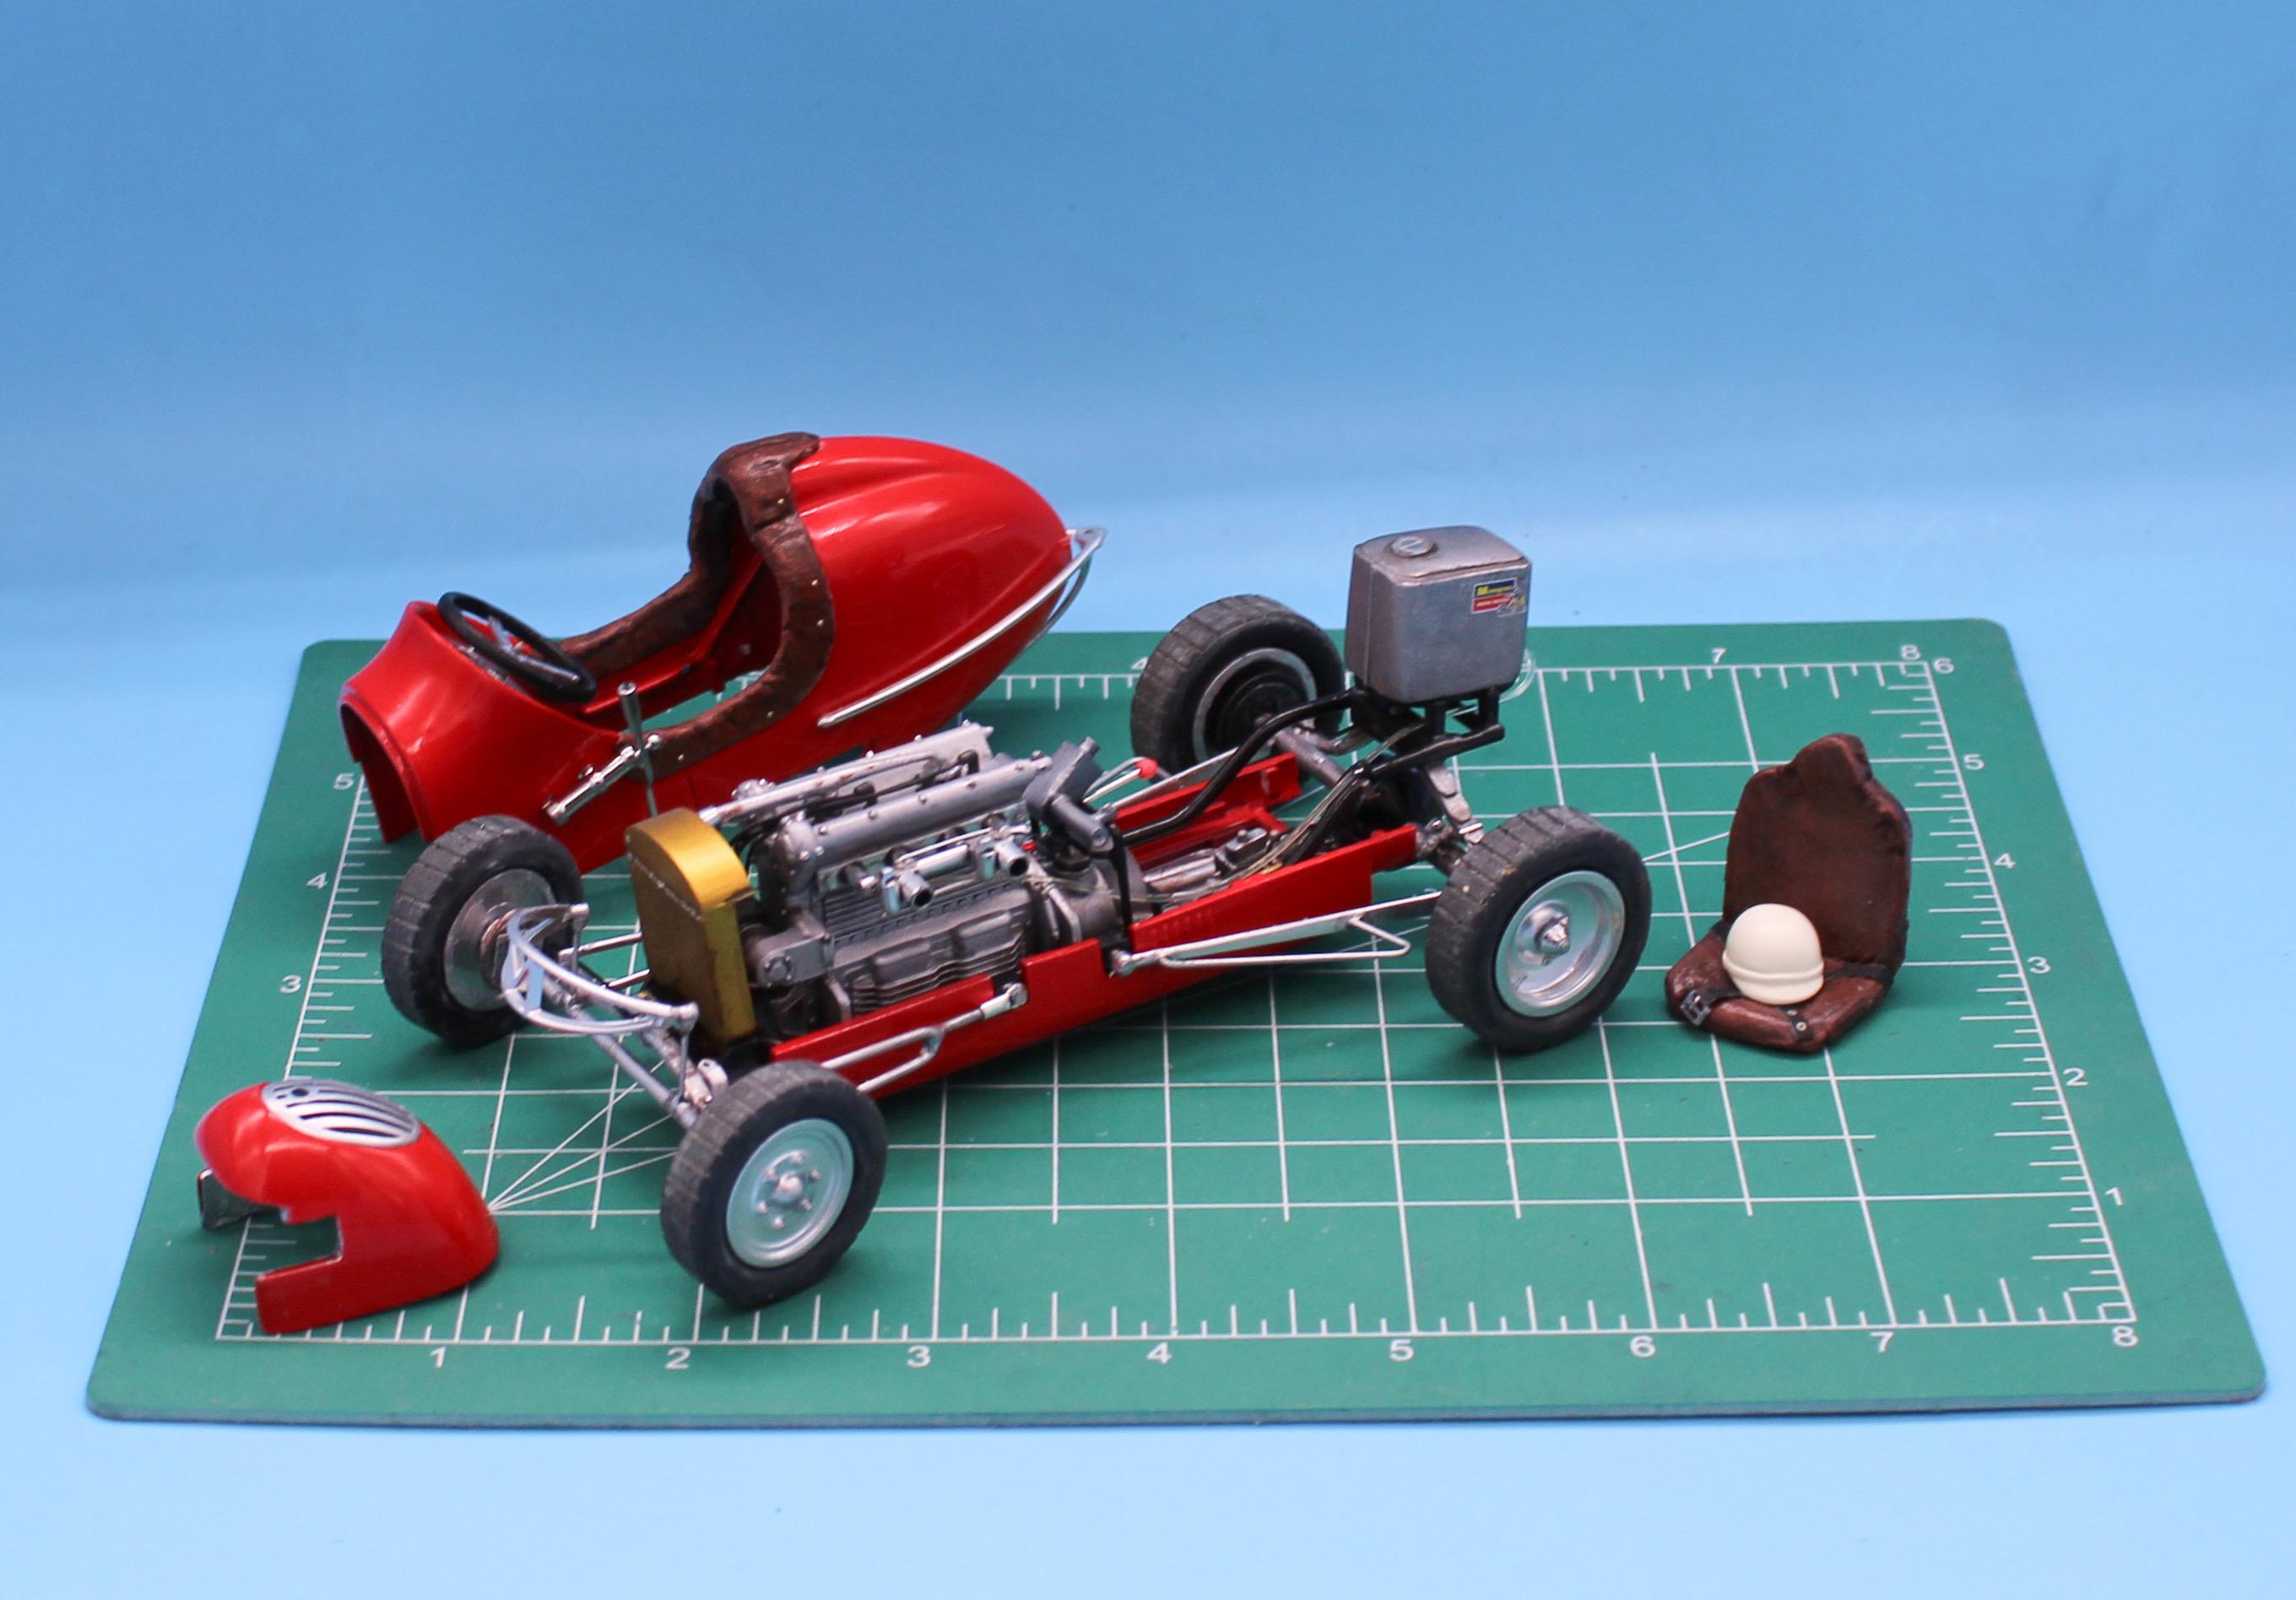
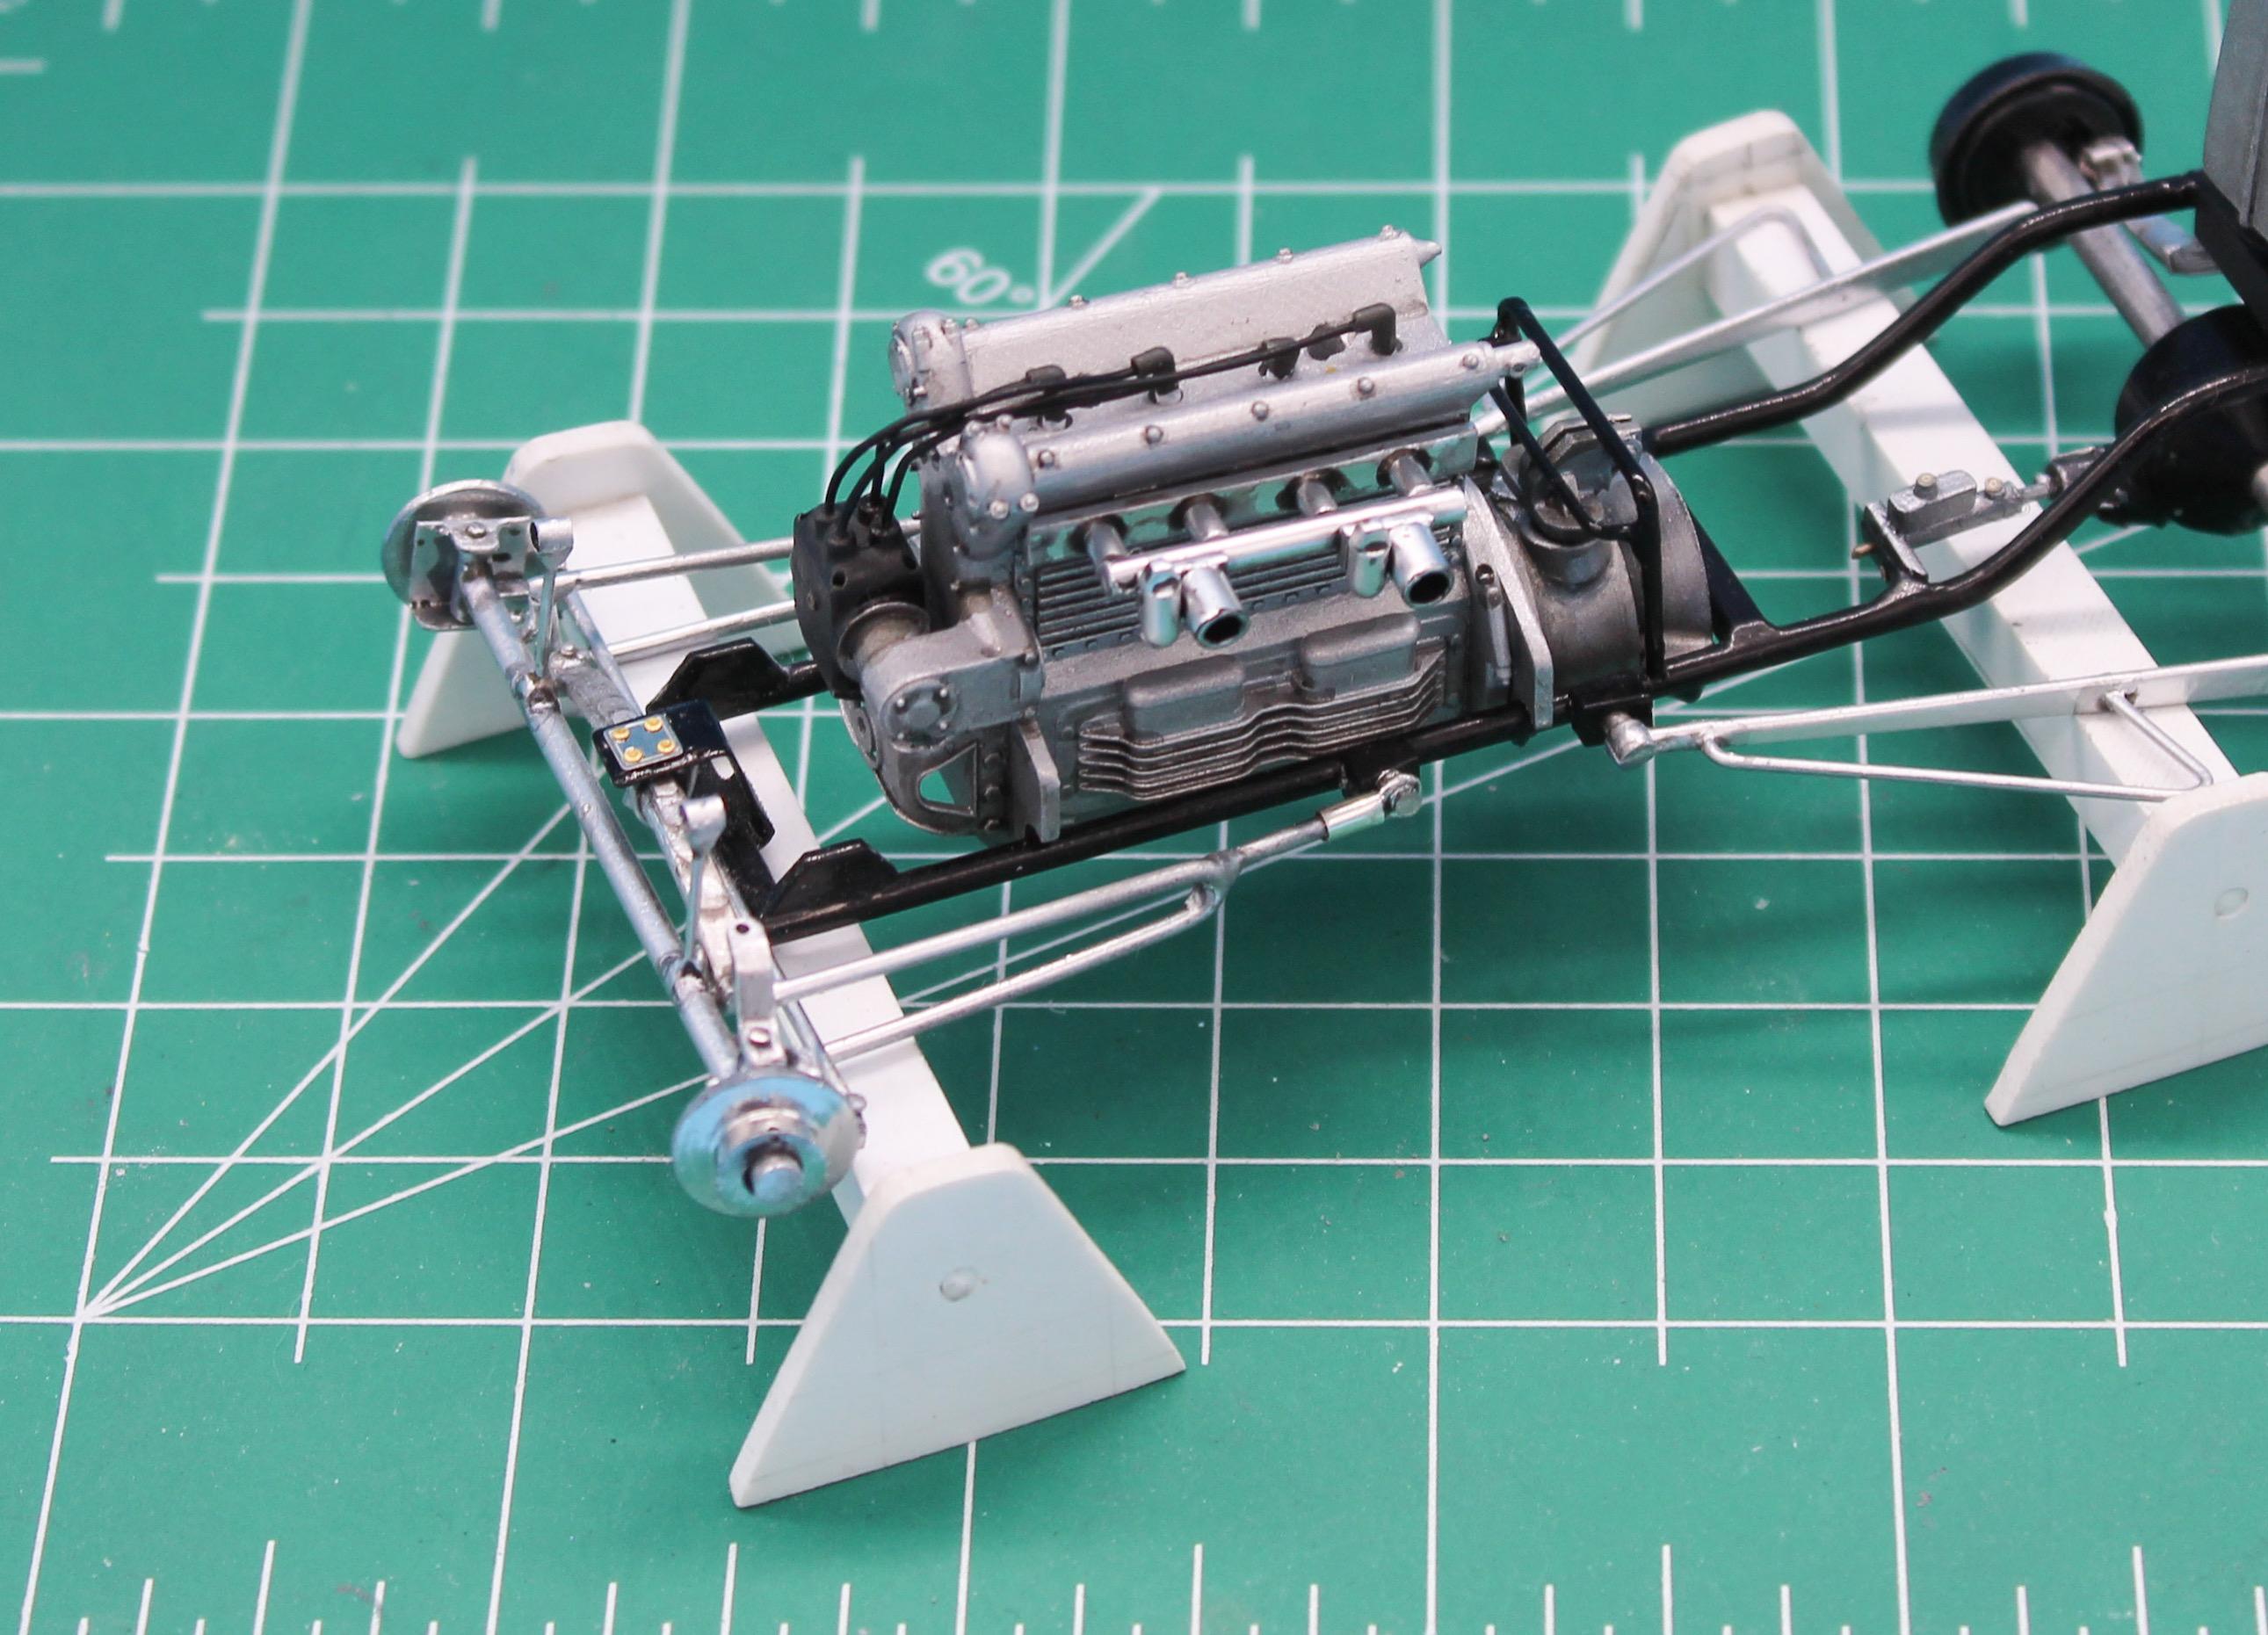
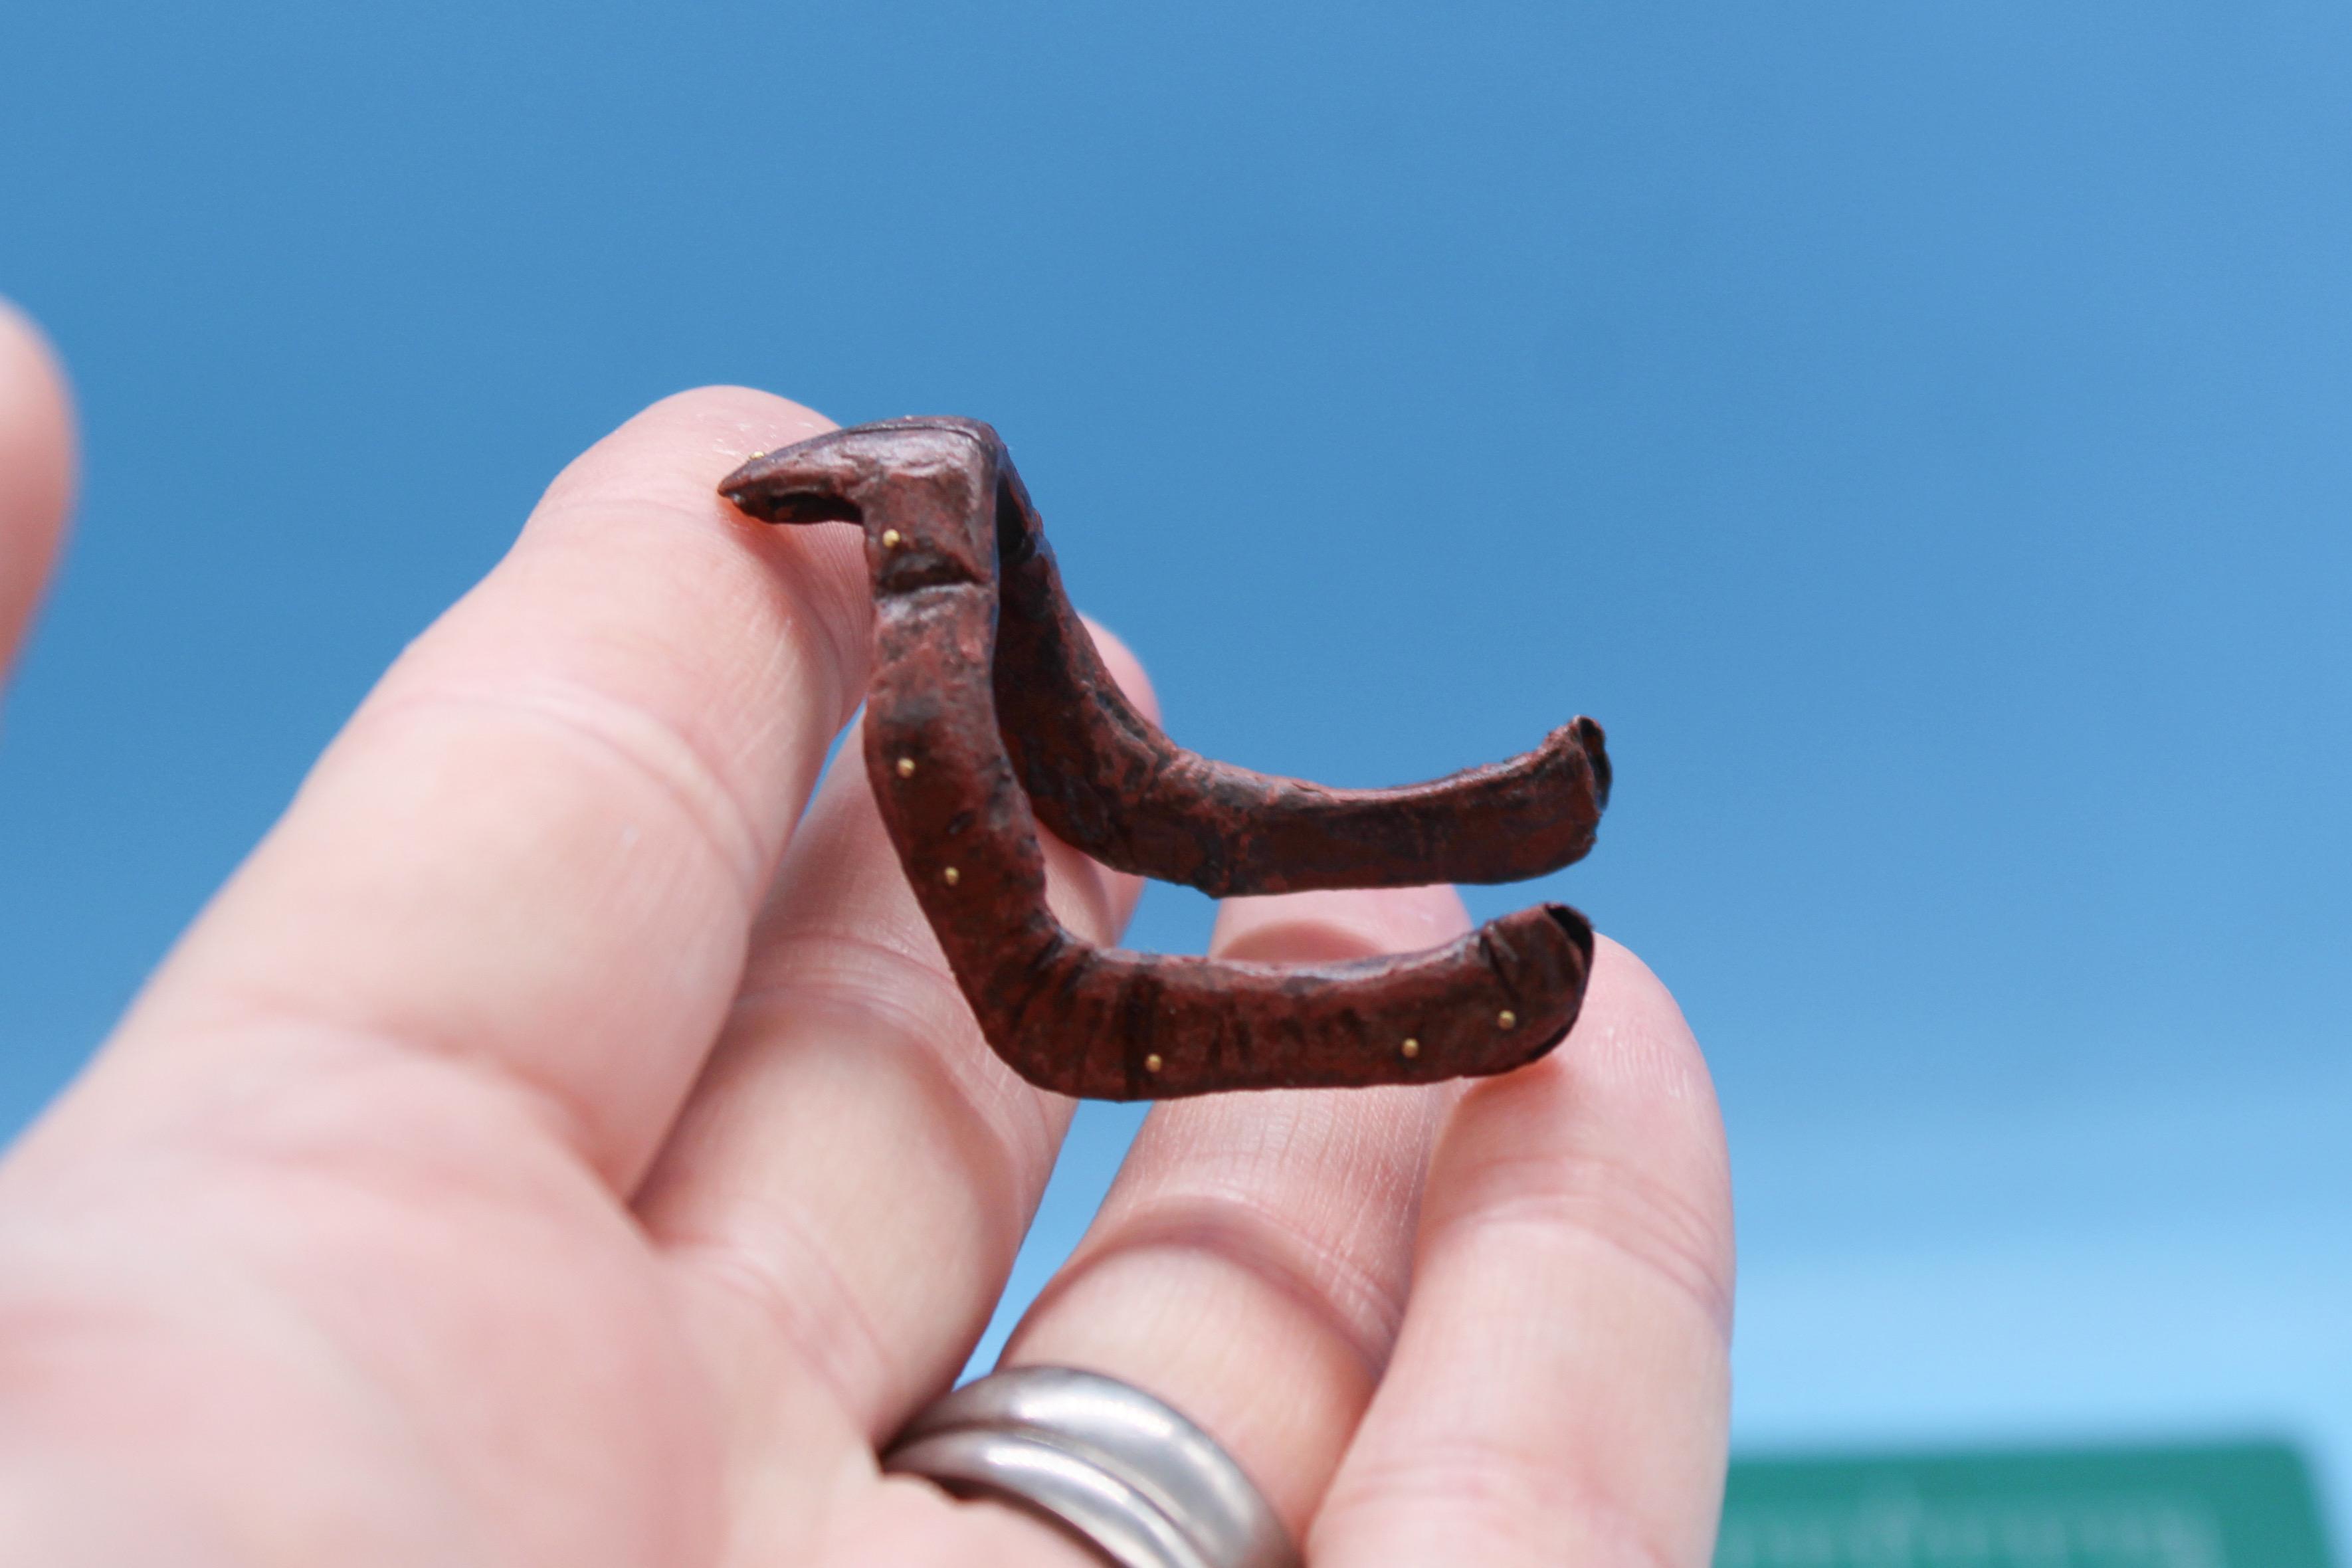
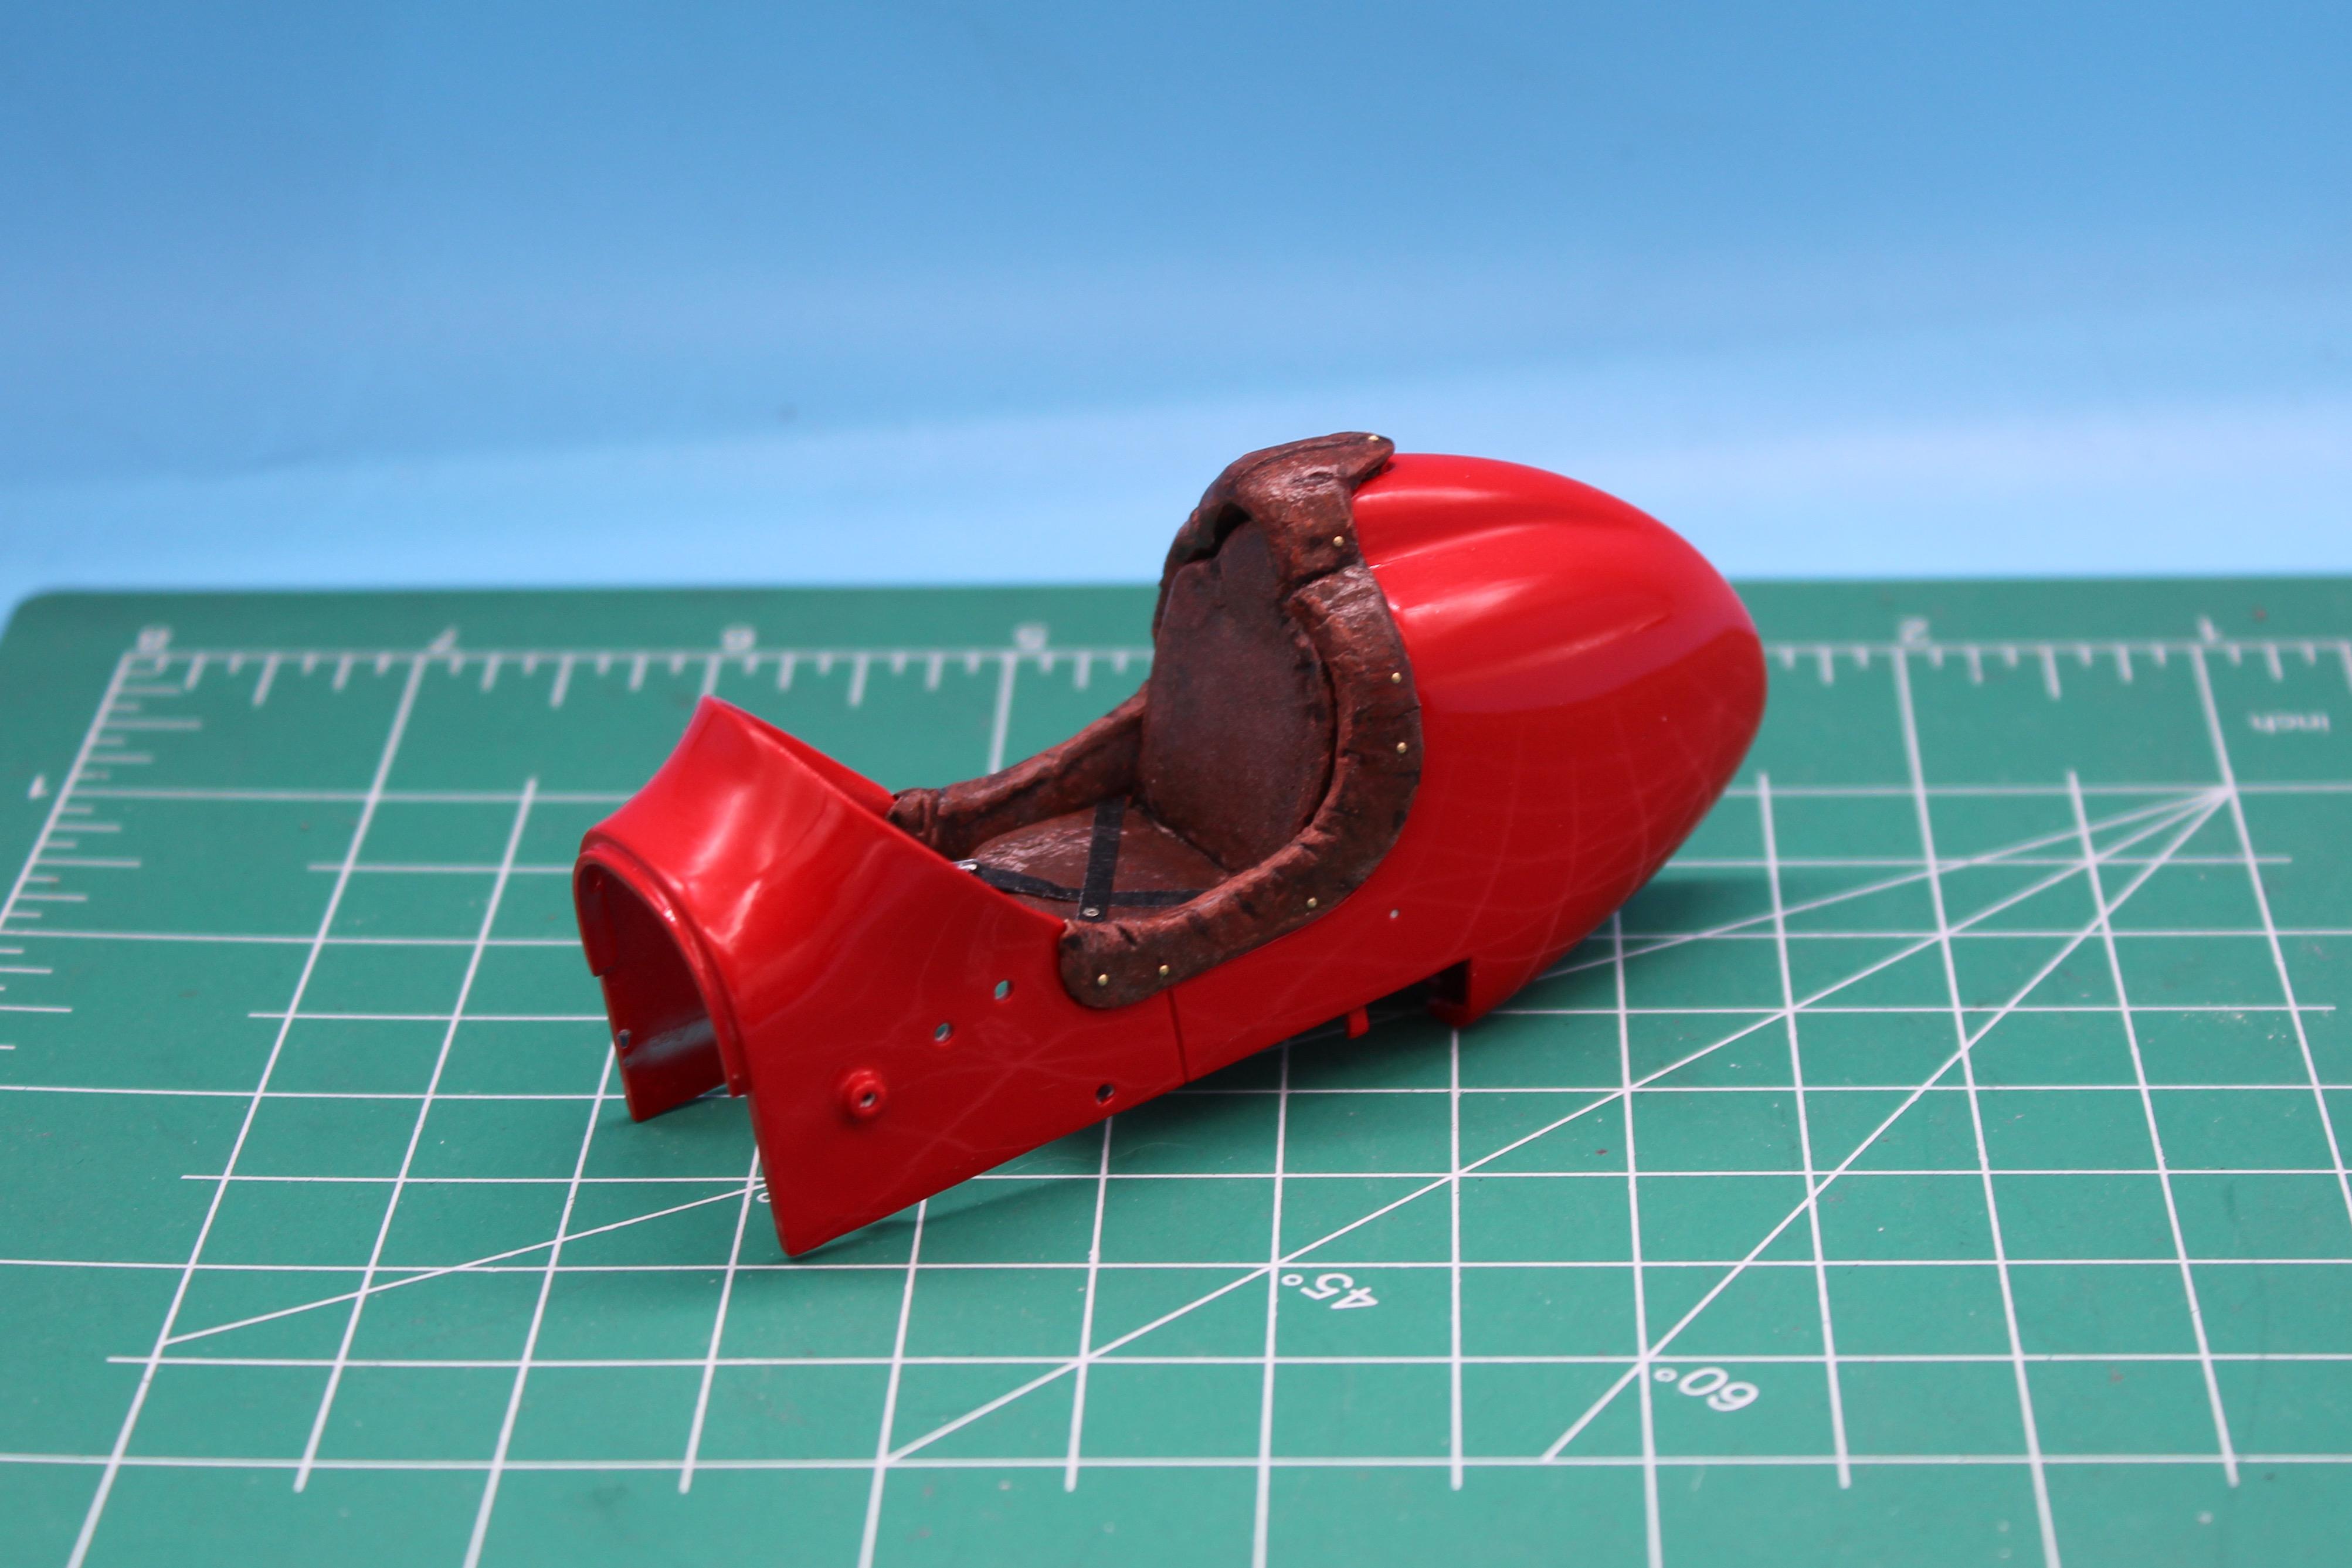
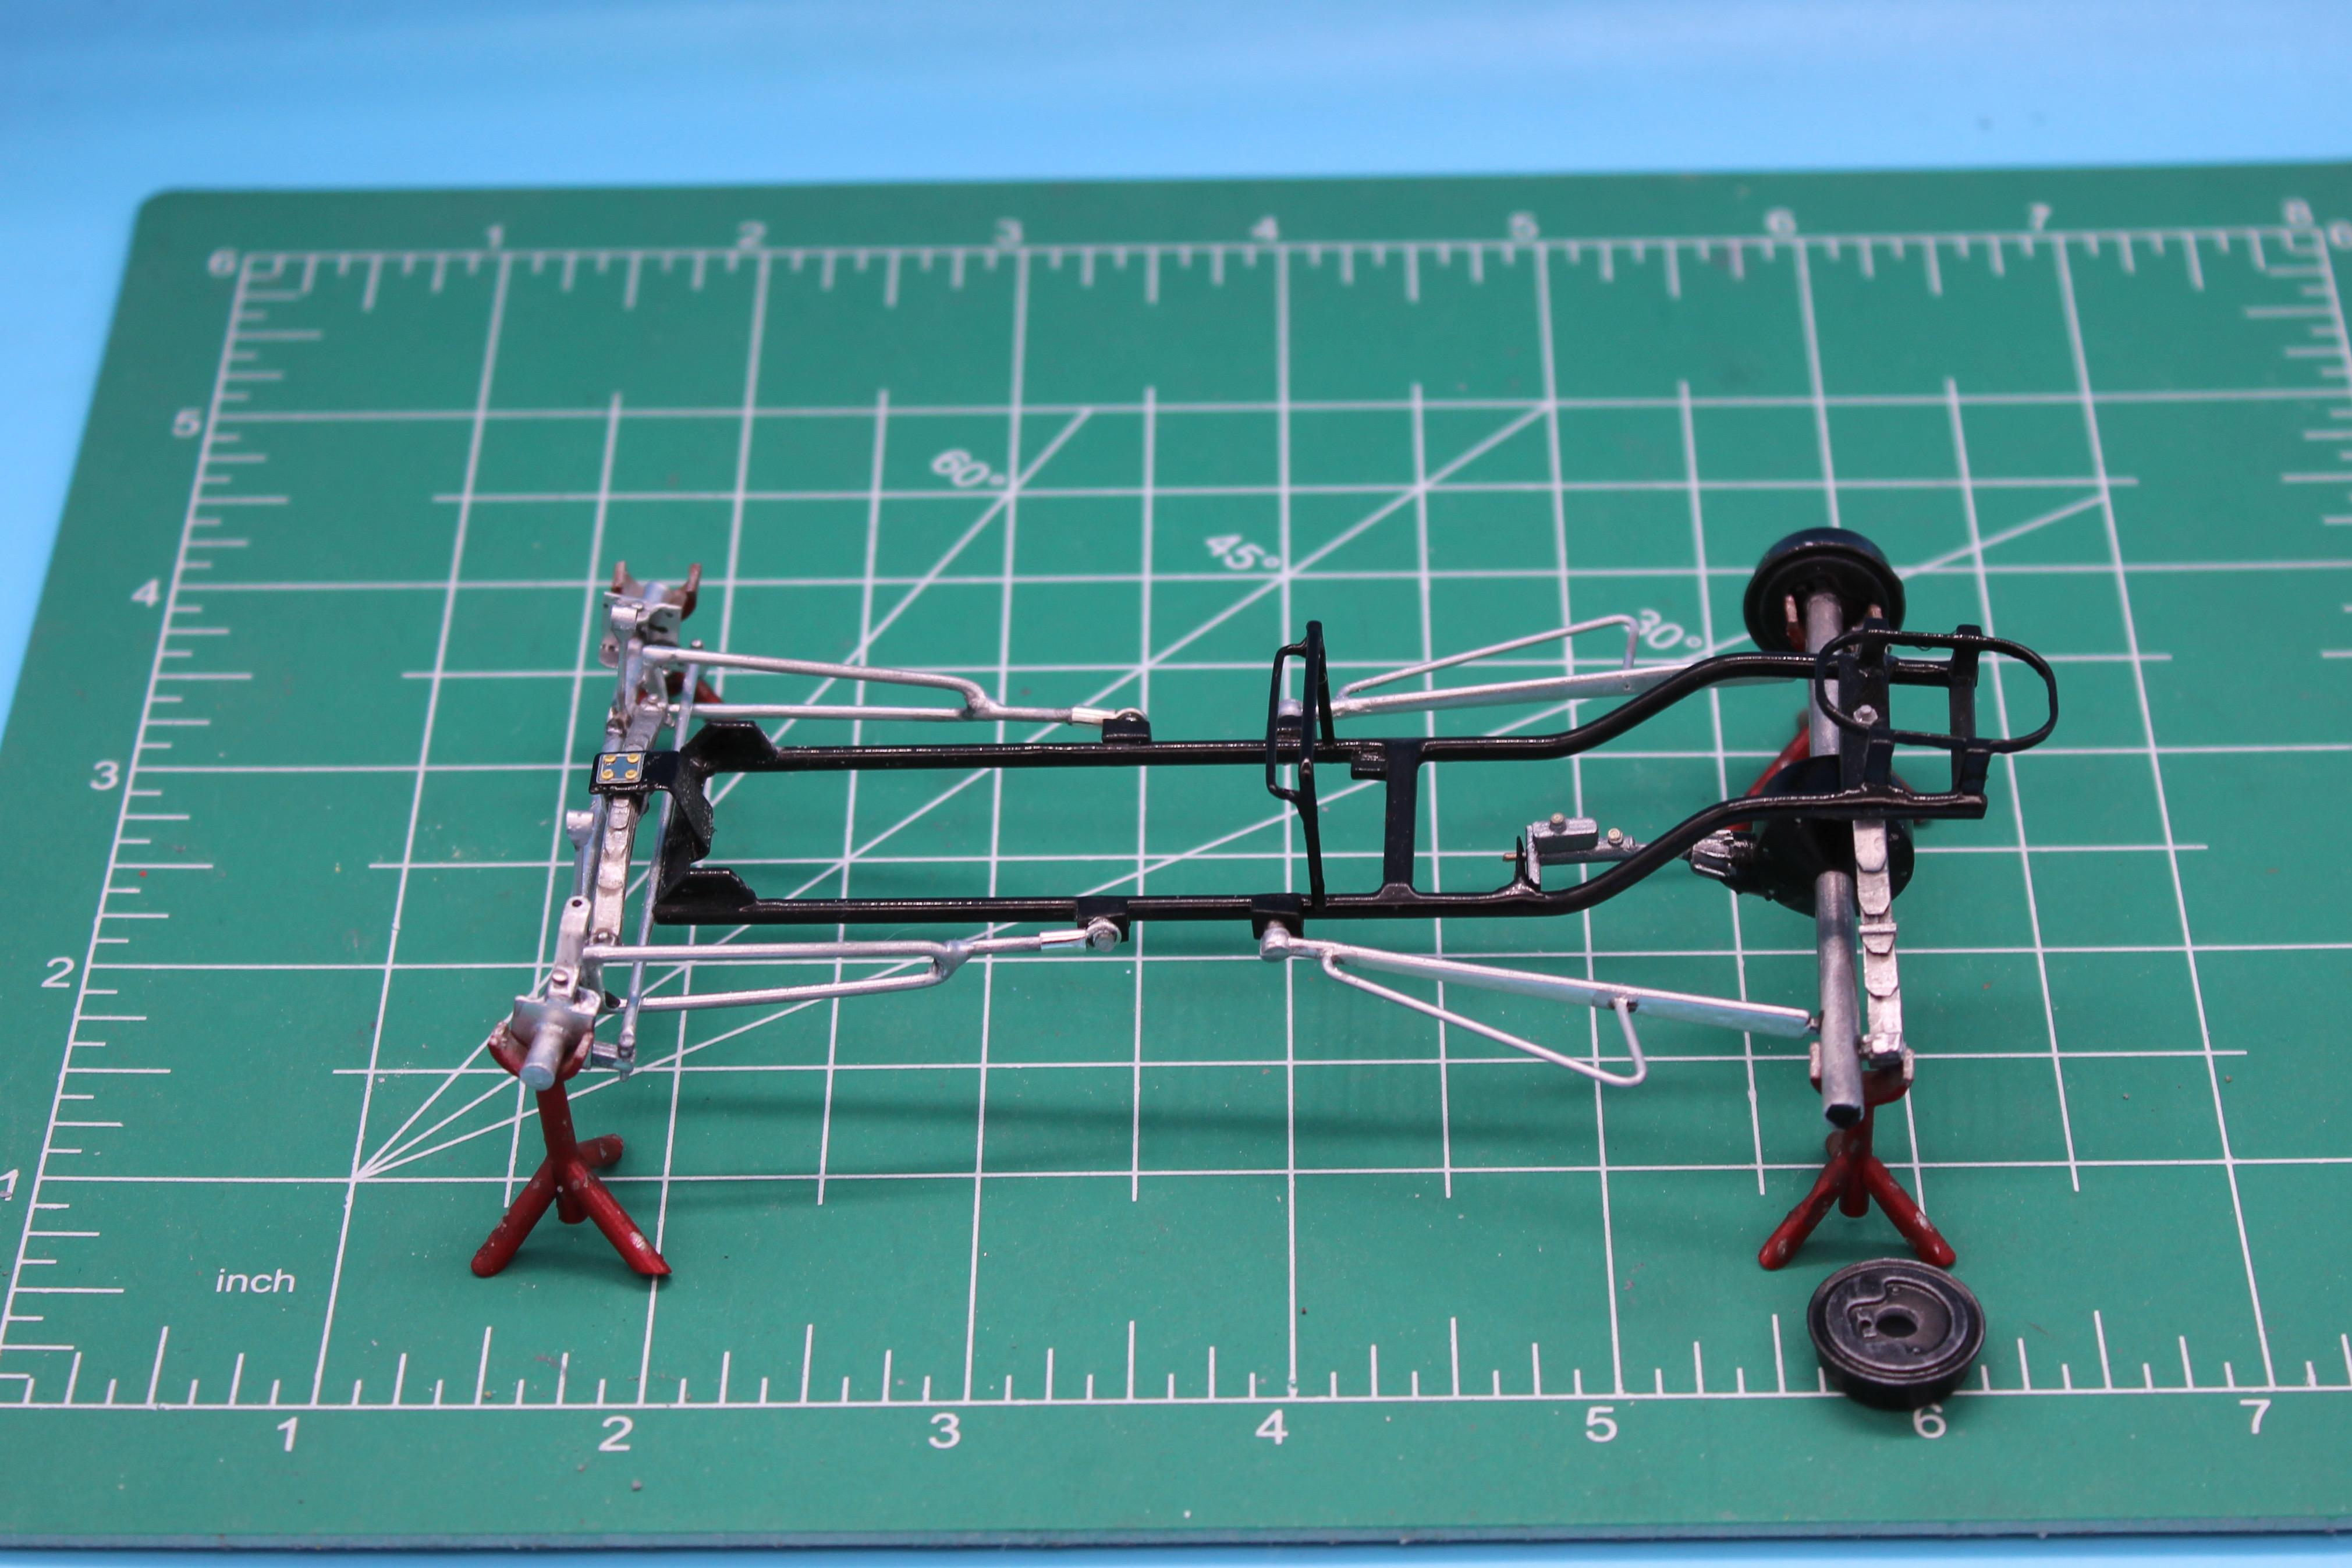
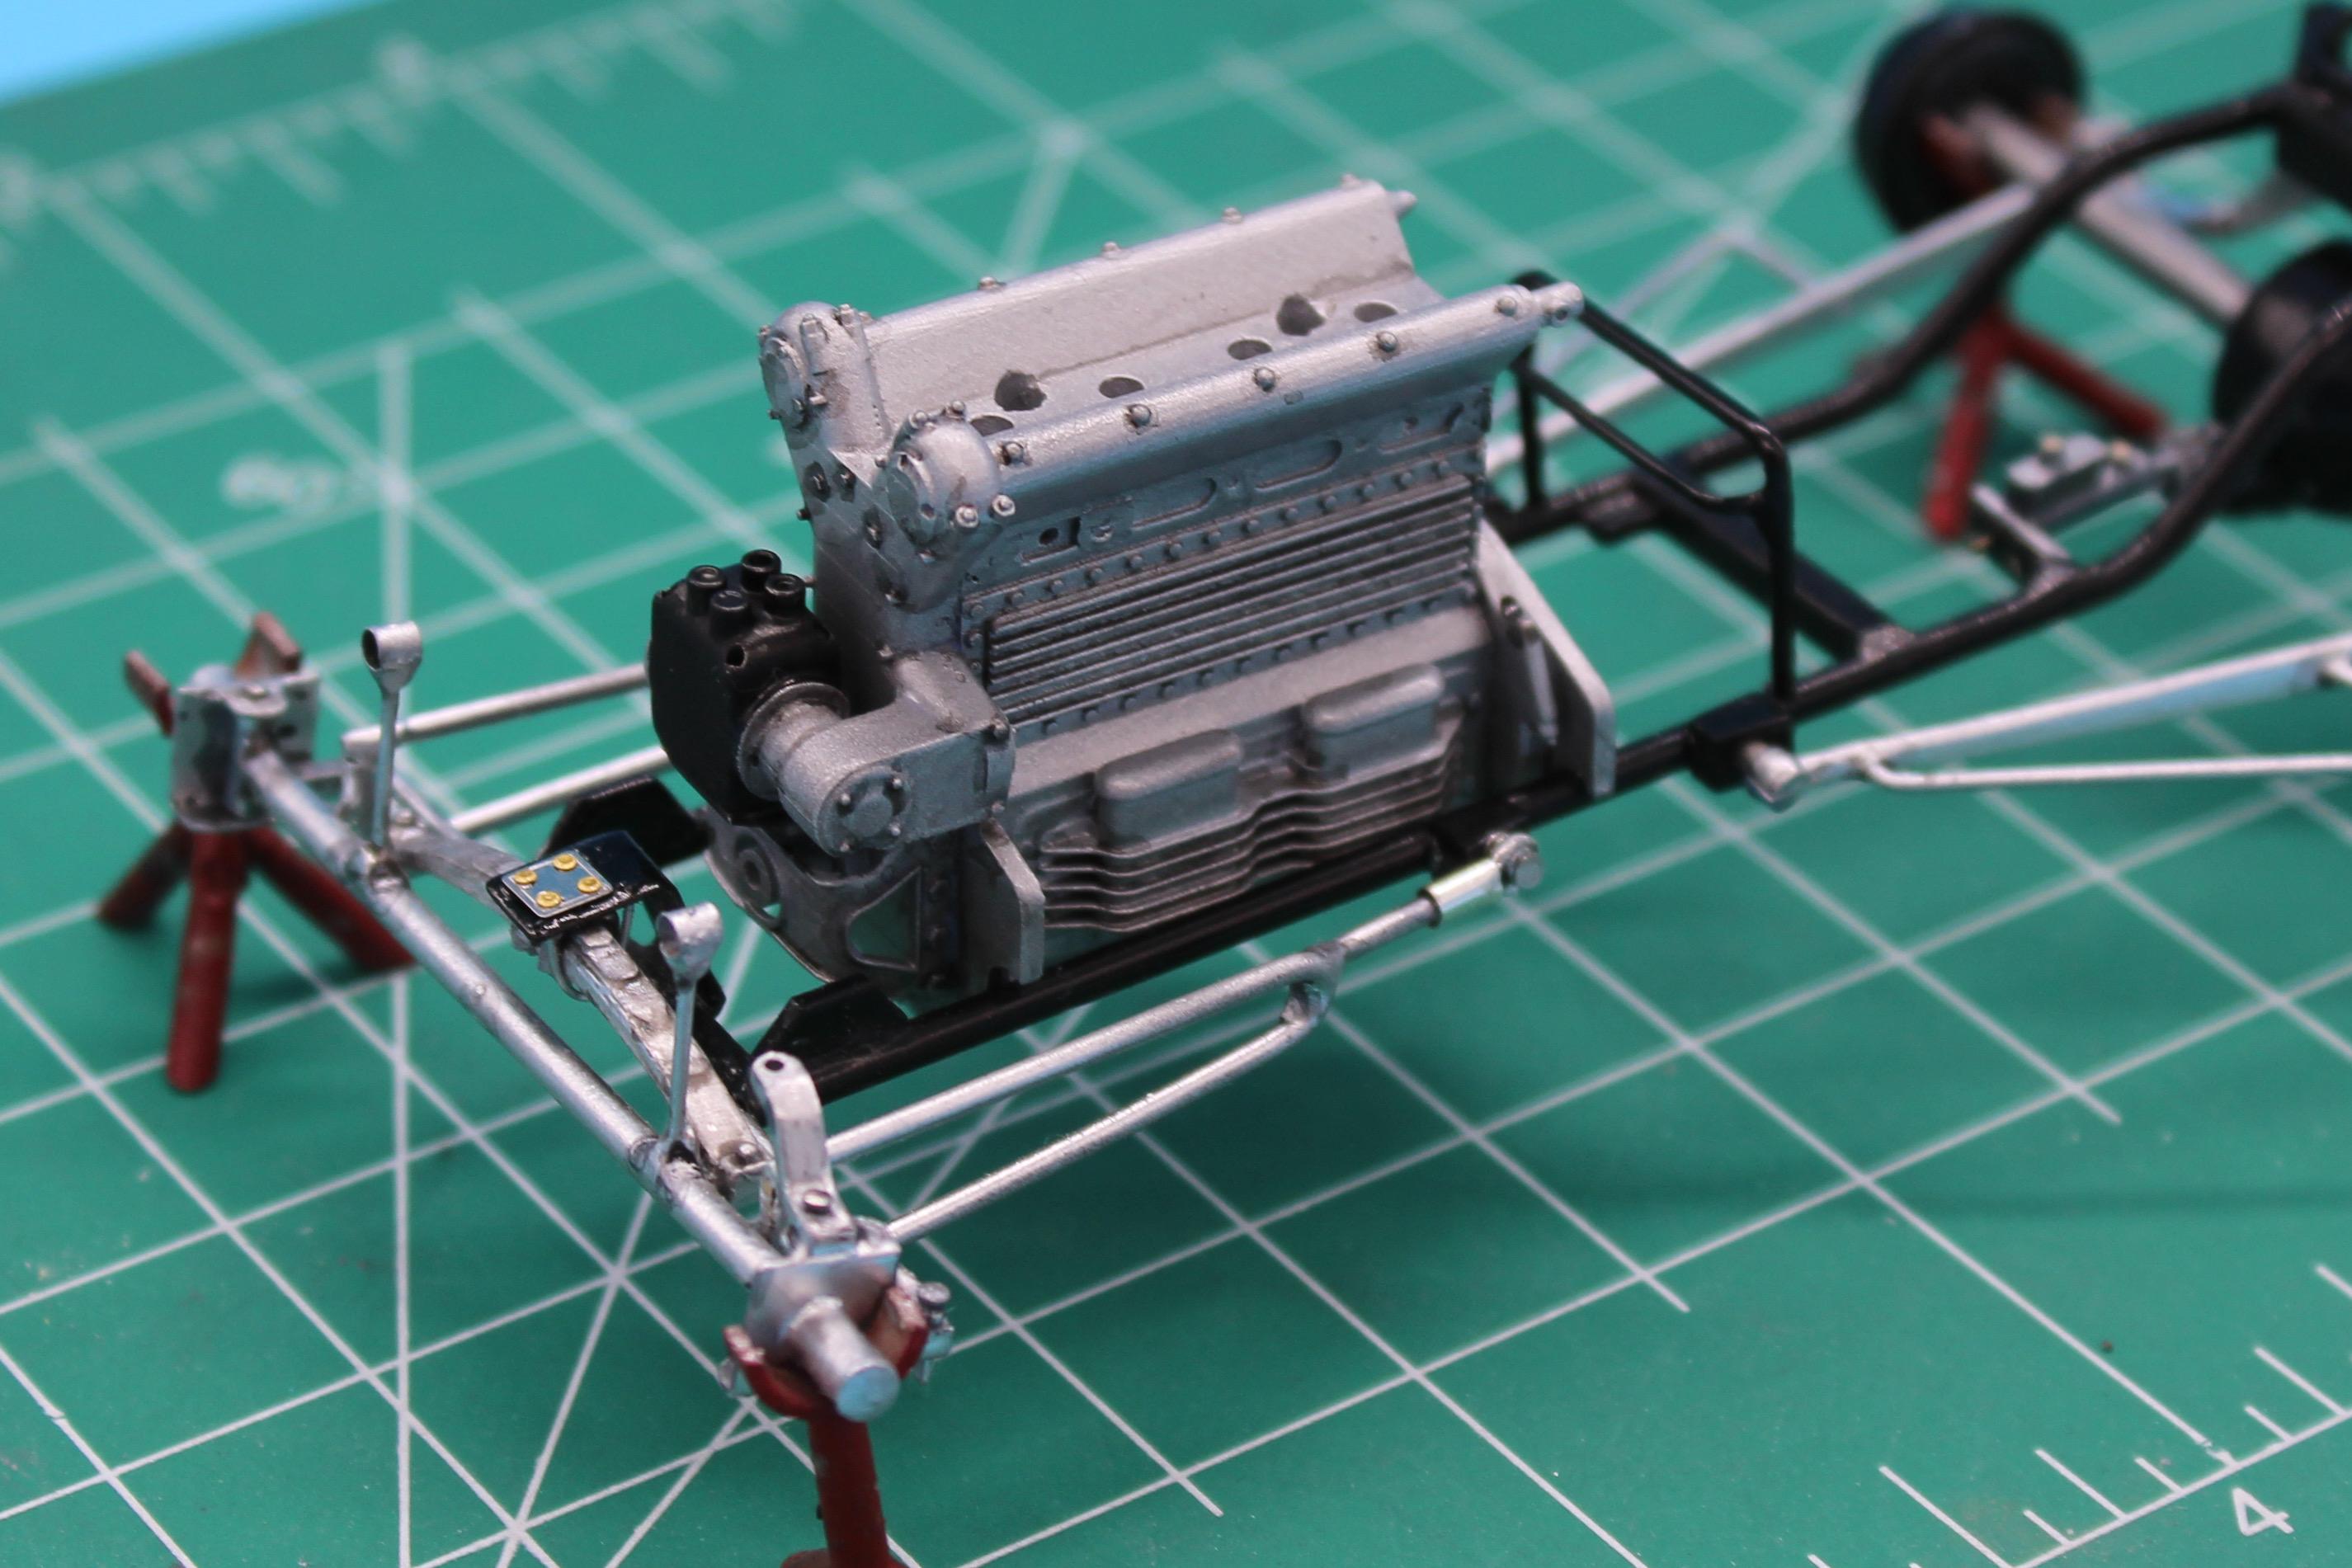
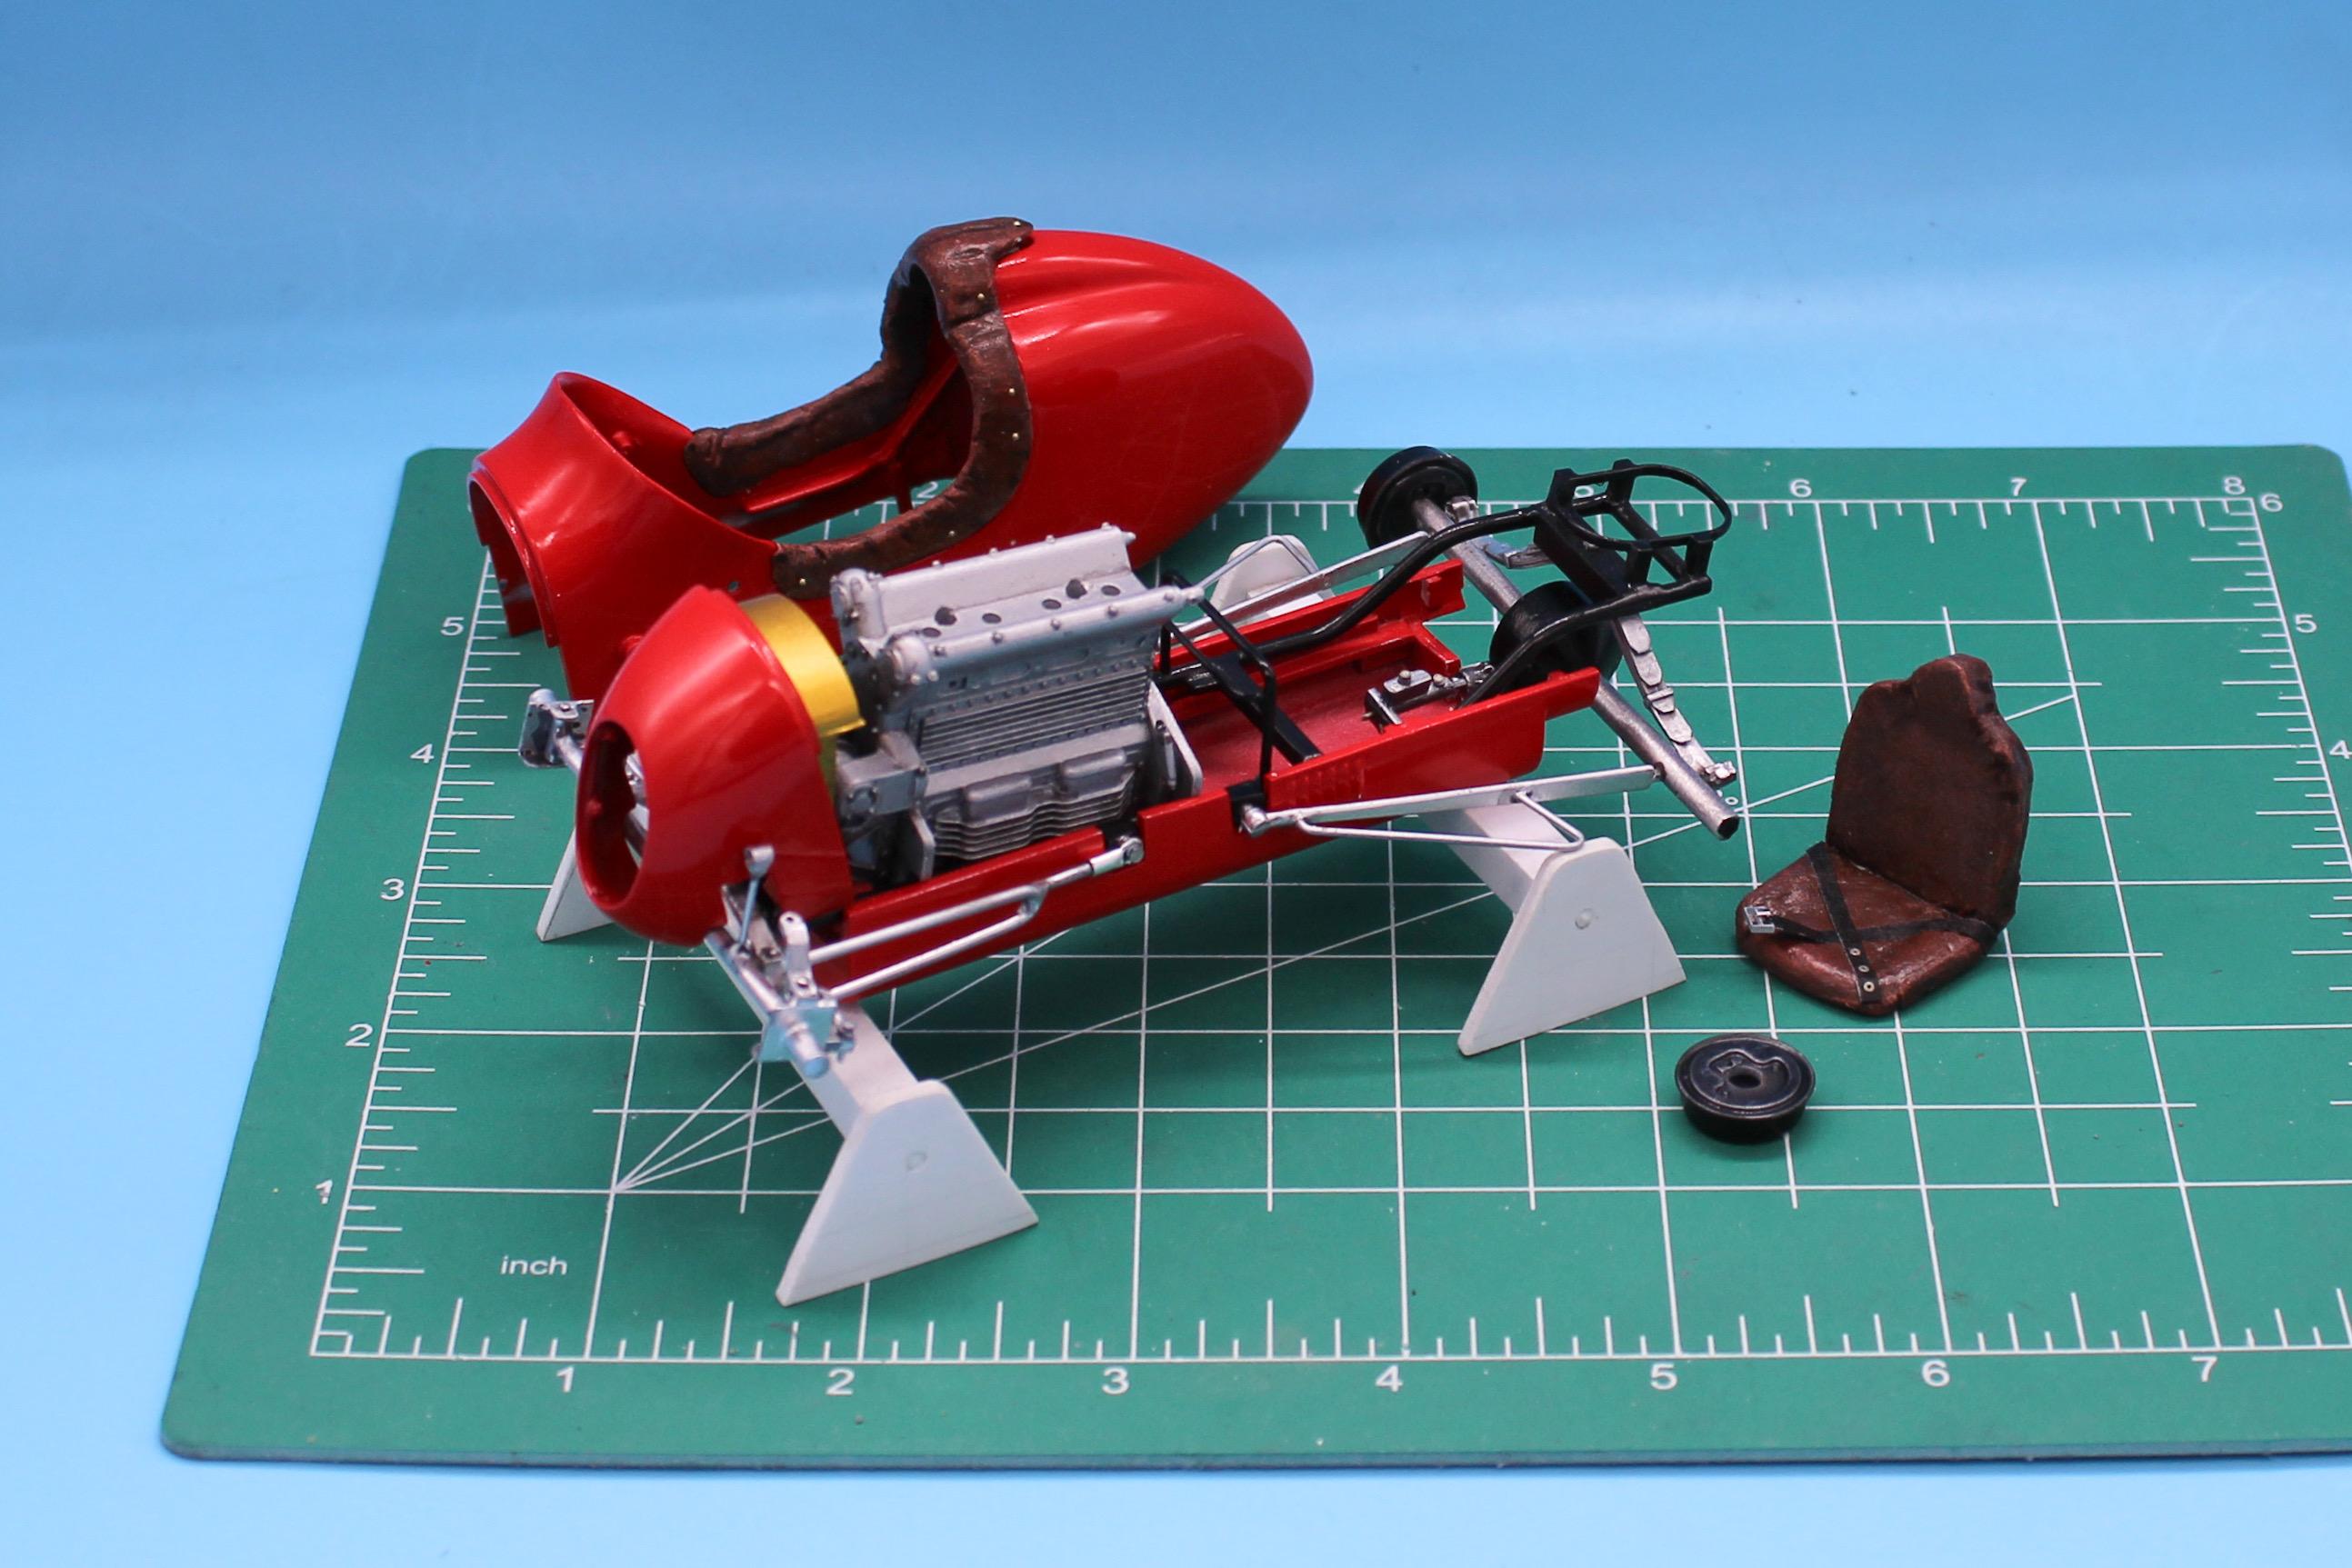
Thanks fellas! A LITTLE more today, although it was Easter so limited bench-time… Installed some brass ‘poppers’ to the leather cockpit surround…they’re actually tiny brass rivets that look like this: But I think they work for the look I was going for: Quick test-fit to see how this part looks in-place: I like it! A little more assembly on the frame… That banjo rear end has microscopic little photoetch bolts in all the places bolts should be, but they’re like flakes of glitter…I know they’re there though… One of the challenges of using only a couple of metalizer finishes for the whole build was to stop everything looking too toy-like…the Testor’s aluminum I used on the engine turned out really great, I thought - but it needed some washes to add some realism. Did a dark gray, really light, wash plus a darker one for the finned portions on the motor. It brought out the detail a LOT I think! Not quite done with that yet - I prefer to do a few layers in stages, but I'm happy with the first round. That motor looks so huge in this little bitty frame 😂 And finally a real quick drop-some-parts-together mock-up for my own amusement…it’s starting to look like a thing! Thanks for looking - happy Easter!