
stump
-
Posts
985 -
Joined
-
Last visited
Content Type
Profiles
Forums
Events
Gallery
Everything posted by stump
-
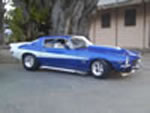
Thank you so much Scott, sorry for being away MIA for so long mate. Where does that time go........While I got you, any more thought to those amazing Dominators in 1/12th scale? Well, in the last 12 months I have given up my day job and become full-time carer for my Mum, she turned 95 in June this year. I thought I might get extra time for modelling, but it hasn't worked out that way so far. LOL In any case, being prepared for when that happens, I have been stock piling some parts. The "new" Camaro body I got from TDR is going to require a complete new chassis, the one I had made is too tall and the main roll hoop too fat.....Consequently, tearing it apart would be to ground level...solution, keep it to hang on workshop wall (1/12). I received an order from Plastruct the other day in preparation for this, so it will begin shortly. Deciding to stick with plastic (styrene) and not brass as I feel it will be easier to work...The motor has been fully stripped down as well in readiness for new paint and detailing. Several new bags of braid from Pro-Tech have also been sourced from Ted @ Teds model market place. New wheels and tyres are due to arrive any day now (newly 3D printed), along with a 3D Mountain motor - complete with tunnel ram and split Dominators. (note -- NOT for Camaro) And I weakened and got another 1/12 ProMod body...... a 63 Corvette. Wheelbase is a tad short at 108inch, but it should work ok.
-

1/12 Camaro Radial Tire - Chassis & Rear Suspension6-22-17
stump replied to John Clutch's topic in WIP: Drag Racing Models
Nice start to what sounds like a great build John. I hope Joseph @ Fireball can work something out for you regarding tyres. Keep the pressure on, without being a pest. He's a great guy to work with and made some 1/12th Mickey Thopson's for me. Up-scaled from his 1/24 tyres. Cheers Greg -
Nice clean build, congrats on a fine example of "model completion." It is something I've not done in over 5 years. (soon to change......)
-
1:12 1969 Camaro Z/28 as seen in the August '69 issue of Car Life.
stump replied to swede70's topic in WIP: Model Cars
Great work so far Mike. Your attention to the finer details is faultless and encouraging, I like where this is headed. Loving the idea behind the "wider" rear tyres too, I think this is something most of us have tried at some point. I have an idea a mate may actually be casting them? I will have to check with him. -
Thanks for the picture link John. I do have those, plus an assortment of others which I've managed to find online. Not the most photographed car ever. lol. Jeff, thanks for your kind words mate. The 3D parts are rough, but not unworkable....The trans I left "as supplied", it has a kind of cast look to it, so I was happy to use it as it was. The main engine block could have done with some smoothing, but again, I was happy to leave it alone. It is painted black and will not be overly visible when everything else it bolted on and around it. The heads have had minor clean up, but only on the surfaces which would be "machined" smooth (or flat) on a real motor. For what it's worth, I believe Shapeways have now added (or will be very soon) a NEW material process which is supposed to get the details even finer. Will be interesting to see how much better parts will become. The tube for the headers is Plastruct 4.8mm which scales up to approx 2.27inch in 1:1. It's a tad large, but still works for me, they are supposed to be a set of "competition headers", so a bit of give and take. Looking thru some parts lists online, I found some which are tagged as 2.1**inch (on real set), so they aren't that much oversize. Cheers
-
After a few solid hours over several weekends, the headers are almost looking like, well.....headers. The tube scales out at a tad over 2inch and snaking them around engine components sure tested my mind....starter motor, oil filter, steering box.....all clear. There is still a massive amount of work to do yet, most of the joints are not yet glued, then I have to make the collectors....... And we are finally caught up......a long journey continues....... Thanks for stopping by and feel free to fire away with questions or concerns, critique etc... Cheers Greg
-
Still with the chassis, as I had cut this off the main floor, the floor was patched and I had to make new mounting boss' to support the mid point... Started on the Hurst shifter mount... I them commenced the tedious work on the Hooker headers....(Note; the entire motor has had NO glue so far, all bolted together with Scalehardware Thanks Bob) ALL holes were very carefully drilled and tapped..... Continues.......
-
Oh my.....nearly 5 years............................................. Took me over an hour just to track down this old post. LOL Oh my goodness, how life can be so full at times......been back at the bench with a couple of old builds for a little while and been hanging out at that FB place.... I have had the pleasure of meeting they guy (thanks to Facebook) who found this car years ago in a barn, before it underwent the rebuild. Quite an interesting past, to say the least. To get the ball rolling I purchased a new TDR 427 BB and 4-speed Muncie rockcrusher box. I rebuilt my own scatter-shield to suit both pieces and mated it all together. The entire front chassis has been rebuilt (fully removed from main chassis floor), added solid engine mounts to bolt the new motor in place. Gearbox cross-member now has slotted holes to allow adjustment and was lengthened to enable bolting it to the chassis. Continues....
-
Woah, nearly 2 years has passed.... How life gets in the way sometimes, huh. One day at a time I say...... Well, a few changes and twisties along a bumpy road, progress on the TDR Camaro has regained some pace......still only in low gear. I hope Dave (Comp) will be pleased to see this resurface, tho I know he will also feel sadness, as I haven't been able to utilize ALL the amazing "parts" which he so graciously provided for this build. Weakness is a major flaw I have, and not being capable of "making" some basic rubber molds for wheels and tyres, I weakened and laid out some $$ for some from MicroNitro. Tyres I got from Rafael, thanks mate. The body was the big aspect of this build which scared me the most.....as you know, the surface texture really is quite grainy, and I have had numerous tips and ideas on the best method of attack. In the end, I chose to just go with paint, or primer in this case. I purchased some automotive grade sprays from my local parts store, some high fill surface Primer-Filler....It was ok, but the graininess was still there. Back I went shopping and ended up with some Spray Putty. The difference was like chalk and cheese. The following few picks just give an indication of how things will eventually look.....Bear in mind, all parts need to be sanded, and recoat with the spray putty. The front on shot of the hood has one side sanded, one not. The primer-filler...... All coated with the spray putty..... Half sanded..... Still a good ways to go, but at least its a start. Thanks for stopping by, and feel free to ask Q or post any queries you may have. Cheers Greg
-
Datsun 240zg. In no way shape or form is this stumps build?
stump replied to lanesteele240's topic in WIP: Model Cars
Gary, thank you for the very kind link to my build, but please....take nothing away from yourself and this epic build mate. What you have done so far looks darn brilliant mate, I LOVE it. (two thumbs up from me ) I'm liking how you molded in the wheel arch flares too.....very sleek. What have you got planned for motivation? Oh, and that rear hatch. Can you scribe out the excess super glue very carefully with the back pf an X-acto blade?? Looking forward to seeing more Gary. -
Thank you Lucas, I appreciate your thoughts mate. Nothing to update at this stage I'm sorry..... Be back on it soon enough tho folks.
-
Thanks Casey, it is pleasing to have it back on da bench. Thank you Gary.
-
Great work Mark! That dashboard and tail light assembly are works of art alone......Always inspirational, that will never change. Thank you.
-
1/16 Scale Army Vega Funny Car - Finished 10/14/2018
stump replied to Mooneyzs's topic in WIP: Drag Racing Models
Simply............................A W E S O M E ! Chris, thanks a million for showing the best possible way to execute the fabrication for that compound curve on the inspection cover....Brilliant Sir! Now, go and take your meds as directed. Can you give us an expected completion date yet mate??? I just want to make sure I have an airfare booked so I can get over there and check this puppy out.....eyeball to eyeball........ -
68 Mustang Twin Turbo Outlaw.... (updates 06/03/15)
stump replied to tyrone's topic in WIP: Drag Racing Models
Tyrone, this is one Horse that won't let itself get flogged. Looking great man, LOVE the detail attention you squeeze into these smaller (to me ) builds mate, simply inspiring is all I can add. -
Sensational stuff Leonard. The rack'n'pinion looks very impressive. Is it functional? Sure looks great mate, as does the whole build of course.
-
Another follower here Joe. (not sure how I missed the start, sorry.) Love what you have done so far and am awaiting the next installment. At your convenience of course.
-
Thank you Scott, Jimmy and Dave. Not much to update you on as yet, our weather has been unfavorable for modelling, just too darn hot to sit in my small room and be comfortable. Cooler change forecast for the weekend. Cheers Greg
-
1/10 scratch built Holden HX Overlander Panel Van
stump replied to prestonlal's topic in WIP: Model Cars
This shot right here.....simply amazing how you have got this all looking so believably real......That could almost pass for a 1:1 restoration. GREAT work! -
Jimmy, the motor turned out a treat mate. nice details without being too over the top. And yes, it's so pleasing to see some different (outside the box) thinking with regard to induction....the blower actually suits it very well. I was pressed for ideas with mine....with 4 to build, each has it's own unique induction......
-
Bravo David. (insert applause here..) Man, those awesome wheels make such an amazing difference, hey. SUPERB!
-
Cato, Eric makes an extremely valid point above, take care of the home duties first and foremost mate, modelling takes a backseat now and again, and we shall all be here when you are ready. I have an idea of how things may be for you, not exactly....but similar circumstances are in my life circle too. I am my Mums carer. I still live at home with her (she will be 94 this year), after moving back home some 26 years ago, after Dad passed away. With her being deaf (with hearing aids) and almost totally blind, it is pretty much a high-care situation. So yeah, sometimes models need to wait.
-
1/16 Scale Army Vega Funny Car - Finished 10/14/2018
stump replied to Mooneyzs's topic in WIP: Drag Racing Models
Chris, to my old eyes, I'd say you got the "shade" just about spot on mate. As Joe mentioned, I'd now be inclined to try a semi-flat/gloss or a satin clear topcoat, just to get the sheen you're after. As long as a top coat clear doesn't react to it... Aside from that, the blower looks amazing after the sanding and clean up. Might have to look at one of those myself eventually..... Nitpicking......you gonna add the "arc" on the side panel for the steering arm movement? Looks GREAT buddy. -
Now c'mon Cato, I for one, do not believe that for a moment mate. Not here to bash on anyone, least of all my good friends, but maybe you just need a good kick in the tail to spur you on, hey. Whatcha reckon? Seriously though, I can only look on in awe at what you have achieved thus far....please don't cave now.
-
Hehehe, no worries Tomio, ain't nothing wrong with the Pro-touring look either in my mind.