stump
-
Posts
985 -
Joined
-
Last visited
Content Type
Profiles
Forums
Events
Gallery
Everything posted by stump
-
Ooooooh, see what I been missing in my absence. Darryl, incredible craftsmanship on display right here lad. GREAT work! The intricate brass fabrication is mind blowing mate, look forward to seeing more as it happens.
-
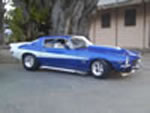
This looks AWESOME Henry. Hats off to you and your designer mate, I think you nailed it. Would love one to go with my 69 Camaro, but it may be a while before I can get one @ 1/12. Gotta save some coin.
-

1/25 Revell '70 Plymouth HEMI 'Cuda 2'n1
stump replied to MachinistMark's topic in Car Kit News & Reviews
Oh rats..................here I was, thinking I was not gonna bother with any more 1/25 stuff. Oh well, just one more couldn't hurt could it? Already got one bookmarked on eBay. Maybe two......... -
Aaah, GREAT to see this back on the bench Dave. The rims look awesome! Hey, you haven't tackled any of the body prep as yet??
-
Definitely a stump puller you got here Edward. No pun intended. I must admit, like DrKerry, I too had glossed passed here without looking....didn't register at first with the 2JZ in the heading.... My bad. This is looking amazing so far, and now I'm also waiting on the next installment.
-
1/16 Scale Army Vega Funny Car - Finished 10/14/2018
stump replied to Mooneyzs's topic in WIP: Drag Racing Models
Yeah c'mon Chris....How we supposed to believe you've done this stuff if we can't see results. . S'ok man, I'll catch up on my next trip through, and it will be like a double bonus. -
Just echoing everyone's thoughts Tyrone, SUPERB work mate.
-
My 1/12 scratch-built BAE style Hemi, awaiting more work and a car to run it in. All accept the blower (modified Revell unit), pulleys and assorted nuts and bolts was scratch-built using a 1/24 Revell T/Fuel motor as a starting guide.
-
FANtastic update Ray, and yes, the slight downsizing works amazingly well, good stuff. Hey, if you're still chasing hardware, I've been getting 90% of mine through Scale Hardware. Not sure how they compete price wise, I just tend to go there because they are quick, even posted down to Aus.
-
1/16 Scale Army Vega Funny Car - Finished 10/14/2018
stump replied to Mooneyzs's topic in WIP: Drag Racing Models
Fantastic. X 2 Man, I gotta get me one of them new smellevision computer monitors... Chris, GREAT update buddy. Just make sure there's plenty of adjustment there.....I can be over in a week, ready for a test lap at the wheel. Superb! -
Man, this just gets better......now, who has the pop-corn.
-
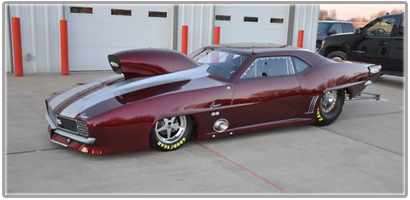
Hmmmmm, I'll take a Camaro in 1/12 please. Just kiddin' but that DOES look sweet Joe, and it may convince me to step back into 1/25 briefly. GREAT work.
-
I like the way you think Dave. That's a very good take on the variances in the body styling. The "you can't get there from here" makes perfect light of where I was trying to go with my body....as I said, close but yet way off. I still love the look of the Cynergy Camaro, it was my first pick as a "want to build this style" when I kicked this off, and I think most guys using 69's at the track use their body. As a side, my nephew was out to visit this arvo and the first thing he said was, "hm, you finally got one"........... He's a 69 Camaro nutter (has a 1:1 for a full resto, one day) and he still prefers the body I started, even with this gorgeous new body sitting next to it. And no, it's not too late for a funny car either. That is the BEST idea yet. And something I reckon is very doable. The front clip is already cut off but nothing that can't be reversed......I'll get back to you on this, but yes.....Nostalgia funny car, that sounds awesome. Thanks Dave.
-
Thanks guys. Ray, yep....actually started on some minor prep work today. It does sand rather easily and I'm thinking a couple of coats of primer (sanded between coats) will work quite well. Paul, thanks so much mate, your kind words are very much appreciated. Chris, thanks Brother. Hey, if you can find something on mine to help, great....as you know, I'm eying off your work for ideas. PM coming your way.... Dave, my big Brother. Hehehe, you know, I keep looking at that comparison myself. I was close in some areas......miles away in others. Overall length is within mm's, width is almost identical, but the roof area is where they differ the most. The original kit roof is still way too flat, something I would never have picked. It's most noticeable at the top of the windscreen, then of course, you can also see the hood needed a lot more curvature. I guess it's the case in their 1:1 counterparts too, as some of the 69 cars I've seen look way off compared to the style Mike has. I will still persevere with mine, and having a good reference sitting right here beside it will aid the transformation I hope. Stay tuned mate.

-
Ray, it looks great man. With regard to the nut, as Bill mentions, some smaller diameter (and cross section width) from Scale Hardware or similar, held in an appropriate wrench, run a drill bit carefully through removing the inner thread, this may then slip over the cotter pin, yielding a smaller more "scale" jam nut??
-
Hey Derrick, so pleased to see someone bring this back, I thoroughly enjoyed reading through the whole thread once more...it helped in getting my creative juices moving again too. And as Ray mentioned, these projects will wait around until that time we see fit to get 'em moving again....they ain't going anywhere without us.
-
Hi Clay, Niko had a similar query below relating to the construction of a ProMod body. http://www.modelcarsmag.com/forums/index.php?showtopic=77219 Some great advice in there from some very talented guys, Wayne has even added some pics of bodies he has/is modifying which show how much they can get altered.
-
Thanks Ray. I can not claim all the credit though. It's a TDR piece, I added some brass tube to each corner to tighten up the free-play a little. It's a lot tighter now, and still has movement. Well.............Christmas arrived early for me....too early for my birthday as well, but I'll accept it. They say a photo is worth a thousand words.......... Looks like Shapeways have changed the printing process....this body is 100% better than the 1:16 body I have. I know scale plays a part in that, but the smaller body has a very visible "circle" pattern from the layer process, but this one appears to be layered front to back. There is still a textured feel to it, but it WILL be a whole lot easier to sand and get smooth. And, side by side.....the "old" war horse. As I mentioned, the decision to go this route was tough, but having this new body in my sweaty hands, I know it was the right way to go. I will persevere with the old body in the future, and may just display it as a "spare".......?? Stay tuned guys, I'm waiting to hear back from a guy regarding some other new parts.....will have more for you soon. Cheers Greg
-
Great stuff Ray. Hey, neat idea with the cotter pin, watching to see how this pans out. Love your way of thinking.
-
GREAT piece of modelling excellence Henry. And I love the display box, a model looking that good deserves to be displayed and protected accordingly, nice work mate.
-
David, another absolute masterpiece from you, as is always the case mate. Regardless of colour, which I like BTW, the whole model is beautifully built and flawlessly presented, great work.
-
1/16 Scale Army Vega Funny Car - Finished 10/14/2018
stump replied to Mooneyzs's topic in WIP: Drag Racing Models
Chris, totally agree with Ben, that IS disgusting.............LOL As is my typical post reading execution, I saw the pic of the chicken packet and thought you used the lunch packet...so glad I then read that you asked for new ones. BRILLIANT idea bud. The tie downs look absolutely flawless too mate, I might just have to borrow that idea as well. You know, as harsh as this may sound.....I want you to slow down, I don't know if I'll survive once it's completed and there are no more updates. Keep at it buddy, I'm diggin' this immensely. -
Chuck, I likes that a lot, and would maybe consider a return to 1:25 just to build one of these. Great work and brilliant idea mate.
-
Hi Niko, Mate, while I do not consider myself an expert in such things, ProMods are indeed my favourite drag car. I guess the main thing is wheel base. I believe most fall into the 110 - 115 inch wheel base. So you may need to stretch the body. Not saying ALL use this rule, but most would be a guess. Having only built 2 ProMod bodies, the first one I stretched, but did not narrow, the second one (Camaro) was stretched and narrowed at the front. I also slightly widened the rear. The second car was also 1:12, but from memory, I think I narrowed by approximately 6 scale inches. The cut tapered towards the rear, including the roof section. The lower edge also benefited from a wedge piece glued along the entire length, helped to raise the rear for tyre clearance. Keep the front low, the rear higher. Hope this helps your needs Niko.
-
Hey guys, Joe, Chris, James and Scott, your support and encouraging words are greatly appreciated mates. James, I'll check my stash, I'm pretty sure I DO have one......but I want to be positive before saying "yes". Well, my excitement is building. Even though I glanced at my confirmation email and saw "July 22nd, end of day"......I neglected to click on the tracking number link. It is now, actually on my Australian shore! Been cleared by the Import Authority and is "en route" for delivery.......... Gotta LOVE FAST shipping. Which means, I really need to dig in and sort what needs sorting, and get ready to parte. (said with a French accent, one of those little doovers over the "e") Stay tuned guys cheers Greg