
Steve H.
-
Posts
820 -
Joined
-
Last visited
Content Type
Profiles
Forums
Events
Gallery
Everything posted by Steve H.
-
Very Nice, Great color choice!
-
Car & Driver to have a model 10 best
Steve H. replied to Dave McFly's topic in General Automotive Talk (Trucks and Cars)
I tried... Their link only goes thru AOL... I couldn't get it to work, besides, I wouldn't touch AOL with a ten foot pole. -
Sure seems like an Urban Legend, doesn't it? Same as you, I've never seen it in the stores nor know of anyone thats used it! There is something available on-line, just not sure exactly what it is, since the listing is somewhat vaugue... Alclad spray
-
Well, it looks like you succeeded admirably! Great build with tons of old school tough!
-
Clear acrylics work well for glueing P/E. Future (being an acrylic also) floor wax qualifies too. Acrylics are easily cleaned up if you goof. Tip for cutting P/E off runners... fold some tape sticky side up on your bench and stick the P/E to it... pieces won't go flying off into oblivion that way. Any good craft store will have spools of craft wire... various sizes for various engine compartment detail.
-
I'm not a low rider builder, but I always appreciate a well done build! Very nice work! It's got "Money Shot" written all over it!
-
Well, Duhhhh I'm peeved, though, because I lost the 8 ball shifter I was going to use!!!
-
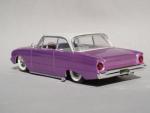
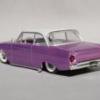
I'm still plugging along on the 55 Street Freak and the 27 roadster. The 55 kinda got sidelined when the roadster started coming together, but I started polishing out the clearcoat this week. Still need to polish, BMF and detail the interior before I call it done. The roadster, on the other hand, has had all my attention lately. Got the suspension together, the engine 90% built, and the interior 90% complete. MCG banjo wheel (There should be a rule about big meat hook hands and ultra fine photo-etch!), scratch built dash, craft wire bezels on photocopy gauges. I only need a shifter to wrap it up. The steering wheel is a bit too big, but, oh well... Those injector stacks are hard gas line swages (the peice that flares a tube out). A buddy gave me a set to use, and they are the perfect little peice of engine jewelry! Sorry for the crappy pics! Hopefully I'll wrap these up soon and get some beauty shots to post. Thanks for looking... Comments always welcome.
-
Yeah, That has a lot of personality! Great looking project, hope to see more of it soon! I think Lyle Willets did the same thing with an El Camino, and it came out looking great!
-
Ummmm... Thanks, Jairus... (you're scarin' me now) Gregg did name me in the article text. Great GSL Coverage, Gregg. The personality photos are unique for magazine coverage, but a welcome addition. Plus, my 32 made the mag, so I'm happy! And Congrats to Mark for a well deserved win and great magazine coverage!
-
All Right Steve H. You cause me to Get my 34 Ford Truck back out !
Steve H. replied to KDog's topic in WIP: Model Cars
Glad to help in any way I can! Nice lookin' Truck! -
The reason I decided to BMF the project was so I had a tough base to sand against. You have to sand pretty hard to cut thru BMF. A silver basecoat would probably sand away with the topcoat. An added bonus is that BMF, after sanding, really takes on a raw steel look. James, the body side is one peice, trimmed at the trunk/quarter seam. I was able to get the BMF to cover the complex curves, by carefully working the BMF up and over the rolled edges. Thats what model building is all about... learning from others and trying new stuff.
-
Its a pretty small body, so it didn't take much at all... maybe 6" x 4" worth of BMF. Its done in 5 peices... cowl, firewall, body sides and trunk. The hardest parts were the complex curves behind the bucket leading to the trunk and getting the cowl to body side cut cleanly. A bigger problem was having the edges curl up when I was sanding it. Next time I'll leave more wrapped around the edges. I lost a few small chunks of BMF, but just brush painted those areas and blended them back in during sanding. Its a pretty forgiving finish, so most of the goofs (wrinkles, tears, etc...) are hidden.
-
Finally got some paint on it last night... then sanded most of it off! Thanks to James Warkenton for the inspiration, I've wanted to try this since seeing his bare metal junker at GSL. I covered the body with BMF and painted over that. after sanding it left me with a raw steel body effect. The interior tub was painted basic Testors flat red and dirtied up with some black weathering powder. I've removed about 1/4" from the parts box Duvall windshield frame to make it fit the cowl. The frame, wheels and running gear are from the Revell Modified racer and trailer kit. Added some KDog graphics to the trunk... it'll have a number on the door and maybe some subtle pinstriping. Thanks for looking... Comments always welcome.
-
Beautiful work! Its especially nice to see the modded part next to a kit part. That makes your work stand out.
-
No... I was weird before I got the Mustang! :shock: Speaking of that... here's my stable...
-
Thats where this build comes from... I was 9-10 yrs old when the Street freaks were being built. Needless to say, I was pretty impressed! Makes me understand why kids now like monster trucks!
-
Are both on my bench right now! Its been quite a while since I've been on the board... Way too much going on in life right now... but I still try to get some time in daily! The 55 Street Freak is coming along... the engine and chassis are finished. I laid down the MetalSpecks red paint and it crazed on the left side of the body. Oh well, I'm just going to finish it as-is, it'll only be a shelf model, anyway The Hot Rod is cast by a local guy. Pretty nice work for a newbie. I'm building it using the Edmunds Modified (Revell Modified racer and trailer kit) for the frame, engine and running gear. It's an oddball conglomeration, but I think it'll work in the end.
-
I'll be in Toronto July 14-21 and was wondering if theres anything going on, such as models shows, etc... I'd also enjoy meeting with the local clubs just to chat. Email me and I'll fill you in on details of my trip, availibility, etc...
-
Lookin' good! Hope this one gets you out of the slump!
-
Well, I have half of my builds
Steve H. replied to RDean58's topic in General Automotive Talk (Trucks and Cars)
I haven't had time to comment on all of them... Very nice work! I look forward to seeing more! -
Gary, No problem with your pics... You have the coolest garage on the forum! 8) Back when the street gassers were popular, there was a lot of one-up-manship going on in the SF Bay Area. Every year they got higher. At one time, there was a Nomad that had its rocker panels about 7' off the ground. Now thats outrageous! :shock: The other car that I remember really well was from the show car circuit... Cherry red 55, everything chromed, flip front end, Hilborn injecton, white fenderwell headers... just a beautiful peice of automotive excess! My build is probably a bit higher than would have been typical, but hey, its just a model... It'll have "Table Presence" at shows! 8)
-
WIP: 2003 Pirates of the Carribean Pontiac LONG 1st Post!!
Steve H. replied to David Thibodeau's topic in WIP: Model Cars
What Ismael said... I second that! :shock: Thats some world class model building! Each and every assembly is beautiful! -
You can interrupt my post anytime with a cool daily cruiser like that! 8)
-
Here's the latest on my bench... A '55 Nomad street Gasser, circa 1968-69. This is kind of a nostalgia build for me. I was 8 or 9 yrs old when these were on the streets in NorCal and I was pretty impressed! I've since come to realize how impractical (and dangerous) they were, but there's still that first impression on a young mind! A friend coined the phrase last night... "Dinosaur Donk"... Evergreen square tube for the mounts, Strip styrene to build the leafs, brass pins to hold it all together. The front axle is from a glue bomb 53 Chevy panel gasser (as was the rear, but I had problems with the old plastic!) It'll have tunnel ram SBC from a glue bomb 57 nomad kit. Wheels and tires are some oddball diecast I had in the parts box. I still need to scratch some axle to leaf shackles and shocks and figure out some ladder bars. Here's what I'm claiming as inspiration...