Dennis Lacy
-
Posts
2,487 -
Joined
-
Last visited
Content Type
Profiles
Forums
Events
Gallery
Everything posted by Dennis Lacy
-
 @Kit Karson Mock up looks really good! @Rocking Rodney Rat Built the RPU however you want. Interested to see what you’ve got cooking.
 -
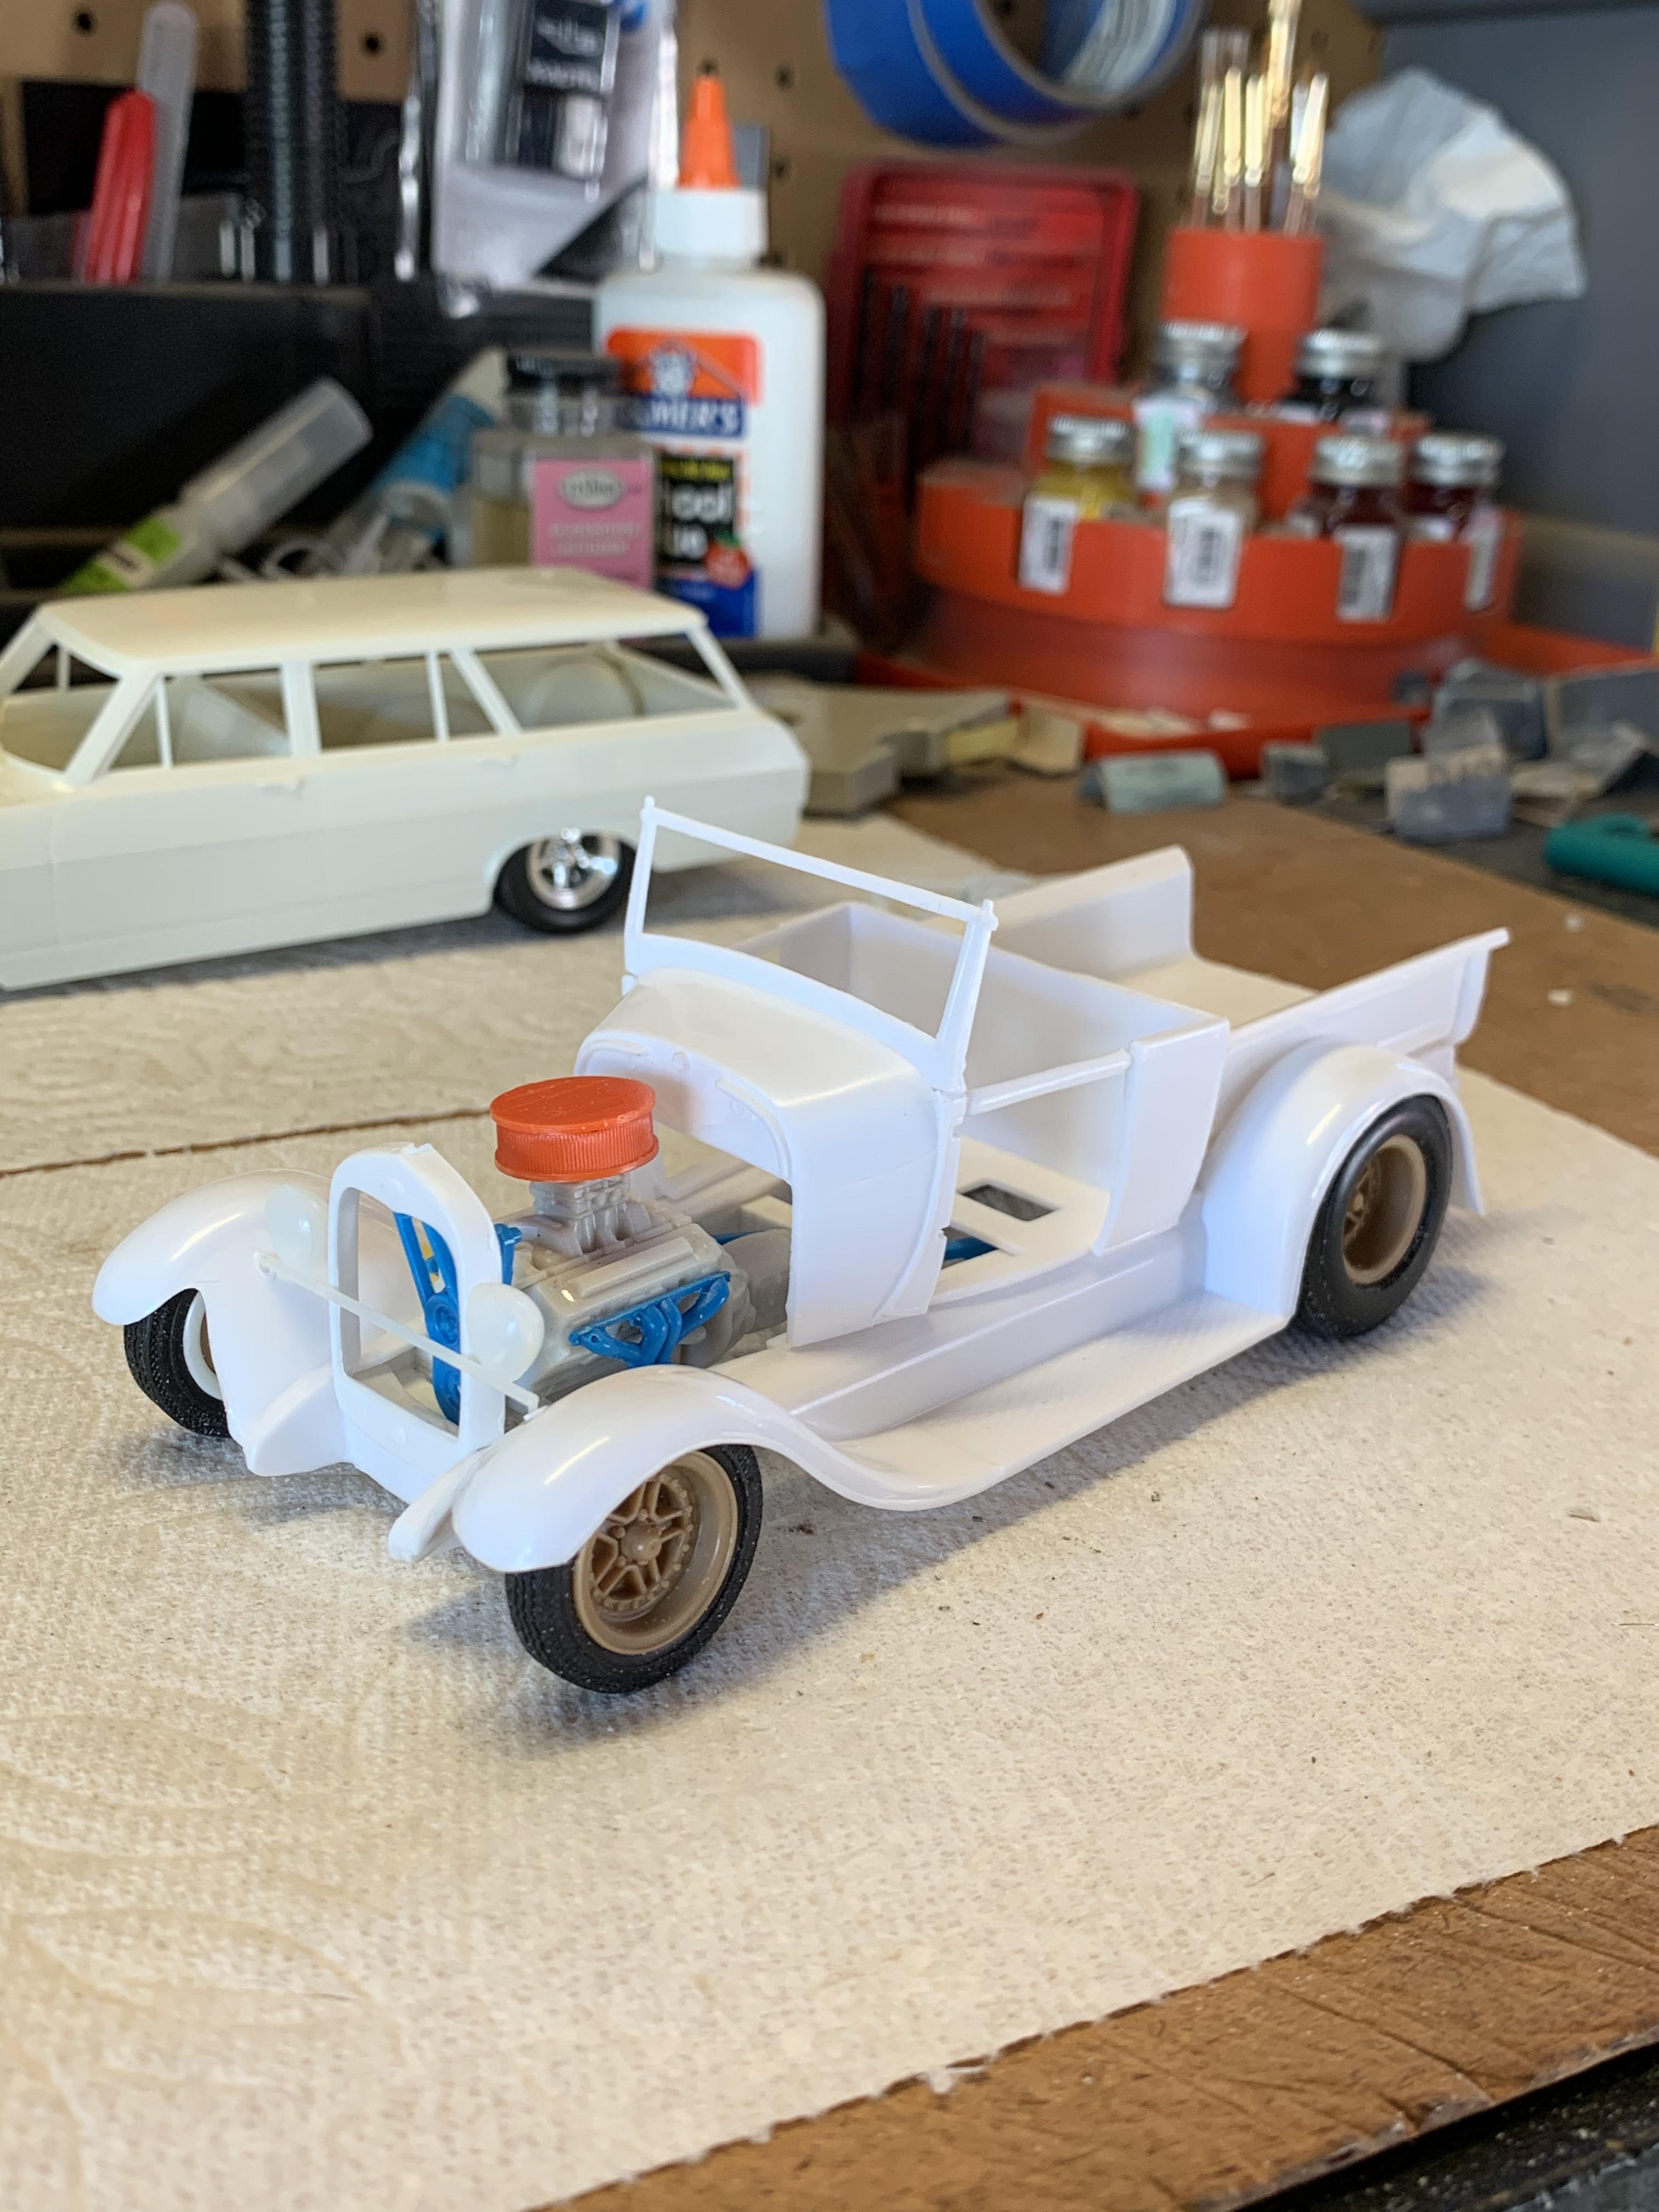
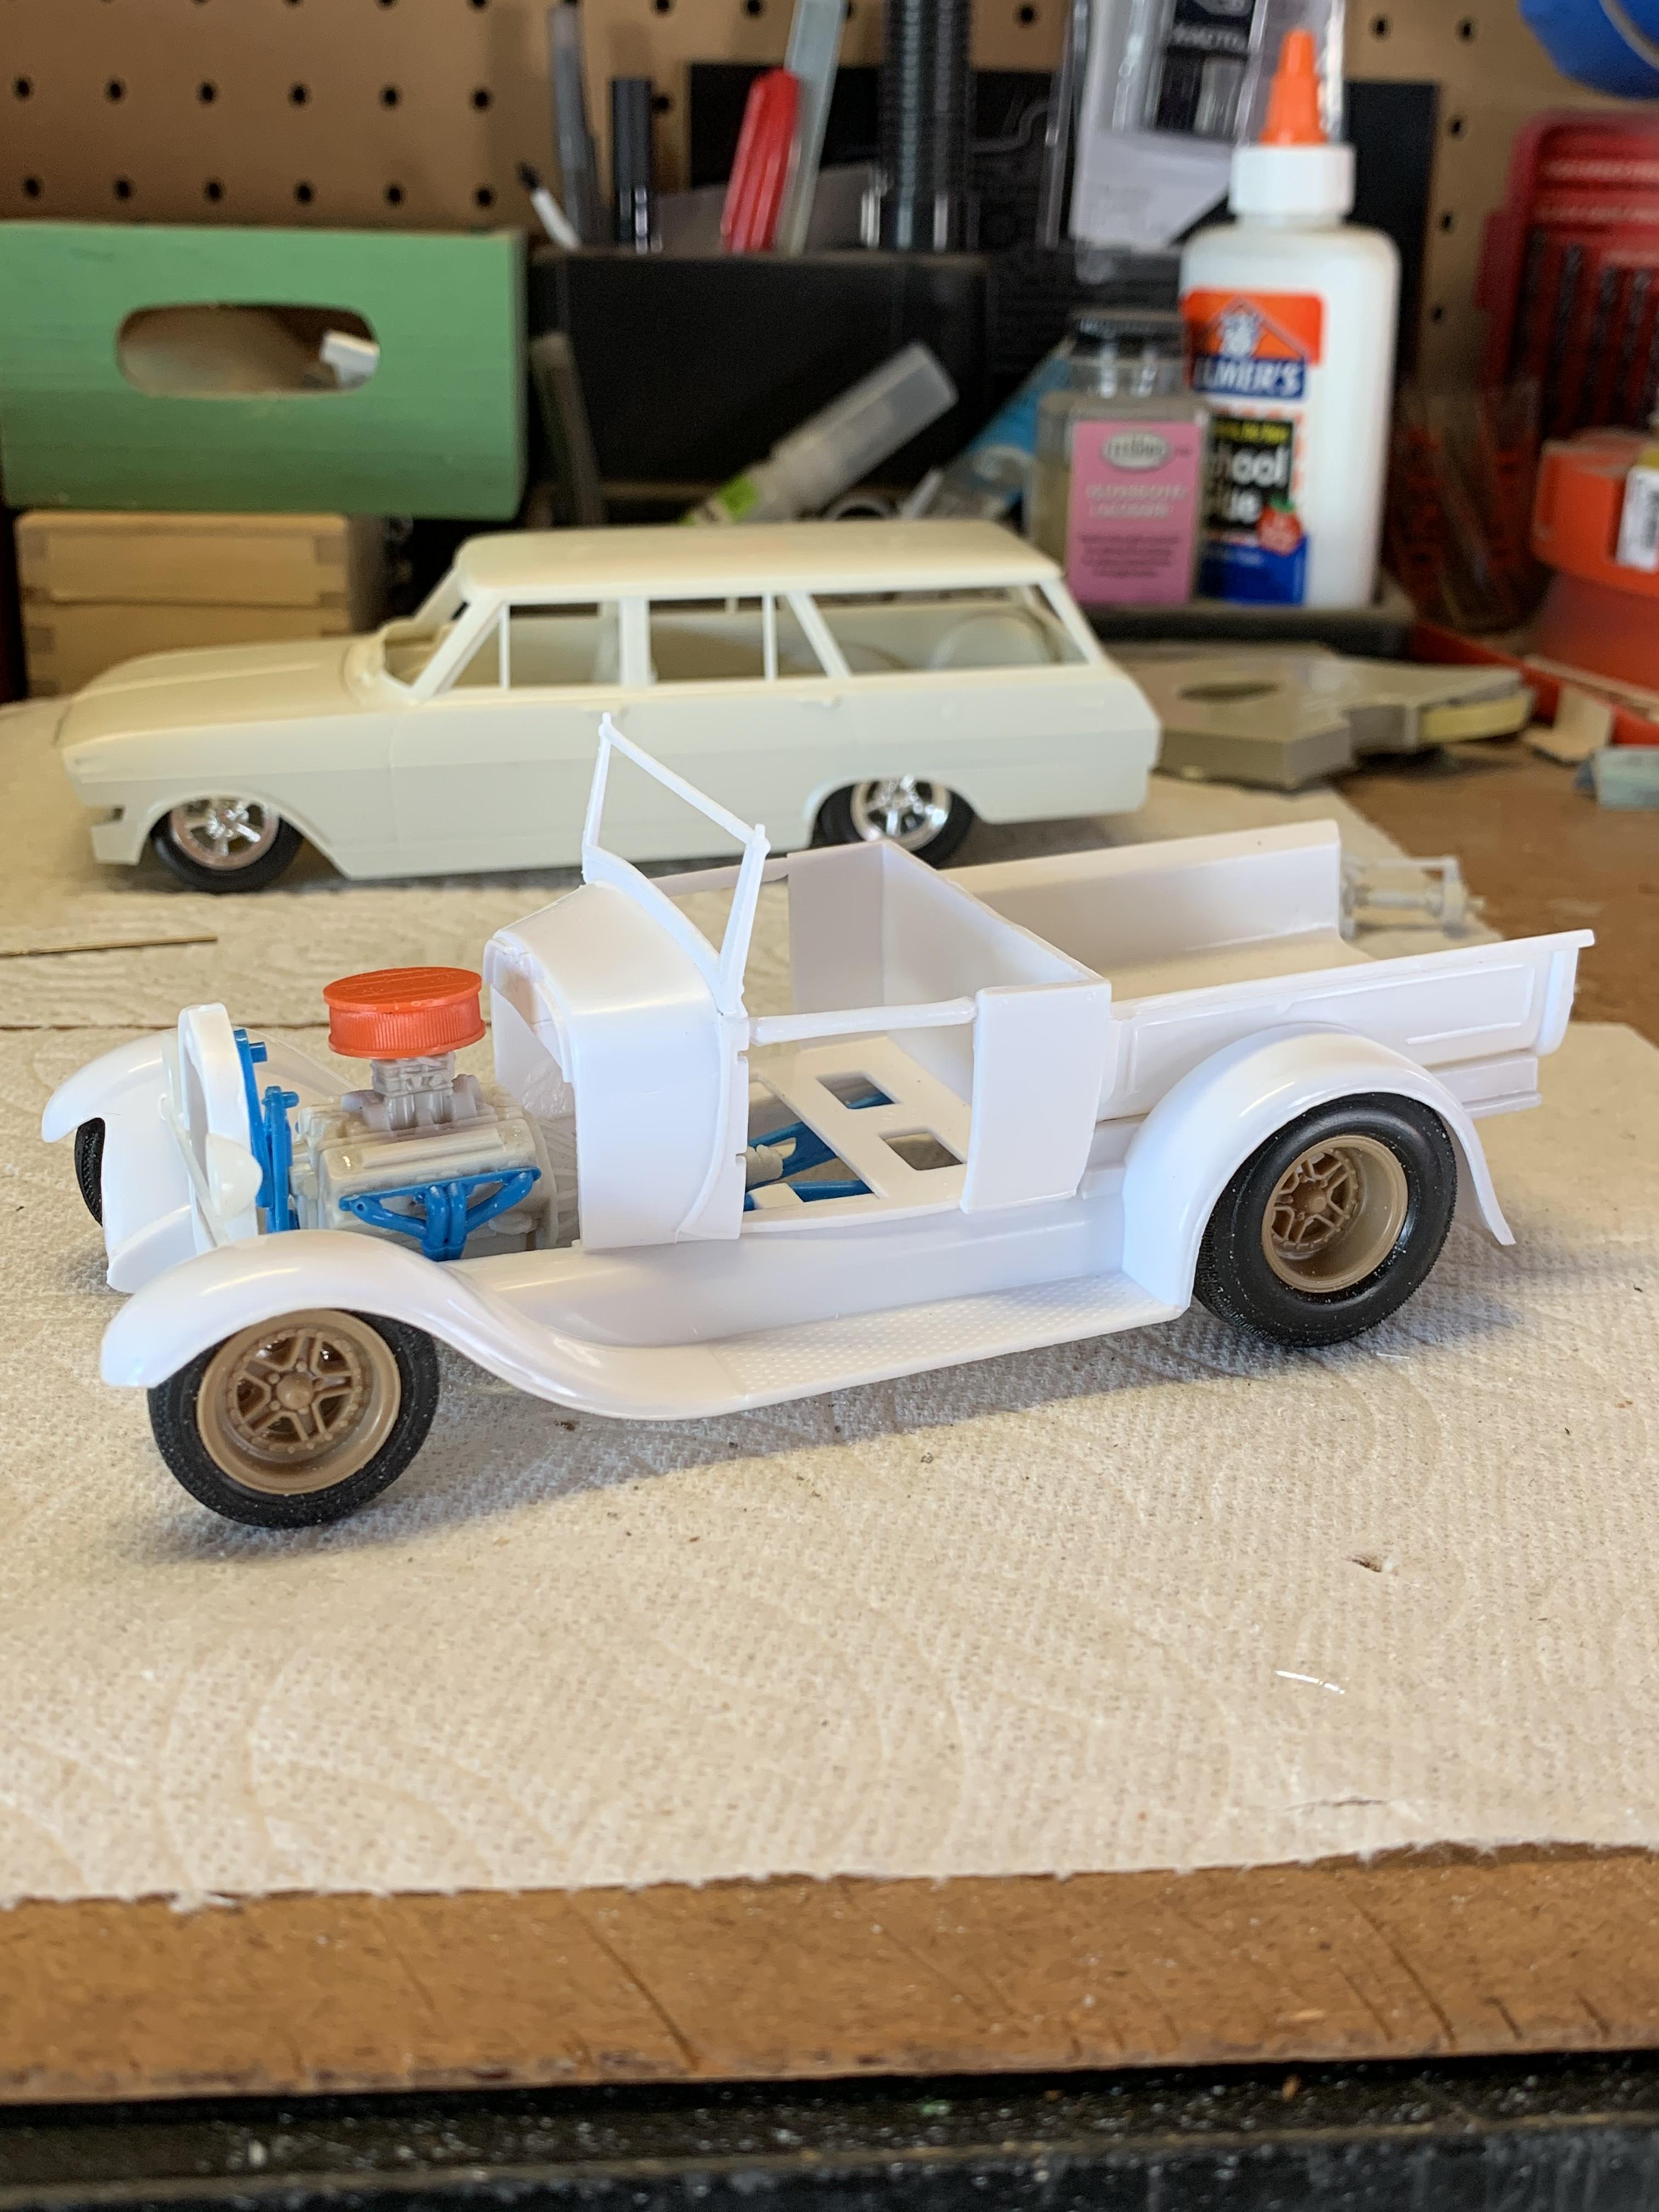
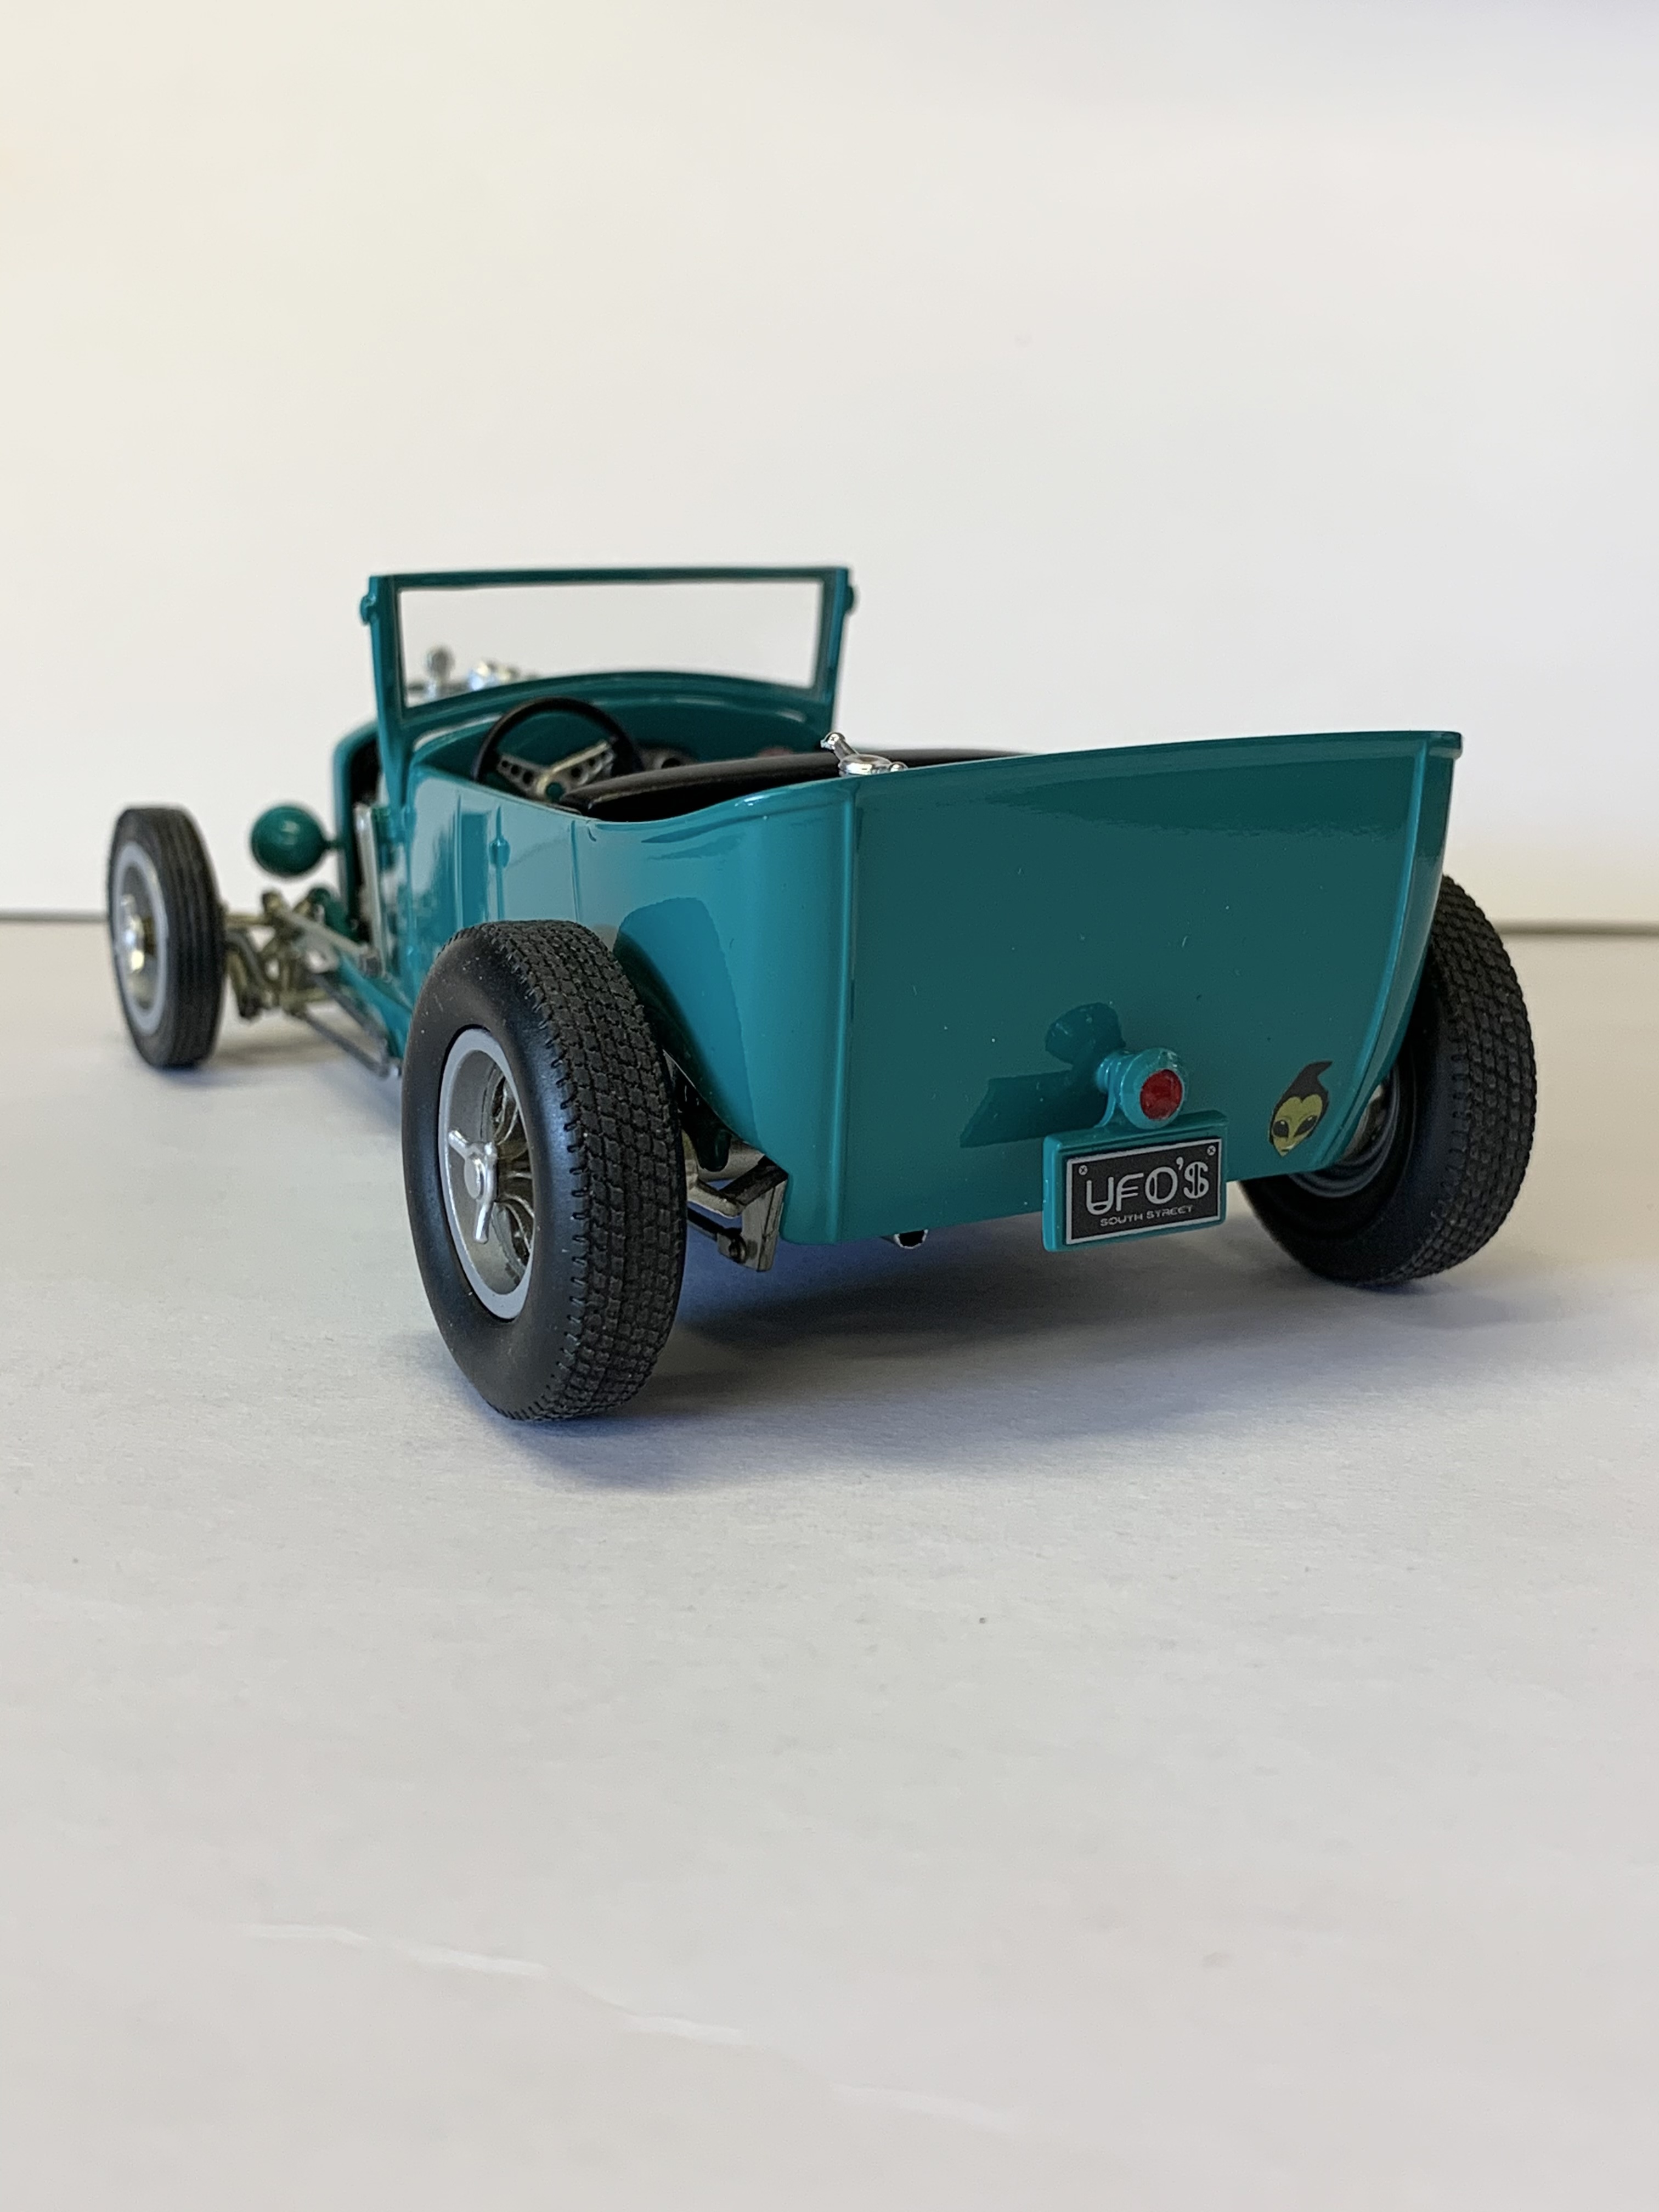
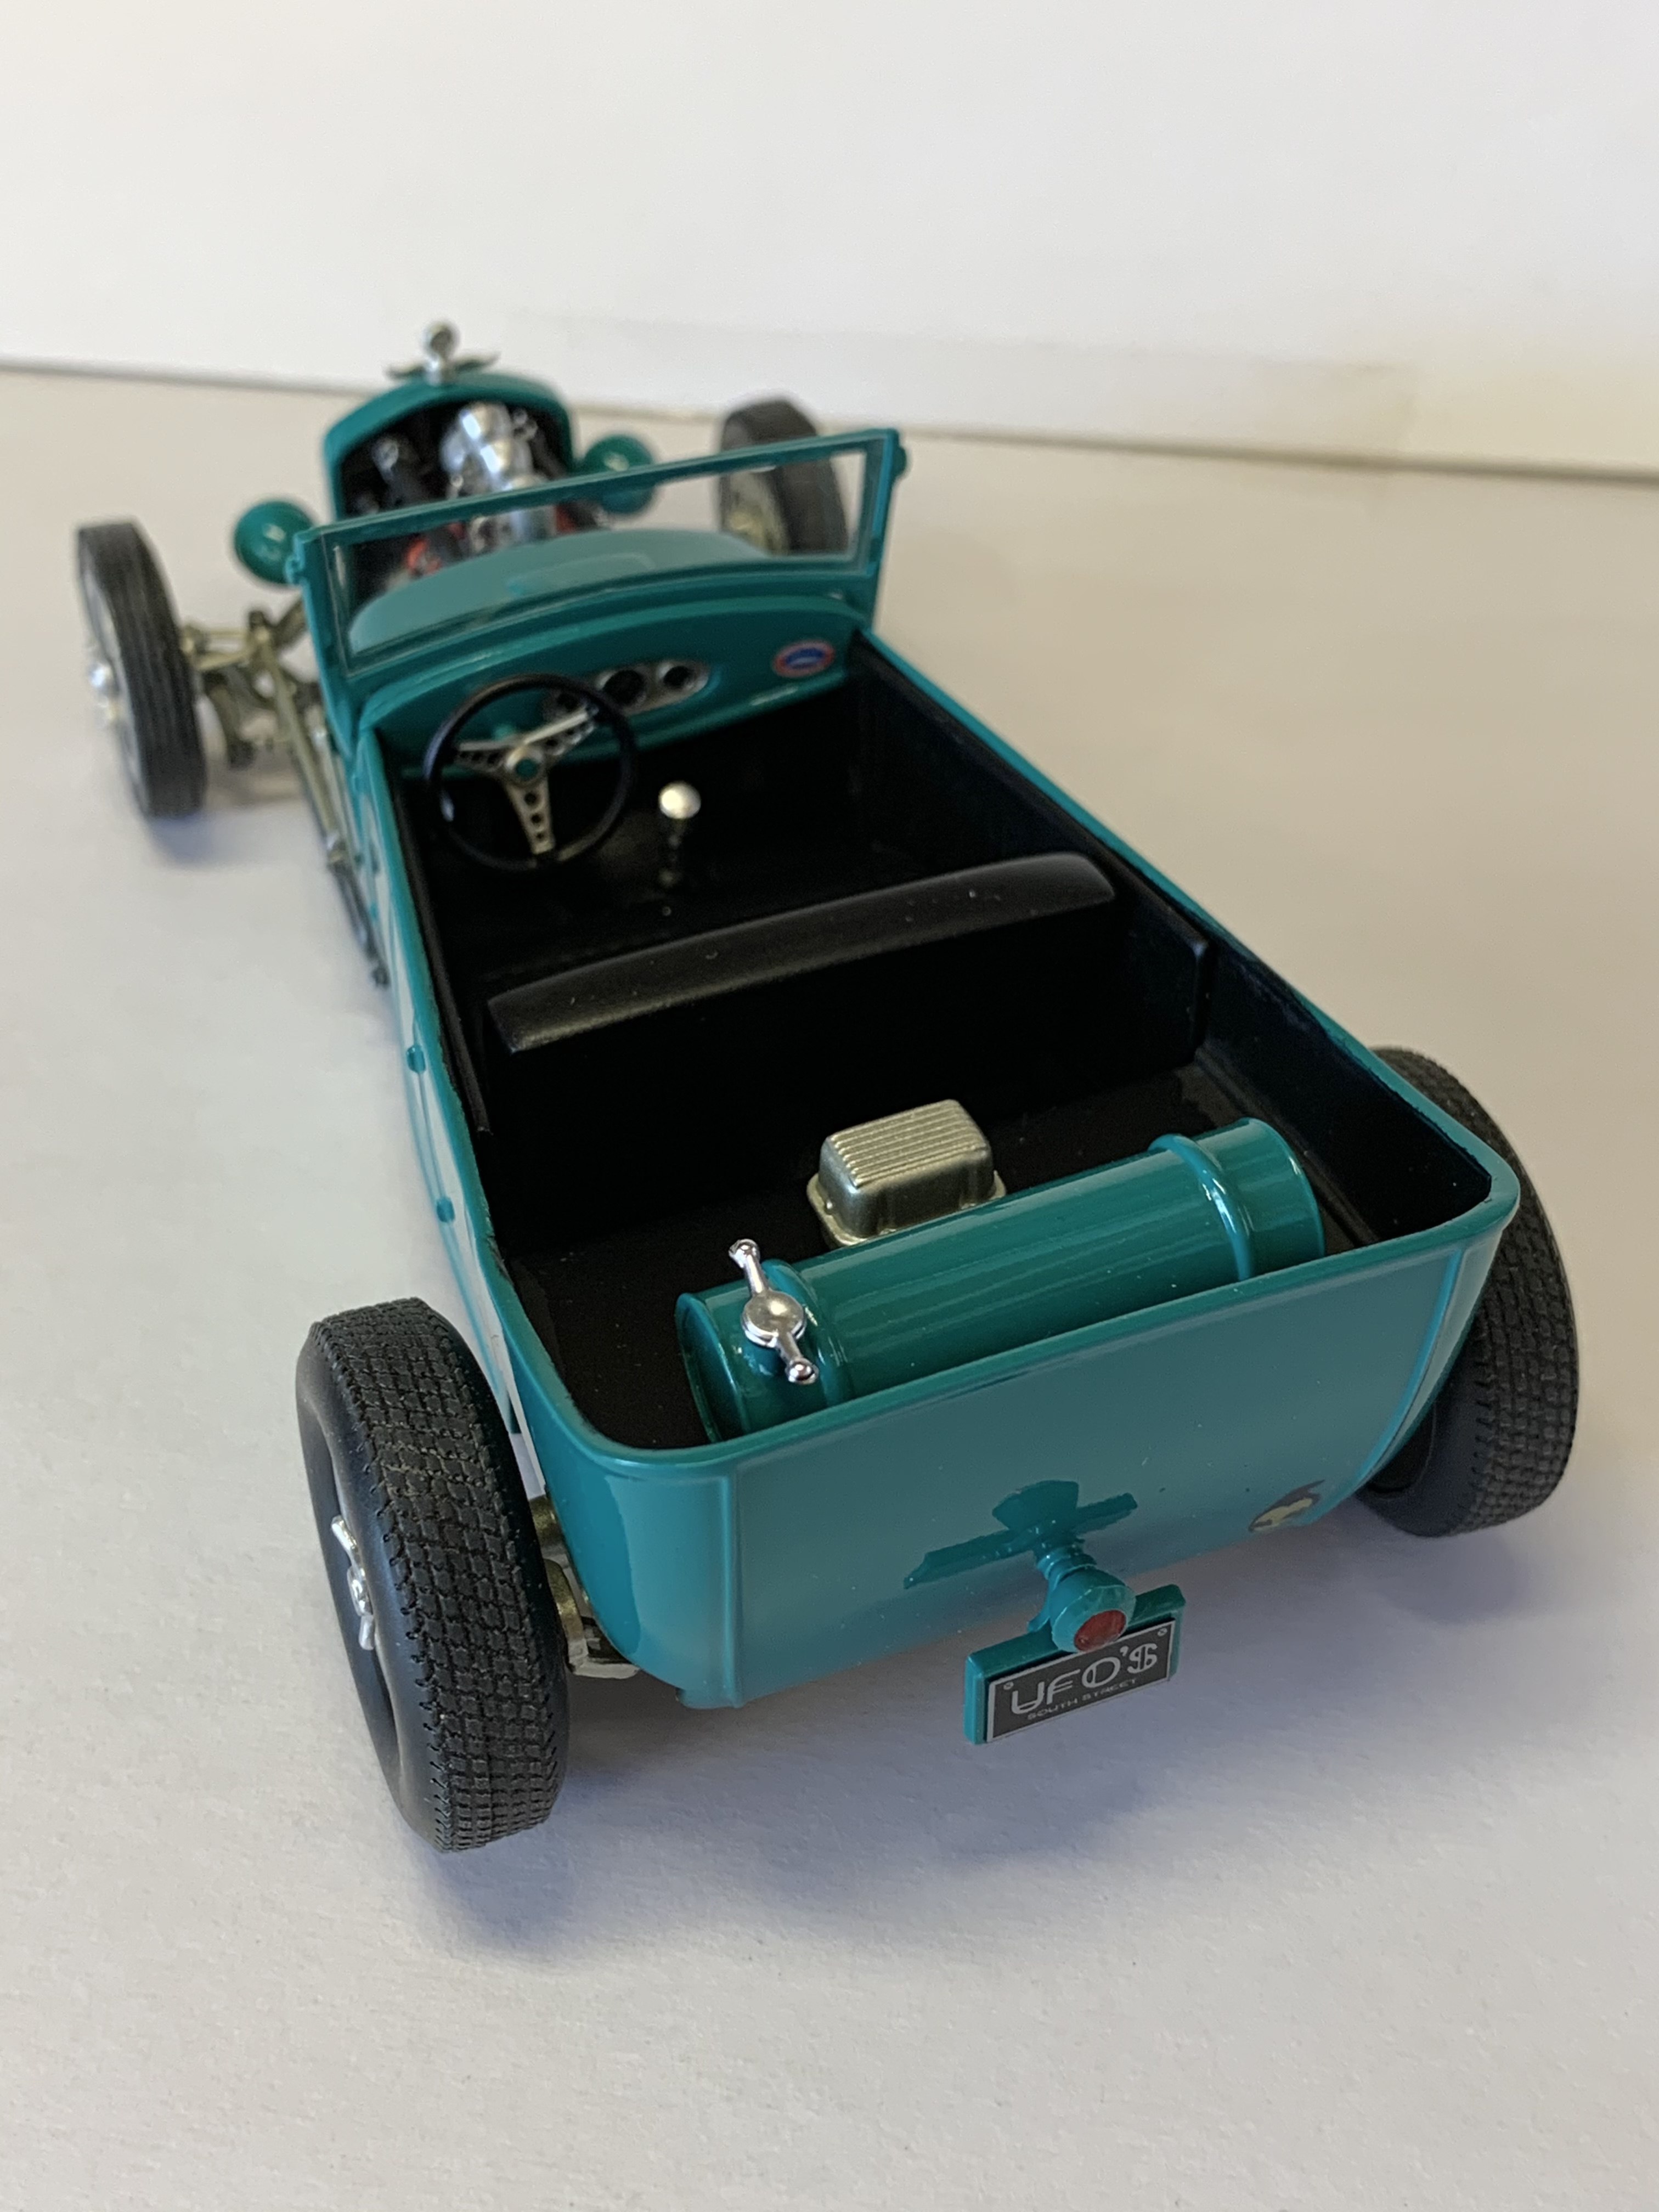
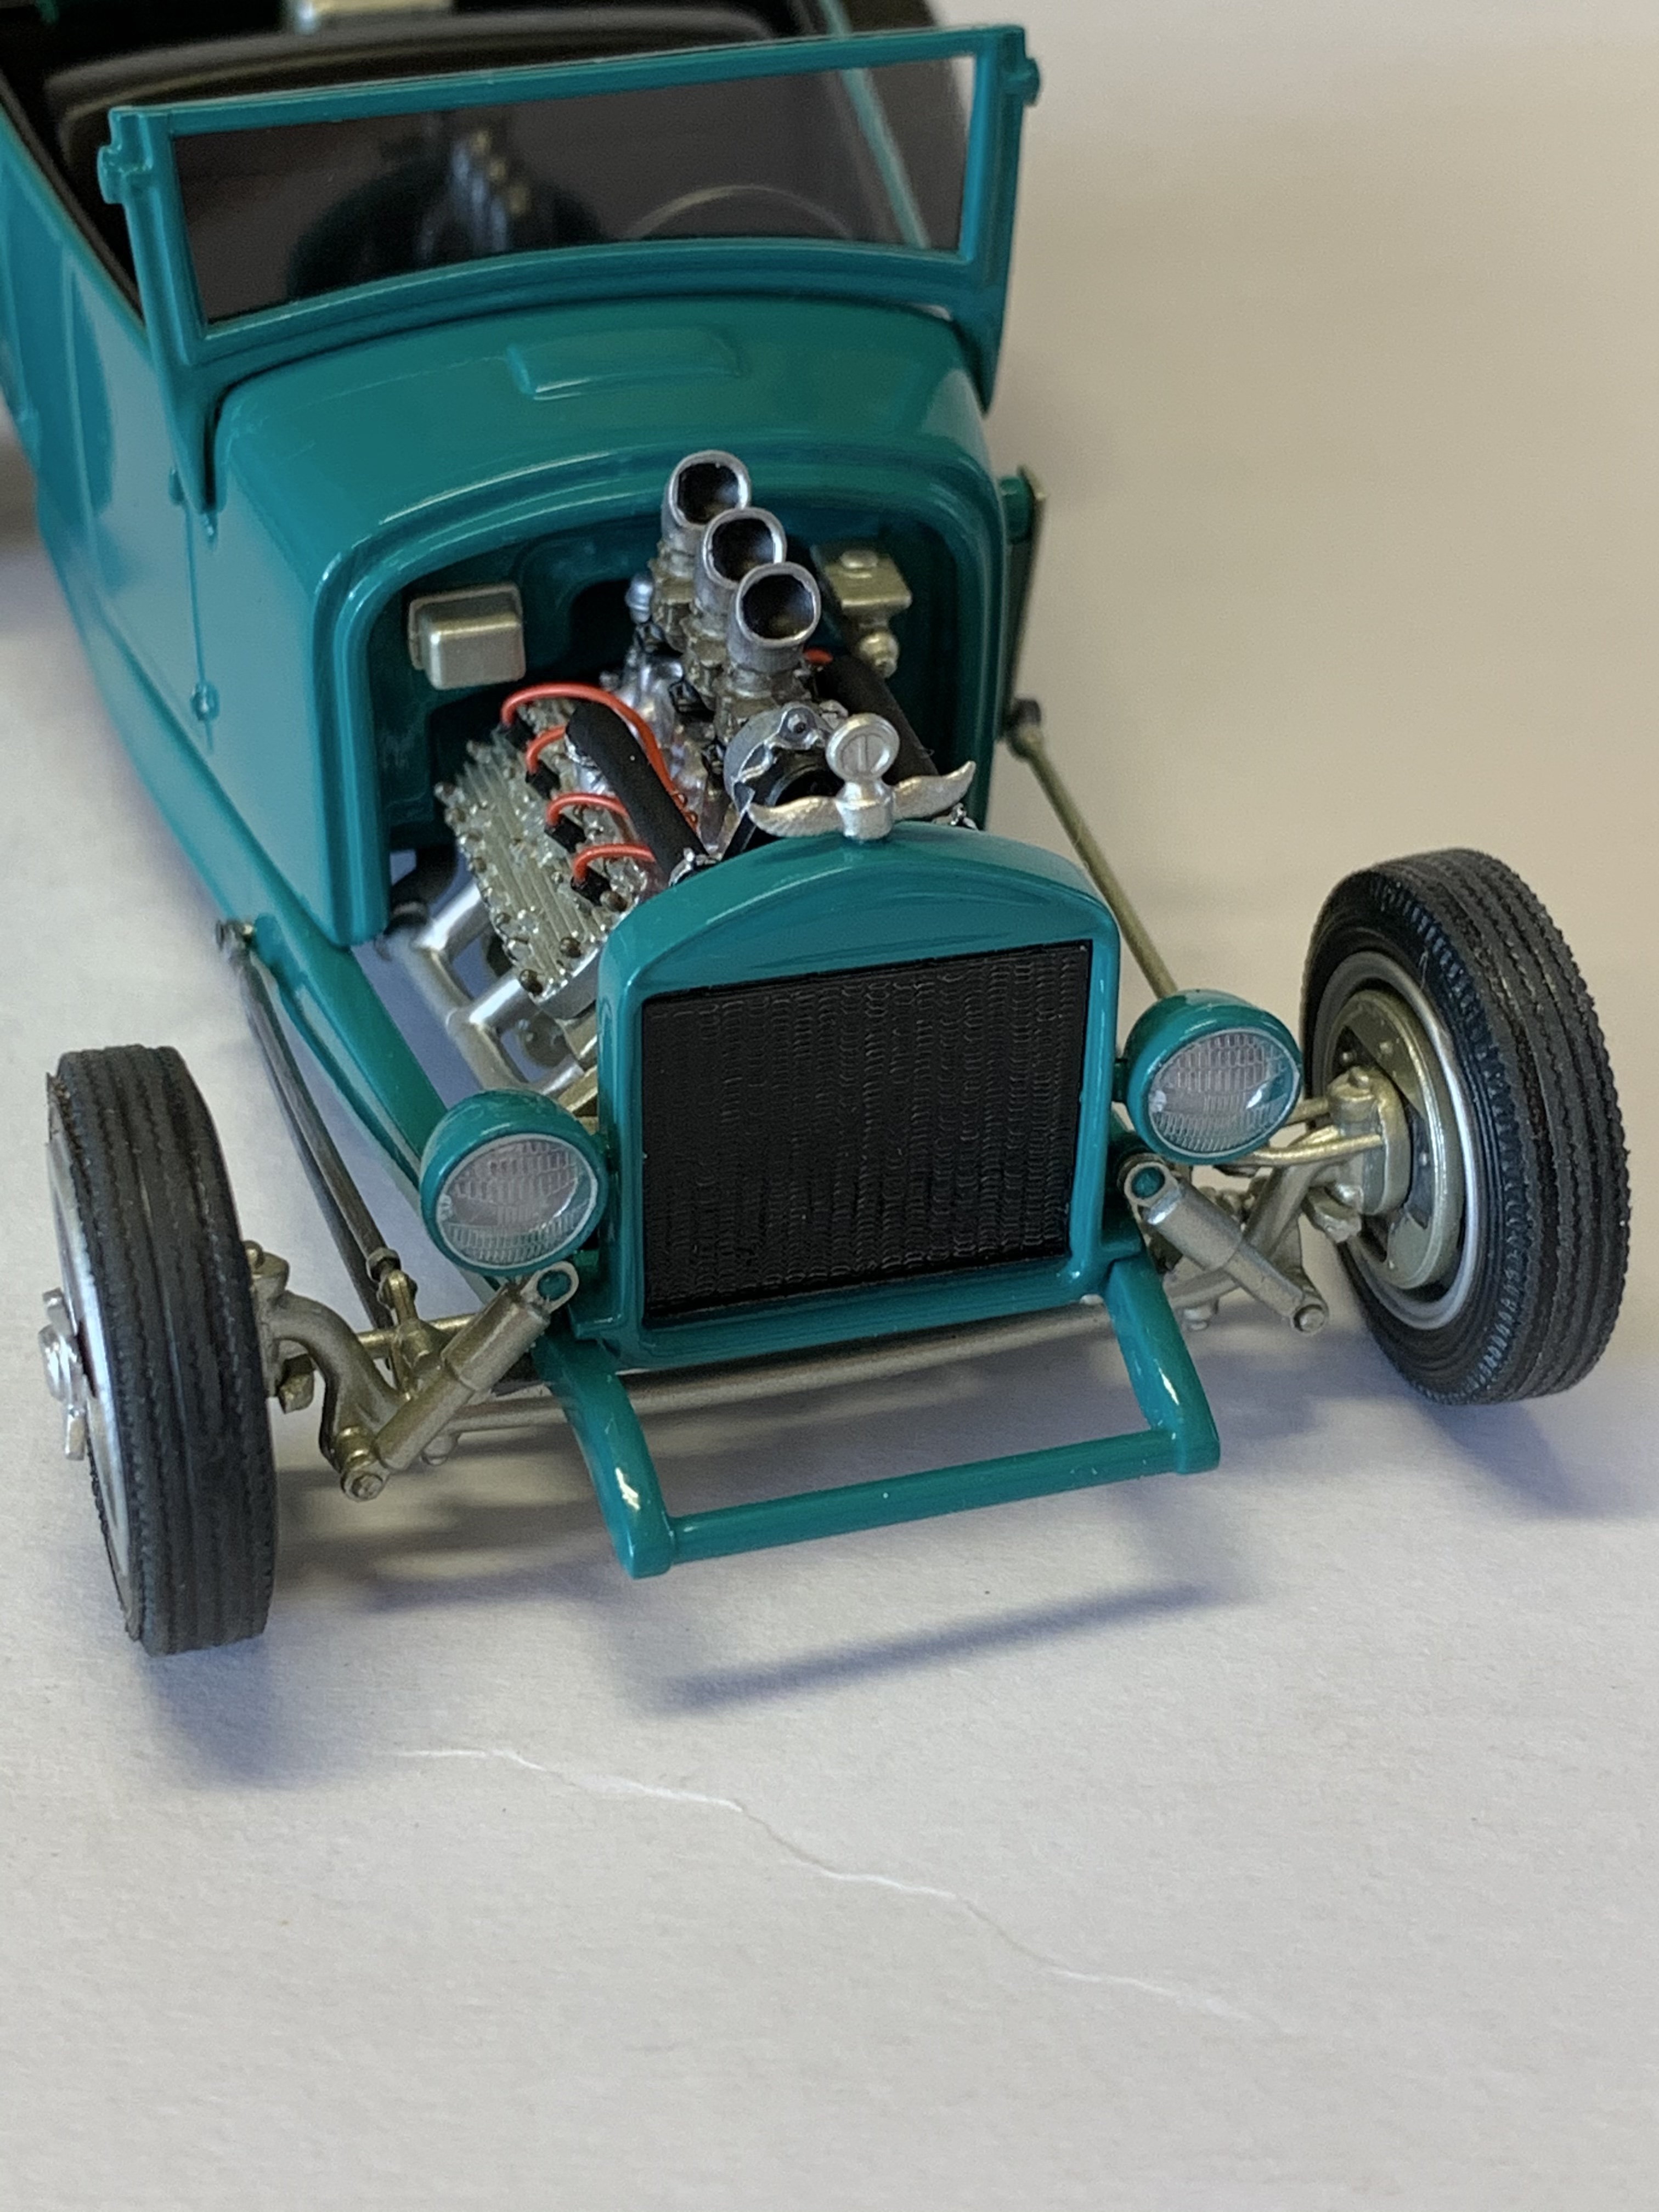
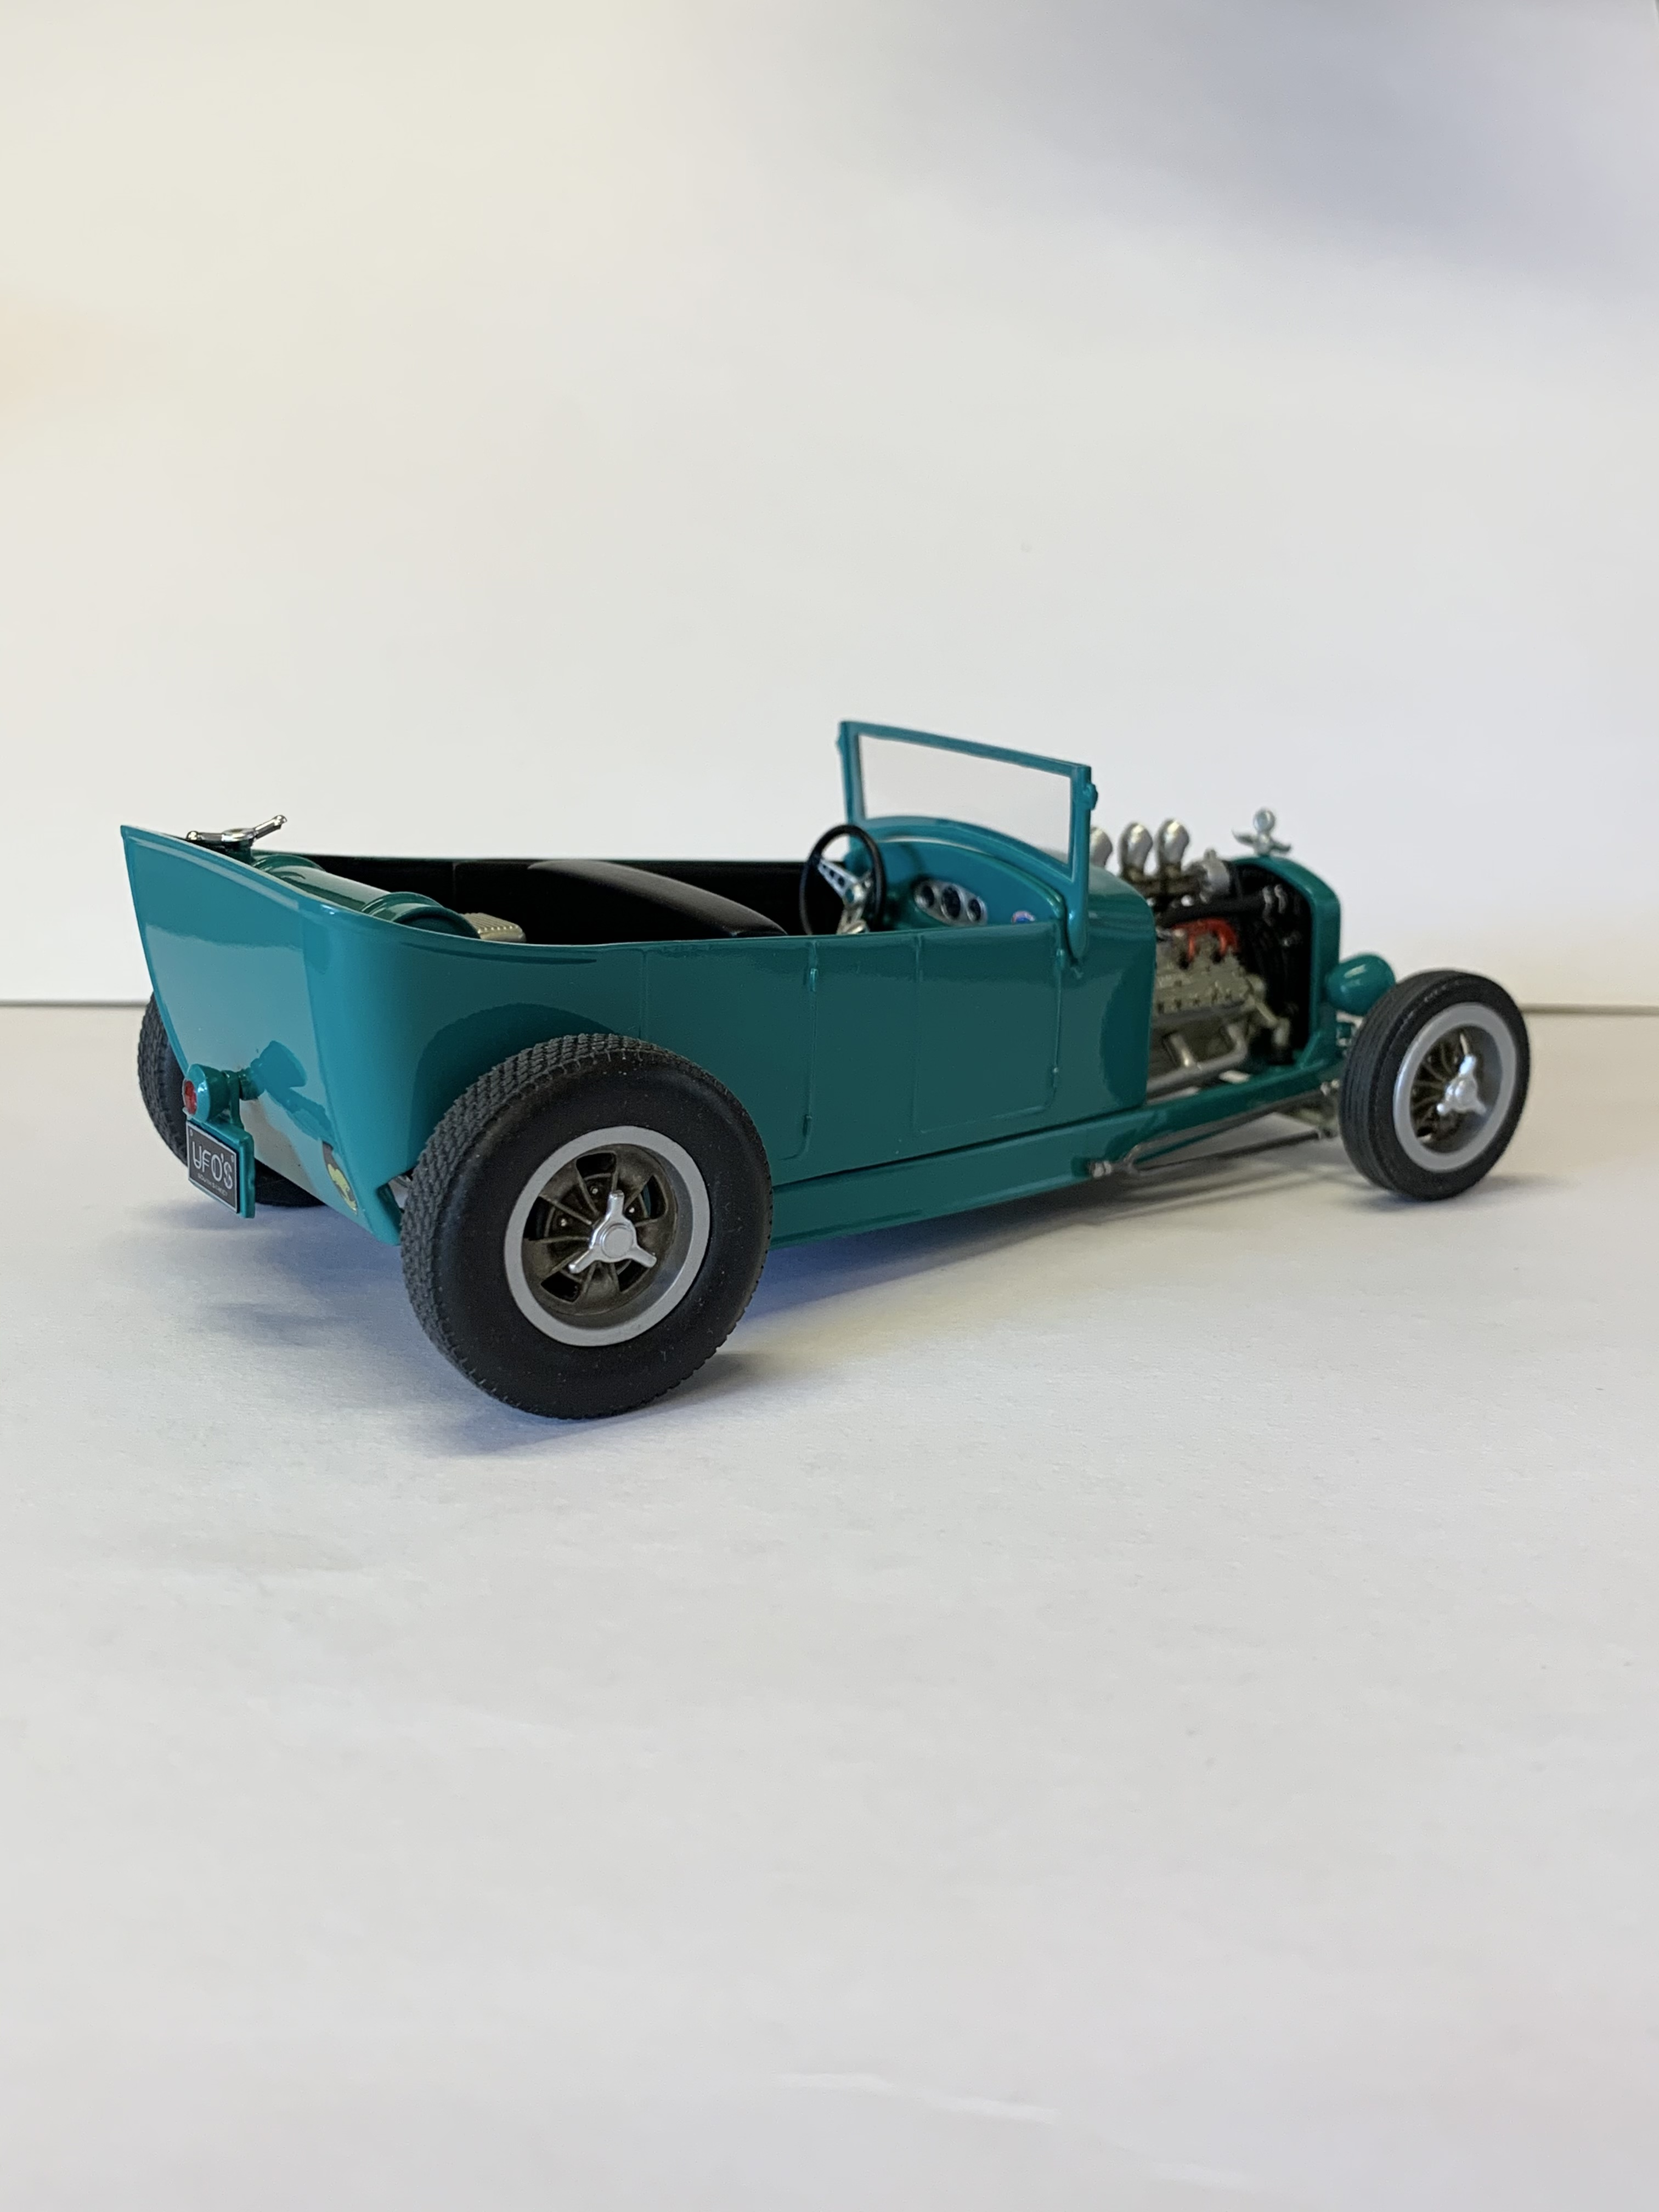
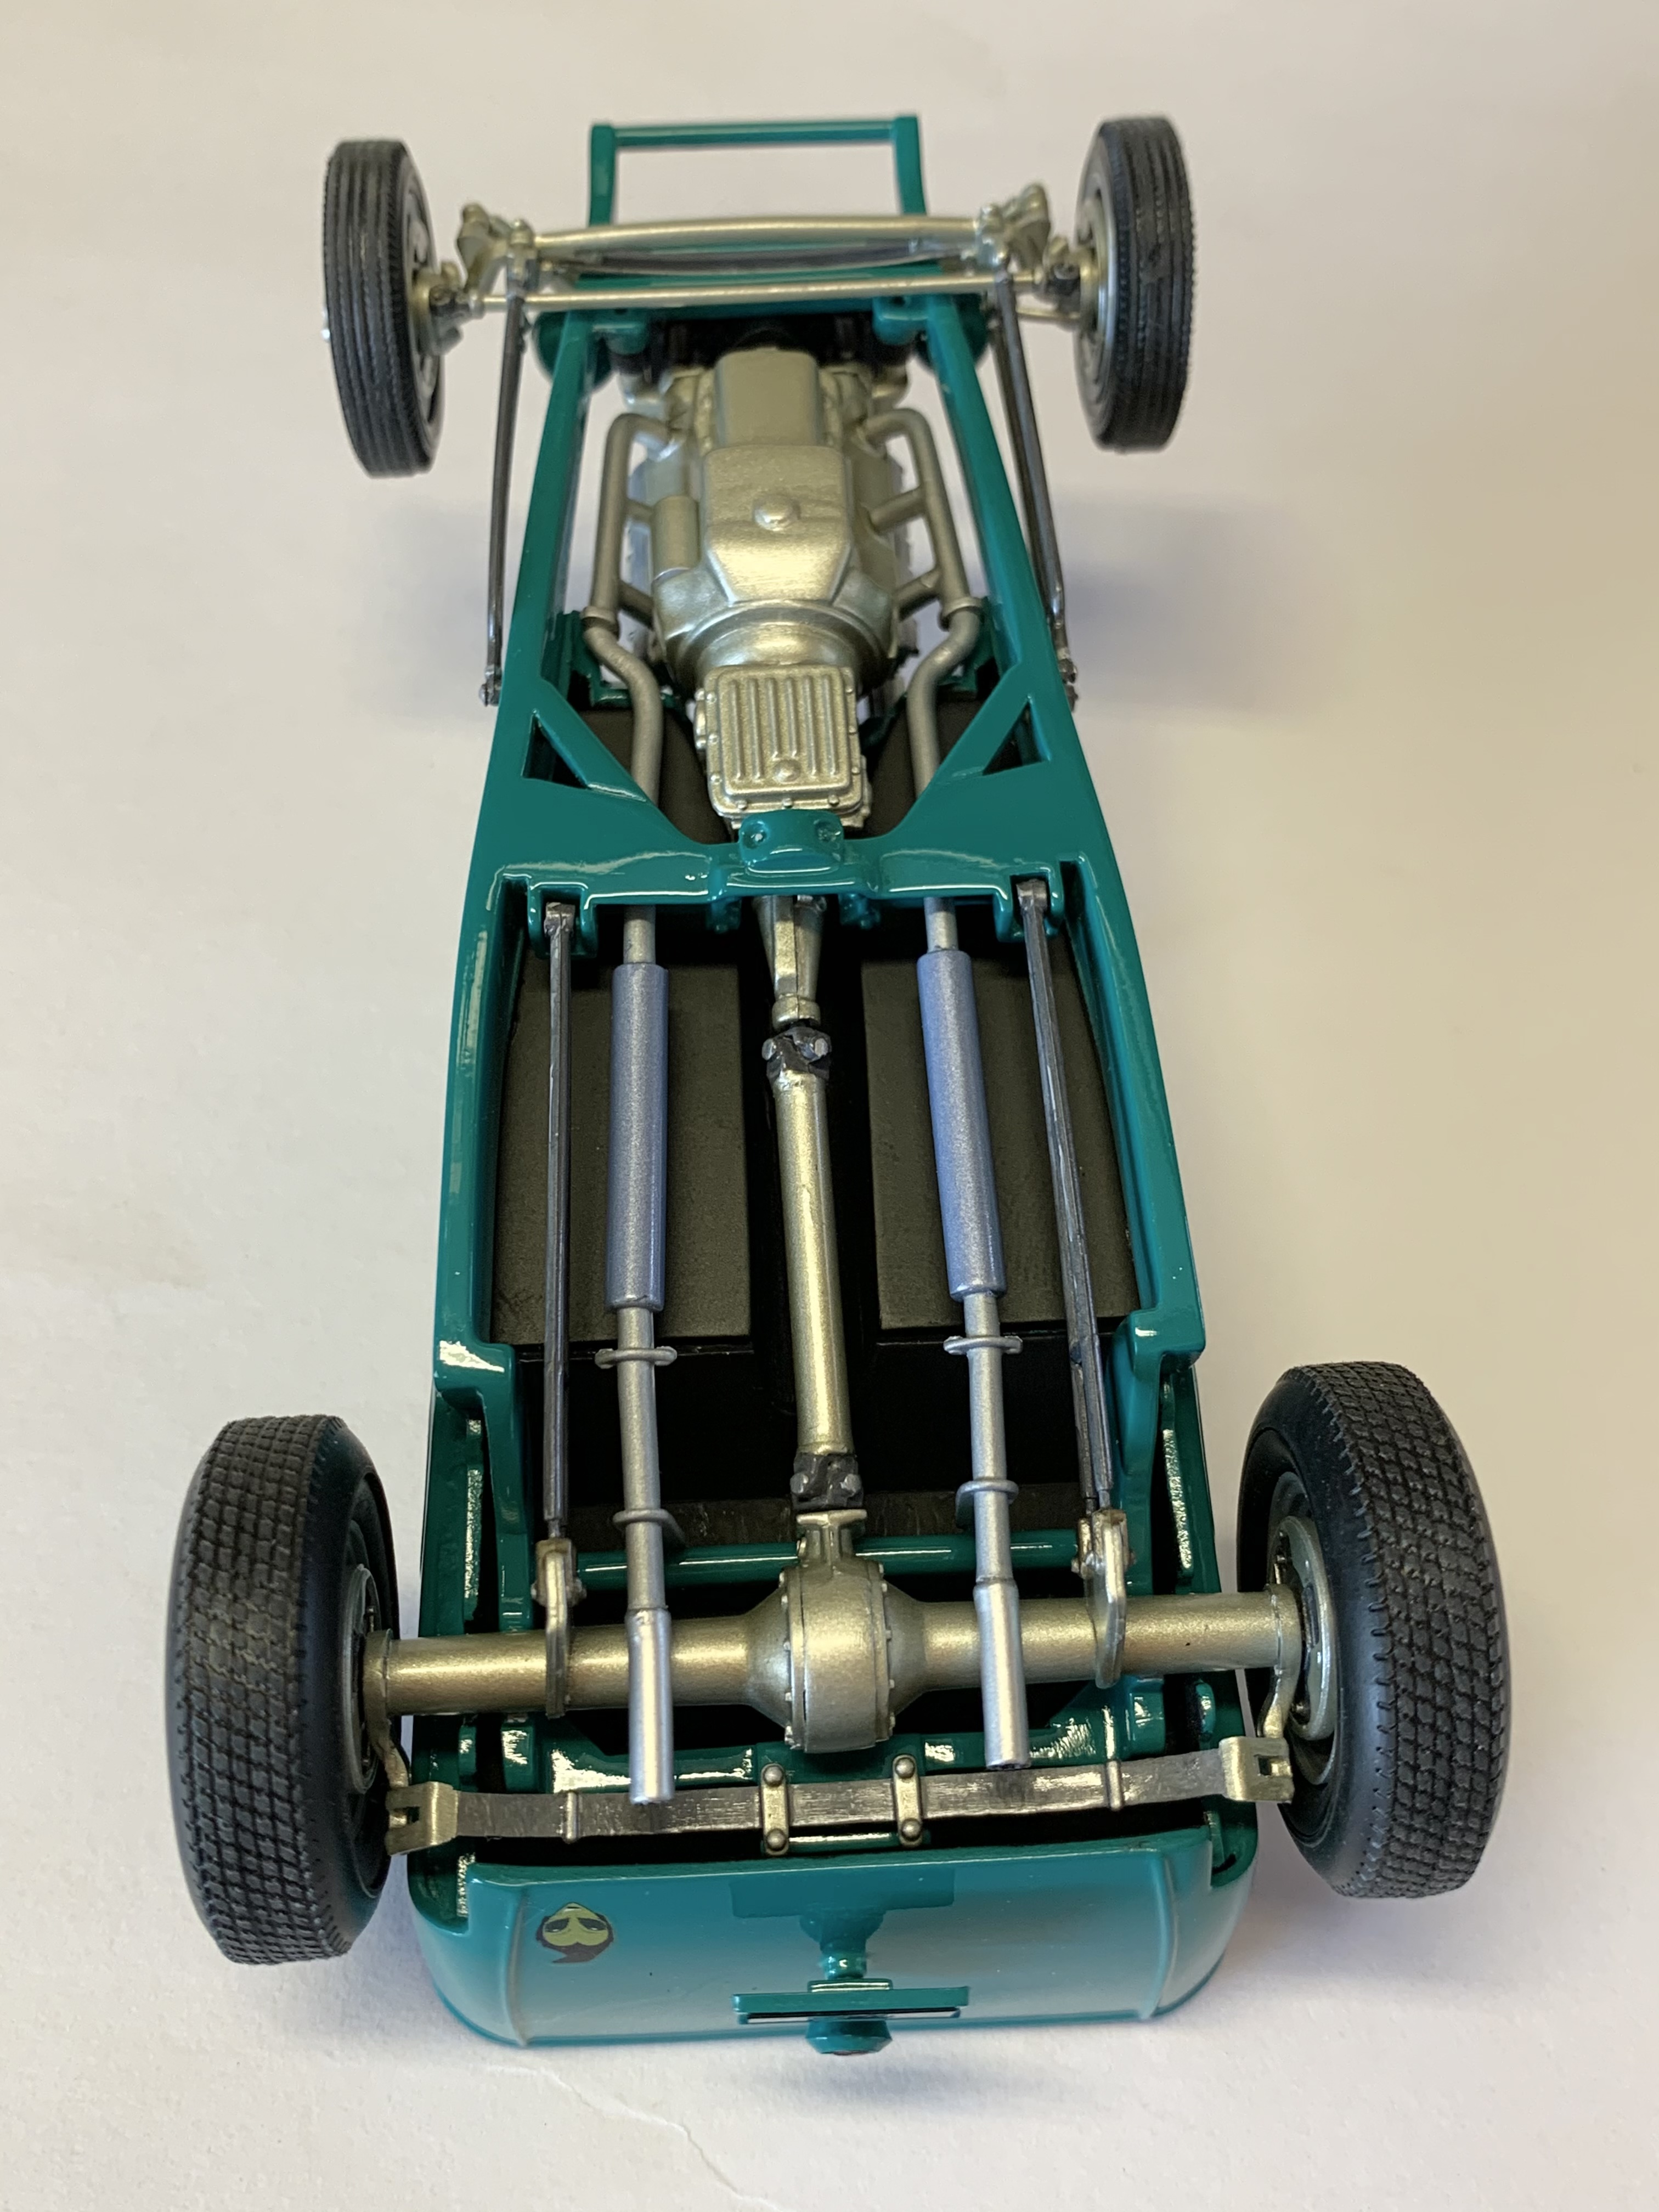
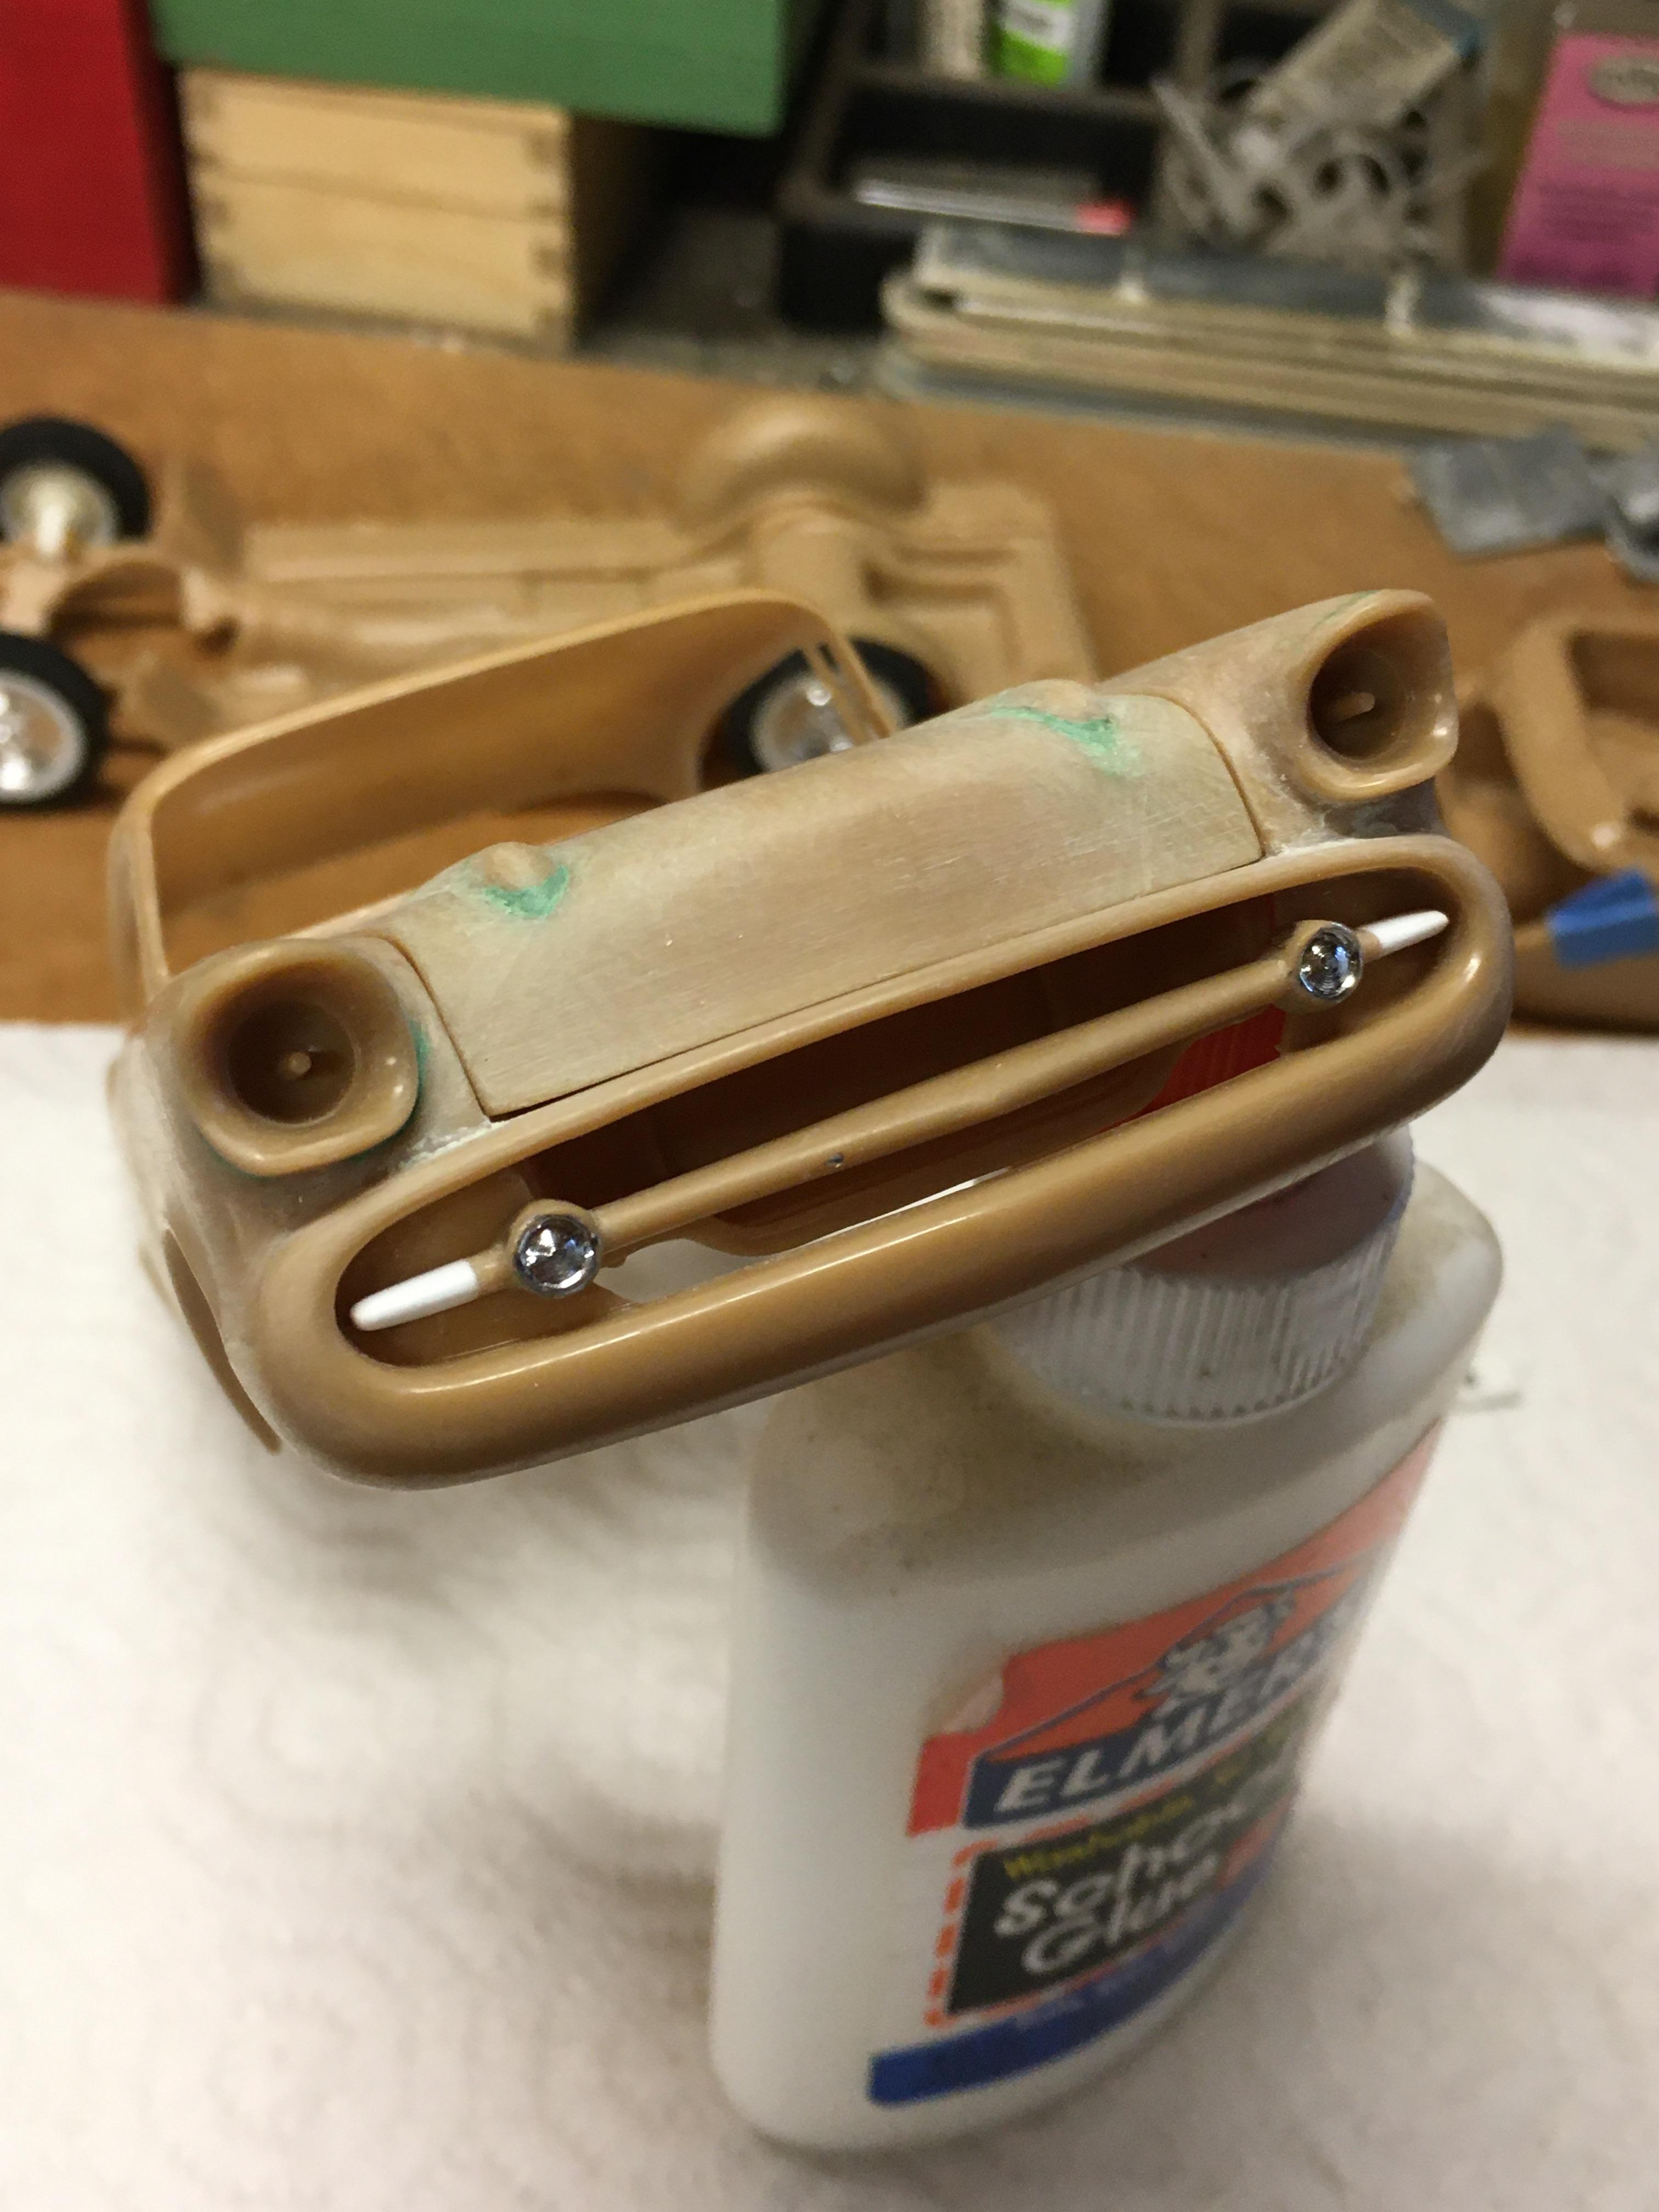
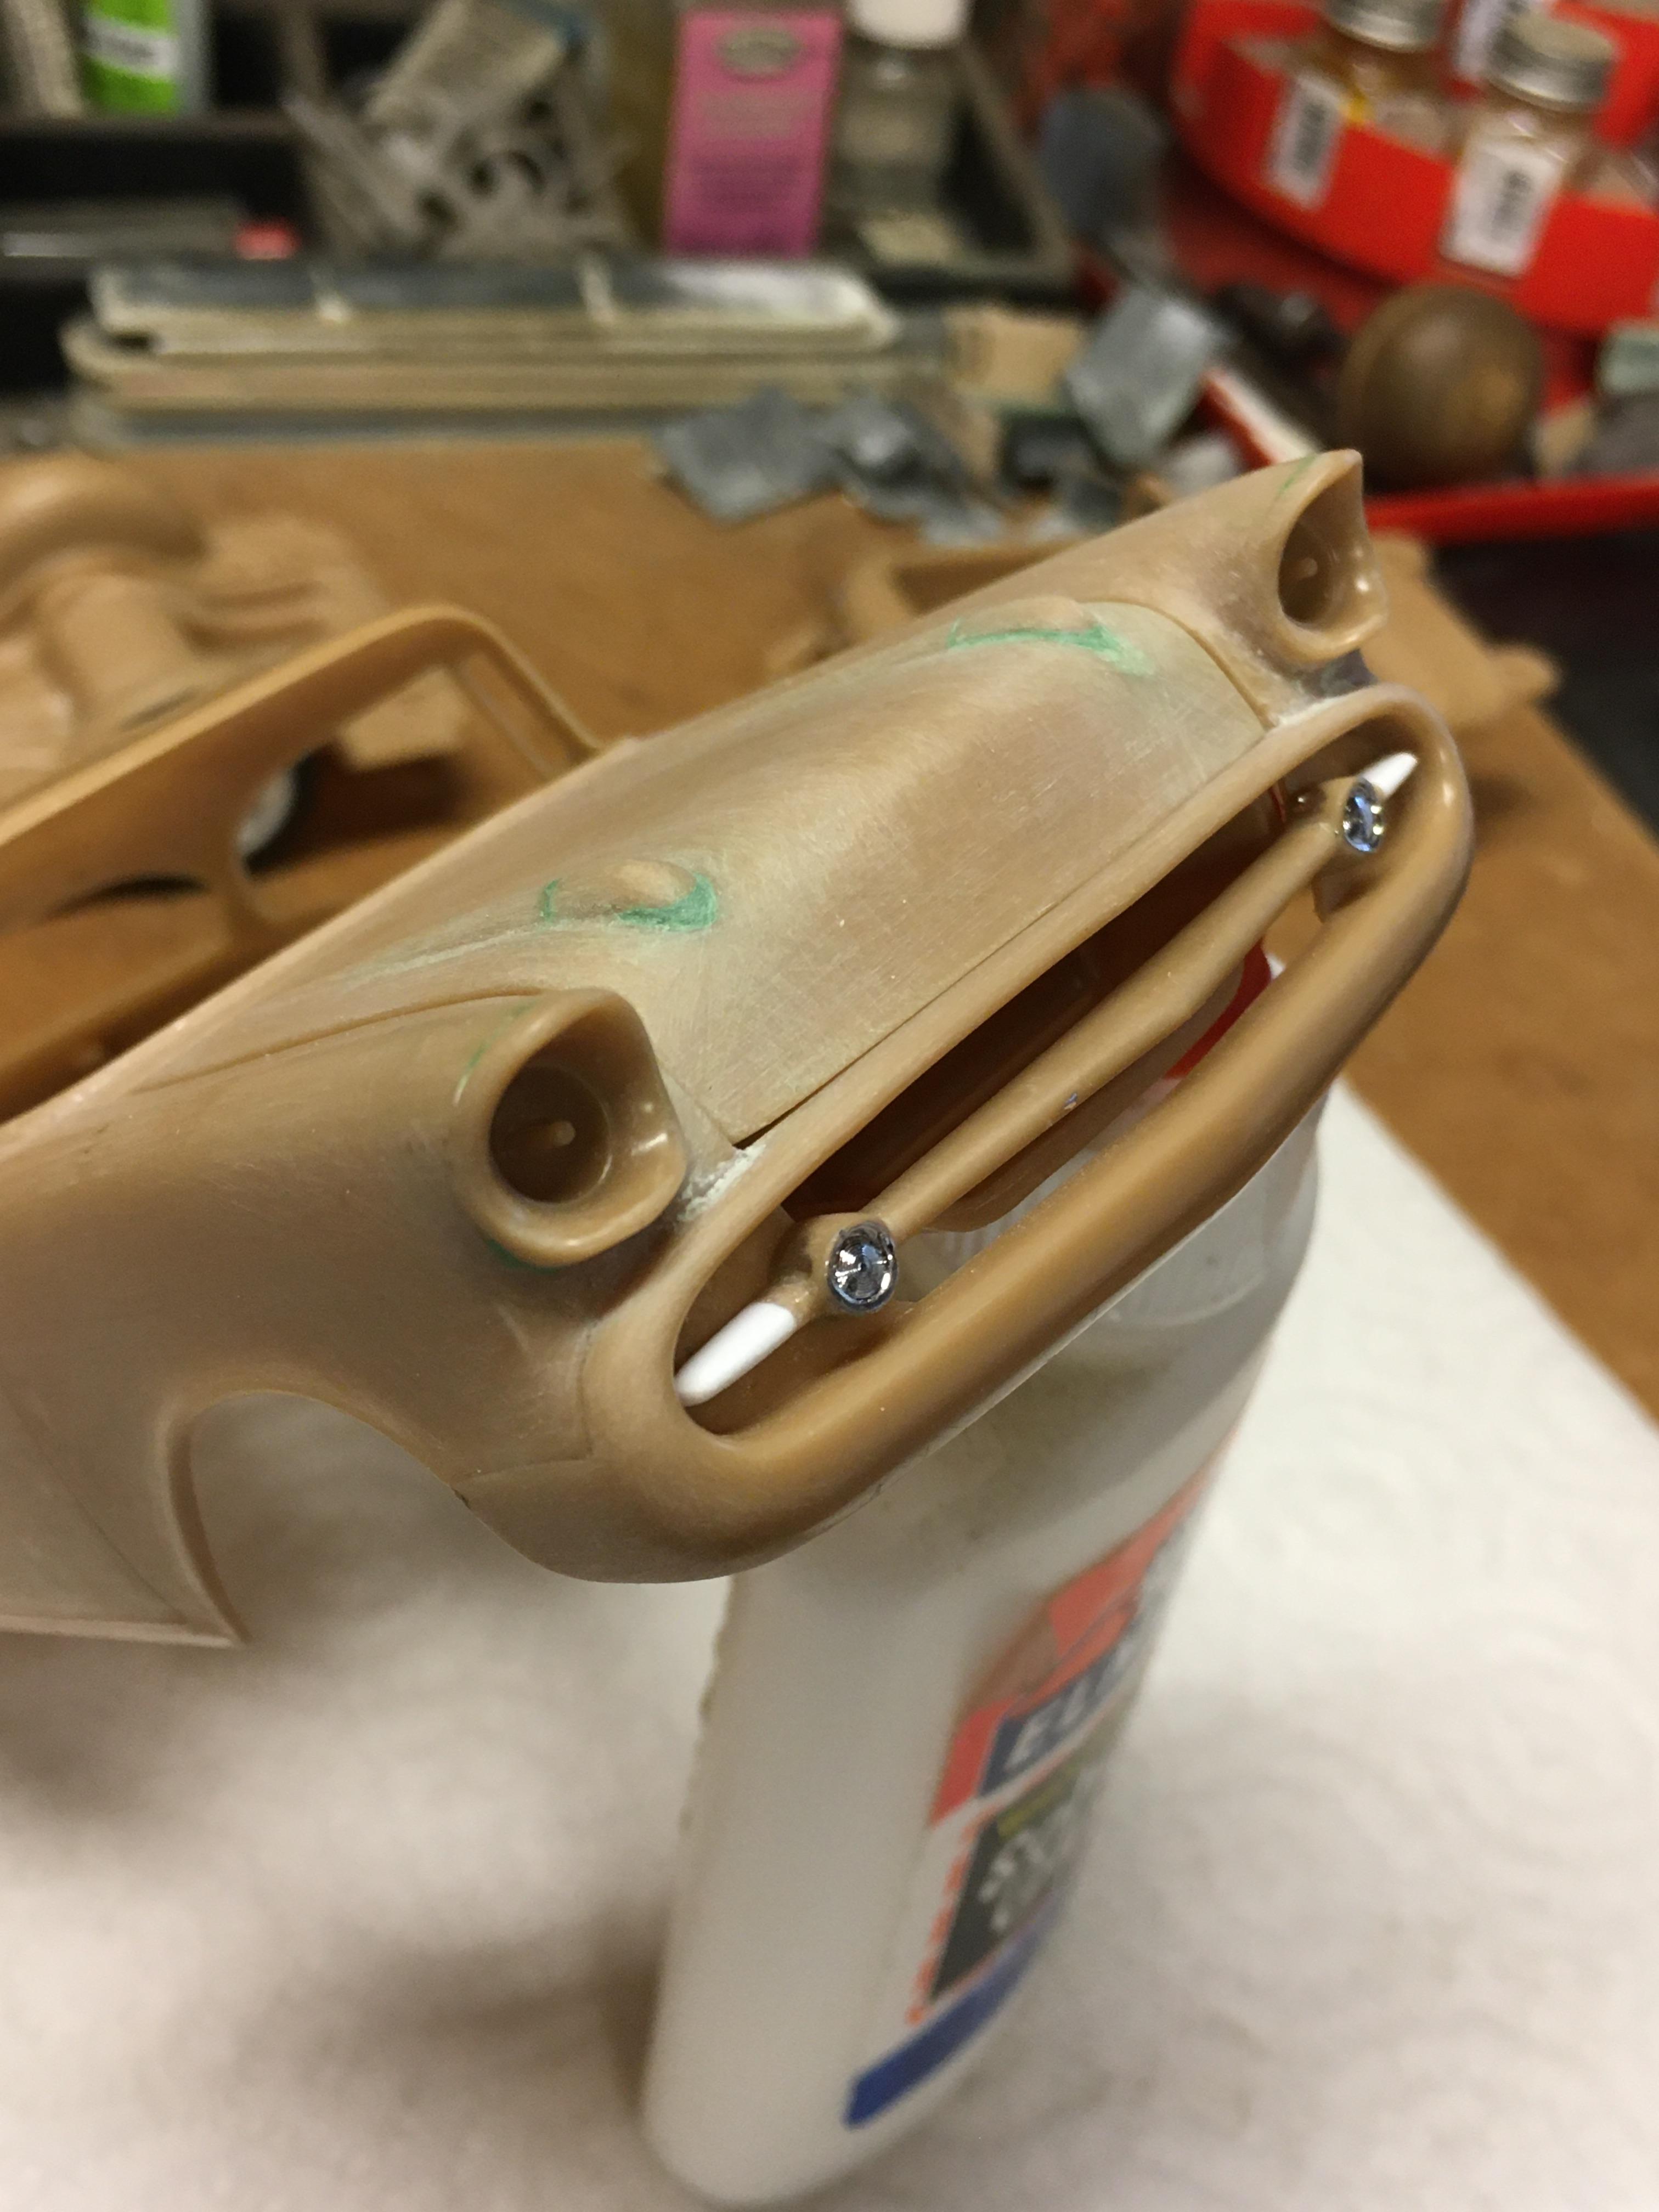
UPDATE! As you may recall back in the first pages of this thread I showed that I started on a sister roadster pickup to go with my closed cab. I had a pretty good start on the roadster but decided to put it aside so that I could focus on one model at a time. I’ve since finished the closed cab, finished a T Touring hot rod and am in the middle of the paint process on a customized ‘57 Chevy. That means I have an opening on the fabrication end and today I decided to bring the sister roadster pickup back up to the front burner! I decided to change the wheels to the set I originally showed in my opening post and today got the front wheels adapted to the dropped axle, got the front axle fit to the frame and also got the Corvette IRS assembled and fit to the frame. To finish the chassis set up I need to adapt the rear wheels and build some rear shock mounts on the frame to match the other truck. From there I’ll need to create the interior and do a few body related things and it can go to primer and paint. Here’s a basic mock up with the wheel change. Rear tires are simply sitting under the fenders for now. This truck is also NOT going to be surf themed (and most likely not any kind of theme) but I’m thinking I might tie the color scheme into the closed cab. Then again, maybe not. We’ll see...

-
@Kit Karson Good to see you’re still chipping away. Interior is gonna look great!
-
Great idea! Suits it perfectly.
-
Thanks a bunch, Alan! I guess my full scale hands on experience helps a lot getting my scale chassis dialed in. I like them to appear as though they would actually function decent. ?
-
60's Banger Geek '27 T Touring - Updated 10/13/18
Dennis Lacy replied to Dennis Lacy's topic in WIP: Model Cars
UPDATE! This one is finished and on the shelf! -
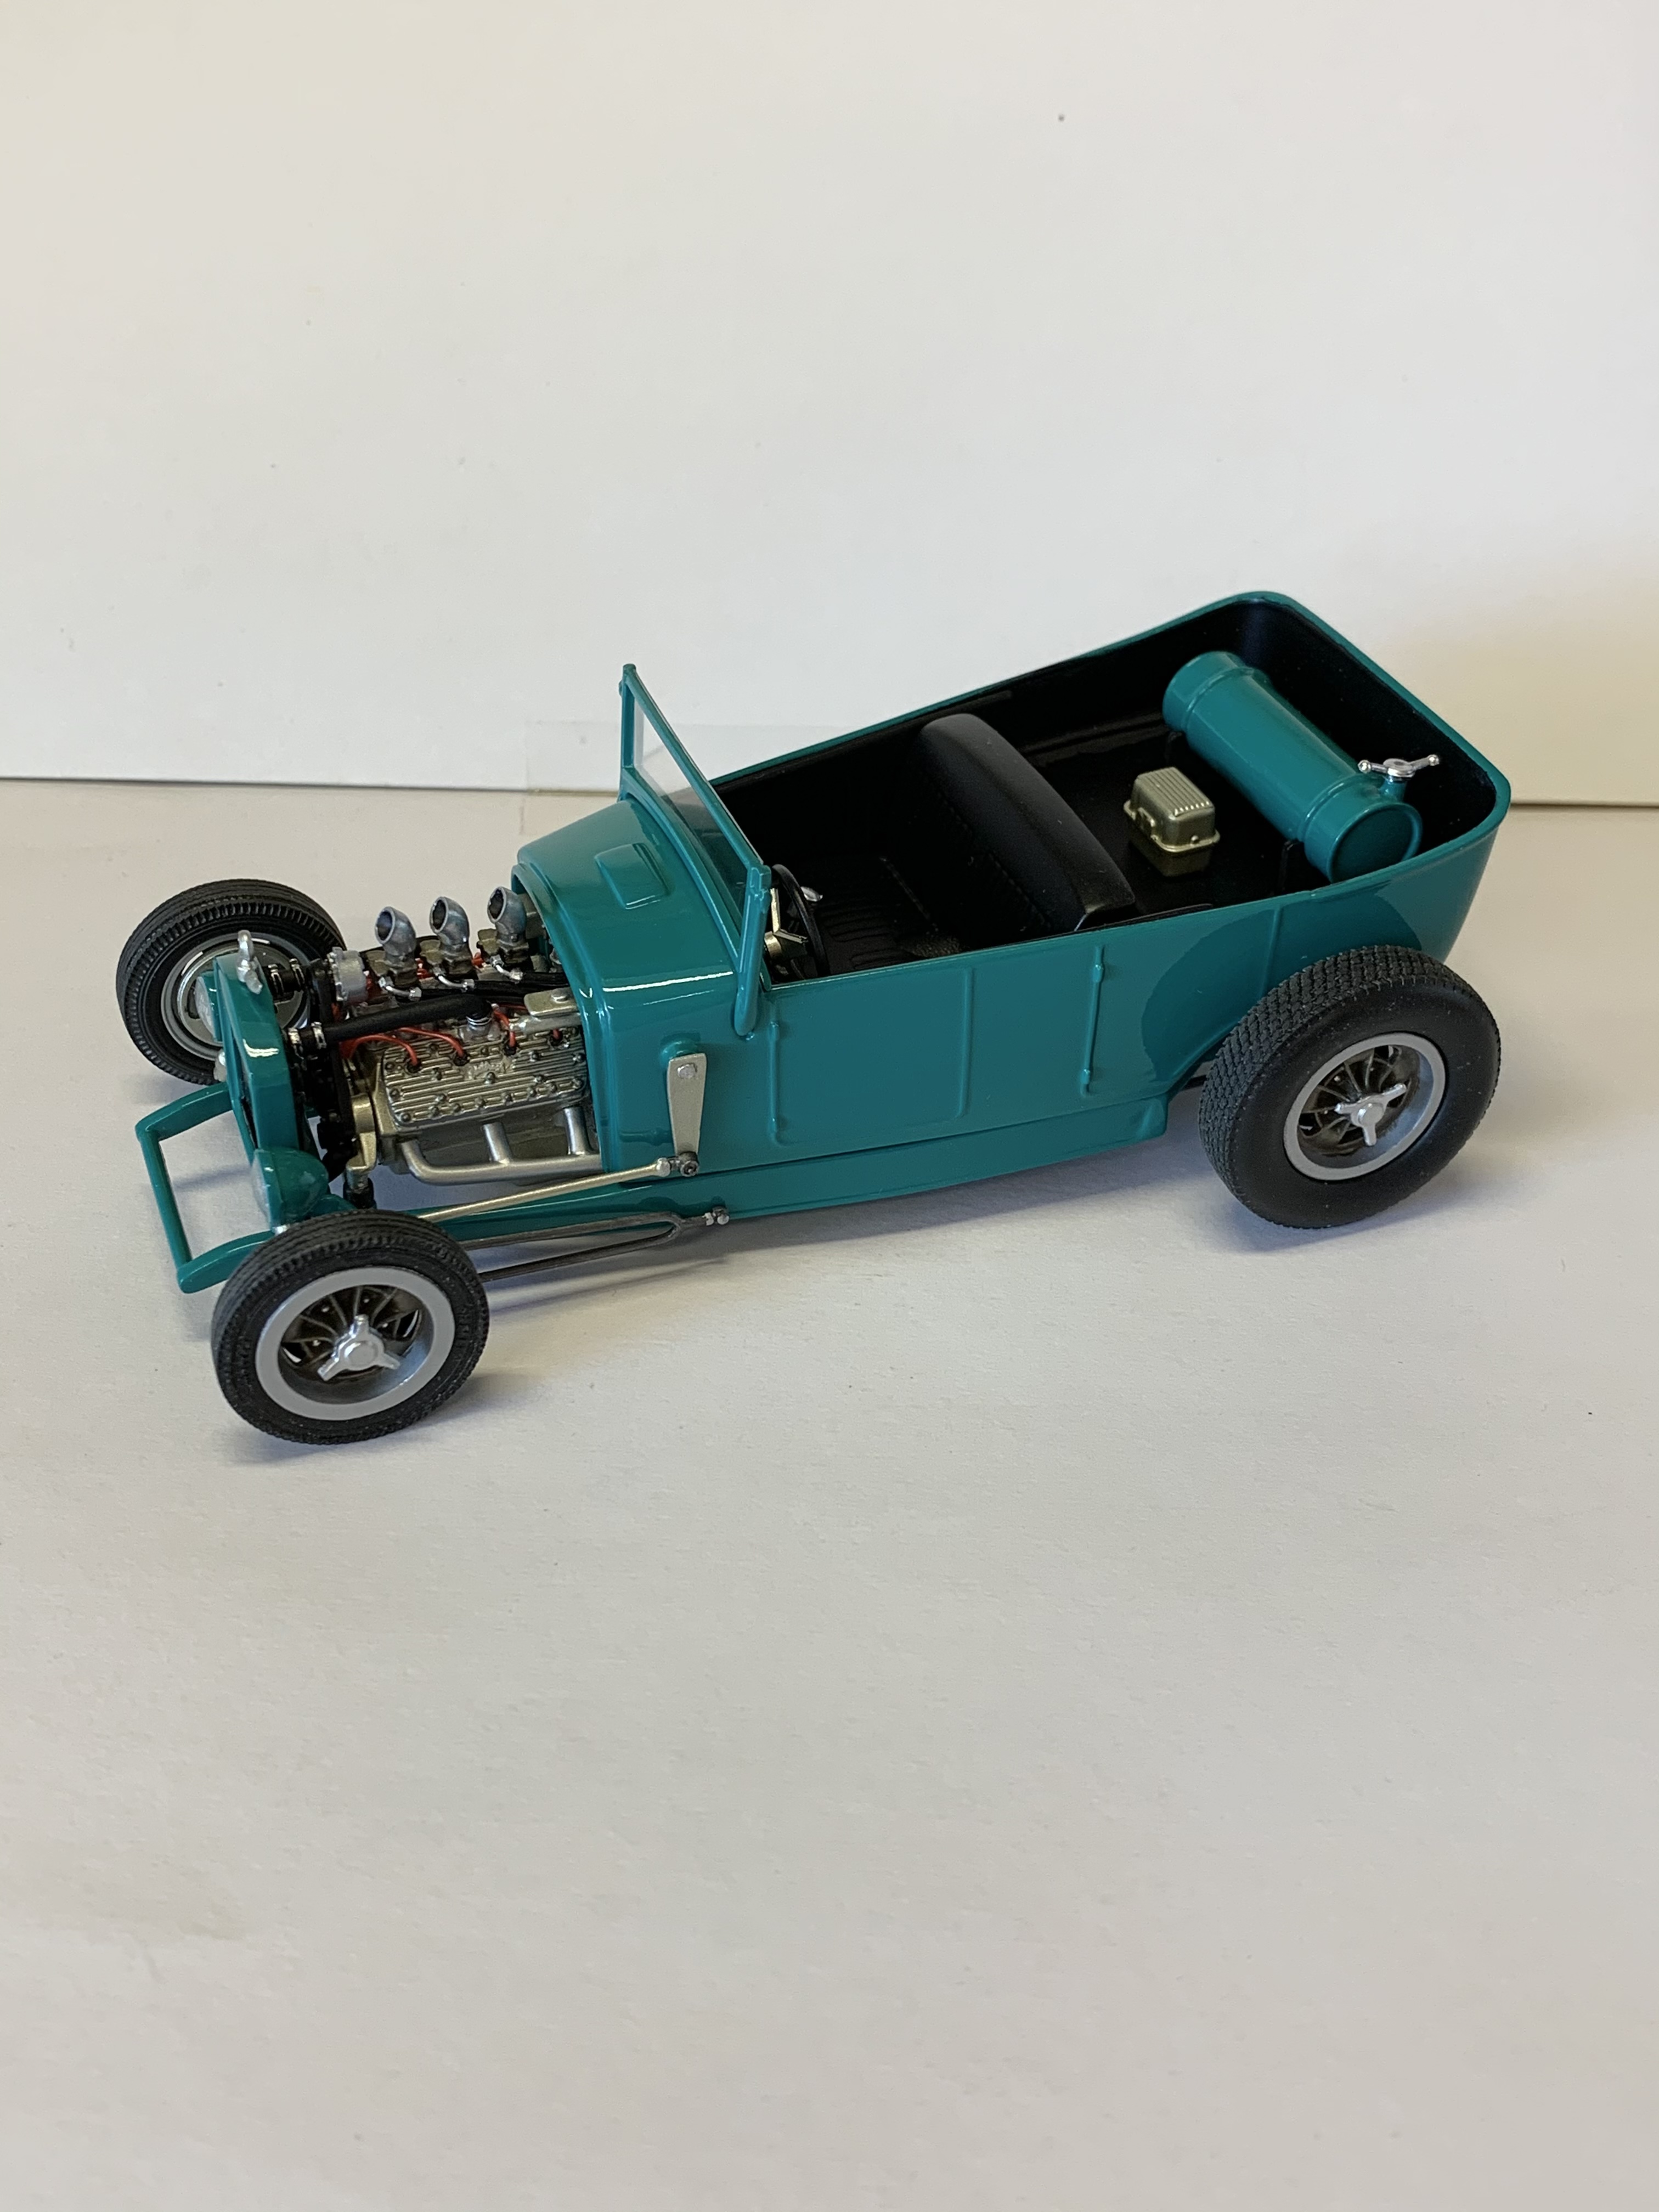
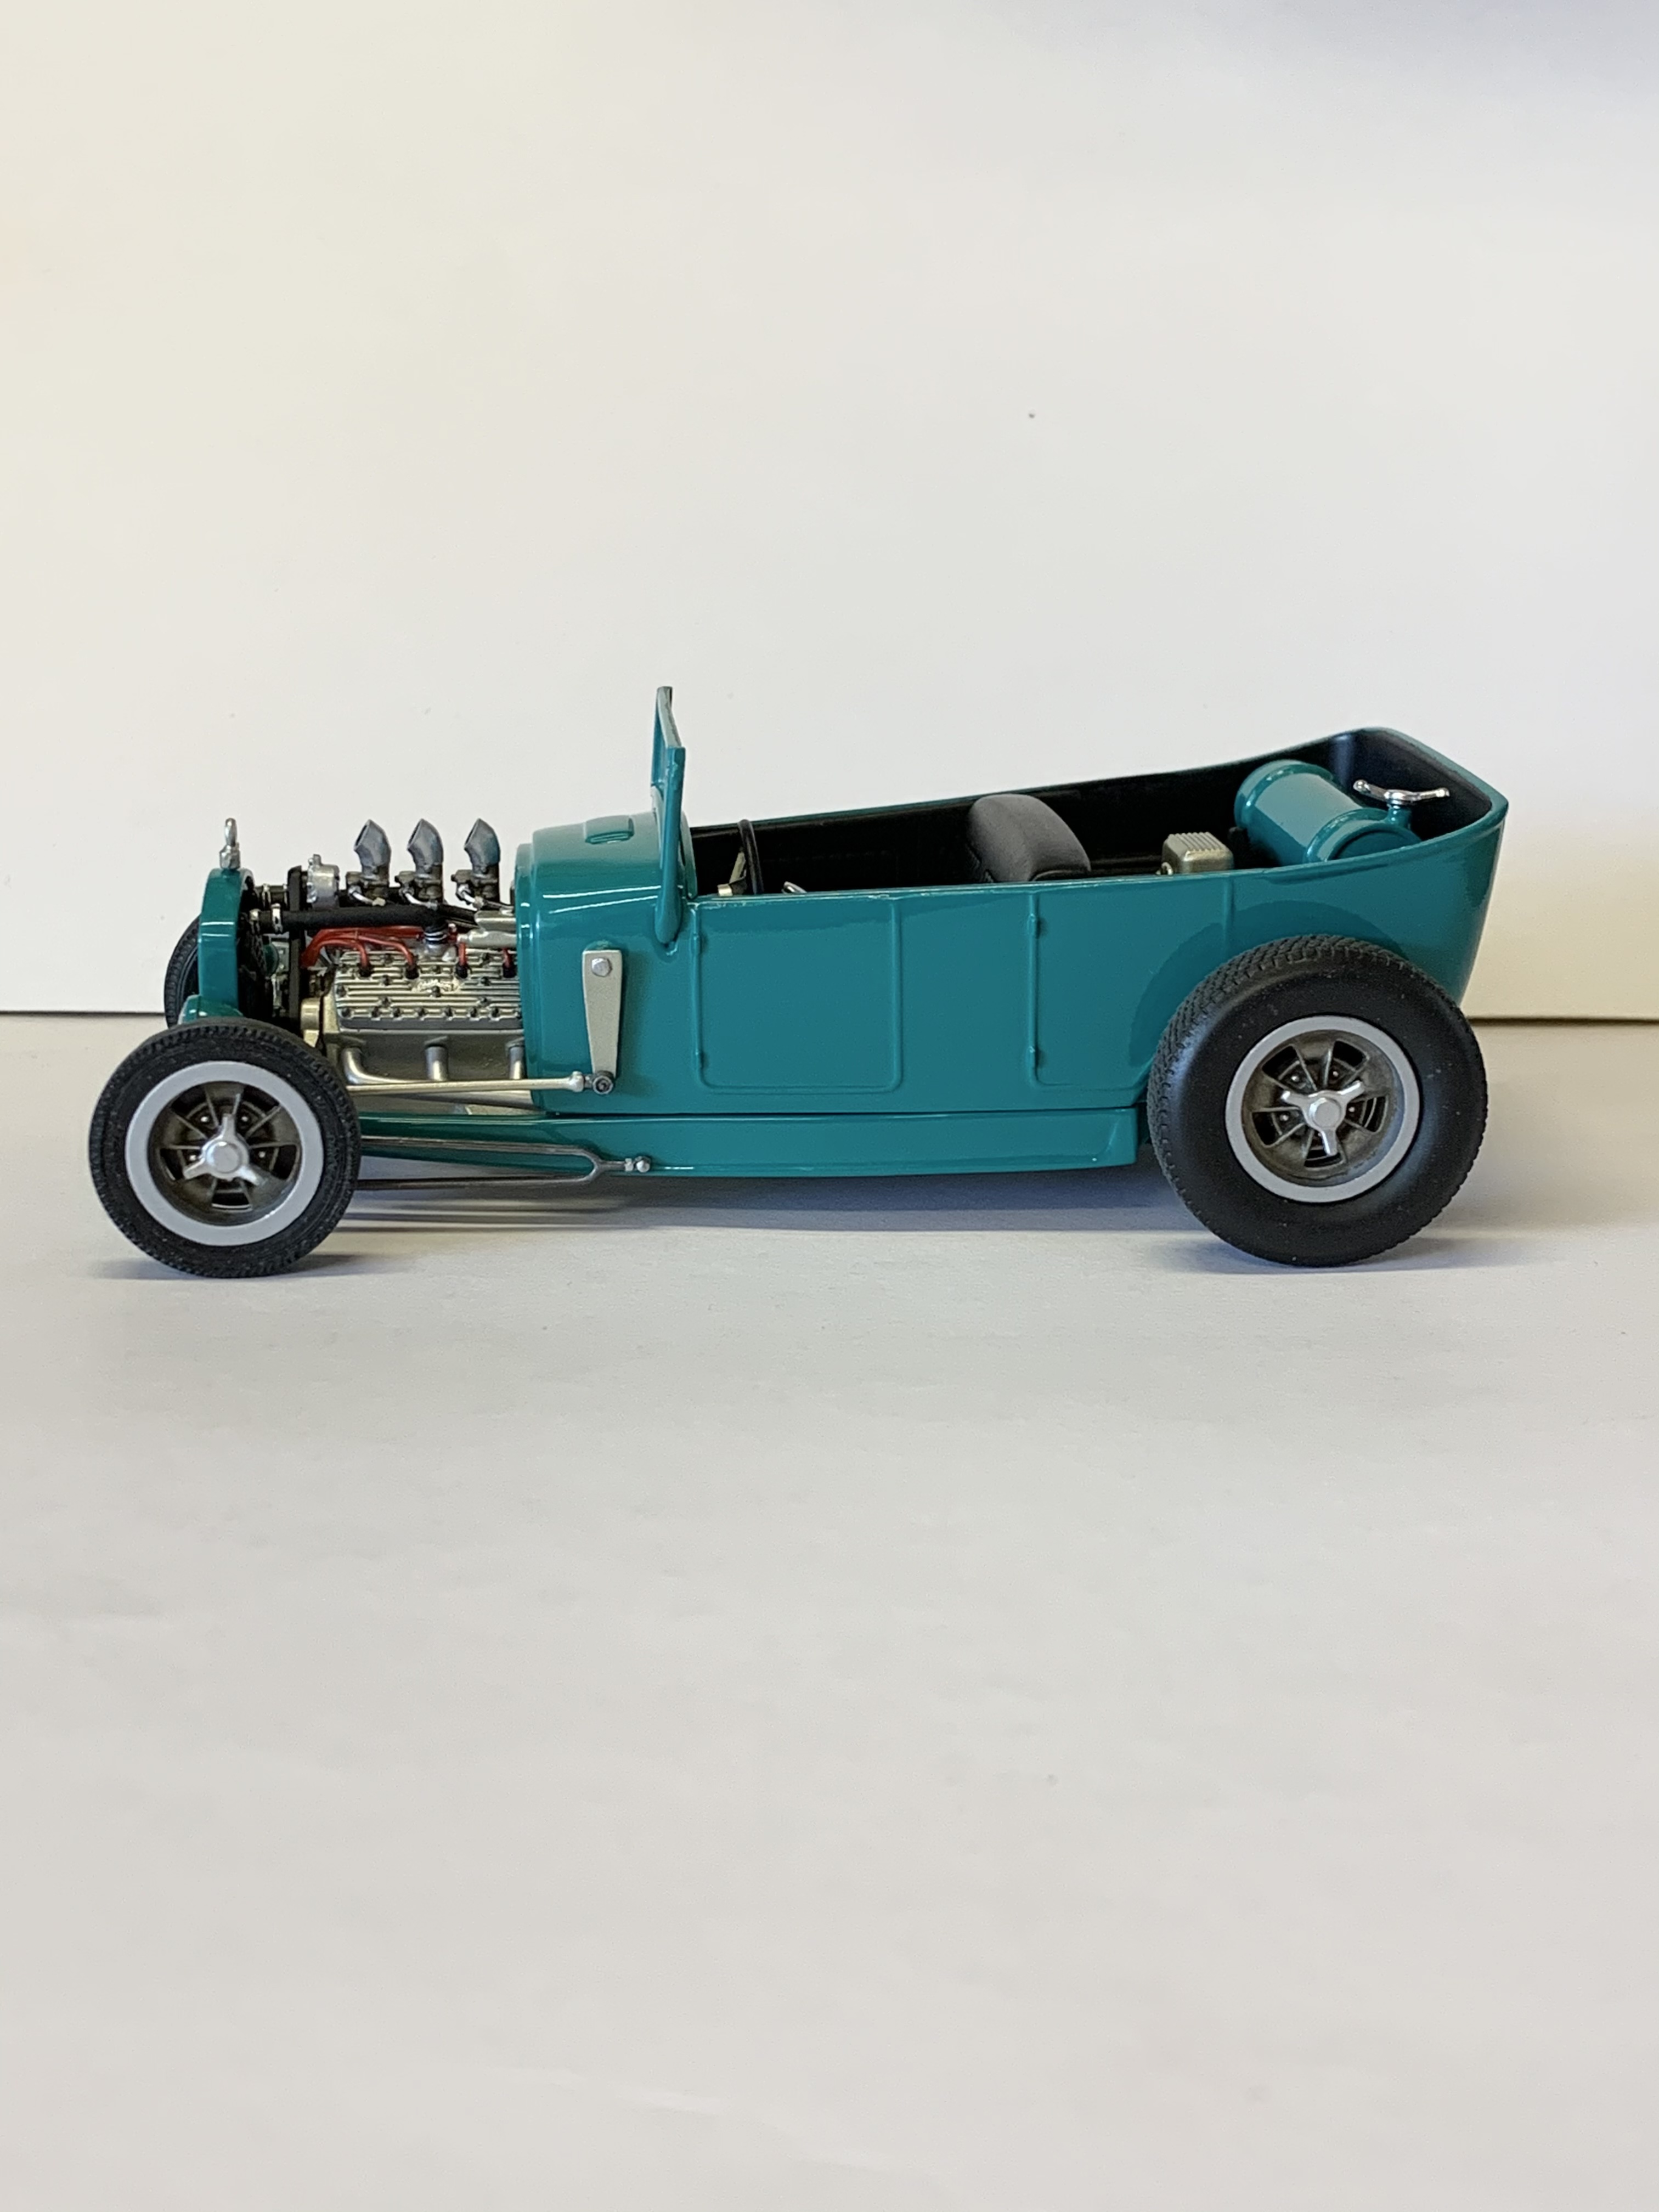
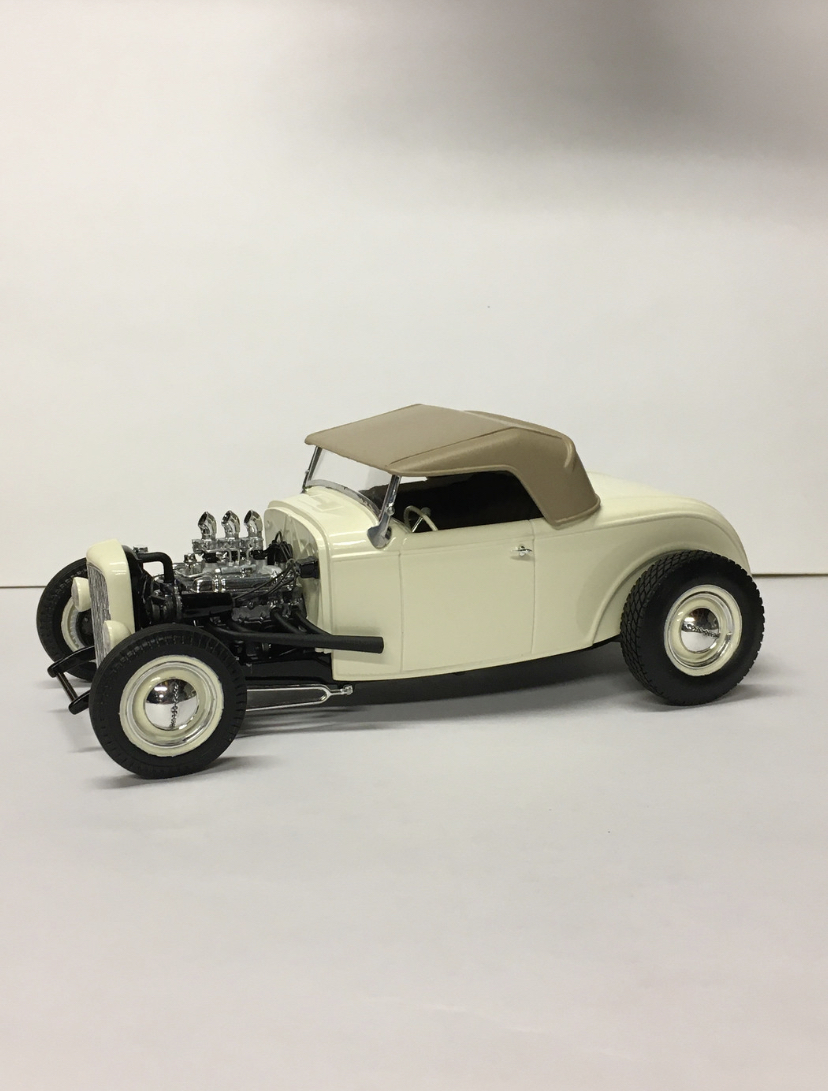
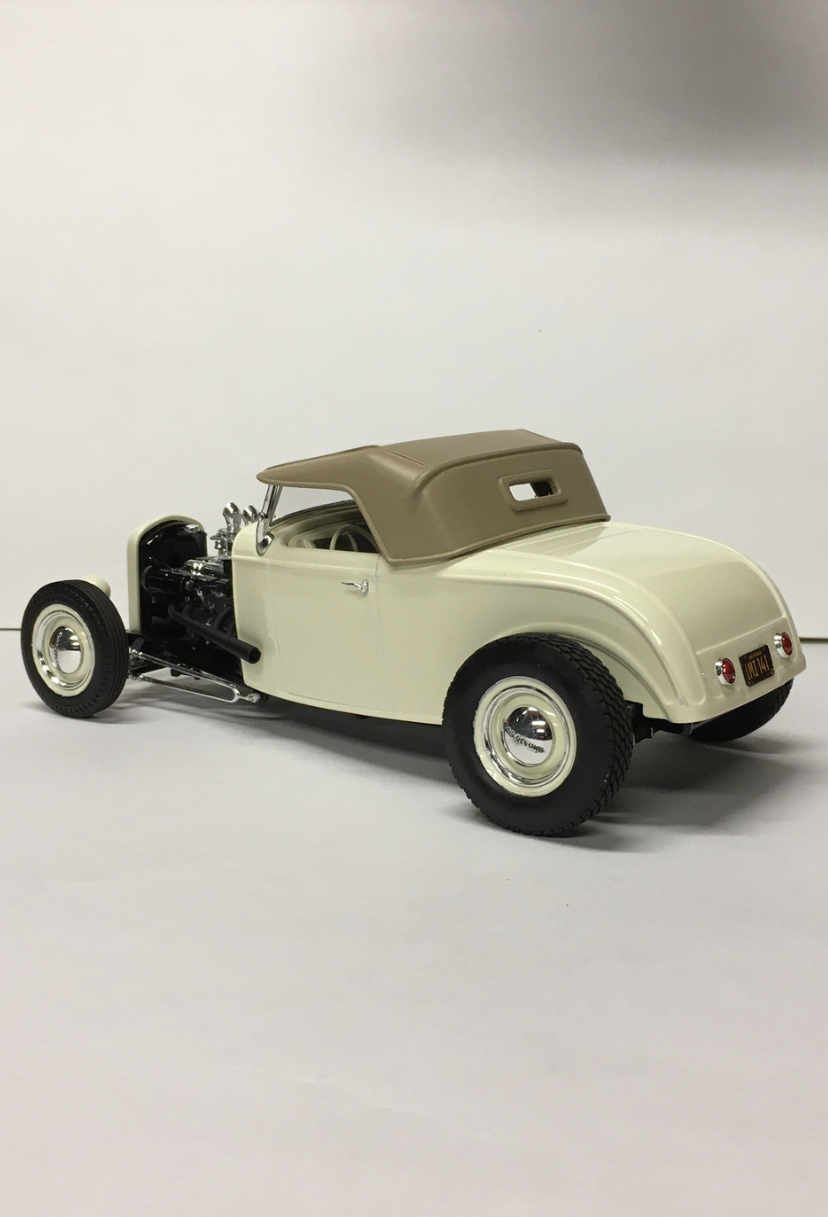
This model was started over 3 years ago but spent most of that time half constructed in a box under my workbench. I randomly got inspired a few months ago to get it out and work it to completion. As it usually goes when I come back to a project after a long hiatus I ended up making a number of changes to the original plan such as replacing the hopped up Model A 4-banger with a flathead V8, different grill, some frame updates, etc... Hope you all like it! - Revell 1927 T Touring body and windshield - Revell 1929 Roadster optional ‘32 frame shortened 1/4”, Z’d at rear, scratch built front and rear cross members, Revell ‘32 series center “K” member. - Revell 1932 5-Window front axle and suspension - Revell Ed Roth Tweedy Pie rear axle and spring, Revell ‘29 Roadster ladder bars. - Revell 1940 Ford brake plates front and rear. - Revell 1931 Sedan tires and Halibrand Touring wheels. Chrome stripped, missing lug nuts added and correct 60’s wing nut caps from Revell Orange Crate. - Revell 1932 Sedan Edelbrock equipped flathead V8, Tweedy Pie carbs/scoops, Revell 1948 Ford headers, modified AMT 1941 Woody exhaust pipes. - Heavily modified Revell ‘29 Roadster interior panels and bench seat, scratch built floors, scratch built ‘32 Roadster style dash with Revell ‘32 gauge panel, Tweedy Pie gas tank and Revell ‘29 Roadster battery box. - Tweedy Pie radiator and shell, Revell ‘29 Roadster small headlights, Revell 1937 Ford Panel Delivery taillight and plate mount. - Tamiya Cobalt Green, Champagne Gold and Clear.
-
@alan barton I like the gray primer lakes car a lot! Those big Lincoln wheels and tires really look great out back. A small detail I love is the windshield brackets left on the cowl which can be seen remaining on 100’s of old lakes pictures. I’m willing to bet that most model builders don’t even realize those are separate pieces on the real 32’s. I wish I had pictures to share of one of mine but neither of them survived and the first one was pretty rough as I made it when I was about 12, haha! The second one years later turned out pretty clean, though. It was a dark orange from the Boyd colors (sunset, maybe?) and had the flathead from the first issue of the 1950 F1 pickup with the heads and intake from the 1940 pickup. Wheels were shallow & deep steelies (probably from the AMT ‘49 Ford) with the ‘50 pickup hubcaps.
-
I think that this is the first time I’ve seen this version of the kit built, and box stock no less. Turned out nice and as you said, very 70’s.
-
Bitchin! I built two of these this way back in the 90’s as a kid/teen before the modern Revell hiboy kit was available. I didn’t add material to create the reveal lines, though, and that makes a huge difference. I love the overall styling and color scheme. The big seat bolster turned out really nice and I dig the Duvall style windshield. I also have to say I prefer the side with the ‘37 “artillery” wheels, in part because (IMO) their larger diameter is in better proportion to the car. Seeing this is also bringing back memories and makes me want to recreate one of mine...
-
1932 Ford Roadster: Channeled, Nailhead-Powered Early 50's Hot Rod
Dennis Lacy replied to Dennis Lacy's topic in Model Cars
Thanks! If you search my posts there should be a thread detailing the entire project and that will lay out how everything was back-dated. Last year I added a stylized top which is a resin duplicate of a top that I mastered. Makes the car look tough and sneaky! They are available through Drag City Casting.
-
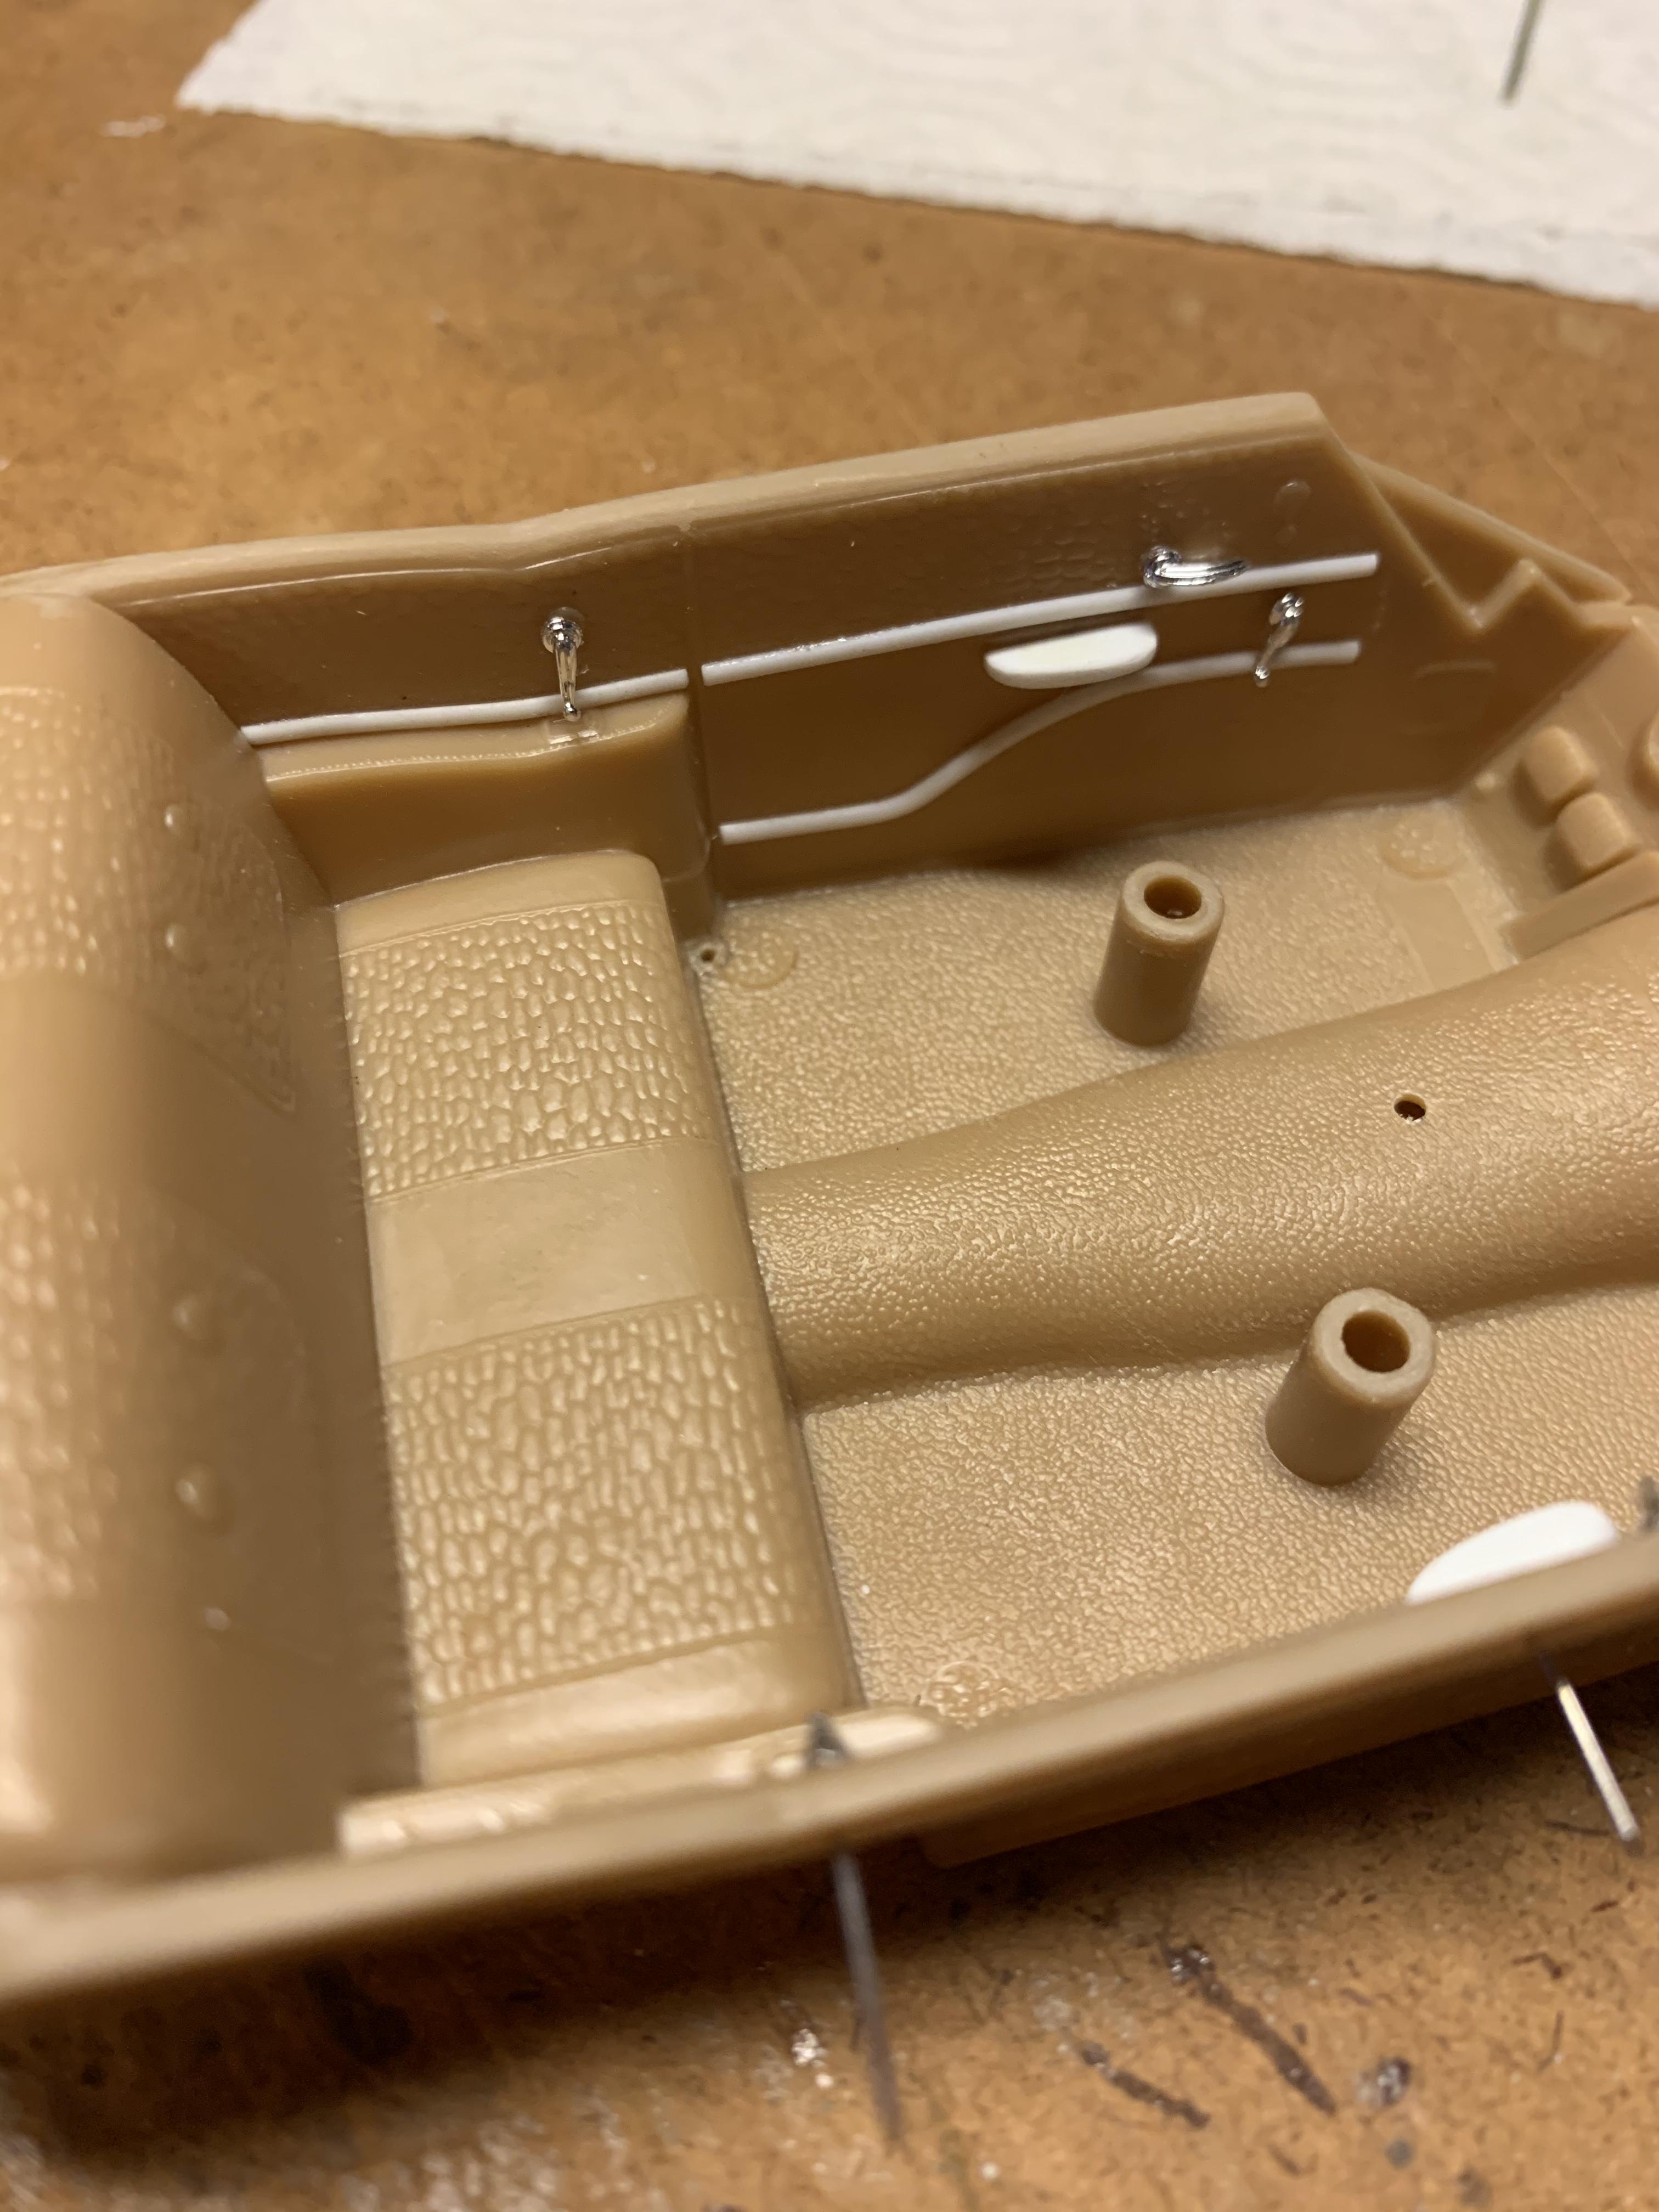
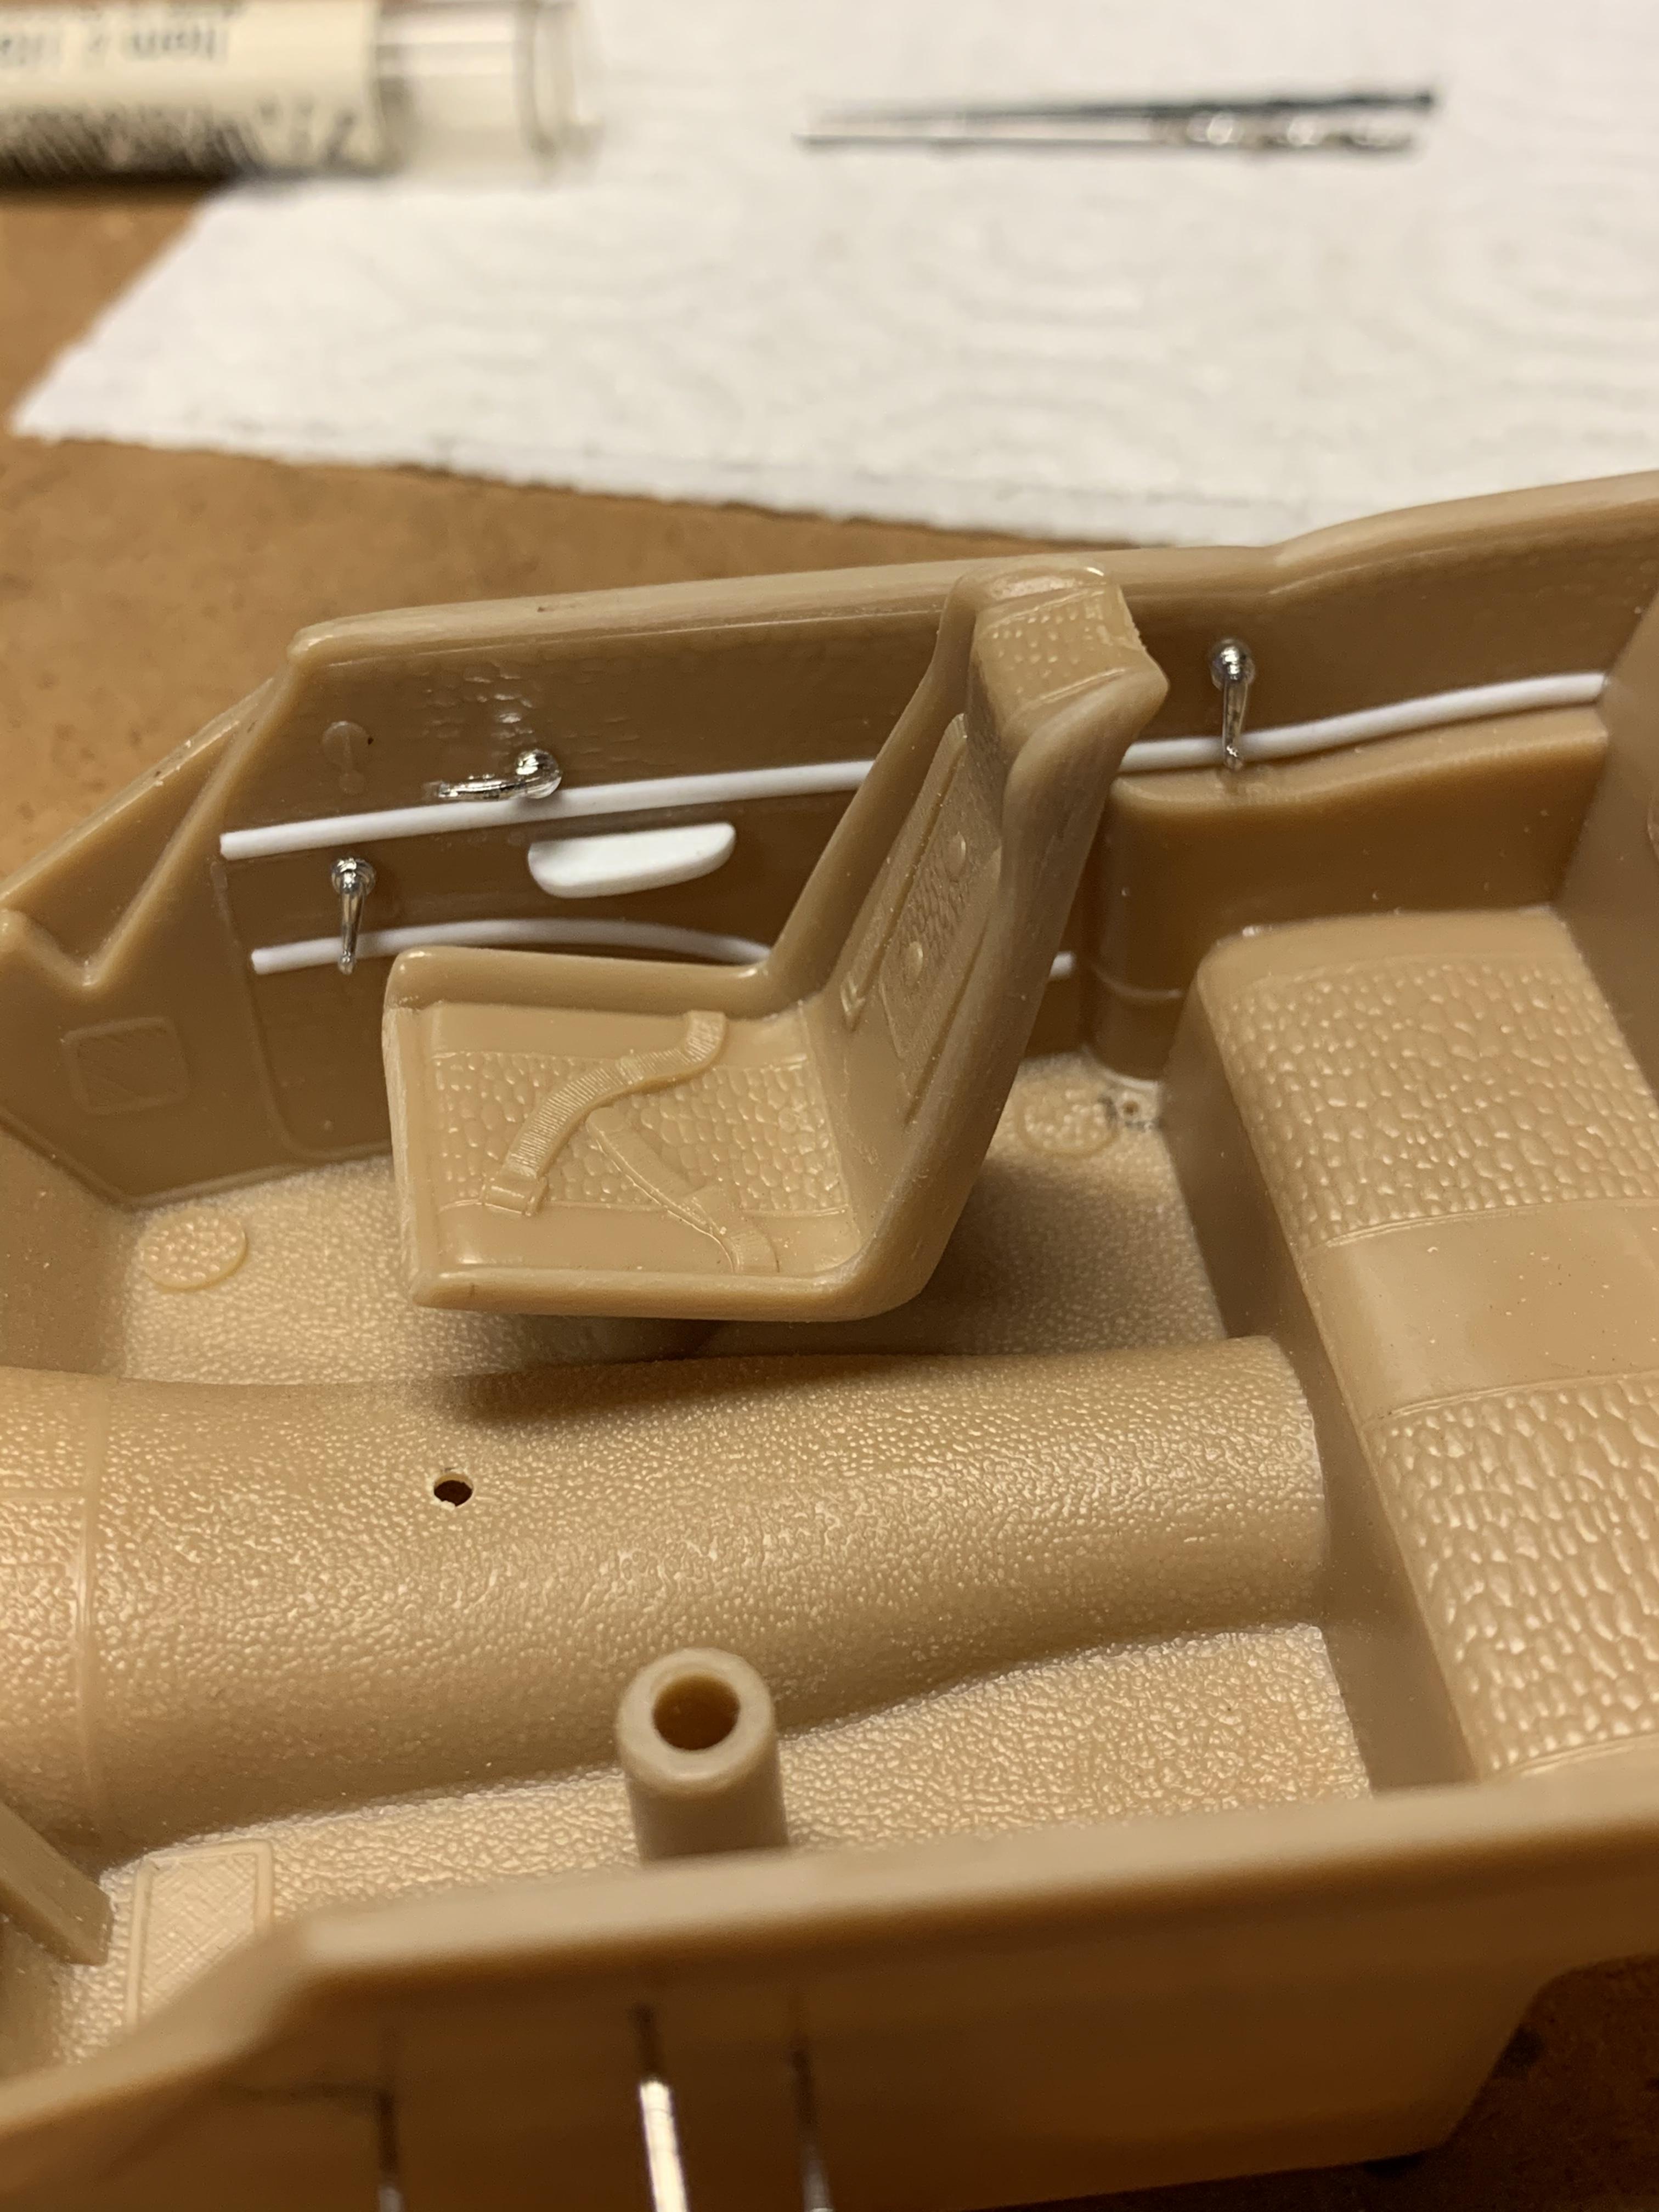
UPDATE! I thought I was done with fabrication type work but after really looking at the interior tub while trying to plan my paint detailing scheme I realized that the (lack of) detail really leaves a lot to be desired with the barely there engraved handles, cranks, arm rests and trim lines. To remedy all of this I ran new trim made from .040” half-round right on top of the faint lines from AMT, installed door handles and window cranks pirated from Revell’s 1937 Ford Pickup and Panel Delivery and finished up with some hand shaped armrests made from some pieces of Evergreen rectangle rod. Normally on the hot rods I usually build a lot of the interiors are hard to view through the little windows so I often don’t sweat this kind of stuff but on this car with the wide open hardtop side windows I feel like this will be time well spent. I did decide to forgo the little knobs for the vent windows so as not to rob another kit.
-
Thanks, Phil! I have the hot rods pretty well figured out I think so I felt like it was time to try something out of my comfort zone. I’m actually having a good time so I’ll have to do more of these “late models” once in a while. ?
-
Thanks! It definitely doesn’t always feel as easy as it looks. ?
-
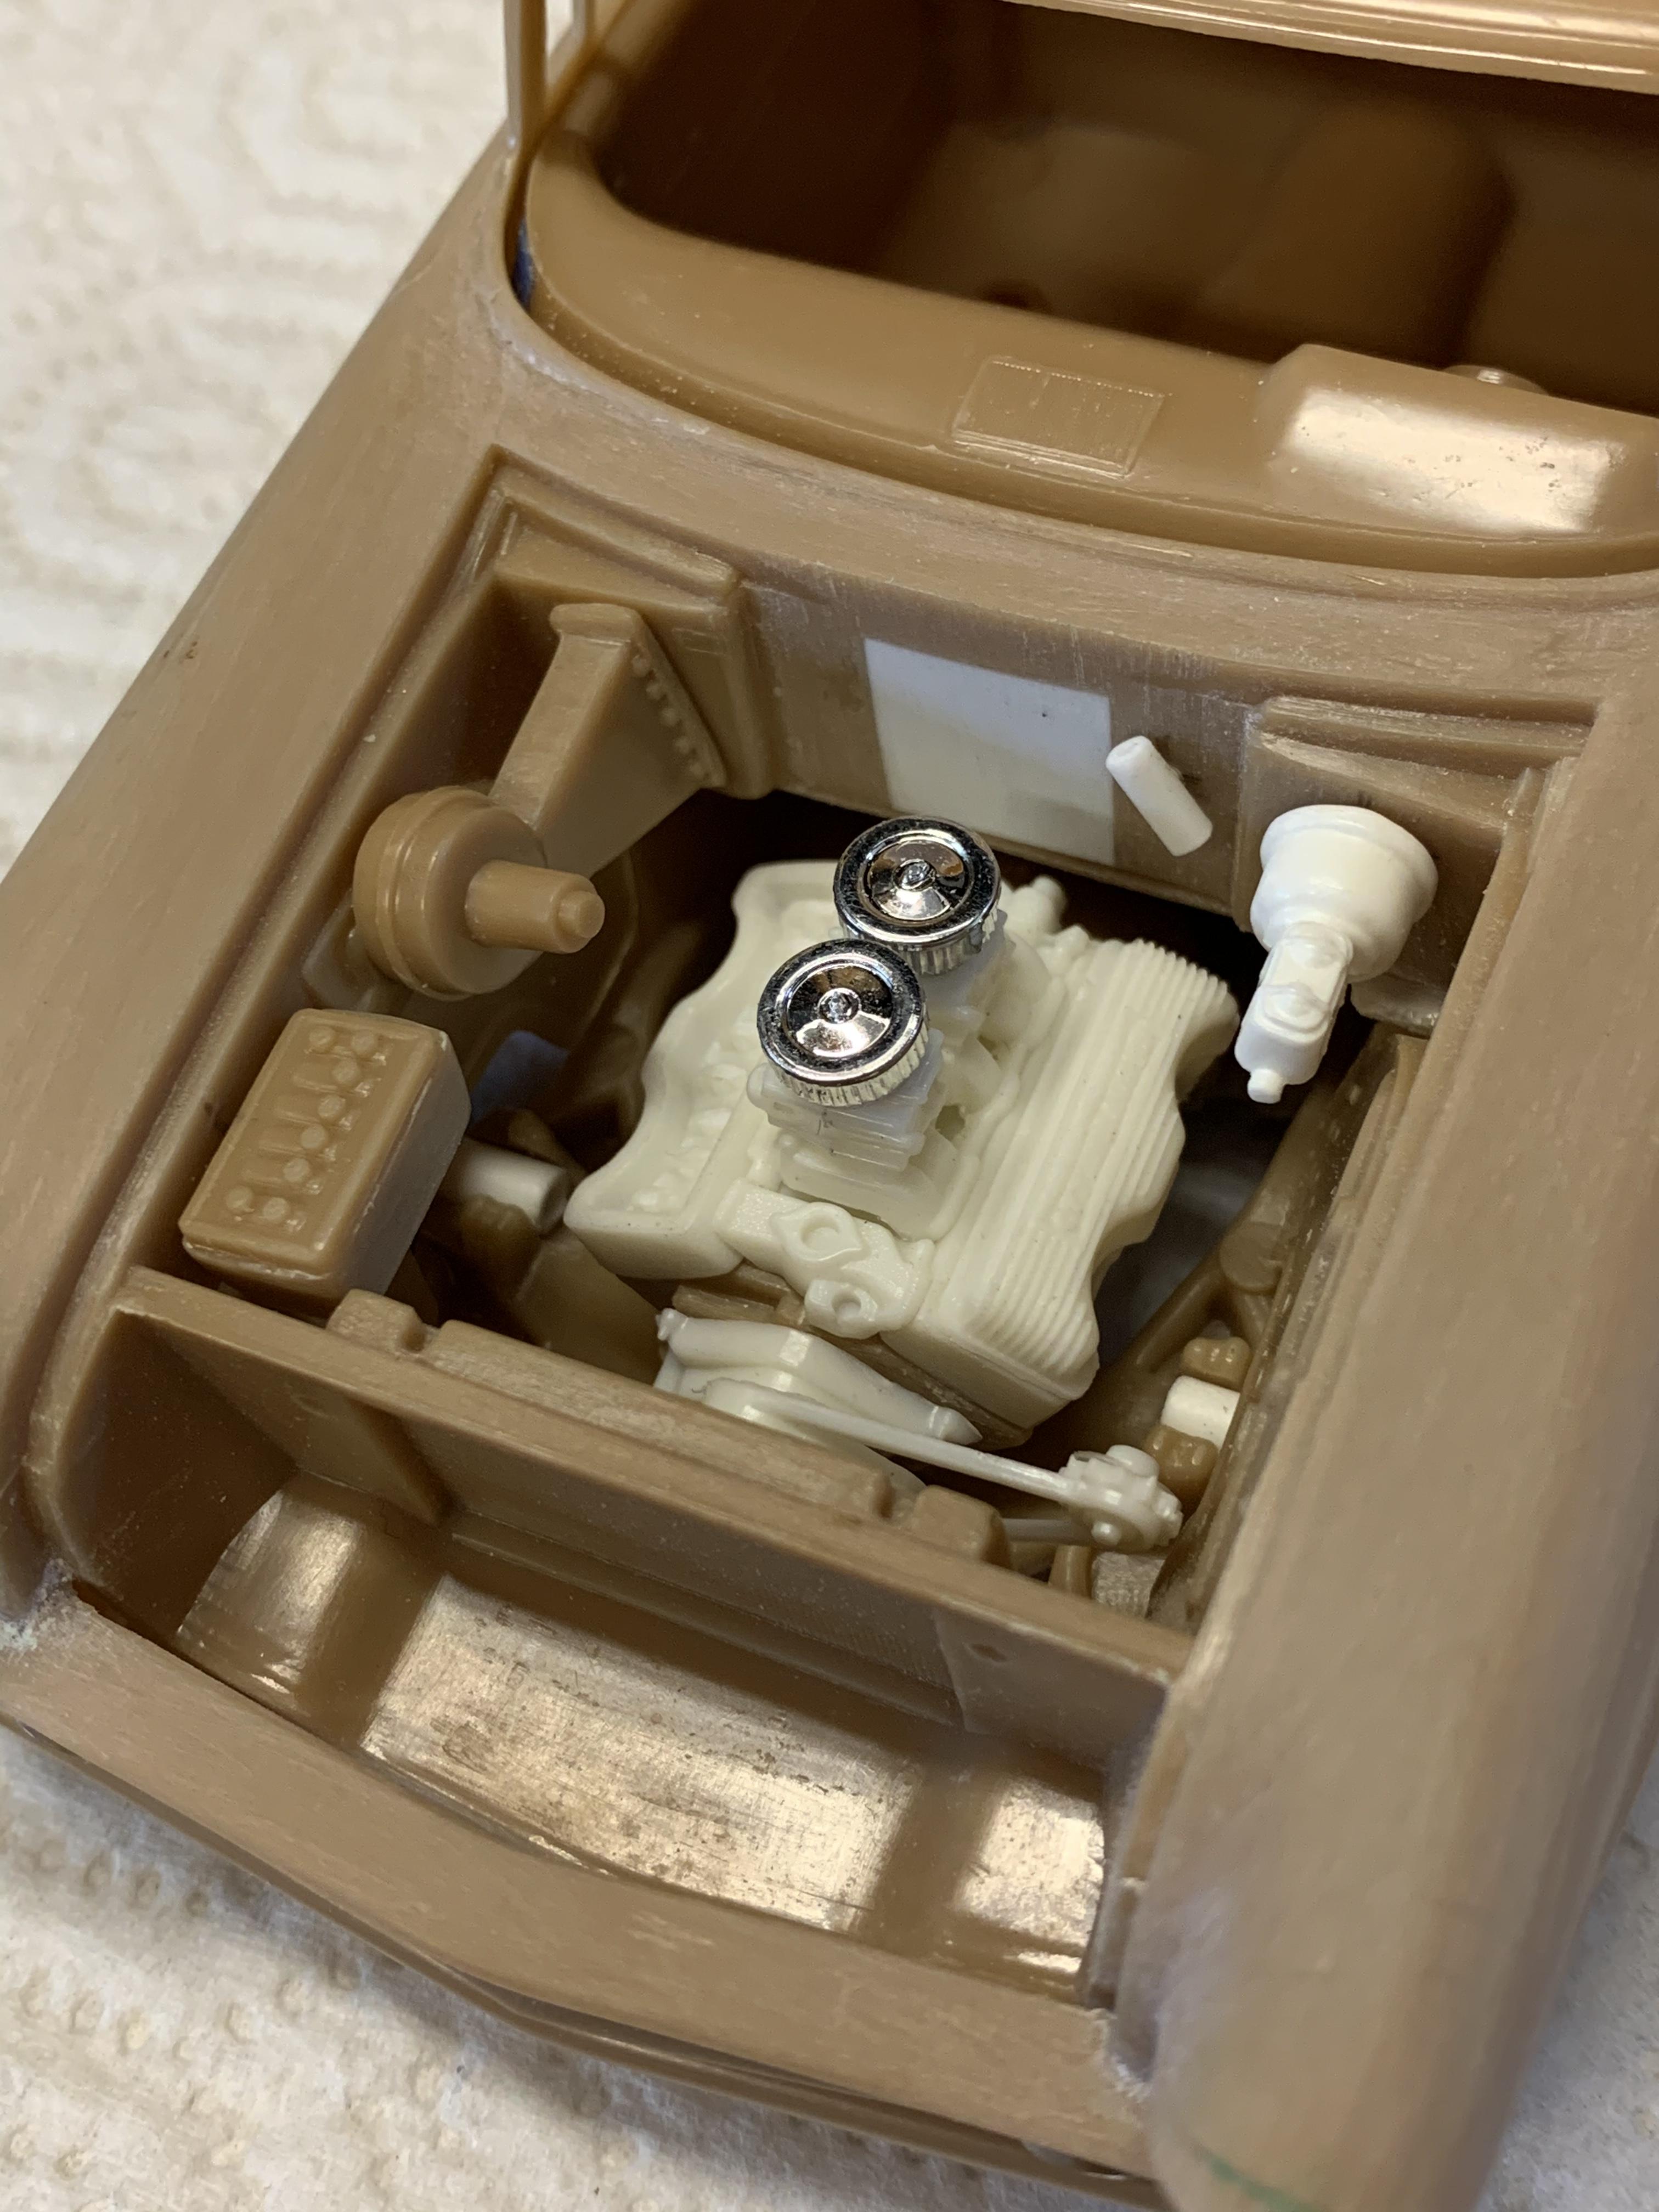
UPDATE! Got back to the workbench today and focused on setting up the final details, most of which are under the hood. I started by filling that giant hole in the middle of the firewall AMT leaves you with and in doing that I eliminated the center “hump” to gain a little more distributor clearance for the big “409”. I then pinned the kits heater blower motor housing and battery, pinned an outsourced master cylinder and made a simple ignition coil and pinned it as well. Out back I trimmed away some of the molded in tailpipes and fit some separate chrome tips from Revell’s 1940 Ford street rods. At this point I think everything is accounted for so it’s time to get primer on the body to see where I’m at.
-
Thanks a bunch, Dan! If I were ever to build a custom out of a 50’s car full scale I could never have a slow, stock motored cruiser like so many of them were. Mine would have to have some balls! ?
-
Thanks, Mike! I’m generally not into 50’s cars whether they are stock, custom or anywhere between so I’m totally winging it here. That said it’s nice to hear some positive feedback from someone who is a ‘57 Chevy fan with strong feelings against messing with the original design.
-
Thanks, Mark! This is my first rodeo and had no idea how things would go. Just had to jump in and give it a try!
-
Thanks! I’m gonna do Champagne Gold on the body but am considering a red metal flake on the roof like Tamiya’s Mica Red which I think would look awesome over the base color. We’ll see...
-
While it may not be an exact replica the McGee roadster inspiration is immediately identifiable. Great stance, proportions and clean red paint job! It also makes me smile every time I see one of the parts I mastered (top) for Drag City Casting get used! ?
-
It was an alligator and if you look at my last pics again you will see it perched on the rear seat package shelf where he will be when the model is finished.
-
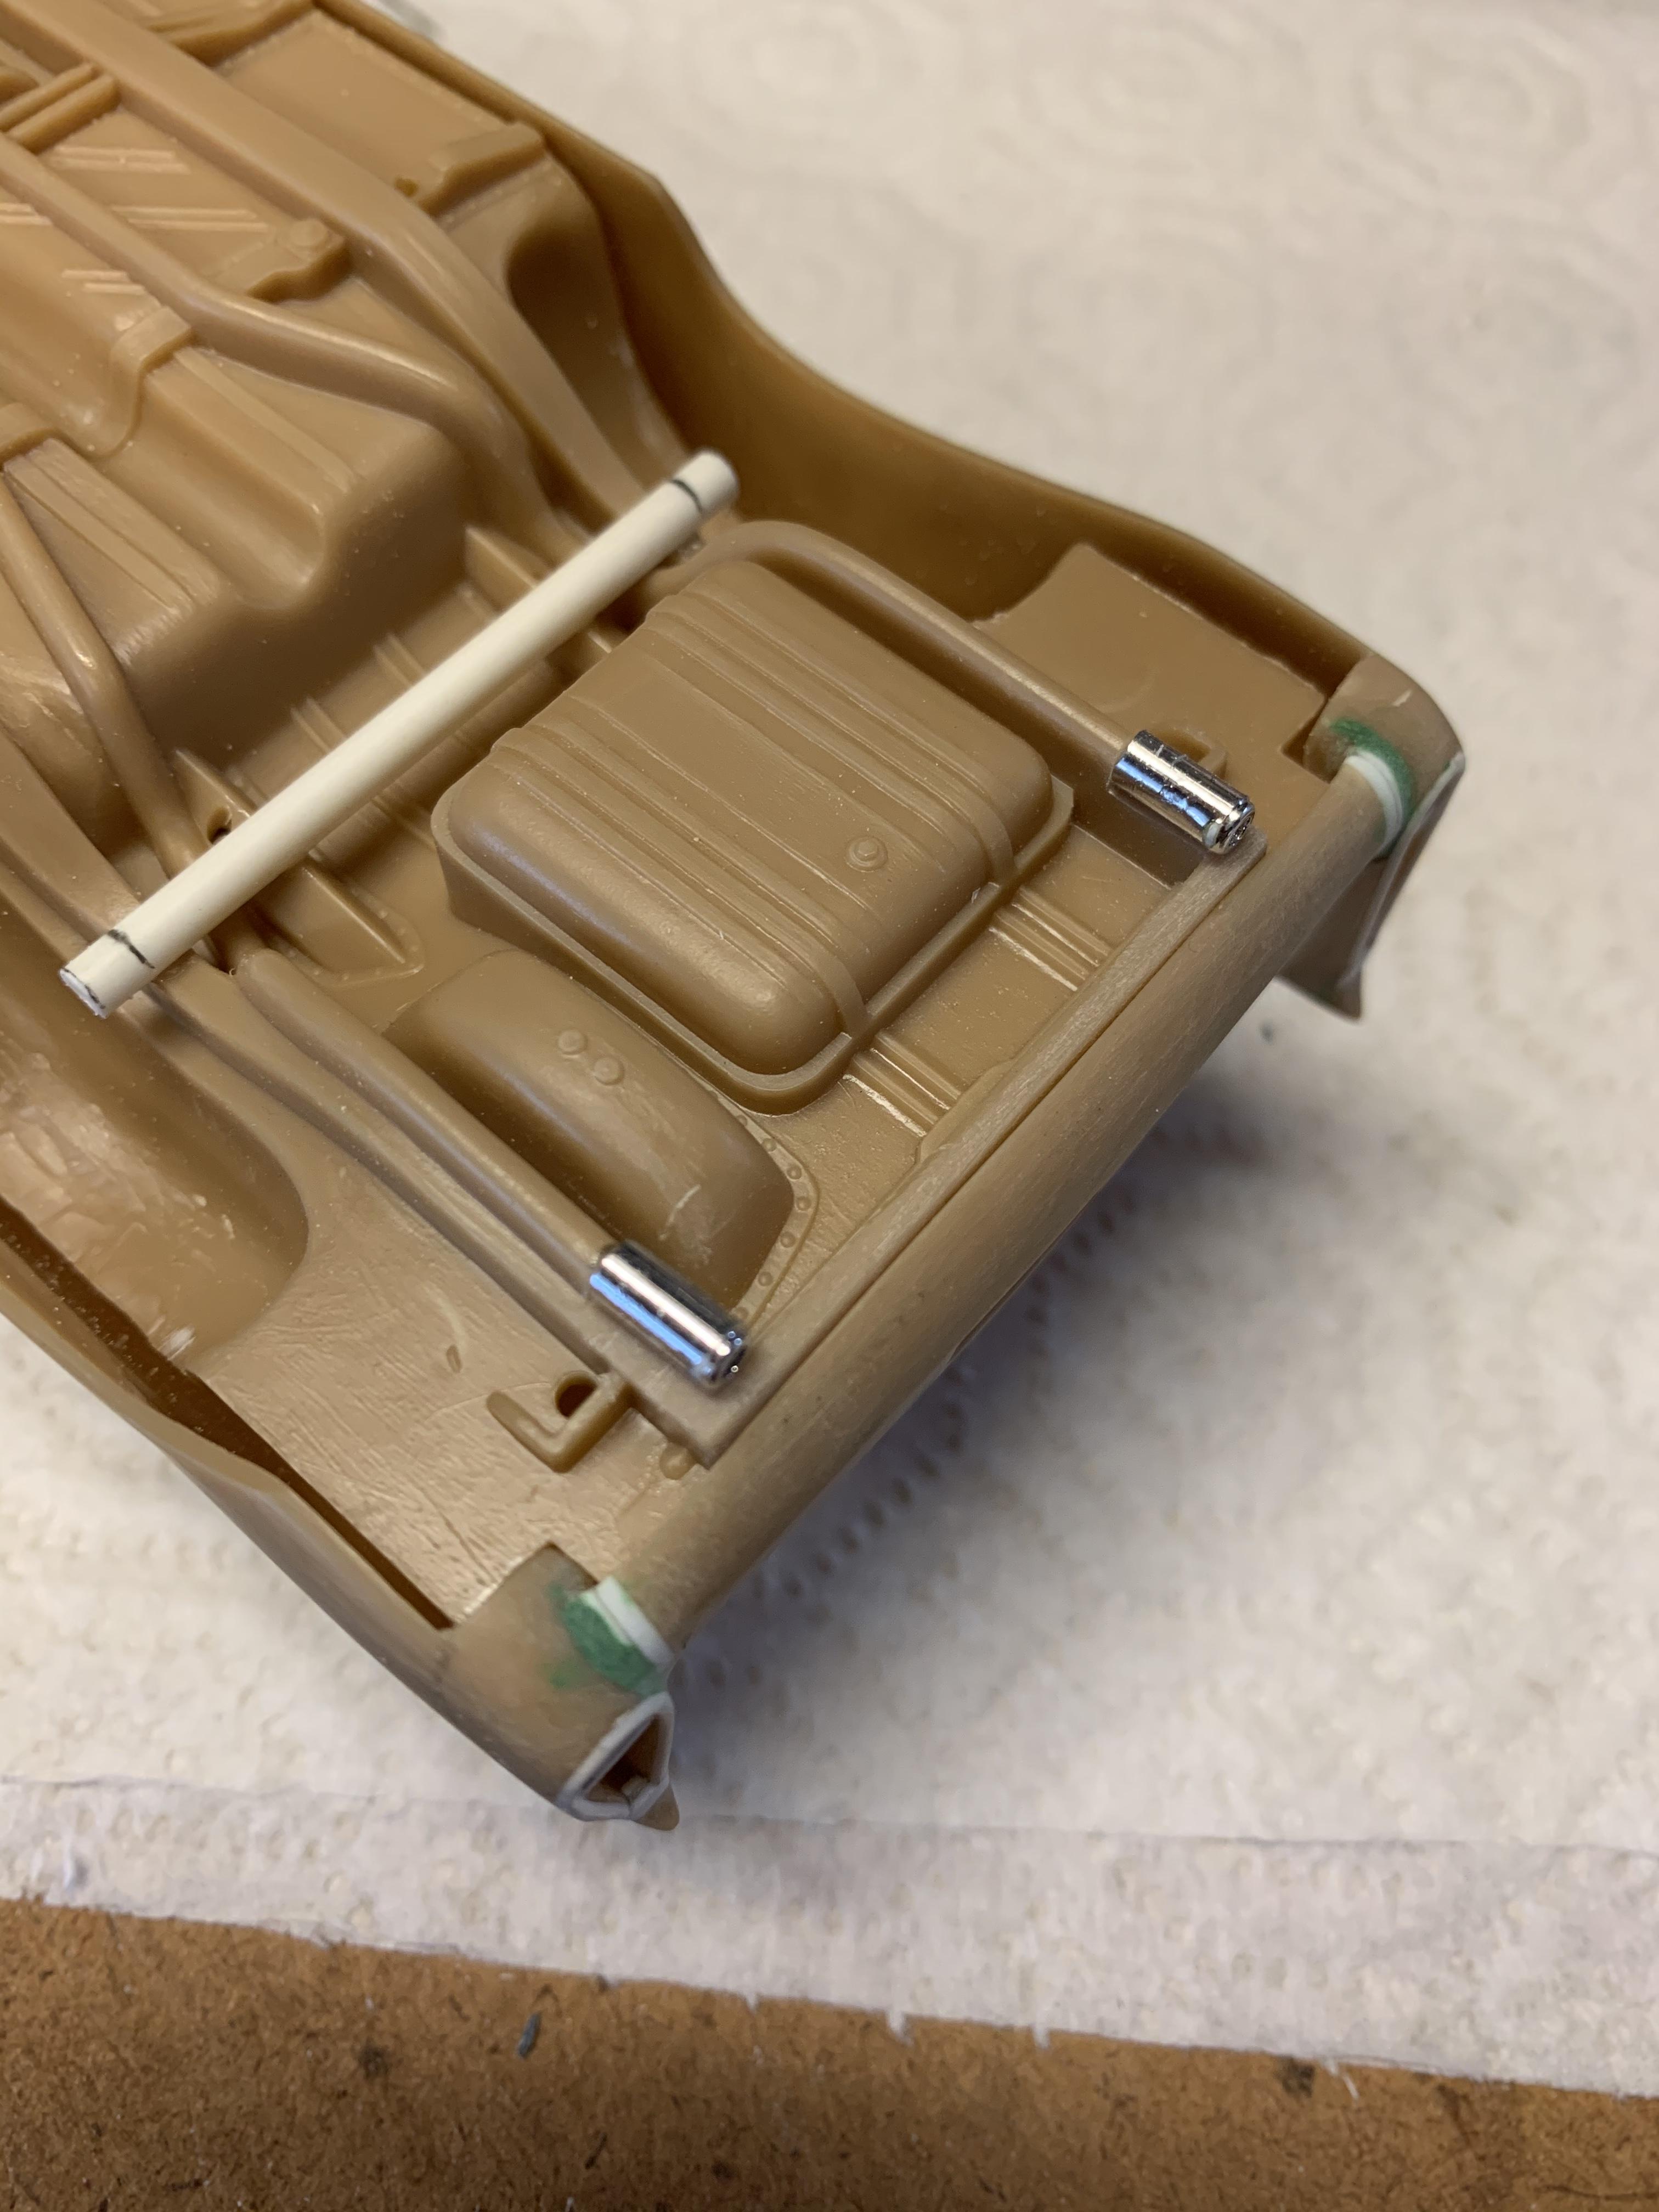
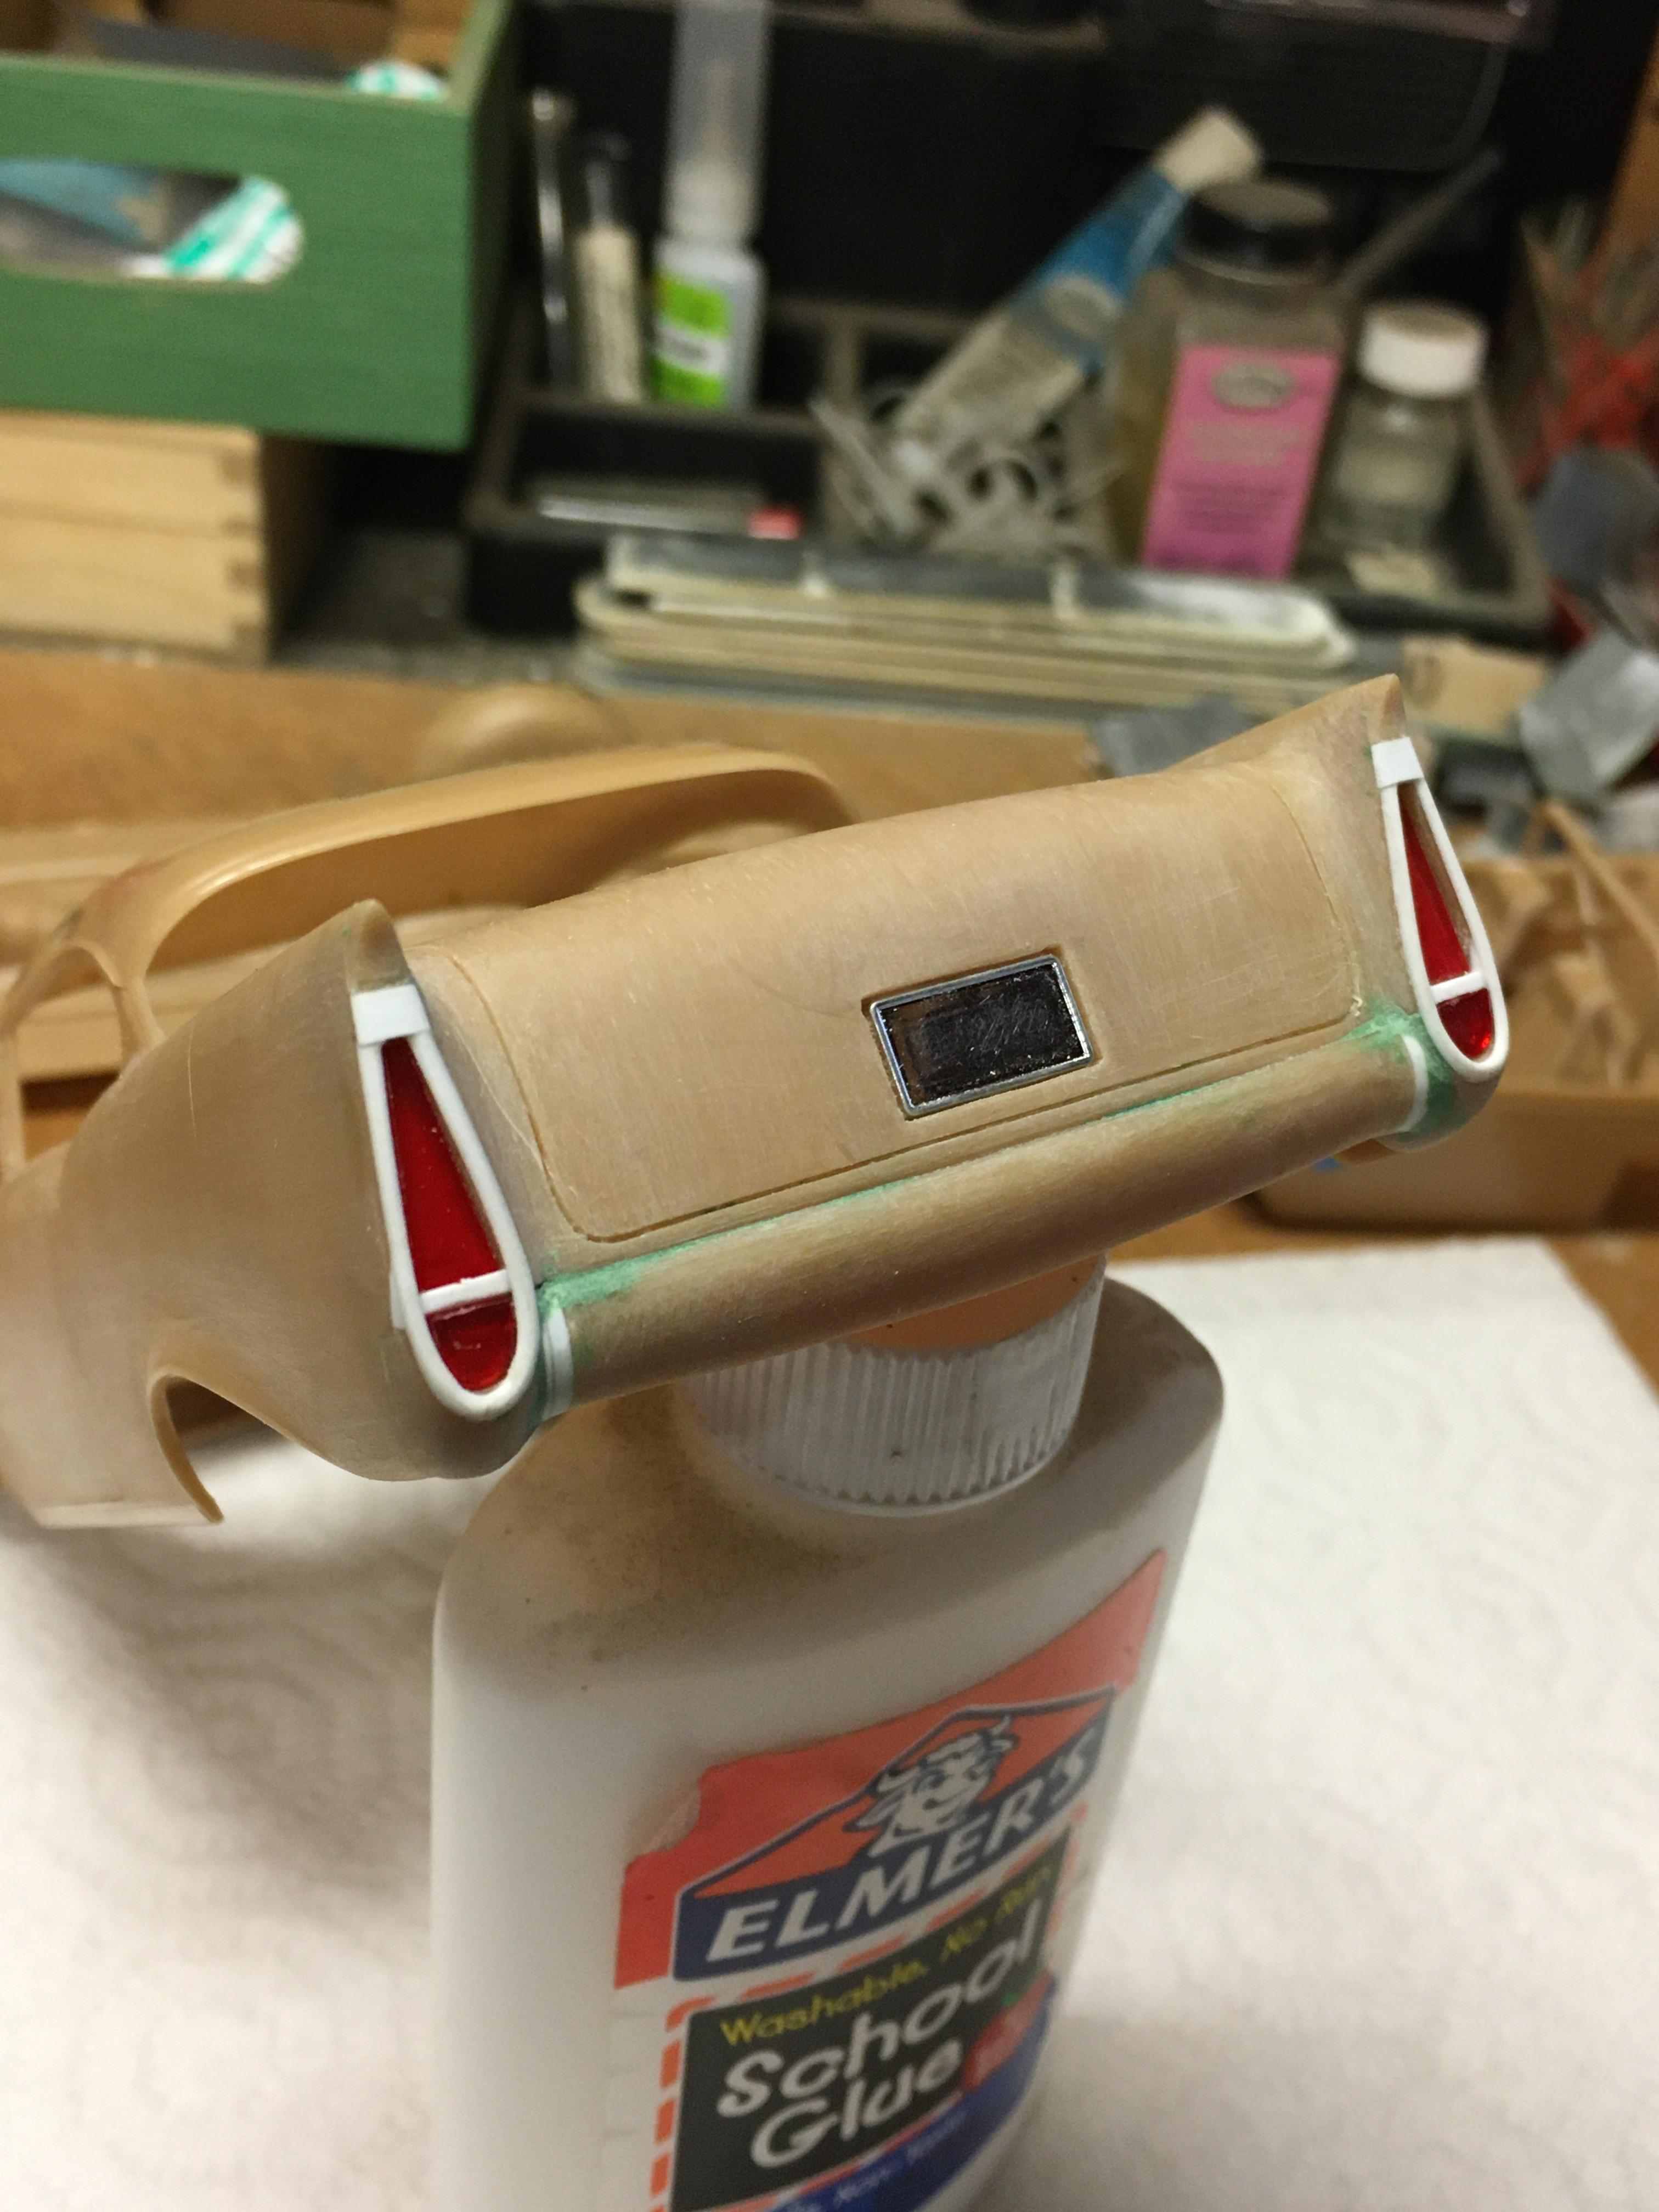
Thanks again for all your interests and comments on this project! UPDATE! Had another good day at the workbench with this one. Just moments after sitting down I was handling the body and one of the chrome grill bullets fell to the garage floor and went who knows where (and is still MIA!) This is my only AMT '57 kit so I don't have anymore to replace it. After some frustration and thought I got the idea to glue some material to the ends of the bar to lengthen it. I'm so glad now that I lost the bullet because I like this SO MUCH BETTER! To be honest I wasn't in love with the bullets. They seemed a little cheap and gimmicky, like something out of an old JC Whitney catalog. I think the full width bar looks much more refined and "finished". Out back I did some final refinements to the taillight areas by filling in the little areas between the half round beads just above the lenses. I also wrapped a piece of 400 grit paper around my knife handle and ever so slightly made an inside radius on the little tips. Lastly I recessed a license plate frame into the trunk lid. Underneath the "chassis" will be full "curbside" style. Out back I glued a length of 1/8" Evergreen tube across the frame rails and then glued .060" rod into the wheel backs which stub into the tube. I had to relieve the wheel wells a little and also the inside corners of the slicks to get them fully tucked up tight. Up front I filed out the area the kits metal axle normally passes through and glued in pieces of 1/8" tube and put stubs in the wheel backs just like the rear. Since there will be a detailed engine and the upper A-arms will show under the hood I tweaked them to fit over the tubes. I cleaned up the heavy mold seams on the sides of the kits optional bucket seats and also also added 3/16" to the legs of the kits optional roll bar to put the top of it at a proper height because as it came it was barely higher than the head rests. I also inserted alignment pins into the bottoms to give it a positive location and glue joint at final assembly. At this point there's not much left to do and one more day at the workbench should get the final details wrapped up. With that, here are the final mock ups and the actual stance of the car. For my first customized 50's car I'm very happy with where it's at. Let me know what you all think!
-
Thanks! I had a full set of those original issue custom parts at one time. I like the look of them but don't like that they stack onto body making it ridiculously LONG. Somewhere I saw where a builder had grafted them INTO the body rather than ONTO the ends so the body wasn't any longer than stock. It looked fantastic. But, yes, if you squint you can kind of see a hint of that custom rear clip. Probably because the lenses I used are the only thing left in the kit of those original parts. I've always like the kits supercharged "409" but it gets used a lot when people build these so I wanted my "409" setup to be different.
-
Looking really good! I love all the thoughtful chassis and engine painting. That brings all the details to life. Looks like this kit has a good realistic stance to it, not sitting too high as a lot of factory-stock models tend to.
-
Thanks so much, Steve! I’m really surprised by the overwhelmingly positive response to this project because I really don’t know these 50’s cars. And you might see me do a 60’s car one of these days... Paint is going to be Tamiya Champagne Gold.