Dennis Lacy
-
Posts
2,487 -
Joined
-
Last visited
Content Type
Profiles
Forums
Events
Gallery
Everything posted by Dennis Lacy
-
Can’t wait to see the custom rear cap all blended in!
-

1963 Chevy Nova Wagon Street Rod FINISHED 3/20/22
Dennis Lacy replied to Dennis Lacy's topic in WIP: Model Cars
Thanks! I’m happy with how they turned out. Little bit of a pain to get around those tight headers on the ends. -
Nice start, Tom!
-
1963 Chevy Nova Wagon Street Rod FINISHED 3/20/22
Dennis Lacy replied to Dennis Lacy's topic in WIP: Model Cars
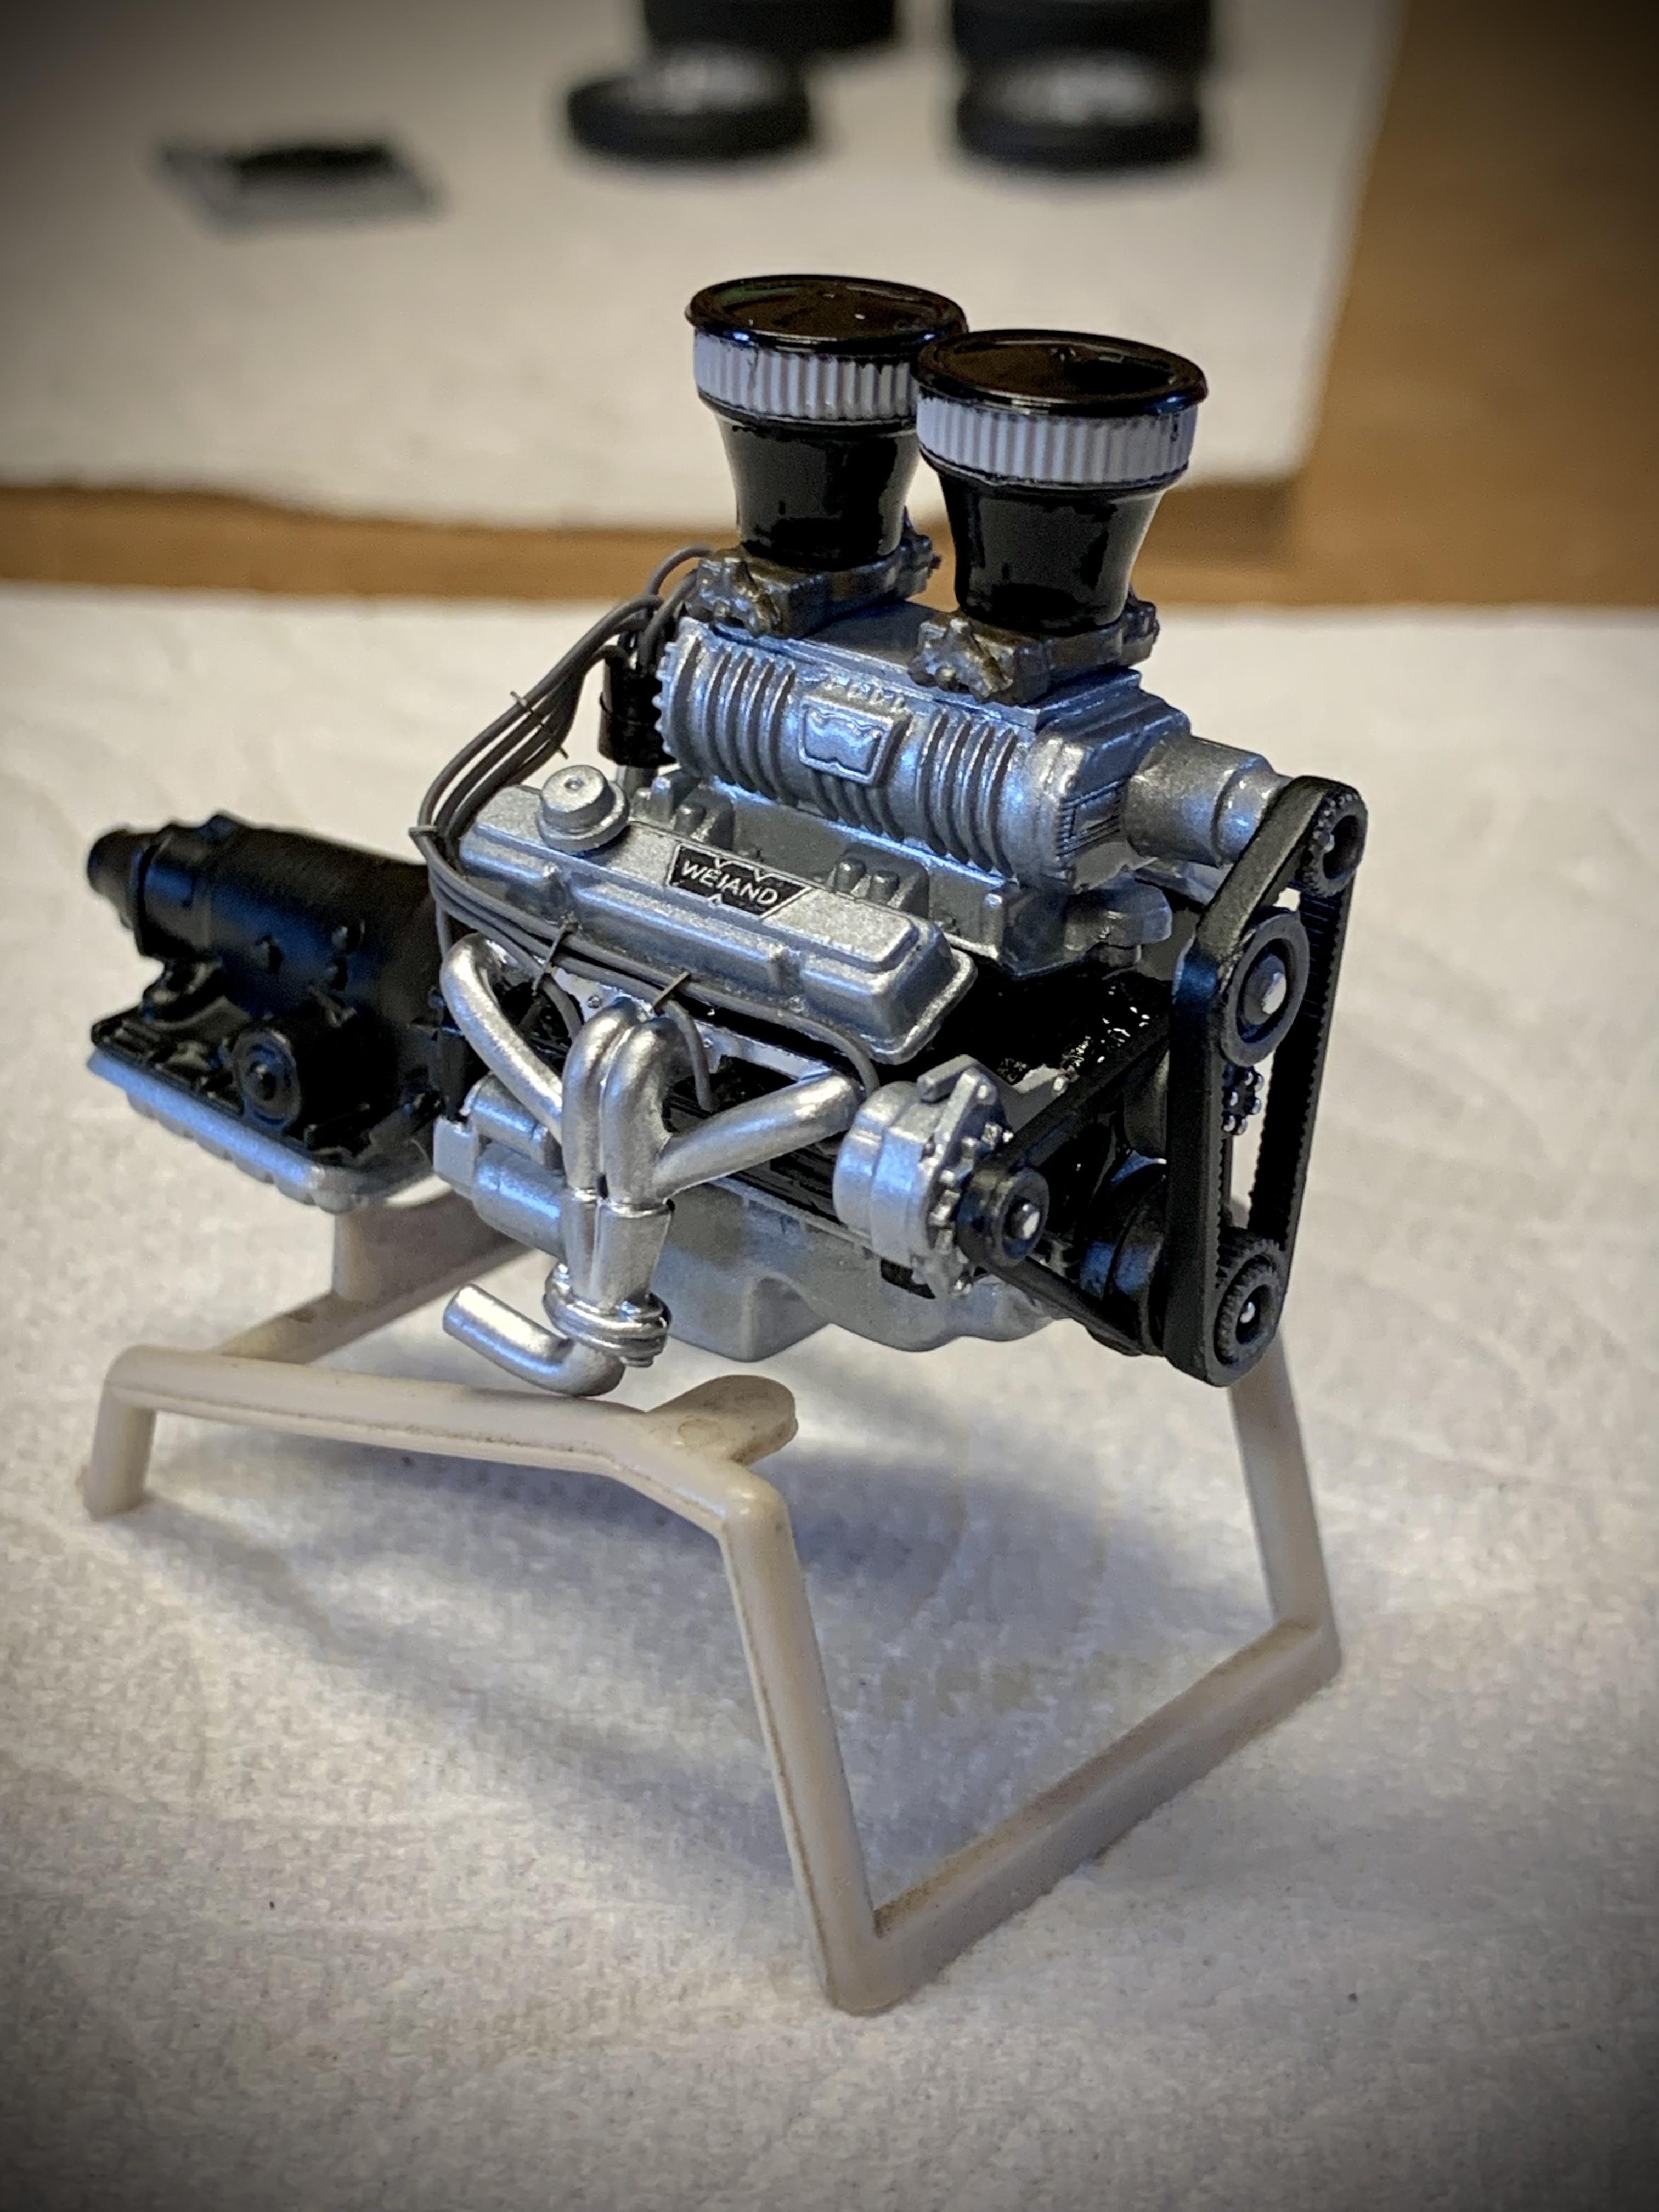
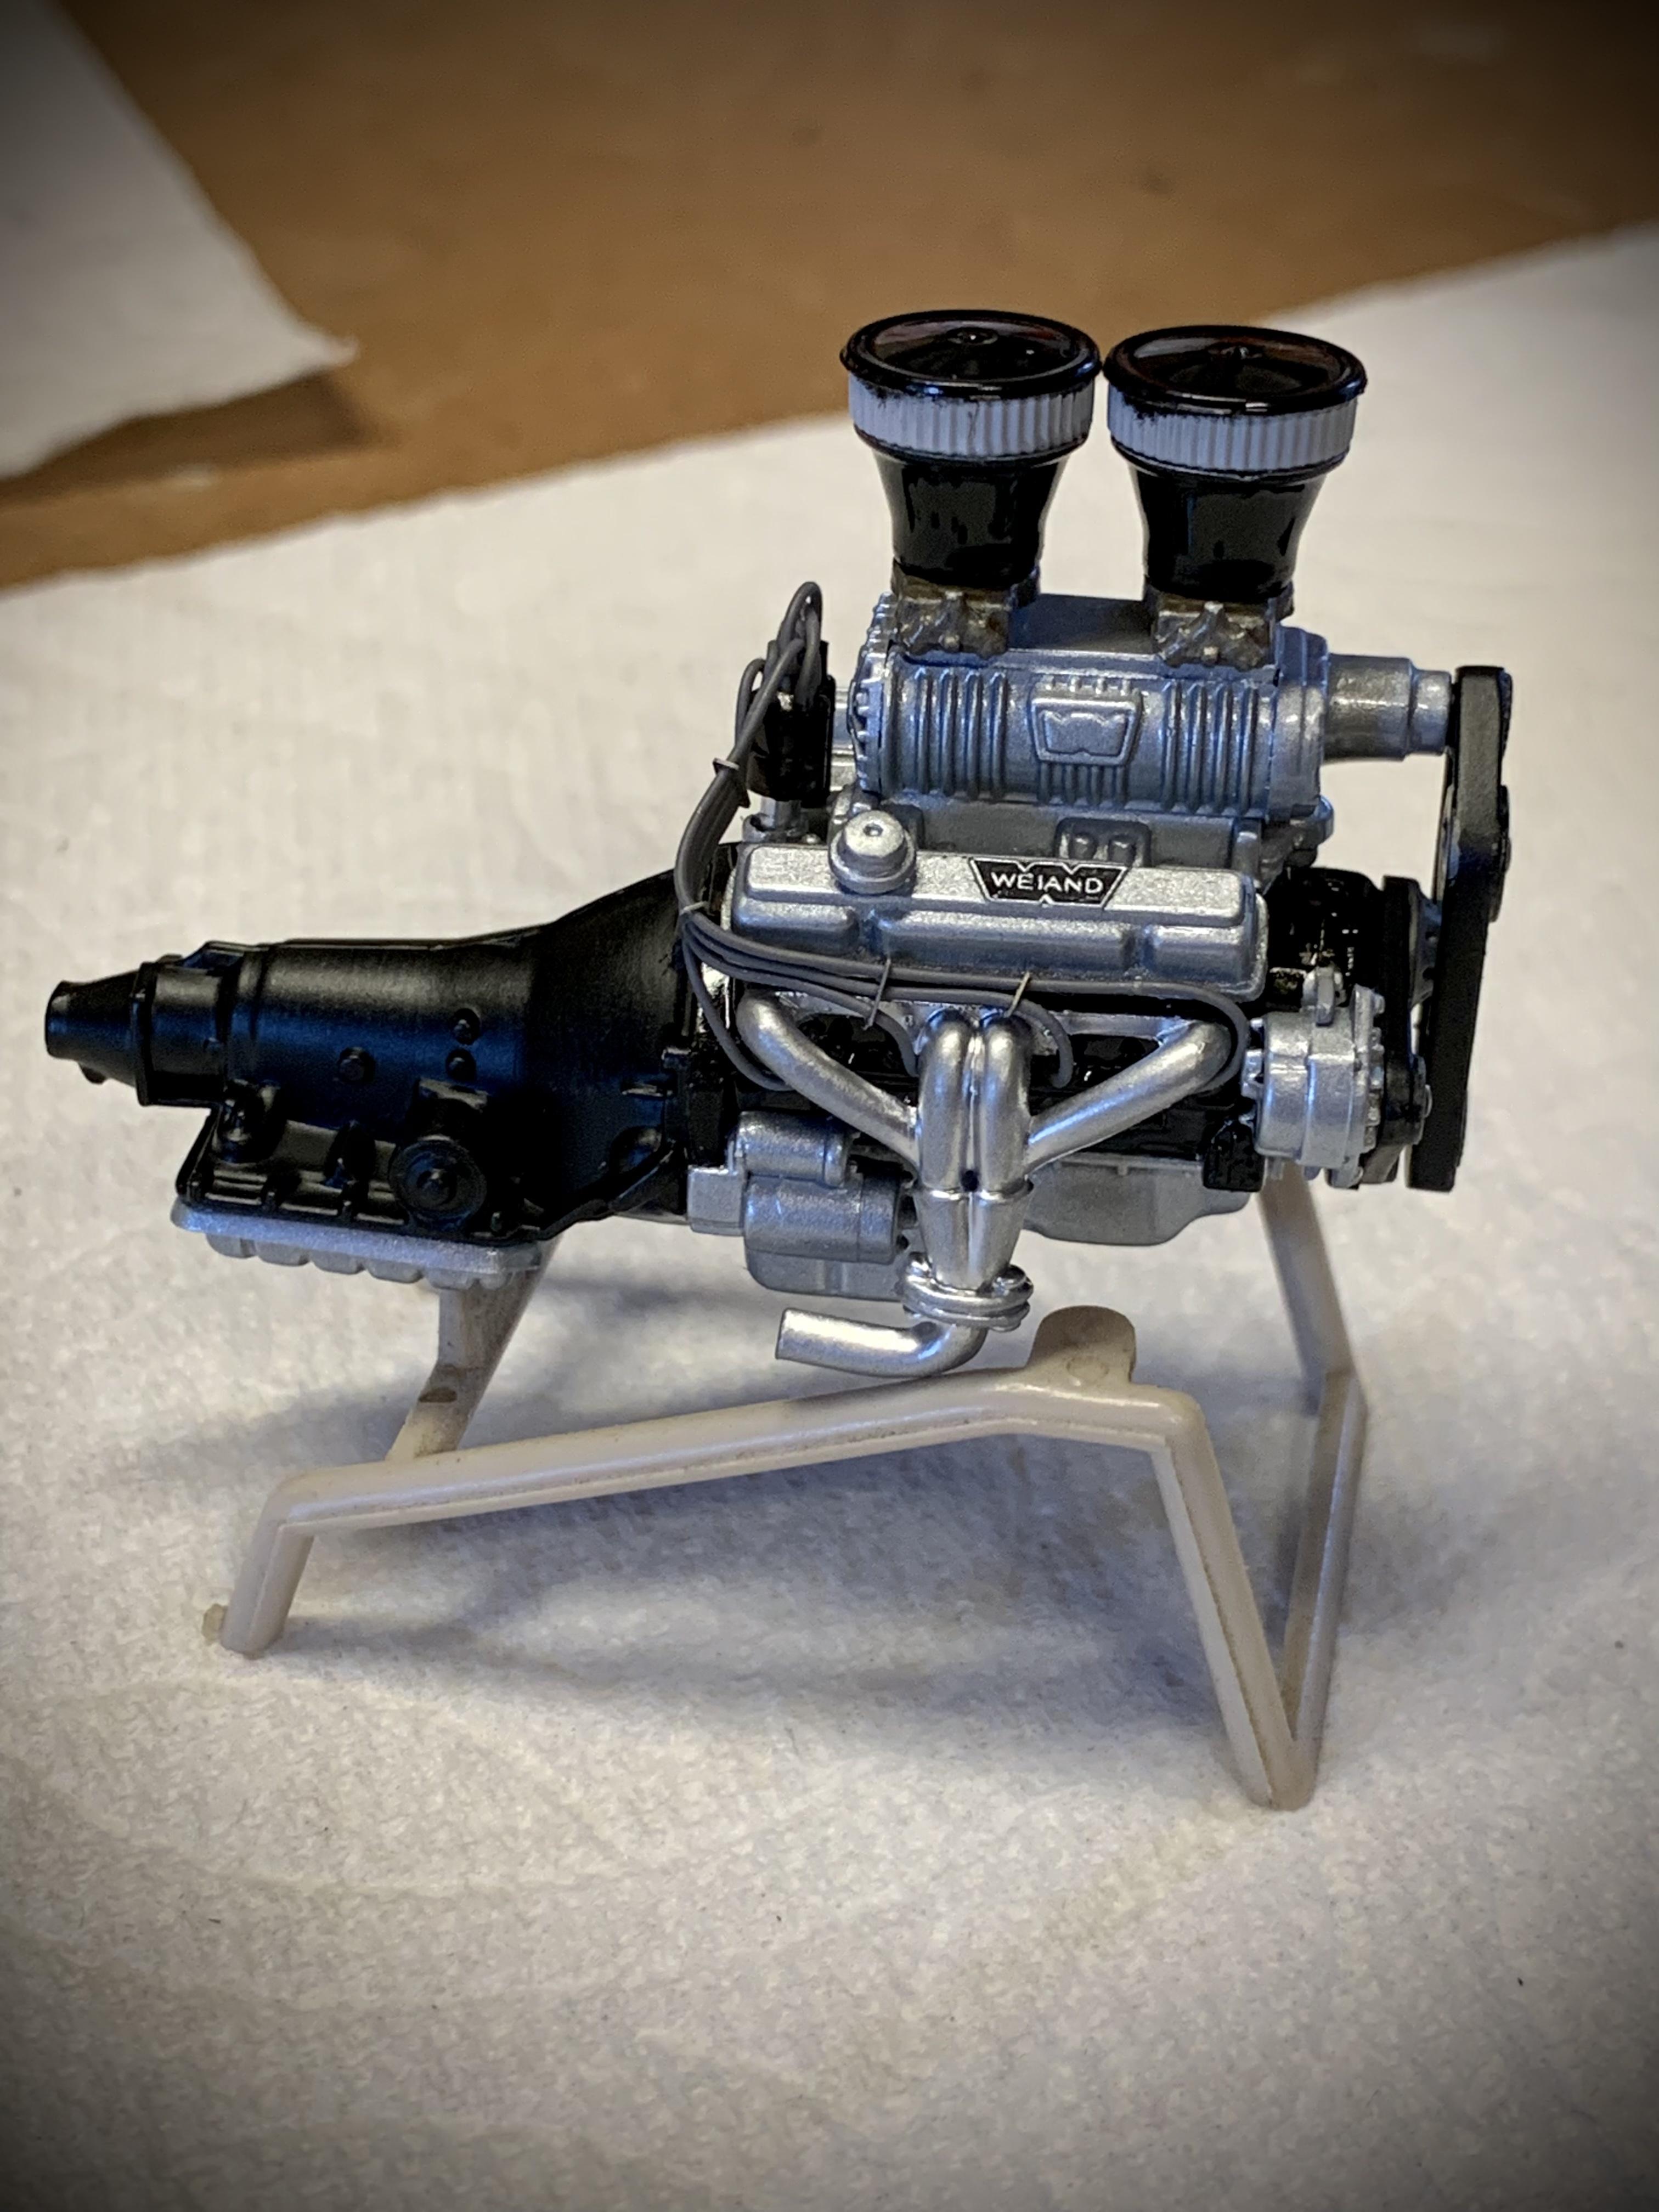
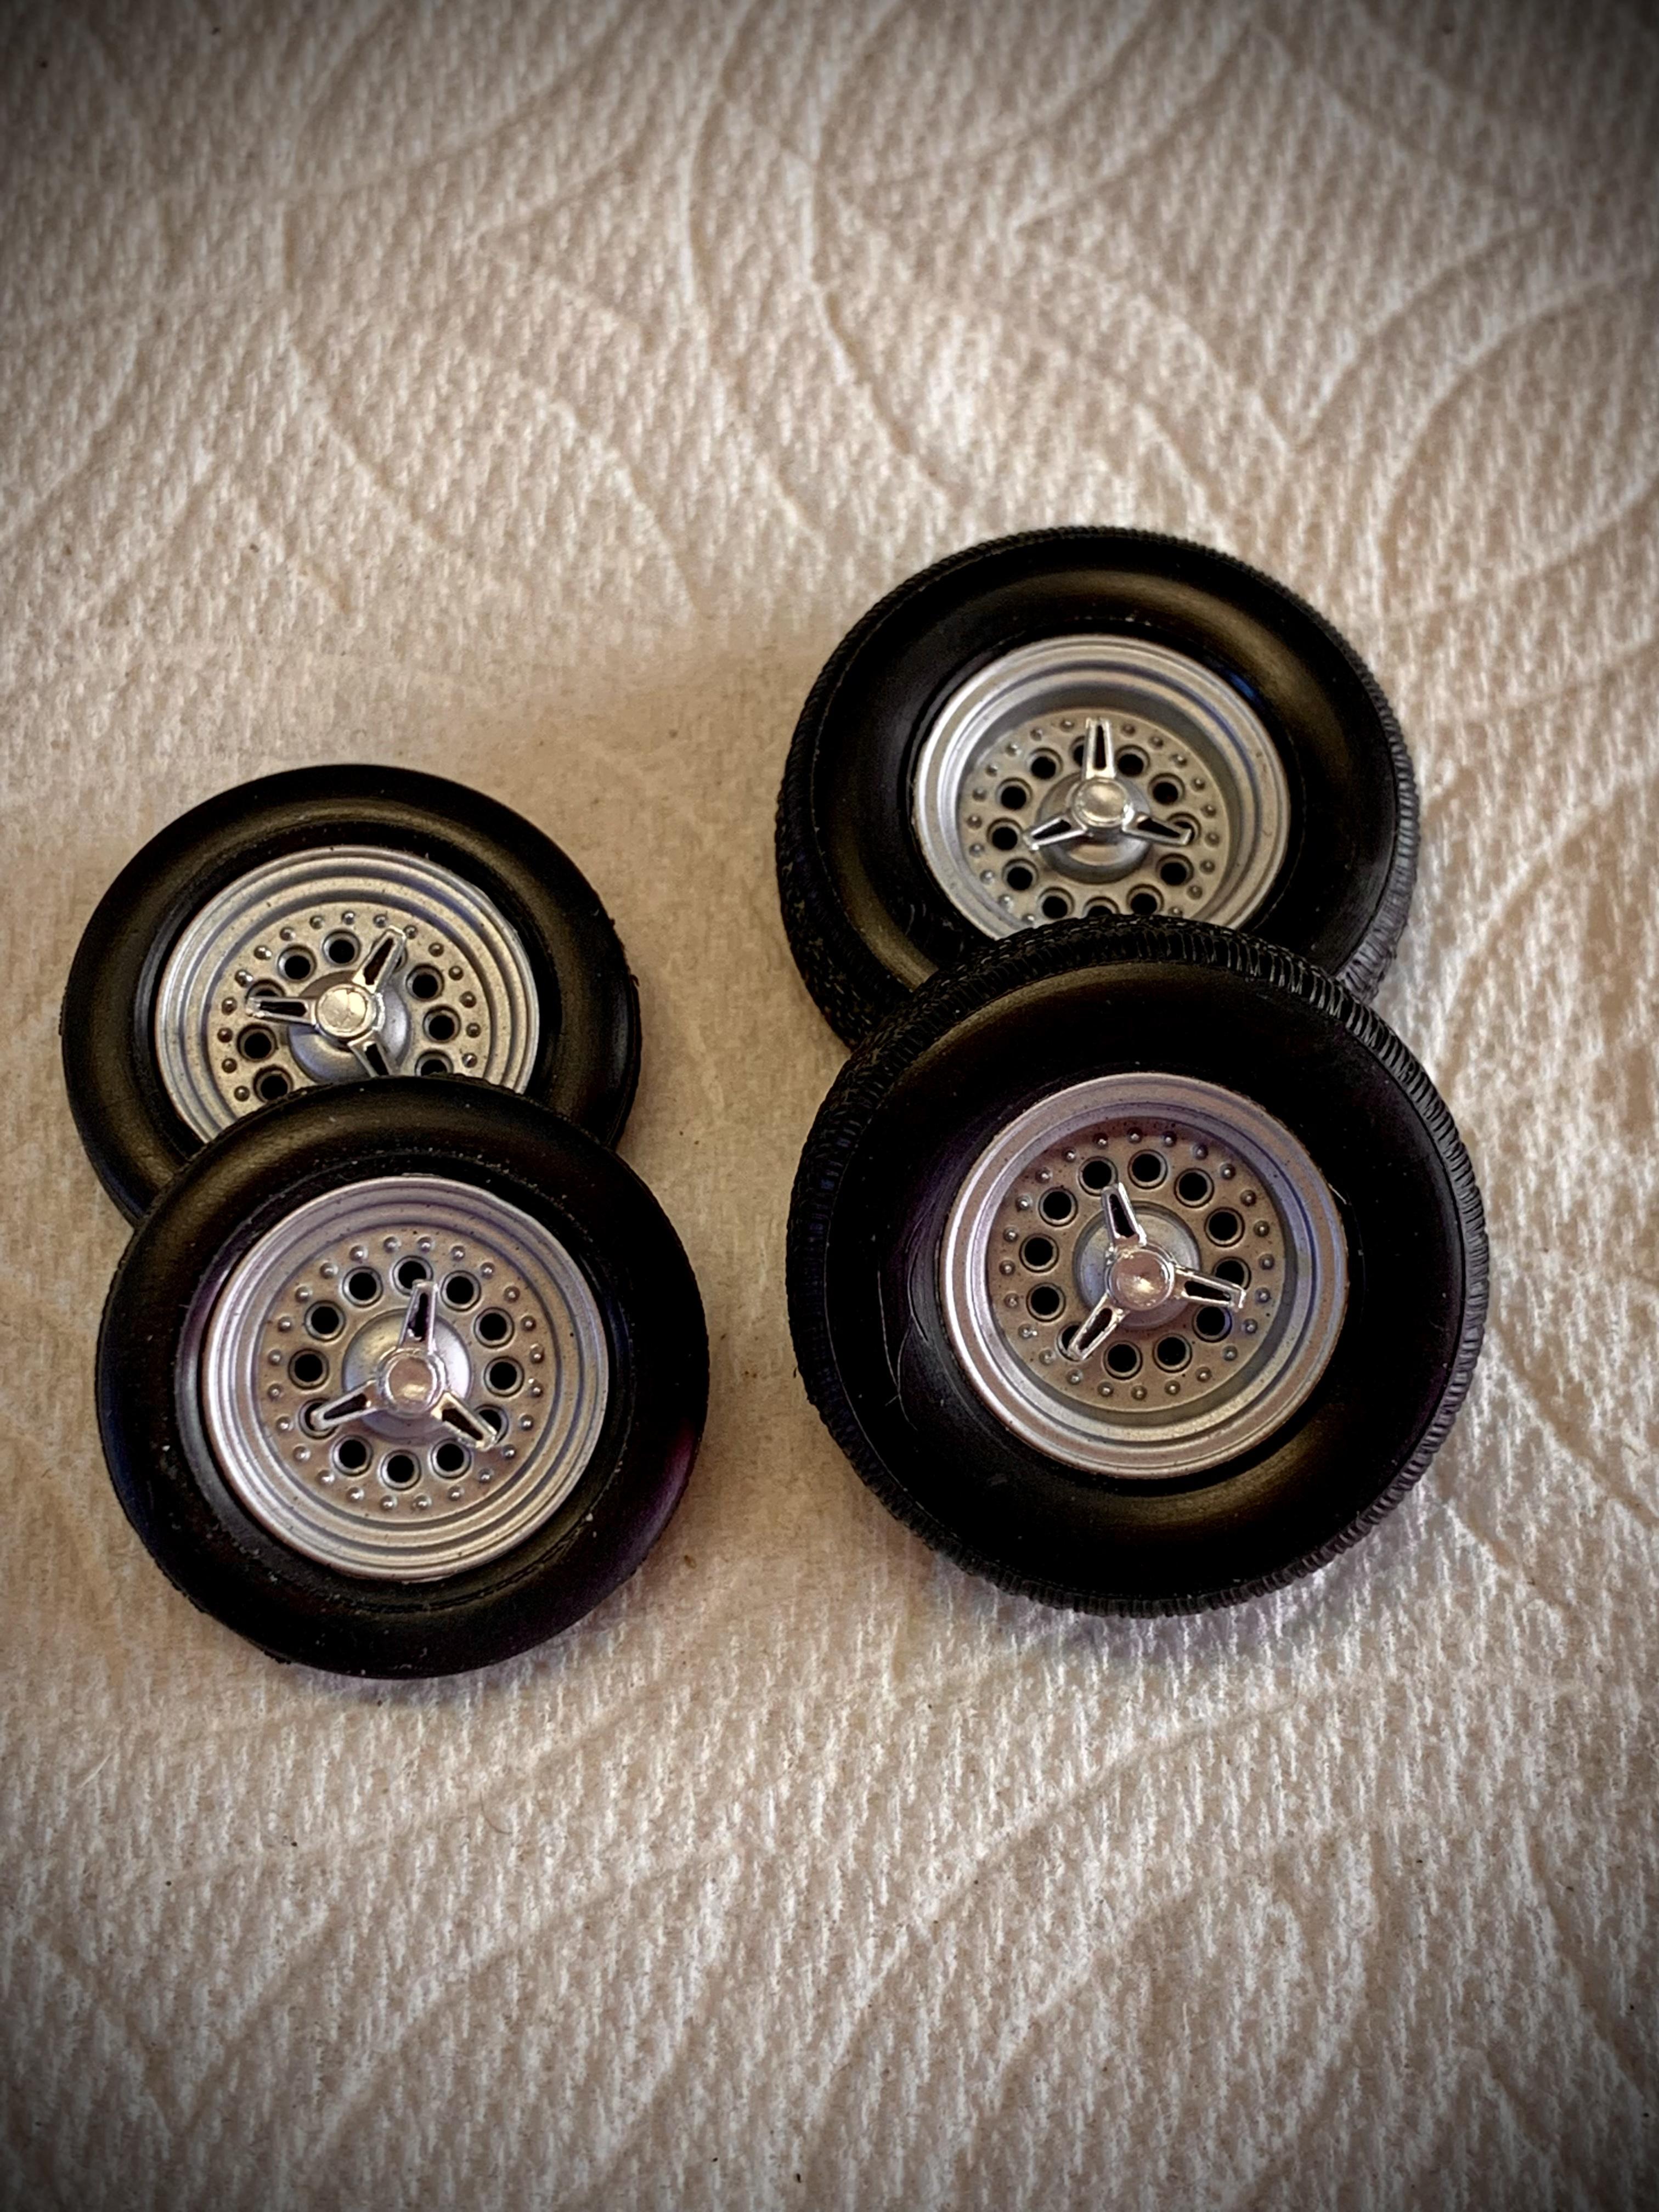
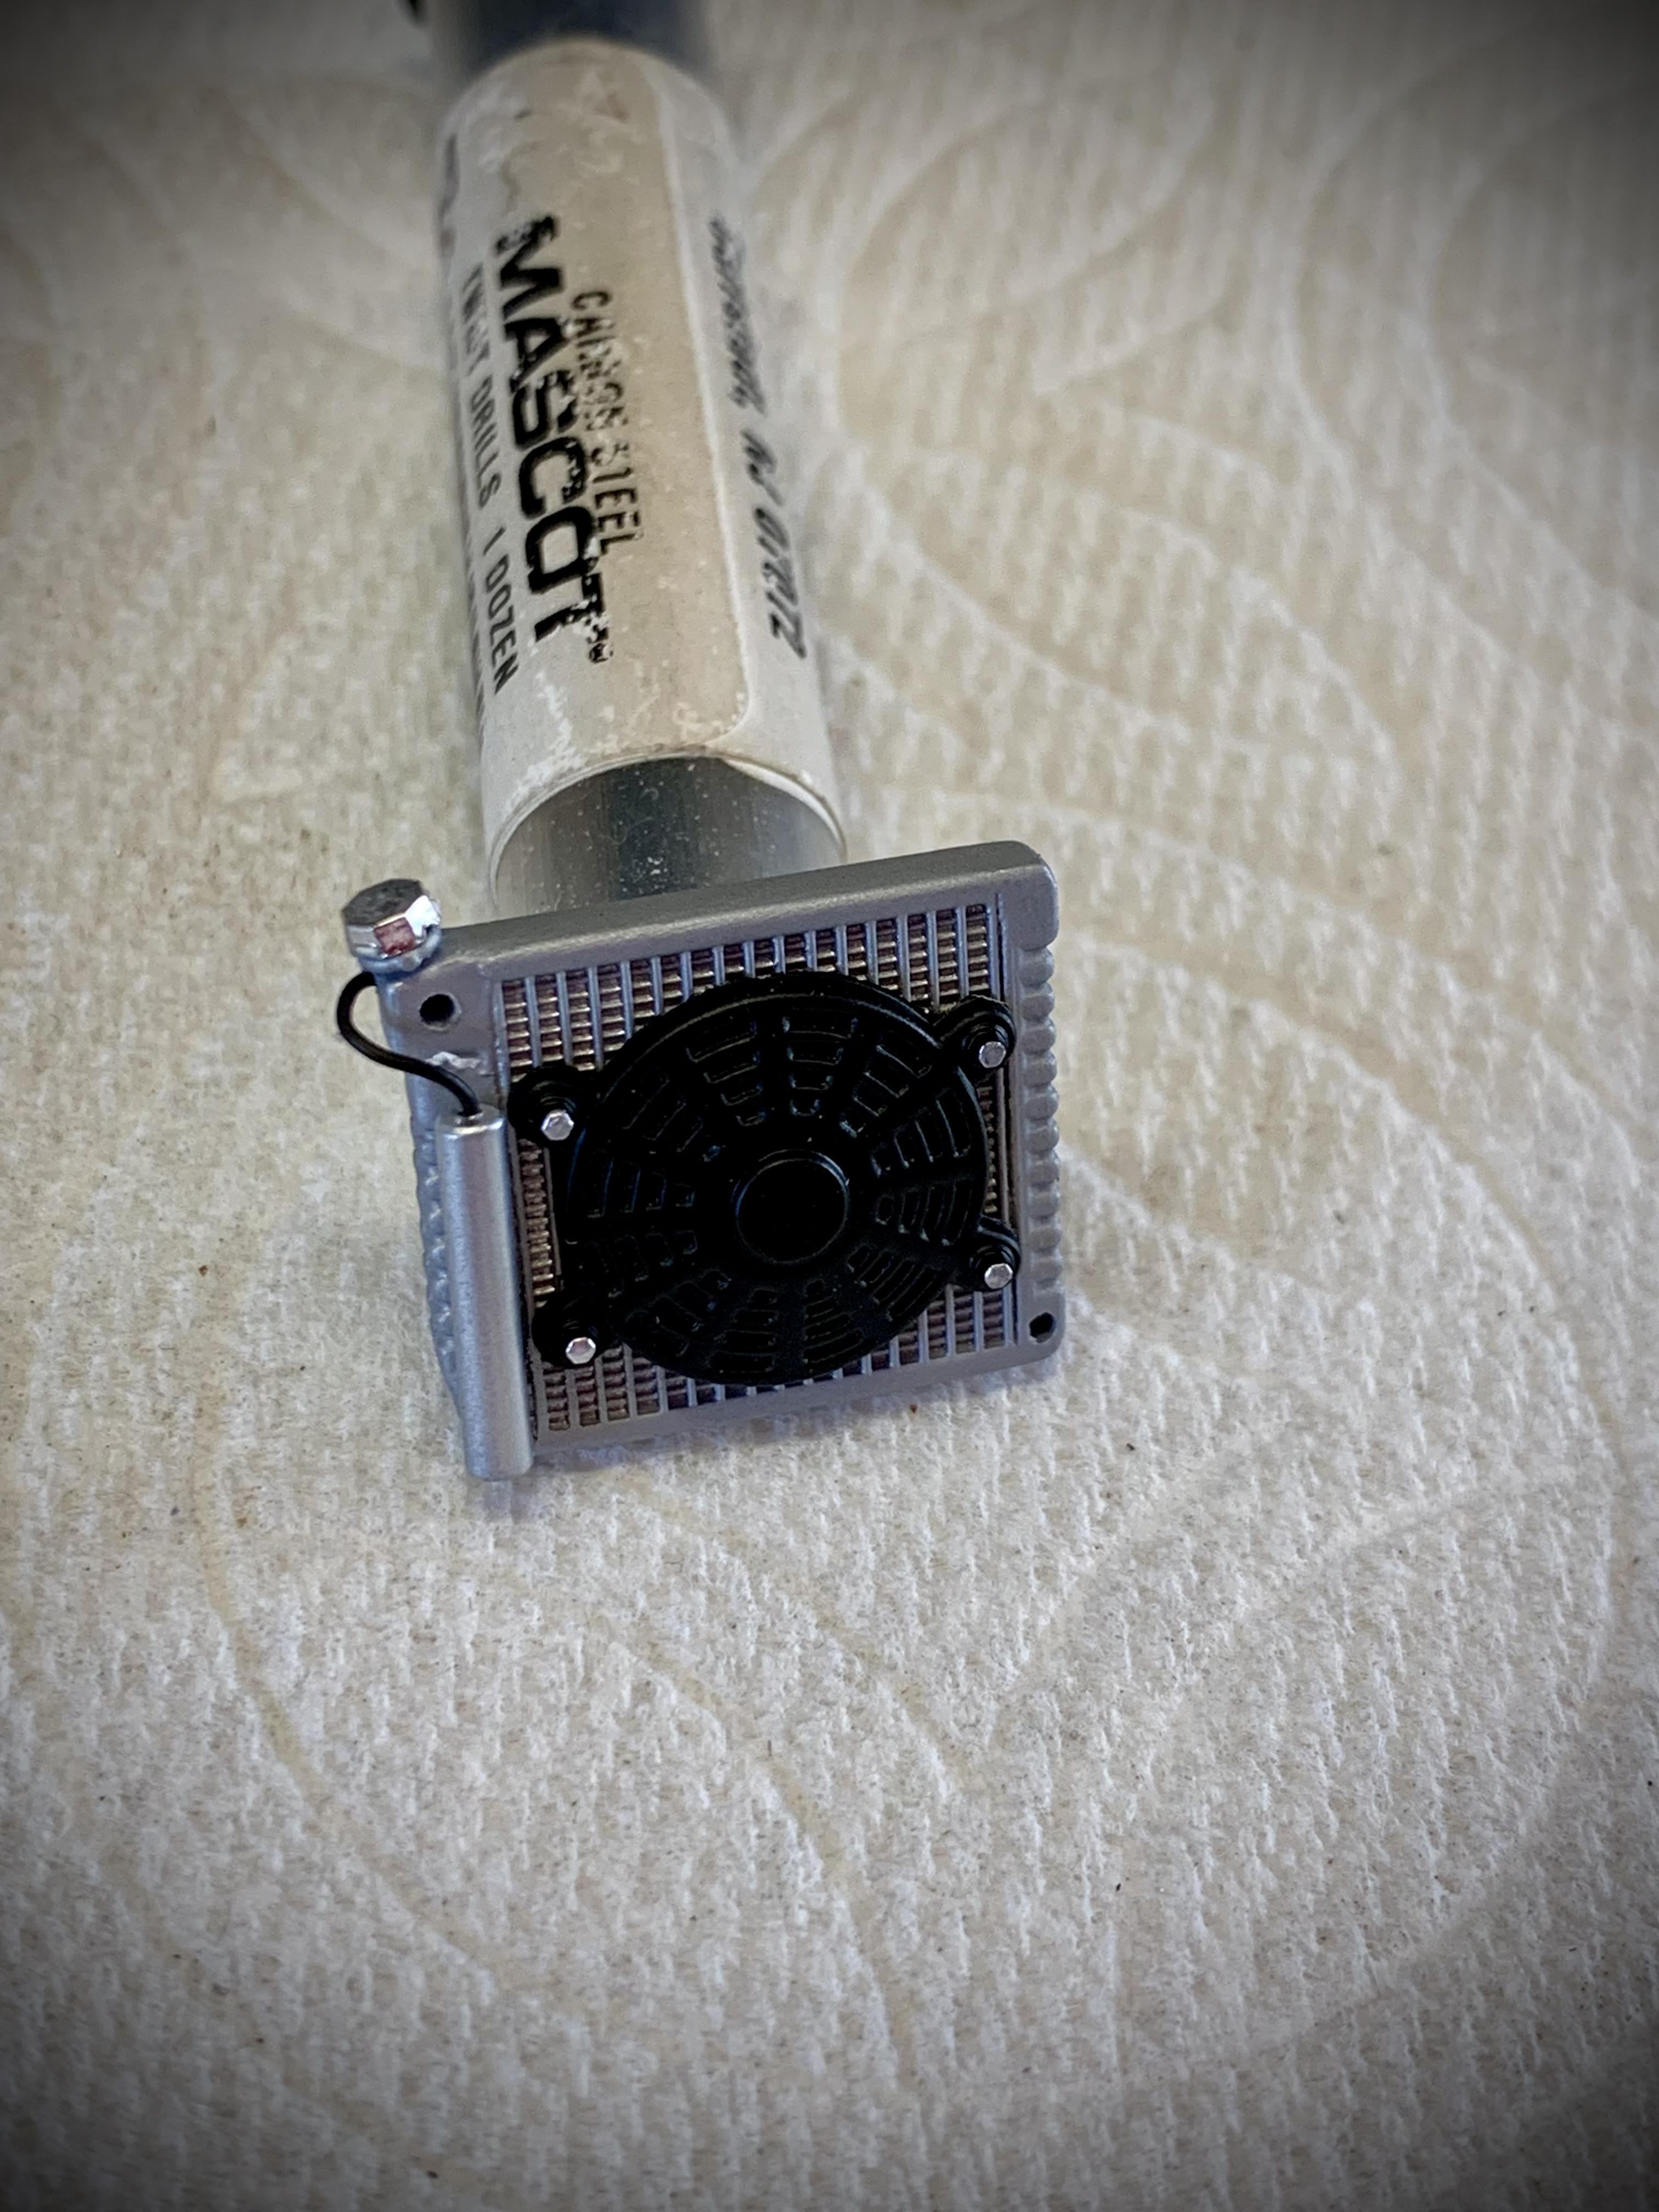
UPDATE: It’s been a few weeks since my last update but there has been some progress happening behind the curtain. In addition to getting all of the engine, exhaust and wheel parts finish painted I was also focusing on finishing my ‘57 Chevy Custom. Now that the ‘57 is in my display case it’s back to the Nova. This afternoon I parked myself at the workbench and fully assembled the engine, radiator and the wheels & tires. The engine is finished in a combination of Tamiya Gloss Black and their Mica Silver with clear coat on both. The headers are their Silver Leaf which convincingly imitates silver ceramic coating. The trans is finished in flat black as that was customary when getting a built automatic from places like Art Carr. The wired distributor is from Parts By Parks with Detail Master wire dividers. The radiator as shown previously is a cut down Revell ‘90 Mustang piece with reconfigured hose locations. I made a simple overflow tank from Evergreen rod and hose connection from a discarded piece of black ignition wire. The cap and fan come from any of Revell’s ‘32 Ford kits. The wheels and wing nuts from Revell’s ZZ Top ‘33 Ford were stripped and painted with Tamiya Silver Leaf and their Semi Gloss Clear on the wheels to look more like brushed aluminum. The wing nuts were left shiny and paint detailed black in their recesses. All of the rivets on the wheels were touched with bright silver on a toothpick to bring them out more. That’s all for now. The body and related parts are just about ready for primer and I’ve decided to do some modern updating to the interior because the stock looking seats and panels look out of place now for a smooth 90’s street car. More to come soon!
-
I have never used an airbrush. I almost exclusively use Tamiya spray cans.
-
Bad Ass! The stance, wheels and tires and proportions are perfect. The injected Nailhead is the perfect choice. Nice clean work on the chassis mods, too. Very much looking forward to more! Are you going to try and replicate the paint on the inspiration car?
-
Thank you! Not bad for a rattle can job, right? LOL!
-
Good to hear from you, Glenn! Thanks for the nice words. I couldn’t help myself, I had to sprinkle some hot rod on top. I feel like it works. We’ll see about a Merc down the line…
-
Very nice build of the original issue roadster!
-
UPDATE! Thanks to everyone who participated in this thread, including the ones who just looked and never commented. It’s pretty wild that this project racked up 10,000 views! The ‘57 is finished and over On The Shelf. Be sure to go see how it turned out!
-
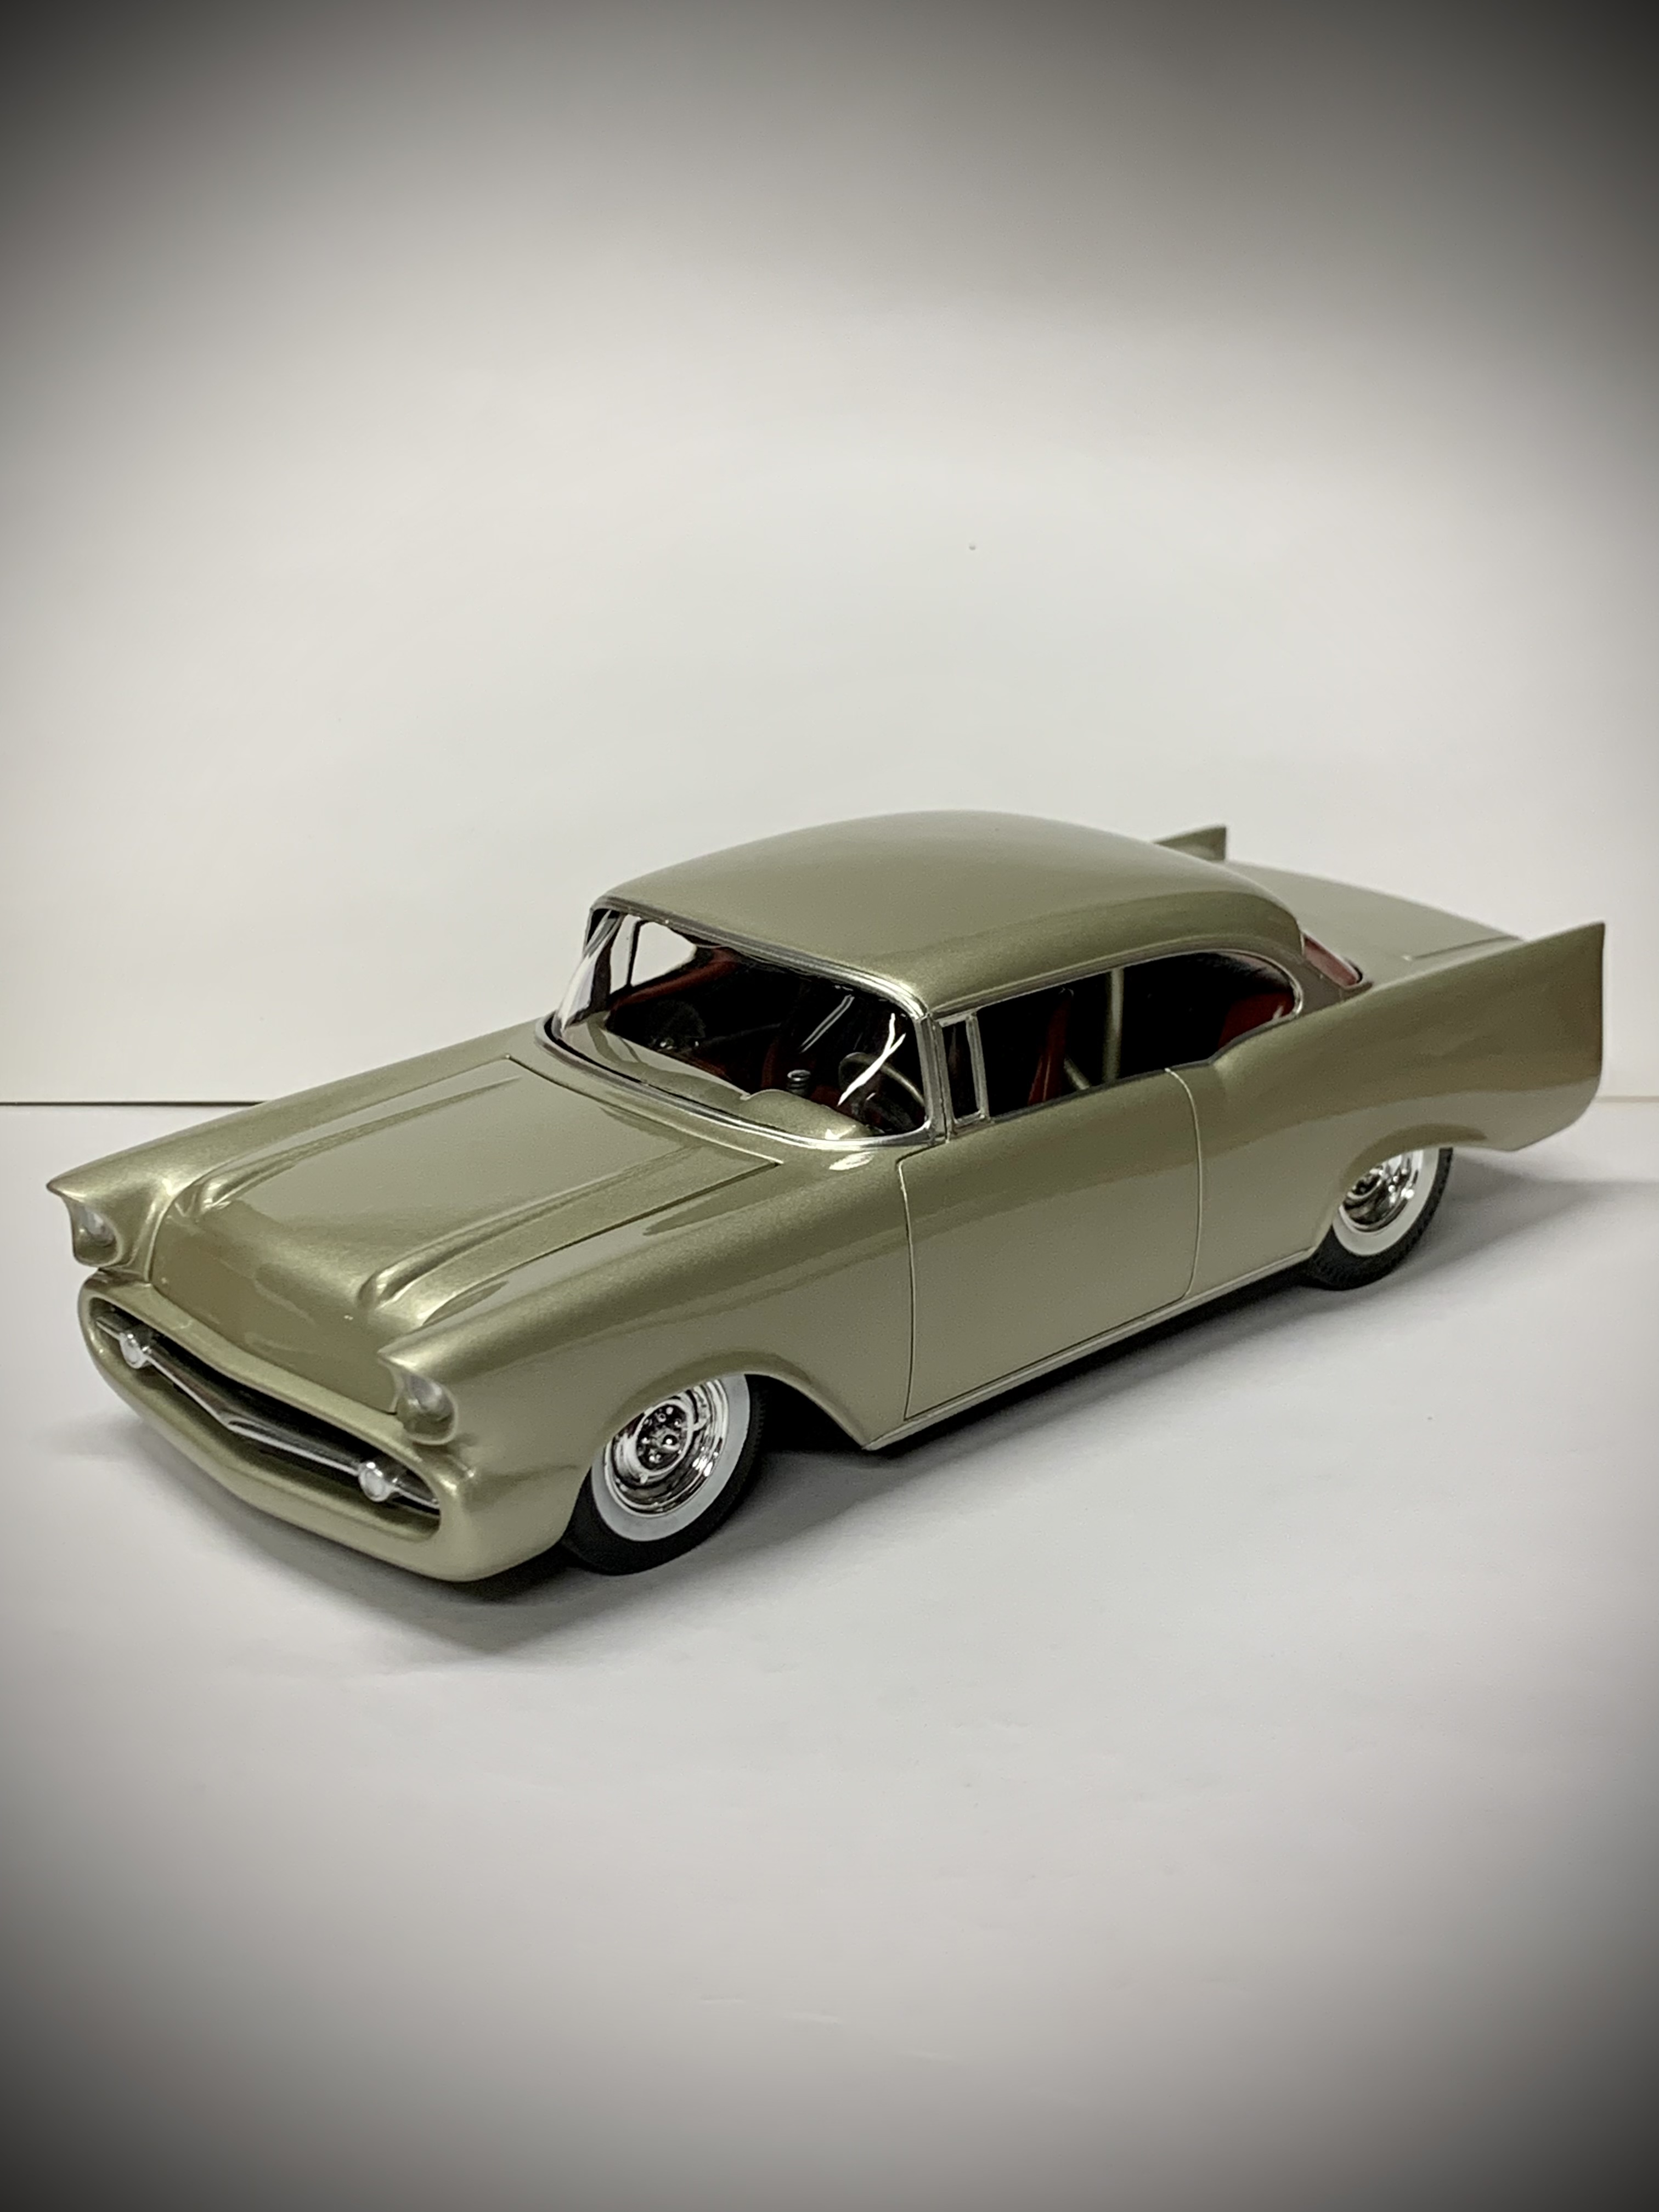
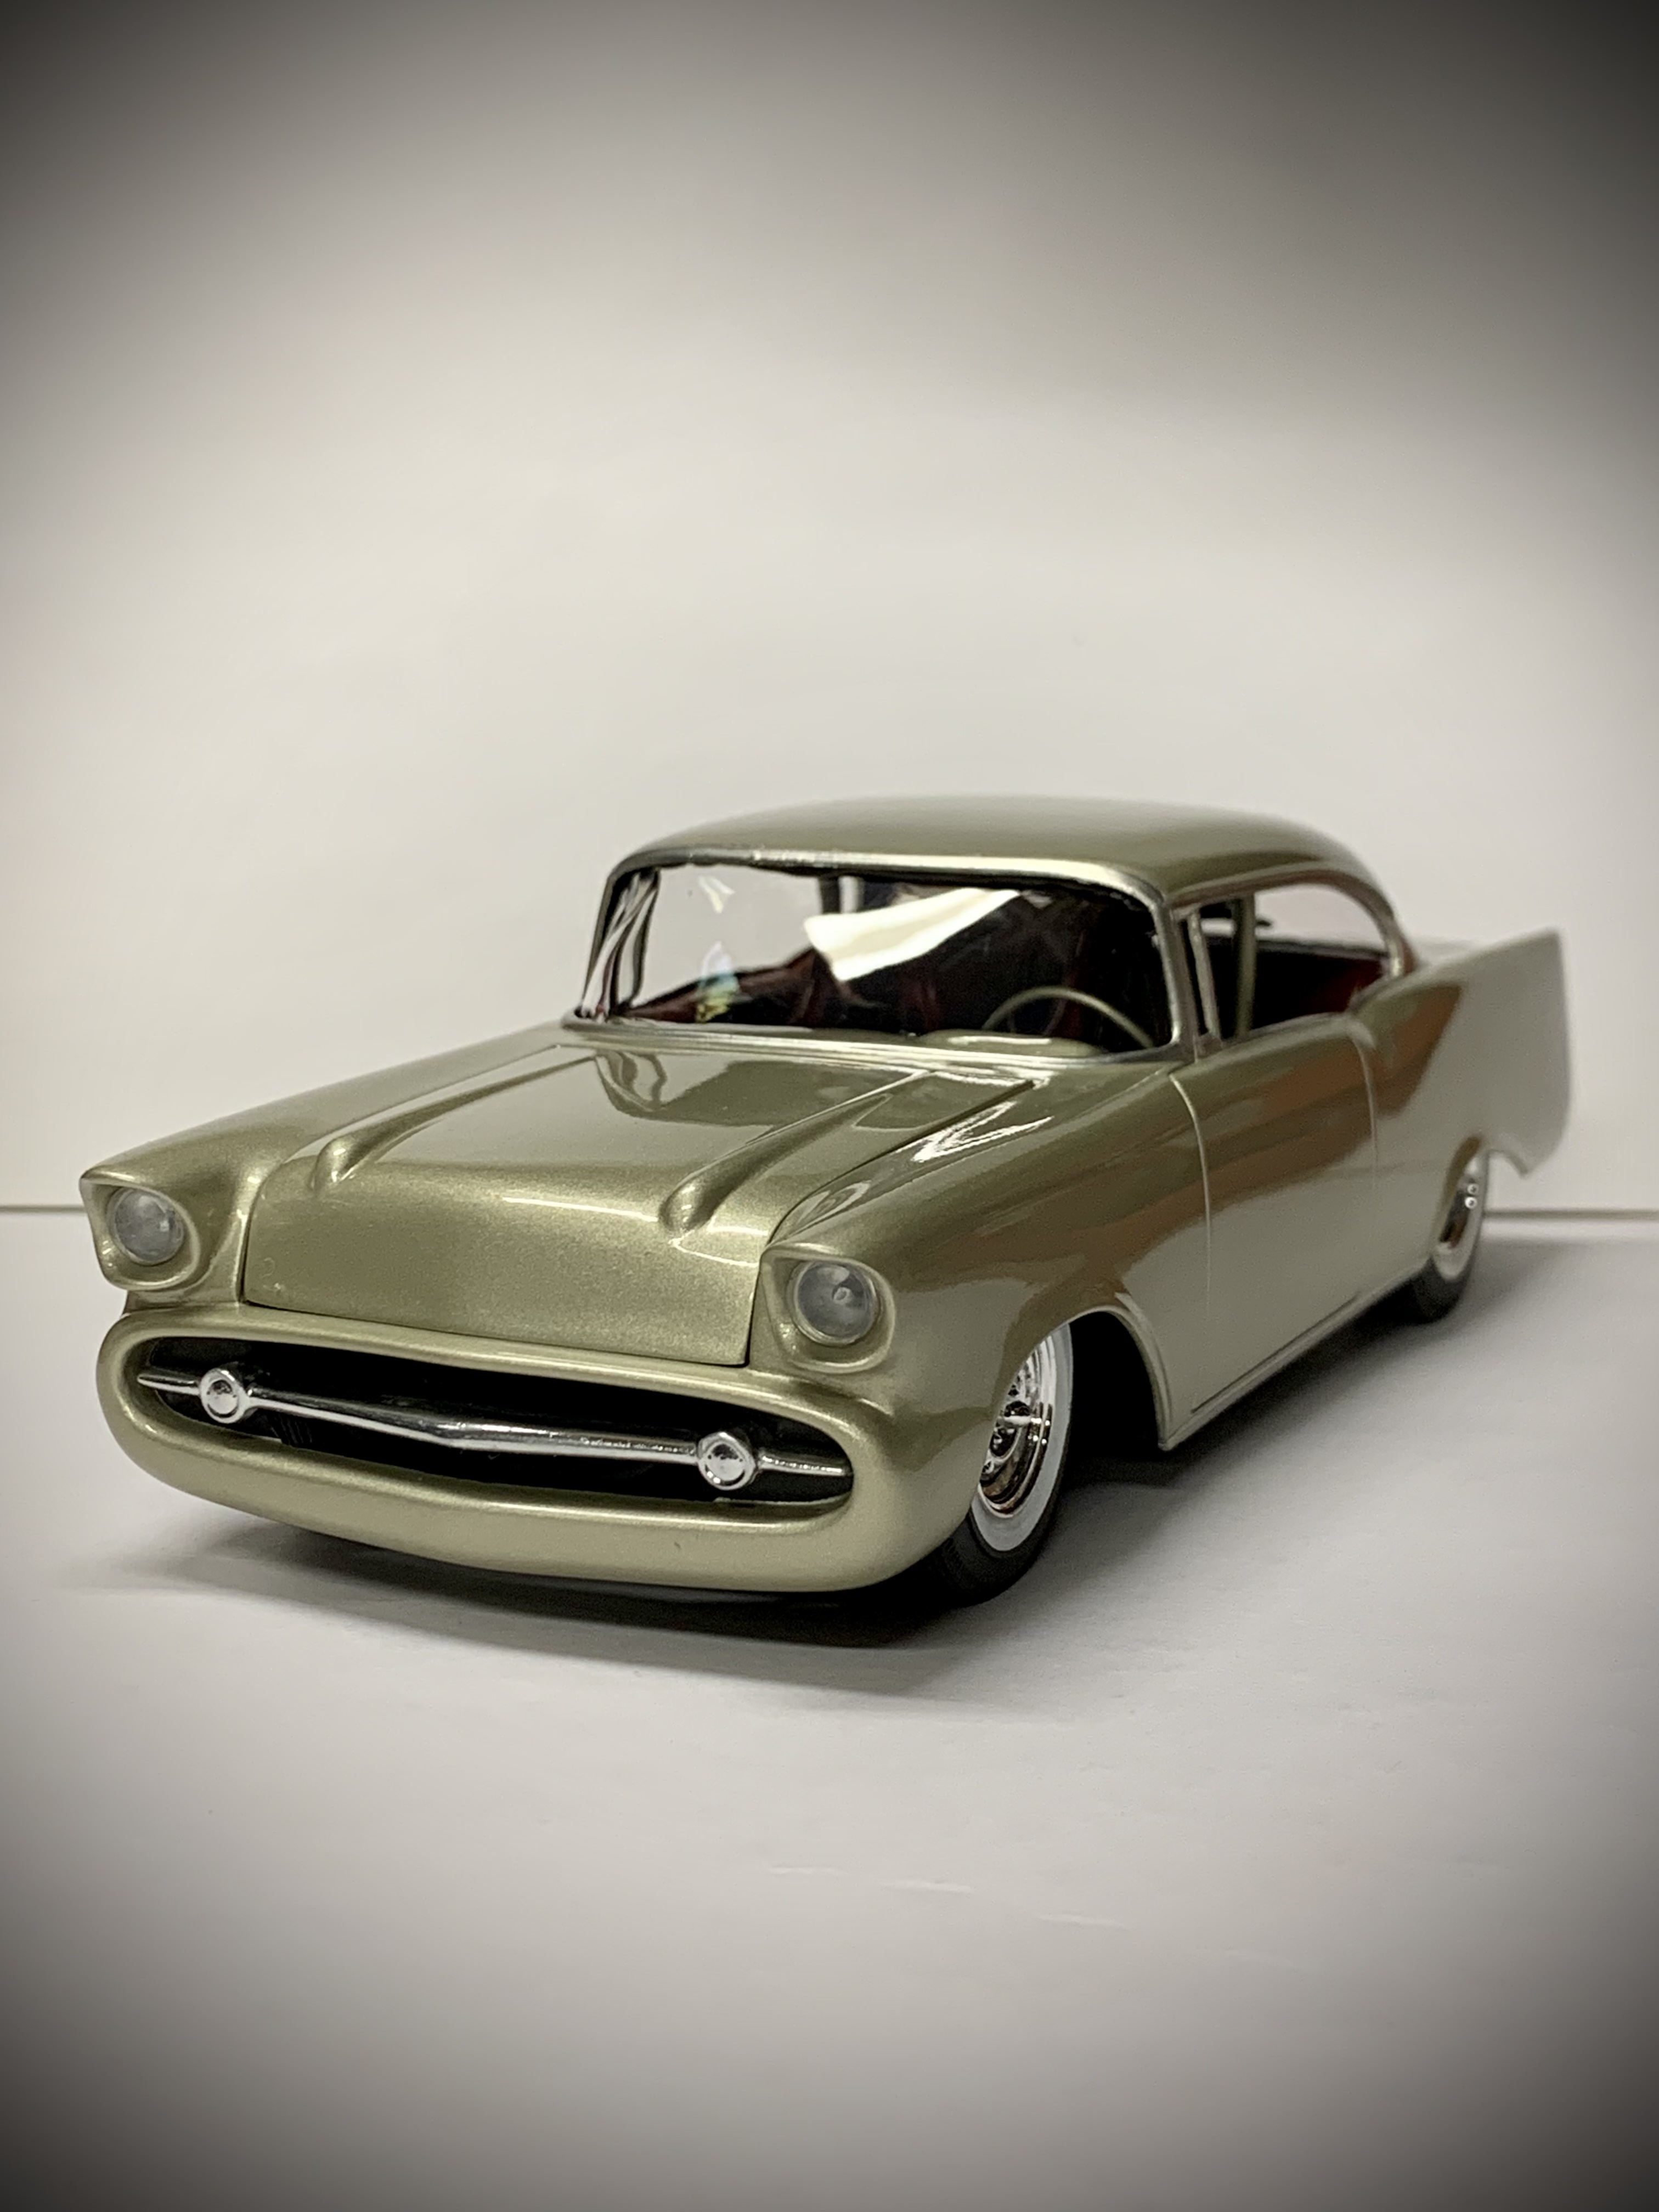
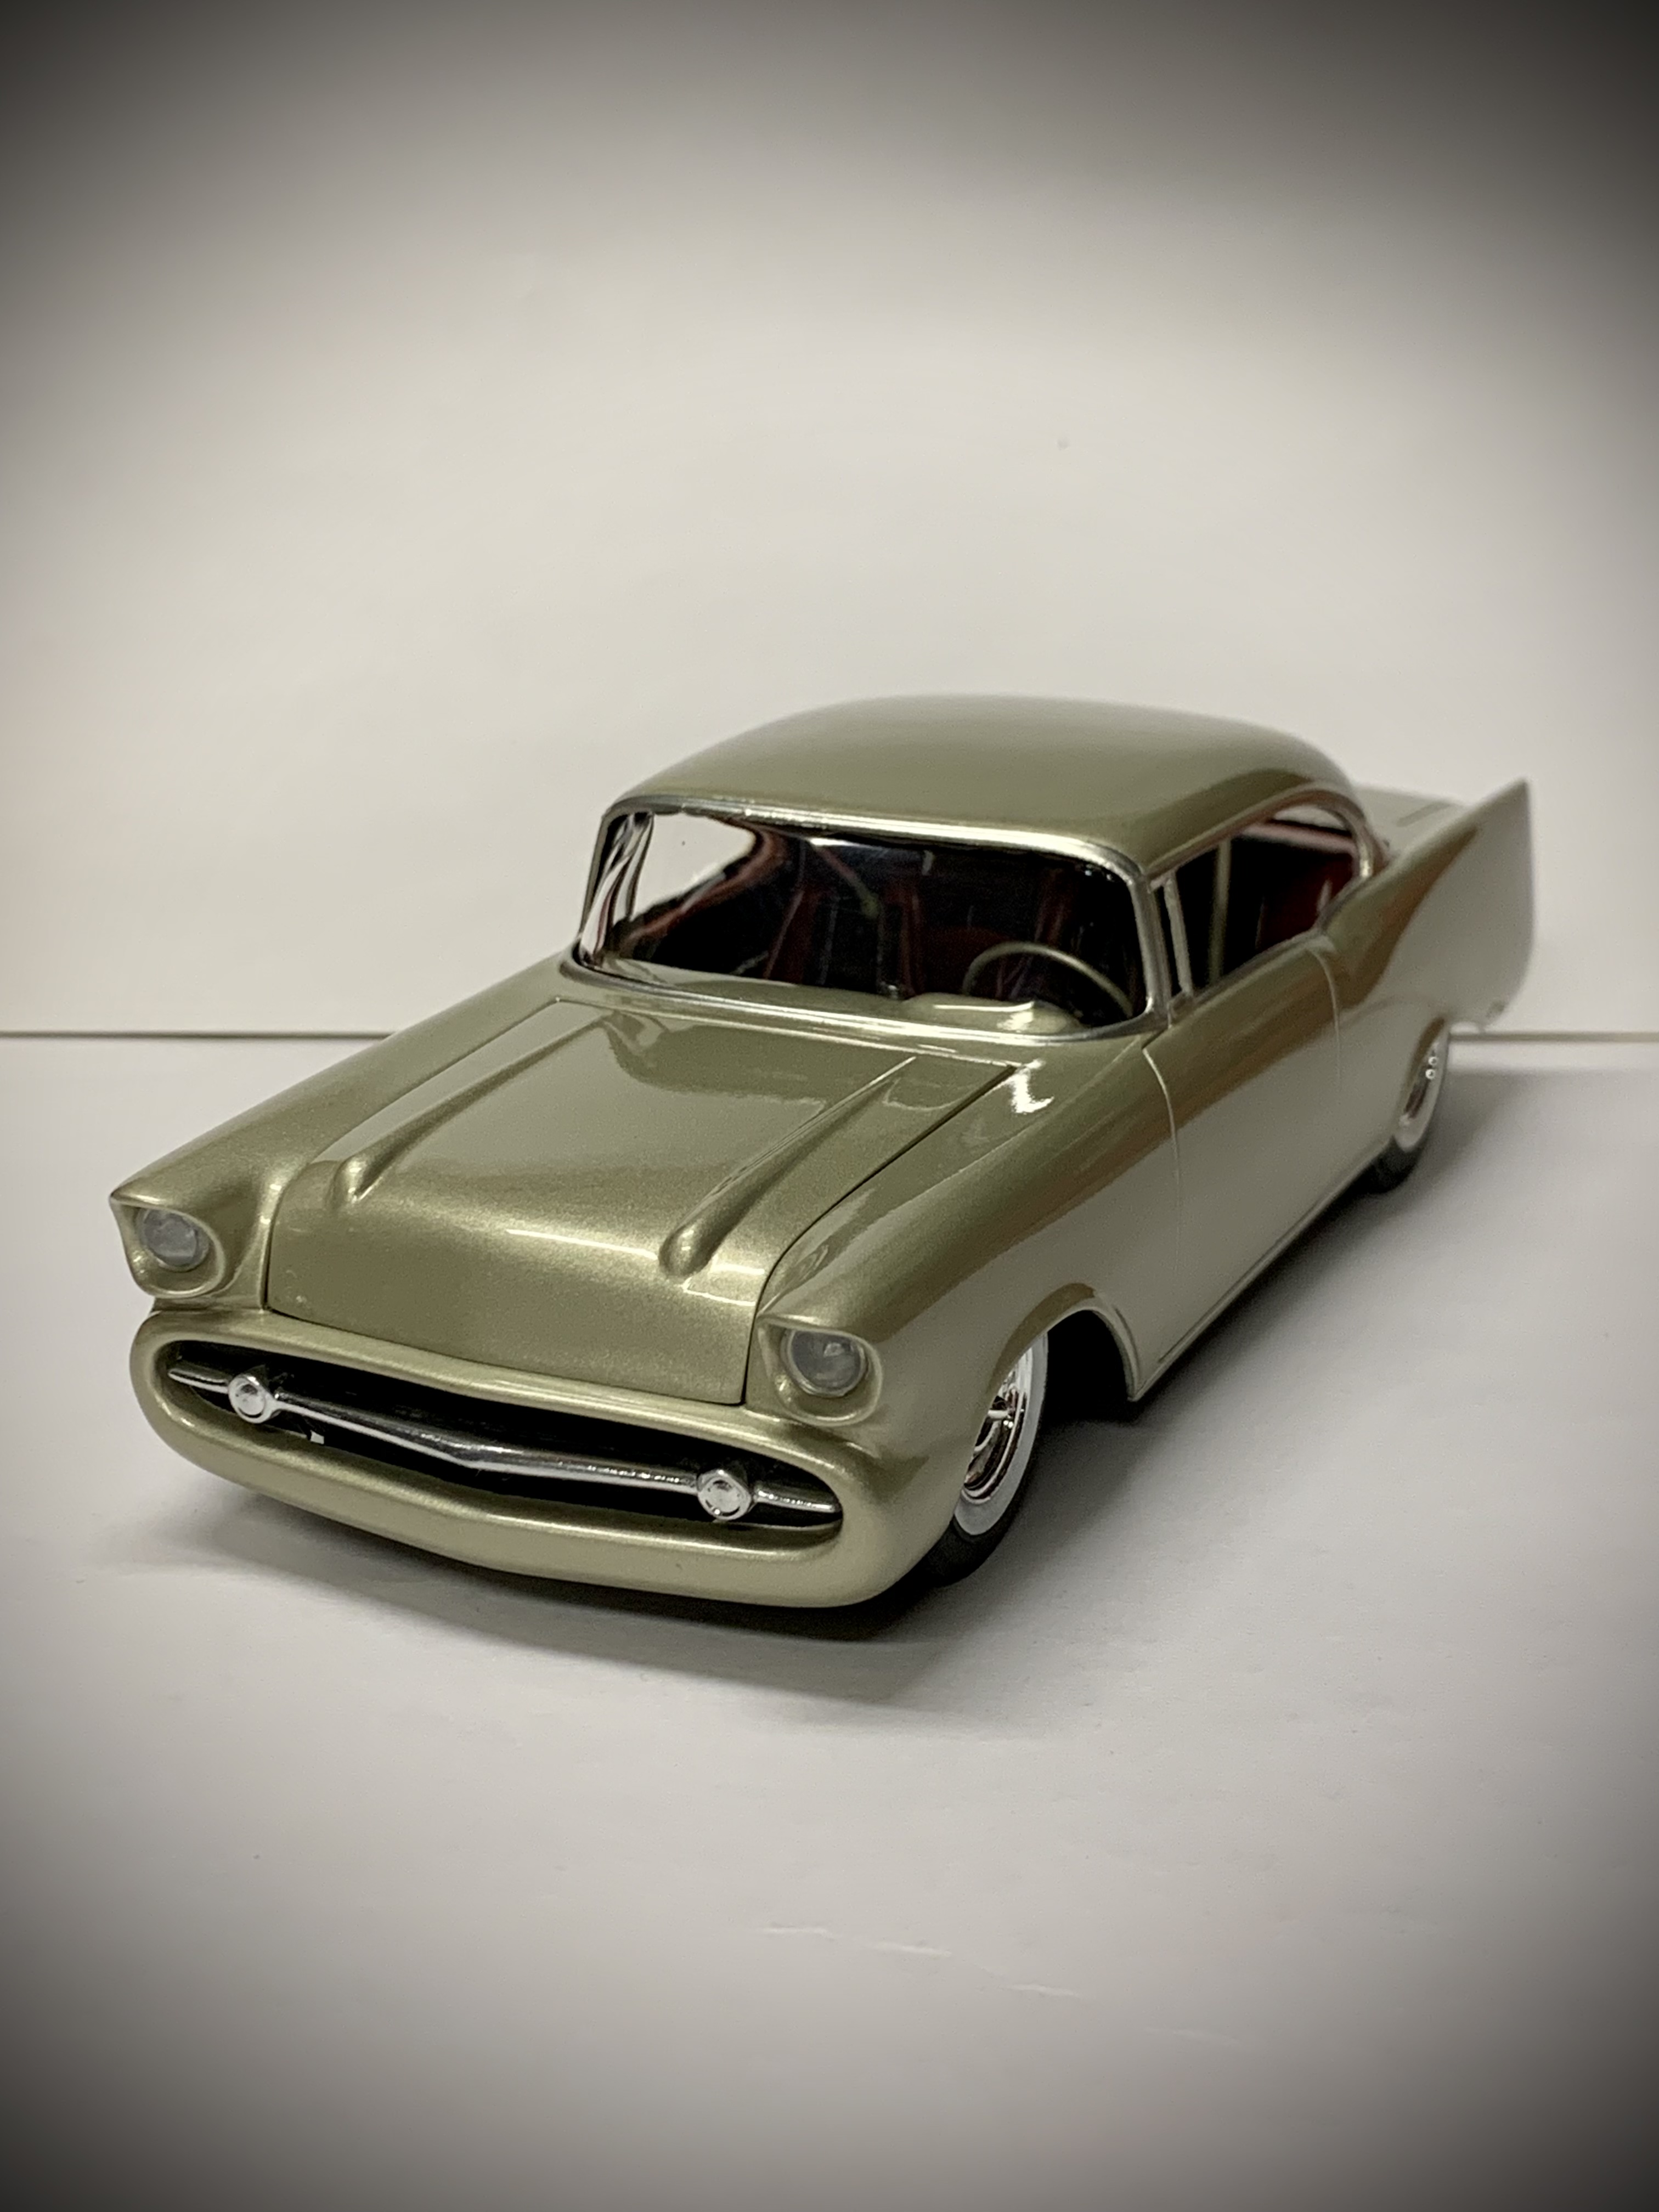
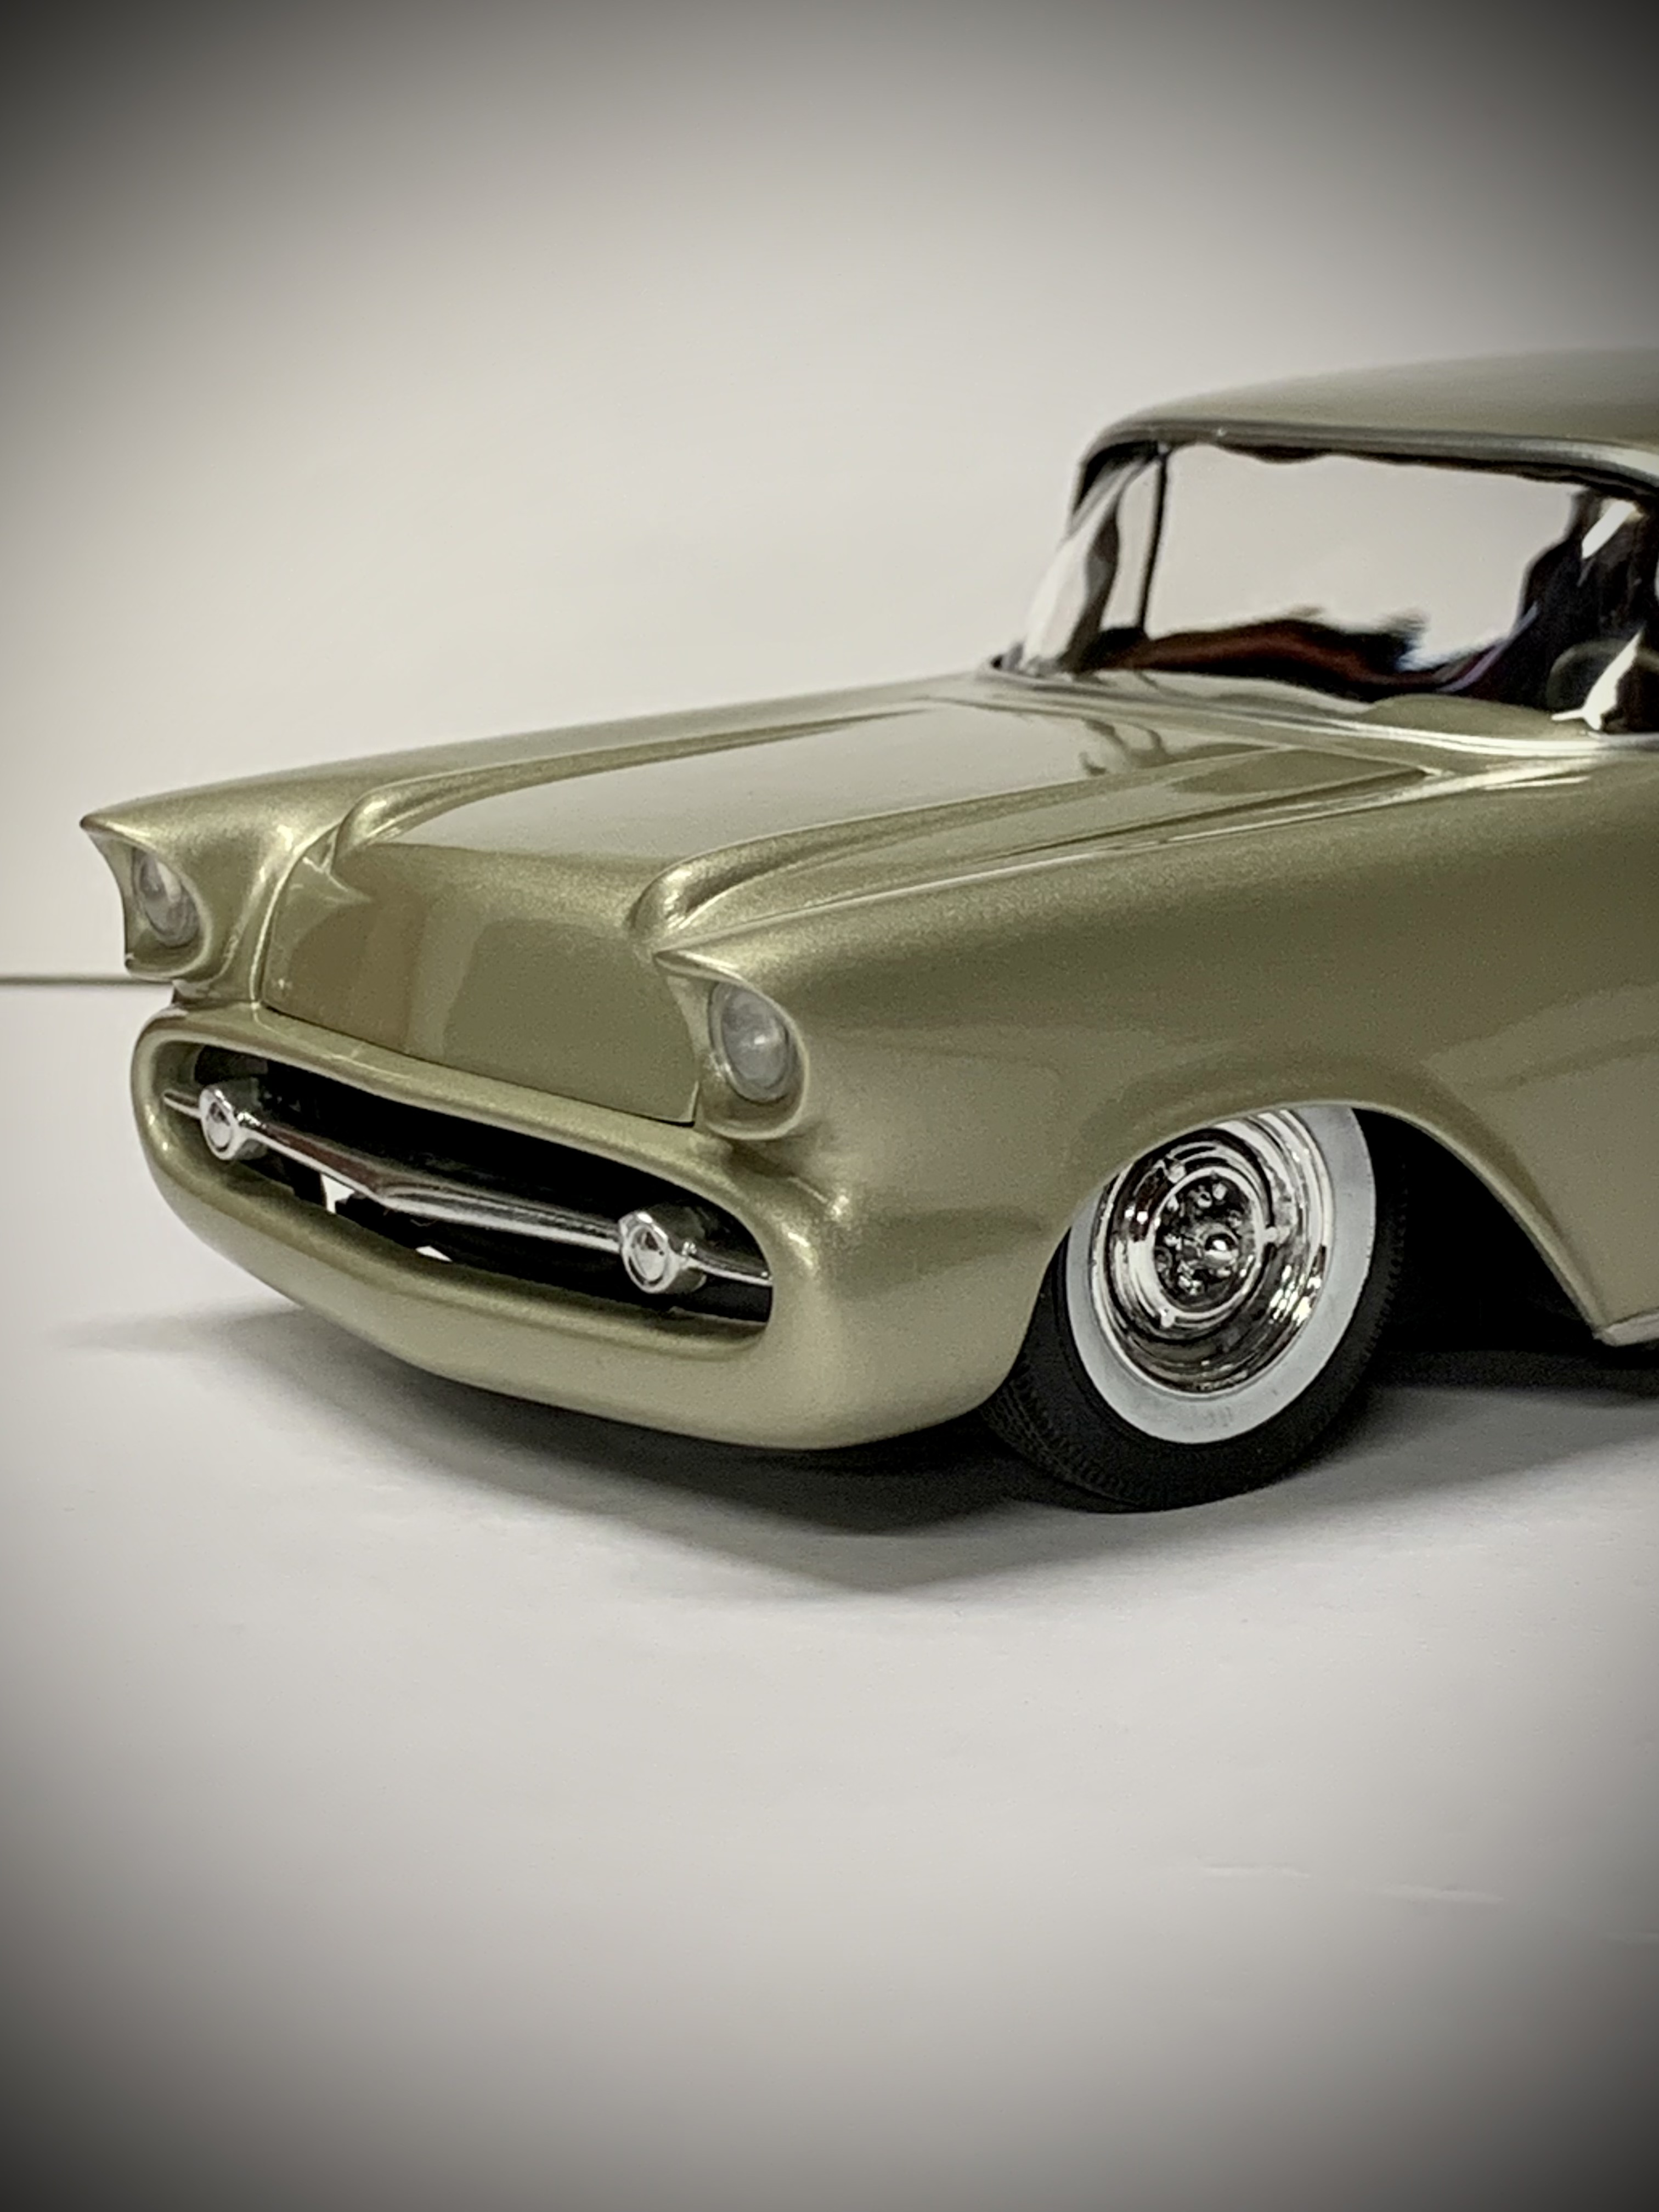
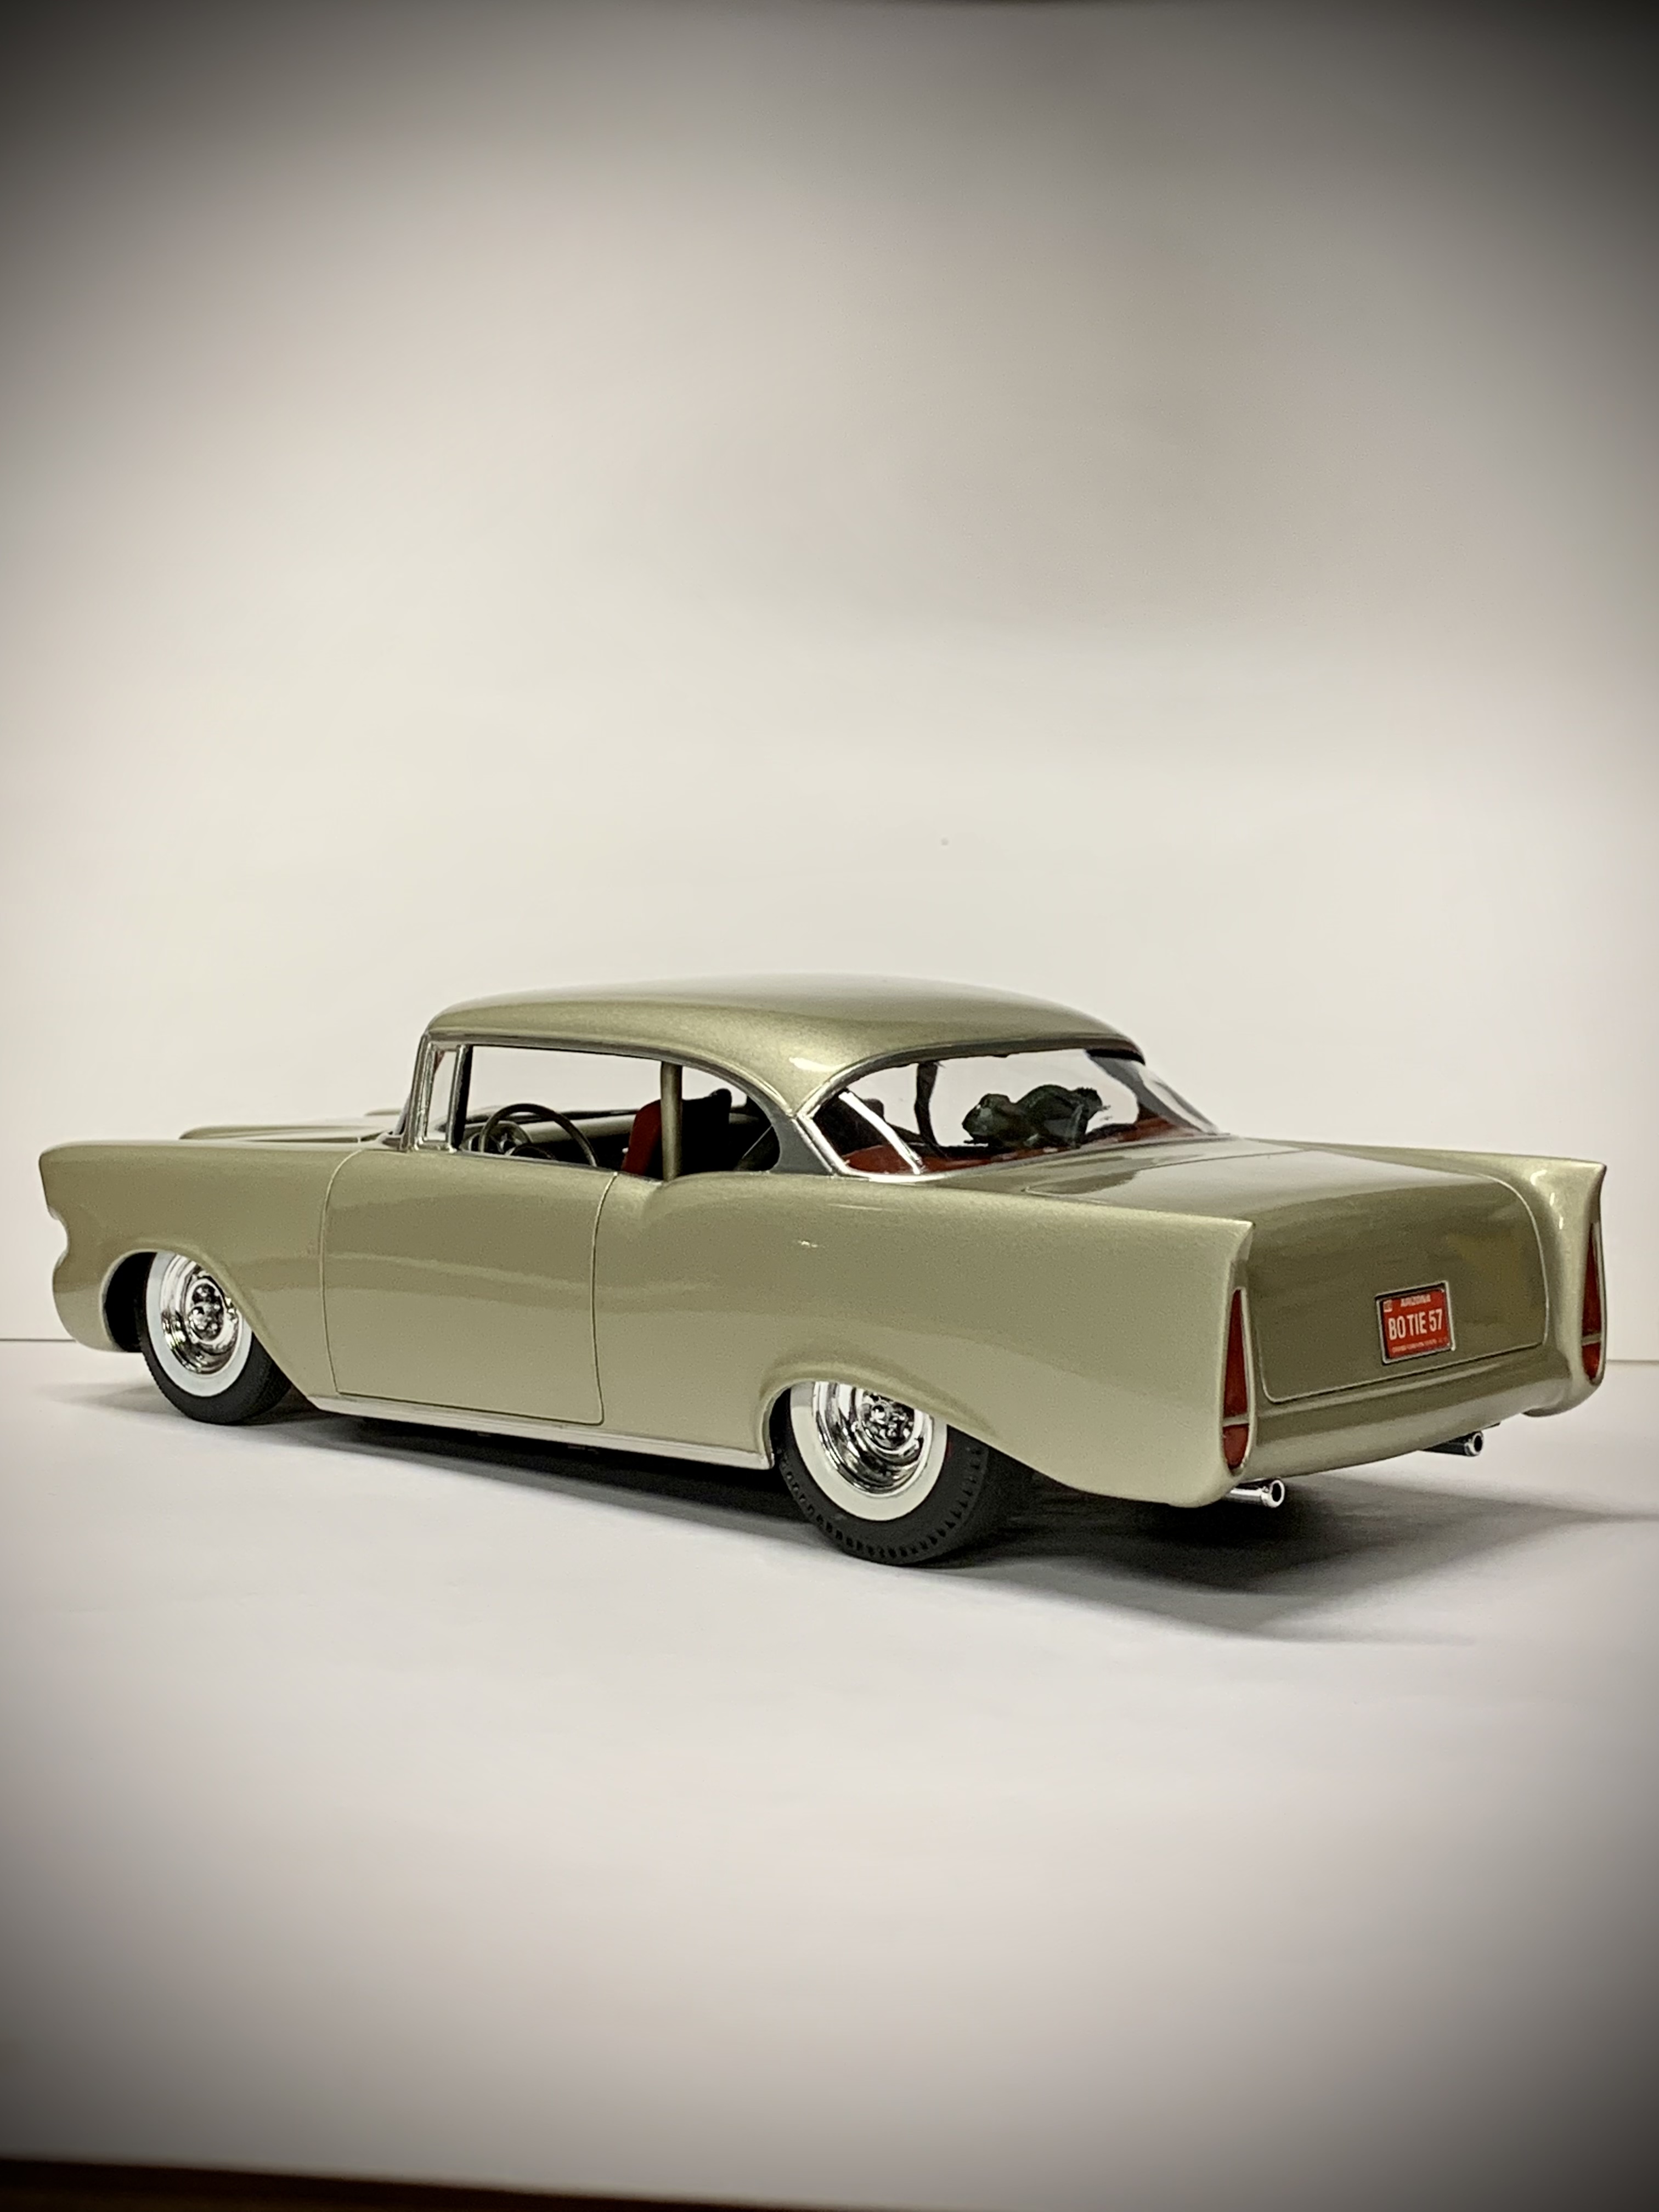
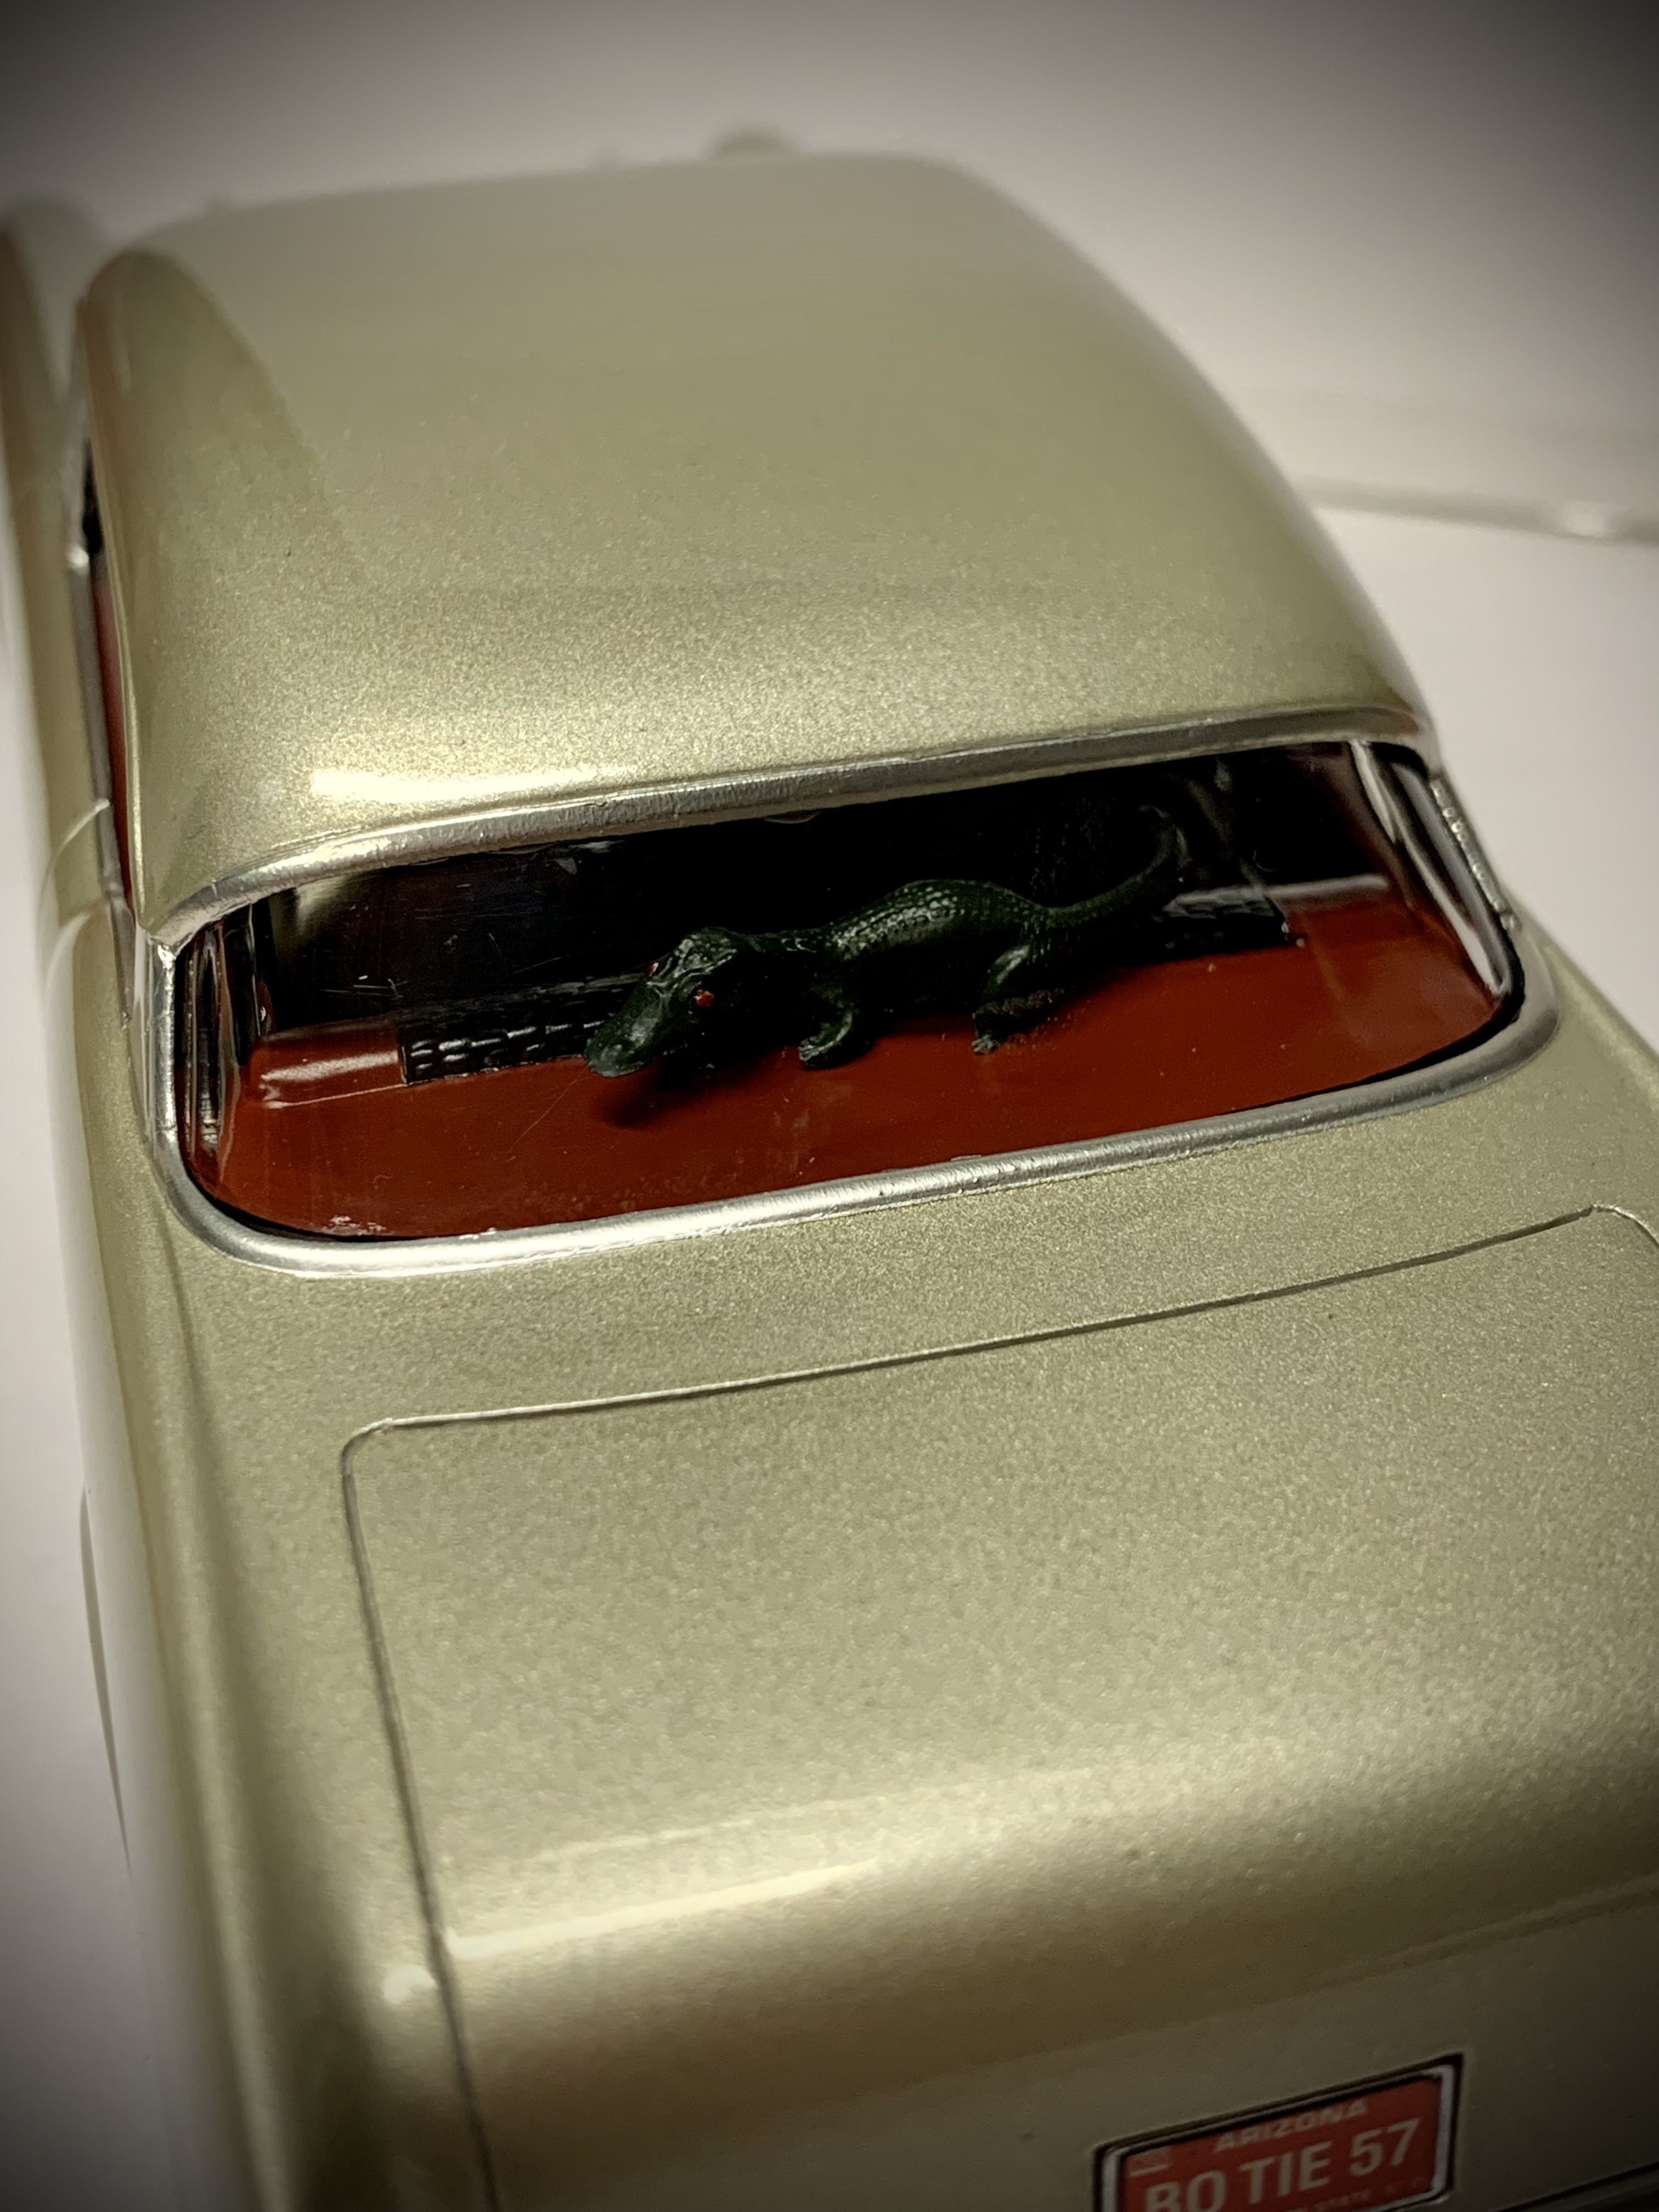
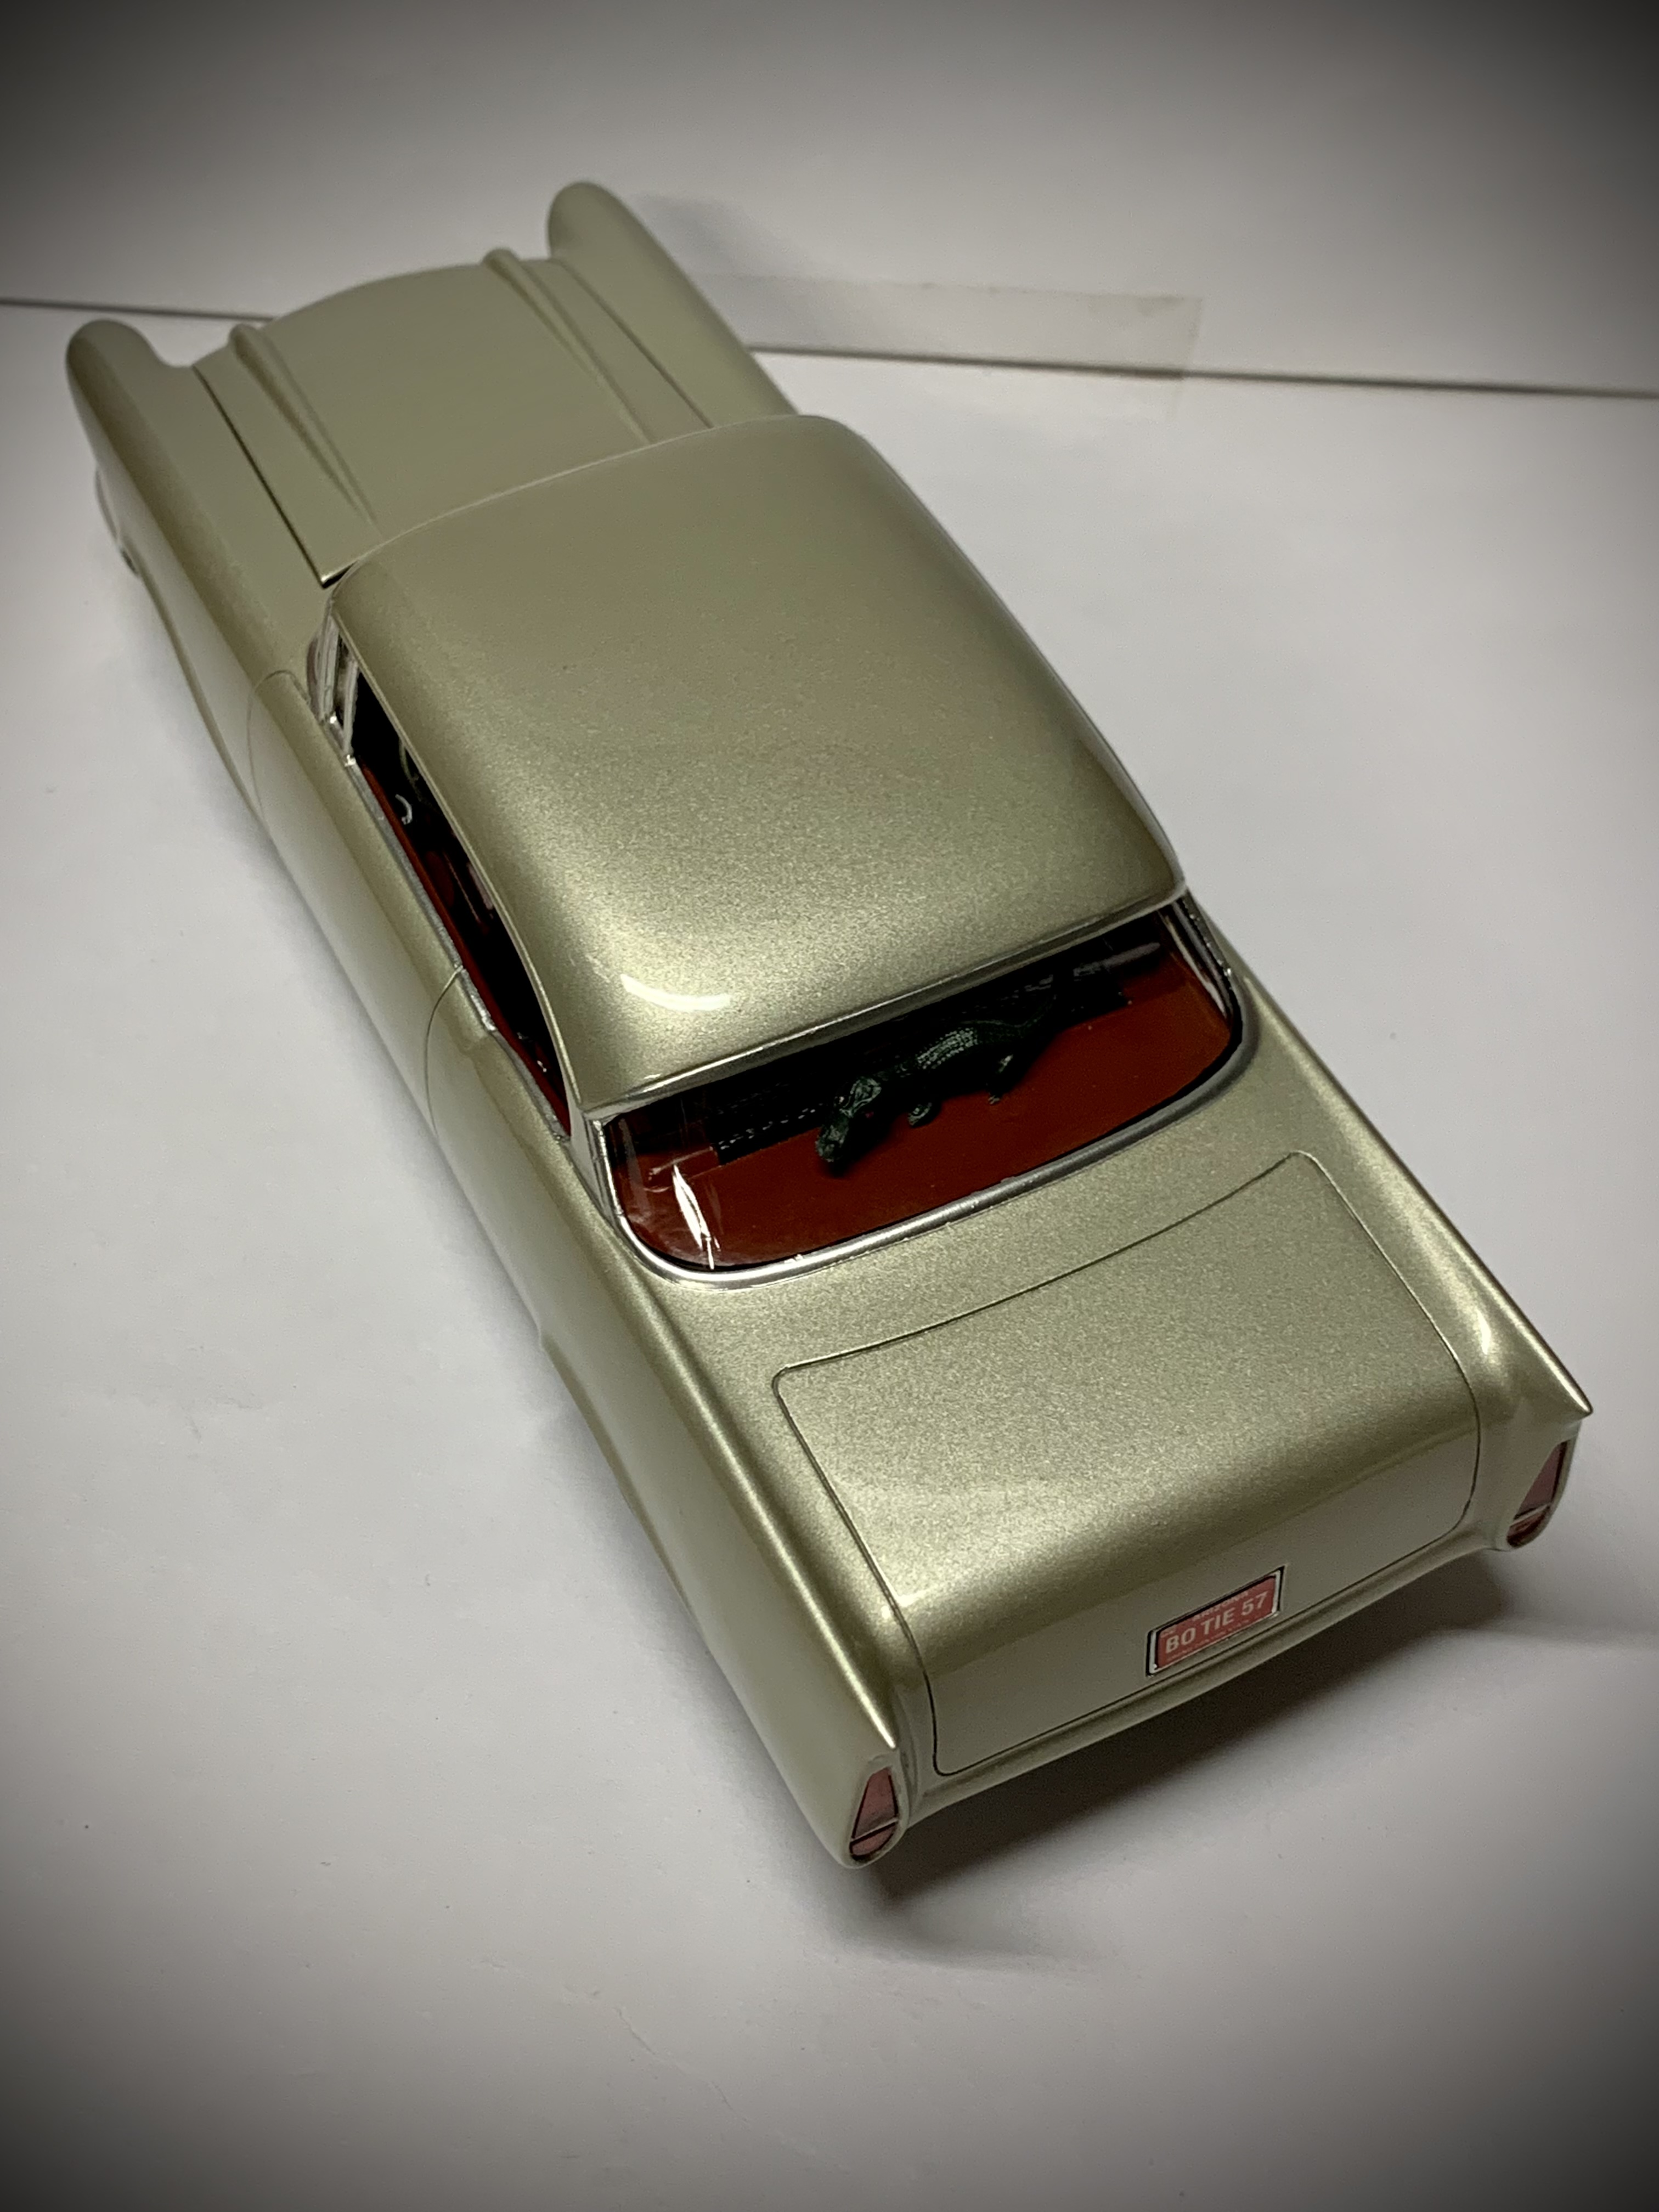
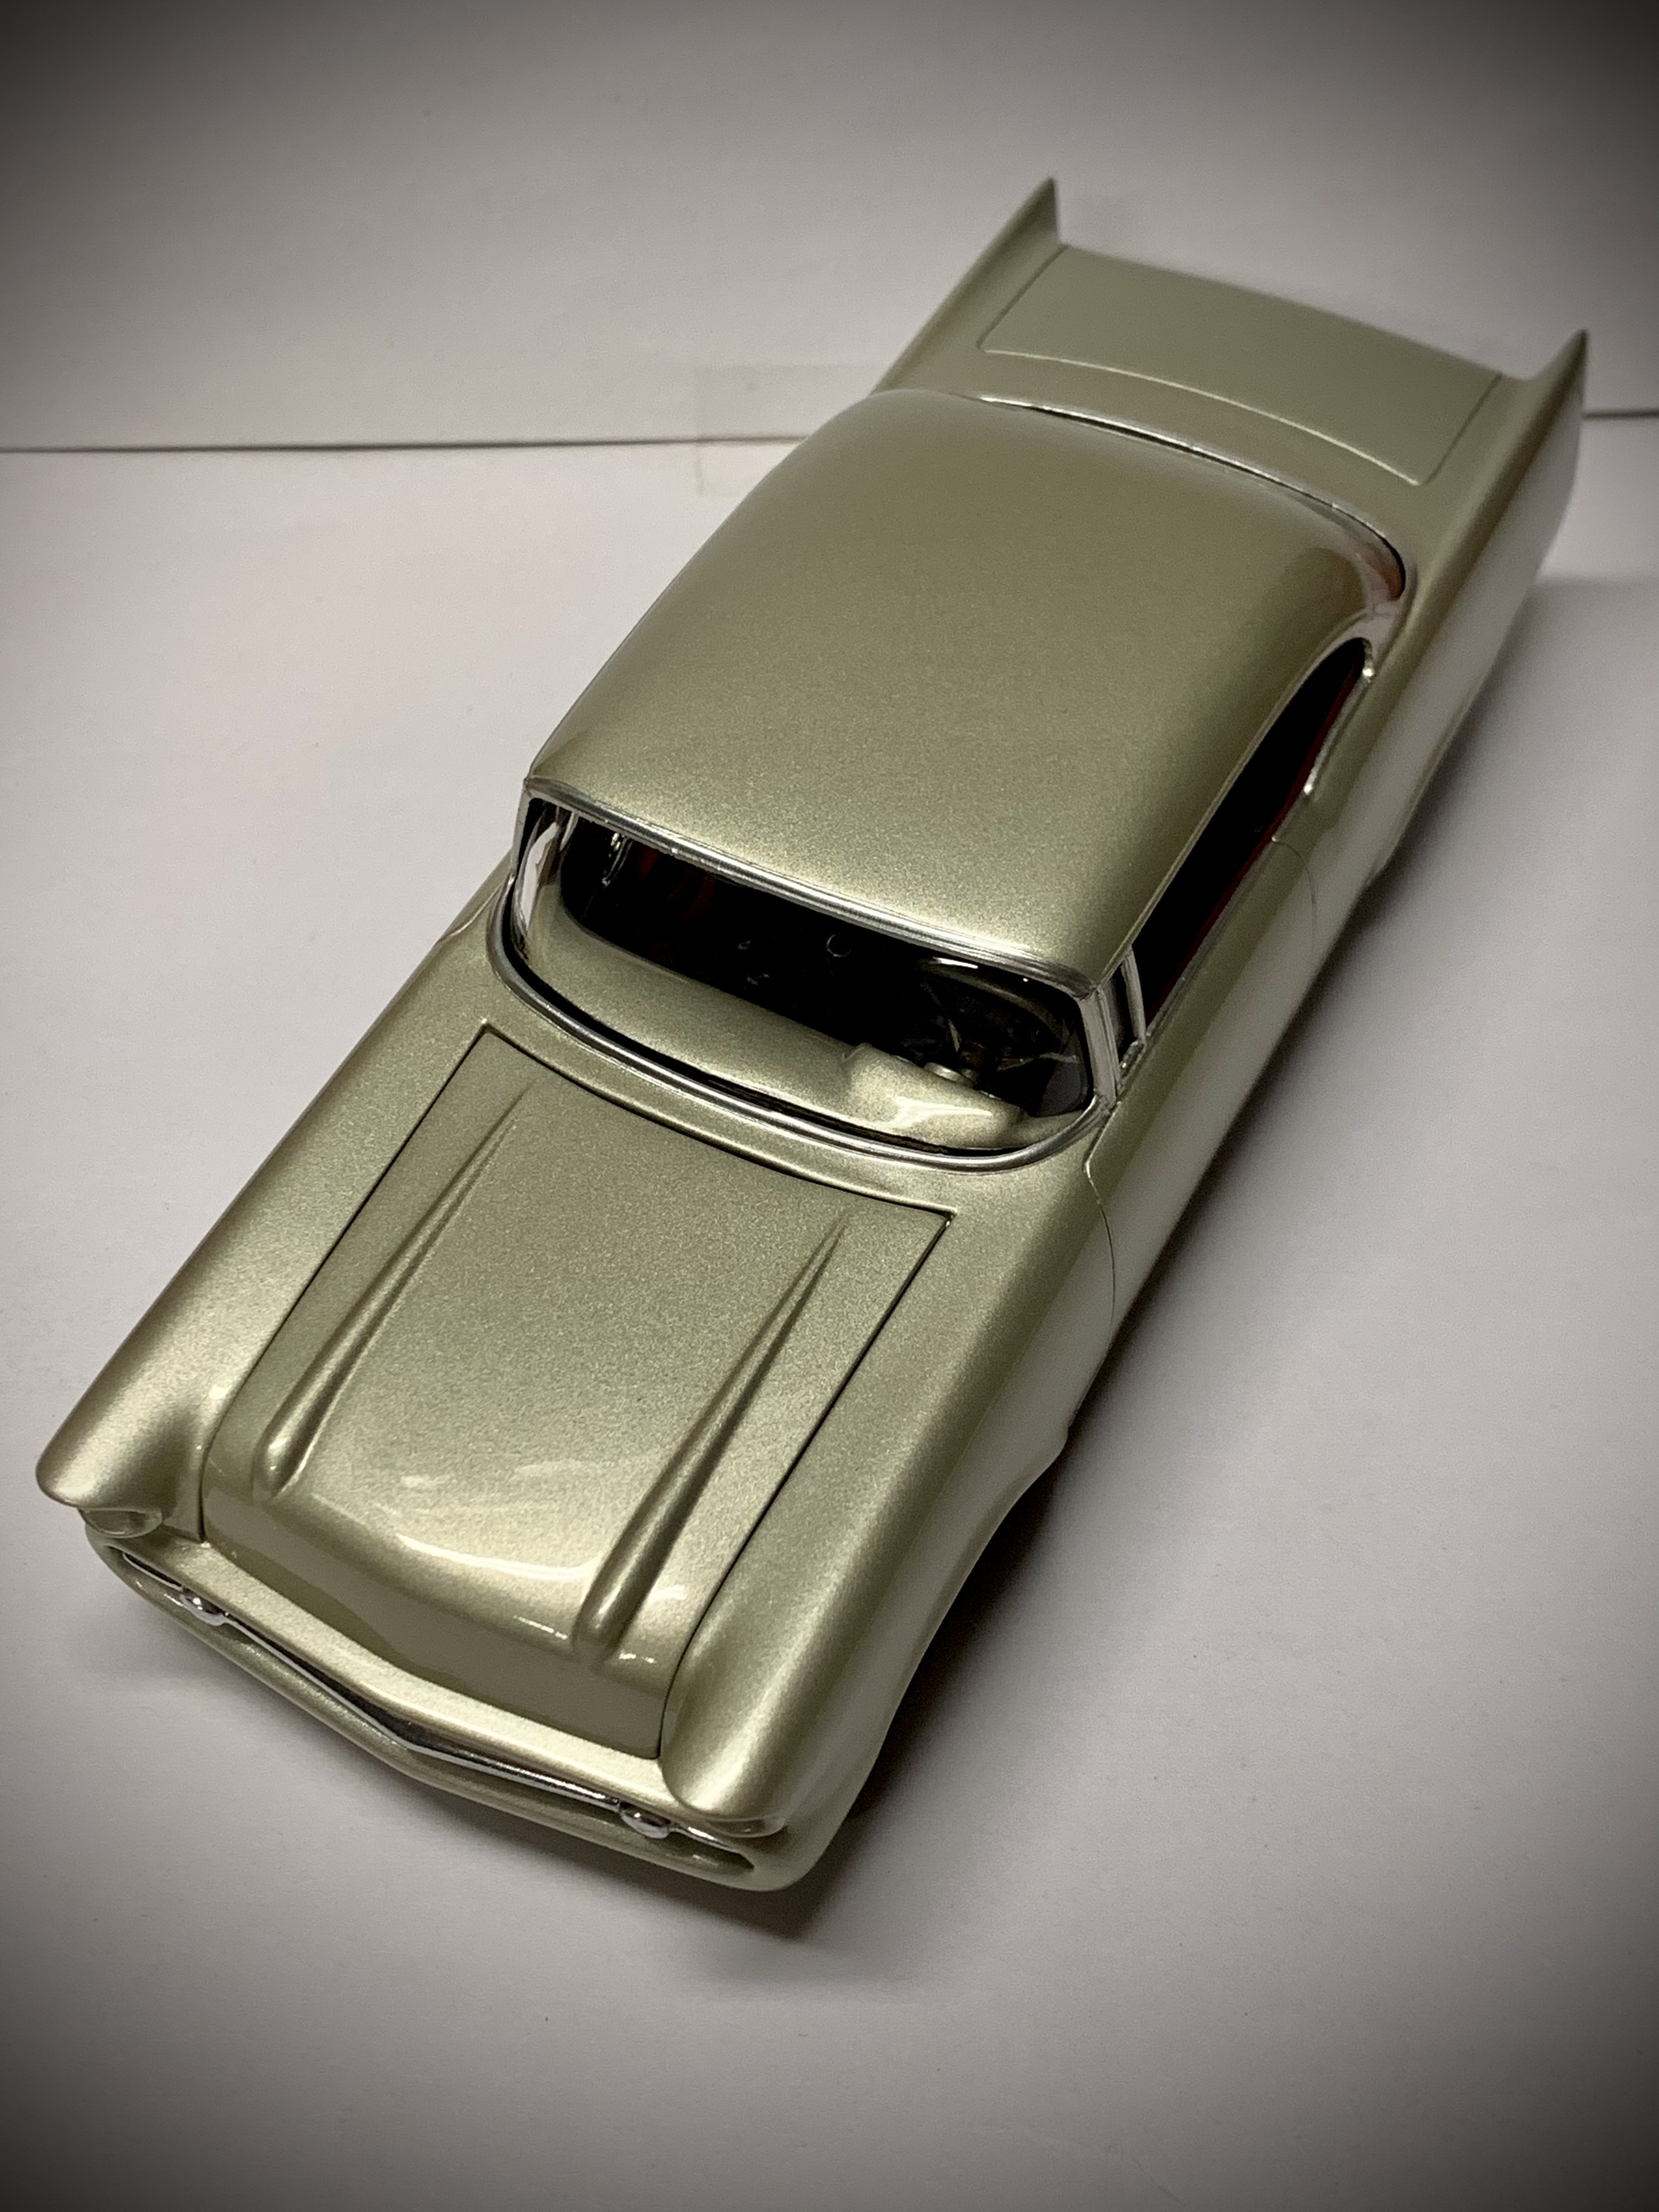
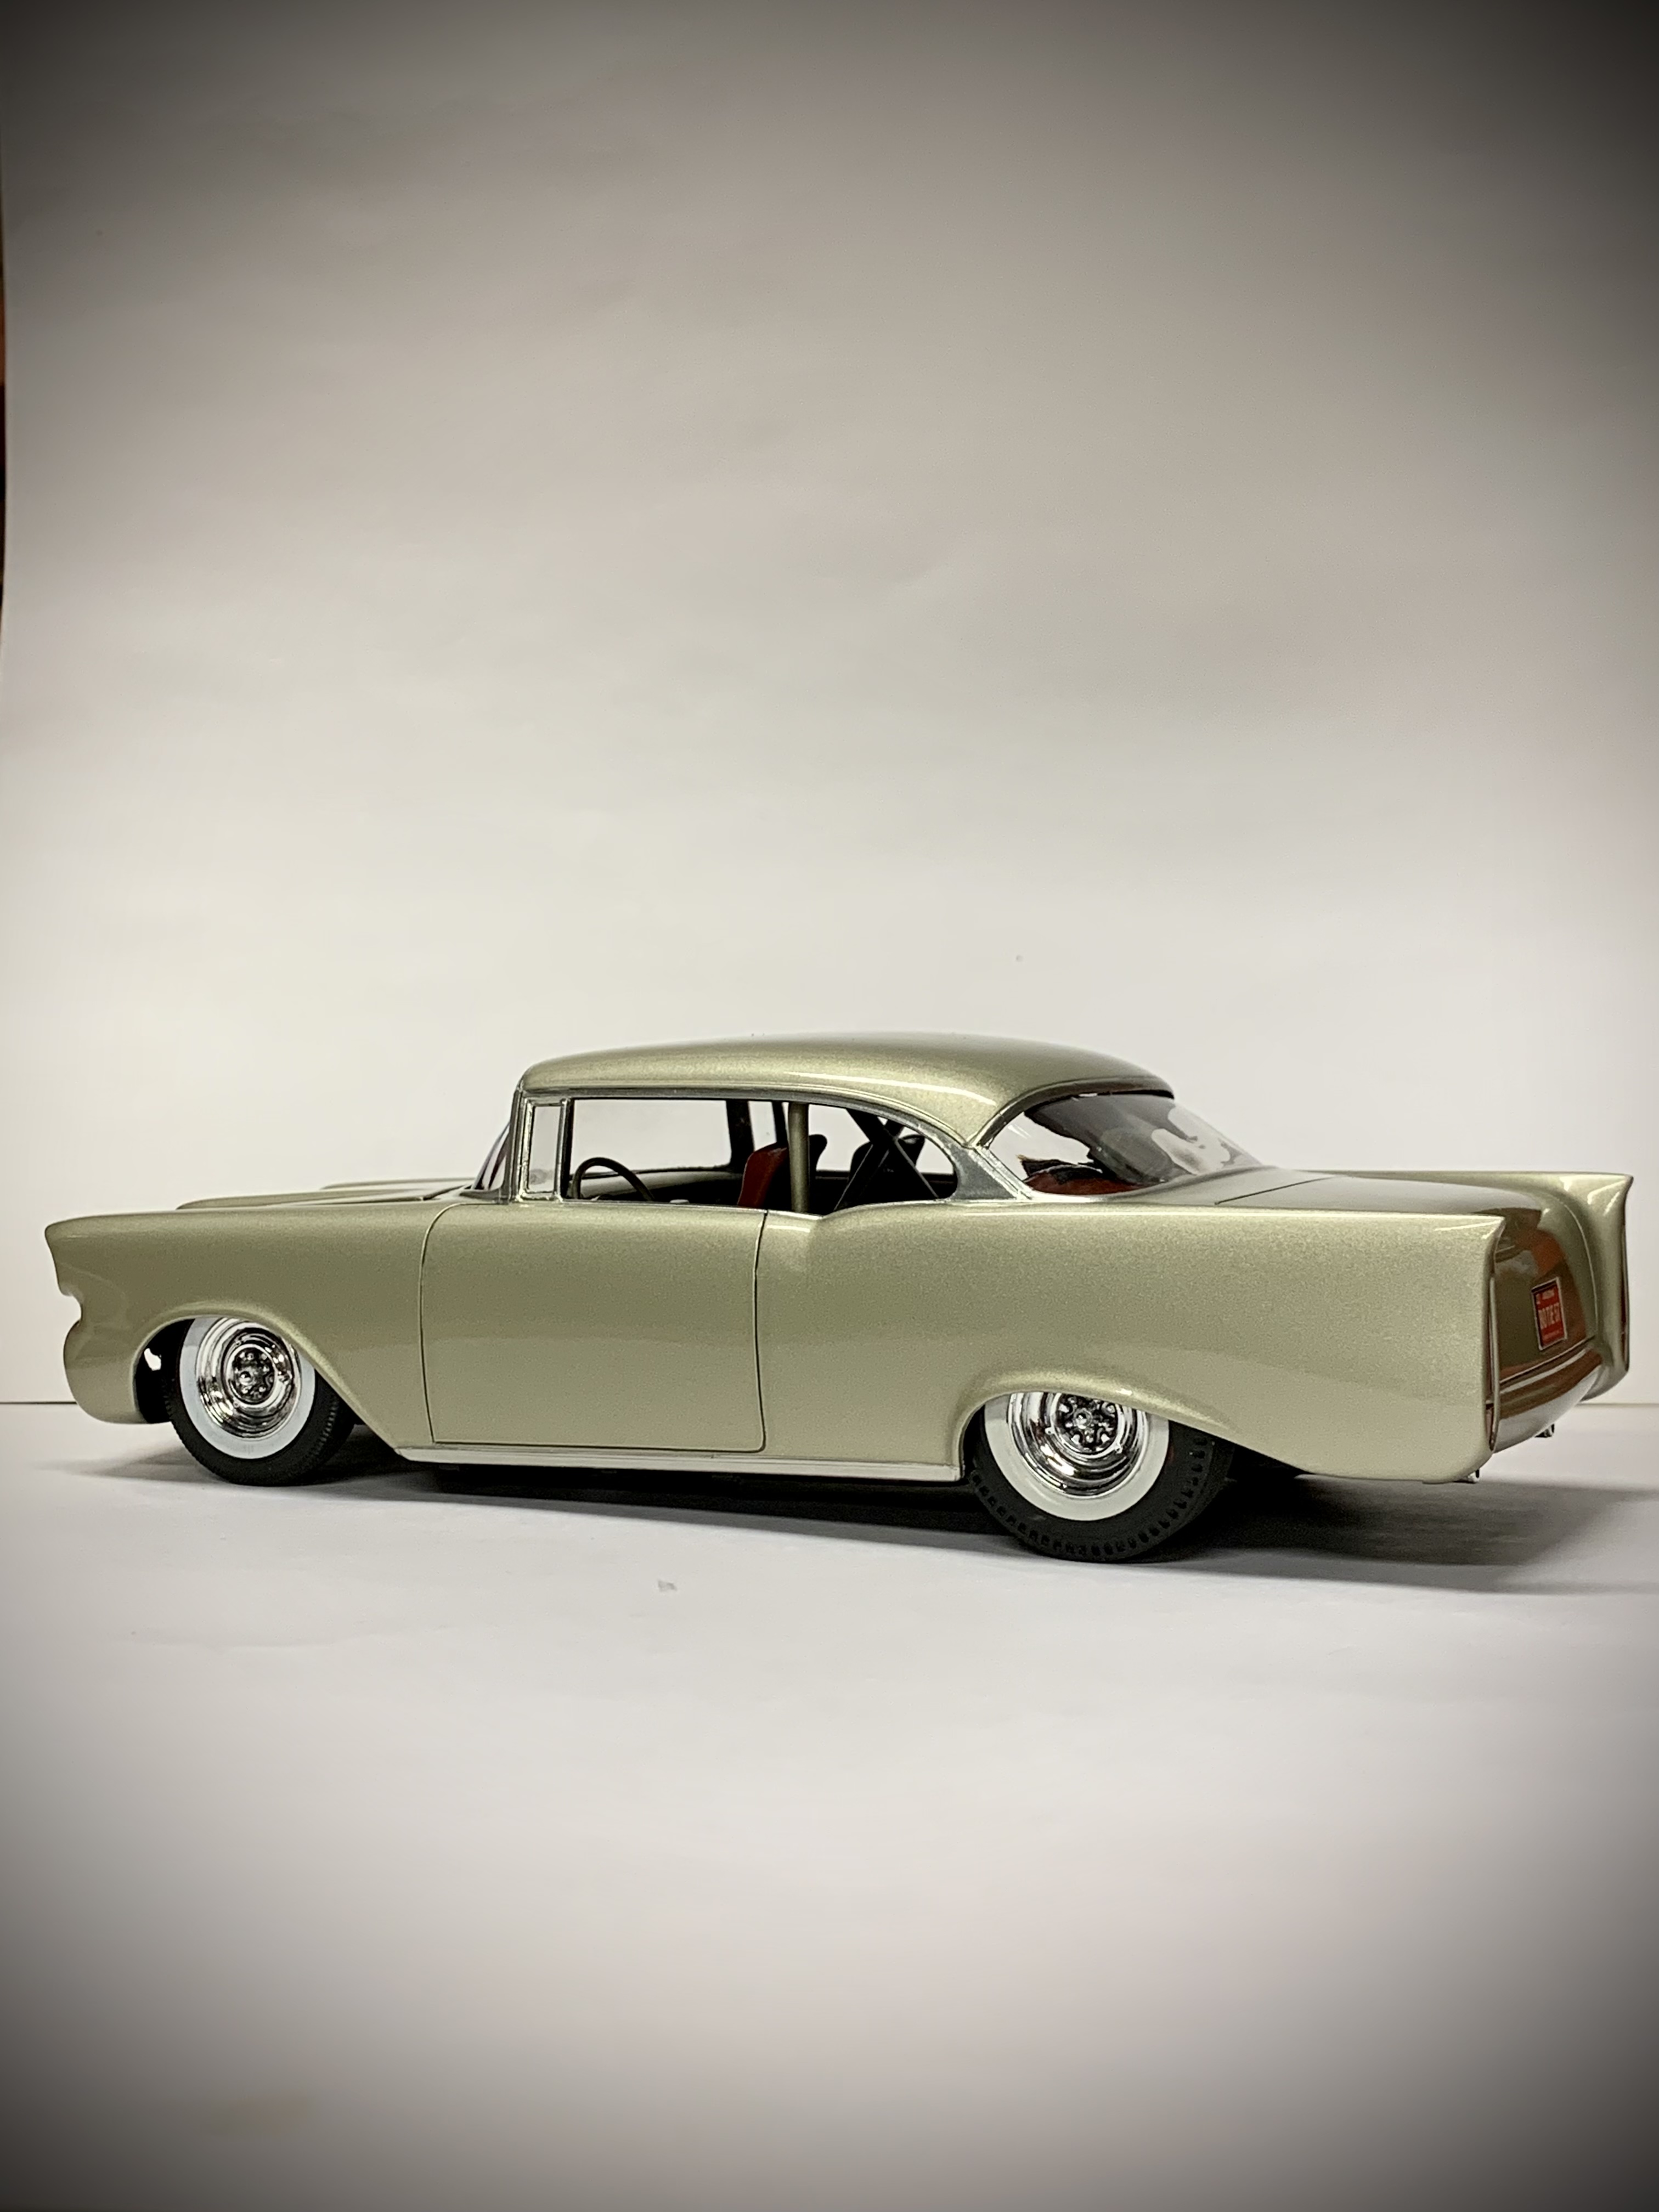
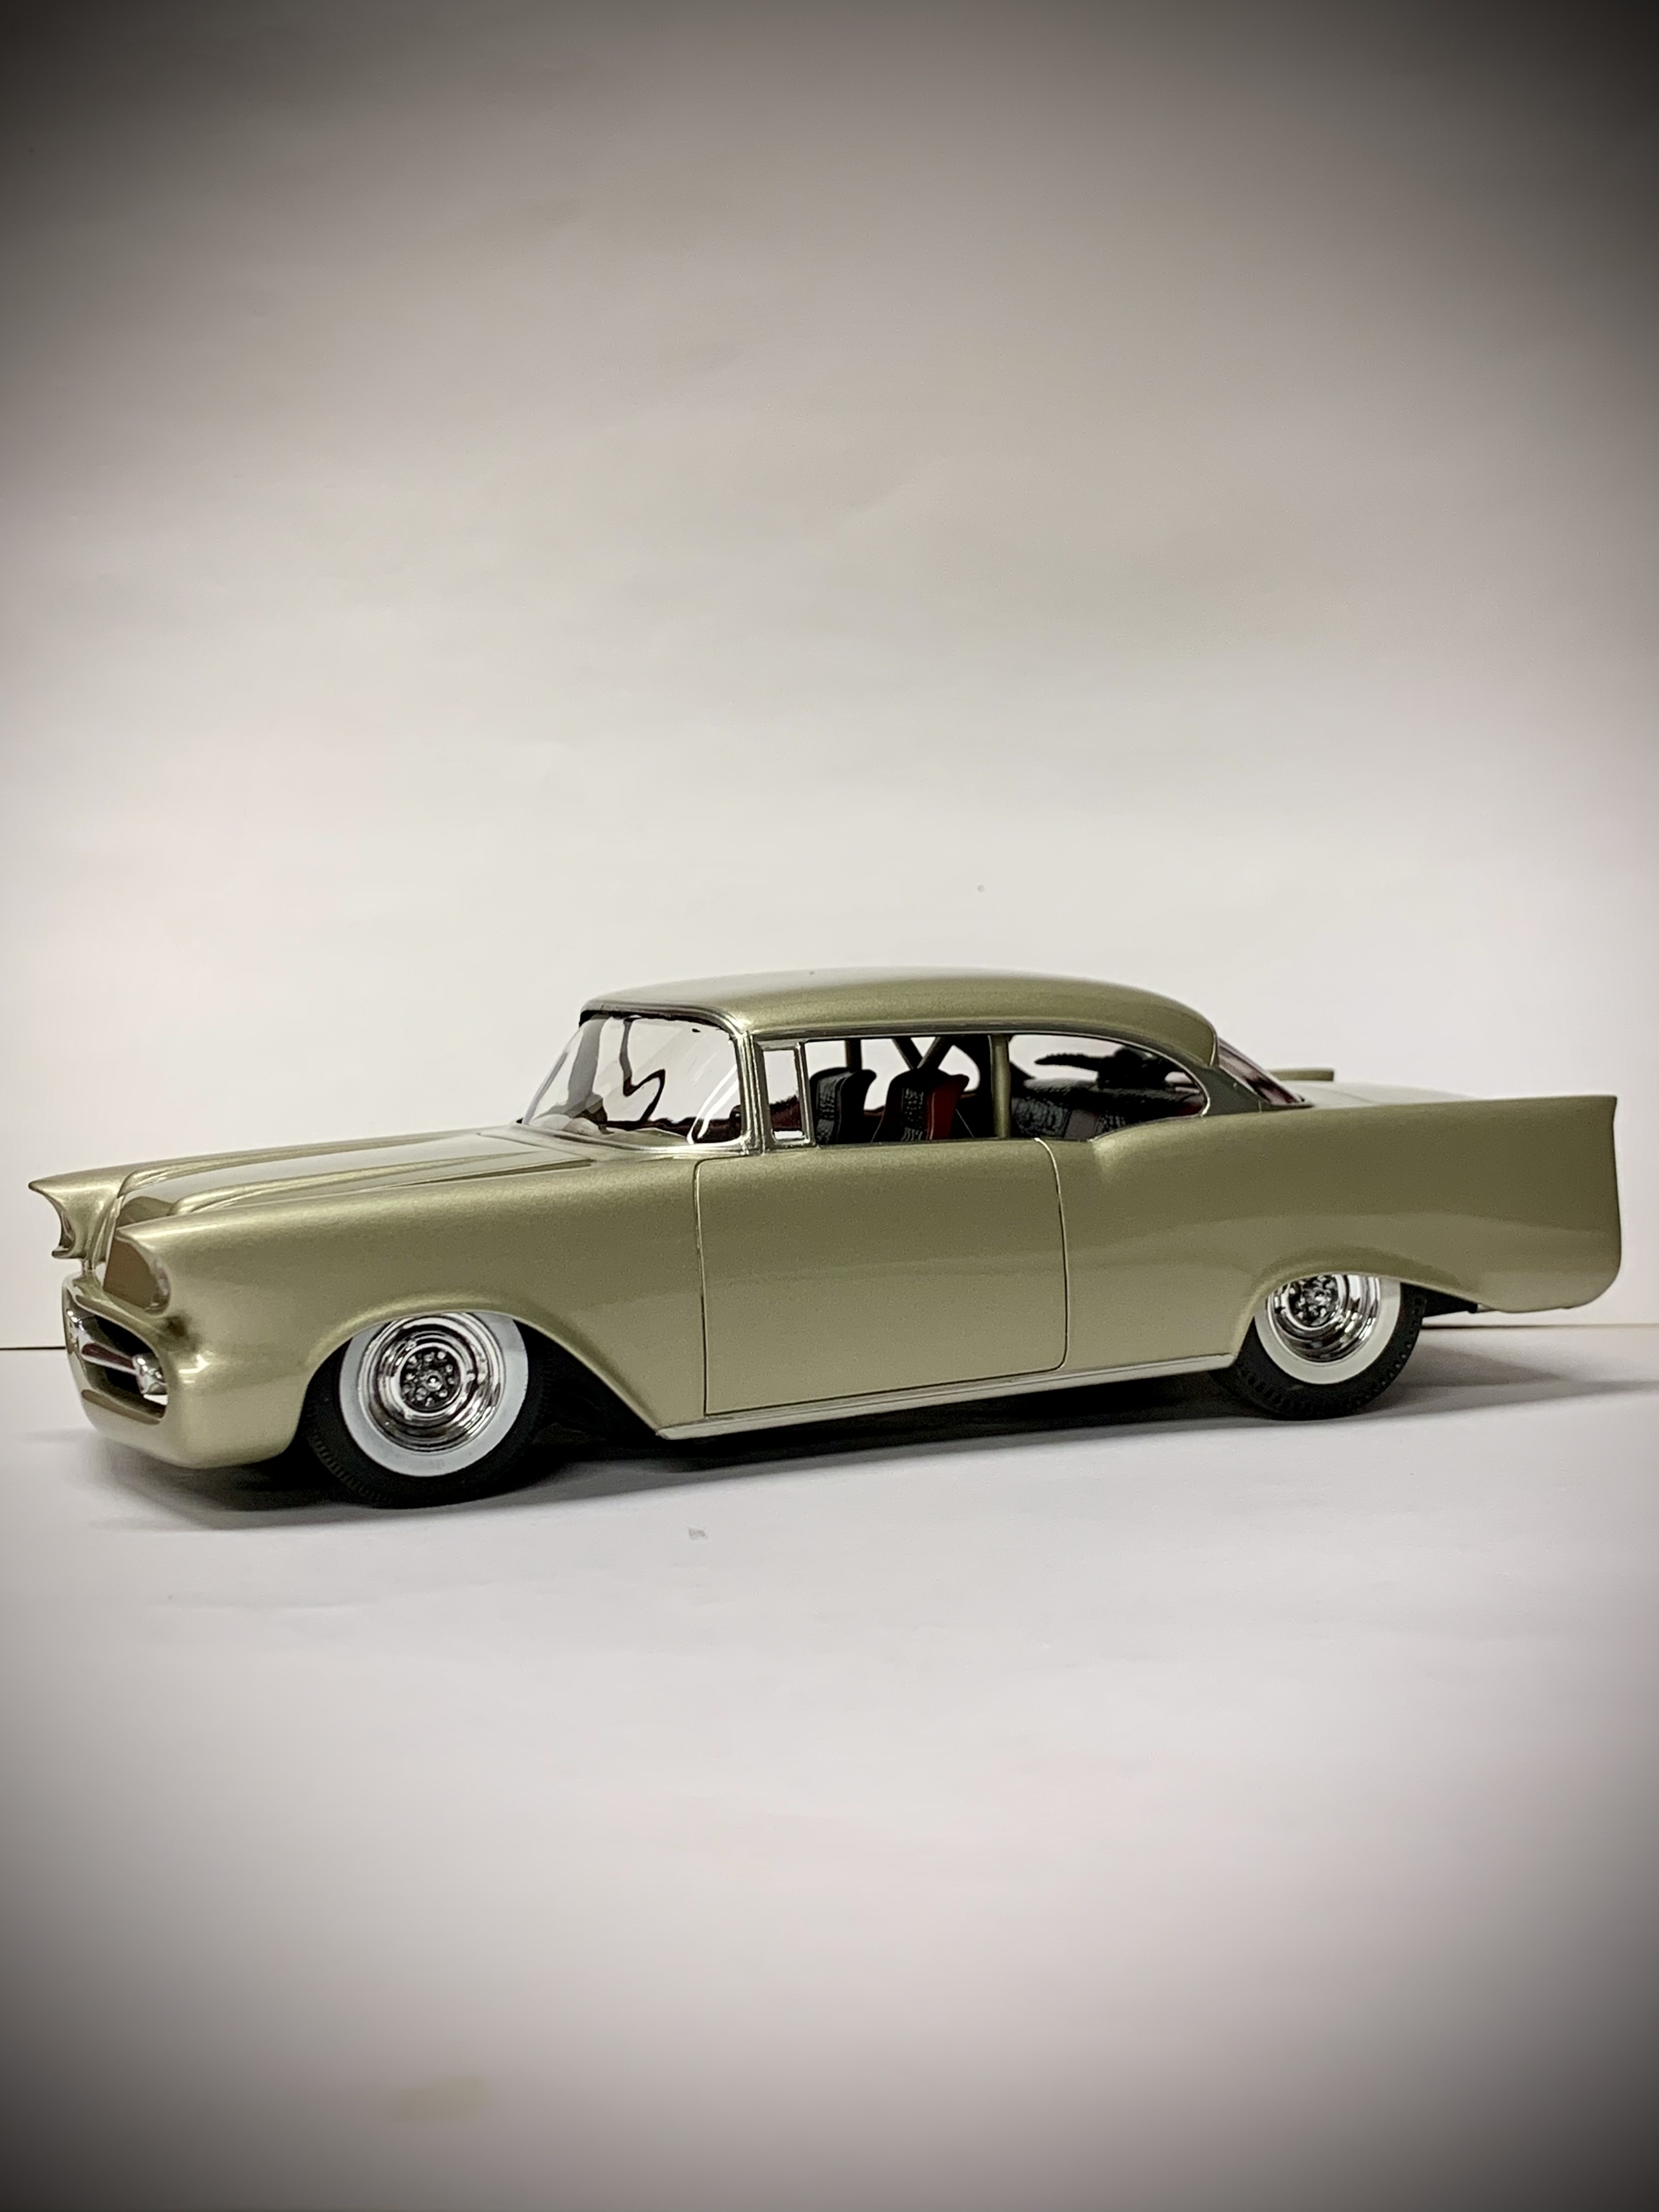
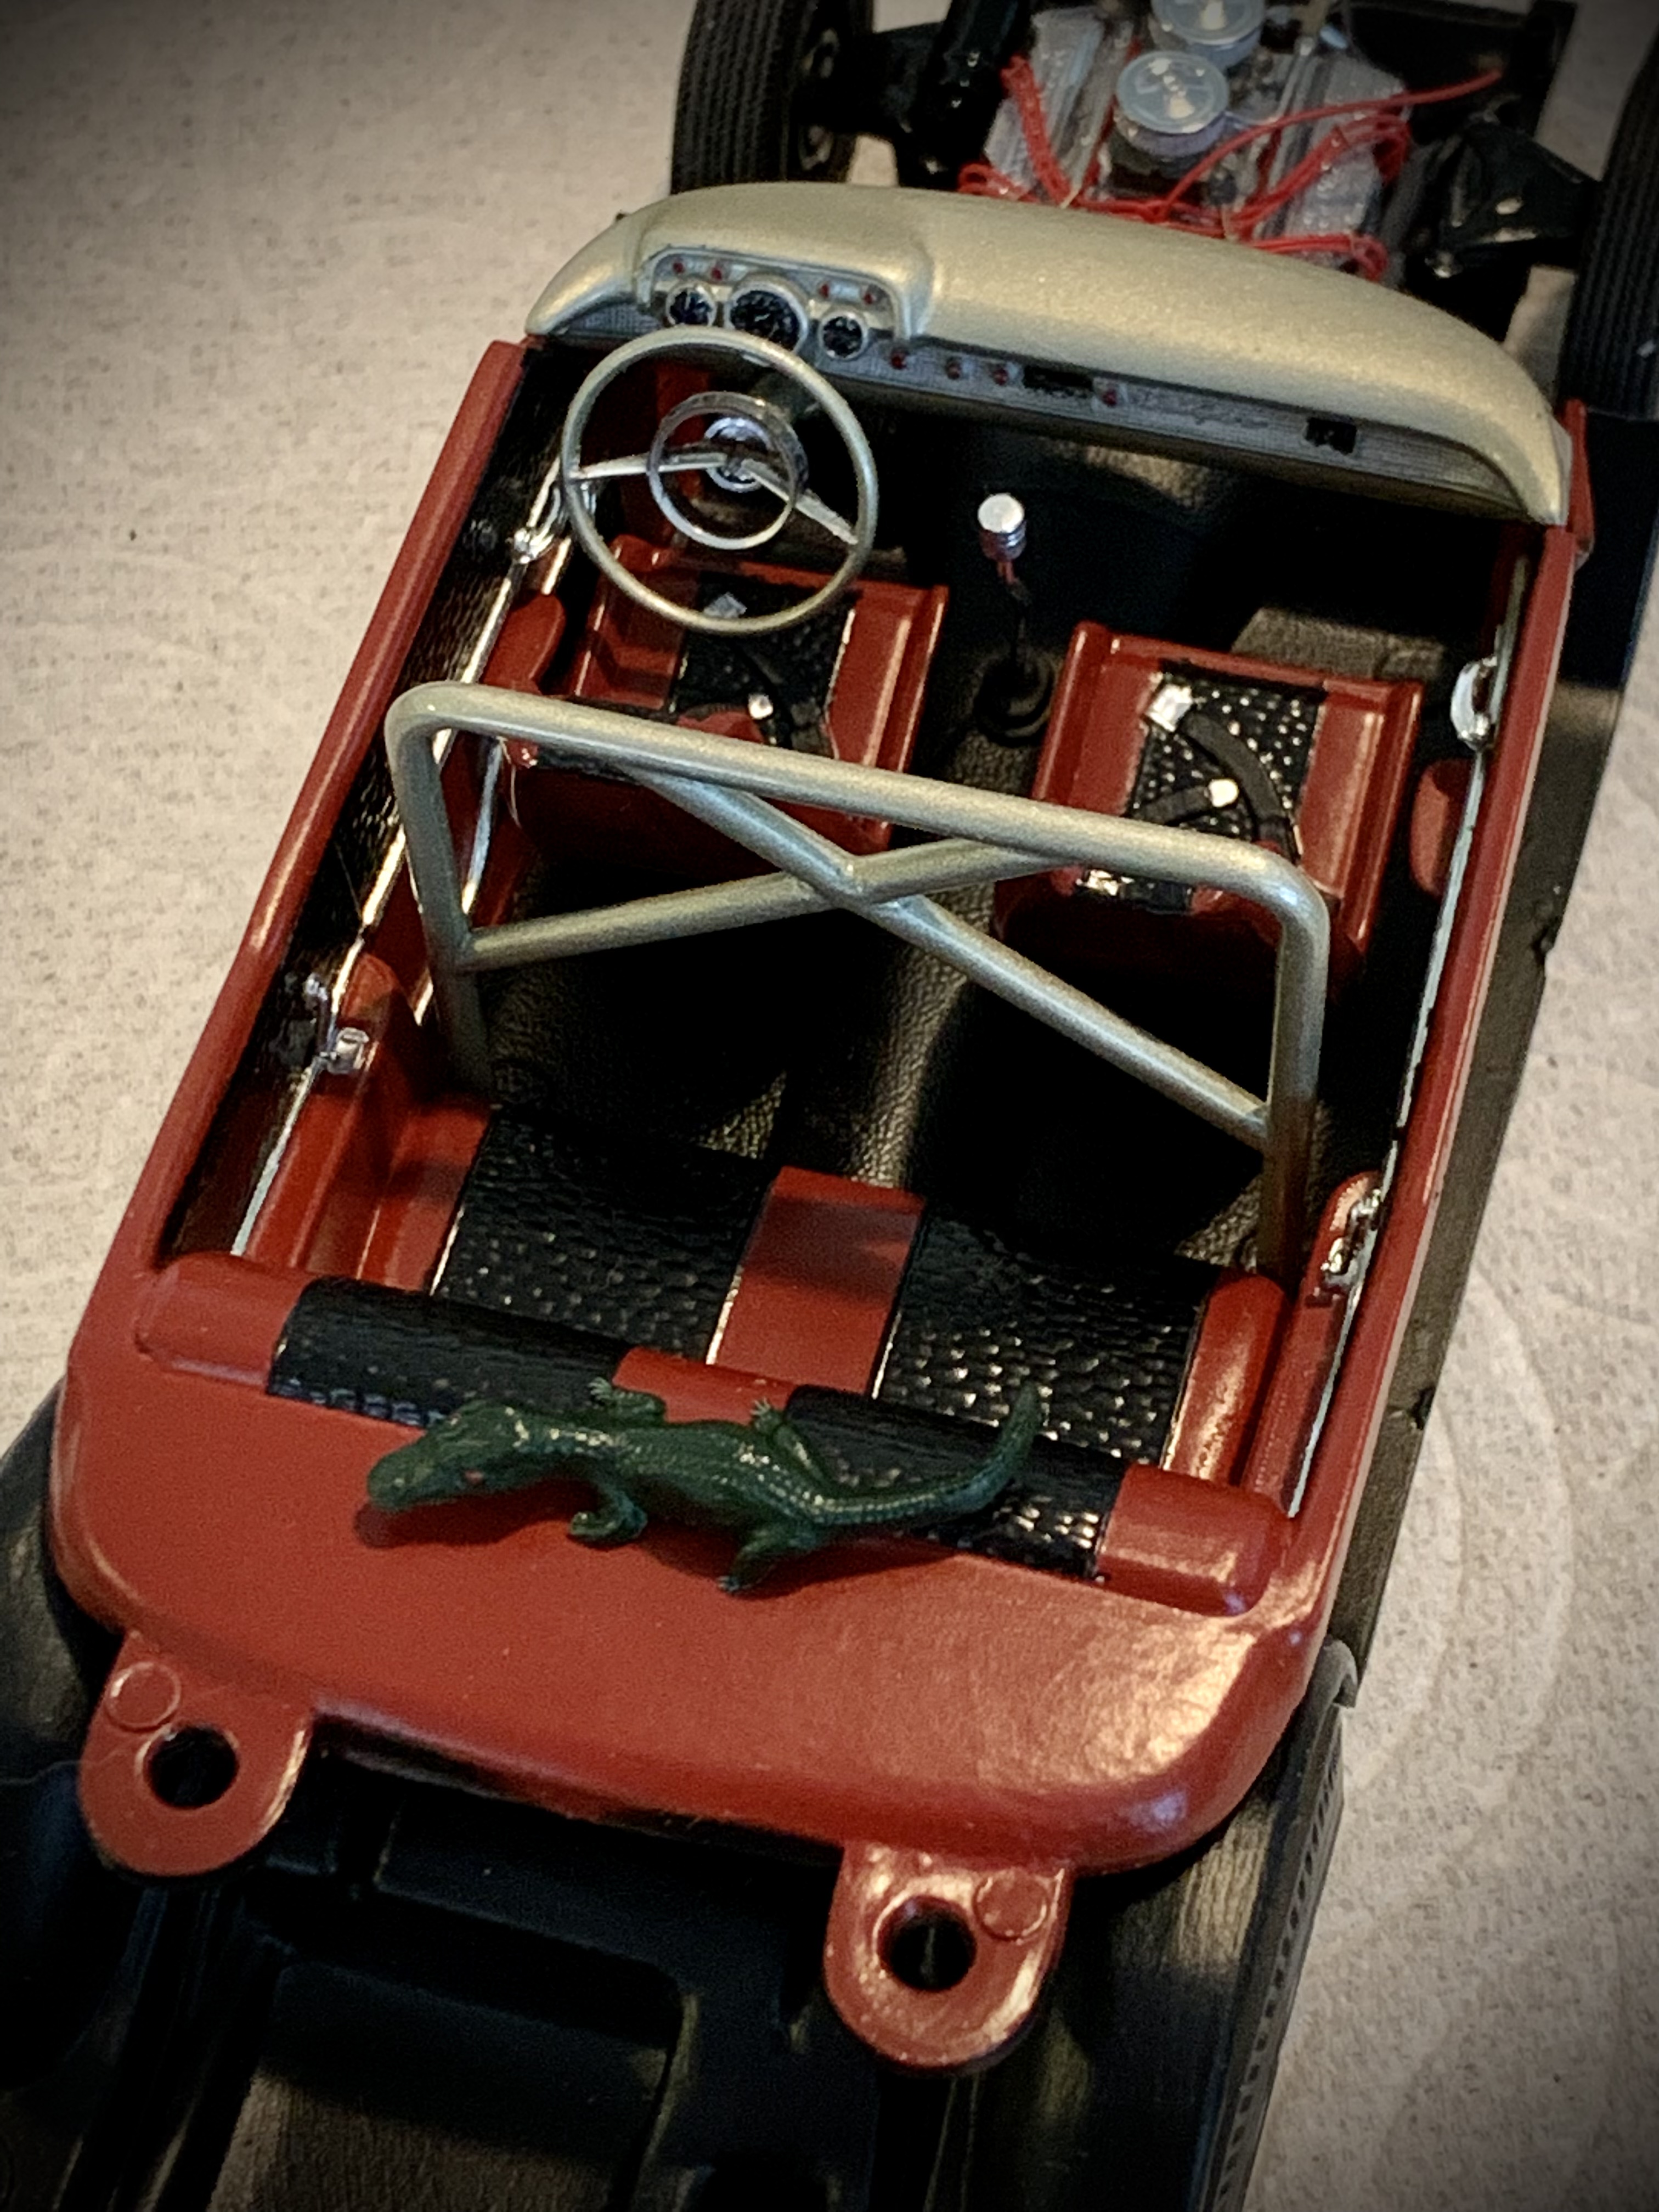
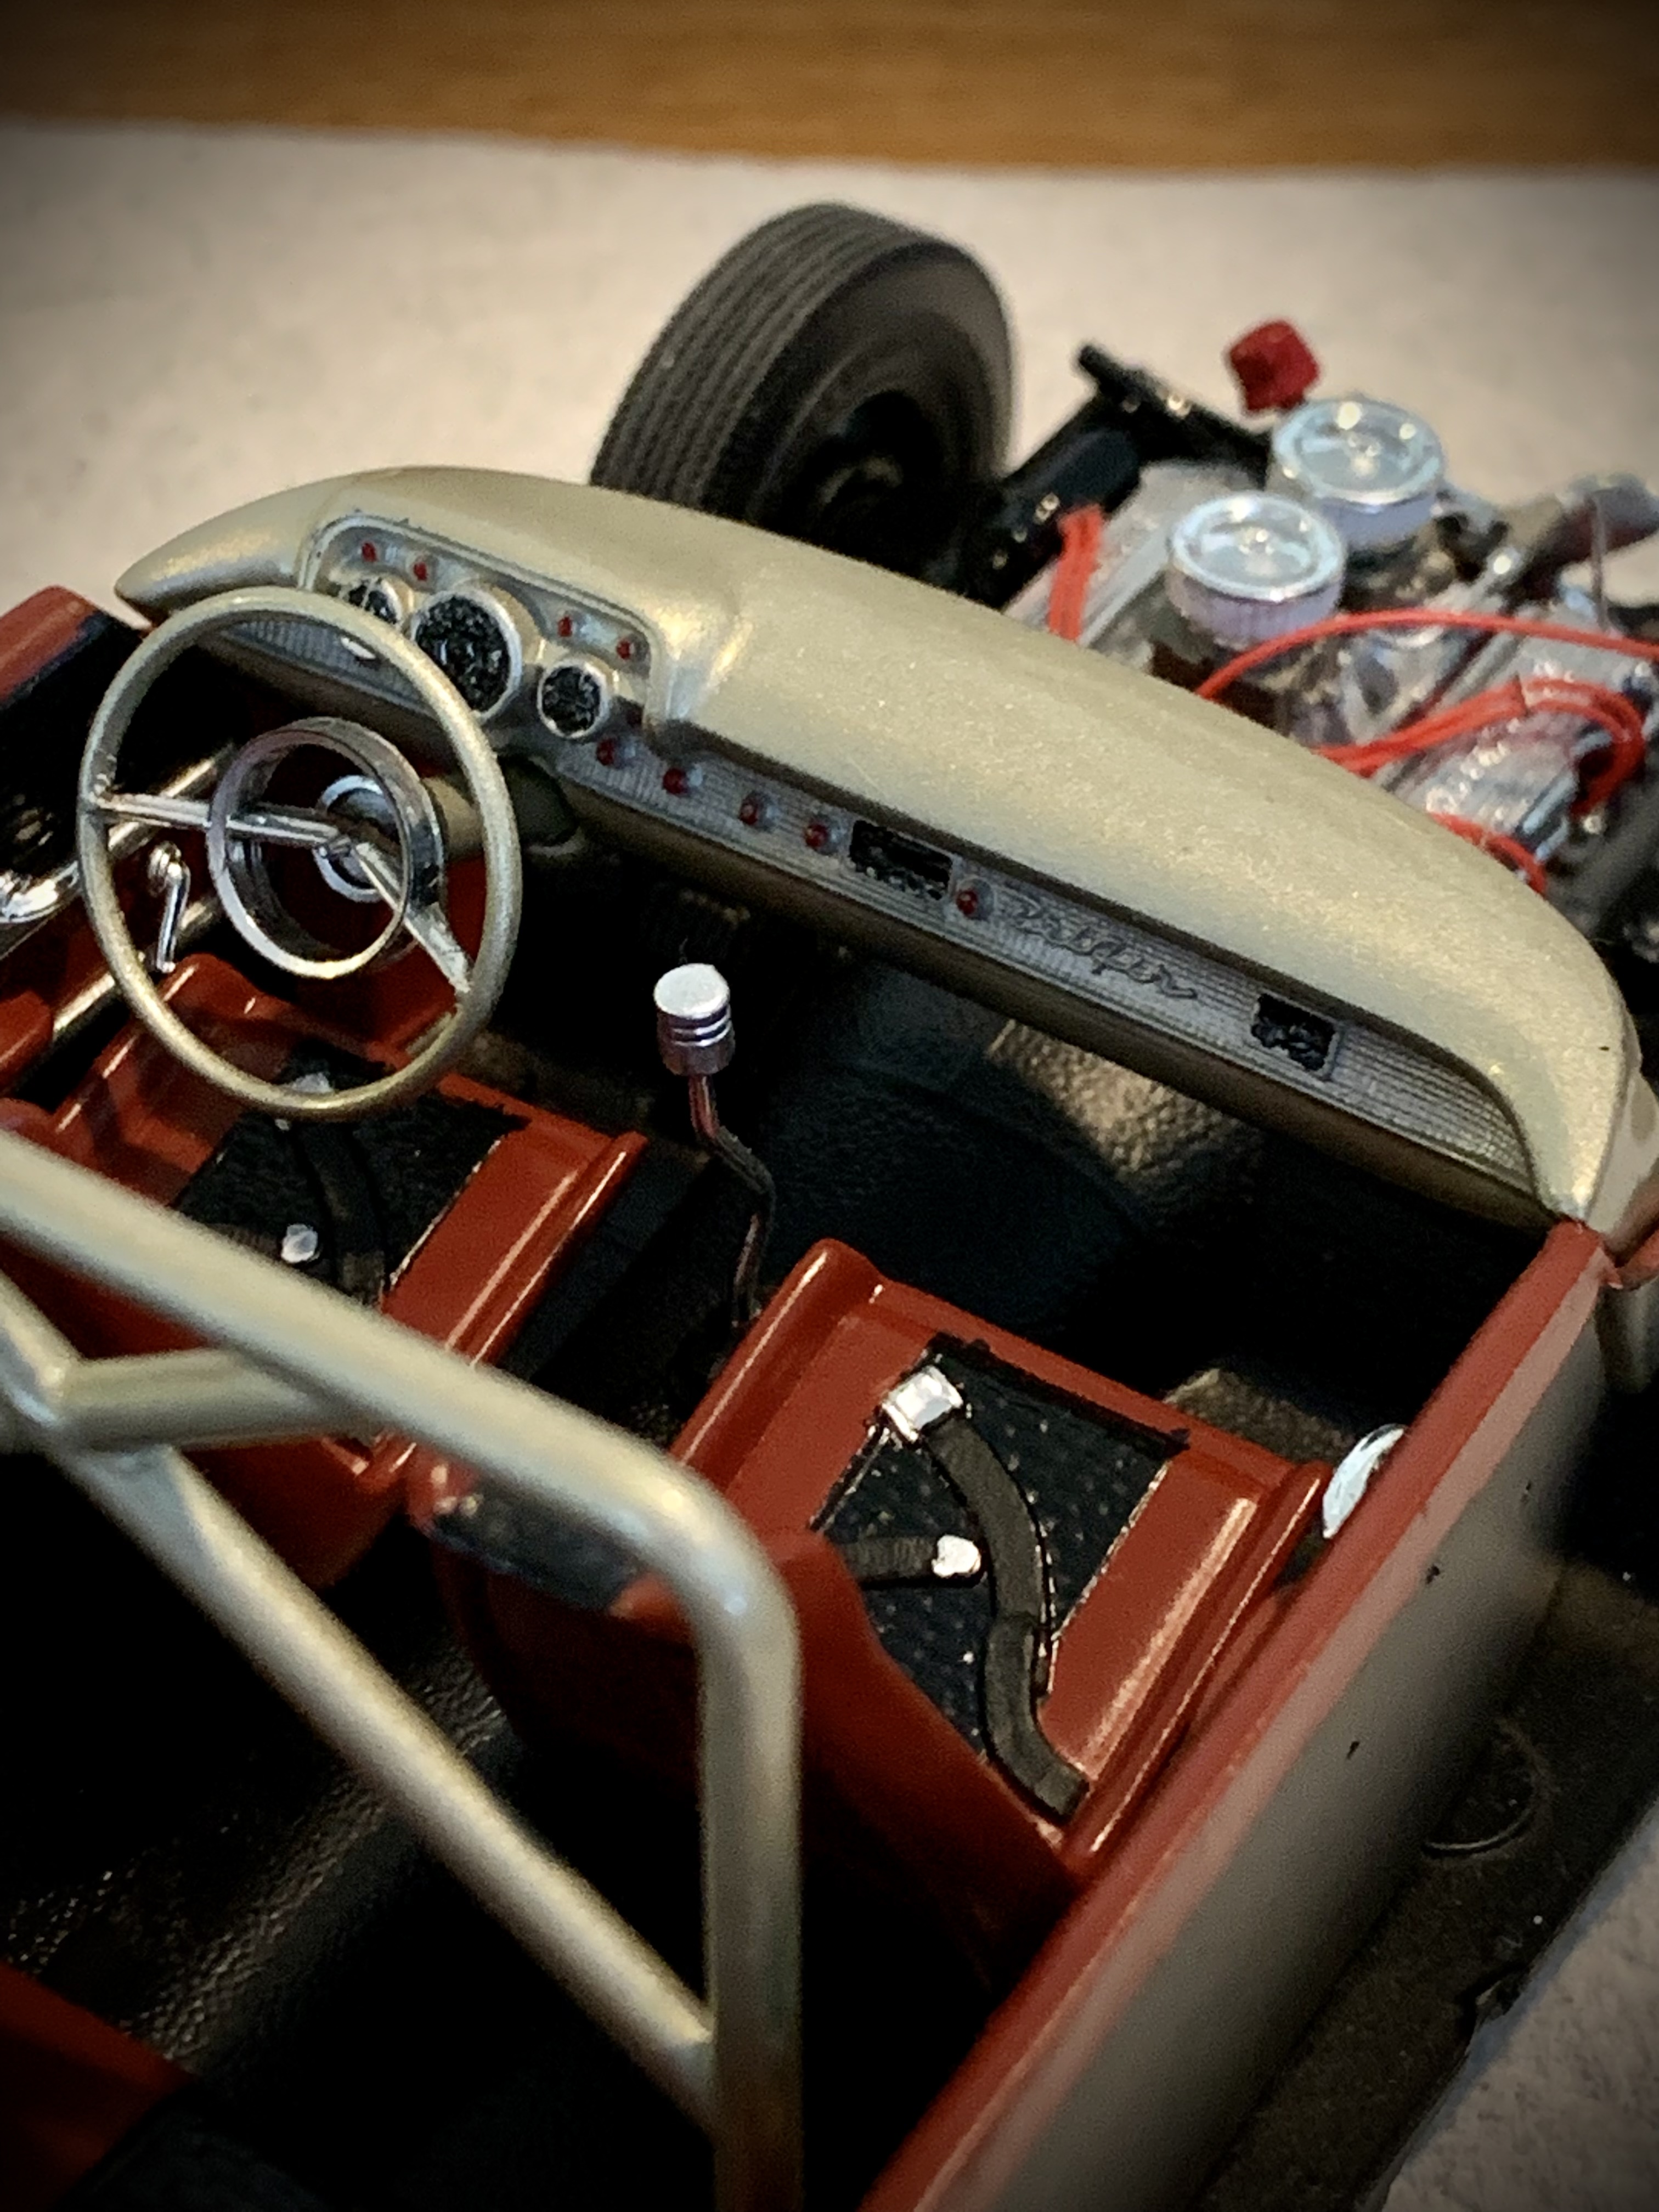
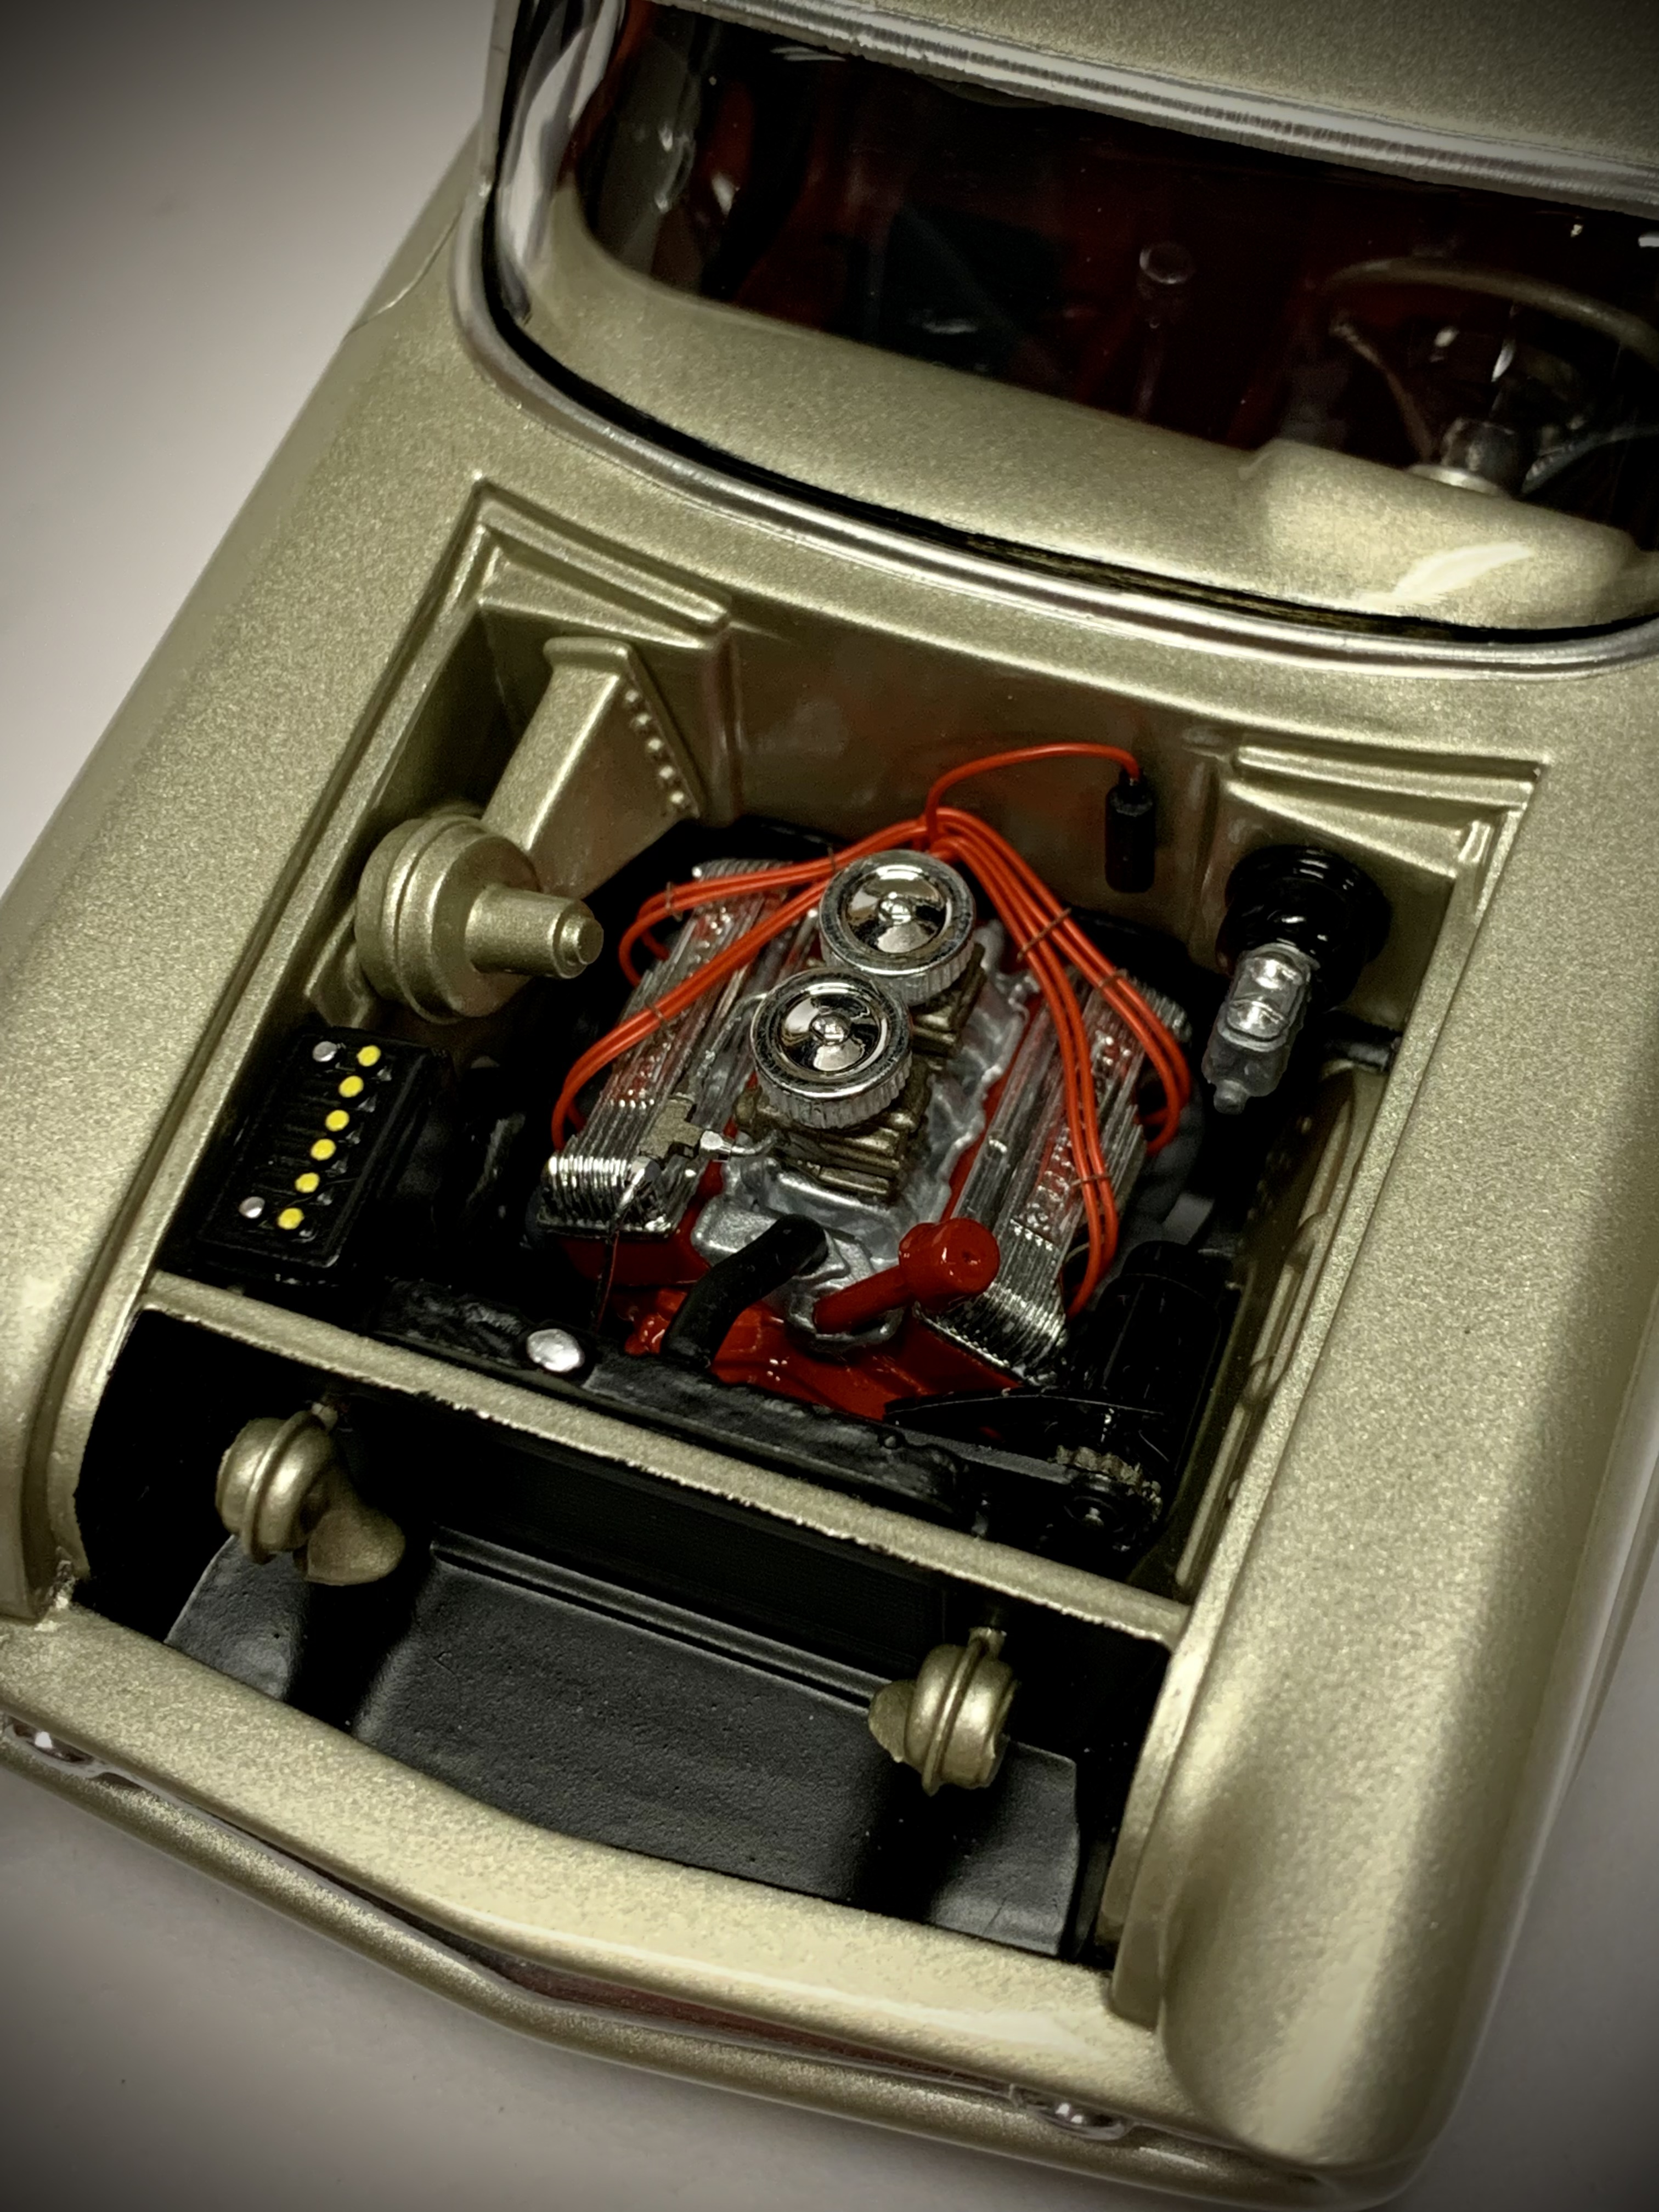
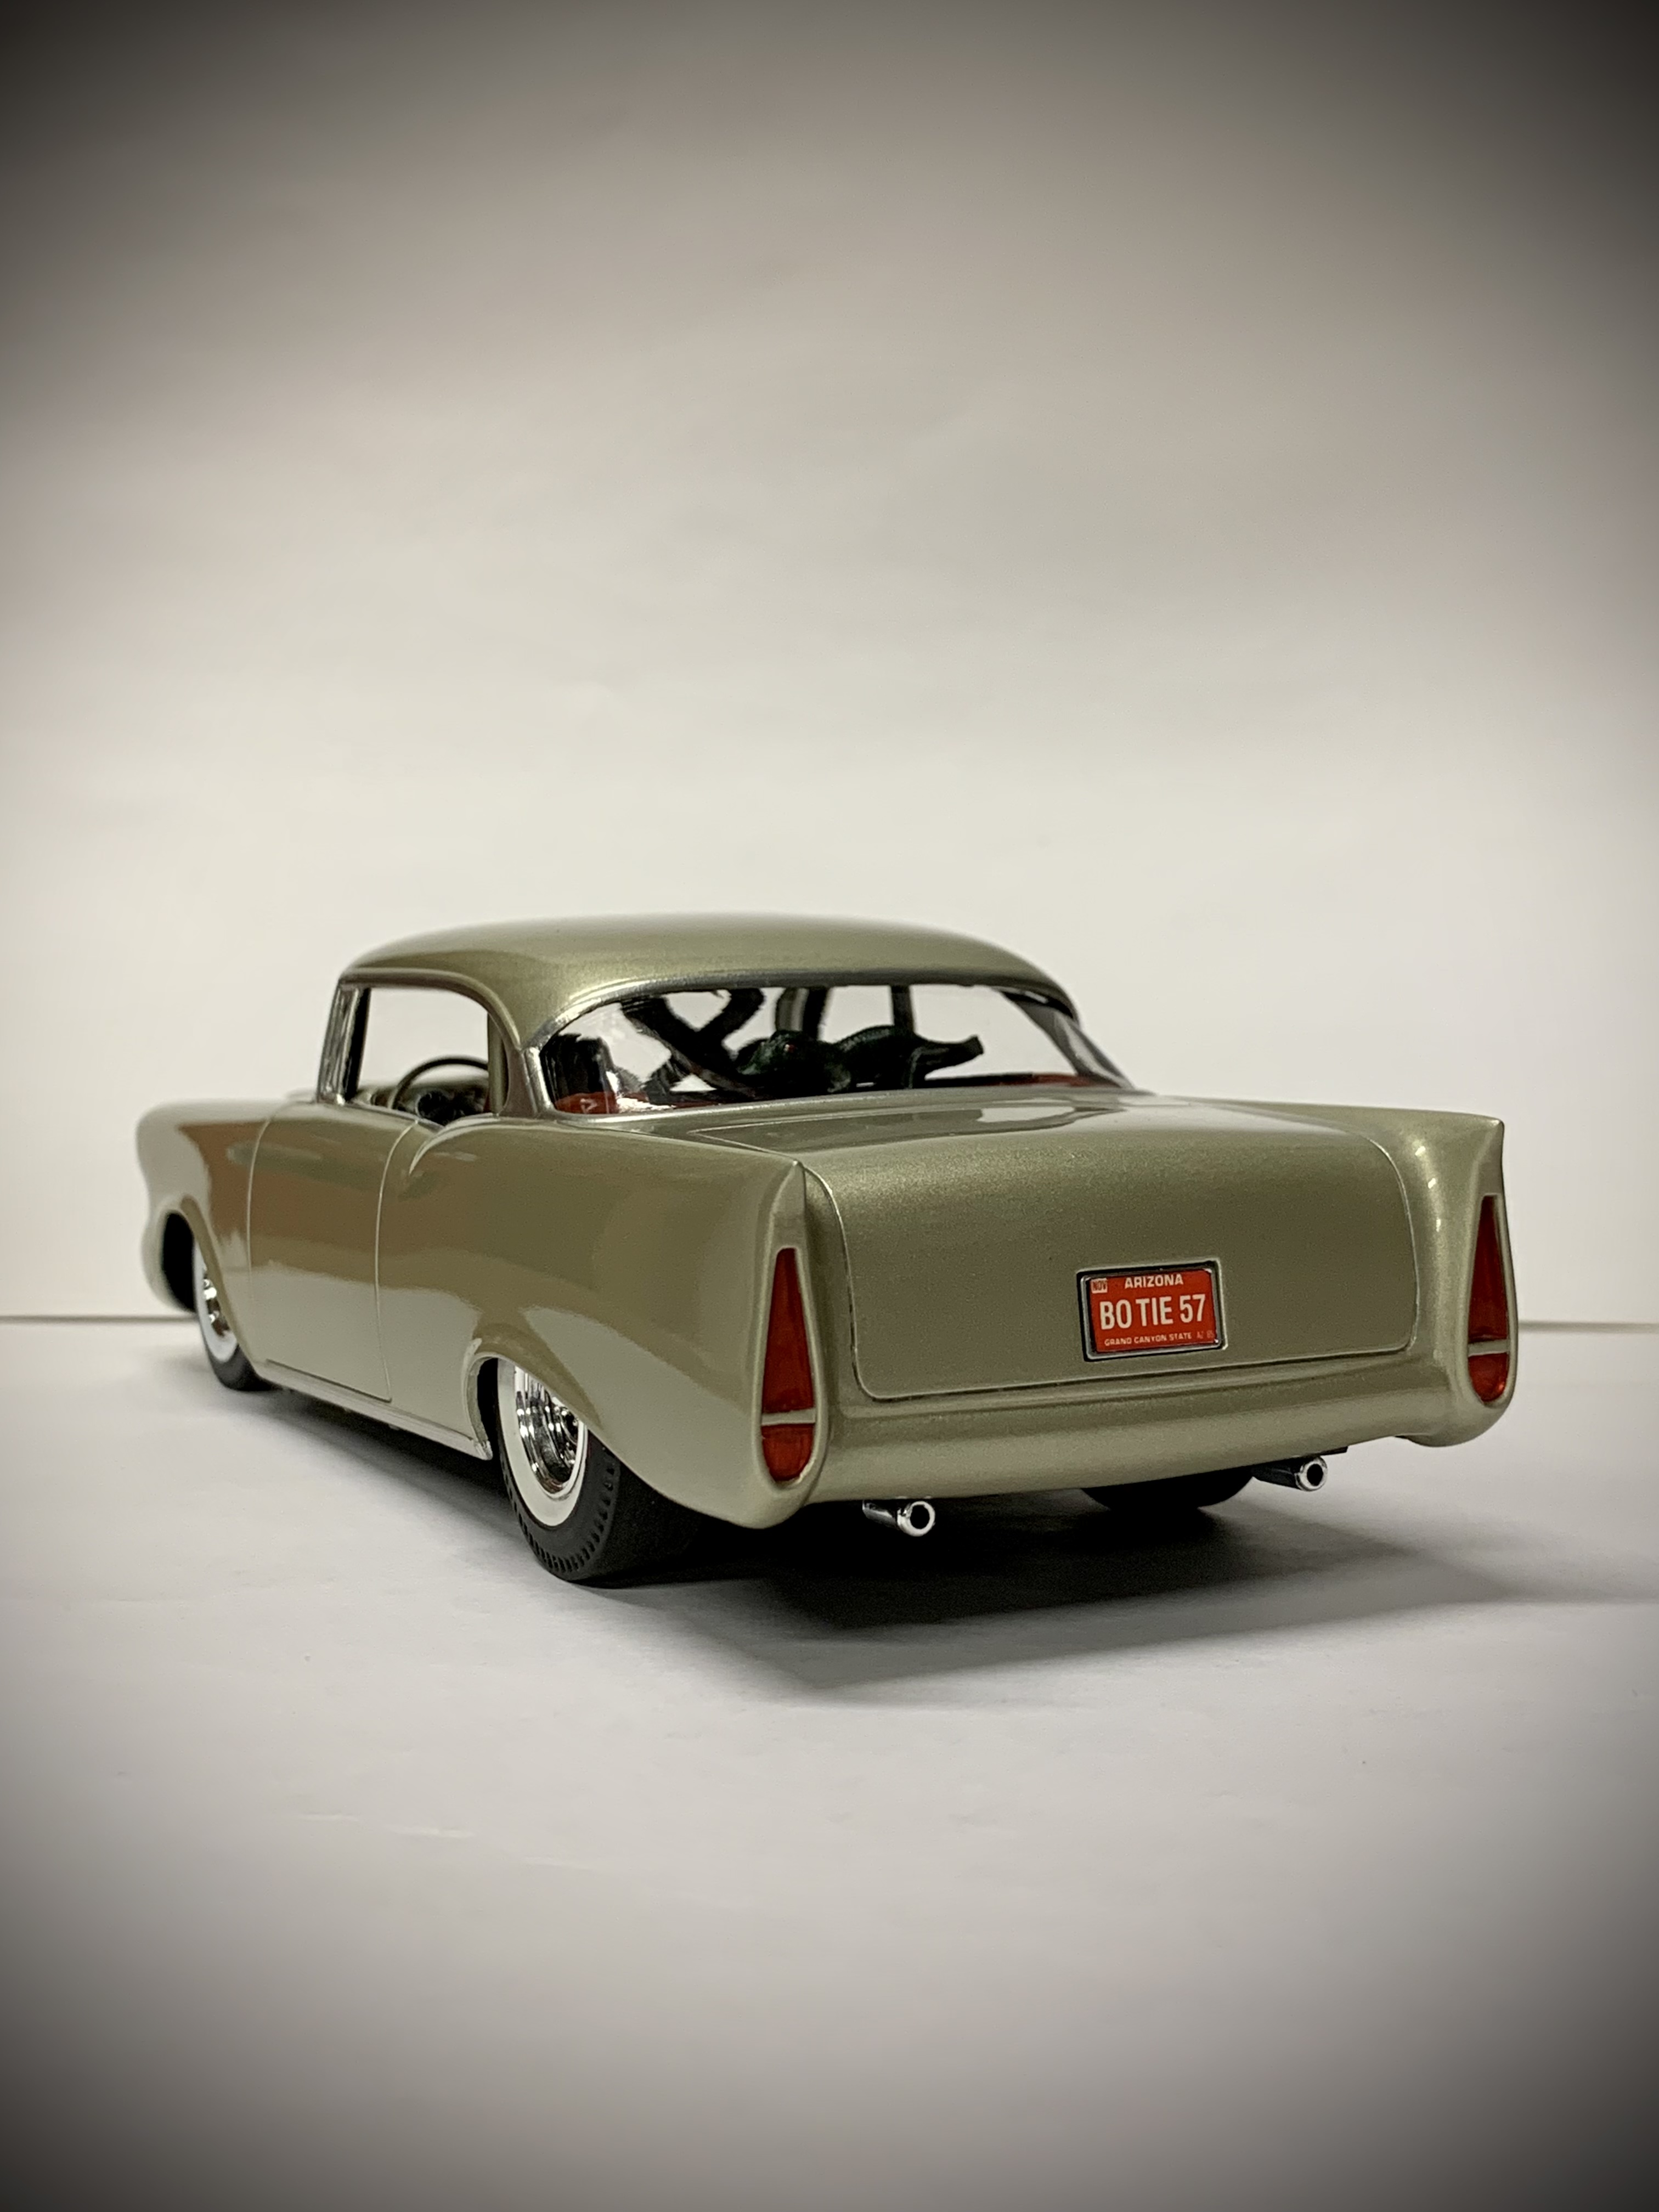
Fresh off the workbench and on the shelf is my 1957 Chevy traditional 60’s custom. This is my first attempt, ever, at creating a custom so I had to pretend like I knew what I was doing. I also don’t have much for parts resources for 50’s cars so I had to do what I could with what little I had. I didn’t look at any reference material, just made it up as I went. I do know that a lot of early customs were all show and no go so I wanted to create a car that could haul ass as much as it looked good. Hope you all like it. I have to say that I couldn’t be happier with how it turned out. I’ll have to try another some time! - AMT 1957 Chevy Bel Air Hardtop - Kit provided custom rolled front pan and scalloped headlight housings molded in. - Stock grill bar modified by removing big center crest and adding material to extend ends out to edges of opening. Chrome redone with Molotow pen. - Fender peaks, side trim, emblems and handles shaved. - Hood gunsights filled and shaped. - Rear fin and taillight treatment of my own design using the kit provided custom lenses. - Kit provided rear rolled pan modified and molded in. - License plate flush fit into trunk lid. - Kit provided option “409” engine block/transmission. Cylinder heads, Offenhauser valve covers, hi-rise dual intake, factory cast headers, water pump and belt drive from AMT ‘62 Chevy Bel Air. Chrome air filters from Revell ‘70 Nova. Generator with adjusting arm from Revell ‘57 Chevy’s. Parts By Parks wired distributor. Detail Master #1 fuel line and fittings with scratch built T fitting. - Modelhaus chrome reverse wheels with spider caps. AMT Parts Pack tires and slicks. - Interior uses kit provided custom bucket seats, roll bar and alligator mascot. Custom steering wheel from AMT ‘32 Ford Victoria. Separate chrome handles from Revell ‘37 Ford Pickup/Panel Delivery trucks. - Chassis has no detail, curbside style. Chrome exhaust tips from Revell 1940 Ford’s. - Tamiya “Champagne Gold” with their clear coat, polished and waxed with Adam’s products. Interior is Tamiya “Dull Red” and Semi Gloss Black. Window and rocker trim detailed with Bare Metal Foil.
-
I have always liked the custom front and rear treatments from the original issue ‘57 Chevy EXCEPT for how looooong they make the car. I really dig how you cut the body back to keep the stock proportions. Can’t wait to see how it looks with all the body mods done. Are you going to keep the custom parts hatch style hood? Always loved that feature.
-
Nice model! Now I suddenly have the urge to go make some guacamole… ?
-
I love it! Excellent blending together of the two kits for an even more bitchin’ hot rod than the AMT kit makes. Great color choice, too!
-
You’re killing it on the interior! The embossed “carpet” with the piping looks awesome!
-
2021 IPMS Nationals Kit Information
Dennis Lacy replied to niteowl7710's topic in Car Kit News & Reviews
I do the same with every Revell ‘32 I build, too. In the case of the Rat Roaster, they did that mod for us. -
There’s some really creative work going into this model, Alan. Just as important as the ability to do the physical work is the ability to look at a part and be able to see it repurposed into something else. In that regard, the belly pan is bad ass! I look forward to watching this project unfold. I actually know the current caretaker (Karpo Murkijanian, super nice guy!) of the original Buttera Roadster and he brought it to an early morning hot rod gathering we had at a local shop just down the street a couple of months ago. I didn’t look close at it as I was too busy talking with friends but did see it coming in and parking then pulling out and leaving a bit later. It had the same updated wheels as in your picture under the trees to show the headlight mounting.
-
2021 IPMS Nationals Kit Information
Dennis Lacy replied to niteowl7710's topic in Car Kit News & Reviews
I was under the impression that low performance engines still got the offset outlet manifolds in ‘57 and the hi performance (dual 4-barrel and Rochester FI for example) engines got the center outlet “Ram Horns.” I thought that both styles came in the Revell ‘57 150 “Black Widow” sedan? I very well may be wrong. I also have a few of those Revell Tri-5 Chevy engines I bought by themselves on eBay and some of them are from ‘55 kits and that’s where I grabbed those manifolds from. Hmmm… ? -
2021 IPMS Nationals Kit Information
Dennis Lacy replied to niteowl7710's topic in Car Kit News & Reviews
The axle isn’t exactly the same. The spring is redesigned at the top center to lower the front end an extra 1/16” compared to all the other ‘32 series kits. That’s like an extra 1-1/2” drop in full scale and it’s noticeable. -
2021 IPMS Nationals Kit Information
Dennis Lacy replied to niteowl7710's topic in Car Kit News & Reviews
Thanks! It’s been built for a good while now. It actually uses the entire Rat Roaster chassis, exhaust, Chevy small block, grill/shell and modified interior panels, floor pan and seats. Wheels and tires are from Orange Crate ‘32 Sedan. I changed the motor to a dual 4 barrel intake and stock ‘57 exhaust manifolds. The pictures I have are terrible from a Nikon digital camera that never worked good. I should take new, improved pics.
-
2021 IPMS Nationals Kit Information
Dennis Lacy replied to niteowl7710's topic in Car Kit News & Reviews
Yes, the rear fenders are separate. I used them on this 5 Window a few years back.
-
'53 Studebaker funny car
Dennis Lacy replied to Rocking Rodney Rat's topic in WIP: Drag Racing Models
That last picture with the chopped top looks absolutely WICKED! You’ve got the magic touch when it comes to retro drag cars. Always a treat to watch you put them together. -
Very cool! The cargo area details are really nice. I especially like that you added an air dam to the front. I’ve been thinking about doing the same for mine and now I’m convinced. Glad I didn’t start painting the body yet!
-
Beautiful Corvette, Phil! The candy paint looks awesome and it’s customized just enough to be noticeable without being overdone.
-
Man, you’re doing a helluva nice job on this! Chassis looks great with the added details.