Scott Colmer
-
Posts
1,651 -
Joined
-
Last visited
Content Type
Profiles
Forums
Events
Gallery
Everything posted by Scott Colmer
-

What did you see on the road today?
Scott Colmer replied to Harry P.'s topic in General Automotive Talk (Trucks and Cars)
On the streets of Tokyo At a local hangout. It runs every night. Little green guy is waiting for the crosswalk light This is not Kevin karting on the streets. He took the PIC. Behind Mooneyes Yokohama -
Excellent scratchbuilding! I like watching this project come together.
-
Excellent work, Mark. I wanted to see how you placed the rear wheels in the fenderwells. They look great. The stance is dead on, as it the rest of the car. Scott
-
Well done, Mark. You nailed it!
-
The "Illusion" by Rick Dore.......on the Bench 12/9/23
Scott Colmer replied to John Teresi's topic in WIP: Model Cars
Just got to see this one in person. John's Illusion took best of show at the GNRS model contest as it should have. An amazing reproduction of a beautiful car. Well done, John! -
https://public.fotki.com/Scottcolmer/reference-pics/uncertain-t/
-
What did you see on the road today?
Scott Colmer replied to Harry P.'s topic in General Automotive Talk (Trucks and Cars)
Had to pull my EV into a liquid energy dispensary to get a PIC of this really nice mustang. The guy driving it said he got it for his son to drive to high school and had it built in AZ. He would not adopt me, but he was a really nice guy. -
Went to the Zimmerman Driving Museum in SoCal on Saturday. It's a great smaller museum that allows you to open the doors of the cars. Sundays, they give rides. We ended up taking to a docent who gave us an extra tour behind the glass wall. It was really fun hearing what it was like to drive a 20's Packard Limo. In the gift shop they had only one model car on the shelf. The price was right, so I bought it.
- 35,997 replies
-
- 4
-

-
- johan
- glue bombs
- (and 1 more)
-
Wow, Mark. What a treat to see you do this one. I'm looking forward to watching you make a jewel out of what I consider to be a pretty rough kit. Scott
-
Childhood memory right there. Thanks for posting it. I still have parts from the one I built.

- 35,997 replies
-
- 1
-
-
- johan
- glue bombs
- (and 1 more)
-
I have to say that Chris is are great guy and super talented builder. It was a pleasure to spend time with him learning about his excellent recreation of the Army Vega.
-
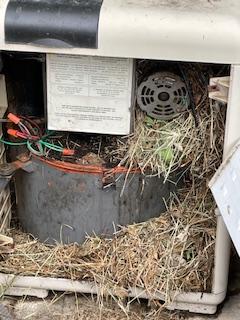
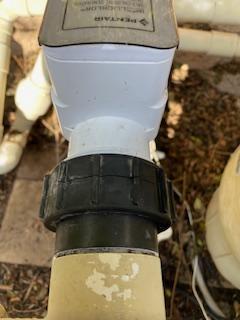
The breaker on the pool has been tripping for a while now. We even had a newer one put in because of a code issue discussed in another post. Well, we had a good downpour a couple of days ago and the breaker tripped. I could not get it back. Great. I called the electrician and the can out today (12/24!) the guy knocked on the back door and said he found the problem. There is some wet wiring. Hmm? Then he pointed to the open heater unit. Yikes! The entire thing was a rats nest. I cleaned it out and the guy replaced some of the wire nuts. Then I gave it a good round with the leaf blower. I got lucky. No chewed wires and nothing shorted out. The bill was 80 bucks. But - The fitting on the salt cell was badly cracked and pouring out water. So one more round of repair needed.
-
Mine showed up in SoCal today.
-
Still nothing in SoCal
-
Pics of Flamin Frank Pedregon Fiat Coupe
Scott Colmer replied to Leo64's topic in Model Building Questions and Answers
Hmmm. If it were me, I'd slip my name and the names of a few friends in there. Jus' Say'n. -
Uncertain T
Scott Colmer replied to Roncla's topic in 1:1 Reference Photos: Auto Shows, Personal vehicles (Cars and Trucks)
The right hand drive is also not a match. : ) -
That is VERY cool. You did a great job with it. I did not know this kit existed. I'll have to check it out.
-
Great thread. Stunning boats. A Chris Craft is on my lottery wish list. There is a good youtube video on the history of the company.
-
I am so sorry about your grandson, Johnny. I should have finished my point. We did not have a problem with the loud Ding Dong alarms, and you could hear them throughout the entire house. I would imagine a lot of people with pools and kids would want to keep them. The high decimal sirens located on the door frame right by your ear probably get taken off before the inspector hits the end of the driveway. It just does not make sense. I don't usually rail on about the government, but this one should be about effective regulations over dumb regulations. I wish your family the best. Scott
-
Stupid regulations. We had our pool remodeled about 5 years ago. Got the door alarms and had the inspection. Thought we were done. Then we recently added car charger to the house. Turns out they couldn't get the permit because the pool permit was not on the record as complete. We did not have our copy. Arrg. Go back and do it again. First inspection - failed. The door alarms we got that emitted a loud DING DONG when opened were not the right ones even though they were sold as such. Plus we needed GFI switches at the fuse box. Pool guy installed the switches and we got the correct alarms. Reinspection charge - 80.00. The new alarms emit a ultra loud shrieking much like a car alarm. It is ear piercing. The instruction say to mount them high so kids can not deactivate them. That puts them right about ear level. Oh- The warning on the alarms says do not activate them near your ear. GEEEZ. One other thing. You can do a 2 minute disable to exit the house, but no such switch is on the other side. So anytime you walk in, you get blasted in the ear. We passed. The deafening alarms went away.
-
And sometimes you just thrash. Probably should get organized again.
-
Hello Mile High, Sorry it took so long to get back to you. Model Cars Magazine is always looking for new content and new shows are a welcome part of the content. Here is the contact link from the MCM web site. https://www.modelcarsmag.com/oops/contact-us/ Scott Colmer - MCM staff.
-
What did you see on the road today?
Scott Colmer replied to Harry P.'s topic in General Automotive Talk (Trucks and Cars)
At a gas station in central CA. I think it was near the infamous intersection where JD met his demise. -
Steve, Steve, and Dale. I am glad you are enjoying this project. Detail and design are my favorite parts of model building. I appreciate your feedback. The last few days are do-over days. It's all parts. Front caliper mounts. Not seeing the front disks or calipers on the car meant I had to fake it. For some reason, I decided to do my research 7 years after I made the caliper mounts. It took a while to actually find what brake system Louie used. The dip in the front axle gave me the clue. Then once I saw the mounts, I had to watch YouTube videos to see how the caliper attached. It is held in with a wedge plate. Here are the revised mounts with the locating arms extend above the rotors. The calipers have been grooved inside to fit on the tops of the mounting arms. Next up are the rims and tires. Several years ago, I widened a set of the kit tires and rims. The rubber on the tires is soft and getting the center piece to line up was hard. I ended up using a plastic tube inside. I thought it looked pretty good, but when I showed a friend of mine the tires, he said "Yeah. I see the seams where you glued them together." Strike one. The mounting on the Revell kit tires is weird. So much so that is a thread about it in the forum. When it can time to mount the widened tires to the widened rims, they would not seat up. Fortunately I bought some back up from Mobius. The looked a lot better but the rims were too wide and took a lot of work to get both beads to seat. The picture shows the seated Mobius rim and tire on the left, Uncorrected Mobius center. Abandoned kit product on the right and in the rear. And finally, the rear shocks. I must have been rushing, because I knocked out a pair of rear shocks without really comparing them to the real thing shown below I knew The shocks looked fat, but I continued on. Once they were in place, I hated the way they looked. So I went back and used K&S tubing to make a better pair. The old ones are on the left. New ones are on the right. The black parts on the mounts are edges are the rubber bushings. Because bushings matter. : ) Mounting the front end is coming up.
-
Anyone watch A4 Garage?
Scott Colmer replied to Scott8950's topic in General Automotive Talk (Trucks and Cars)
A4 and Kenji are on the top of my list. Amazing skills.