
Scott Colmer
-
Posts
1,665 -
Joined
-
Last visited
Content Type
Profiles
Forums
Events
Gallery
Everything posted by Scott Colmer
-

“Gas Chamber” Gasser/Funnycar kind of thing…
Scott Colmer replied to Mad Slammer's topic in Drag Racing
That's really cool. I'll bet the real thing would have been a handful on both ends of a run. -
Those are really cool. Being a fan of Barn Finds, those Box Finds(?) Attic Finds(?) really check all the right boxes. Dusty, old, Glue only for some, fatigued body work, customized to reflect the passion of the builder for others. Good stuff.
-
Renwal Peirce Arrow Concept by Virgli Exner
Scott Colmer replied to Scott Colmer's topic in Model Cars
Thank you all for the great feedback on this one! I appreciate it! This type of build (adding stuff to an unique subject) is right in my wheelhouse, so when other people enjoy these projects too, that puts a lot of icing on the cake. : ) I have seen other upgraded Exner concepts out there. I look forward to seeing those too. Scott -
I really liked seeing this excellent model in person. Your daughter did a great job with it. The paint is a show of it's own. Scott
-
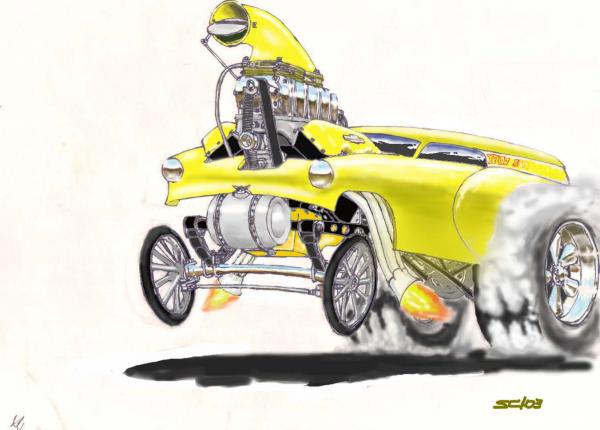
This Pierce Arrow is a concept car designed by famed auto designer Virgil Exner who is responsible for the big fins and pod headlights of the 50's and 60's. Back in the early 60's, Virgil did a series of concept designs updating classic cars of the 30's for Esquire magazine. Renwal model cars molded the designs and Virgil added at least one more design that was not featured in Esquire magazine. One of the new designs was the Pierce Arrow. Virgil's Pierce Arrow redesign was based on a specialty luxury supercar from the 1933. The Pierce Arrow produced by Pierce, featured a slope back, periscope rear window, and a powerful V12 that could propel the streamlined beauty to over 110 mph. Virgil used many of the styling cues from the 1933 version on his redesign, but added a lot of midcentury modern flare. These Renwal kits are expensive. I got mine cheap because the grill and front bumper were missing and had to be scratchbuilt. The scratchbuilding continued from there. The inspirations for Exner's design This is the kit as received from eBay. Note the red body on the box art. It hard to see how simple it is. I'm thinking a luxury car needs a more classic paint scheme. Why not follow to original design Scratchbuilt grill. Full boat blown V12. Fully detailed interior. That center console is a work of art. Exner design for sure. The once sparse engine compartment is now filled up with an IFS from a Cobra and lots of scratchbuilt parts. All done.
- 32 replies
-
- 12
-

-

-
That mid engine Mustang is another one on Hand Built Cars. I was hoping to see it here.
-
If you look up Hand Built Cars on youtube and then start scrolling back, you can see a full build up on Troy's Torino. There are other great ones too. Thom's 32 is the best!
-
Thanks, Russell. I just put in for the email list on Monday. Nothing yet. It's a good drive to Salt Lake. I am hoping there is table space. Scott
-
Is there a place to register to participate in the contest or is come one, come all?
-
I saw the round door RR in the Peterson basement. It was stunning. It takes a step stool to get up inside. Lots go cool cars down there.
-
This might be the final piece of major fabrication. The bed cover. At one point, Louis created the bed cover seen below. He abandoned it when he realized that it would interfere with the roll bar down tubes. He told me to just come up with something. I wanted to keep the original look of Louis' cover and try to make it work. I can up with this two piece design. But.... It did not allow for the wing struts. A two piece design turned into a three piece design. I am hoping I can make a hinge of some sort for the rearmost panel. We will see.
-
There are two ways to get dremmels to run at slower speed 1) Get a plug in Dremmel (Mine is a Black and Decker) and then buy a foot operated rheostat from Harbor Freight for 35- 40 bucks 2) Buy a el cheap dremmel like the one seen below off amazon. 20 - 25 bucks You can slow it down by putting you thumb on the bit chuck. I have both, but since I got the CHOKMAX, I only use the hardwired one when little red needs a charge.
-
I have a cheapie from Amazon- a bit over 20 bucks. The charge lasts at least a month depending on what I'm doing.
-
I am guessing you already know that Jimmy Flintstone sells a resin replica of the GR. It is a solid block of resin. I'm not sure if it is 100% accurate to 1/25th scale. Maybe? Mine was missing some decals so I had to improvise.
-
What did you see on the road today?
Scott Colmer replied to Harry P.'s topic in General Automotive Talk (Trucks and Cars)
Hey Randy, I'm in Riverside. I'm at the facility a lot visiting Mom. This car was parked in the Furture Resident spot. Could be a future resident. Lots of visitors part there too. Does the PIGPEN1 plate look familiar? -
What did you see on the road today?
Scott Colmer replied to Harry P.'s topic in General Automotive Talk (Trucks and Cars)
Saw this parked at Mom's assisted living facility. -
Me too. Great issue!
-
Watched Knivesout - Glass Onion a couple days ago. Good stuff! Take a look and see how many clues you can catch before the real at the ending.
-
Hi Samuel, I have helped with contest and show coverage for MCM on the west coast. Here is the process. A staff person will put a card by a model they would like to photograph. It is up to the builder to bring the model to the MCM photo booth. (We tend to avoid table shots because lighting and angles are limited.) When the builder comes to the photo booth, they receive a form to fill out and sometimes we will talk to them about the model. The form and pictures go in with the rest of the models that have been photographed. We can shoot from 50 to 75 models depending on support and time we have. The editor then goes through all the pictures and selects the ones that he thinks will look the best in the magazine. Unfortunately not all models get selected for publication. We then use the form filled out by the builder to write the captions you see in the magazine. (That is how I help.) Now to answer your question. There is no index of modelers that have been featured in MCM. If you think you may be in the magazine look for the issue with the show MCM attended and either purchase that issue (see Model Round up or Spotlight hobbies, or a local hobby store, or ask a friend with a subscription if they can check. and you can always subscribe too. I have been a subscriber for a couple decades, so I never miss an issue. And I do always get excited if I get a picture in the magazine. I hope this helps. Keep building and going to shows. Scott
-
Happy New year. Thanks for info Randy! Glad to see you back Francis! I found the today to finish up the scratchbuilt parts for the front of the engine. That square is the start of a bed cover. Louie had one but abandoned it when it did not work with the wing. I think I have a way to make it work. I am waiting for some screen to arrive. I think this is close to the end of the scratch building. I reached out to Louie to let me know what colors/finishes he wants of the primered engine parts. Waiting for his response. I think it's time to start prepping things for paint. Whoop! and Ugh. Scott
-
Today's progress. Scratchbuilt blower endplate and snout. Valve covers are close to done. That little box sits in front of the lower blower. I'm not sure what it is. I still have a little more work on the lower end of it.
-
Thank you so much for jumping in, Randy. I'm going to need the help. Merry Christmas! Scott
-
Beware HOT resin parts attacking styrene parts
Scott Colmer replied to Scott Colmer's topic in Tips, Tricks, and Tutorials
Thanks for the input. Gregg, Peter, and Steve. I'll get some more resin and see how it goes. Scott -
Beware HOT resin parts attacking styrene parts
Scott Colmer replied to Scott Colmer's topic in Tips, Tricks, and Tutorials
It may be me. I've using the 50/50 mix of resin and catalyst and stirring it slowly for as long as possible before I make the pour. How tight do the measurements need to be? I let it sit on the mold for about 12 hours. That was when the containers were new. The containers are about 5-6 years old now. The last items I cast (some cooling fans) never really hardened up. -
What we have here is a materials learning curve. The valve cover on the right is made from Smooth On resin. I have noticed that the objects made from this material sometimes feel sticky and might be soft. When I packed this project away, I had the cast valve cover in with the styrene parts. I opened the container and found the valve cover stuck to the styrene oil pan and injector hat. Both had softened areas where they came in contact with the resin part. Even left in the open air, they never hardened up again. What you see it the in-progress repair job on both parts. You can see the deep tube on the injector that is grafted in styrene. The pan has its repair piece ready to go. I am going to use another resin for future projects. Scott