Art Anderson
-
Posts
5,052 -
Joined
-
Last visited
Content Type
Profiles
Forums
Events
Gallery
Everything posted by Art Anderson
-
Gluing resin to styrene???
Art Anderson replied to Mike77's topic in Model Building Questions and Answers
CA glue works just fine for joining resin to styrene, and in my experience, will stand quite a bit of stress. I used to use it for joining resin panels to styrene for making masters for resin casting: Removing a plastic or resin master body shell from a newly cured RTV mold is just about as much stress as I have ever put on a body shell--almost never experienced a failure of a glue joint doing that. Art -
1/25 First Gear 1938 International pickup
Art Anderson replied to jeffs396's topic in Diecast Corner
FWIW, A local Speedway gas station still has a supply of these--and at the REDICULOUS PRICE of $9.95! (it's in a university town, and everybody here was gone right about the time the IH pickups hit, for the holidays. Art -
'33 Ford trucks (pickups through 1.5 ton BB) had the same shape louvers on the hood side panel, where the '34 truck hood sides have several shorter louvers in the middle of the top edges of the louvers, to accommodate a chrome-plated emblem: A Ford oval badge superimposed on their V8 logo (same as appears on the AMT/Lindberg '34 Ford pickup) with the Model B 4-cylinder powered trucks having just the plain Ford oval badge. 1933 and 1934 Ford truck cabs are identical, but differ from the '32 in having that wider "3rd" reinforcing rib above the smaller, narrower twin "belt line" moldings. This was added to the then-1932 cab for 1933, as Ford's fixing the backrest of the seat directly to the sheet metal of the back of the cab resulted in fatique cracking of that panel around the bolt heads. Art
-
Tucker kit? YES!
Art Anderson replied to Jon Cole's topic in General Automotive Talk (Trucks and Cars)
Or, more that they were made from fairly rugged components. If any component of a Tucker would be a problem, it would be the transaxle--every Tucker built is equipped with a Cord 810 transaxle, modified to mount to the Tucker engine. Even the Tucker engine was more ruggedly built than most other automobile engines of the time, simply because it had to meet aircraft requirements: Tucker's flat-opposed six cylinder engine was nothing more than a Franklin (yeah, after Franklin ceased doing automobiles in 1932-33, the company continued as "Air Cooled Motors", and the six that Tucker used was the engine that powered not only the post-WW-II Stinson Station Wagon civilian ;plane, but also the legendary "bubble topped" helicopters used for medivac in Korea--made even more visible/famous in the TV series M*A*S*H. It should be pointed out, however, that not one of the Tuckers built, nor that exist today, were truly production models. Rather, they were preproduction prototypes, which every automaker builds, in order to find the flaws, and things that might cause problems in mass production (pretty much a 1:1 scale "test shot" if you will). Art -
engine color for Studebaker (Avanti)
Art Anderson replied to fiatboy's topic in Model Building Questions and Answers
Well, a good starting point would be a Google Search for Studebaker Avanti--there should be numerous pics of them out there. Of course, keep in mind that even if one specifies Studebaker Avanti, there will be pictures show up of Avanti Corporation Avanti II's, which were Chevrolet small block powered. I am not sure about 1963, but for 1962, Studebaker V8 engines from the factory were painted black (block, heads, intake) with light yellow valve covers and oilpans (did that reference search 20+ years ago). But as Bill commented, an engine built up for competition or even straight line speed runs at Bonneville could have been painted any color, depending on the whims of the builder, or even not painted at all. Art -
It could probably be done with a variable speed Dremel in their drill press, just figure out something to hold the wheel rim in. Art
-
I did a slight rework on my 8-lug wheels as well. Having a Sherline Mill made it pretty easy to do--I simply chucked the rims into the rotary indexing unit for my mill, then used a 1/8" flat-nosed carbide cutter to thin the flanges down from the back side. I wound up with flanges that are .025" thick, looking pretty good to me

-
It's interesting to remember GM Styling's rationale for that square-rigged hardtop roof as used in 1963-'64 on Chevies and Pontiacs: If you look at that roof closely, you can see a pronounced "crease" which runs across it from the leading edge of the C-pillar (sail panel) and then the square-rigged angle between the rear panel and the upper part of the roof. That was styled that way, to make those hardtops more closely resemble the shape of the then current GM convertible top when raised. Art
-
Except that the Subaru BRAT was produced by AMT, not MPC.
-
1956 Chrysler hemi colors?
Art Anderson replied to Kit Basher's topic in Model Building Questions and Answers
Chrysler engines back then were painted silver, as in aluminum paint, with metallic gold valve covers and aircleaners. As Bill stated, the sheet metal covers over the plug leads were gloss black. Art -
Those which exist are now owned by Round2
-
Basically, anything that would dissolve tube glue would also dissolve the plastic as well--after all, all plastic cements are solvent-based, meaning they slightly dissolve the mating surfaces of two plastic parts in order to "weld" them together. Art
-
Welding brass and aluminum
Art Anderson replied to aurfalien's topic in Model Building Questions and Answers
I used it extensively in my '13 T build, for plug leads, and making my own front radius rods, cannot reccomend it enough! -
In all this discussion: It seems to me to bear in mind that nobody should be "blamed" for what they do with model car kits or old builtups they might have and decide to turn into cash--that's an old saw of an argument that gets beaten to death, not only in our scale model building world, but in the 1:1 world of cars as well. After all, is not any model car kit or part in the possession of each and every one of us here a matter or our own property? Yes, it is. And to somehow declare or at least intimate that just because Smith has the kit/part, and Jones wants it, does not, in my considered opinion, change that fact. In the world of real collector cars, for years restorers cannibalized sedans, limousines, even town cars to restore what they saw (decades ago) as the more desirable roadsters, speedsters, phaetons. The same was true of the all-black Model T's of 1917 and later--parts cars for brass era T's. The end effect of course was that those who wanted to restore that famous old chauffeur driven town car, or that Model T sedan that looks just like the one in Great Grandpa's photo album becomes just that more difficult to do. And in result, a considerable aftermarket industry sprang up to supply the needed bits and pieces. With model cars, I've been seeing tables of parts of model car kits ever since my first Super Model Car Sunday swap meet in 1981--it's been going on that long! As for putting those up for auction on eBay--consider this: When eBay took off for real back what, about 15yrs ago now? it became the largest auction venue the World has ever seen, bar none. It opened up the possibility of being able to acquire that model car kit from years ago to literally hundreds of thousands of modelers (we on message forums like this are, by comparison, only a small fraction of model car builders!) who never get the chance to make it to a model car show or swap meet for all the reasons one can imagine. As with any auction--the final price paid is a pure function of supply and demand: The more people who are after a particular item, the higher the final bid is going to be--that is always the case. Sometimes it can get insane--is any Ferrari REALLY worth $52 Million????????--but on the flip side, there have been, are right now, and will be again in the future, bargains to be had, even for that "rare" model car kit or piece that one needs in order to finish a project. Patience can be a real virtue in all this--just as patience with a model car project is often essential. Art
-
Interesting mashup! Seems almost appropriate, given that both Cadillac and Lincoln were founded by the same man. Henry M. Leland.
-
I've been using the Touch N Flow liquid glue applicators for years now! They are a glass tube about 1/8" OD, with a BLUNT ended stainless steel capillary tube at one end. I simply fill the applicator from bottle of liquid cement with the same method I learned to use in HS Chemistry Class with glass pipettes. I can simply touch the tip of the stainless tube to my work, and the liquid cement flows into the joint, right where it's needed. Flexi-File: http://www.flex-i-file.com/adhesives.php Art
-
Need info on two model kits
Art Anderson replied to Nova-ss's topic in Model Building Questions and Answers
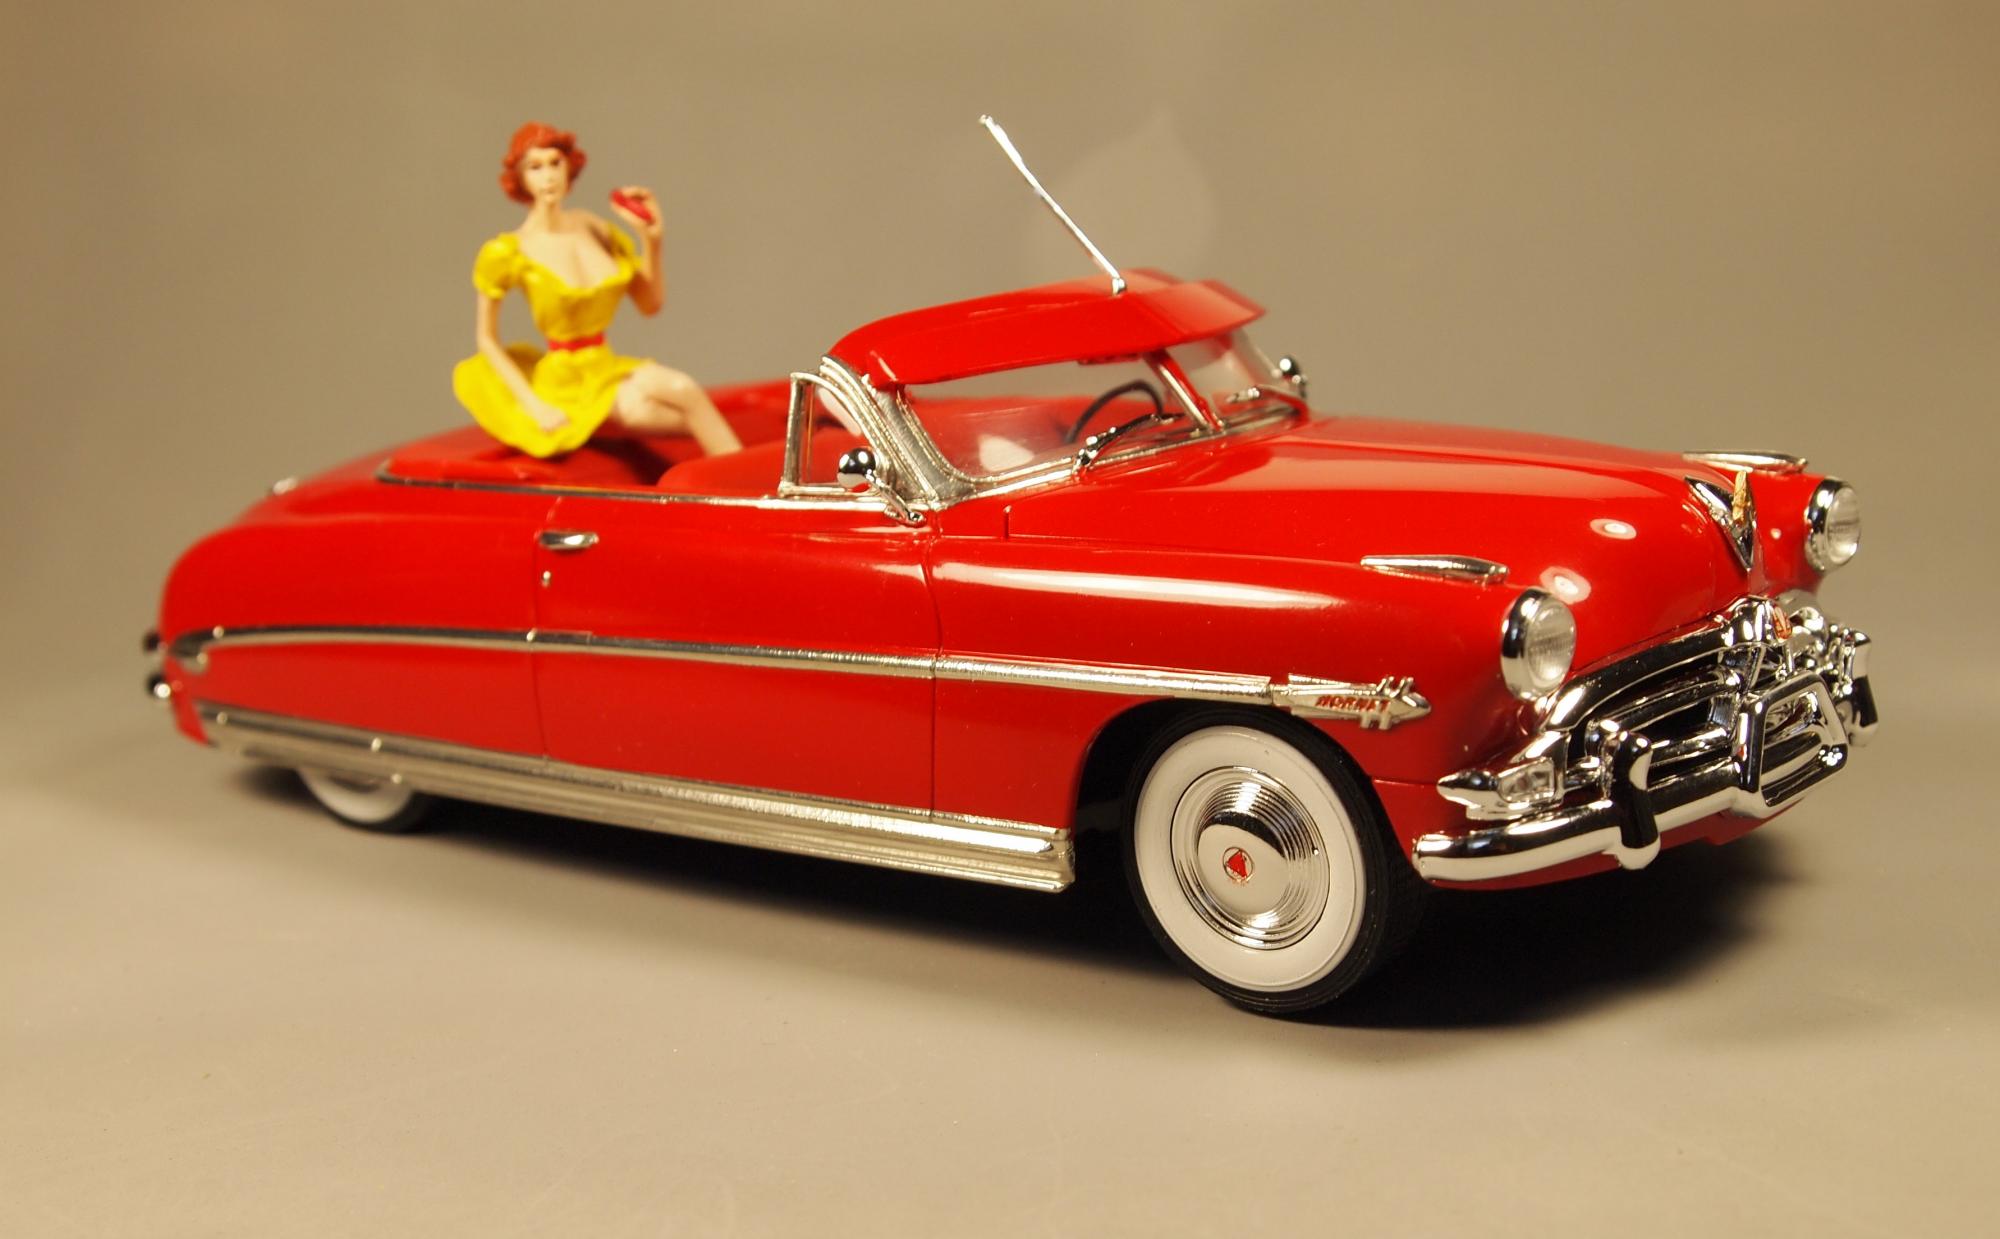
For starters, they are not "hardtops" in the sense of having no upper B-pillar, but rather they are Club Coupes (AKA 2dr sedans). That said, there were no noticeable trim differences between 1952 and 1953, save for the grille (1952 had a pair of vertical grille bars exposed to the outside, in an inverted Vee shape, and a different, Vee-themed hood ornament. In short, only detail differences. The interior upholstery is also different, having a different treatment for the armrests, which were "faired in" with the upholstery. The black and cream coupe is a '53, the red convertible is a '52:
-
Welding brass and aluminum
Art Anderson replied to aurfalien's topic in Model Building Questions and Answers
When I built up the chassis, front axle and springs for my 1904 Knox Waterless, I used Stay-Brite Silver Solder (available at electronics stores, and some hobby shops) for one simple reason: Unlike lead/tin solder, silver solder joints don't melt as easily once solidified as will lead alloy solders--a lesson I learned in reading British scratchbuilder Gerald Wingrove's books (he used silver solders exclusively on his models which were built mainly from brass), as silver solder joints require a good bit more heat to melt than does the original solder, for whatever reason. Rather than a torch (which I used on the Knox) I now use an ordinary soldering pencil, as torches, even the micro-sized ones, put out way too much heat, making controlling the solder all that much more difficult, where an iron or pencil allows for much finer control, with a bit of practice, just a bit of solder goes a long way, flows completely into the joint with very little in the way of excess needing to be cleaned off. BTW, a package of StayBrite silver solder comes with a bottle of flux which is more than enough to outlast the use of the solder itself--and not all that expensive, either. Massachusetts fire apparatus modeler, Charlie "Chariots of Fire" Rowley does the very same thing, and to see his brass work is to see sheer artistry--less excess solder than any glue you can think of. Back in my 1960's slot car days, when building 1/32 slot car chassis from sheet aluminum, I used K&S square brass tubing for axle bearings, and epoxied those in place on the aluminum chassis--then once the epoxy was cured, put the chassis in Mom's kitchen oven at about 350-degrees, and baked it for about an hour--after which, the epoxy turned about as brown as a drop of Coca Cola, and was strong enough to handle even the worst crashes--never had one of those axle bearings break off the aluminum frame. Gerald Wingrove also built numerous model cars needing polished aluminum bodywork--for which he used epoxies to hold the aluminum sheetmetal components together--if you've ever seen even pics of his masterpieces, they are truly works of art, BTW. Art -
Decals, Shelf Life, and Other Issues.
Art Anderson replied to 2002p51's topic in General Automotive Talk (Trucks and Cars)
Could well be the grade of gelatin, or else some other water-soluble material, In addition, there are non-yellowing clear lacquers out there, synthetic in their formula. Earlier lacquers were a natural base, very similar to common shellac, which does yellow with age. Art -
Scratch building glue?
Art Anderson replied to jones45's topic in Model Building Questions and Answers
I too have done the fiberglass reinforcement technique that Bill described so very well. Any hobby shop with a decent flying model aircraft or RC boat department will have fiberglas cloth in several weights. Personally, I have used 1/2 ounce glass cloth (that's 1/2 ounce weight per square yard!), which is plenty strong enough for reinforcing spliced panels (such as underneath a chopped top), and yet still thin enough so as to allow a builder to control the panel thickness in such conversion work. It can be layered on (I have used as many as three layers of this cloth while still making a thin section surface possible. Art -
Decals, Shelf Life, and Other Issues.
Art Anderson replied to 2002p51's topic in General Automotive Talk (Trucks and Cars)
Tobacco smoke (and for that matter, fumes from cooking) will "yellow" things, such as models, but almost always that tends to be on upper surfaces, as the particulates in the smoke or cooking vapors settles by gravity. Art -
Decals, Shelf Life, and Other Issues.
Art Anderson replied to 2002p51's topic in General Automotive Talk (Trucks and Cars)
For years (and pretty much still the same) decal film has been made by applying a clear lacquer film onto blotting paper that has been coated with a thin layer of ordinary gelatin, which is the "glue" used, as it's water-soluble. Gelatin, being an animal byproduct, is naturally lightly yellow in tint (you can find pure, unflavored, un-tinted gelatin in your supermarket, BTW), so if there is a lot of gelatin adhesive underneath a decal, it will eventually yellow even more. It's a natural thing, not due to any "breaking down" or contamination, from what I have been told. Art -
Outstanding! I did that kit many moons ago, lost the build when the sun got to it in the window at our LHS back about 1980. I have an original issue kit still, begging me to build it up now! Art
-
Delta Ceramacoat paints
Art Anderson replied to Bullitt's topic in Model Building Questions and Answers
A bit of background is in order here: Delta Ceramcoat, as with any of the other brands of water-borne acrylic paints (even the old, formerly available Poly 'S' paints) is the same basic paint formula as the latex paint you might paint your living room walls & ceiling with. That paint is waterborne of course, and doesn't bead up on porous surfaces, or an impervious surface that has a dull finish already applied to it--just as water alone won't do that either. I have used this sort of paint in the past on plastic, and have had the exact same problem you describe. I found that two things will make it work, stick to where you want it, and if airbrushed, eliminate the "beading up": One is to use an enamel or lacquer primer on the raw styrene surface, and the other is to use ordinary Isopropyl Rubbing Alcohol as the thinner/reducer for airbrushing. Of the two, while rubbing alcohol will break the surface tension of the water in that paint to the point that it will spray and flow out, it does little, if anything, for adhesion, while a thin coat of lacquer primer airbrushed on, will allow the acrylic paint to flow out AND gives great adhesion as well. Art
.jpg.b62f64550135de654dcc1579416325a4.jpg)