-
Posts
4,608 -
Joined
-
Last visited
Content Type
Profiles
Forums
Events
Gallery
Everything posted by Force
-
I did go in and looked at the model car show and voted for the model I liked best both times I were there, 2012 we were at the show for two days so I had time to study the models more thoroughly before I laid my vote. I like the Goodguys Southwest Nationals and Scottsdale and I will hopefully come back in the near future, maybe even next fall...I will for sure go over to USA next year and most likely to the western parts but me and my friends haven't decided about date and exactly where to go yet...a week ago today I came home from a trip to Los Angeles CA, Las Vegas NV and a short trip to Kingman AZ...three states in two weeks...so I have just been to your country.
-
I usually measure and mark how much I would like to cut off, then cut the frame rails with a fine tooth saw, sand the joining surfaces slightly so they are square and glue them back together and I usually reinforce joint on the inside of the rail with a piece of sheet styrene...tools needed, fine tooth saw, sand paper hobby knife and glue. Mostly I do the cut before I build the chassis because it's easier, but you can do it after the frame is assembled if you're careful, just make sure the cut is square so the frame still is straight after you're done.
-

Kenworth Cabover
Force replied to Sam I Am's topic in 1:1 Reference Photos: Auto Shows, Personal vehicles (Cars and Trucks)
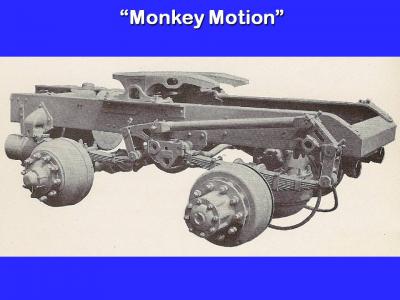
Yes it looks very much like a Monkey Motion to me. I have never seen this type of rubber band drive before either....well it might have worked fairly good for at least on road use. -

kenworth w900 done and help!
Force replied to christian's topic in Model Trucks: Big Rigs and Heavy Equipment
My suggestion is to get the Moebius Big Rig Wheel and Tire set, they look a lot better than the kit wheels wich in my opinion looks much too shallow. https://www.scalemates.com/products/product.php?id=266083 -
I agree about the Challenge Transit Mixer, try to restore that as it is instead as it's very rare. Howerver, shorten the frame isn't that hard, just cut out a portion somewhere between the cab and rear axles and glue the frame rails back together with some reinforcement behind the joint and you're done, you also have to shorten the drive shaft the same amount. But convert from a dual drive bogie to single drive axle is a bit harder and mostly depends on what kind of rear suspension the kit has, Air Ride suspensions are often easier to convert than for example a Hendrickson Walking Beam or Mack Camel Back...so how you go at it varies from kit to kit. The Freightliner SD and the Ford LN 8000 Short Hauler are already single drive so you don't have to do anything to the rear suspension there.
-

Corvette Grand Sport induction setup
Force replied to om617's topic in Car Aftermarket / Resin / 3D Printed
As I said...they are from the same tooling. I believe Revell sold out quite soon after they released the stock they had because they weren't avalable that long. -
Plastruct has diamond plate, but don't go by the scale that's marked on the packace, if you buy the 1:24-1:25 scale the pattern is a lot too big, the HO 1:100th scale pattern looks more right.
-

Corvette Grand Sport induction setup
Force replied to om617's topic in Car Aftermarket / Resin / 3D Printed
Well the Accurate Miniatures 1963 Corvette Grand Sport and the Revell 1963 Grand Sport are from the same tooling. -
The quality among the resin casters varies a lot...some are good and some are...well not so good, and that's the way it is and we have to work with what's available to us...do the things ourselves...or do without it completely...it's up to each one to decide As many here have said, Ross Gibson offers many engines and versions of engines never done before for modelers and that's mainly why I bought the ones I have, and with some work they looks quite decent. I have bought some engine kits and parts from HRM too and his products are very good...but you can't exactly call them cheap and HRM and RG doesn't offer the same things so I don't know if you can compare them at the same level other than they are both resin casters and the quality of their products.
-

Lindberg Petty Belvedere
Force replied to kalbert's topic in WIP: Stock Cars (NASCAR, Super Stock, Late Model, etc.)
Jupp Hemi only for the Petty car...and mostly race stuff. -

1/16 Scale Army Vega Funny Car - Finished 10/14/2018
Force replied to Mooneyzs's topic in WIP: Drag Racing Models
Well I could have if I have had more paid vacation days...I was at the Toyota Nationals event in Las Vegas for two days tho'...and the SEMA show...before I went back to the L.A. area. -
I ordered some stuff from him a couple of years ago and never got anything.
-

1/16 Scale Army Vega Funny Car - Finished 10/14/2018
Force replied to Mooneyzs's topic in WIP: Drag Racing Models
Great work Chris. I have just come home after a two week trip to your country (Los Angeles CA, Las Vegas NV and a quick trip to Kingman AZ) so I haven't been able to follow much of your progress until now. -

Pig Pen's "Love Machine" from "CONVOY" movie
Force replied to Sergey's topic in Model Trucks: Big Rigs and Heavy Equipment
Very nice model Sergey, I followed your buildup of this model here until you stopped updating and I have waited to see this finished. -
The latest most updated version of the Revell/Monogram Funny Car kits was the kits with the Pontiac Firebird bodies. To do a modern version of those kits you'll need to update a bit more, such as MSD Pro Mag 44 magnetos, set back blower, Waterman fuel pumps, carbon fibre injector hat, dry sump oil system and a few things more. Slixx also sells Comp Resins whole inventory and I belive Comp Resins carries some of Slixx decals, so you can buy everything at one place.
-
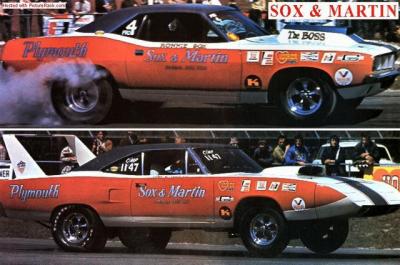
I don't know exactly how many 1970 Barracuda's Sox & Martin had...one had red bumpers, one had chrome bumpers and there were other differences, so they had at least 2, 3 or maybe more, pictures of the cars both from the time and restored cars are available on internet so do a google search on Sox & Martin and you will for sure find some. They raced Barracuda's in Pro Stock 1970, 1971 and 1972 as well as Duster's 1970, 1971, 1972 and 1973, drivers were Ronnie Sox, Herb McCandless, Don Carlton, Joe Fisher and some more and each driver had their own number on the cars (Ronnie Sox had number 200 on the Pro Stock cars he drove 1970, number 4 1971, number 23 1972 and number 200 again 1973).
-

Sox & martin 1970 Superbird Help needed
Force replied to 72 Charger's topic in WIP: Drag Racing Models
I do have a magazine article about this car and I checked it out yesterday as I don't want to give out false information, the Super Stock & Drag Illustrated July 1970 issue article says Joe Fisher was going to do the driving as you said. But the information regarding classification of the car is conflicting in this article, the text at one place says the car was built for SS/E and makes the class by less than 10 pounds...but at another place in the same article it says it will run in SS/F...a bit confusing if you ask me. I have never seen any pictures of this car with anyting else than SS/E classification on the windows and 138 or 605 numbers, or nothing at all...but on the other hand there are not many pictures of this car around...but that's not important as the car indeed ran in the SS/E class during it's short lifetime with the Sox & Martin team and we can leave it with that. -

Sox & martin 1970 Superbird Help needed
Force replied to 72 Charger's topic in WIP: Drag Racing Models
Can be true, but as far as I know the car was only used for a very short period around the 1970 US Nationals, and I have never seen any pictures of the Super Stock Superbird with any other weight break than E, and after what I have read both Super Stock Superbird's (the Sox & Martin car and Jack Werst car) were built with one purpose, to take out Ray Allen's SS/E 454 LS 6 Chevelle Convertible...if it's true or not I don't know. Sox & Martin had many different drivers for their cars, Ronnie Sox, Herb McCandless, Don Carlton and some more drove for them, I don't exactly know who drove the SS/E Superbird, the numbers I have seen on the car are 138 and 605. -

Sox & martin 1970 Superbird Help needed
Force replied to 72 Charger's topic in WIP: Drag Racing Models
Sox & Martin used both silver and gold lettering on the doors and quarter panels on their cars but I don't know if any of the colors were used more than the other. The different 68 and 69 Barracuda's had both gold and silver lettering, the 70 and 71 Barracuda's had silver, the 72 barracuda had gold, the 67 Belvedere/GTX's, 68, 69 and 71 Road Runner's and GTX's had silver, the 70 Superbird's had silver, the 70 and 71 Duster's had silver, the 72 and 73 Dusters had gold and most of the cars after that like the Colt, Challenger and Omni also had gold lettering. As I said, Slixx had a decal set for the Road Runner, GTX and Superbird but it looks like they are out on that one because I can't find it, the number is #SM3/1483. Bill: Of course they were 4-speed as was most of the Sox & Martin cars...it was Ronnie Sox and Herb McCandless driving and they were the best 4-speed shifters out there. But I don't think either the SS/E or the C/MP car had any console. -

Sox & martin 1970 Superbird Help needed
Force replied to 72 Charger's topic in WIP: Drag Racing Models
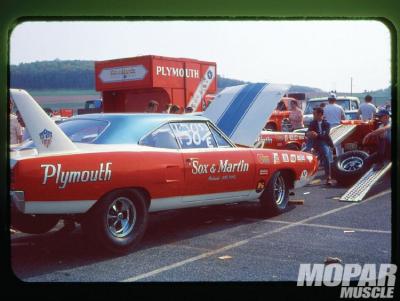
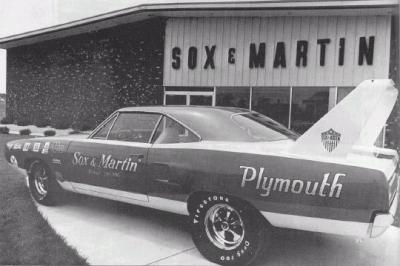
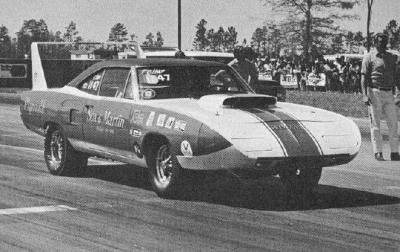
I have done some research on the subject and there are some pictures on the internet of the Sox & Martin Superbird...s...yes they had two different cars, but there aren't that many pictures around of them. One of the Superbirds ran in Super Stock / E (SS/E) and was one of only two Super Stock Superbird's built (Jack Werst got the other and ran in SS/EA), that car was not used for very long, just a couple of months in 1970 and it's the car the Jo-Han kit is supposed to be, the other Sox & Martin Superbird ran in C / Modified Production (C/MP) and it was used for a longer period. The SS/E car had no hood scoop and a painted blue metallic roof, the C/MP car had a Six Pack hood scoop and a black vinyl top. The engine setup was also different, the SS/E car had a 426 Hemi with a Rat Roaster intake manifold and dual 4bbl Carters as it was a Super Stock car, and the C/MP car had a 426 Hemi with Individual runner intake manifold and dual 4bbl Holley Dominators, pretty much the same setup as the Revell Sox & Martin 70 Barracuda has. Slixx has some sets of Sox & Martin decals and they had one set for the Superbird, Road Runner and GTX (#SM3/1483) but I don't know if they still have it in stock. Here are a couple of pictures of the cars. Note that none of the cars has the rearward facing scoops on top of the front fenders. The SS/E car. And the C/MP car. -
Color pictures of the engine in the 70'Cuda from back in the day is hard to find, belive me I have looked, but from the black and white pictures I have found so far where you actually see the engine block and heads it looks too dark to be orange, and as Jake King was known to paint the engines he built Ford engine blue it's possible the engine was blue...but it's hard to tell from black and white pictures so I can't be sure. Another thing...Sox & Martin did both lots of match racing and regular NHRA/AHRA races so there can be differences between the different setups. The Revell model is patterned from the restored car wich have orange engine block, aluminum heads and waterpump so either way would work and as it's your model you do as you please.
-
I used Tamiya tires at the rear on this build.
-
As far as I know NASCAR owns the rights to the shape and construction of the generation 6 cars together with the teams who builds them so you can't do even generic cars without licensing from NASCAR, Toyota, Chevrolet and Ford, but you also may be needing licensing from Hendricks Motorsports, Toyota Racing Development, Roush-Fenway, Joe Gibbs Racing and so on even if you leave out the decals. But if the licensing is shared it could cut the cost some, the question is if it's enough to develop a new kit. It's a weard time we live in when you have to pay lots of money for exactly nothing just to be able to do a model kit of something, it was a time when there were less greed and the model manufacturers could do model kits without having to pay huge ammounts of money just to be allowed to use the name of the tires, the brand of car and so on for the model kits...it's kind of free advertising if you ask me, and you could even call it product placing, that's done all the time in movies and the brand owners even pay for it and give out their products for free. I for one learned of many of the car related brands through my models, what kid who built models back then didn't know what for example Good Year and Firestone did. I'm more into the "dark side" of NASCAR as not many of the later race cars from the 1990's and 2000's didn't look like anything, but I like the shape of the present Generation 6 cars, so if they are done I will for sure buy.
-
Very cool model, I really like it.

