Force
-
Posts
4,608 -
Joined
-
Last visited
Content Type
Profiles
Forums
Events
Gallery
Everything posted by Force
-

Objective (non passionate) question on AMT quality
Force replied to ismaelg's topic in Model Building Questions and Answers
Yes I know that and I have done the same observation and as you have, there are lots of errors and missing information there for several kits, but most of the time you will get a hint anyway. They could have done a bit more homework and the timelines would be a lot more accurate, because kits based on the same basic tooling sometimes have different timelines instead of being on one wich they should be if the kit history would be right I did a timeline here on this forum a while ago on the Revell Germany Kenworth W900 kits with the kits in correct order from the first issue to the most present, Scalemates had them on three different timelines not tied together, but they all are based on the same tooling from the beginning so they should be on only one. -
Ok, thanks.
-
Objective (non passionate) question on AMT quality
Force replied to ismaelg's topic in Model Building Questions and Answers
The thing is to get a good kit is to know it's history, when it was developed and first made and how many times they have been reissued, but that's not that easy if you are fairly new to the hobby, because some kits are 40-50-60 years old by now and are still on the market. Scalemates.com can give you a hint of the age of the tooling for a particular kit if you look at the timelines where you can see when the kit was new and originally issued and approximately how many times it has been reissued after that. If the molding tool is old and the kit is frequently reissued the quality nowadays is often worse than it was when the tool was new, and the other way around where the tooling is recently developed and fairly new and not used as much the quality is better, not just because the tooling but the details and buildup of the kits are too as development has come forward quite a bit over the years. So if you know a bit of the kits history you can get gems even from AMT -
Smokey and the Bandit Rig.
Force replied to stavanzer's topic in Model Building Questions and Answers
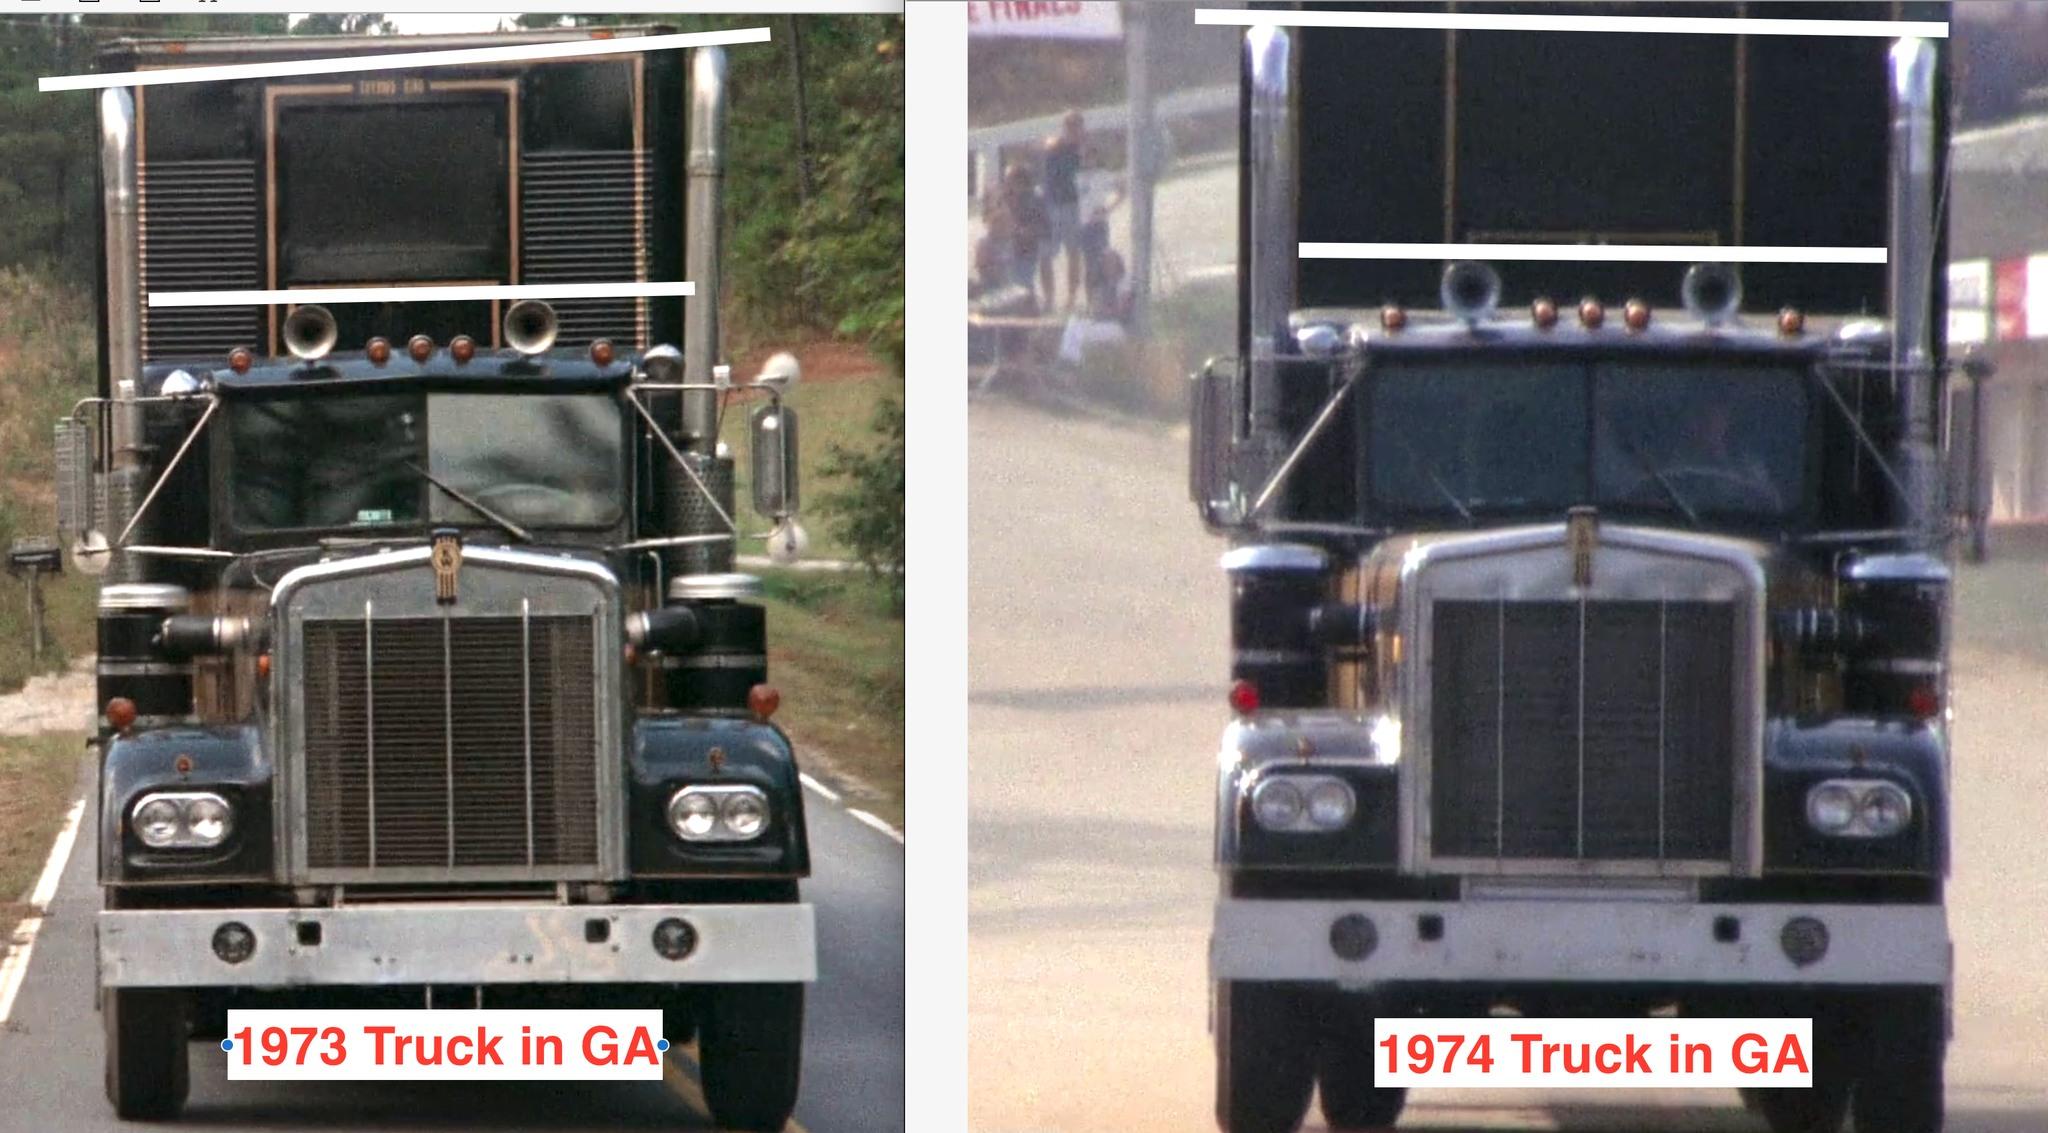
They are nice but unfortunately not the correct style I'm affraid, here is the 1973 truck at the Lamar's scene and the 1974 has the same door handles. Auslowe has the correct style in photo etch, the middle ones in the picture below are right with the triangle shape and lock cylinder on top, can most certainly be found at STS. The ones on top is the new style used on modern KW's CMT do also have them but you have to get a complete detail set to get them, STS deals with CTM parts too.
-
The website is still there but they have stopped sales for some reason. I was about to order a couple of sets but it seems like I'm too late.
-
Well it was not Revell who came up with this system, these kits were originally Monogram like the large scale 1:16 Kenworths and Peterbilts from back in the early 80's and before the Revel-Monogram merge 1986. But I agree, these wheels stinks even if they are done right and should be replaced with something else that looks a lot better as these are too shallow and toylike. The problem I see with the Moebius wheels are that they look way too modern for this era trucks, but if you like using them it's fine by me. I would rather like to use older style 24½ inch Alcoas...or even a set of 22 inch split ring Alcoa wheels, instead of the newer style 22½ inch wheels, but that's me.
-
1963 Super Torque Ford
Force replied to MarkJ's topic in WIP: Stock Cars (NASCAR, Super Stock, Late Model, etc.)
Not hard at all, just a couple of screws and you are done ? Ohh you mean on the kit body...I couldn't resist joking around. Looks good so far. -
Objective (non passionate) question on AMT quality
Force replied to ismaelg's topic in Model Building Questions and Answers
One must keep in mind when the tooling for the kits are made, 40-50-60 year old tooling are worn and the kits from them are plagued with molding seams and lots of flash, the buildup are sometimes questionable and the quality varies. The AMT brand was bought by ERTL 1983 and the MPC brand 1985 and all kits were branded AMT/ERTL after that and it continued under the Racing Champions RC2 ownership until Round 2 LLC bought out the tool bank and AMT and MPC brand names from Tomy who now owns the ERTL brand. And the latest developed AMT kits under the ERTL era in the late 90's was really good, but you have to know what kits they are, among them was the 1960 Ford Starliner, the 1958 Edsel Pacer, the 1957 Chrysler 300C, the 1962 Ford Thunderbird, the "new tool" 1957 Chevy and some others, but most of the tooling is old and worn and developed in the 60's and 70's, many of the kits are issued many times. The worst period was under the Racing Champions/RC2 era when they did kits with lousy quality and they were in it just to try to make money with the least effort, not to do anything for the hobby itself and they only reissued old kits over and over and did nothing new, that changed with the Round 2 ownership where the owners seems to be interested to do a good product and reinstated the MPC brand and quite recently bought Polar Lights, Lindberg and Hawk lines and they restore and retool kits frequently and has recently done some all new tooling kits. So just to reject an AMT kit just because it is an AMT kit is wrong as there are some gold nuggets there too if you know the kit histories. If you take Revell, the old 60's and 70's kits are not that good either, hard and difficult to build and has mold lines and flash, but they continued to develop new tooling the whole time and the quality is a lot better on the more recent kits developed from the late 80's and forward. Another thing is that Revell and Monogram merged 1986 and the Monogram and Revell brands are sometimes used on wrong kits, Monogram was mostly 1:24 and the Revell kits are and has allways been 1:25, no Revell developed kits are 1:24, so kits developed after the merge of the companies can be both for Monogram branded kits. -
Smokey and the Bandit Rig.
Force replied to stavanzer's topic in Model Building Questions and Answers
Where do I start. The "Snowman" "Bandit" truck in the movie is in fact two different trucks (some say it was three but I have proof it was only two), one was a 1973 and one was a 1974 and they are painted black and gold to match the Trans Am and are very similar but there are differences and clearly visible if you know what to look for...and they also had two different Hobbs trailers for the shoot. There are no kits done for this exact truck so the best kit to replicate the trucks are the AMT W925 but it need some modifications to be correct, the cab in the kit is too old as it's a pre 1972 so it has wrong door handles and the vent window is larger, but that's not a big deal and can be changed, otherwise much is right in the kit. The door handles should be the low mount paddle latch handles used from 1972 forward and not the high mount lever handle that are on the AMT cab, one way to go is to use a cab from the Revell Germany W900 wich is right on the outside, but it's easier to foil copy the door handles from a Revell snap kit or the Revell Germany full detail glue kit and move the vent window post forward slightly on the AMT cab. The trucks had about 200 inch wheelbase wich is a little shorter than the AMT kit, both trucks also had torsion bar suspension at the rear wich early AMT W925 kits had but was later changed to walking beam, the 1973 truck most likely had a Cat 1693 and the distinct rattle from that over head cam pre combustion engine can be heard in the opening scenes, and the 1974 a Cummins NTC 350. Both trucks has battery/tool box steps on both sides and the tanks are under the 36 inch sleeper. And for the trailer I would use the AMT Fruehauf trailer with a dummy reefer unit like the movie trucks had, because the trailers did not have a real reefer unit, they both had a box meant to look like a Thermo King unit, without the grille and other stuff and they had no tanks under the trailers wich a real reefer trailer would have. Decals are available from modeltruckin.com both for the truck and trailer. Torsion bar suspension can be found at Auslowe and a couple of other aftermarket companies, STS supply Co sells Auslowe parts. Cat 1693 engine can be found at KFS, STS sells KFS parts too Here are some pictures to enlighten the differences between the two trucks. The 1973 on the left and 1974 on the right, look at the placement of the KENWORTH emblem on the side of the hood wich are different, the 1973 emblem is gold as it should be on a 1973, due to Kenworth's 50th anniversary that year all US built Kenworths had gold emblems, and the 1974 emblem is chrome. The easiest way to tell the trucks appart is to look at the air cleaners, the 1973 on the left had Donaldson FWA air cleaners wich are in the AMT kit and the 1974 on the right had Donaldson EBA air cleaners wich can be found in the Revell W900 kits. Here you see them from the front, look at the stack hight and mirror setups, they are different You can also see the dummy reefer units. Sometimes they used both trucks in the same scene obviously shot at different times, note the battery/tool box covers, one has handles and the other don't, and the lock ring on the wheel is rusty on the 1973 truck and painted silver on the 1974. Note the step under the center of the bumper, it's silver on the 1973 truck on the left and black on the 1974. One thing, the KW bug emblem on the grille is painted gold and black, gold is correct for the 1973 but it should be reversed with red bottom and gold stripes, rings and KW letters, you can also see the different mirror setups On this picture you can see both rigs at the same time. There are much more if you go into details but these are the most noticable differences between the two trucks. So it depends on how accurate you will be and how much work you are willing to do and wich one you decide to build is up to you.
-
Will do, Thank you.
-
1963 Super Torque Ford
Force replied to MarkJ's topic in WIP: Stock Cars (NASCAR, Super Stock, Late Model, etc.)
I have a real 1963½ Galaxie 500XL and I will follow this closely. -
It's gonna be nice Tom. I seems like Flintstone grafted in a 49-50 back window, or lengthened the quarter panels on a 49 body on this one. Because the back window opening is totally different on the 51 and much larger.
-
It looks like I'm stiffed again because I have not got the #217 yet, I also live in Sweden like Claes who got his copy February 21st, and it has been over a month and I still haven't not got mine...it's a week into April now for gods sake. I don't know where the problem lies, if it's with the post delivery in here in Sweden or if it's with the bulk shipper you are using, somewhere somehow magazines seems to disappear in to a dark hole and never reach the subscriber. Issue #216 came as it should tho'. I subscribe to another magazine from the US and it seems to come sporadically too so I suspect some of the problems can be with Postnord, the Swedish post delivery, since they changed to every other day delivery a while ago it hasn't been that reliable. This is starting to get very frustrating.
-
It's not just the "bubble" that's different, the nose is longer on the later Firebird/Trans Am bodies too and things like the wheel openings and back sections are shaped differently, so to do a Skoal Bandit car with a correct appearence you need the whole body. The body Revell did wich was Prudhommes car 1984-85 and the earlier Pepsi Challenger Trans Am from 1982-83 had the same body. And one of the later Skoal Bandit cars from 1987 or 1988. The nose of the body was changed even during the Pepsi-Wendy's sponsorship , this must be 1985 because he took a year off 1986 due to lack of sponsorship. This one is not the same as the Skoal Bandit bodies, just the earlier body with a longer nose.
- 1 reply
-
- 1
-

-
2023 BRGB Movin' On Kenworth
Force replied to leafsprings's topic in WIP: Model Trucks: Big Rigs and Heavy Equipment
No the end cap at the rear of the AMT torsion bar setup is not there, I have one W925 and one K123 originals with torsion bar suspension and I just checked. The aftermarket setup is easier to build than the original AMT setup. -
They are all the same basic kit, and one has some Aussie stuff and a pup trailer...but the basic kit are the same. Here is the different versions. 1994, box marked 1:24 but it is 1:25 like most of the other Revell Germany US truck kits. Here is the version with the Aussie parts and the pup trailer from 1995, box also marked 1:24. 2012 and now the box is marked 1:25. 2022-23, still marked 1:25. Revell did not do two different kits of the same subject so close in scale and as far as I know there are no W900 kits available in 1:24th scale. Here are all versions of the Revell Germany Kenworth W900/T900 listed in order and you can see for yourself that the scale markings differ from version to version, but it's the same basic kit from 1992.
-
Kenworth Cab Over tractor
Force replied to Mopar2's topic in Model Trucks: Big Rigs and Heavy Equipment
Well Revell did a few versions of the K100 with the flat top roof. 1984, the first one I bought and I still have it as a tri-drive from 1986 1990 And the latest issue from 2016 Sorry for the hijack Anthony -
It looks really good and I'm looking forward to be able to get this dash so keep us updated on when it will be available to get...because I will get several for my K100 Aerodyne kits. I'm really glad I was able to convince you to do it because this has been missing from the market since forever it seems like. Nuts and bolts are allways welcome to be able to detail our kits, so I'm in.
-
AMT has 2 different 57 Chevy tools and that's the old tool 57 Chevy wich was first issued 1963 and has been reissued over and over since then, the tooling the Pro Shop 57 Chevy and the other ones I listed above was first issued in 1997 some years before Racing Champions bought the company and are totally different.
-
Kenworth Cab Over tractor
Force replied to Mopar2's topic in Model Trucks: Big Rigs and Heavy Equipment
The Revell Germany K100 kit was available both as a flat top and an Aerodyne, same kit with different roof sections and I have several of both. Nice build Anthony -
AMT did a non Pro Shop version of the same kit with pretty much the same parts count except for the photo etch and rubber parts. Here are the different versions of this kit as far as I know. Standard non Pro Shop kit and first version of this new tooling kit from 1997 #8315 The Pro Shop kit with rubber and photoetch parts from 1998 #8455, otherwise it's the same kit as the above Reissue of the non Pro Shop kit, it's a 2 door post sedan on the picture but it's a hard top. #8315 Reissue of the non Pro Shop kit with Coca Cola decals #H862 And a Pro Street version based on the same tooling from 1998 #8319
-
I think 1966 was the first year for this kit and this is the second issue from 1970's and it was later reissued under the Lindberg brand a couple of times.
-
2023 BRGB Movin' On Kenworth
Force replied to leafsprings's topic in WIP: Model Trucks: Big Rigs and Heavy Equipment
It's funny, some people insists that the Revell Germany Kenworth W900 is 1:24th scale, yes some of the boxes of the different versions of this kit says 1:24th scale but all versions are based on the same kit bcause they did not do 2 different kits in different scales, and it really is 1:25th scale like it says on other boxes with versions of this kit. I covered all versions of the Revell Germany KW W900 kits in this topic back in August. I have not compared the chassis on the Revell and AMT kits but it could be like you say. -
Hey Scott, where are we with the K100 Aerodyne dash?
-
2023 BRGB Movin' On Kenworth
Force replied to leafsprings's topic in WIP: Model Trucks: Big Rigs and Heavy Equipment
I was planning to do just that on my build when I get to it, splice in the rear section of the AMT chassis to the Revell AG front section.
.jpg.4a8a6691994dfcc5cacf3d4c54cb519a.jpg)