
spkgibson
-
Posts
859 -
Joined
-
Last visited
Content Type
Profiles
Forums
Events
Gallery
Everything posted by spkgibson
-
Highly Detailed GENERAL LEE.... finally done...!1yr and 6 days
spkgibson replied to mopar01lee's topic in WIP: Model Cars
I'm enjoying your build, But a word of advice, It's really not at all in your benefit , Or smart to make rude commments to Harry, Or Gregg. They have this forum up for all of us . How I check my spelling, Is type the first 3 letters into my toolbar, It wiil show you the propper spelling, And by no way don't think I'm attacking you at all, I'm just letting you know,That you cannot do things like this statement above. They made this forum for us all to enjoy and share our builds with others. By the way , Back to the Model, I think you're doing a great job on it, I really like that Orange. Very Nice. -
Dean's Hobby Stop. Here is the website, www.deanshobbystop.com
-
Went out to Dean's Hobby Stop and picked these up for alittle over $100.00, Not bad the AMT 72 Nova in this issue is worth around $40 alone. The old original AMT 66 Novas from 1988 have one with,And without the rear view mirror molded in the glass, And they both have the same date on the decals on the back. All of them were F/S Also. I love that Hobby Shop.
-
Highly Detailed GENERAL LEE.... finally done...!1yr and 6 days
spkgibson replied to mopar01lee's topic in WIP: Model Cars
May I suggest a tip for you? Before painting the car, You should have added Strip Styrene to all of you panels, To close up the oversized gaps.Or used another body as a donor for the Doors,Trunk,Ect, Very Nice paint job. When I cut panels out, I use 2 bodys, One for the panels, Doors,Trunk,Ect, And the other for the main body. That way you can sand back the edges to have a perfect fit, I cut out the doors and other panels oversized from the donor body, And cut the Body i'll be using for my build undersized in those areas, That way I can sand back the edges to make a perfect fit for all of your body panels, Just a little food for thought .For your next build . -
Very true, I guess it depends on the years, Where the car was made, Ect, So I guess any color could have been used, I'm pretty sure though Chrysler used Gray in the 60's and 70's. The 79 Nova that my brother and I are restoring has the Red Oxide under the White Paint. I remember touring the Fisher Body Plant in the 1980's on a school field trip, And they used to take the entire body shell and drip them, I can't remember if it was to rust proof the cars, Of if it was the primer bath, That was along time ago, 1984 or 85 I think, Then When my father worked at The Buick Engine Plant 36-4 I was able to go see how they made the Buick V-6, That was really cool. He started working there in September of 1965, He worked on the transmissions for the Then new 1966 Toronado. If I need to ask anything about Building a Buick model, I have him to ask, that pretty cool. Most of my family worked for GM , All divisions.
-
BMF that is sloppy , Uneven lines and not burnished down properly, With hairs and such, Also uneven paint , And markerlights painted on sloppy ,And in the wrong color, Most of the automobiles out there used the proper color Tamiya Clear Orange, Sone use the Testors Turn Signal Amber.Both are different in the shades, And to solve the clear headlight issue, Thin out some of the clear Testors cement, And flow it into the headlights, It makes them look more realistic, Also if the headlight background needs to be blacked out, Example being, The 69 Nova,Paint the entire area with black, Then back your Clear Headlight with BMF, Then glue it in with the clear cement mentioned above. It makes it look more relistic , I see so many models ruined by headlights being painted white,Or silver, I have never see either color headlights on real cars. Also if there is no bezels for the taillights, Example a 68 Firebird, And other subjects, Back those also with BMF, That way it will brighting the lenses up. I use those methods all the time. And make sure you reserch your projects before adding the final details. I have seen so many projects, That look nice,But most of the details are totally wrong, Factory overspray is another issue I have seen. For Mopars, Everything underneith is body color, Chassis wise, The only thing that is black is the "K" Frame, and the rear axle, The rest is gray with body color overspray, The unibody Fords,And GM cars were the same,Except. The subframes were Semigloss Black. The rest was Bodycolor overspray. for Ford, They used Red Oxide Primer Most of the time, GM used Gray. Full frame cars were painted the same, The only difference was the entire frame was Semigloss black. The only way you would have and entire black chassis would be if the car was Undercoated,And that wasn't uniform from the factory . And even sometimes they used different colors for it. But for a factory stock model, The best way to start is to research the subject from top to bottom, and front to back. And one of the most common problems I see is mid to late 60's Chrysler Products engine colors, They only used Orange on the 426 Wedge and HEMI's up untill 1968, In 1969, That is when all the Hiproformance Engines were orange, The 68 and earlier 383'and 440s were Turquoise . 1969 was the first year for the Orange engines. Unless they weren't the Hiproformance versions , Those were the same colors as the 68 and earlier years, All of your Smallblock Chrysler engines were red up untill 1969 or 1970. Just do alot of research on the next project. Take your time and you should be good. But the chassis details I mentioned are correct. As I have been building and researching this stuff for years.
-
Good one. And, I'm glad you like the car.
-
I tried, I guess all the hours of research made it possible. I'm glad everyone likes it. That grill was a pain to get to look right, As was the taillight panel. The Acadian Medalian in the grill had to be filed both top and bottom to get to line up with the chrome bars in the grill. One little mishap and the entire car would have been ruined.I As you can see that part is tiny, I was also afraid of the carpet eating it, I'm pleased with all the positive comments and the results of the car. I have another project in mind out of one of these Nova kits, But I have a few ideas about how the easiest way of doing it.
-
Here is the chassis shot, And a better photo of the engine compartment, And also the interior showing the 68 Style seats.
-
krylon, whats the verdict?
spkgibson replied to robdot's topic in General Automotive Talk (Trucks and Cars)
The key to using Krylon is all in the prep work, Make sure you use a good automotive primer, Like Duplicolor Filler primer, I always use that primer, Let it dry for a few days,Then go over it with the the color primer you plan on before your topcoat. I use the Duplicolor White Sandable for the light colors, Like Yellows and Oranges And other Pastels , Grey for the Blues, Greens and Blacks , And the Red Oxide for the Reds and Browns and other Shades. But. Make sure you mist coat your parts , Let them tack, I wait around 30 minutes between coats. But make sure you inspect it for dust and other things in the first few coats, Lightly sand them with an 1800 grit sanding cloth, Thats what I use atleast, Then after there isn't anything in the paint,Proceed to add more mist coats. Repeating the process untill you have your desired coverage. Then set the parts aside for atleast a week. Then take your favorite wax or rubbing compound and rub it out, I have never used clear on this stuff ,Some people do. One word of caution with using this paint, Make sure you get the parts painted all in the same day, Or if you try to recoat it later, Even a day after , It will lift,And ruin the paintjob, I learned that the hard way recently on one of my Novas I'm working on. It strips off with the Scale Coat Paint Stripper with ease. Never , Ever use this paint on bare styrene, You'll end up with a complete mess, And Make sure you use the primers I mentioned, It eats into Tamiya primers right down to the plasic. I found that out the hard way also. -
Nice touch ,Adding the epoxy to the guages ,I looks very real, And you can actually read them, Very nice detailing on that dash, I can't wait to see more of this car , You're doing one heck of a good job on this one.
-
Afew More, I also had to reposition the "Acadian Emblems on the rear quarters , I had those to far back, They need to be centered over the markerlights.
-
I took some pictures of the car outside today, I also added a set of old MPC tires to it. Enjoy.
-
You don't want to do this . . .
spkgibson replied to Greg Myers's topic in General Automotive Talk (Trucks and Cars)
Talk about being lucky, Thats nuts! You know he had a load in the pants after that. -
'71 Charger Base Hardtop from: '77 movie Speedtrap
spkgibson replied to Nick Winter's topic in WIP: Model Cars
The best way to solve the orange peel problem, Just wet sand it, The Duplicolor Filler primer I always use does that, I simply just wetsand the entire body with an 1800 grit sanding cloth, Mine came in the LMG polishing set, I have used it for over 6 years now, It will also feather out your body work perfect, Thats the method I use all the time.Alot of times all I need to do is just go over the car with the cloth using the rubber sanding block that came with the kit, And I always let my primer gas out for atleast 2-3 days , After the final coat. Then go over the entire car with the 1800 grit and 2400 cloths in my polishing kit. The smoother the primer is, The smoother the paint will be, Final prep is key to applying a smooth paint job, This is for your future reference when you get ready to paint the car, To help with filling in those vents on the door, First mix up some Superglue and baking soda, or baby powder , apply a thin coat only in the recessed areas, Almost to the point of it sticking up beyond the area, Sand it down after dry,Usually about 5 minutes or so, Then apply a light skim coat of your filler putty. Sand to the basic shape, Prime, The sand again, build up the primer in that area only. Then taking a finer grit sanding stick, blend the bodylines back into the area you sanded , I always tape off the area around before I do any mods on Bodys, I just work those areas , Then blend in the body work into the rest after the first couple coats of primer I apply only to the areas being modified. After I'm pleased with the results of my body work, Then I prime the entire car, Wet sanding between every coat. -
Thats to funny,I almost mentioned that car in my last post.
-
The Beaumont was dropped after the 1969 model year, And the Acadian was dropped midyear in 1971 when Canada got the Ventura II, Also, According to my references ,And what I have reserched online about the 68-71 Acadians they were built here in the United States also.But were not sold here,Only to the Canadian Market,Though I have seen alot of them in car shows in the Detroit area. Along with a few Beaumonts. So in 1971 Canada had the Acadian,Nova and Ventura II ,Mid year,the Acadian was dropped the Ventura II took it's place , The 71 Acadian is an extreemly rare car, According to my research. And neither one was called a Pontiac anywhere on the cars, They were both sold through Pontiac dealerships , But not one Pontiac nameplate on neither car,Only the fullsized Pontiacs had Pontiac emblems,And were almost the same as the US models ,But had different model names,And Chevy engines ,And their own unique interior patterns,Similar to the fullsize Chevys.By my own personal opinion, I think the 68-69 Beaumont ,And the 68-69 Acadians looked better then the Chevelles and Novas of those years, In SS and SD trim, they looked great, I love both the US and Canadian versions of both of the series of cars. I can't wait to see how you make that 66 Acadian Canso, I plan on making a series of both the 68-71 Acadians and the 68-72 Novas out of that new C.O.P.O kit.
-
That was the only problem, I tryed finding one close to the correct one, so I ended up just using the 69 Style, I know it's wrong for the one year only 68 Dash, The next one I build,As a 68 I'll figure out the best way to convert the 69 into a 68, I have great reference photos of the dash, But I was a little worried about messing up the dash in this one, The chrome in this kit was bad, So thats what gave me the idea to make the Acadian out of it, By the way if you have any Ideas on how to make the 68 Dash, Feel free to share them with me, Also, The Nova detail sets from MCG Work great on these kit's, Only part that you can't use is the rear taillight trim part , That part is to narrow. That steering wheel is out of a 69 Barracuda, I matched the shape perfect, They also had the same steering wheel as the 68 Nova as another option. Those can be found in the MPC 69 Camaros and the AMT/MPC 69 Firebirds. That is the only flaw, I'm not happy with, The dash.
-
I used the 69 Nova SS kit for the Start of this build, All of the emblems and rocker trim are from the Model Car Garage Detail set, The Seats have been converted back to 1968 spects, All that was needed to do was to remove the head rests and fill in the holes, And rescribe the patterns at the top, The taillight panel is scratch built, The engine I used was the SS 350, With the AMT 72 Valve Covers, And Air Cleaner, The wheels are from a MPC 69 Impala, I think, I found those in the junk box out to Dean's Hobby Stop. Well have a look, I recently painted the wiper blades black,After the photos were taking, So I'm about 99% done with it.
-
'71 Charger Base Hardtop from: '77 movie Speedtrap
spkgibson replied to Nick Winter's topic in WIP: Model Cars
This is the 72 through 74 Style hood. This one came from Time Machine Resin, narrowed and thinned from the underside to fit the AMT body. -
'71 Charger Base Hardtop from: '77 movie Speedtrap
spkgibson replied to Nick Winter's topic in WIP: Model Cars
Nick here is the after and before photo of the hood. -
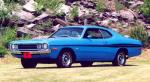
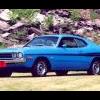
One of the main differences in the chassis's is just mainly the shape of the gas tank, from 71 on up they were smaller, and they changed the engine compartment, Slightly, Thats about it, As far as the color pictured on the real car photos, That is Lucerne Blue,Thats what it was called in 1974, In 1973 it was called True Blue, The shades only differed slighty . Cool Idea with using the 70 Superbee chassis.
-
How would I go about casting this
spkgibson replied to Mr. Moparman's topic in Car Aftermarket / Resin / 3D Printed
Finish that one up, The 500 also had the same A-piller trim on them like the Daytona. I made sure to add them to the MPC 500 I need to finish up. Look up the real car on Google. Everyone I have seen has them. -
'71 Charger Base Hardtop from: '77 movie Speedtrap
spkgibson replied to Nick Winter's topic in WIP: Model Cars
I did the same thing to my hood on the 71 Charger I have been working on and off for awhile, I did mine the same way, Put a skim coat of Bondo spot filler putty on it, And it smooth, Then heat up a piece of kit sprue with a lighter, stretch it to the thickness of the bodyline, Then glue it on with liquid cement, Make sure you center the peice on the hood, After that is dry, Take some of the same putty and lightly go over it with it on your finger, Make sure you can still see the color of the peice you added, After it drys sand just the sides , Not the center, It will blend in perfectly if you use this method, I'll post a photo of the before and after hoods I made . And do not fill in any of the vents on the hood, the 71 had them the way they are in the kit, That car in the photos has a 72-74 Hood .By the way, I'm very impressed with how well your skills are improving. Keep up the good work.
