
spkgibson
-
Posts
859 -
Joined
-
Last visited
Content Type
Profiles
Forums
Events
Gallery
Everything posted by spkgibson
-
Inlight of what I was watching on the weather channel last night, My thoughts and prayers go out to all of the people in the south, I know some of the members on here are live down there. Just be safe . The record number of Toronadoes passed the 1974 outbreak from April 3-4 of that year. So to all of you modelers that live down in that part of the country , Be Safe.
-
Hey don't feel that way, Just find the model in plastic and build one, You have a great piece there to get all the details right for it.Those Cars were painted in various shade of orange, The first cars were 1975 GM Flame Orange, Some were painted in 70-71 Mopar Go-Mango, And Hemi Orange, As far as the engine bay , Those could have been any of the factory colors offered in 1969, The best wheels, In my oppinion to use are the custom wheels out of the AMT 69 Riviera. Those are the same wheels for the GL, The best kit, Is the Revell kit, And the AMT/MPC Kit for the Front bumper, Cut the grill inserts out of the Revell grill and use them inplace of the wrong ones in the AMT/MPC Kit, I have an original MPC 69 Charger Annual that I'm restoring ,And it will be the Dirty Mary , Crazy Larry Charger. I have everything for it, I just need to pull it out and get working on it, With the kitbash I explained you can come up with a nice GL, That Grill/Bumper unit in the Revell 69 looks completely wrong to me, The bumper is to big,As is the grill surround. Grab some kits and impress us.
-
Another amazing build, Looks perfect.
-
Beautiful paint, And those flames accent it perfectly. Looking Great!
-
I have been going to his shop for over 15 years now, Thats where I get most of my stuff at, Great Prices , And a great person to deal with. AMT kits run from around $12-15 for the newer stuff, Older stuff is priced accordingly ,Not the high prices thet you pay on e-bay , I would highly recommend buying stuff from him, I found a 69 Barracuda built up in his built up box for $8. That one has the 68 style makerlights on the body, I'm converting it to the 68 using the Small Block Dodge Conversion kit, So I have a total of $23 invested in the car so far.Not $150-$200,I've also found some really good stuff in those boxes also. Visit his website and get rare stuff at half the price other places. I'm not only a customer,But I'm also really good friends with him.
-
I already like where this is going, I think the results so far speak for themselves, Nothing like good old vintage plastic, With the Metal axles! Looking Very Cool, Those wheels fit that car very well.
-
What did I say something wrong? I like both of the photos of the builds on here. My eyes are perfectly fine. I'm not taking the bait on that one my friend, Thank you so much. The build looks nice .
-
Ok, That's not a model, If it was completely tore down and redone, Then it would be, Nice Factory paint.
-
Now that I have seen better photos of the kit, I may go out and purchase one, The Idea of using the Grill and Bumper from one of the AFX Falcons is a great Idea, I would go a step further though, And also use the Back bumper as well, And put it on one of the AMT 67 Mustang Chassis's , The roof would also be an easy swap ,IF everything lined up properly. Or just make a Convertable out of it, Which I'm sure will be the next kit to be released, One thing I would like to know however is, How thin is the plastic on the hood ? Those parts were a nightmare in the 63 Nova kits, Once you glued the bracing in the hood and trunk warped, And you had to skim coat the entire panels, Also, The plastic in those kits crazed with ANY automotive primers, I had to mist on 3 coats of Tamiya surfacer ,Then use the Automotive primers on it. That took care of the problem. I have to say this one looks better then the Nova, I thought the separate chrome was a good idea,But didn't fit well, I'm glad they didn't do that with this one.
-
Modelhaus Has the correct tires, You would have to call them ,And tell them what kind of car you're using them on, As they have all kinds of different sets, I got lucky and was able to find a complete set of originals out at Dean's Hobby Stop. I just finished polishing out the paint on sunday, I am going to let it sit now for about a week, Then i'll start putting together. I will be getting another one of these from Missing Link. Soon. As I want to build another one fully detailed with foil and detail painting along with getting the AFX version of the car from Speed City Resin, To make a Drag Team out of.
-
Looks better in your photos DD, Thanks for sharing.
-
I noticed the same issues as this post. If alittle more time would have been taking on assembly and better masking, I personally think they would have came out better, the burgundy and gold, just isn't that appealing to me.Good job though on hard to build kits.
-
Yes this would, My plan was to build this one, Then get the Speed City Resin Altered wheelbase 66 , And make the "Hairy Canary" 66 Valiant . I want to get another one of these also, And the other one I mentioned , Paint them alike ,And make a drag team out of them, I already have the Trailer out of the 76 Caprice, But I would love to find the one out of the "Diamond In the Rough " Set that was out back in the late 80's. Crusader, The Valiant Promos were made From 1960 to 1966, I think the 60 and 61 were made by SMP, I'm not 100% sure about that though, The 62-66 By AMT. Personally I would try and find resin kits , Or Annuals of the 60 and 61, As the plastic the promos were made of warped severely, I have never seen one without a warp.
-
What I trying to explain was, Cut both rear quarters below the trim line, Graft in the stock wheelbased ones out of this kit, And use whatever else you could out of the Trumpeter kit, That way atleast you would have a somewhat accurate body. But in my eyes they both look wrong, But for the price you would pay for both kits to chop up, You would be better off trying to find a resin body .
-
Well a big thanks to both of you,Without you guy's investing time and money in stuff like this, We would all be fighting for a promo on the "Bay" , This is a great kit , And anyone that has anything to say about the price of it, Well I think it was either the pale blue promo, Or the pale yellow one that Someone payed $900.00 for on there. That kind of money would be silly to pay for something like this. This IS the best 66 Valiant Kit out there. The factory stock one. And are worth every penny . Anyways as soon as I get the car polished out, And put the windows in I'll post the finished project. This is going to look great sitting on my shelf of A-Body promos, The next one i'm after it that 66 Barracuda , And another one of these to make a full detail Valiant And the Barracuda, Thats what that HOG kit under the Vailiat is for, To Swipe parts out of.
-
Personally , I think if you kitbashed it with the altered wheelbased falcon It could possibly be built in to a decent replica of a 64 falcon, I'd cut the rear quarters out of both bodys below the trim line, Toss this monstrosity in the trash. Or save the money you spent on both kits to find an old annual. Sorry but this car reminds me of 80's technology. With the types of stuff out there to make kits , This thing is horrific. I do however think that if you wanted to make an Aussie Ute out of it, That grill looks pretty close. If memory serves me. This thing is about as bad as the AMT 71 Duster, That was another one, When compared to the annual, Looked completely off.
-
Keep in mind that the real car is in direct sunlight, Mine is in natural overhead light.
-
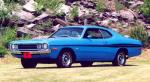
I recieved this kit from Missing Link about a year or so ago, I'm building this as just a display piece. I searched high and low for the correct shade of blue, I ended up using Krylon "Peek A Boo Blue" that color is almost the perfect match for the pale blue Chrysler used back in the mid 60's. I shot the paint over gray duplicolor sandable filler primer, I wet sanded the entire car before I put color on it, I found that if you use white, The color is to blue, The grey gave me the right shade I was looking for, It seems to tint the color , In these photos, That is the car freshley painted just 3 days ago, All I need to do is polish it out with some rubbing compound, No sanding required. When using this type of paint, I found it easier to mist on 3 light coats ,1 Meadium coat, Let it sit for an hour and a half. Inspect the paint job, And remove any dust or other stuff in the paint, I used a 2400 grit sanding cloth for that on the rubber block that comes in the kit I have,To remove a few dust particals, That was the only sanding I had to do, Then I added I heavy coat to gloss it up. And brought it inside and put it under a clear bread box, Let it dry overnight. Well on to the photos, I think the results speek for themselves, I haven't polished it yet, So it will look even better one I get that finished.And one of the real thing, I think I came very close.
-
1966 Plymouth Valiant
spkgibson replied to spkgibson's topic in Car Aftermarket / Resin / 3D Printed
Well I got this car painted, I'll post photos of it over in the on the work bench, I'm building this one exacly like the promo, No detail. The color I painted it was the pale blue that the promo came molded in, All I need to do is polish out the body. And the paint is done. Thanks for making such a great product Kevin, I'll be ordering another one of these babys soon to do a fully detailed version . -
Wish they made....
spkgibson replied to Jocache83's topic in General Automotive Talk (Trucks and Cars)
Any Fullsize C-body Chrysler Products from 1969-76 ,The 69 And 70 300's would be great to have in plastic, Same with the 67-69 Dodge Polara. I won't even mention the Monaco name.The 69-71 Fury's also, The 70 and 71 Fury GT would fit with the muscle cars, They were part of the Rapid Transit Themed Plymouths in the 70-71 Model Years.Plus in my eyes all three makes had some of the most beautiful designs of that area for fullsized cars. -
Those have to be THE best reworked diecasts ever done, That Convertable looks like it was made that way,That Gasser looks like something right out of the early to mid 60's ,Very cool, How in the world did you get the windshield frame on the convertable to look so nice? Great work on all 3, I have to say I can't pick a favorite, I love all 3 of them.
-
Nice score!
-
Those look great so far, The Challenger , And Duster are my favorites, I also like the 65 Coronet, I can't wait to see how you do that Rod Shop Challenger, I have a LOT of 71-72 Demons ,And have been wanting to make the 71 and 72 Versions of the Rod Shop cars, But I can't find the Decals for them, Hey Mr. Resin Buddy. One heck of a job on both of those kits, Caine you never cease to amaze me with your builds. I love everyone I have seen so far!Top Notch builder here guys !
-
They Are all correct, But if you're not going to use the taillights anyways, Superglue those in the cavitys , File them down close to the correct shape you want, Then use the 2-Part putty over them, It saves you alot of time, And won't cost you dime on sheet styrene and trying to shape it, They already have the correct shape to them, And it is save to use the filler over the clear plastic. It's actually , To me better then sheet plastic, It's alot more rigid then the other plastic in the kit. Plus it's free!
-
1/25 Scale Resin 1970 Swinger
spkgibson replied to 1972coronet's topic in Car Aftermarket / Resin / 3D Printed
I already own the Bandit 71 Scamp, Also the AFX 70 Dart, I ordered one of those , And I never got it, I have no idea what happend to it,Oh well. I'll make my own. Far better then that one! I still would like to see some of your built models,Like that 71 Barracuda you did like I was doing mine.