sjordan2
-
Posts
7,675 -
Joined
-
Last visited
Content Type
Profiles
Forums
Events
Gallery
Everything posted by sjordan2
-
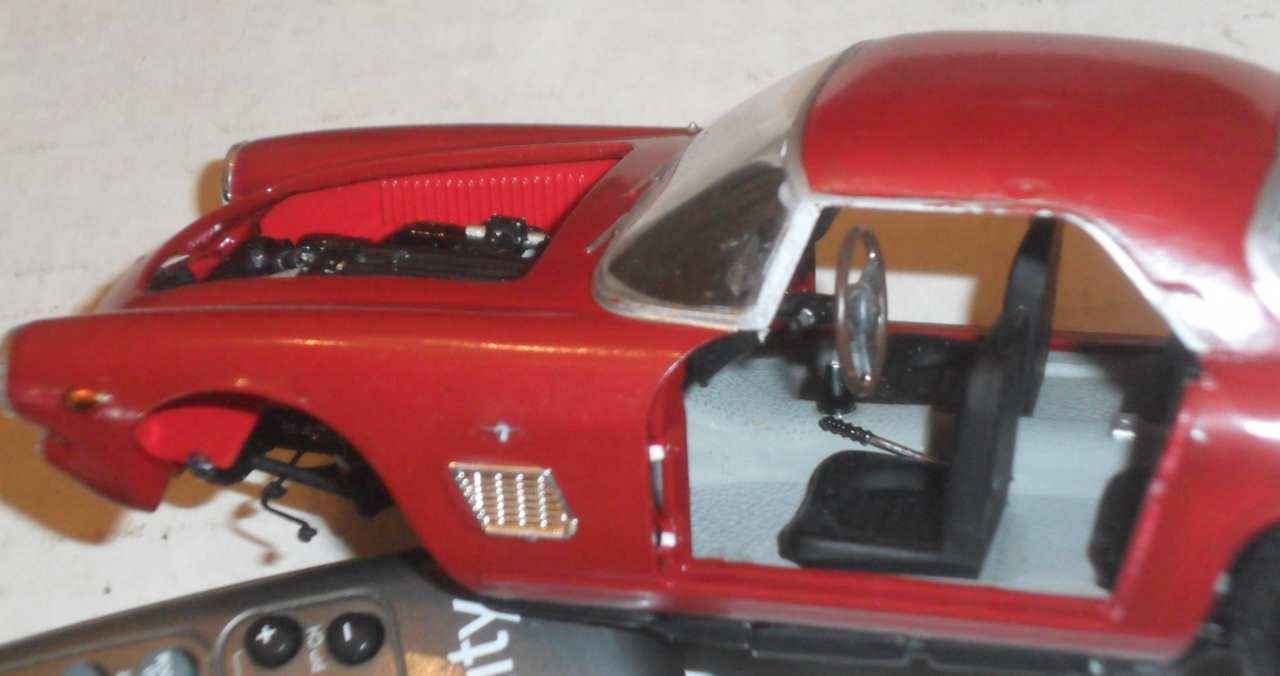
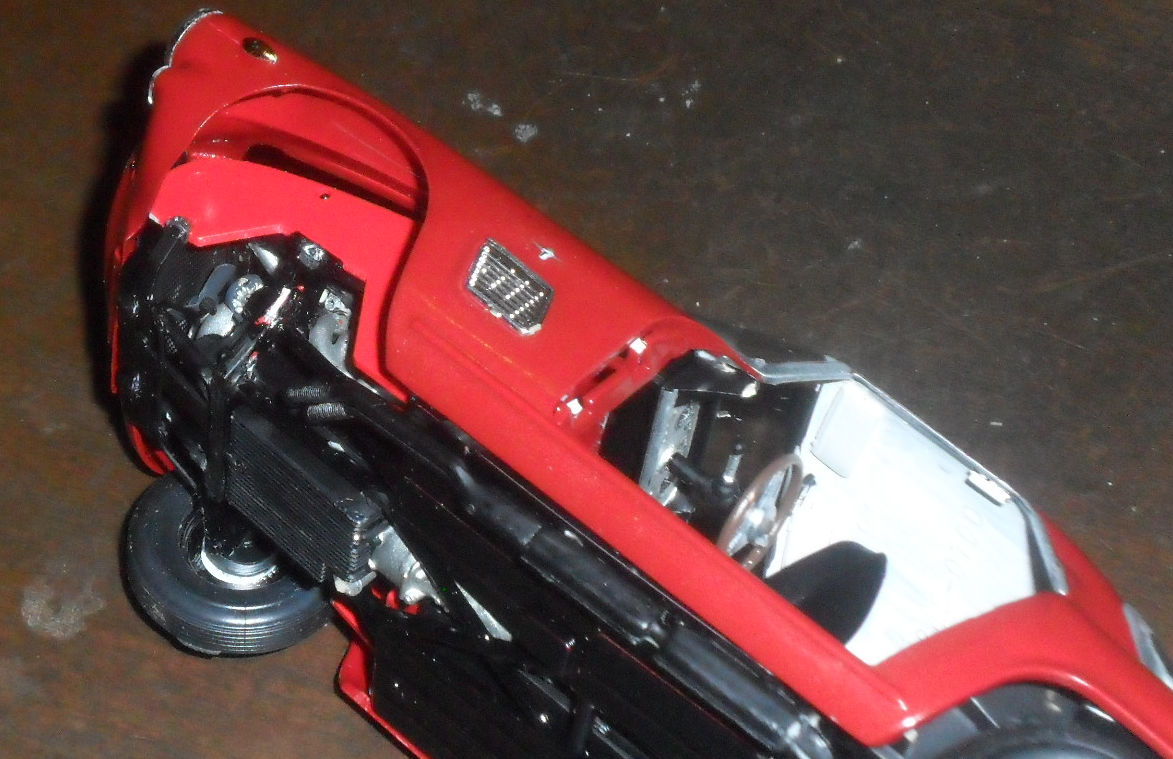
Here are some shots from the built-up kit I got on eBay (click to enlarge). These show the fender liner issue I described, which MAY NOT really be an issue -- just this particular kit and the way it was built. You'll see that the liner on the passenger side is just fine, but there's a big gap on the driver side. In picture 2, you can see how the liner mounts to the front of the frame. In any case, the fender liners and insides of the body should be matte black, so nothing will be too obvious. Also study the interior, which requires adding a seat base and a bit of repositioning of the steering wheel. (Like many kits of the era, there is no steering that goes into the engine bay). I think the seats need to slide back more. Let me know if you need other detail shots. PS: I don't know the exact dimensions, but I thought this MCG PE set for the 57 Chevy would be suitable for the grille mesh. Don't know if it's big enough, but it looks close. http://www.ebay.com/itm/MODEL-CAR-GARAGE-2087-1957-CHEVY-BEL-AIR-DETAIL-SET-AMT-KIT-/281055877495 Just got this info from the seller of the PE parts: The OD of the entire piece is 3" and the OD of just the grille piece is 2.5" The original kit grille piece is 1.5" wide, so a little sizing of the art should tell you if it's suitable for the Maserati. The main difference is that the horizontal bars of the Maserati are more prominent, and the vertical bars of the Chevy are more prominent. But the spacing looks good.

-
Revell and Gunze Sangyo. Search in Google Images for pictures.
-
I've always preferred artist's acrylics like Liquitex for seats and other parts. It's easy to add subtle shading and a bit of texture, and you can create wrinkles using a gel medium. You can also change your mind in the process by washing some of it away with water.
-
Just a little preview of what's coming up with the kit interior (I'll also get shots of that from my built-up reference model), the kit's steering wheel projects out too far from the dash at a straight angle, and the seat backs and bottoms are about half as thick as they need to be, which looks very odd. Door jambs on the body and on the doors need to be chrome. Speaking of doors, the hinge arms will snap off easily, simply by looking at them. PS: it's not just the door hinges that can snap, this is an old kit with VERY brittle pieces and cannot stand an ounce of pressure anywhere, trying to line things up. You can also easily snap off the wheels. NOTHING can be forced.
-
As you guessed, the fender liners narrow a bit from the firewall to the horizontal bar at the front of the frame (the taper basically follows the lines of the hood opening); the liners have a notch at the bottom front, which fits onto the bar on either side of the radiator and is glued down. It looks like the fender liners really need to be assembled according to the instructions for structural stability. I'll try to get some pictures later.
-
I've followed your work before, and by far this is the best you have ever done.
-
Looks awesome -- great work!! Maybe the wheels could use a little smoothing out?
-
One kit that can be turned into a very nice WWII vehicle is the Airfix/Heller 170 Mercedes saloon (1936-42 with a later reissue by Mercedes). It also makes for a nice period-correct, frumpy sedan that I find sort of charming, and was used as a police car. Nicely done kit that I have in my stash, awaiting use as a parts car.
-
The scoops are great (the inside of the hood has sort of a tray that runs underneath them). Some survivors have a very thin strip of chrome trim on the front edges of the scoops, some don't, but I think the chrome looks cool (I think that's because some restorers simply can't find the trim). Likewise, one thing I've never figured out is why some cars have a triangular piece of chrome running along the top of the rear fenders and why some don't.
-
As long as you're doing the bodywork, and in my annoying quest to add considerations to the build, you might want to think about adding a small louver in front of the inaccurate side vents.
-
Like that, but the mesh may be too open. I take stuff like that and reduce it to scale width, then print it out and look at it. I had another thought about dealing with the fender liners. Go back and look at the engine bay shots on page 1. You'll see that the driver's side has sort of a wide aluminum "shelf" at the hood opening, and the passenger side has a deep retaining lip that goes downward. These could hide any gaps in the fender liners.
-
I had similar ideas about the fender liners, but you'll have to consider how they fit against the firewall and chassis. Maybe you could cut off the notches. PS: I was finishing some edits to my prior post, probably before you saw them. Might look again.
-
General note: simonr did a fantastic build of the Aston DB5, which is a sister kit to the Maserati -- many of the same issues, including fixing the hood scoops. Might check it out. It's somewhere on this forum. About the valances: The tricky part about mounting the body, as you slide it on from the front, is making sure that the front fender liners (attached to firewall and front of chassis) tuck inside the fender tops. It's tight, and I highly recommend that you do a test fit here. As you mentioned, the rear valance leaves a big seam along the rear quarter panels. That type of seam is typical of every XKE model. Here's one approach to covering it up after assembly on the 1/8 E-Type, using a masking/feathering paint technique... http://www.modelcarsmag.com/forums/index.php?showtopic=64075 PS: As you build the grille, I wonder if photo-etched mesh for the '57 Chevy would work?
-
That's a Vignale-designed coupe, known mostly as a Maserati Sebring Series 1, or 3500 GTiS. Different car, body-wise. Less than 400 made between 1962 and 1965. PS: Matt, I'm waiting with bated breath to see how you solve the rear valance issue, especially since you're using metallic paint. On non-metallic, the fit is close enough that it isn't too obvious.
-
Worked fine for me about an hour ago. I'm on Mac, so your results may differ. What computer, what operating system, what Internet browser do you have? (For example, Dell PC with Windows 7 operating system on Internet Explorer 9). This may be a question for Dave Ambrose (originator of the Forum Problems topic at the top of the General page). I just now took this screen shot, uploaded it and copied it.
-
Alas, I have to rely on aerosol spray cans. To be totally anal about this, there should be a thin strip of body color between the vertical part of the windshield chrome and the door window chrome.
-
Ooohhh...thanks. Do you have a link? I also wonder if the kit wheels might work a bit better simply by sanding down the hubs a bit, if the spinners will work with that. But I've seen the MGB wheels and they look quite nice. Matt, the nose is looking brilliant! What color scheme do you have in mind? Here's how I want to do mine -- sort of a dark gray pearl (not metallic), but I haven't had any luck finding it. I have a smoke gray pearl that I want to try out.
-
Don't know about that one, but the Allemano was a 5000GT commissioned by the Shah of Iran. Only about 30+ built over a few years. Gorgeous car. http://fantasyjunction.com/cars/778-Maserati-5000%20GT-DOHC%20Injected%20V8
-
Daytona Day!
sjordan2 replied to Danno's topic in WIP: Stock Cars (NASCAR, Super Stock, Late Model, etc.)
Top 10 finish. Was in the top 3 for a good portion of the race. http://www.sbnation.com/nascar/2013/2/24/4025508/daytona-500-2013-Danica-Patrick-finishes-eighth-top-10 1) Jimmie Johnson 2) Dale Earnhardt Jr. 3) Mark Martin 4) Brad Keselowski 5) Ryan Newman 6) Greg Biffle 7) Regan Smith 8) Danica Patrick 9) Michael McDowell 10) J.J. Yeley 11) Clint Bowyer 12) Ricky Stenhouse Jr. 13) Aric Almirola 14) Denny Hamlin 15) Bobby Labonte 16) David Reutimann 17) Dave Blaney 18) Marcos Ambrose 19) Joey Logano 20) Jeff Gordon 21) Paul Menard 22) Michael Waltrip 23) Scott Speed 24) Marin Truex Jr. 25) Travis Kvapil 26) Terry Labonte 27) Trevor Bayne 28) Kurt Busch 29) Casey Mears 30) Jeff Burton 31) Austin Dillon 32) Jamie McMurray 33) Carl Edwards 34) Kyle Busch 35) David Ragan 36) Kasey Kahne 37) Matt Kenseth 38) David Gilliland 39) Juan Pablo Montoya 40) Josh Wise 41) Tony Stewart 42) Kevin Harvick 43) Joe Nemechek -
Just great. What brand is the Rosso Scuderia paint?
-
It has two coils on the passenger side firewall, but one big distributor and two plugs per cylinder for cleaner gas burning, so that presents quite a challenge for wiring at this small scale -- 14 wires from the distributor. Then, there are the injector tubes to deal with.
-
Matt, I can't tell you how excited I am to see you build this kit!! I'll definitely go to school on it. I don't remember how much information I sent you, but I've got plenty. I'll be happy to send you my complete digital file if you PM me with your mailing address. Great work on the roofline! As far as the body goes, it really needs a slightly longer nose and the grille should not be as oval as it is...needs sharper corners on the sides. Please let me know whatever you need. I have a complete illustrated parts catalogue. Engine needs a filter box in front of the right wheel, with a corrugated hose to the injection airbox, plus an oil filler tube on the left of the upper block. To go beyond the ordinary, couldn't hurt to add blue-tinted glass sun visors. Sadly, Model Factory Hiro's aftermarket PE Borrani wire wheels are too big for the kit and have rear wheels with too deep a dish, since they're intended for a 1/24 GTO. Maybe Herb Deeks has something. This is an example of aftermarket parts not handling the difference between 1/24 and 1/25 scale. The kit wheels aren't bad at all, but they protrude outward a lot. I would also add that the seat backs are about half as thick as they should be, needing a pocket in the back.
-
MASTERPIECE STYRENE
sjordan2 replied to Dr. Cranky's topic in General Automotive Talk (Trucks and Cars)
That's the kind of money (and higher) that scratch builders like Gerald Wingrove and Fine Art Models get for their commissions. -
Well, I just spent about 30 minutes writing down the process and the site dumped everything. All I can say is, if you're adding an image to a thread directly from your computer, use "More Reply Options," and look at all the prompts at the bottom of the reply box where it says "Attach Files." Click on Choose Files and follow everything as the screen changes. Same goes if you're starting a new topic, which includes the same attachment buttons. It could be a bit more intuitive than it is, but it's up to the site administrators to post a tutorial on this process and not me.
-
It is NOT a pain to upload pictures here directly from your computer. It couldn't be easier. Upload directly from your computer to your post as an e-mail style attachment, available under "Start New Topic" -- or under "More Reply Options" when replying to an existing post.