
charlzrocks
-
Posts
564 -
Joined
-
Last visited
Content Type
Profiles
Forums
Events
Gallery
Everything posted by charlzrocks
-
I love em both! Great job!!
-
Like Marcos said, WOW!! Nice freakin detail there! (You might want to sand down your slicks on the next one though) Clean build with a great color choice as well! Great Job, I'm jealous
-
Bronze Bee, Bronze Bee, Bronze Bee!!!
-
Thanks again guys! I suppose by now you know I am into show rods, bubble tops in particular. So far, I have built 8 of em: Silhouette, Beatnik Bandit, Beatnik Bandit II, Road Agent, Mysterion, Cherry Bomb, Predicta, and Orange Hauler. I was fortunate enough to obtain a Monogram '58 Thunderbird kit with the full bubble canopy recently. I can't say enough about the seller, who went out of his way to find it for me. I need to get the Cosma Ray, Magnum GT II, Futurista, and '69 Chevy SS 427 bubbletop. All of which are pretty rare and expensive, so any hints on where to get them (sides the bay) would be helpful. Thanks again for all of your kind words! That is what makes this hobby so much fun!
-
Sad but Great news :)
charlzrocks replied to Railfreak78's topic in General Automotive Talk (Trucks and Cars)
Congrats man! Hope that it's a job you like! Work is made so much easier if it's something that you actually like to do! Me, I am a Reproductive Therapist.....or in laymans terms a Copier Repair Man. I love it most times, but I work part time due to health issues so it's always a challenge. Good Luck! -
Glad you all like the build, thanks a lot! These old Monogram kits go together like butter, I love 'em!
-
Danno, Your avatar is another Starbird kit that I need to get (kinda rare) Cosma Ray!
-
Nice clean build! Digging the paint job too!
-
does anybody know if any of the model kit manufacturers have plans to make any other bubbletop kits? Does Darrel Starbird sell kits of his cars?
-
Thanks! The Testors spray enamel is pretty thin stuff and there was no white or grey primer undercoat to add to the thickness. Thus less buildup of paint and more color. You should see the thing in bright sunlight...it POPS!
-
Thanks, I have the Second edition of the kit and used the same photos from M. Gustafsons site as reference pics. Heard they found it but nothing more as Mark doesn't update the Custom Clinic site very often. Still a cool bubble top! I'm digging the progress on yours too! This kit is pretty easy to upgrade or customize, that's the beauty part! Wow. Ummmm.....not very, as you just plop the whole chromed upper portion of the engine onto the block and that's it. Then the aircleaner. Not a very detailed engine at all. But then, if you put the whole air cleaner on ya can't see anything in there anyhow!
-
Try setting it to GLOSSY photo paper
-
any decal guys here?
charlzrocks replied to Nick Winter's topic in General Automotive Talk (Trucks and Cars)
Check out this place for inkjet decal paper. http://www.texascraft.com/hps/home.php You don't have to buy a whole lot as they sell samples. Just make up the decals on your pc and print them on the paper with your inkjet printer, then overcoat them with a clear coat and when dry you are ready to go. Only thing is that inkjet printers do not print in white, so if ya got white in your decals it will show up as clear. -
Raul, I say to lose them there runnin boards! Maybe put in a few chromed tubes where they are now so as ta see some daylight there. This build looks like it's gonna be very cool looking!
-
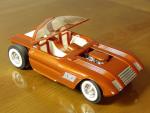
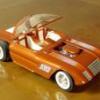
This is a very old Monogram kit that was a pretty fun build to do. It is an out of the box build with a few mods. The custom air filter cover on the original was kinda rectangular-ish and completely covered the engine, so I pared it down to a somewhat teardrop shape. I added aluminum tubing exhaust extensions with flared and flattened ends. The paint is Testors Fiery Orange that went on directly over the orange plastic body. I made 5 coats to get the deep coppery color. Clear coated with Future and voila! Comments welcome as always!
-
Wow, nice detail! De tiger tail too!! And diggin the dragon as well!
-
I am digging this whole thing. It's really a hoot to come back and see some of the twisted stuff we can come up with on this forum thread! LOL! That "Decapitizer" is wickedly simple, but effective! Make sure the build has some brains hanging off the wire? I love it!!
-
"Luke, I am your father" If ya got the mad skills to wire your own and wanna, who am I to tell ya to buy em prewired? I don't wire my engines at all so there! Ptthhhhpt! Nya, nya! oh......and the Dark Side also has cheese and crackers!
-
Oh My Gawd! You can see those little holes to be able to drill them?? I envy your razor sharp eyesight! If you can find the means, I would buy them as it's not critical HOW you detail the engine, but WHY you are doing it in the first place! (this monkey with a paycheck is off his soapbox, but it won't be too far away to get back on it) I like the looks of the engine you pictured with the glue/gasket adhesive oozing out. It looks pretty cool to me. I would take the advice of the others and try different shades of metalizer paint for a truer engine look if that is what you are seeking. Good Luck!
-
Probably not! You should always release the decal from the backing paper in water before application, otherwise the Future could dry quickly (the stuff gets tacky pretty easily) and it might fuse to the backing paper before you can get it onto the model! You can try it, but I wouldn't recommend it!
-
remove scratche`s from glass
charlzrocks replied to boohoo's topic in Model Building Questions and Answers
I have had em scratched worse than that and just dipped em in clear Future, let dry, dipped again and all looked great. But FIRST, Experiment! Take a clear plastic spoon, approximate the scratches you have on your windshield onto the spoon, coat the spoon with Future, let dry and see if it works to your needs, then do the windshield. Good luck! -
Wow, this is soooo cool! I am looking forward to further install ments! Maybe you can work in a few of the builds as you encounter them on your quest for survival! Keep up the Saga!!
-
I don't have a lot of confidence when it comes to some kits. I always follow the instruction sheet. I do paint all like parts of the same color at the same time after perusing the instrucions sub-assemblies. I like to paint the body last as sometimes I change my mind about the overall color scheme of the build and it is more work to strip and repaint than it is to wait till later in the build to make my final decision. Call me old fashioned, but I do only out of the box builds with minor customization thus affording me the luxury of being able to read over the instructions test fit parts that may look kind of "wayward" and get advice from guys like us on the forum. Like Harry says: Lather, rinse, repeat. (when all else fails, refer to the instructions) If it doesn't fit, force it. If it breaks, it needed replacing anyway.
-
I'b zorry ib I gabe id do you, ad ib you gabe id do me, shabe od you! Ged well sood!
-
I cad tage da Tylenol stuv, I godda heart condishun. obdions are libided....I godda see a docdor Bud tags addyway!