

Ryan S.
-
Posts
922 -
Joined
-
Last visited
Content Type
Profiles
Forums
Events
Gallery
Everything posted by Ryan S.
-
 I think the real beauty of our hobby is that you really are only limited by your imagination. Since it's all just plastic, we have the ability to create things that aren't able to be done in real life, largely due to budget issues or engineering impossibilities. All it takes for us is a little glue, some skill and some time and we get to enjoy all the whacky and original ideas that we have, like some of those already posted. Some of my favorite builds that people show are the ones that are examples of imagineering. I think the only "rule", in our styrene word, is that there are no rules. Build whatever you want!
 -
55' f-100 Kustom
Ryan S. replied to BKcustoms's topic in WIP: Model Trucks: Pickups, Vans, SUVs, Light Commercial
Nice work with the head lights. What do you have planned for the grill? Some small, horizontal bars of polished aluminum would look good. -
Awesome. Really dig the color combo and how the running boards mimic the grill lines. Great job on this one! We're the running boards and the grill custom decals you made or kit supplied items?
-
Nice looking build. Who makes that Anthracite color paint? I really like it.
-
Simply sick! The outdoor shots are great. The paint really pops in the sun.
-
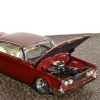
Hi Jesse, The 354 went together pretty easy. I stripped all the chrome off of the block and heads, and filled some of the sink marks in the block where the seams come together. The only real issue I had was with how the bell-housing and transmission fit together. It wasn't a clean fit but with a little sanding it came together. You can't see it in the pictures but there's still a seam going down the transmission pan. I sanded and filled it, but got hasty and didn't do a good enough job. It turns into a pretty good engine when all detailed up so if you've got one you are considering building I say go for it! Cheers, Ryan
-
This is turning into one bad little truck. Keep it up!
-
As promised, here's some primer shots. Still more work to do on the front wheel arches and the bottom lip of the front as well, but it's coming a long. I've worked on the front suspension some and got it lowered a little. I still might try and get the tires a little more inward though.
-
Thanks for the info. I've got the Novus polishes, but haven't tried them on clear plastic. I'll have to see if it works as well as Meguires and I'll keep an eye out for those too. I love the Challenger! I had just commented on it already, but not the other two . You've got 3 really nice projects going my friend!
-
Magnum and the Merc are going to be sweet too. How do you polish your glass? It's beautiful.
-
Simply spectacular, John!
-
I'm going to try to have an updated picture up for you today Doc! I just had to throw a little more putty on it and it's drying now.
-
Sure looks real from where I'm sitting.
-
Hey, thanks guys! I really appreciate the comments. Still not 100% on the paint choice, but I found this picture on line and I really like the sleekness of the silver. I might go a little darker than this one, and I'm considering the 2-tone option too. It's been all body work and lot of sanding last night and still at it today. It's been raining all day today so I'm going to try to get another coat of primer on it again tomorrow and see where it's at.
-
Challenger is looking great Cliff. The green suits it very well. Those rims are awesome too. They look way better than the stock rims! Can't wait to see your other 2 builds.
-
That's pretty! I love the color choice. The blue pairs well with the light color of wood you choose.
-
Mike Lomaka's F-100 Winder
Ryan S. replied to Chuck Most's topic in WIP: Model Trucks: Pickups, Vans, SUVs, Light Commercial
This is going to be sweet. The concept drawing is genius. I'm sure you'll rock it out, Chuck. -
Thanks to member Gray Smith, I found the rims and tires I'll be using on this one. These are Aoshima Gram Lights R57GT wheels and I'm thankful that Gray could spare the ones he had, so lots of credit to him! I'll have to lower the suspension at all 4 corners and it looks like the fronts will fit just fine, but the rear tires are pretty wide so I might have to find a way to mini-tub the rear just a little to get them to fit.
-
Been taking a little break from body work and started on the engine and the exhaust. I'll let the pictures do the talking. Thanks for looking and the encouragement!
-
DAFT PUNK InterStella 5555
Ryan S. replied to Lownslow's topic in WIP: Model Trucks: Pickups, Vans, SUVs, Light Commercial
This is just all kinds of crazy goodness. Should be interesting to see how this one comes together. Clever idea with the Enzo chassis. -
That gun-belt seat is awesome man!
-
baja beast revamp
Ryan S. replied to doomcrew's topic in WIP: Model Trucks: Pickups, Vans, SUVs, Light Commercial
I'm really looking forward to seeing this one done. It's looking great so far! -
Here it is looking through. And here it is with some black paint on it to darken it up. To hide the edge of the ribbon I'll build a little framing around it. Thanks for all the comments thus far! Cheers.
-
Got started on some of the other parts of this one while I take a little break from body work. I'm using the radiator from the challenger because I like that it has better details. I have some ribbon that I found some where that I think will make a good radiator core. Step one was to remove the molder core. Here's the ribbon. I taped the ribbon down to keep it pulled tight and put a little super glue around the radiator frame and laid it in place to dry. When that was done, flipped it over and repeated the process for the other side. Here's how it looks fit back in the radiator. Cont in next post.
-
Wow, this came out real nice. What a phenomenal build!