

Ryan S.
-
Posts
922 -
Joined
-
Last visited
Content Type
Profiles
Forums
Events
Gallery
Everything posted by Ryan S.
-
No pictures for the update, but I've been doing some block sanding and getting some of the rough areas smoothed out. I've got to add a little plastic back here and there and then I'll be hitting it with a light coat of primer and then getting to work on putty and filling to get the seams cleaned up.
-
Well now, this is looking cool!
-
Thanks for all the comments. Looking forward to getting back to this one, for hopefully a little while today. I'll get pix up when there's a worthy update I've never done casting before and trying for the first time on a full body might not be a good idea. I'll see how the body turns out after I'm done with all the body work and primer and if one of the casters is seriously interested then we'll go from there. In all honesty though, I'd like to just see this one finished before the year is over.
-
This is true artistry and is absolutely mind blowing. I can't believe how you've taken plain sheet stock and turned it into what you have. Thank you for sharing your craftsmanship.
-
Do you know who Norman E. Timbs is? Updated Dec 13, 2011
Ryan S. replied to Peter Lombardo's topic in WIP: Model Cars
Nice to see something from you back on the bench, Peter. This one has all the makings of something special. I'm looking forward to seeing it come together. Your talent astounds. -
This came out real nice. The colors are great and all the little details really set it off.
-
I'm not a big fan of the flip flop paint, normally, but this is the perfect type of build for it and it looks really good!
-
Thanks for all the comments everyone! There's going to be a lot of work massaging and the seams so once we get to putty stage it will be slow going because I want to do it right. I think I like the idea of keeping it looking relatively factory accurate, like something Dodge might have built. The nice thing about that is that I don't have to go parts bin diving, I can use that parts that came in both kits, including the rims. I was thinking of going with a dark paint color. Black base with either red, blue or purple over the top.
-
Holy cow, what a beast! That's looking pretty good.
-
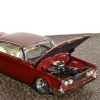
Alright, now that we've got some of the transplant done and while we're waiting on some glue to dry, I did a quick mock up to see how it all looks: This is with the Magnum hood on it, just to see what it looks like with a closed hood. After looking at it, this is a bad angle. The front looks like it comes up because of the Magnum hood. I think I'm going to integrate the Challenger hood into the Magnum hood to get a fairly factory look. We'll see how that goes. I like these rims best of the ones that came with both the kits, but I'm not sure they will make it until the end. I'm still exploring options and I'm certainly up for suggestions. Another angle on the front. This one just looks mean! Here I put the Challenger hood on just for comparison and to show how much different now the front end is when compared to a stock Challenger. I might almost be able to shave the Challenger hood down to fit. I might try that first. I like the duel vents on this one. Thanks for all the comments thus far, you can keep them and any criticism and critiques coming. I'm open to suggestions. At this juncture I have no idea on a paint color so if anyone has any thoughts, I'm listening. I've got a busy weekend celebrating Halloween and all, so I'm going to have to leave this one like this until Monday most likely. Try and get some sleep, Walt . Thanks for following along.
-
Nice to see this one back. I was really digging it the first time around and now I'm really looking forward to seeing it come together in true Cranky fashion!
-
Here we've got the middle of the bumper back in place. The front is really starting to shape up now! The very bottom lip got mis-measured so I've got to add back a couple of shim pieces. I've glued these in place with Tenax and I'm letting it dry over night so that it gets cured up properly. I'll have to trim the sides to match the contours of the piece and then sand it to fit the opening.
-
Both side fenders are glued in place and I've started re-assembling the front fascia. This is not easy! Here you can see how the bottom lip gives some extra width to the bottom of the Challenger front. Despite being wider initially, the way this went back together makes the Challenger nose narrow compared to the squareness of the Magnum. You can see that I've taken off the side trim on the Magnum. I think sleek and smooth will be a good look. The flash really lit this one up, but you can see how I got a little overzealous with the Dremel while carving out the wheel opening on the Challenger fender. I'm a little worried on how to best fill this in. Probably going to go sparingly with scrap plastic and might try the baking soda and CA glue mix as body filler. We'll see...
-
Coming along nicely. I love the brass knuckles on the shifter!
-
So I'll need the rest of the wheel flaring from the front fascia of the Magnum. So more marking and more cutting. I decided to keep the whole bottom and use that as a guide for lining things up on the front and will probably base some sort of chin treatment on the original lower part. This, too, was all done by scribing with the #11 blade.
-
Aaannnndddd...we're back. For now. Here I have the right front fender glued into place. This wasn't easy and it got a little messy, so we'll be doing some clean up on this one eventually. Really all of this is going to take a lot of time and patience with the bondo and plastic to get it all smoothed out eventually. The drivers side fender is just propped in place for right now and you can see how I sectioned the front fascia. Once the sides are put together I'll cut the inner pieces to fit the gap. Seriously Doc, my hands are sore!
-
Continuing onward... In order to keep the lines flowing and looking "correct" I've got to cut away a portion of the Magnum fenders, but leave the wheel arches so they will match the back of the car. The part that will be cut away will be replaced with matching pieces from the Challenger Fenders. Here we see both our patients marked out for surgery. I'm doing all my cutting with the back side of a #11 blade, for accuracy sake. It's slow going but the results are nice clean cuts. Here we see the Challenger fenders separated from the body. The cowl stayed in one piece, but had to be removed separately rather than stay attached to the A pillars. Here I've started cutting out and around the Magnum wheel arches. You can see the line where I'll cut the fender from the body. ...and here's how it looks with the fenders cut away and the wheel arches left. I'll be getting the Challenger fenders prepped and ready for the transplant.
-
Ok, so here's an idea I've had floating around in my head for awhile and I recently acquired the two kits to pull it off (hopefully) thanks to Michaels 50% coupons. So the concept is putting a new Challenger front end on the Dodge Magnum. Challengum, Mallenger, doesn't matter what you call it, I think it would look pretty cool. Here's my favorite photoshop that I found online *this is not an image I made*. This is the basis of what I'm going for, but with some of my own twists as well: So, I'll spare you the pure white styrene shot and we'll just get down and dirty. First thing was to cut the molded in grill from the Challenger front. The Challenger is wider than the Magnum in the front, so the whole front fascia will need to be sectioned some. We'll get to that... Step 2 was to remove this piece from the front of the Challenger. There isn't one on the Magnum. We'll be cutting the front fenders off the Challenger soon as well. As best I could, I marked out the center line on the Challenger front and will be cutting along the tape edges for the section. I'll be following the blue lines to cut off the Challenger fenders. I'm going to leave the cowl intact in case this roof finds it's way onto another project someday. Continued...
-
Grave Digger
Ryan S. replied to jcvt's topic in WIP: Model Trucks: Pickups, Vans, SUVs, Light Commercial
Nice job. Grave Digger was always my favorite monster truck. Yours look good. -
Supercharged Inline 6
Ryan S. replied to Swampdonk's topic in WIP: Model Trucks: Pickups, Vans, SUVs, Light Commercial
Looks killer with the blower! Did you scratchbuild it or adapt another kit part to make it? The only feedback I have would be to add 2 more pipes on the header to match the 6 cylinders, other than that it looks real good. -
Thanks for posting this...it's beautiful! I'd be in line to drive it. I bet it would just scream! I think that I love that it could have just been done as a rat rod and been cool, but the thought of it burnin' across the salt sends shivers up the spine. I'm going to have to look for more of her work!
-
Electric Delorean for '13
Ryan S. replied to Chuck Most's topic in General Automotive Talk (Trucks and Cars)
Hmmmm...early 21st century...we are about due for hover conversions. -
This one is just sick, Chuck! I'm loving it. That Starliner roof looks great on there!
-
Beautiful Vette! Perfect color and nice details! Can I take it out for a cruise?! The dice are a nice touch...did you make 'em?
-
Coming along nicely! What is that grill from? It's neat to see something other than a '32 grill.