Ryan S.
-
Posts
922 -
Joined
-
Last visited
Content Type
Profiles
Forums
Events
Gallery
Everything posted by Ryan S.
-
Looks good from where I'm sitting. Nice job!
-
baja beast revamp
Ryan S. replied to doomcrew's topic in WIP: Model Trucks: Pickups, Vans, SUVs, Light Commercial
Wow, looking really good so far. Can't wait to see that V12 sitting in there! Keep it up. -
Simply gorgeous. Came out great!
-
Another beautiful build, Cruz. I love the carbs and horns- great looking Hemi. Not like I need it, but this is more inspiration to pick up one of these; I've been eyeing them on the shelf for some time now.
-
This is just spectacular. I can echo all that has been said. You should be extremely proud of this build!
-
Beautiful Firebird. The engine and chassis details look great.
-
How to make your own plastic.
Ryan S. replied to Nick Notarangelo's topic in General Automotive Talk (Trucks and Cars)
I'm sure it smells terrible and wouldn't it get moldy after a time? -
That is looking great. Can't wait to see it finished
-
I really like the headlight treatment. That's a nice touch. I haven't seen a '40 with that done.
-
I'm going real this week.
-
That is one beautiful Merc. Great paint.
-
AMT 1960 Starliner question
Ryan S. replied to rhs856's topic in Model Building Questions and Answers
Thanks for the insight on that...makes sense now. The kit gives you 2 options for motors and includes parts to build both completely. What the instructions don't tell you is that there is a difference. Both engines use block halves #1 & #2. The only difference being the O/D solenoid apparently. Oh well...my Starliner will have the modified tranny with linkage and no overdrive now, so I guess it will be passable -
AMT 1960 Starliner question
Ryan S. replied to rhs856's topic in Model Building Questions and Answers
No problem, Randall. I'm happy to help! -
AMT 1960 Starliner question
Ryan S. replied to rhs856's topic in Model Building Questions and Answers
I snapped some photo's today. Sorry for the delay but wasn't around this weekend. I hope these help in mounting your linkage. It's not real easy so be patient. In the 3rd pic, the arrow indicates where the cylindrical molded part was that I had to remove from this transmission in order to get the linkage to mount. -
AMT 1960 Starliner question
Ryan S. replied to rhs856's topic in Model Building Questions and Answers
I'll see if I can get a picture tonight or tomorrow for you. I used one of the motors in a '32 build I did, and THAT one probably should have had the linkage on it. I had to cut off that little cylindrical molding on the one that's going in the Starliner so that the linkage would fit. -
AMT 1960 Starliner question
Ryan S. replied to rhs856's topic in Model Building Questions and Answers
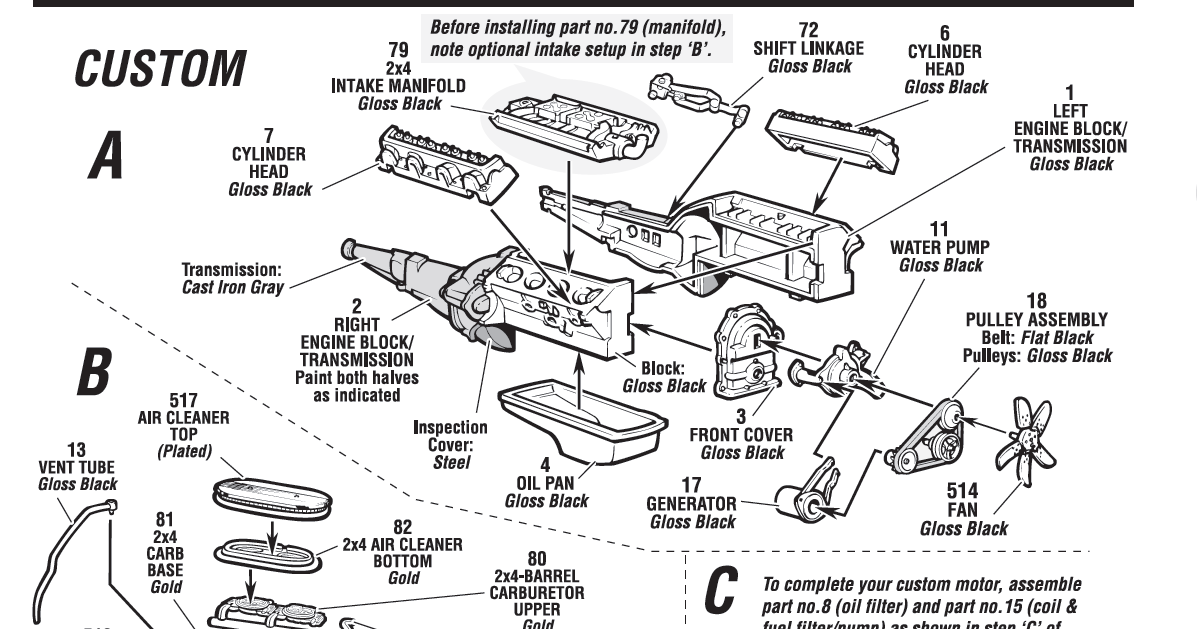
I'm working on the Starliner right now as well. It is hard to mount the shift linkage. There should be a small indentation on the drivers side of the transmission . There is a mounting tab on the linkage itself that kind of fits in that indentation. I recommend scraping off any paint on the mounting surface of both parts before glueing. What I also learned the hard way is that the two engine blocks and trans. are NOT the same. There's one that has a cylindrical part molded at 90 degrees on the transmission that will get in the way of the shift linkage. Don't use that motor, use the other one with a flatter area where the linkage goes. I'm not sure what the original kit is like, but the Round 2 2008 release has options for both manual and automatic transmission. The linkage can be seen below:
-
That's a good looking Mustang. Nice job on the convertible top and the wheels and tires set it off just right.
-
Sweet ride! Are the red-line tires decals? They look real good.
-
I have to go with real this week.
-
That's a beautiful build you got there. Nothing not to like about this one! Fantastic!
-
"Sketch Pad Artist" Mike Lomaka "ITALIVETTE"
Ryan S. replied to John Teresi's topic in WIP: Model Cars
Yeah...this should be pretty good. Looking forward to watching this come together. You going to go mid-engine with it? -
This was cool the first time around. With all the details it's even better. Nice job!
-
Chevrolet van
Ryan S. replied to ufe 64's topic in WIP: Model Trucks: Pickups, Vans, SUVs, Light Commercial
Paint looks great. Nice color choice. I love those round bubble windows in back. Cool project! -
Nice, thanks for sharing. I'm going to have to just try this out myself and see what happens. What were the 3 colors you used. I think I see Lime Ice and Firey Orange...what's the third one?
-
That color combo looks really good and nice job with the spray cans! Can you offer an tips or insight on your method to accomplish this? I'd love to try something similar on a project I'm working on. Thanks!