

Ryan S.
-
Posts
922 -
Joined
-
Last visited
Content Type
Profiles
Forums
Events
Gallery
Everything posted by Ryan S.
-
Beautiful work so far.
-
`70 Chevelle Pro Street, 80`s style - another quickie
Ryan S. replied to Hawk312's topic in Model Cars
Great build and that paint is very, very nice! -
Awesome to see this one back. This is such amazing work.
-
painting after polishing with Novus
Ryan S. replied to Ryan S.'s topic in Model Building Questions and Answers
Thank Donn, I'll have to go pick up some bleche white, I know I've seen it around here somewhere. This is my first paint job using your technique, btw! You're DVD has been a big help! -
I've got a body that I'm working on that I sprayed, gassed out and hit with the polishing kit. There were still a few rough spot so I hit it with some Novus #2. I didn't realize before I did this, but I had burned through the paint in a few small places and now I'd like to touch it up. I imagine that paint won't like sticking to the surfaces hit with the polish. Is there a good way to wash the body with some cleanser that would allow me to keep painting with out stripping the whole car? Thanks for any advice. For what it's worth the paint was airbrushed, Testors enamel gloss Red thinned with lacquer thinner, no clear coat.
-
I love it. What a phenomenal '57. I have to agree that these have gotten kind of cookie-cutter, but yours walks up, slaps you in the face and says look at me! One of the best models I've seen on here. Question, how did you do the plug boots on the distributor? They look so cleanly done and real!
-
Aluminum Willys Coupe: finished pictures posted 8/2/12
Ryan S. replied to John Teresi's topic in WIP: Model Cars
Another amazing build, John. The flames and alclad work are tremendous. I'd be curious to know which aspects are "not perfect, but good enough..." cause I sure don't see anything wrong with it. -
The antenna and something about the front reflector...I'm saying real.
-
That looks like it was a lot of work, but the results speak for themselves. Great job!
-
53 F100 Kustom
Ryan S. replied to Dyno Davo's topic in WIP: Model Trucks: Pickups, Vans, SUVs, Light Commercial
Beautiful kustom! I love it. -
Real also.
-
Awesome combo, should look real good once the body work is done!
-
Well played sir, most impressive!
-
1/24-25 scale engine turned decals?
Ryan S. replied to Ryan S.'s topic in Model Building Questions and Answers
I am a subscriber (and have to renew soon too)! What issue was the tutorial in, if you don't mind? I've only been getting the mag for 10 months or so now and don't recall seeing. I'll have to look through the issues that I do have and see if it's in one of them. -
1/24-25 scale engine turned decals?
Ryan S. replied to Ryan S.'s topic in Model Building Questions and Answers
Thanks guys, I was thinking of similar approaches with BMF and a light abrasive and I'll probably give it a try. -
I picked up some of these a while ago, but haven't tried them yet. I've got some plans to use them though, looks like they could be a lot of fun and yield some cool results!
-
Cool! Nice choice of rims and the top looks like it was made for it!
-
I've searched around and nothing has come up, but does anyone make decals to replicate engine-turned metal in 1/24-25 scale? Or does anyone have an idea how to replicate this? Thanks.
-
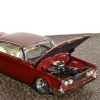
I just picked up this kit as well as the 62 "Special Edition". I have to say that they are, so far, fantastic kits. Great assortment of parts and the molds look great. Can't say I see any flash (and wouldn't expect too). I'll be building both side-by-side; one for me, and one as a replica for my dad of a car he used to have. I will say it's disappointing that the SS is missing the appropriate SS decals for the badges. I got the SS version just for the front bucket seats and the SS markings so now I have to go out and get either the Keith Marks SS decal set or a photo etch set just for those parts. That issue aside, I have to say the thing that irks me the most is the spaces in the firewall for the hood hinges go right through the heater box and generally are placed terribly on both sides. I'll end up filling them in and working the hinges differently or just omitting them altogether so the hood can be opened any closed and the under-hood area looks accurate, but I'm disappointed that I have to in the first place.
-
Dr. Cranky has a good video here:
-
More done on this guy today. The floor/running boards/ bed section has been cleared. The bottom frame rails are foiled and I made to cross bars with boltheads that would keep the bed and slats in place. The floor has been carpeted/ flocked, bench seat is glued in, seat and door panels have their piping attached. Steering wheel and column are attached and and the motor is glued in place and awaiting further detailing. I've got to make some exhaust pipes and run some brake and fuel lines and that will do it for the chassis until the body and bed are ready to be put in. I think finishing up the body work is next on the agenda, so I can get it in paint and then detail while the paint sets up.
-
Really nice job on the Alclad, especially for you first time! Keep it going!
-
well; i've eaten alligator now.
Ryan S. replied to 62rebel's topic in General Automotive Talk (Trucks and Cars)
Better than the alligator eating you! I had gator chili once and it was pretty good, not sure I would seek it out again specifically but there's definitely weirder things that people eat. -
Thanks TJ, those help too. I've seen chassis that are all black, which might be an undercoating and some that are done in the red oxide primer. I guess I could go either way and be relatively accurate.
-
Amazing work so far. I had an idea while looking at the torn apart chassis. Seems to me that the coyote might like some loud tunes...I'd take that speaker that is faced down, build an enclosure for it and mount it in the back seat area. Could look pretty cool. Just a thought, but keep up the good work on this one. I'm going to go grab some popcorn and watch!