
Old Buckaroo
-
Posts
1,968 -
Joined
-
Last visited
Content Type
Profiles
Forums
Events
Gallery
Everything posted by Old Buckaroo
-
 That is incredible, your brother is a Master Modeler. I am always blown away to see builds of this quality, as said earlier WOW !
 -
Kenworth W900L
Old Buckaroo replied to KJ790's topic in WIP: Model Trucks: Big Rigs and Heavy Equipment
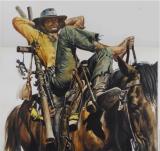
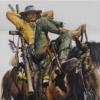
That pin striping is way cool , and nice looking wood grain also. Man your steering wheel and dash reminds me of this little creature -
KW Race Car Hauler
Old Buckaroo replied to kilrathy10's topic in WIP: Model Trucks: Big Rigs and Heavy Equipment
Most Excellent work ! What thickness of styrene did you use for the sides ? I am concerned though about the lack of Orange on your builds. What do you plan on hauling on the deck ? -
Howdy Dennis, I like the idea and the work you have done so far. Here is a pic of one I saw this summer. To me it has that old time "Bonneville Salt Flats" look to it.
-
parts box build
Old Buckaroo replied to mistermodel's topic in WIP: Model Trucks: Big Rigs and Heavy Equipment
Oh Yeah, Builds like this are the best ! I am super excited to see this one transform. If I had a parts box of semi's I would be building right along beside you . -
I dont mind the snow - but it sure irks me when we get a nice fresh 6 - 8 " then followed by rain. What a mess , Snow in the Winter, Rain in the Spring - what is so difficult about that..
-
1968 Freightliner coe
Old Buckaroo replied to Old Buckaroo's topic in WIP: Model Trucks: Big Rigs and Heavy Equipment
A few minor details that will most likely never be seen once assembled - I reworked the dash to resemble the '68. Also I ended up with several of these kits by trading, one will eventually be a day cab - so I robbed the sleeper privacy panels and made a headliner to tidy up the top and help hide the strip of styrene I used on the seam. Yes it fits inside of the cab glass. And the back of the cab got some reshaping also. Thanks for looking in and commenting -
Boss Truck question
Old Buckaroo replied to Old Buckaroo's topic in General Automotive Talk (Trucks and Cars)
While on the subject of Tyrone - wasn't there a "Smoky Bear Corvette " kit released one time ? -
Walmart/Peterbilt WAVE
Old Buckaroo replied to Fabrux's topic in General Automotive Talk (Trucks and Cars)
I disagree , That thing is Fugly... -
definition of a rat rod
Old Buckaroo replied to retroguy's topic in General Automotive Talk (Trucks and Cars)
This is what I consider a rat rod pic from local Craigslist -
007 ton tri axle lowboy
Old Buckaroo replied to goodwin3224's topic in WIP: Model Trucks: Big Rigs and Heavy Equipment
Nice work, and you make it look so easy. Where do you get the plans for projects like this ? I use to drive a truck with a lowboy that could haul 80 tons or more, it was a little beefier. That mama jama measured 102' from front bumper to rear deck. It was a lot of fun to drive but a rough ride . -
1968 Freightliner coe
Old Buckaroo replied to Old Buckaroo's topic in WIP: Model Trucks: Big Rigs and Heavy Equipment
Thanks for looking in and commenting. I am starting to run out of parts on this build. Seems like to me every pipe and tube that connects to this engine had to be modified. I must of really done something somewhere to cause that - but not sure. Oh well, it keeps things interesting. I did have to make a spreader bar for the stacks bracket to keep them in alignment. Still need to paint it. I painted the frame with semi gloss black then mixed up some thin RLM 66 (German Luftwaffe dark gray color) and sprayed over the frame to where it has an oxidized look. Cant get it to show in pics though , but looks really convincing to the eye. Need to finish up the interior and prep the cab for paint. -
CAT in an Italeri Ford LTL
Old Buckaroo replied to Aaronw's topic in General Automotive Talk (Trucks and Cars)
I did a similar swap replacing a Detroit V series with a Cummins 6 in a KW coe. I had to move the front mount lower, trim it so the alternator cleared (made the other side match so one side was not wide and the other thin). And I had to locate the rear mounts farther back . Cut 2 mm off fan shaft to move it closer to engine for radiator clearance. Basically build your engine first before you glue in the front crossmenber/ engine mount . Lots of test fitting and bendable soda straws are your best friend for air and exhaust piping. -
Firefighter William Scott Tanksley's funeral procession
Old Buckaroo replied to milkman's topic in The Off-Topic Lounge
I am sorry for the loss to all who knew him and the community he helped and worked in. So sad indeed. -
One Part of the fleet done
Old Buckaroo replied to alangarber's topic in Model Trucks: Big Rigs and Heavy Equipment
The blue you used on the frame is a real close match to the decal, what color did you use ? -
One Part of the fleet done
Old Buckaroo replied to alangarber's topic in Model Trucks: Big Rigs and Heavy Equipment
That is really a sharp looking build. What is your opinion of the "tilt bracket and mount ? did you modify it any ? Glad to see you found your rear deck. -
Boss Truck question
Old Buckaroo replied to Old Buckaroo's topic in General Automotive Talk (Trucks and Cars)
Yeah it was a real beauty, seeing the remnants is quite depressing to see how Grand it was. Lots of custom pin stripping all over the frame. It would of been a real pleasure to have seen in its glory. Another real nice truck I have seen pics of is the Evel Knievel Mack - The door panels with the stars and bars and the star headliner , Wow. Now all you see in trucks is mostly plastic and vinyl graphics . What happened to these type of talented craftsman ? -
Boss Truck question
Old Buckaroo replied to Old Buckaroo's topic in General Automotive Talk (Trucks and Cars)
Awesome pic Force, that gives me a much better idea. I had looked at dozens of pics and at peoples albums but had not seen that one or angle. That one sums up my suspicion it is a walk through from sleeper to sleeper or the gasket portrays it that way. Otherwise the shadow would not be so prominent from top to bottom. Plus that looks like a "bar/ table" towards the cab and possibly a bench / step up where the small sign board is. I have seen pics of where it shows the crawl through from the cab. Thanks a million -
question about the Ford car-hauler cab
Old Buckaroo replied to jeba's topic in General Automotive Talk (Trucks and Cars)
I have seen a few of these built up with sleepers on them . Anyone know who the aftermarket resin is that makes them ? -
Picked up a extra set of Tyrone Malone tires, thinking about finding a few W-925's and building it up to the Boss Truck. The Movin On kits are hitting ebay quite regularly . The real truck has two 36" sleepers - anyone know if they had a crawl through or a walk through where they joined ? This will be a long one over 15" for 1/25 Any ideas or input will greatly be appreciated.
-
55 chevy
Old Buckaroo replied to carbman's topic in 1:1 Reference Photos: Auto Shows, Personal vehicles (Cars and Trucks)
Very nice clean looking '55. I am so impressed you have had all these years. I have only had my '55 for 3 years but it had been sitting in the same garage / shed since 1971. -
Pro Mod "Motown Missile" FINISHED! 4/6/14
Old Buckaroo replied to am73grand's topic in WIP: Drag Racing Models
That is some really skillful work you have done on this. To me that butterfly scoop looks like E.T. sticking his head out of the hood. -
Peterbilt 377 Daycab
Old Buckaroo replied to ghoodii's topic in WIP: Model Trucks: Big Rigs and Heavy Equipment
I really like this, what a sharp looking truck. -
That is a great looking '55. Looks just like the one in the pic - nice match on the colors.
-
Anyone ever build a paint room ?
Old Buckaroo replied to greymack's topic in General Automotive Talk (Trucks and Cars)
Sounds like a great idea. I just have a open booth centered on the workbench.