Skip
-
Posts
1,049 -
Joined
-
Last visited
Content Type
Profiles
Forums
Events
Gallery
Everything posted by Skip
-
Looks like you've put a whole lot of work into the interior and chassis that's looks like "fresh" Custom; sort of doesn't fit with the rat look. Iconic model years like the '32 Ford and Merc's (in my opinion) don't look plausible as a rat rod, most people who get one know their worth and heritage within the Rod & Custom community. It's your model so do it the way you like best.
-
Yes, right near the door so it could be reached either in retreat of going in with another already in hand.
-
I didn't see that one but I have on other shows, they hammer form the panels just like Ford did, with the same type of old craftsmanship. That alone is why they are worth what they ask and get for them.
-
It isn't because of the builder's quality, it is because the builder represented them self as a "Pro" Modeler. As I stated in my earlier post I blame the high sale price on the buyer, the quality of the product is clearly represented in the seller's pictures. Yet someone thought it was so great they couldn't live without it! I think it's also more of a case of " I can't believe someone actually bought that". To each their own, go figure.
-
$20k for what you're getting isn't that far off of the mark. Figure in what it actually costs in today's dollars to have the bodywork done to bring that same 5 window coupe back to the same condition and it might seem cheap. Yes, you could do the bodywork yourself, but for almost everyone else that would be way over their head. Official Ford Liscensing means that you can take a brand new panel off do this body and in theory it will interchange. The Liscensing gives the manufacturer the right to make the parts to Ford's original dimensions. I can't remember the percentage off the top of my head that a non-OEM part has to be different from the original to not infringe on the manufacturer's patents, (which is why aftermarket sheet metal doesn't always fit as well). Case in point. My uncle bought a really nice '32 3 window back around 1990, he took it to a local Hot Rod shop to have a few of his own tweaks added. Turned out that the coupe body wasn't as pristine as it looked lots of different owners over the years had added their tweaks too. Some of them shouldn't have either. The car had been on the road almost since new as a stocker, then a drag racer and finally a Hot Rod. The top chop was poorly done, it had "Coupe Cracks"* and other issues requiring correcting to make a really nice Hot Rod. Other modifications like filling the poorly fitted gauges in the original dash added to the costs. All this was justified because it was a '32 3 window after all! All said and done he had somewhere around $10 - $15 grand into the coupe body itself. This isn't a case of a shop ripping off someone either, the shop is a well respected, well qualified and not cheap by any means either. (I have taken my own stuff there.) The car turned out nice enough that it had a feature layout in Rodder's Digest magazine in 1992. When you are talking about doing the body work on a '32 Ford you probably wouldn't take it to just any shop either, probably to the most qualified and knowledgeable shop you could afford. So, this isn't that uncommon of a story. I've heard it a few times while discussing someone's nice looking Hot Rod. ( I've been around Hot Rods about as long as I can remember). I've also heard the same sort of tale from guys with restored stockers too, once you start correcting something you just keep finding more. So, in my book $20,000 for a unmolested steel '32 Ford body isn't ridiculous, when all said and done the cash outlay will be nearing the $100,000 mark. I've yet to see a genuine '32 Ford Coupe rat rod, not to say someone hasn't. It would probably be ran out of even the most casual cruise night, most Hot Rodder's are pretty tolerant but a '32 Ford is an icon after all. The reason that you see Chevrolet, Oldsmobile, Cadillac and even Pontiac overhead valve V8's in many early Hot Rods is because they came out before Ford got around to it. Read some of the old Hot Rod magazines of that era, the new Chevrolet 265 inch V8 was beating the pants off of Hot Rodded Flatheads, and Ford was still building them! Can't change history. *Coupe Cracks form at the joint of the coupe top and rear quarters from the body flexing, they appear in most Ford coupes from the Model T through '36 or '37. In some cases the rear part of the coupe's top almost cracks from one side of the body to the other. Not a cheap fix.
-
Nice Comp Coupe!
-
Great choice on that color, looks even better than black would have. That paint looks flawless. Very impressive, then again I'm always impressed with shiny things!! I did say I loved it didn't i, if I didn't already say it,,, I really love it!
-
In this case those who have bought the spray bombs that are being passed off as works of art bear a little of the blame as well. In the case of the white Nova those pictures clearly show that there are issues with the paint; yet someone bid on it! The pictures show that there are issues with fit and finish; someone bid on it after seeing that too. If someone truly knew what Bill Jenkins Super Stock Nova/Chevy II really looked like they would not have bought a Pro-Street Nova, but they bid on it anyway. If the bidder knew anything about the engines allowed in Super Stockers they would know that even Bill Jenkins himself couldn't get a tunnel rammed small block to pass tech for an SS classed car, they chose to bid on it. Why? Even in my most sarcastic moments I couldn't come up with a smart Alec enough answer! If people quit buying stuff that clearly looks like a garage sale refugee those who try to pass off this stuff as if it were the absolute best of the bestest. Maybe, just maybe they would go back under the rock from whence they came. Back to the model, if people keep buying these creations then their builder gets he self notoriety that they are going for. In their mind they probably feel that since their models are selling for as much as they are that they are putting out a quality product. Probably not, when you build something you can normally point out even the most minute flaw which would go unnoticed by all but the most critical person. There are all sorts of ideas on quality... I'm not going there all the low hanging fruit is gone!
-
My first car was a then nine year old '65 GTO copper with a white interior, Crager SS mags, headers... The original 389 Tri-Power engine had been bored 60 over and got hot pretty quick, eventually seizing. A guy my Dad worked with had a Pontiac motor sitting in his garage for free, come and get it. The price was right so I got it, figuring it was a 326 or something, turned out to be a 421 out of a wrecked low mileage Bonneville. This was right in the middle of the gas crisis around '73 so no one in their right mind wanted huge engines anymore, I did! Worked pumping gas to get and feed that car, seemed like a lot of money then looking back it was pretty cheap fun! My other car necessitated by the Goat's "drinking habit" and being in the garage for a while, which turned out to be my daily high school driver (much more to my parents liking) was a '57 VW Sunroof Beetle. If my folks knew half of the crazy stuff we did with that car which I held onto long after the GTO was gone. Both were really fun cars in their own ways my girlfriend liked the Beetle better than the Goat, probably thought she was "safe" in it, she wasn't. I'd take them both back, cars not the girlfriend, saw her at a class reunion she's got old and a little pudgy nothing like the "sporty compact" I knew!
-
Barrett Jackson Auction Begin Today!
Skip replied to Misha's topic in General Automotive Talk (Trucks and Cars)
-
Pace Paint booth out of business?
Skip replied to abelaxe's topic in General Automotive Talk (Trucks and Cars)
http://www.tcpglobal.com/itemdetail.aspx?itemno=PAS+HSSB-22-16 I've had a Paasche booth for quite a while, haven't had any issues with it. Can't remember where I bought it either Coast AB or TCP Global (buy stuff from both). -
Got threatened for parking in the disabled spot today
Skip replied to disabled modeler's topic in The Off-Topic Lounge
Actually Harry it is not easy to understand, people need to keep their noses out of other people's business. Many individuals have handicapping conditions that may not be readily apparent to others. Yet they are just as needful of the use of a handicap parking spot as a person with a van, driver and in a wheelchair. My sister in law is the victim of a hack doctor(?) whom during back surgery "slightly" nicked a few nerves in her back, she now walks around unable to lift her foot to maintain a normal gate, this worsens the more she has walked during the day. She too is constantly reminded by well meaning oafs that the spot is for Handicapped persons... Her normal response is something like; "Well I'll tell my Doctor about that next time I see him..." Most of the time the idiot realizes they screwed up and goes about minding their own business. Another one we like to laugh about now. I had a guy working for me who came in telling me that he needed to go to his Doctor to get his Handicapped placard renewed. My response was something like, "what for, you stub your toe or something?" So he proceeds to pull off his boot and lower leg, Oops! He was working on his dad's fishing boat at 16. The ice auger got stuck, while trying to free it up he got caught in the auger which chewed his foot and lower part of his leg off. He occasionally developshot spots from his prosthesis which he never told anyone about because he never wanted the handicap stigma. I never knew about this, he wasn't hired with a handicapping status. This same guy has worked on our inspection crew for years, yet only uses his "Handicap" placard very occasionally when he needs it. He like a whole lot of others in that same boat would rather be able bodied, so much so that they go to great lengths to prove they can do every thing every one else can. So just because you can't detect a person's handicapping condition does not give them the right to hassle them. If they are that concerned then call a police officer, and let them sort it out. Sorry for the rant, and Harry I am not attacking you, you just illustrated how a whole lot of people seem to feel sorry if you feel like I stepped on your toes I didn't mean to. Edited for spelling/content error not caught by iPad. -
I didn't see it until I saw this, I voted with all my multiple personalities (one that I know of), but they're mad at each other at the moment so they're not speaking.... I actually like slot cars a lot, but only check this forums slots section once and a while since it is pretty slow at times. Having painted a wood body a time or two (Pinewood Derby Cars), I have to commend you on that beautiful shining red paint. Bet it's even better in person!
-
0001 Maserati by some guy named Jairus Watson, (how come he didn't do a "Watson Roadster"?) 0077 BRG Triumph TR3 by Jaak Beentjes 0022 Cannaught Type B by Regis Baron
-
Trash the existing chassis and floorboard. The last time I built a Henry J I used the then new Reher Morrison Pro-Stock chassis under it, it was low. The Pro-Stock chassis was cut and pasted together to fit. From your pix you are looking for something with a little less race car look to it, you might start with the Revell Willys Street Rod chassis under it. It has a Mustang II front suspension to start with, the rear suspension isn't a parallel leaf so you might have to graft something back there. Really depends on how stock looking you're going for. Can't remember who the resin caster is but there is a similar (to the Willys) Mustang II based front end in resin, that might be another avenue to look at.
-
Scale Tabs and Brackets - À la carte!?
Skip replied to DirtModeler's topic in Car Aftermarket / Resin / 3D Printed
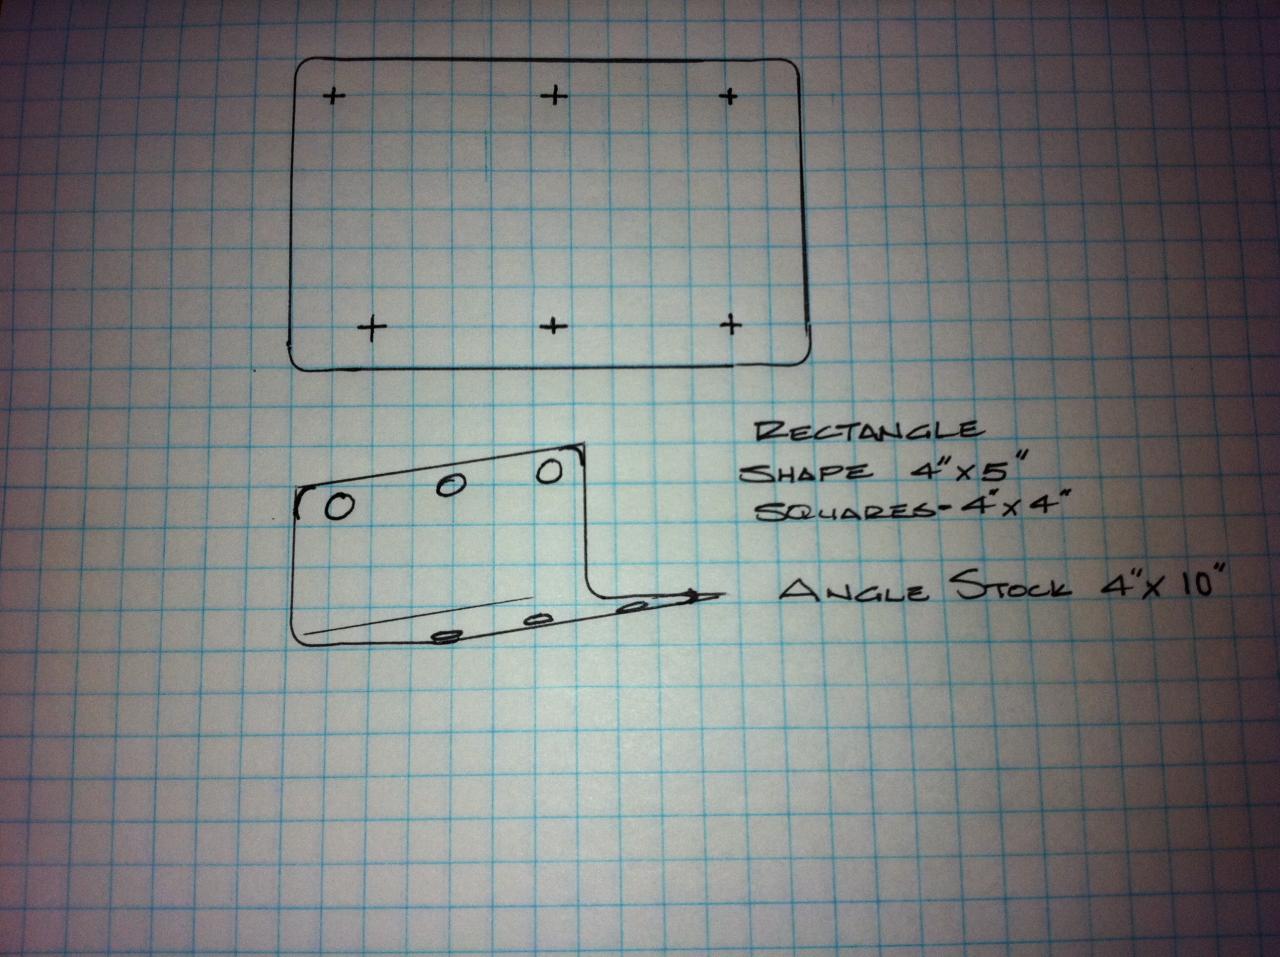
Here is the basic concept for the u-bend brackets that I was thinking. I've really never seen anything along this line, they are the basic bare bones of Hot Rod and Race Car fabrication, as you almost always need to turn 90 degrees to mount something. They don't have to be the same sizes suggested I just pulled those dimensions out of the air. Basic flat object with a radius on each corner 1/4 inch is pretty standard in manufacturing in 1/25th scale that would be an 0.01 radius or almost un-noticeable, so slightly rounded corner. Hole size, again go for a 1/4 inch hole or 0.01 there for basic location, the user could open it up or use as is. Basically what I am thinking in the world of flat would be, 4" X 5" with 3 holes across the 5" wide flange. When bent up in an equal leg configuration it would have (2) 2" legs and a 5" long flange, or the user could bend it unequally say a 3" and 1" leg and 5" flange... For the longer lengths, or cut to length a flat piece of angle stock again say 2" X 2" legs and maybe a 12" long flange with holes every 2". the user could then trim the flat angle to their required size and bend it to their required leg lengths. Please pardon the poor quality cell phone pic it gets the idea across though.
-
Scale Tabs and Brackets - À la carte!?
Skip replied to DirtModeler's topic in Car Aftermarket / Resin / 3D Printed
While you are at it a a fret of say 5 - 10 angle brackets would be great something that the user could bend themselves. With 4 - 6 holes in them so fastener heads could be located. Those would be super easy squares or rectangles, even a longer length that the user could trim to size. I'd buy a bunch of something like that. For Hot Rods you always need some sort of angle bracket. -
What happened to all the pinned tutorials?
Skip replied to sjordan2's topic in Tips, Tricks, and Tutorials
To those who have voiced a dislike for answering questions, consider this. I have found the times I've been called on (at work, hobbies, etc.) to answer a technical question, that my knowledge and understanding of the subject grows with the relating and passing the answer to the other person. In regards to the pinned subjects. I was a little disappointed to see them gone, I often looked through them when looking for tips or techniques. I also read through the entire Tips, Tricks and Tutorials section now and then. I find I pick up something new nearly every time. My opinion on repetitive questions is though they may be a pain at times each of us has been therein our grasp of modeling knowledge. So unless there is some sort of subject specific repository where one can go to get their answers, then maybe the newbies and repeat questioners need to be cut some slack. -
Ideas On Duplicating Welds from YouTube
Skip replied to Skip's topic in Model Building Questions and Answers
Daves Kustom Paint & Body does faux welds in a different way, scaled down it might be something as simple as dipping the end of a round toothpick into silver paint and layering the dots. Need to try this out and play with it. Sometimes the art of illusion is the easiest solution, after all how much would a weld bead stick up from the surface of the metal? Think about it, a 1/8" weld bead scales out to 0.005" which is pretty doable with paint alone. Another way it could be done to give it more height would be using a toothpick dipped in glazing putty overlapping the dots like a stack of dimes. Take a look and see what you come up with http://m.youtube.com/watch?v=a444T3X8NHg Part 1 http://m.youtube.com/watch?v=V5R--SM-n_U Part 2 -
This is not my original idea, credit is due to Ryan Townsend at Berserk Custom Paint The question comes up every now and then about how to duplicate welds on the surface of a model. While watching this video for a customer's project it hit me that this technique could be used to duplicate weld beads on a model. Just by reducing the size of the applicator used to lay the weld beads, the rest could either be done by airbrush or carefully layed down with a paintbrush. Watch it and see what you think, haven't tried it yet but it looks like it could work with a little practice. http://m.youtube.com/watch?v=PTTILRcMtlw
-
Not sure that you want a metalizer for this. If you closely look at argent silver wheel paint it is a metallic alright but there is a whole lot of clear mixed in there as well. I think I'd look for a true metallic paint, you could probably find a touch up paint in the small tube / brush kits that is similar, then shoot it on the wheels with an airbrush.
-
Early Christmas Present I didn't ask for.
Skip replied to Porscheman's topic in The Off-Topic Lounge
The "anti-roll" trick works well. Wish I had been using it before the X-Acto knife, (with brand new blade) rolled off the table between my thighs. My cat like reflexes insured I caught it in my left thigh six inches above the knee, buried just past the knurled part of the chuck. Wife thought it was rather humorous as did the entire ER staff. So, I must have figured that one needed topped. While using one of those saw blades on my Dremel hand piece running at slightly over 60 bazillion RPM's it sorta kicked back into my left ring finger tip. Making a rather clean slit up through the fingernail and stopping almost to the joint, nice white glisteney bone right out there to see. Wife's first question was, "did you hit your wedding ring?".... Then that irritated laughter over another late night trip to the ER. Same (female) Doctor, who remembered me from my knifing incident. Doctor told, me she couldn't stitch it up so she superglued everything back together, that everything should heal up ok, it did. She even gave me two extra superglue kits, telling me she thought that I'd need them in the future! (Haven't used them yet!) -
Original Meyer's Manx, I think I was about 8 or 9, my uncle sat down and helped me build it. Introduced me to a whole new world of building models. Still got the itch to this day!
-
Is there an X-Acto Man figure on there anywhere? The X-Acto Man changed over the years, so if you can match that, you can sort of figure the year range. I think Art is correct it's probably '60's era.
-
Roy, if you choose to tint the baking soda here's how I do it, I got it from someone else too (not my idea). I think it helps to provide contrast between the filler and base styrene. Take about 2 tablespoons of Baking Soda then a couple of drops of food coloring, mix together until you reach a consistent color. If it's too light repeat the process until you are satisfied with the color. Next spread the mixture out on a plate, let dry completely, put it in an airtight container and use like you would regular old baking soda. Blue and green seem to show up the best for me, you can also use this method to match the plastic color you are filling if you want. Since I usually spray gray primer over it the color isn't an issue.