MrObsessive
-
Posts
9,785 -
Joined
-
Last visited
Content Type
Profiles
Forums
Events
Gallery
Everything posted by MrObsessive
-
1 OOOOH! That is nice! I have that kit too (two actually......one for another project), but the glass on that kit leaves much to be desired IMO. That's a pet peeve of mine------distorted glass which this kit has to my view. I'll build it someday and that is a nice color for that '57.
-

Tools recommend for resin kit?
MrObsessive replied to 花火's topic in Model Building Questions and Answers
Only caveat is that with resin, it doesn't sand/cut at the same rate as plastic. Resin can be more brittle and when sanding it, you'll notice that it sands/grinds away 'faster' than your average plastic kit. It also wouldn't hurt to wash any resin pieces, or wipe them down with alcohol. One never knows what kind of process was done to remove the resin from the mold be it some type of mold release, or what have you. When it comes time for paint, any type of action that can ward off surprises is always a good thing! -
Tools recommend for resin kit?
MrObsessive replied to 花火's topic in Model Building Questions and Answers
That's an open ended questions that can get you many answers. Basic tools you'll need------A good PE cutter as there are certain cutters that are very good for cutting it away from the fret. I'd use those strictly for cutting that.......anything else can make them dull. Make sure you've got plenty of 5 min. epoxy on hand. This size of a kit will need it and you'll need toothpicks and such to apply it. If you're a regular builder of models, there's really not much else different in the way of tools you'll need. Good Exacto blades, several types of glue depending on application besides epoxy (CA or "superglue", MEK liquid type glue). Good set of tape for masking-----I prefer Tamiya tape. A bit more expensive but very effective. It would be a good idea if you haven't done so to jump on the 'net and get as many reference pics as possible. MFH while their instructions are good, doesn't give you many pics of the real deal when it comes to detailing. This car of course changed from race to race, but it wouldn't hurt to still get as many close up pics as you can. The biggest tool you'll need in your arsenal is patience! MFH kits are no joke especially in this scale as I now have one (Ferrari 250 GTO). You'll come across things that might leave you scratching your head, so don't hesitate to ask questions if something has you stumped. If you're able, do post pics so that we can see where you may be having difficulties. I'm sure others will jump on with more input, so stay tuned! -
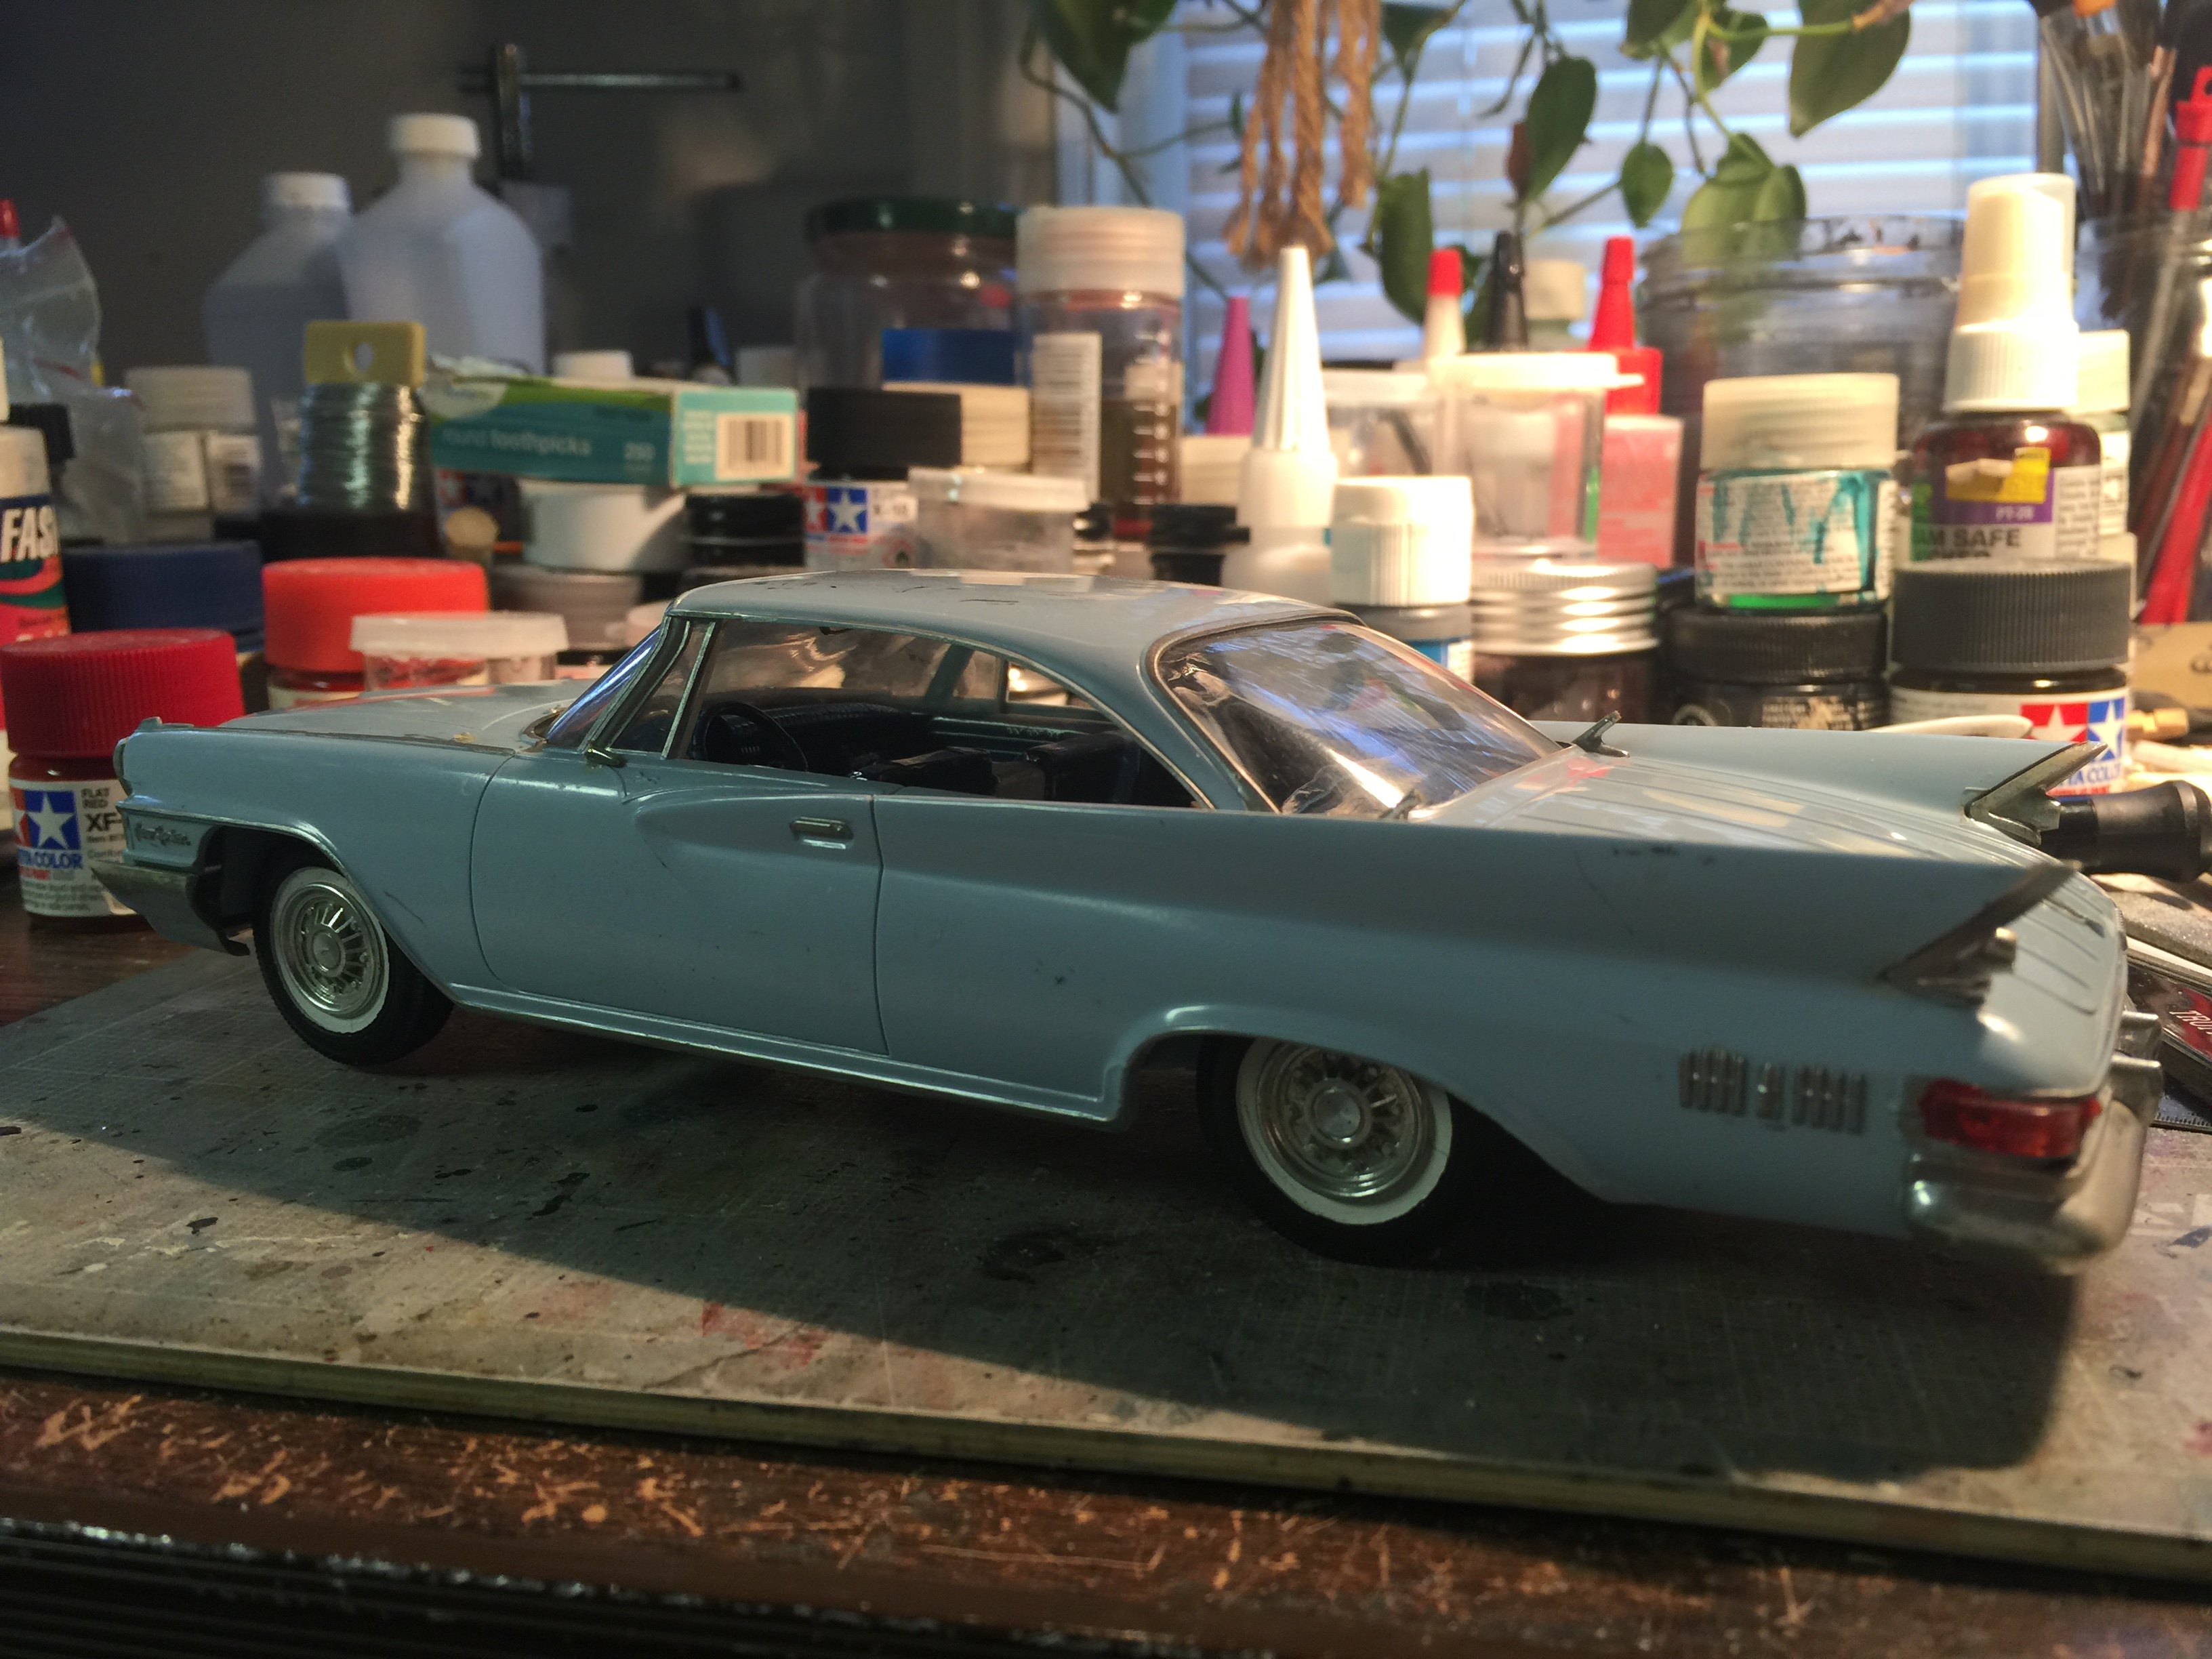
You're welcome Jan! That happens to be one of my favorite early '60's Mopar engines. I was looking for a pic I have of a Ross Gibson's engine kit. I thought I took a pic of it but I guess I didn't. I want to do a future project of this '61 Chrysler I've got with that engine in it. I'd LOVE to have it look like this one........... Some bodywork would be needed. The front end IMO is a tad short (checked with my architect's dividers) and of course there's emblem and interior changes that need done. BTW, nice set of projects you've got going on!

-
Welcome aboard Jan! As far as your engine, you might want to keep a lookout for eBay (US). If you check this out here, there's some past auctions that did have the very thing you're looking for. They do turn up from time to time.
-
Very nice little details Kurt! I saved your pic of the engine above in the 1:1 Beetle. I really liked the simplicity of these cars..........reminds me a whole lot of my '65 Dart convertible I had many years ago which was super easy to work on because everything was laid out so simple. Unlike today's cars which can be an electronic nightmare to figure anything out. Your vacuum advance line looks fine to me. It seems like it connects somewhere underneath the base of the carb. A good location since it sat up so high.
-
There's a seller on eBay right now that has those exact decals. You can check 'em out here.
-
You may have seen these from Keith Marks........... Unfortunately, I don't see gold decals listed----just 1:1 cars showing the stripes. If you click on the pic, it'll take you to his Fotki Page. EDIT: His link is here.
-
I personally like the lower body painted black as it lessens the visual 'weight' of the car. Not that it's a bad looking car at all, but it makes the body seem all the more slender with those lower portions blacked out. That might have been why the designers made them standard for the SS------to make the car appear more 'lithe and athletic'.
-
I like the full size Pontiacs pretty much through 1966. After that while not bad cars, they always seemed a bit heavy handed style wise pretty much through the '70's. When they shrank them for the '77 model year, they were not bad looking, but gone were true two and four door hardtops. Convertibles bit the dust too as we were deep in the "malaise years". I wouldn't mind having a model of a '77 Catalina two door with fender skirts though!
-
Evergreen Clear Styrene
MrObsessive replied to NOBLNG's topic in Model Building Questions and Answers
That'll do......same stuff basically but more than likely PETG or Vivak. -
Evergreen Clear Styrene
MrObsessive replied to NOBLNG's topic in Model Building Questions and Answers
That was it Kurt but it wasn't in that type package. Where I got mine you could buy it in single sheets and not in packs. It was something like 25¢ a sheet or in that range years ago. Make sure it's the 'stiff' type and not the super flexible stuff. That'll curl up in years to come like a potato chip! -
Chris, I would do to the Plymouth pretty much the same I did with this Plymouth. There are some other changes I'd do to the body as well. Not to hijack the thread, but I can think of at least 3 areas on the RC2 body that IMO would need changing when I get around to starting on it.
-
Evergreen Clear Styrene
MrObsessive replied to NOBLNG's topic in Model Building Questions and Answers
Greg, you may have to build up the dash a bit on the top pad to get it to mate up with the windshield. I have to do this from time to time where I don't want to use the kit glass (distortion) and yes, the stencil sheet is very thin. Roughly .005 to .010" thickness. I get mine from the Arts and Crafts store. When asking for it, let them know you're looking for clear stencil sheet and not simply acetate. They'll look at you funny and won't know what that means. Some of it comes in packs. Make sure it says 'clear' on the package and not the opaque kind. That's the foggy stuff that won't do any good. Hope this helps! -
Evergreen Clear Styrene
MrObsessive replied to NOBLNG's topic in Model Building Questions and Answers
If you're using this for 'glass' why not try clear stencil sheet (acetate)? IMO, it looks much clearer than styrene and 'reads' like real glass. The only caveat is that you'll need to use some sort of epoxy to put it in, and it's better for flatter type glass as it likes to be bent in only one direction. -
Yikes! We haven't been hit that hard here in Central PA.........................yet!
-
Super Gorgeous Paul! Looks soooooo much better than what RC2 gave us! BTW that is a super sharp color! What is that?
-
DeAgostini 1/8 1967 Shelby GT 500....Update! 2/5/19
MrObsessive replied to MrObsessive's topic in WIP: Model Cars
Yeah Chuck, there's NO WAY the Molotow paint would've survived all the handling and wrestling I had to do to get this thing in! I didn't know about the fellow on the ModelSpace board that did that even though I have a thread there. Later on I'll be posting there with the same update as here. -
DeAgostini 1/8 1967 Shelby GT 500....Update! 2/5/19
MrObsessive replied to MrObsessive's topic in WIP: Model Cars
Ray, that's a VERY good idea and something I'll definitely keep in mind! I already have a spot in my house where this can be displayed once it's all built. I sure don't want this sitting out in the open despite its size. -
DeAgostini 1/8 1967 Shelby GT 500....Update! 2/5/19
MrObsessive replied to MrObsessive's topic in WIP: Model Cars
Chuck it's funny that you mention this as this is exactly what I did a few days ago as you'll see in this mini update........... First I gotta say that whatever DeAgostini used to paint their wheels, this was some TOUGH STUFF! I tried using Easy Off (Yellow Can) to take off the paint and it WOULD NOT TOUCH IT! Same thing with brake fluid......some success, but waaaay too slow. Soooo, I got the idea to start sanding away at the finish and see what exactly was underneath. I was seeing nice and bright, shiny metal! I then got out the Acetone and dunked the entire wheel in a metal can. After much peeling away of the paint, I got out my polishing cloths starting with 1800 grit and worked all the way up to 12,000. Some constant washing of the cloths was needed as of course, this is some dirty stuff! I did paint the brake caliper just a bit with some Alclad Magnesium to give just a bit of contrast with the rotor. As you can see here they give you this teeny-tiny screw to fasten the caliper to the rotor. I did have to put the tire in my dehydrator set at 130° for roughly 15 minutes at a time. After several tries I FINALLY got the wheel inside the tire, but this was NOT without some cursing along the way! Here's the wheel and tire all nice lettered up........something I haven't done in a very long time. And to think I get to do this THREE MORE TIMES! I can hardly wait. I'll polish up the wheel just a tad more, but at this point I'm done with this pretty much till later this week. Just getting the wheel and tire done alone was a real workout and to me it was a real tail kicker. It's back to the '68 Corvette for now as I can see the next instructions for the Shelby is putting the seat together and of course another wheel and tire! I'm thinking about adding brake and fuel lines so I need to dig out my references to see just where the brake line fitting goes in the calipers for this vintage (I have a shop manual) and also to get the 'right size' so things don't appear out of scale. I have to keep reminding myself this is 1/8 scale. Thanks for tuning in! -
OK, that's good! I didn't make it to this past Saturday's meeting. It was simply too cold out and I didn't want to leave the house. I went nowhere in fact till it was time to come back into work Sunday night. There's also a club we have meeting the third Saturday of the month at the Mechanicsburg Library. We meet from 10-2, although if I'm working very early that morning, I may not make it (tired).
-
Welcome back Nick! Good to see you! Are you and your Dad heading to NNL East in April?
-
Many years ago, SA(then E) ran an article on my '61 Ferrari 250 GT SWB. One of the things they said was how I was "Obsessively" into getting the little details done. A cousin of mine saw that and was tickled how they used the word "Obsessive", so that's where my handle MrObsessive comes from. On another board, I went by the name "Plastiksurgeon" because as most of you know, I won't hesitate to point out where something is not quite right with a particular model's body shape and take measures to show how/where it can be fixed. It's also a moniker I use on my one YT channel, but there's not much model stuff on there (yet). I have it well as one of my email addresses.
-
As far as detailed GM A bodies, you can perhaps look no further than the newly released Revell '68 Chevelle. Granted that one is 1/25 scale, but IMO that's one of the best detailed chassis to come down the pike that I've seen.
-
Isn't that a '70?