polybius
-
Posts
119 -
Joined
-
Last visited
Content Type
Profiles
Forums
Events
Gallery
Everything posted by polybius
-
Thank you everyone for the kind comments, much appreciated! After finishing this one up I regretted getting rid of the other late-model Revell Mustang kits I had a while back. In the meantime and while I seem to have Mustangs on the mind, an '89 GT convertible in rare dove grey with red interior is on the bench now. Thanks again for the encouragement!
-
Very nice job on this kit! It's hard to find one, like you mentioned about the Thunderbird, that doesn't have a warped roof or broken pillars. You've done great with it, well done!
-
Beautiful build, super color and paint, and great engine detail. Very nicely done all around!
-
Tamiya 1/24 Alfa Romeo GTV (1996) Twin Spark 16V
polybius replied to Italianhorses's topic in Model Cars
It's great to see one of these built so nicely. Beautiful build of an unusual subject! -
Great build and great car! These look great right out of the box and I'm a fan of the classic blue with white stripes that you chose for this one.
-
Wow, very nice! I immediately thought of Kojak. Great builds, love these 70s tanks!
-
Great work! It looks showroom fresh, well done!
-
Very cool build, and unusual! I'm a fan of one-off cop cars like this. Well done!
-
Very nice looking T-Bird! It's unusual to see one let alone built so cleanly. Well done!
-
Very nice work on this! The details are spot-on, well done!
-
Great looking T-Bird! Well done!
-
Thanks so much everyone! Yes, the Rustoleum clear lacquer can be very tricky but it's cheap and readily available, and with some patience gives an acceptable result. I've found the key is very light mist coats every step of the way with at least 10-20min off-gas between coats, and only the final coat is moderate to heavy. It also takes a very long time to fully off-gas and cure despite being perfectly dry to the touch, so I'll let a body sit for weeks or sometimes months before wet sanding and polishing it. I'd imagine 2k through the airbrush would be the faster and easier route, but I'm comfortable with the consistency of the technique and results. Again, much appreciated!!
-
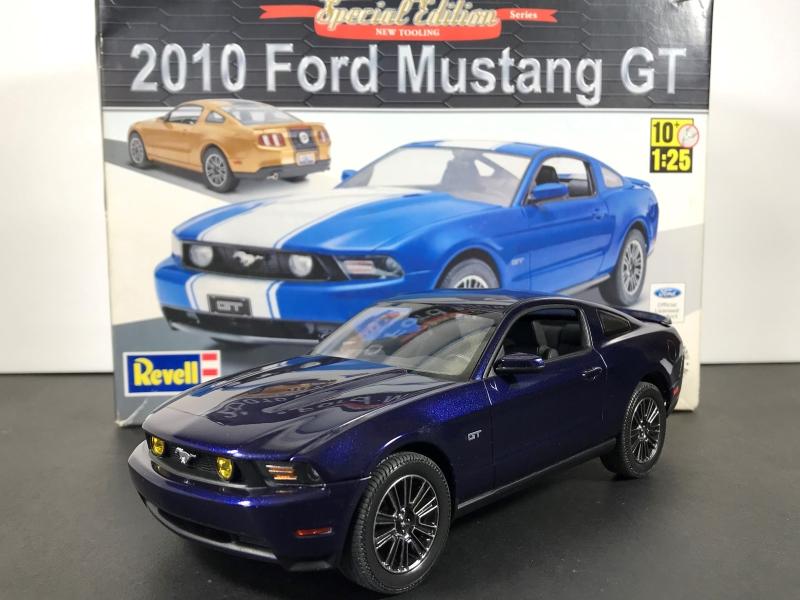
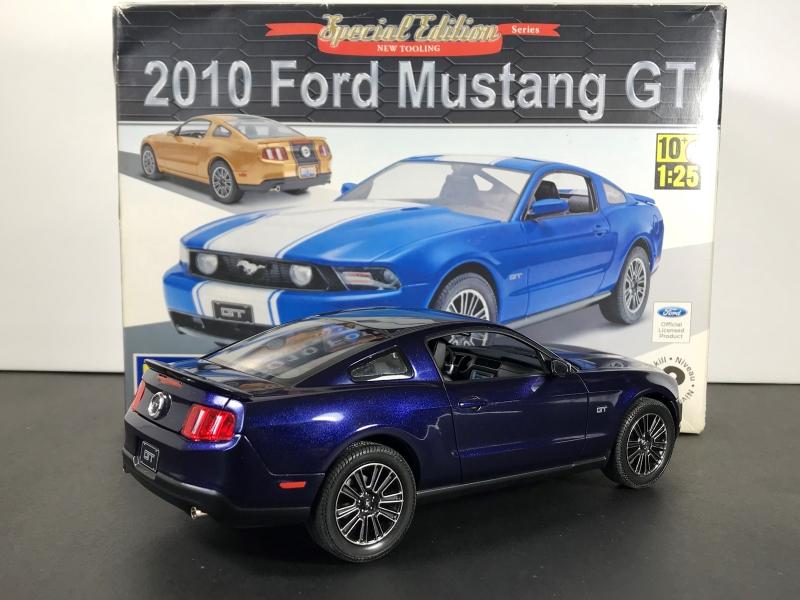
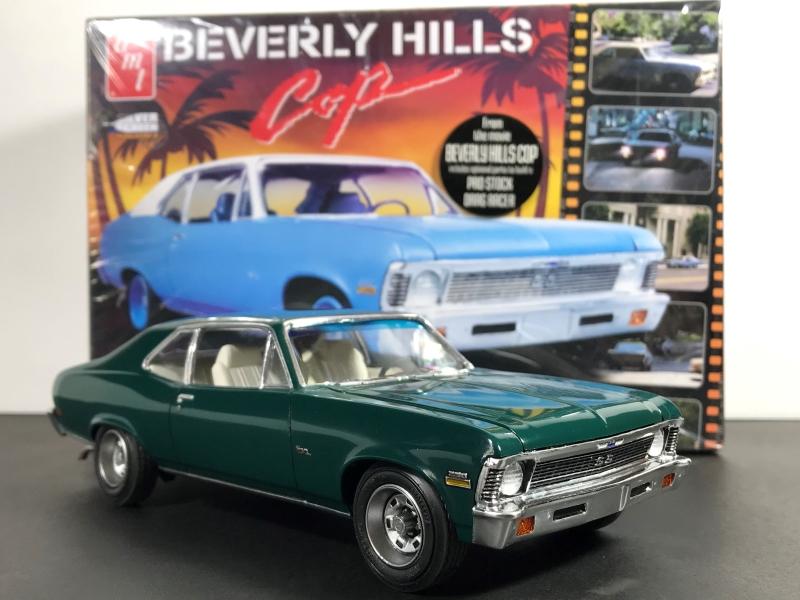
This kit arrived in a box lot of open kits that I bought for parts. After looking it over, despite almost everything including the body covered in a gloppy gloss black of some kind, the parts seemed to be complete and I gave a thought to trying to strip it all down and give it a build. Whatever black paint had been used was etched into the plastic especially on the body. After a few days in a brake fluid bath, and then after carefully sanding down the remnants, it was ready for several coats of primer and more sanding. The rest of the parts were stripped, repainted, and assembled. Only the oil fill cap and master cylinder reservoir turned out to be missing, but they were easy enough to scratchbuild and the rest is history. For a relatively new Revell tooling it was mostly a breeze to assemble. Fitment was very good for most parts, and the clear glass and lenses were surprisingly crisp. Since initially I wasn't sure if it was even salvageable or whether the paint might react with whatever had been hosed on, I used some leftover DupliColor Stellar Blue Pearl that was remotely similar to the deep blue available on the '10 GT. After some lacquer clearcoat, sanding, and polishing, it worked out just fine. The interior received some dark charcoal grey, aluminum trim, and black embossing powder for carpet. Of all the wheels in '10 the units included in the kit are my least favorite but after stripping the chrome, spraying some graphite, and dry-brushing the machined aluminum trim they worked out well and seem to suit its character. Since I was aiming for a stock GT the kit's stripes were not used. This kit offers some nice touches and refinements that are leaps and bounds ahead of the toolings of yore. I had a few of these in my stash some time ago but never opened them and ended up getting rid of them, but when an open box or orphaned kit comes my way it's often a good enough reason to build it.

-
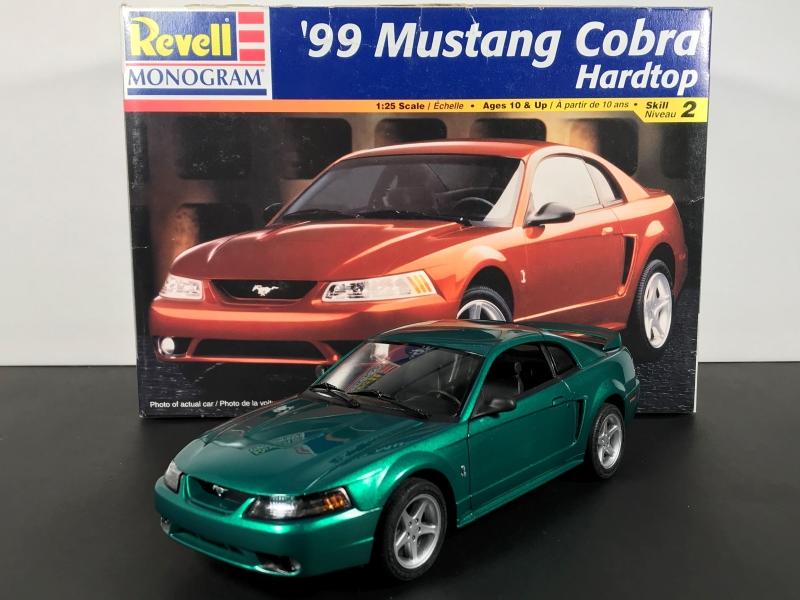
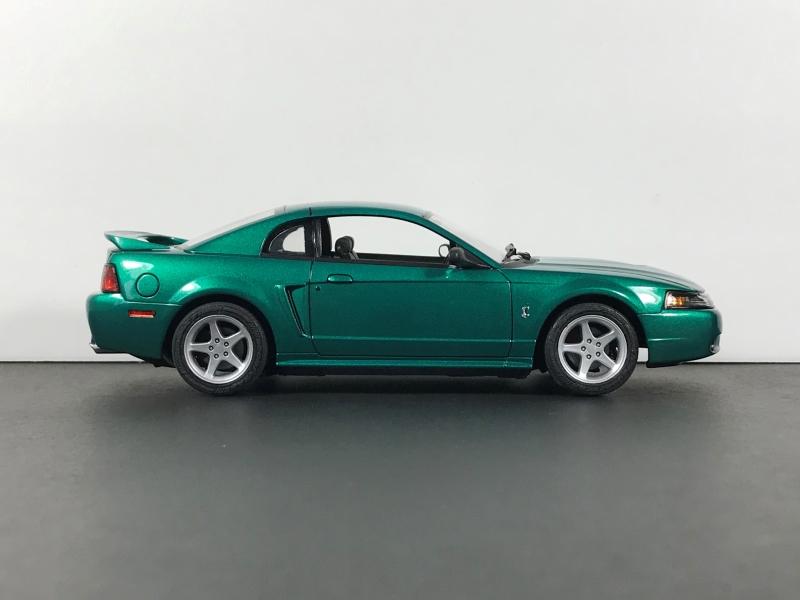
The latest build to move from the bench to the display shelf is this Revell/Monogram 1/25 scale 1999 Mustang SVT Cobra. Back in '99 I worked for a big-box auto parts chain and a co-worker showed up one day in a new Mustang GT in Electric Green. It was an odd color and some loved it and some hated it. All these years later as I searched around for factory colors for the '99 Cobra the green I remembered from all those years ago jumped at me. With '99 Cobra hardtop coupe colors limited Black, Laser Red, Ultra White, and Electric Green, it was the obvious choice. According to Ford's production numbers it was the rarest of the Cobra colors that year. I happened to have a few jars of Mr. Color C77 Metallic Green that, after soaking a few test spoons with it, seemed to be a reasonable match for Ford's Electric Green. If I had to guess, the correct color has a slightly more yellow hue whereas the Mr. Color version leans more blueish. Regardless it was a go! While the color coats were airbrushed through a trusty old Paasche H, the clearcoat is my go-to rattle can Rustoleum clear lacquer subsequently wet sanded and polished. Having built plenty of MPC/AMT and Monogram 1980s Mustangs back in the day I wasn't expecting much from this offering but was very surprised at the complexity and detail of this tooling. I had already thrown an AMT '97 Cobra back into its box after giving up trying to fix the badly misaligned body and bumpers, and in comparison this 'Revellogram' was a joy! The rear suspension is an intricate multi-piece apparatus, and the engine builds up with beautiful accuracy. The instruction sheet was significantly lacking, however, since the mounting locations for most parts are vague. The cooling hoses, for example, are comprised of several parts that must be precisely assembled to have any chance of lining up with the radiator, intake, and lower engine block but the instructions offer only confusing arrows and generic sketches. There are some pitfalls, as well. The lack of positive mounting points on the aforementioned rear suspension makes alignment very challenging since the thin and bendable rear axle shafts seemingly float between the differential and rotors. I'm also not a fan of having to attach the interior to the chassis rather than the interior to the body. Since some of the suspension components do not attach until after the chassis is mated to the interior, I found it necessary to trim both front and rear shocks before installation to ensure a proper fit. Otherwise, the shocks were too long to allow the chassis and interior to fit flushly together. Otherwise it was box-stock with only some black embossing powder added for interior carpeting. Since I used the original issue of the kit from 1998-99, the decals were barely usable. I was able to salvage the Ford oval, some underhood markings, and part of the instrument cluster, otherwise the rest crumbled to pieces. The headlights and taillights were easy enough to install after some routine clean-up, but would have benefitted from having multi-piece buckets and lenses. Painting the tiny amber slats and the correct black bucket trim was an exersise in patience. The taillights received the correct amber turn signal treatment, but the molded in reflectors don't quite match the lenses so the red tends to wash the amber out. If I build another, and someday soon I just might, it'll go together a bit easier knowing the ins, outs, and pitfalls in advance. Until then this Cobra will sit on the shelf and remind me of the first time I saw that green '99 Mustang pull into the parking lot looking just like a grasshopper.
-
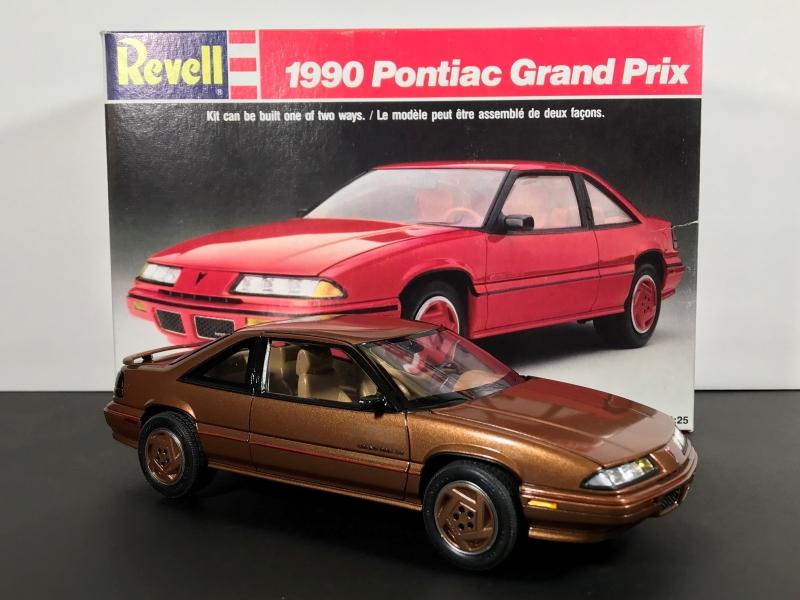
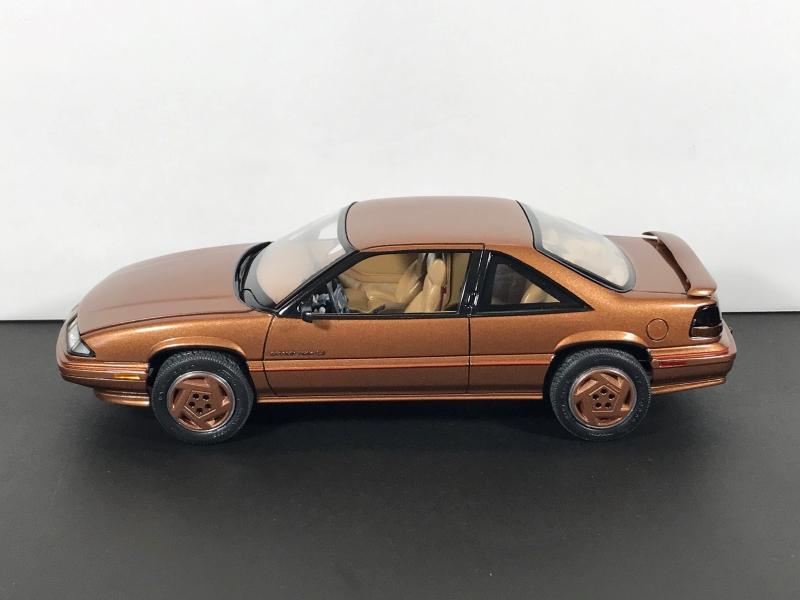
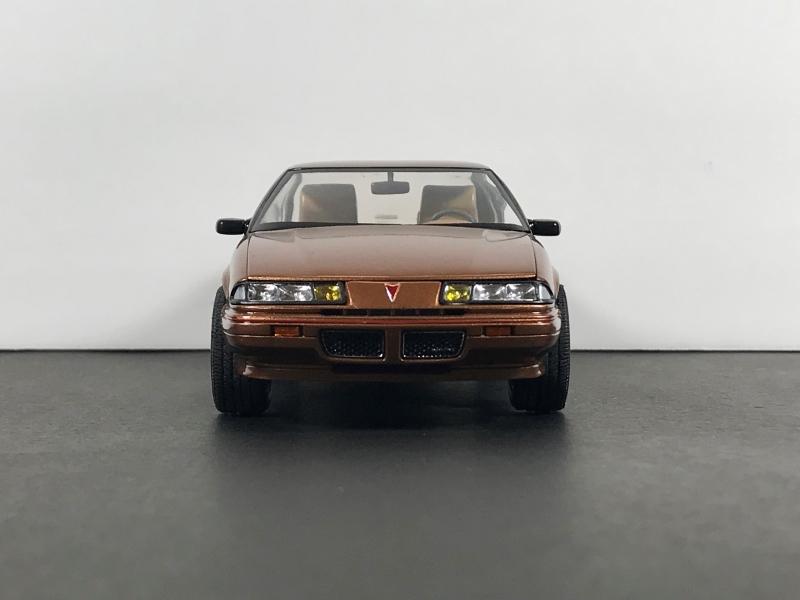
This Revell 1990 Pontiac Grand Prix SE was started a few years ago when I initially planned to build it as a companion to the similar Grand Prix McLaren Turbo. However, after the body was painted it went back into its box until I recently got around to finishing it. It turned out to be a practice run for a future McLaren Turbo build, and building this one helped to work out a few quirks of these kits. I remember the excitement I felt when these kits were originally released in the late 1980s. Back then I built all of them including the later GTP variat, but those old builds from childhood didn't survive the ages. As the world turned, in 1994 I bought a real one (albeit slightly used) - a 1990 SE in black metallic - and I remember it being comfortable and loaded with gadgets. But I also remembered the 3.1L V6, while it sounded nice and throaty through the dual exhaust, provided adequate power but was less than enthusastic. With that in mind, I figured this build could use some extra power from the 3.1L intercooled turbo borrowed from the McLaren kit. Since the kit was originally tooled as a '88 spec, this kit's intake plenum is still the 2.8L from '88 rather than the later 3.1L from '89 on. This was another good reason for upgrading the kit's engine. The kit's interior is also '88 spec with the partially digital cluster, half-sized radio, and without the console mounted driver information center. There were some changes made in the later '91 and '92 GTP kits including the heads-up-display, but these '90 kits were just a duplicate of the '88 kits. Pontiac limited the color options on the SE and most had color-keyed wheels including white, maroon, blue, and gold (Light Camel Metallic). The other SE colors such as silver, grey, and black typically had machine-faced wheels rather than color-keyed. The closest in my DupliColor rattle can stash that matched the uncommon gold was Camel Metallic, so it's a slightly darker shade but close enough for my eye. Other than swapping in the turbo engine and adding some ignition wires and carpet flocking, it's otherwise box stock. If you are lucky enough to have one of these early Grand Prix kits that doesn't have a warped body or scratched windows, the kit generally assembles smoothly with relatively few fit issues. These kits were developed around the time Monogram and Revell were merging, and while these Revell kits are 1:25 scale they used Monogram's 1:24 scale Goodyear Eagle Gatorback tires. Despite searching my spares bin I couldn't find another set of 80s-90s era tires that would fit, so I had to settle for those that came in the kit. These are more fitting and look great on the McLaren Turbo since it has wider fender flares, but the SE should have less aggressive and slightly smaller tires. The 1:25 Thunderbird and Cougar kits were in the same boat, but I haven't come across suitable alternatives that are period correct. A correctly scaled set of Goodyear Eagle GT+4 tires would have been ideal for these and other kits of the era. Lastly, initially I hadn't planned to install the rear spoiler since even in '90 it still wasn't a factory option and they were somewhat rare as a dealer add-on, but I went ahead and drilled the mounting holes before discovering the kit's spoiler was badly warped. Despite several tries to straighten it out, it still had a kink in it but I wasn't going to lose any sleep over it. Ultimately it was a nice stroll down memory lane and I'm pleased to finally finish it.
-
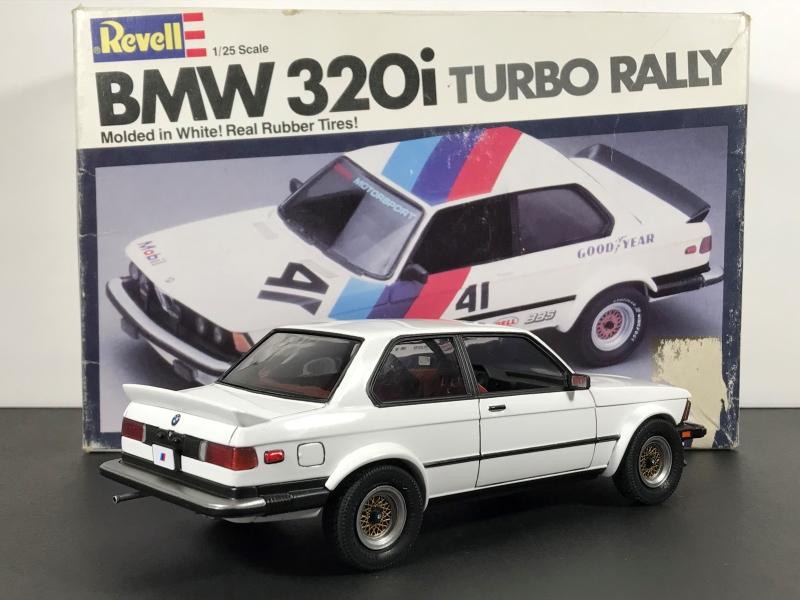
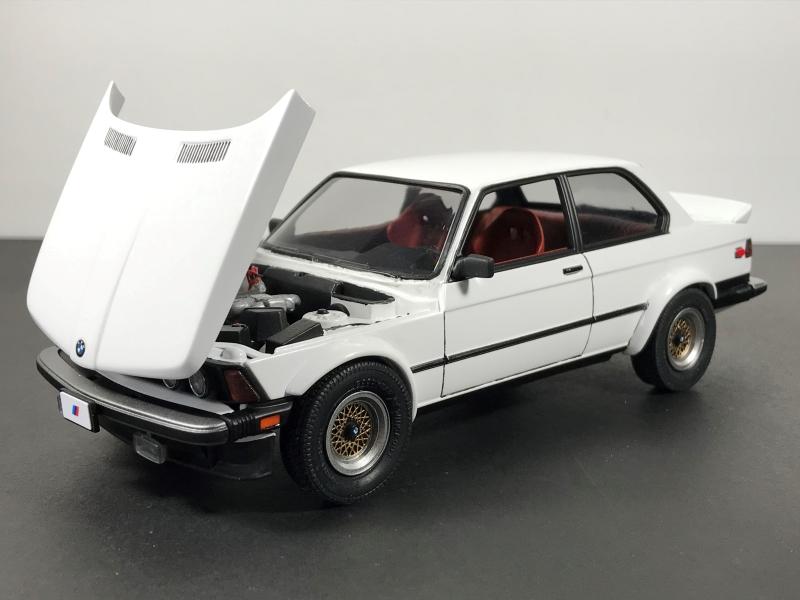
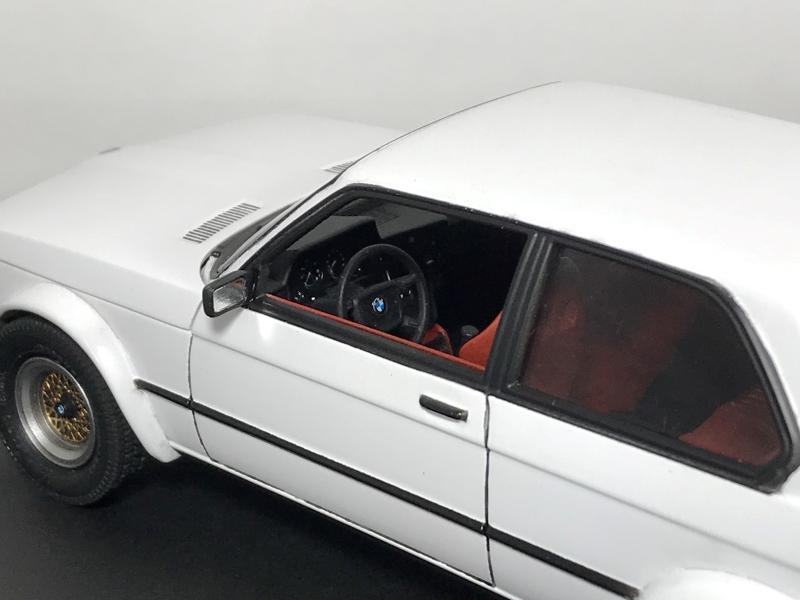
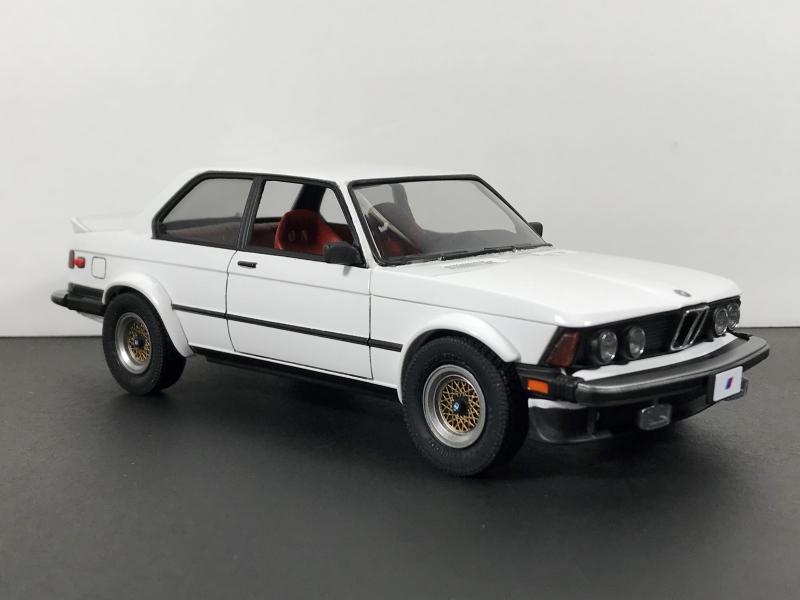
This is an old and somwhat hard to find Revell kit that dates back to the early 1980s. It was in my stash for a few years and it's finally off the bench. Somewhere along the way one of the fender flares went missing, and despite an exhastive search for it the build went back on the shelf until I was able to find a second kit to supply the missing part. Initially I planned to use the kit's Rally decals but the more I researched photos of the 320i the more I favored the non-striped stock look. The kit's body has a scribed in sunroof panel in the roof, so figuring the car's rally heritage I filled and smoothed the roof to effectively delete the sunroof. The finish is a very basic gloss white appliance lacquer wet sanded and polished without clearcoat. It is mostly box stock other than the sunroof delete, and the only parts not used were the off-road lights and roll cage. Ignition wires were added along with black flocking for the interior carpet. I had some BMW photo-etched parts and decals in the spares bin that came in handy for the emblems. The kit assembled surprisingly soothly for an old Revell offering, although I believe the kit has Japanese origins since I noticed small Japan stampings in the tires. Most parts had tabs or slots that made placement straight-forward, although the entire front end of the car is a test in patience. First the header panel and hood, then the grille, and from there down. It was necessary for the hood to be in place since the hinges are effectively locked in once the grille is attached. After some minor adjustments it delicately fit together and somehow the hood manages to open properly. The most disappointing parts in the kit were the wheels which looked to be short-shot and were missing some of the finely detailed spokes. Even the wheels in the second kit I used for parts had the same issues in the same places, so I had to make the best of them. The later Revell reissues of this kit are a bit easier to find, and it looks like they contain the same Rally parts along with different wheels. Overall it's a surprisingly well engineered kit and was mostly a joy to build.
-
First, let me explain the color. I had an old can of Duplicolor DSGM4780 Dark Green that would have otherwise been thrown away but I was hoping to find a use for it. Second, let me explain the kit. A few years ago the local Ollie's had a shelf full of these kits at their 'good stuff cheap' price. So I picked up a few of them with some ideas of variations. Having never built one of these before, and never having much interest in them, I figured I could still put them to good use. Then I opened one and saw the horribly misaligned roof and c-pillars. Then I saw the separate front fenders that looked like they'd never align with the body. Initially I thought it must have been a bad batch of kits and likely the reason they were at Ollie's and thus cheap. But after reading the years and years worth of reviews and builds it soon became obvious these were just badly molded kits from its Pro Stocker and Novacaine beginnings back in the 70s. I took the unopened kits and my receipt back to the store and returned them, keeping only this one that I'd already opened. I set about to work on the roof and c-pillars to get them as close to aligned as possible and with much fitting and fiddling got the front fenders attached. After finishing up the bodywork and getting it in primer, the search for its color quickly ended when I came across that can of green paint. Combining what might be one of the worst kits with such an unwanted color seemed an appropriate conspiracy to put them both to good use. After spraying and clearcoating the paint, the interior, chassis, and engine assembly progressed until it was time to mate it all together. It then sat in its box for more than two years until I recently rediscovered it. After looking it over, I decided to list the painted and partially assembled heap on a popular online auction site. After weeks of offending online shoppers with its hideousness and nary bid for even $15, I sympathized with it and took down the listing. The only option, at that point, was to finish the ugly thing. It's box stock with only some ignition and battery wires added. The kit lacked mirrors of any sort, so the sideview was sourced from the parts bin. The interior is a creamy white with black flocking and chrome trim. The wheels are the kit's ZJ7 style rally wheels but the tires are some Firestone Super Sports sourced from the parts bin. Since the theme of this kit is 'nothing fits' the metal axles were no exception and were too short. Some metal rod was cut to the correct size. Along with the aforementioned bodywork on the roofline, I removed the molded in SS style hood vents to give it a more basic appearance. It reminds me of a story my aunt once told us about our colorblind uncle who bought a new Chevy Scottsdale in the late 70s. He pointed it out to her and said, "It's that black one over there." As they walked closer to it she realized he bought an ugly green truck believing it was shiny black. I'm pretty sure this can of Duplicolor would have been the perfect match.
-
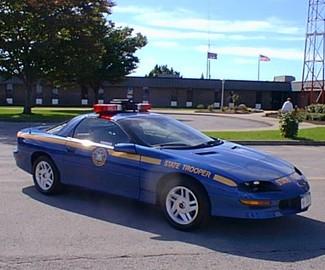
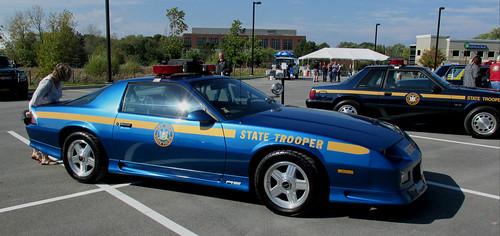
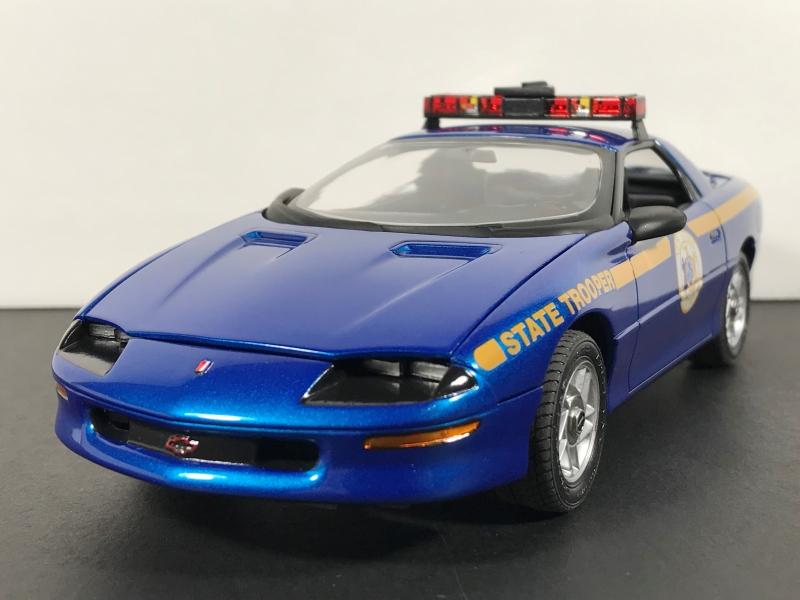
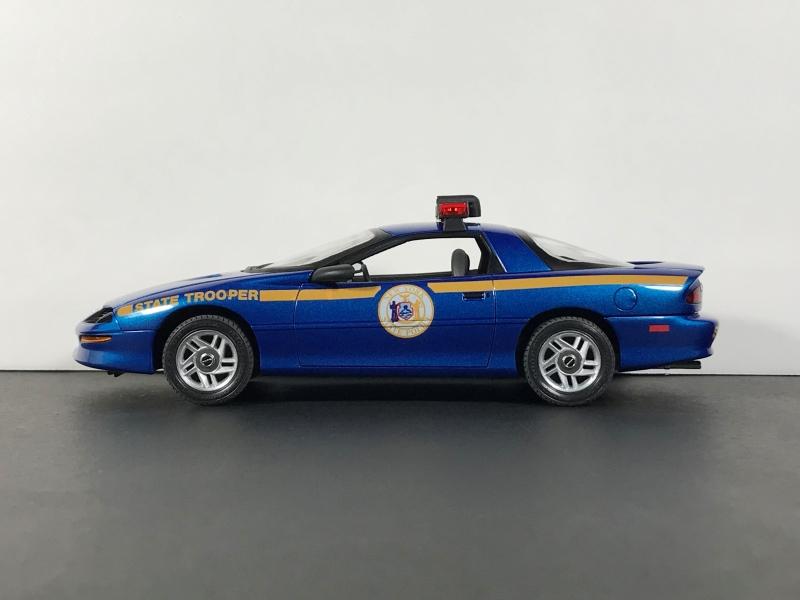
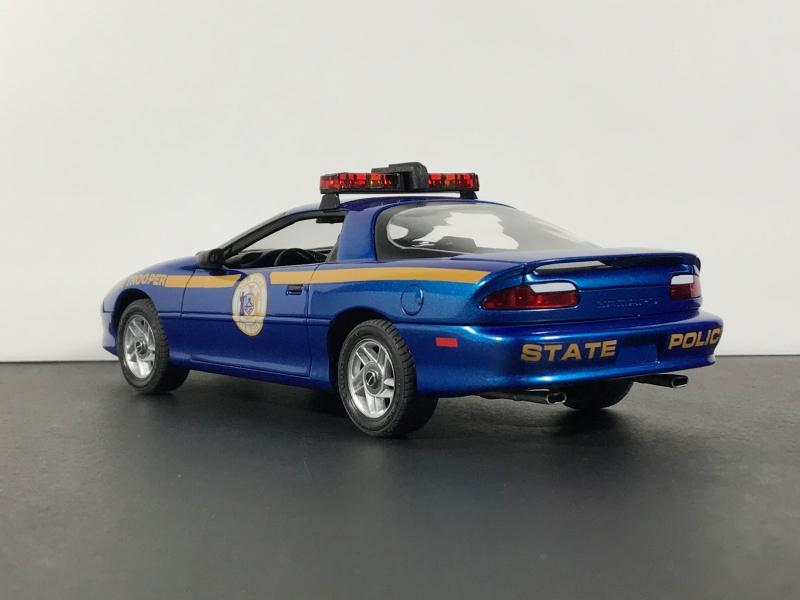
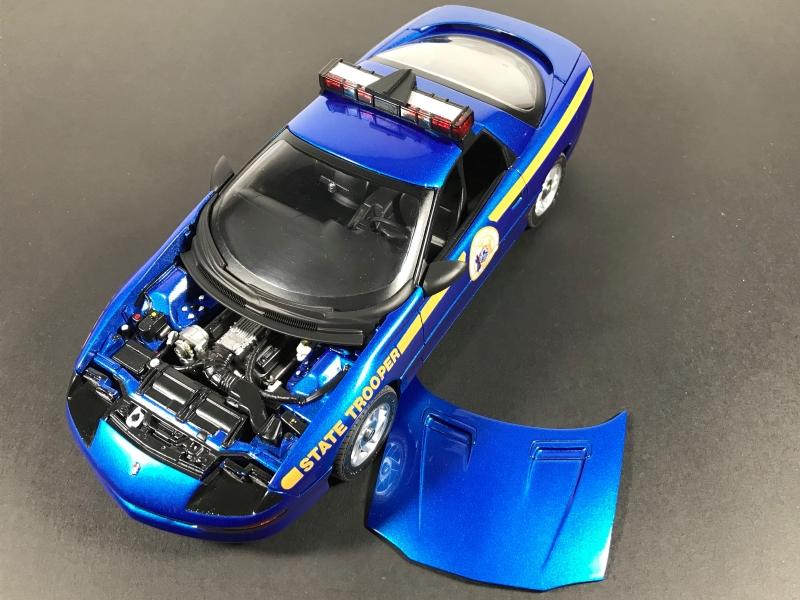
Revell 1993 Chevy Camaro B4C New York State Police
polybius replied to polybius's topic in Model Cars
Thanks again! In comparing the glue kit with the snap kit, it looked like most of the parts were identical. In fact, I found assembly of some parts to be easier by cutting off any snap-tabs and simply gluing the parts normally. After finishing up this build I saw an AMT '92 Camaro in my stash and thought it might be fun to do it as a companion build. It'll have to be de-Z28'd and turned into an RS, and I'm trying to figure out how to convert the basket-handle spoiler back to the traditional decklid lip. The hood bulges will have to be sanded smooth, but otherwise it should be a straight-forward conversion. Nearly all of the photos I came across for 4th gen NYSP Camaros were in the later dark blue or black except for one. The medium blue seemed to be a short carry-over from the 3rd gen NYSP Camaros. I guess the main driver for the livery and color of this build was simply having the supplies at hand to give it a try and see how it turned out. I think the '92 will look good next to it on the shelf.
-
Revell 1993 Chevy Camaro B4C New York State Police
polybius replied to polybius's topic in Model Cars
Thanks everyone, I appreciate it! The wheels were one of the more nerve-racking parts of the build. Using an original wheel as the guide, it looked like the center cap and outer lip were machined while the spokes were silver. After floating a few ideas it came down to laying down the machined color followed by the silver color. The kit's chrome was stripped in Purple Power down to the bare black plastic and Vallejo Metal Colors Duraluminum was airbrushed as the basecoat. I've found it to be a tolerable match for machined aluminum and works well for some wheels. The spokes were hand painted with Vallejo Model Air Silver and the center caps got a touch of black in the recess. Some tiny slivers of foil were an attempt at the tiny Camaro script in the center caps. Hand painting the spokes became an exercise in deep breathing and stepping away from time to time, but the molded in detail makes a good guide for the exercise. The alternative was going to be laying down the Duraluminum then cutting circular masks for the outer lip and center cap. That seemed like as much work as hand painting them, but maybe that's an easier way. It's great to see another B4C in the works, and good luck with your build!
-
This build started as a kit that was missing its box. I suspect it was water damaged since the parts arrived in a plastic bag with a wrinkled instruction sheet. What was worse, it was the Revell Snap-Tite 1/25 scale '93 Camaro Z-28. It's a simplified version of Monogram's full glue kit of the '93 Camaro, but I remembered from building one when they were released in the 90s that it was still a decent kit. With that in mind, and since SSP Mustangs seem to be far more common than B4C Camaros, I set about cobbling together some bits and bobs to come up with a livery for it. After digging through paint, decals, and lightbars I had in spares bins, the easiest way forward was a New York State Police scheme. The decals were modified from the 90s AMT Taurus Police Car, but the AMT set didn't have the small font State Police decal for the front bumper so I chose to forgo it. The Whelen Edge lightbar was an aftermarket piece from who-knows-where painted with Tamiya clear red and amber. The siren is a Whelen Lo-Pro scratchbuilt from scrap styrene to match a source photo of the NYSP Camaro. That takes us to the color selection. It seems around 1992-93 New York State switched from a somewhat medium blue shade to a dark blue shade. Most photos I found of their B4C Camaros were dark blue, and some even looked black. I found one photo, however, in medium blue that closely matched some jars of Mr. Color Metallic Blue that I had laying around waiting to be airbrushed. The Z-28 badging was removed to match the B4C police package. The interior was slated to get an array of radios, radar gun, and other equipment until I ran into one of the quirks of this kit. The dashboard attaches to the cowl rather than to the interior tub. When sizing up the radio equipment it was a challenge to match the dashboard clearances with the interior tub. Since this wasn't meant to be a stressful build, I decided to forgo the interior equipment and keep it all stock. While the decal scheme isn't entirely accurate and the hue of blue might be a bit too dark, it was close enough for me and a close enough match for the single photo I was able to find of the real one.
-
Wow! Very nice, and well done!
-
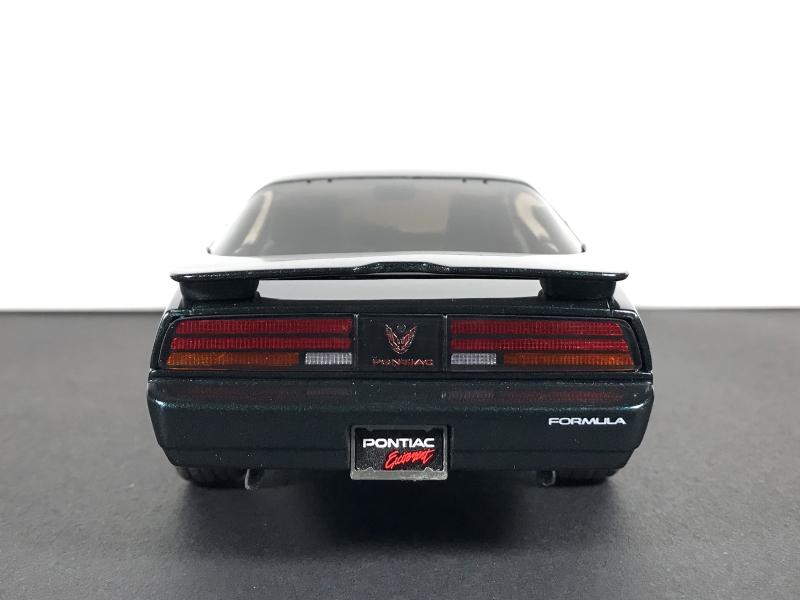
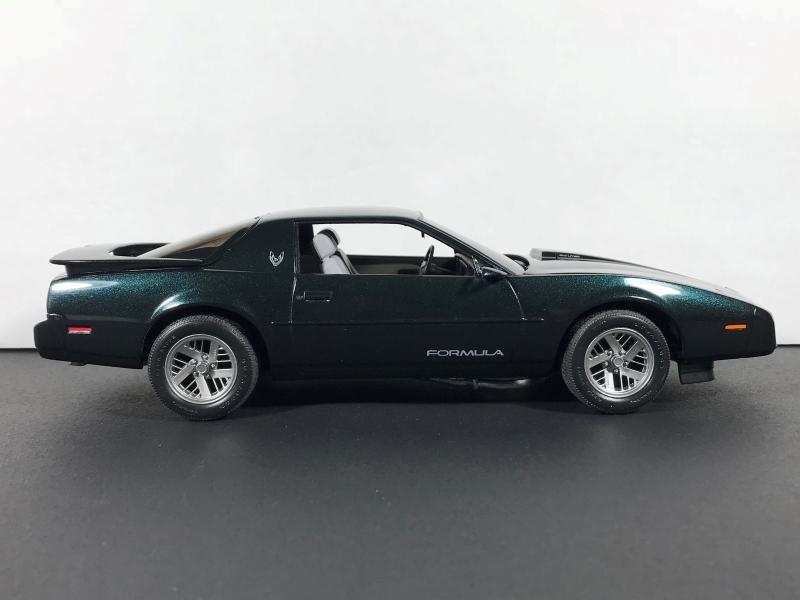
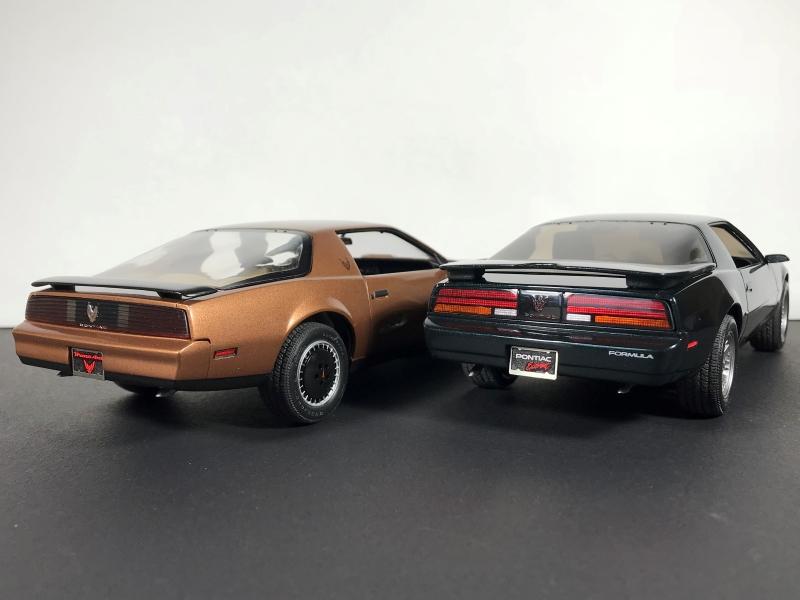
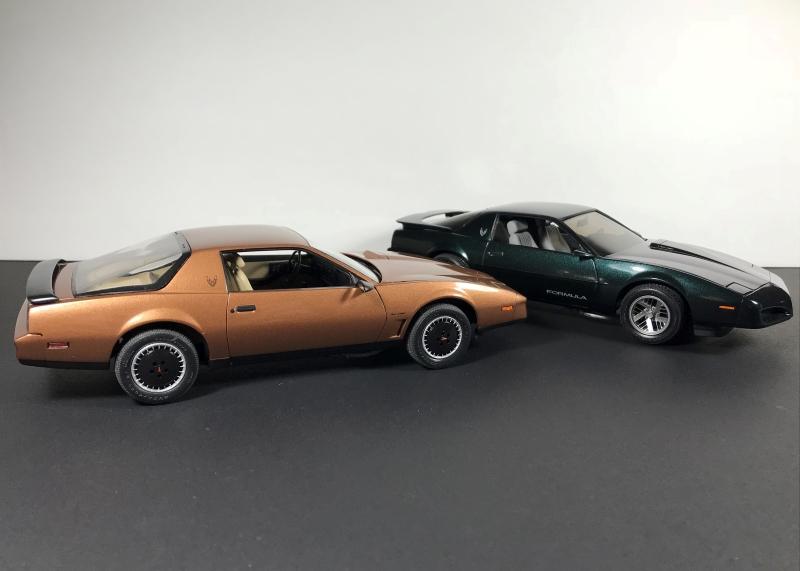
This Monogram 1/24 scale '92 Firebird Formula was a companion build to the '82 Trans-Am. It is box stock except for some flocking to match the interior. Since it was built from the 1990s Monogram release that came only with dark Formula decals, I sourced an updated decal sheet from the more recent Revell reissue that included a silver decal option. The newer decal sheet also had some of the correct decals in black for the '82, so it was a worthwhile investment. The original windows were clear in these later issues, but the earlier 80s versions were tinted. I went with the tinted windows for this build and swapped the clear units into the '82. The color is Dupli-Color Dark Green Metallic to closely match one of the two shades of dark green offered in 1992 on the Firebird. It assembled without much fuss as many of these 80s-90s Monogram kits did. 1982 and 1992 were the bookend years for the 3rd generation F-body, and Monogram offered a few updated kits across the decade. While I'm glad to finish up both this one and the '82, I'm still looking forward to diving into the '85 Trans-Am and the '87 GTA. Until then, these two birds make a nice pairing in the display case.
-
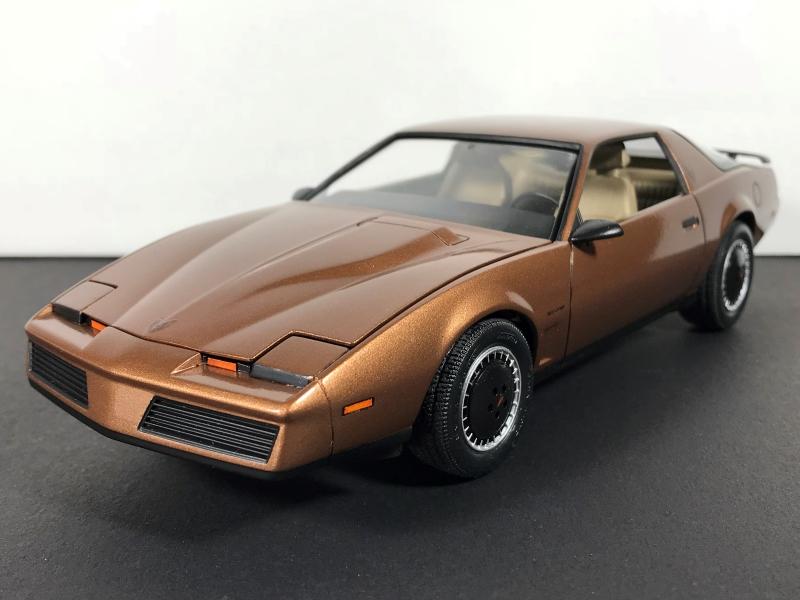
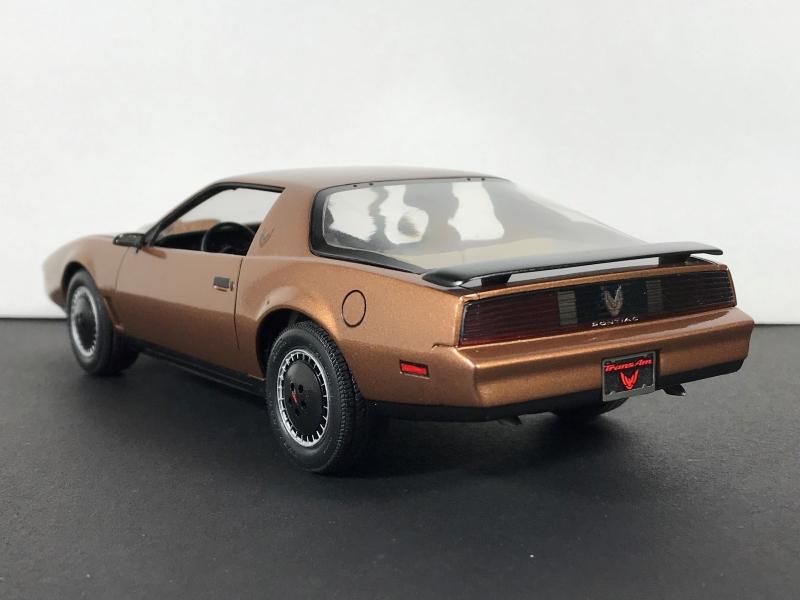
This 1/24 Monogram 1982 Pontiac Firebird Trans-Am arrived with no box, instructions, or decals, and the parts were all removed from the sprues. It was missing the seats, but in time I discovered it was otherwise complete. I built it alongside a 1992 Firebird Formula that had an instruction sheet, so the assembly steps were identical and only the trim and some details differed. It is finished in Dupli-Color GM Camel Metallic, and while not the exact color offered on this first of the third-generation F-bodies it was a very close match. Reference photos showed some variety in the trim offerings in '82, so I went with the black mirrors and spoiler to match the black lower accents. Since the kit's seats were missing and should have been the Knight Rider style high-back bucket with the small horizontal slot, rather than trying to source the correct seat or scratchbuild them I went with a pair of '87 GTA seats that'd been sitting in my parts bin since I gluebombed that GTA back in 1987. It seemed like a reasonable upgrade, anyway. Aside from the flocked carpet, it's mostly box-stock. I have a soft-spot for these 1980s vintage Monogram kits. They fit together fairly well and the plastic had a unique crispness and crunchiness to it. I don't think we'll ever see Revell reissue these early Firebirds since the molds have long since been updated, and it's getting hard to find these kits in buildable condition. Having finished both this '82 and the '92 Formula, there are still at least three of these old Monogram Firebird kits still on my to-build list - '85 Trans-Am, '87 GTA (to avenge the one I glued to death as a kid), and '89 20th Anniversary Turbo.
-
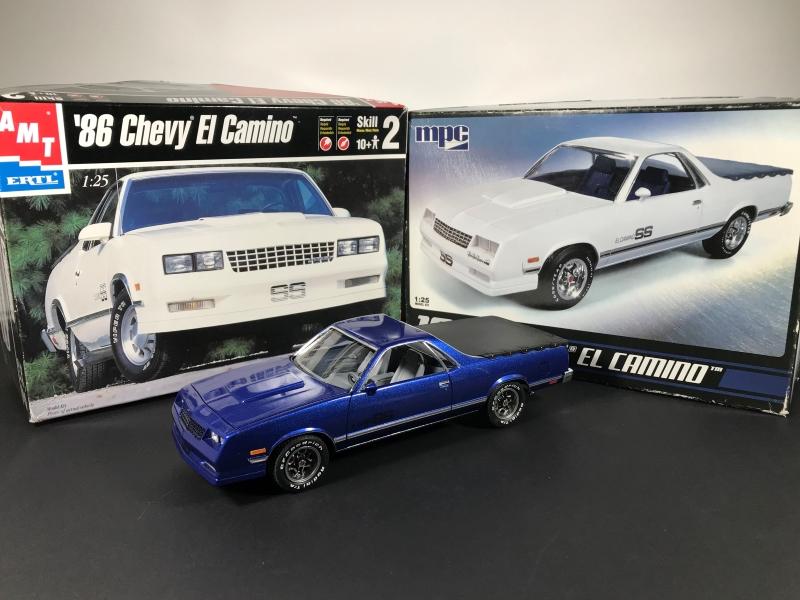
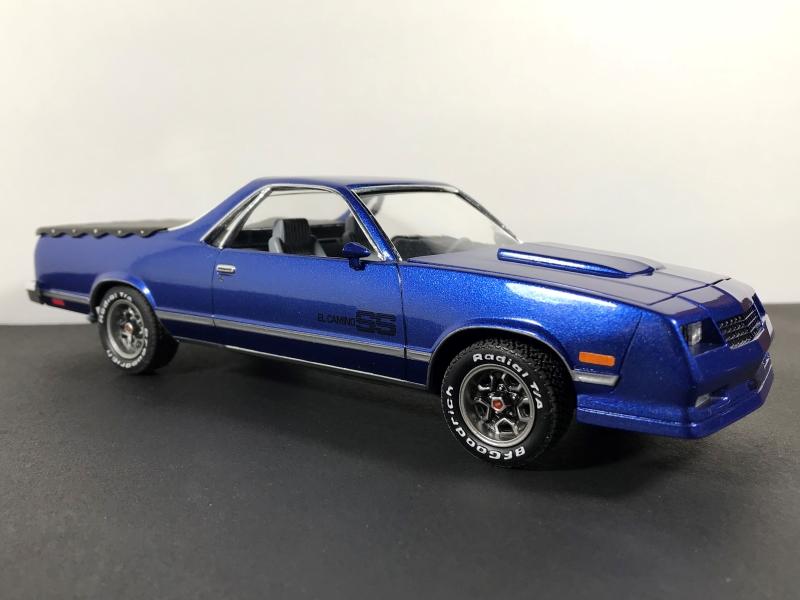
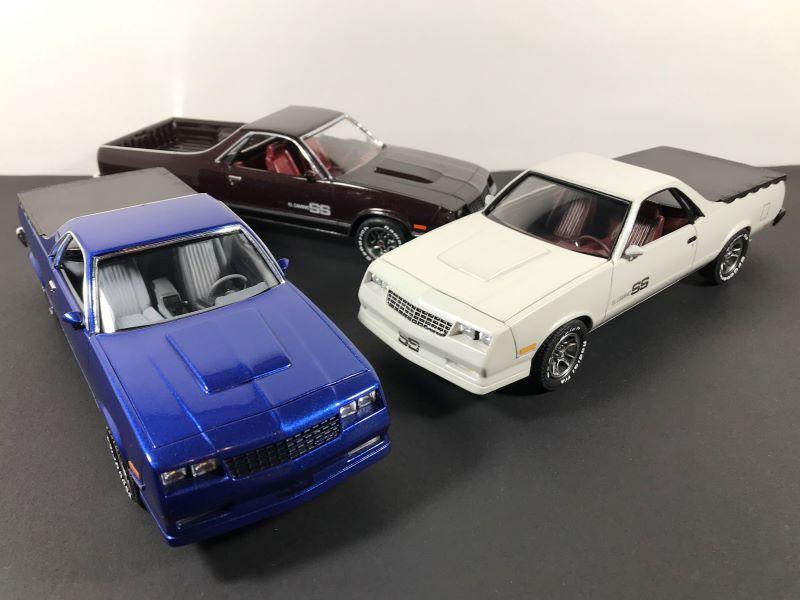
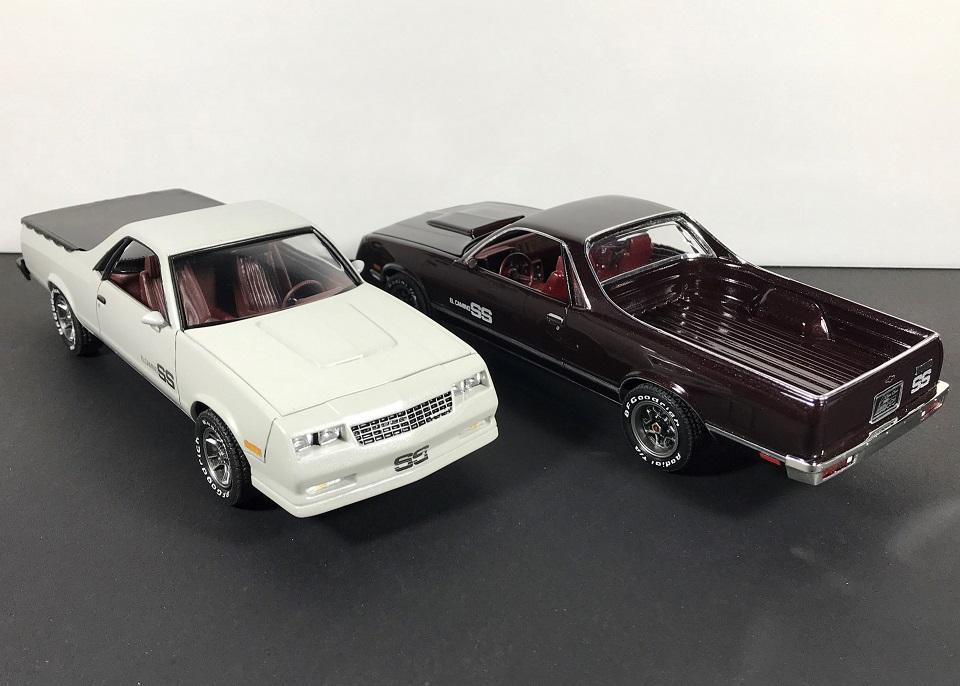
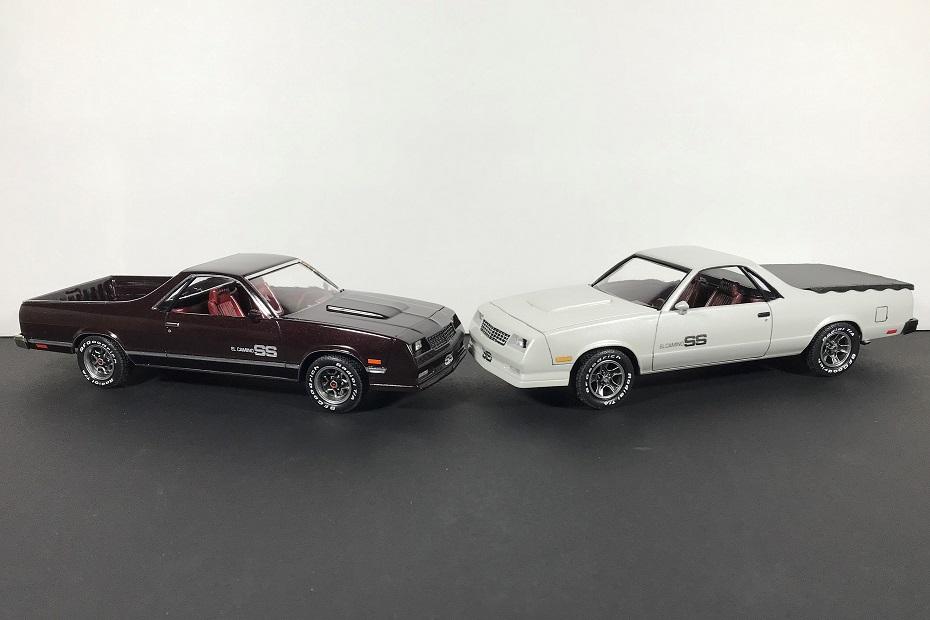
The third '86 El Camino is now complete. There were quite a few parts missing including the windows, so I gave in and bought the new Round2 reissue to borrow the clear parts and a few miscellaneous items. The finish is Dupli-Color Electron Blue Pearl clearcoated and polished. It started out in black metallic, but the Dupli-Color seemed to react with its own primer and some fisheyes appeared. After stripping and sanding it smooth again, I decided to go with the non-OE blue. Since the kits are mysteriously missing a center console to match the bucket seats and floor-shifter, the Monogram Monte Carlo SS donated its center console and it fit nicely. I also hoped to source some five-spoke Monogram 1/24 1980s Camaro Z-28 wheels to give it a mild custom appearance, but those '82-85 Camaro kits are getting hard to find. With this trio off the bench it will be quite a while before I'll want to build another El Camino. The next one might be an '82-85 quad headlight two-tone SS without the Choo Choo front end. I'm trying to talk myself out of it, but we'll see. Until then, enjoy these three Elkies!
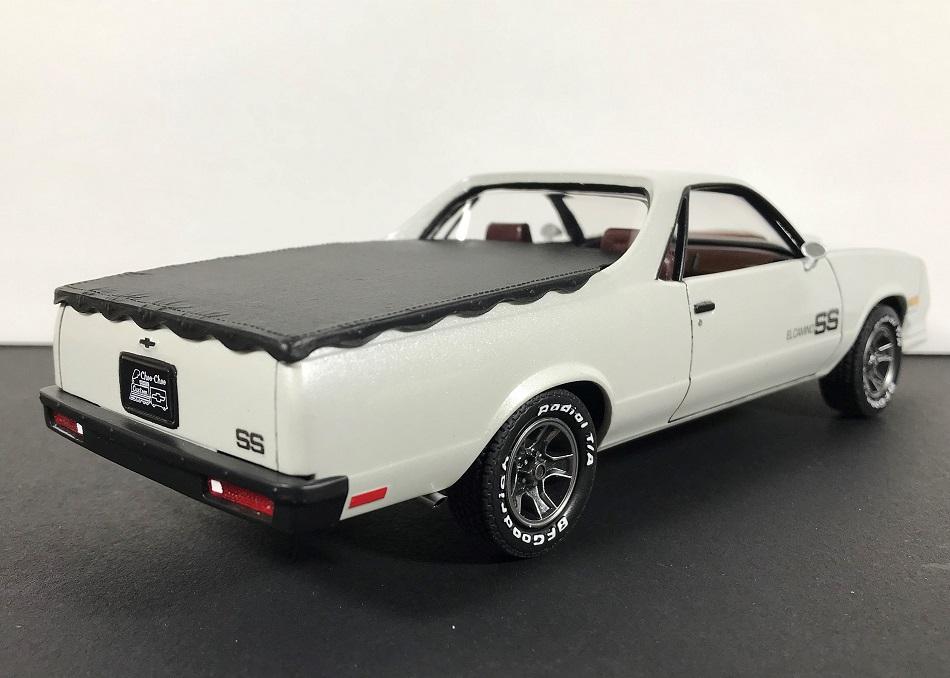
-
Thanks everyone! Your encouraging comments are much appreciated! This is quite a challenging kit as some of you mentioned, although the only other option might be to kitbash Monogram's 1/24 El Camino with their Monte Carlo SS. I'd imagine someone has done it, but with these old MPC repops at least it provides plenty of exercises in patience and improvisation. I tracked down most of the errant parts to get the second of the three Elkys finished. Other than a washer fluid reservoir from a similar vintage MPC Camaro, only the tailpipes remained missing. They were scratch built with some aluminum tubing, and were the finishing touches to wrap it up. This second '86 El Camino SS was finished in Dupli-Color White Pearl, and the bodyside moldings were removed to give it a mild custom look. Aside from the blacked-out trim and rear bumper, it also got N90 wheels from the 80-81 Z/28 and 86-88 Monte Carlo SS. It looks right at home next to the maroon one, and it's a small relief to finally get another one off the bench.