polybius
-
Posts
119 -
Joined
-
Last visited
Content Type
Profiles
Forums
Events
Gallery
Everything posted by polybius
-
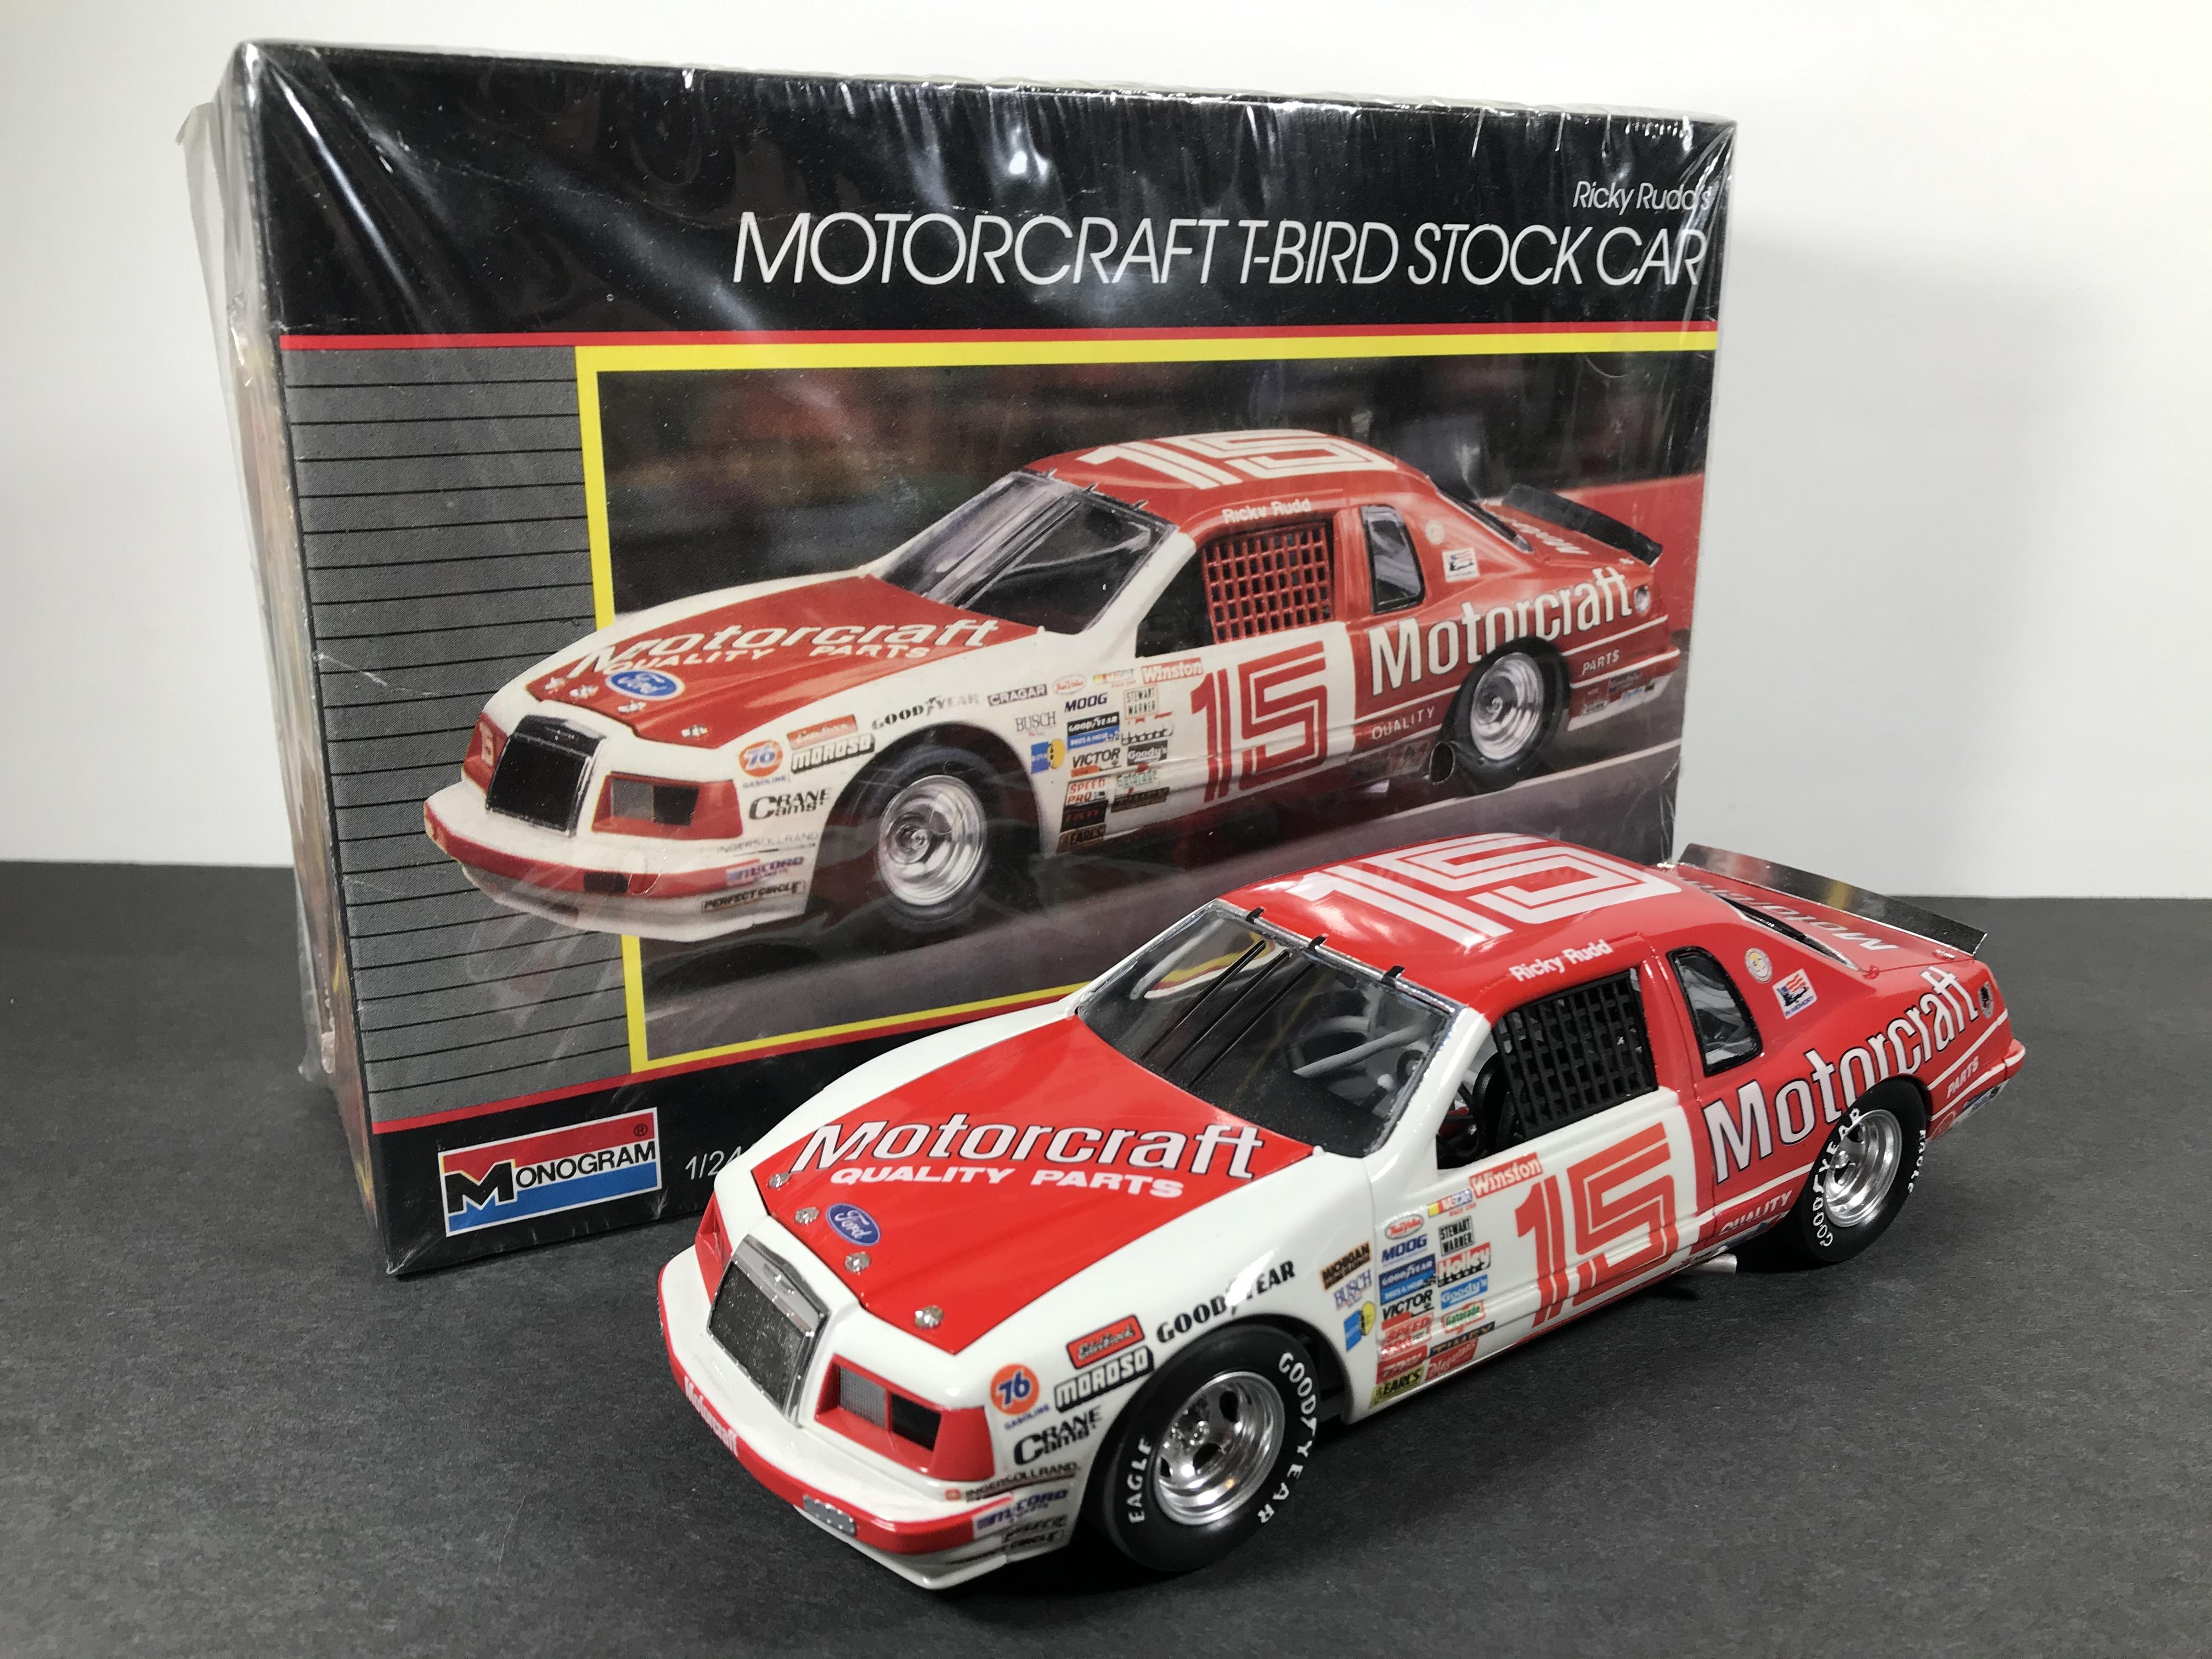
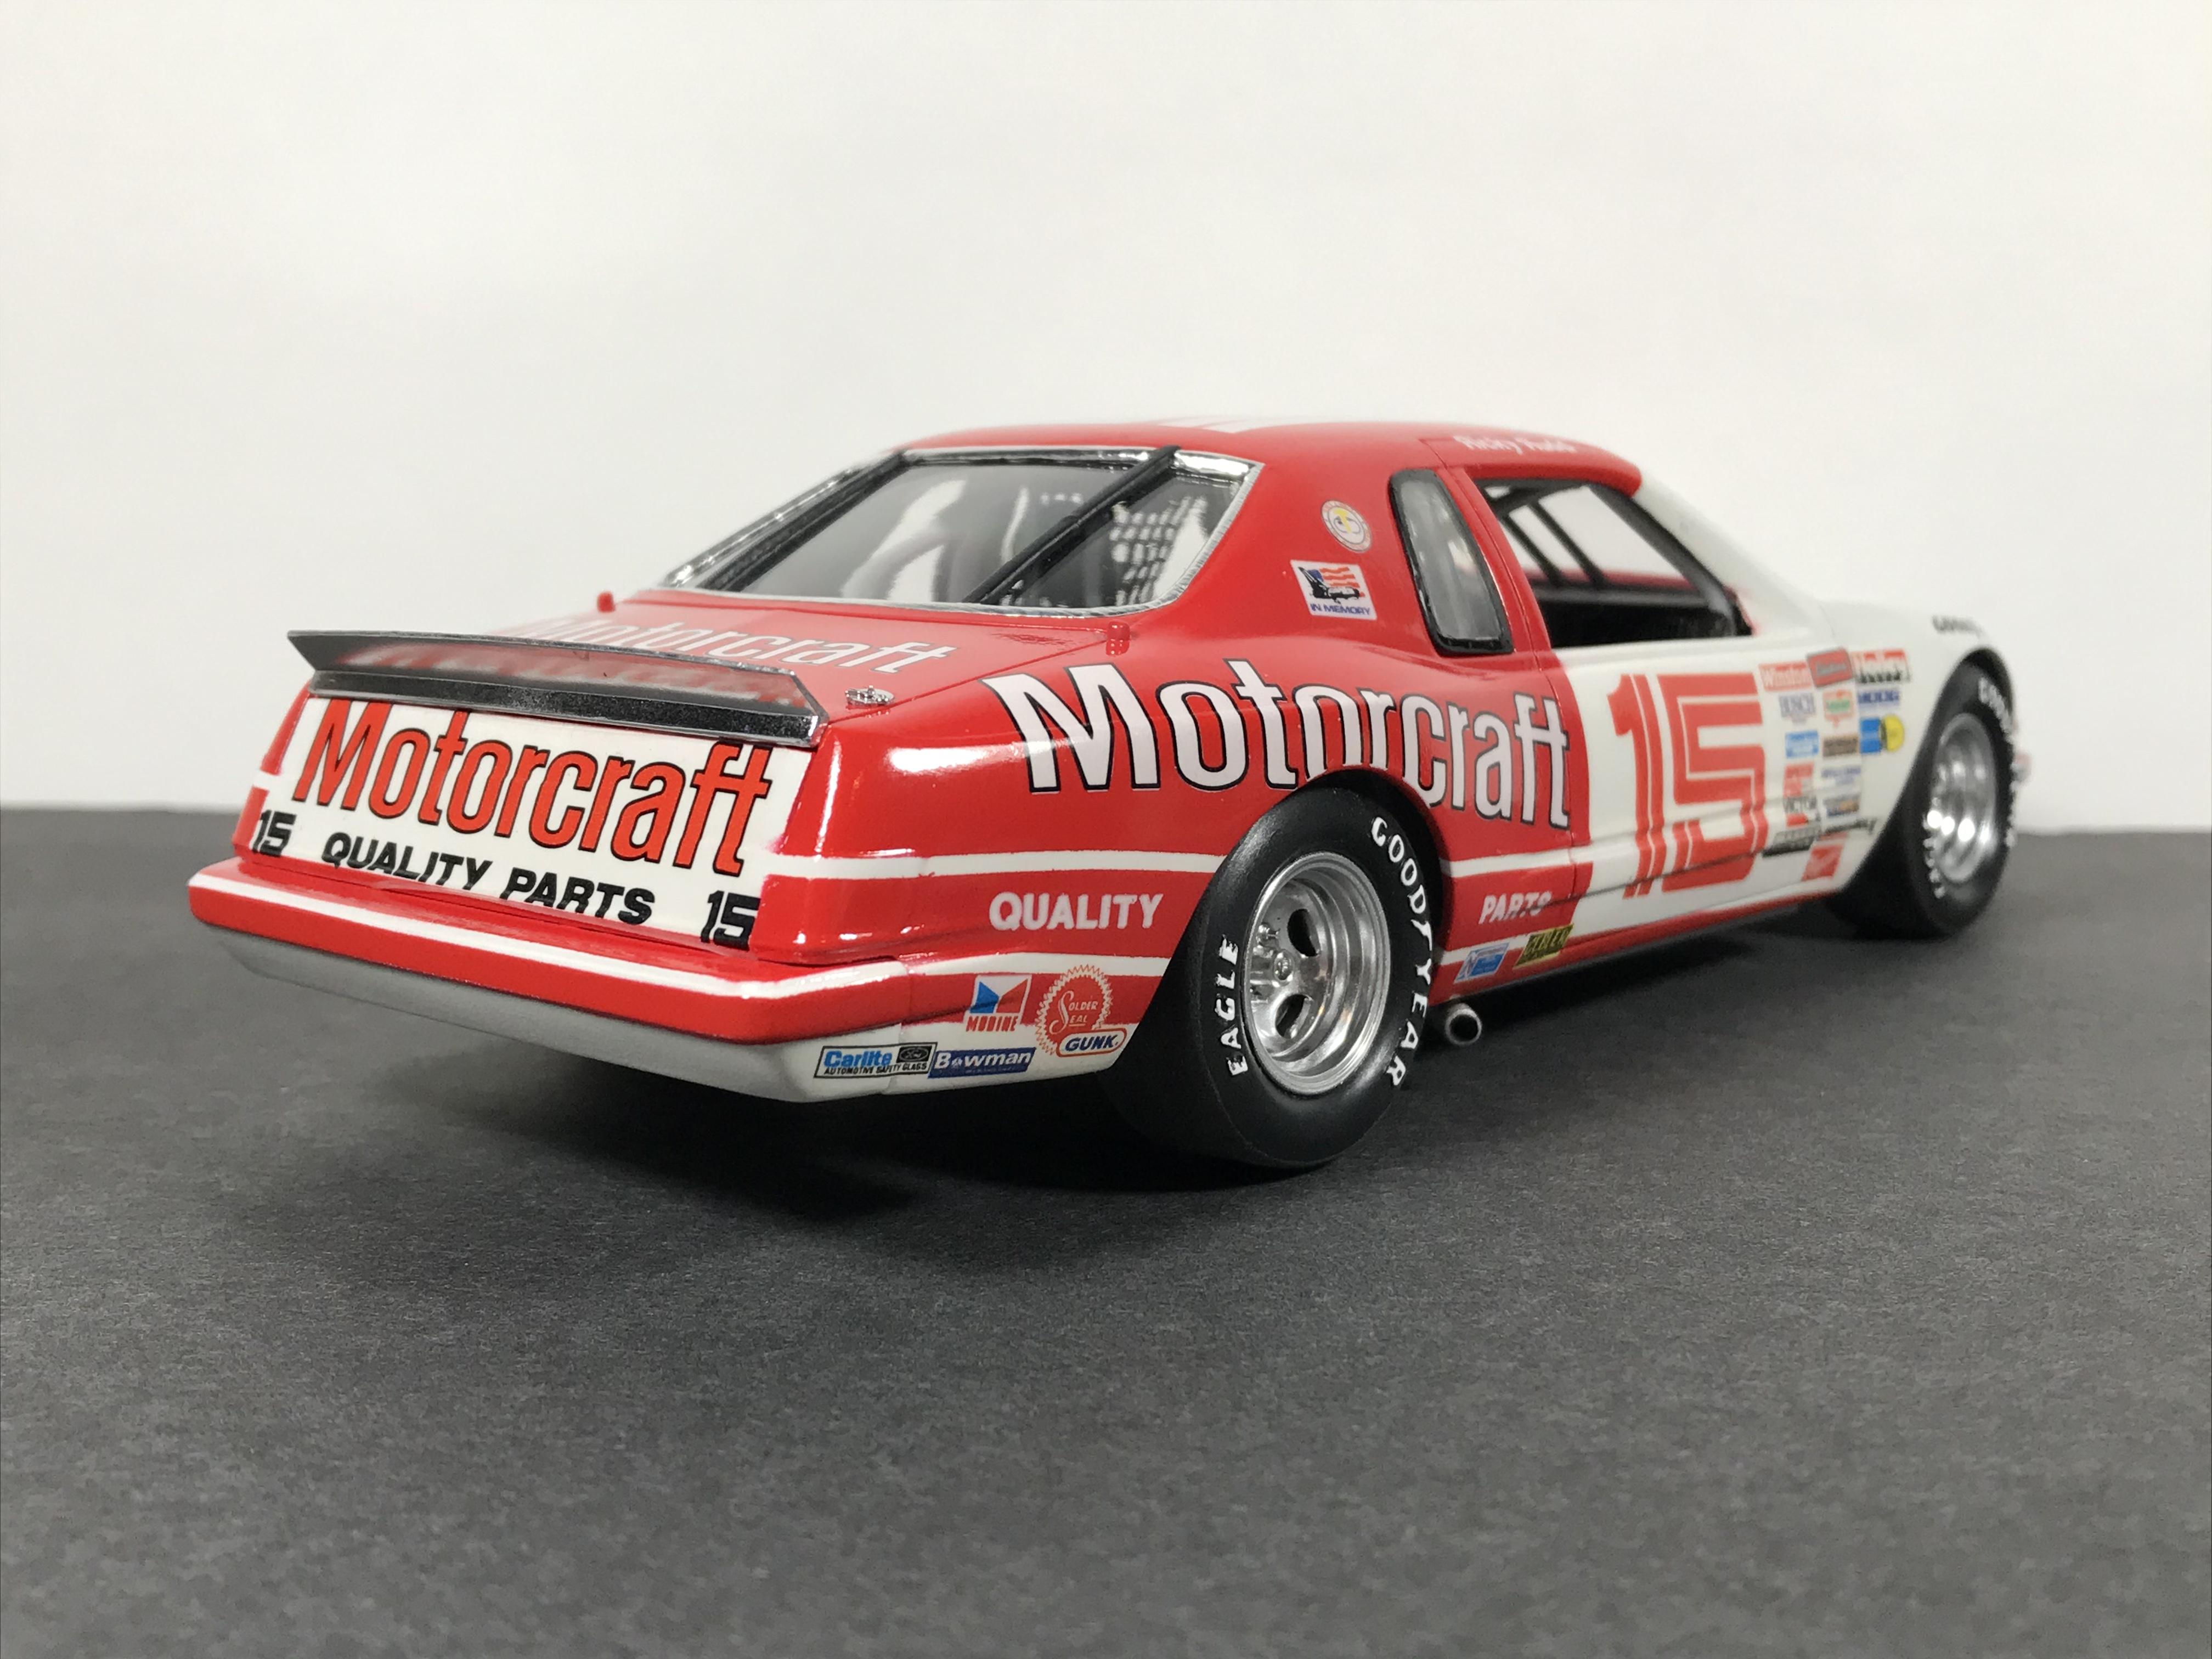
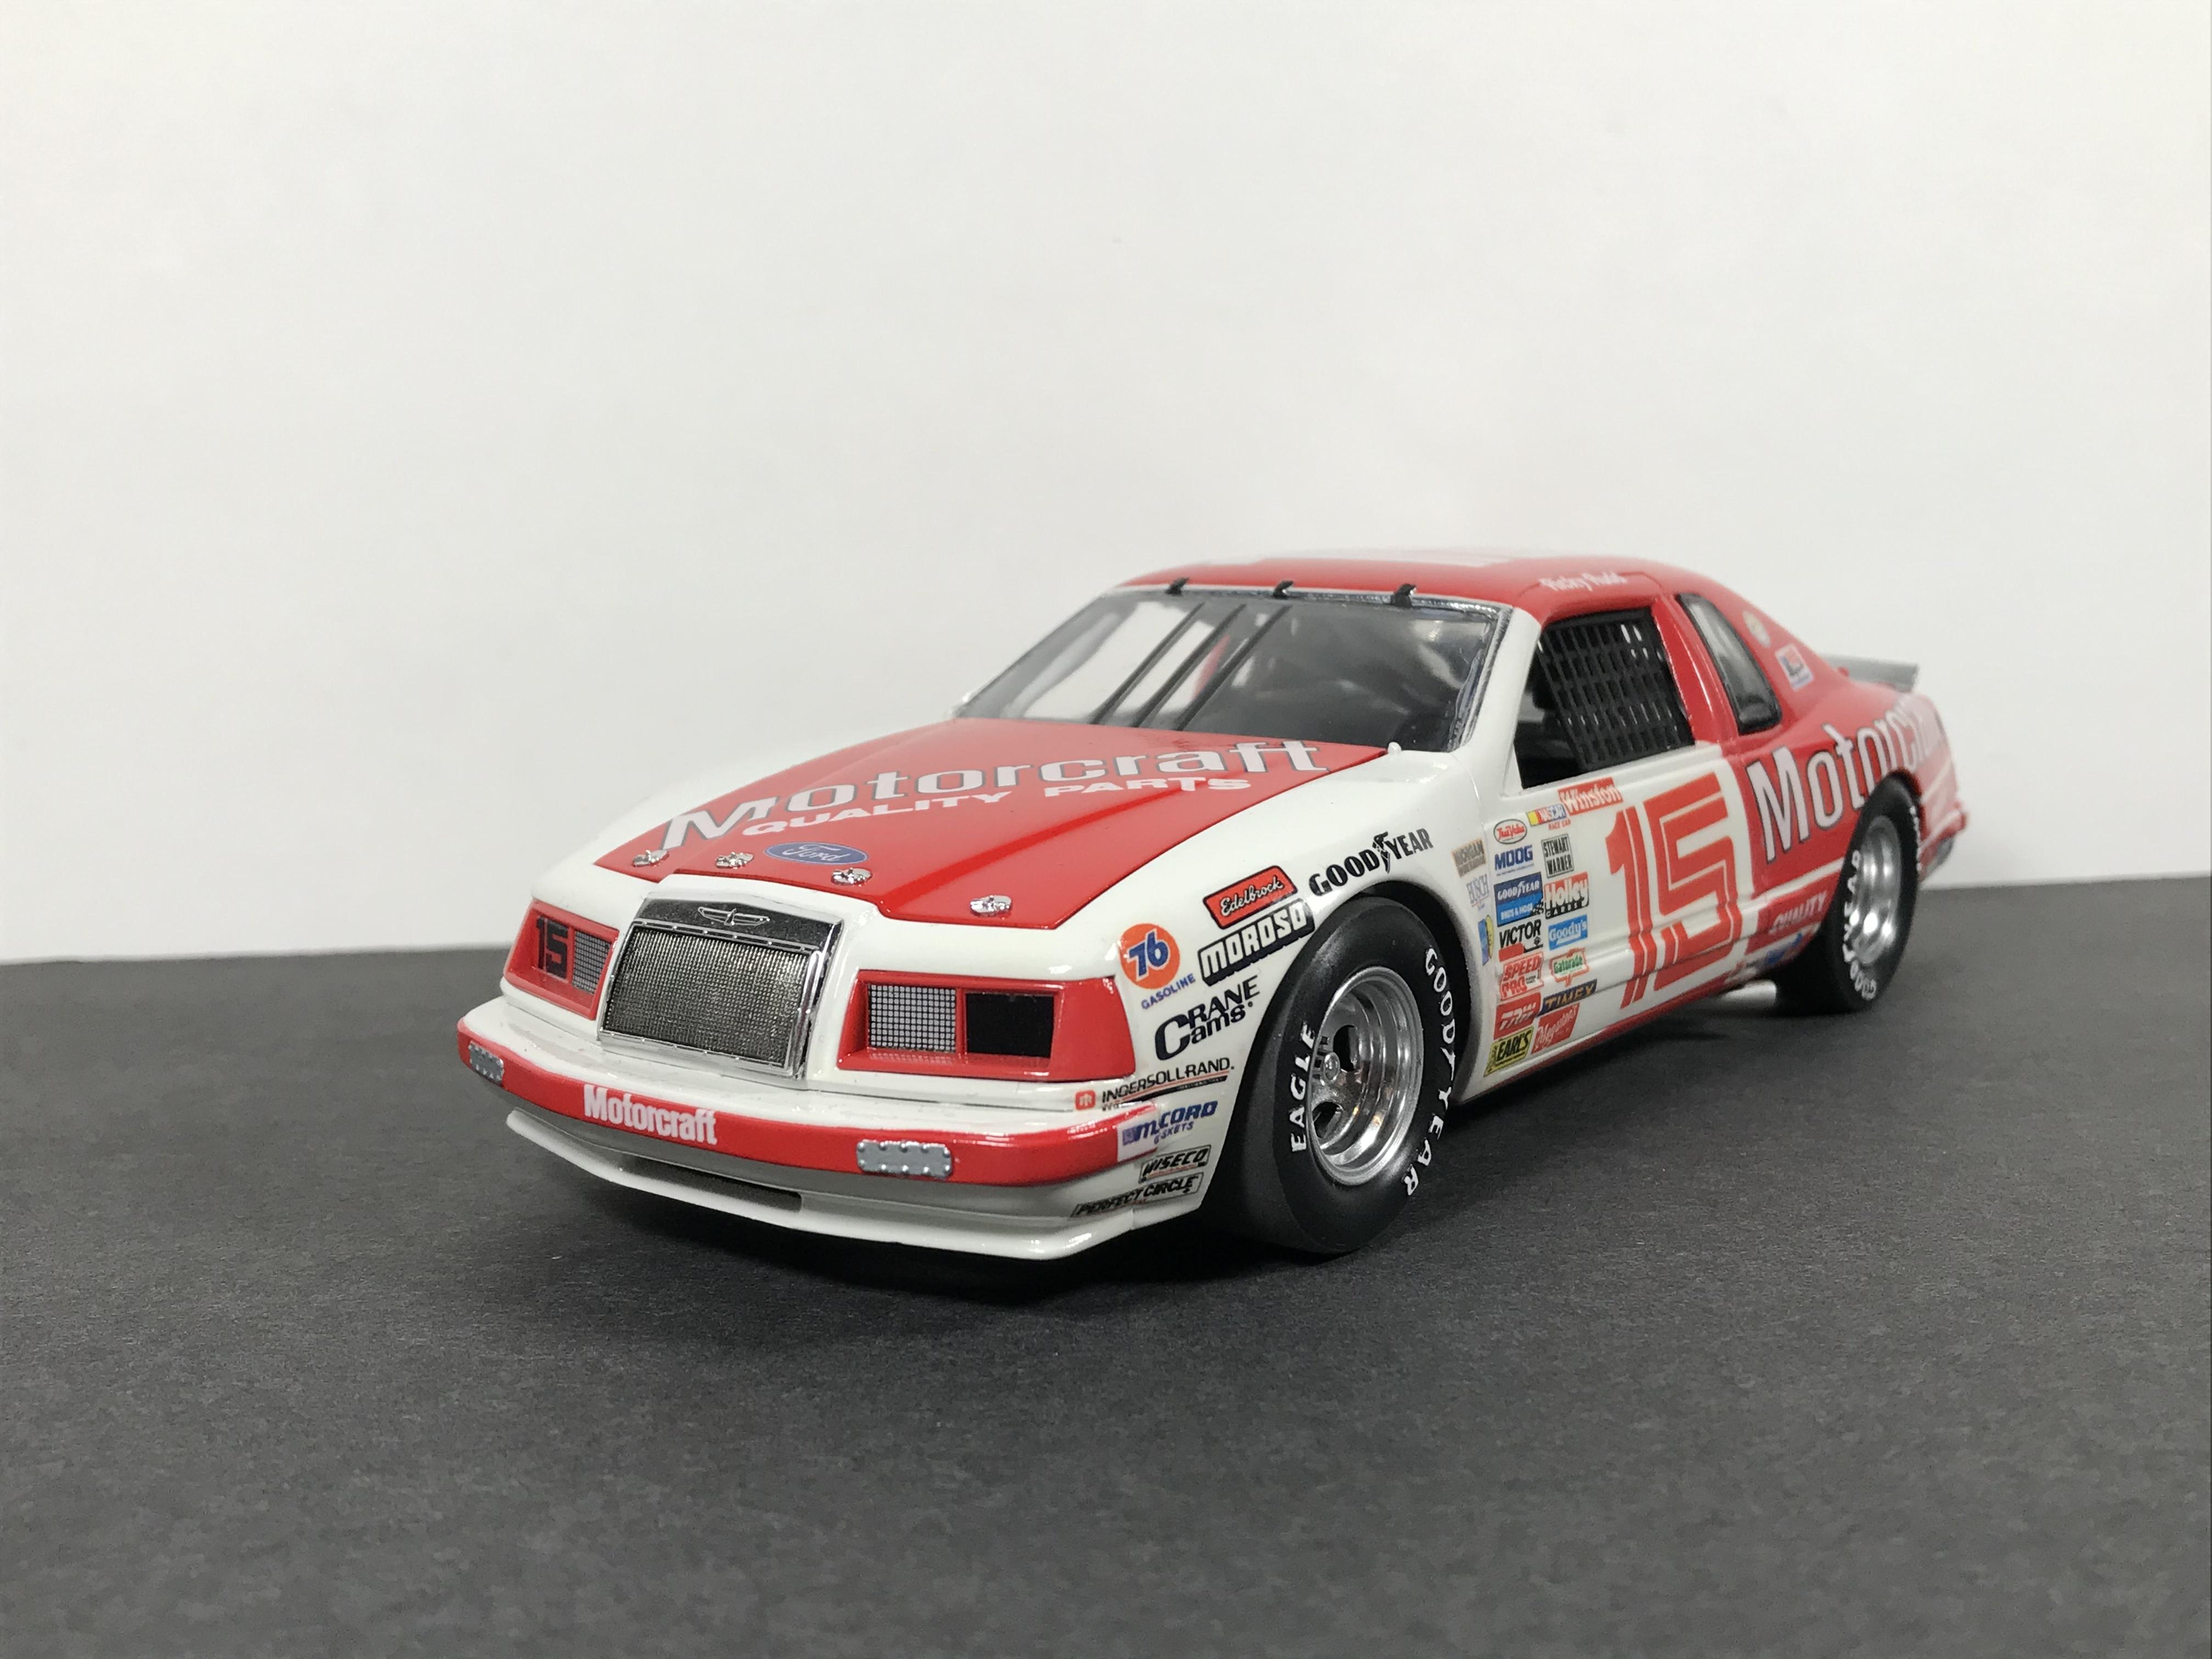
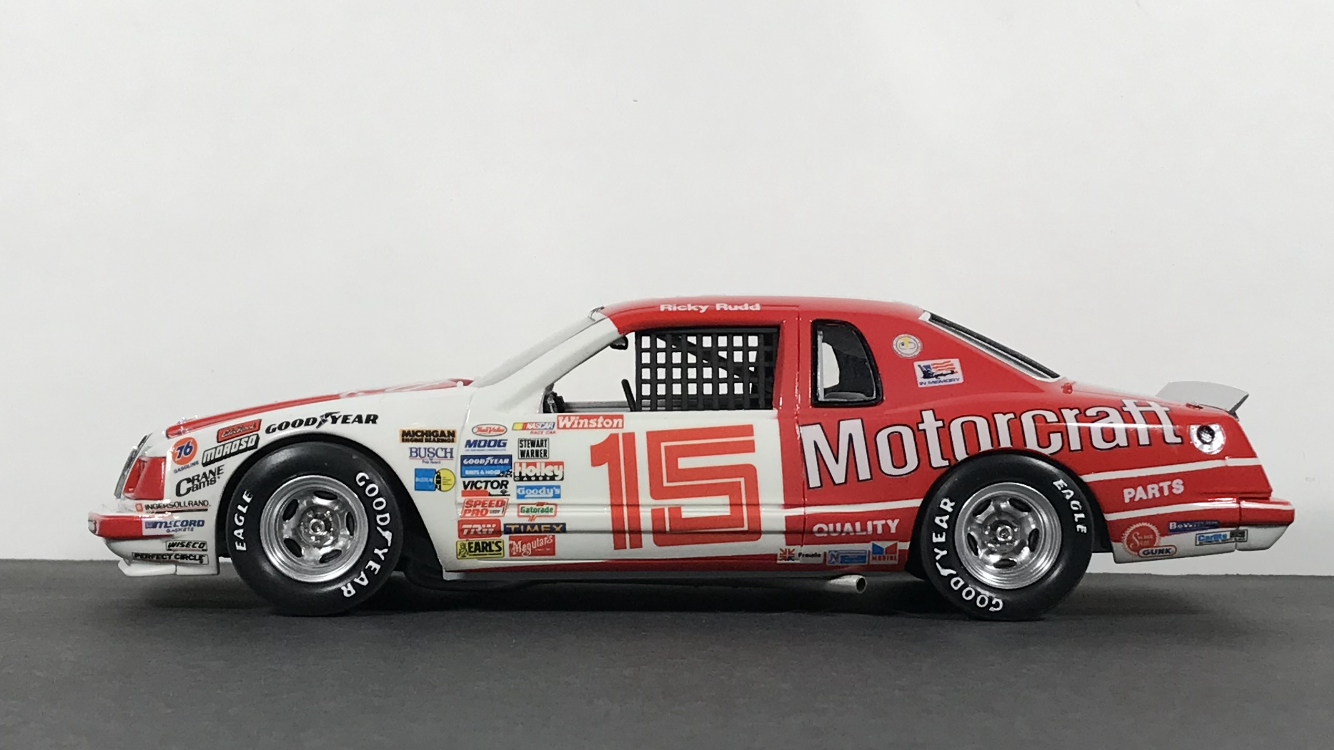
 The first time I tried to build a NASCAR kit was 1987-ish. At 11 years old and having no idea that automotive spray paint would craze unprimed plastic, it didn’t go so well. Fast forward to five years ago when I picked up a box lot of six of these 1980s vintage Monogram T-Bird kits. After selling off five of them, I kept one and went to work on the build. After a couple weeks I lost interest in it, so it went back into the box as a partial build. A few months ago I was anxious to clear out some old works in progress, and this one was at the top of the pile. A good bit of research revealed how inaccurate these mid-80s T-Bird kits were, but it looked decent on the box art so that’s what I aimed for. After body prep and primer, it got a few coats of DupliColor Ford Oxford White. Having just got my hands on some of the new Tamiya LP range of lacquers, the red sections were masked and shot with some LP-7 Pure Red. The decals were the 35 year old sheet from the kit, but despite their age they finally went down decently with copious amounts of Micro Sol, a plethora of foul language, and many walks around the block to calm my nerves. After that hassle I didn’t want to risk using a hot clearcoat that might react with the DupliColor or Tamiya lacquer, so it was the first time I used Future as a final clearcoat finish. Despite the kit’s inherent inaccuracies, helpfully pointed out by some great model builders who have built these over the years, the end result makes a nice shelf piece. I was so pleased after all these years to have finally finished a NASCAR kit that I’ve already started work on another.. well, maybe two more.. you know how that goes.
- 12 replies
-
- 1
-

-
- ford
- thunderbird
- (and 2 more)
-
1989 Ford Mustang GT ‘Vert in Light Gray (Smoke) 1/24 Monogram
polybius replied to polybius's topic in Model Cars
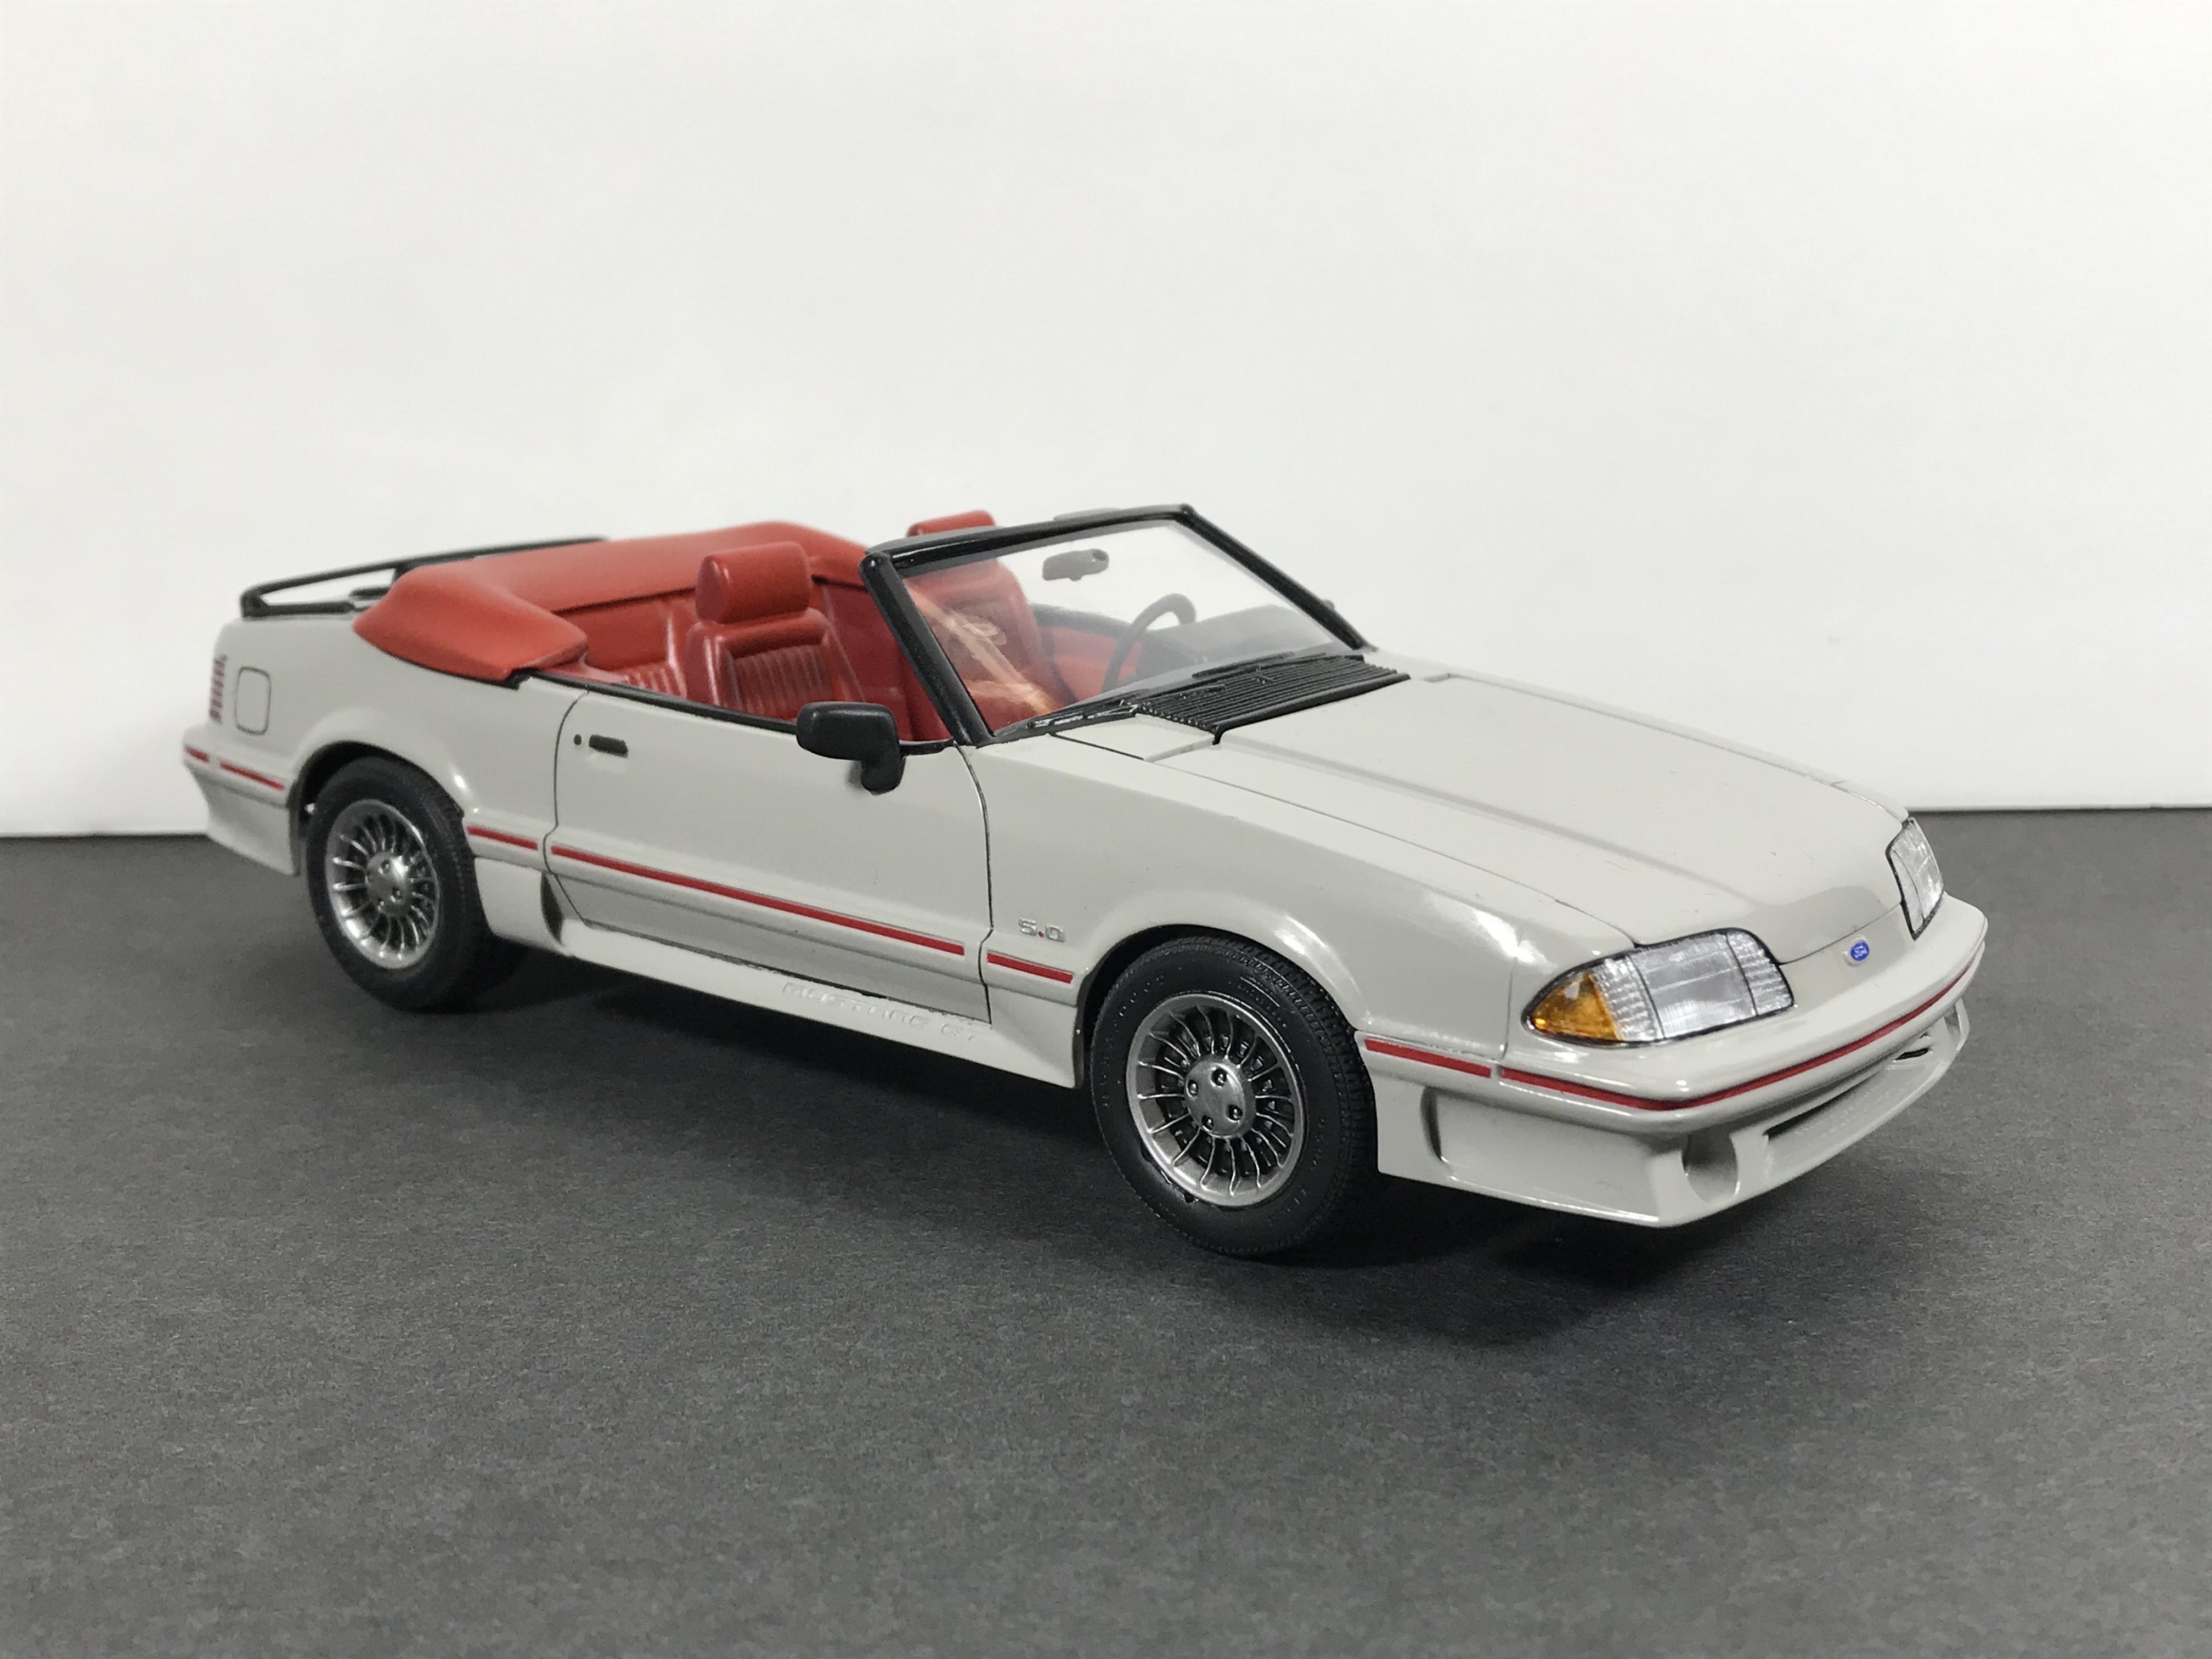
Thanks so much! I wouldn’t mind parking a real one in the stable, but until I hit the lottery this will do. Here’s its stablemate, “The New Monkees” version but there was no way I could replicate the weird marbled paint scheme for that. The kit’s plastic was a strange marbled light blue, so the easier route was some traditional dark gray metallic for a stock appearance. I didn’t mind the wrong interior and motor since it was a pleasant enough build out of the box. There’s also a later Monogram ‘92 version that’s in the box waiting to be built, but I’m waiting for the right color idea to come to mind. That version has the updated 5-spoke wheels as well.
-
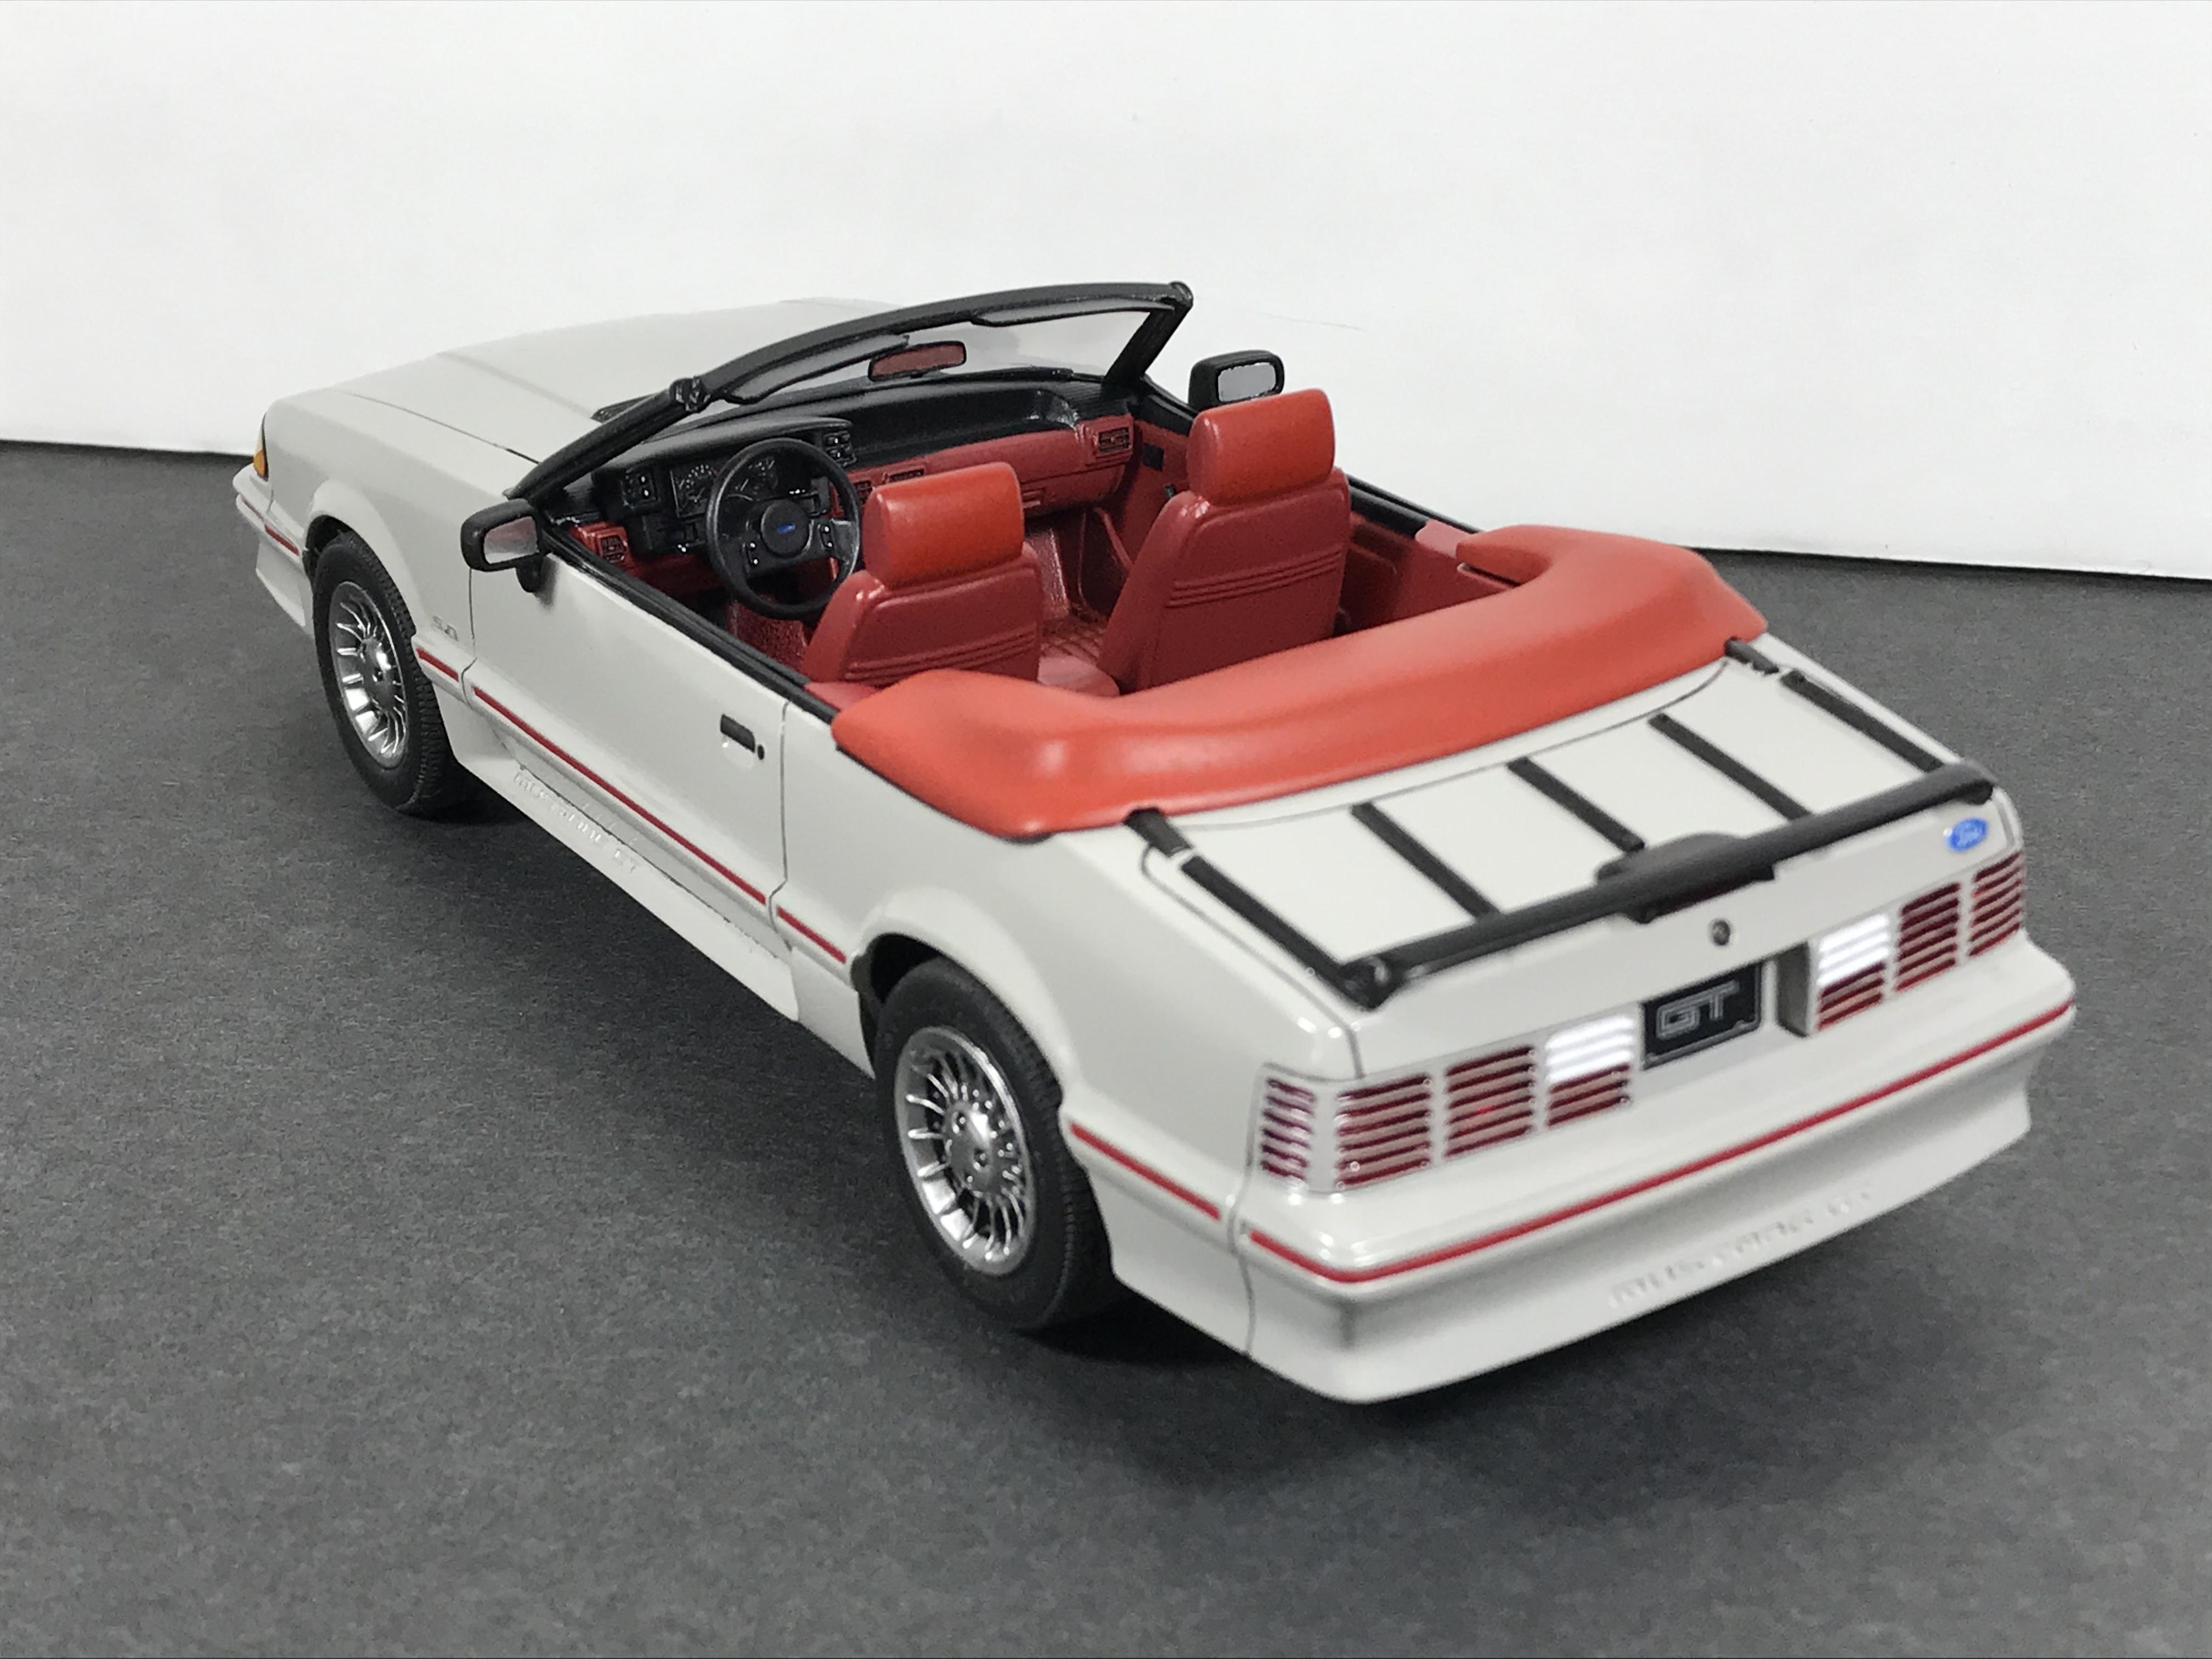
1989 Ford Mustang GT ‘Vert in Light Gray (Smoke) 1/24 Monogram
polybius posted a topic in Model Cars
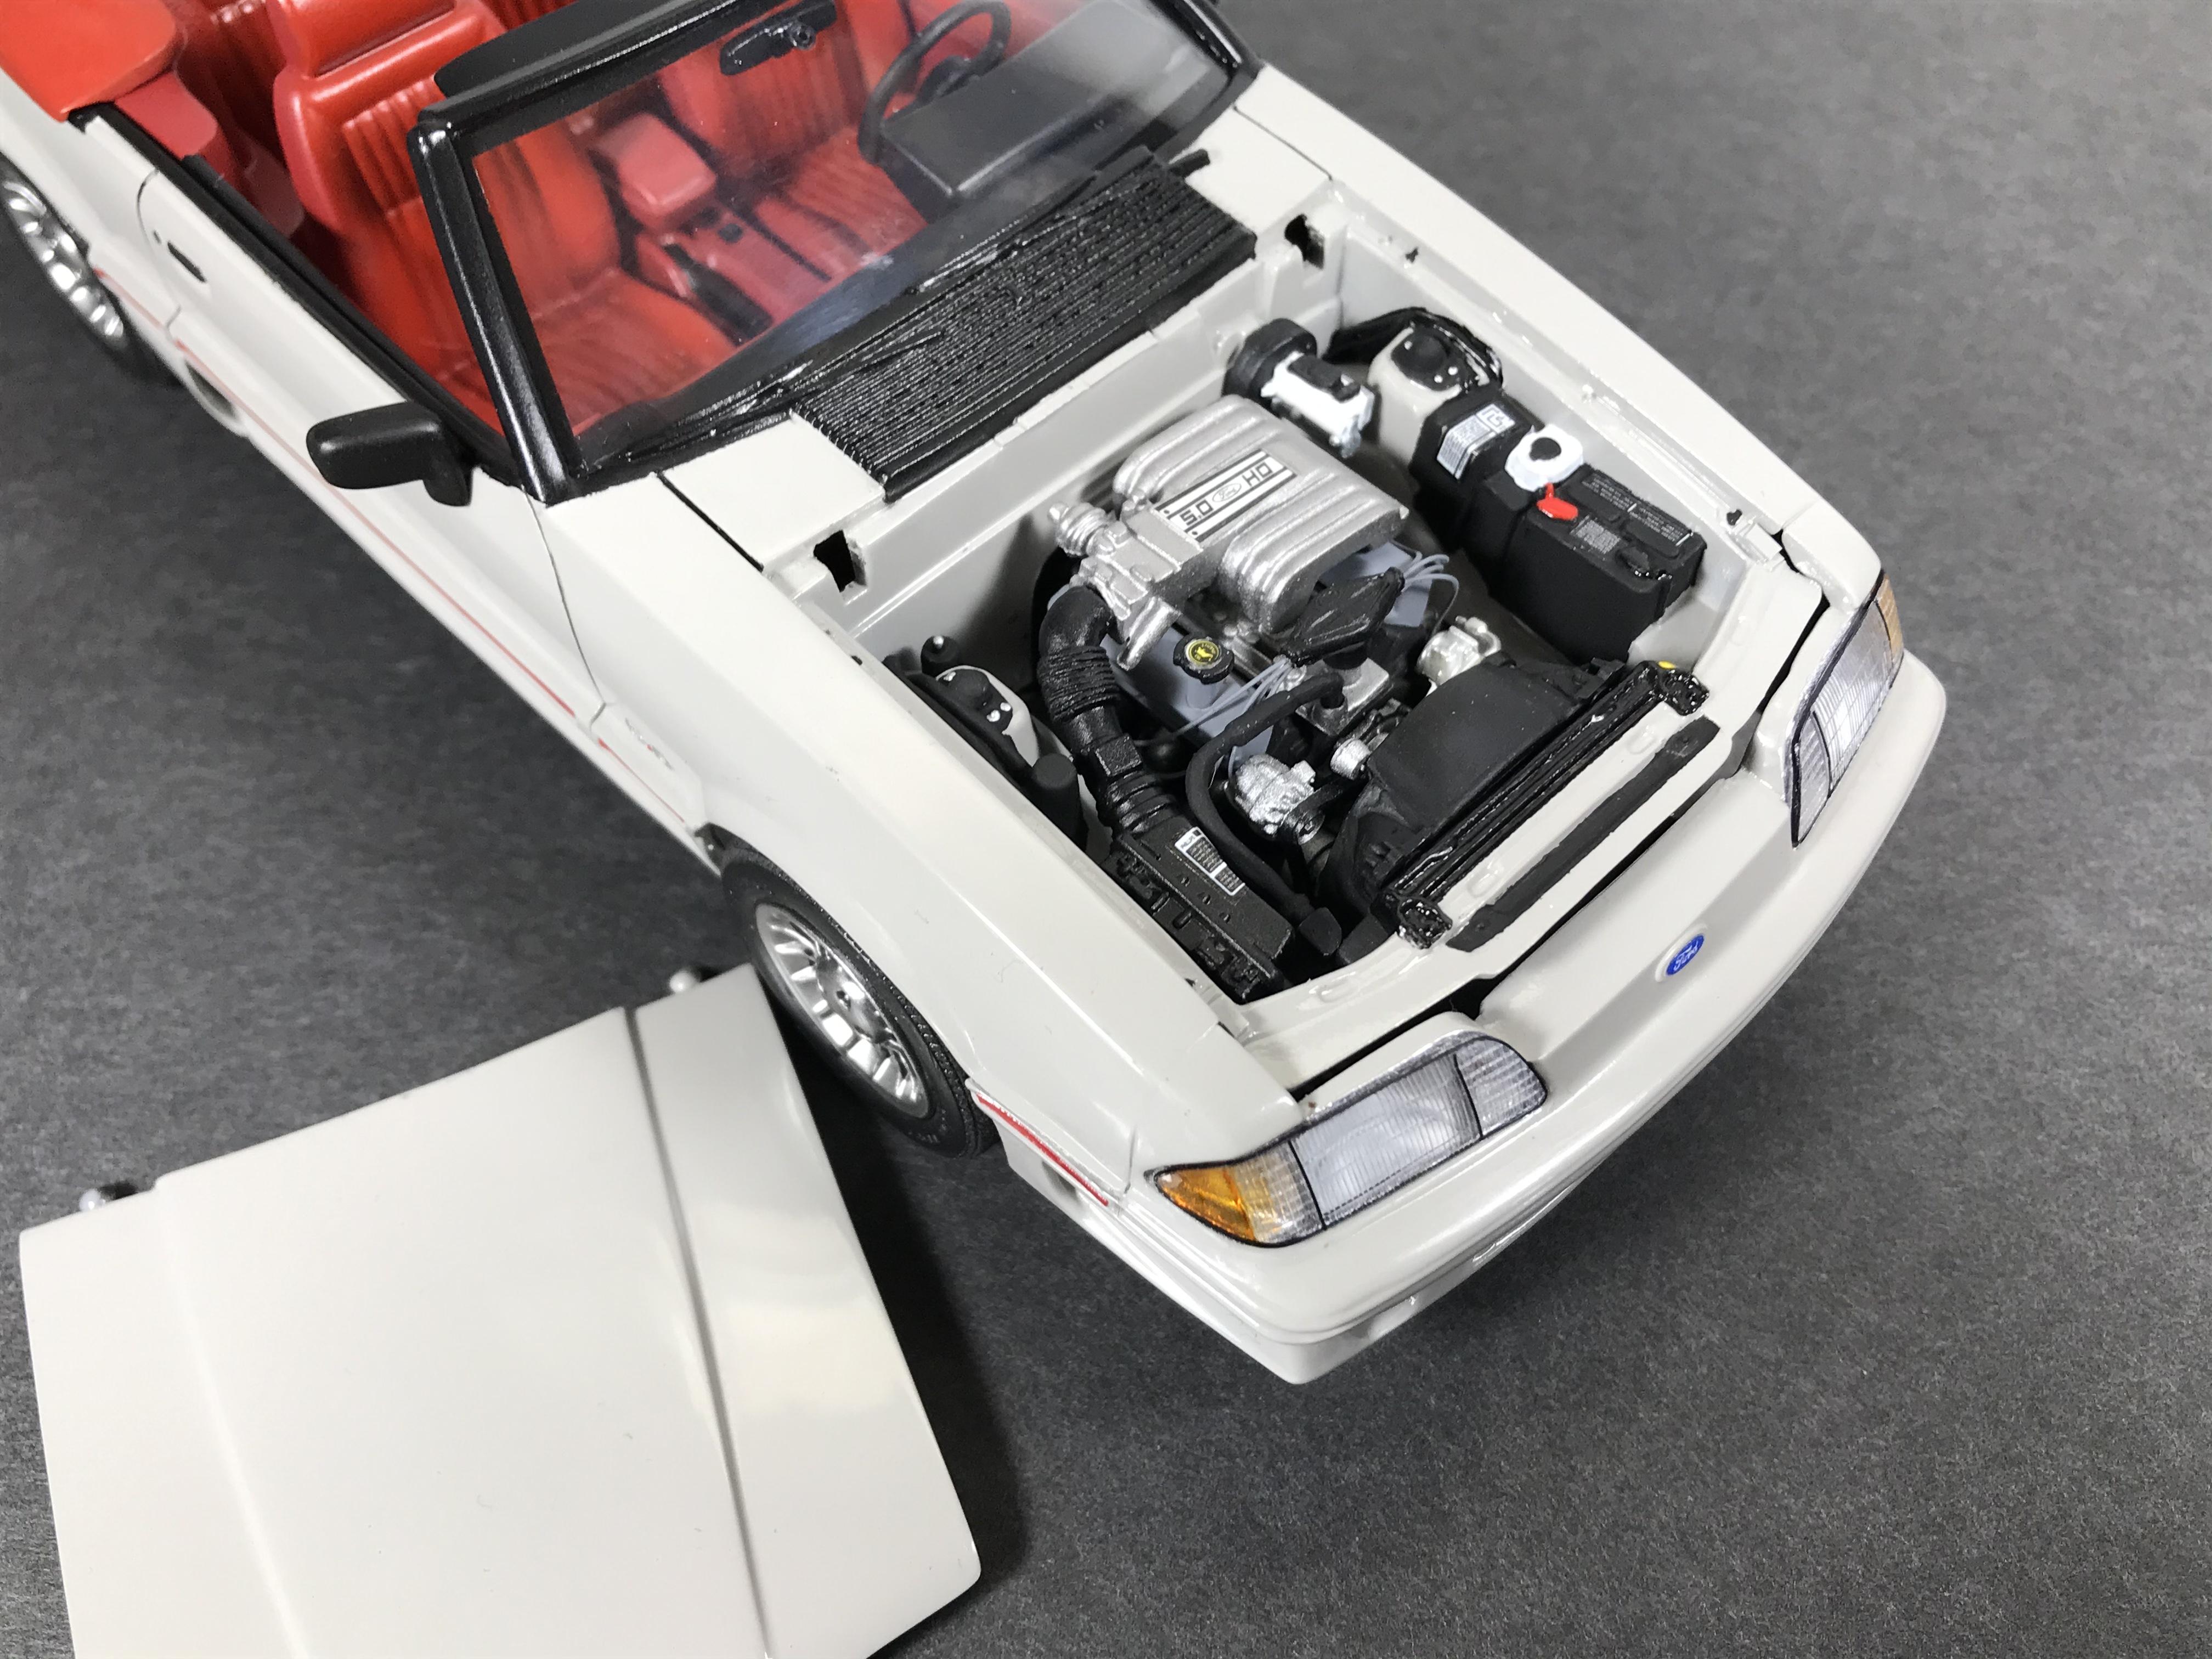
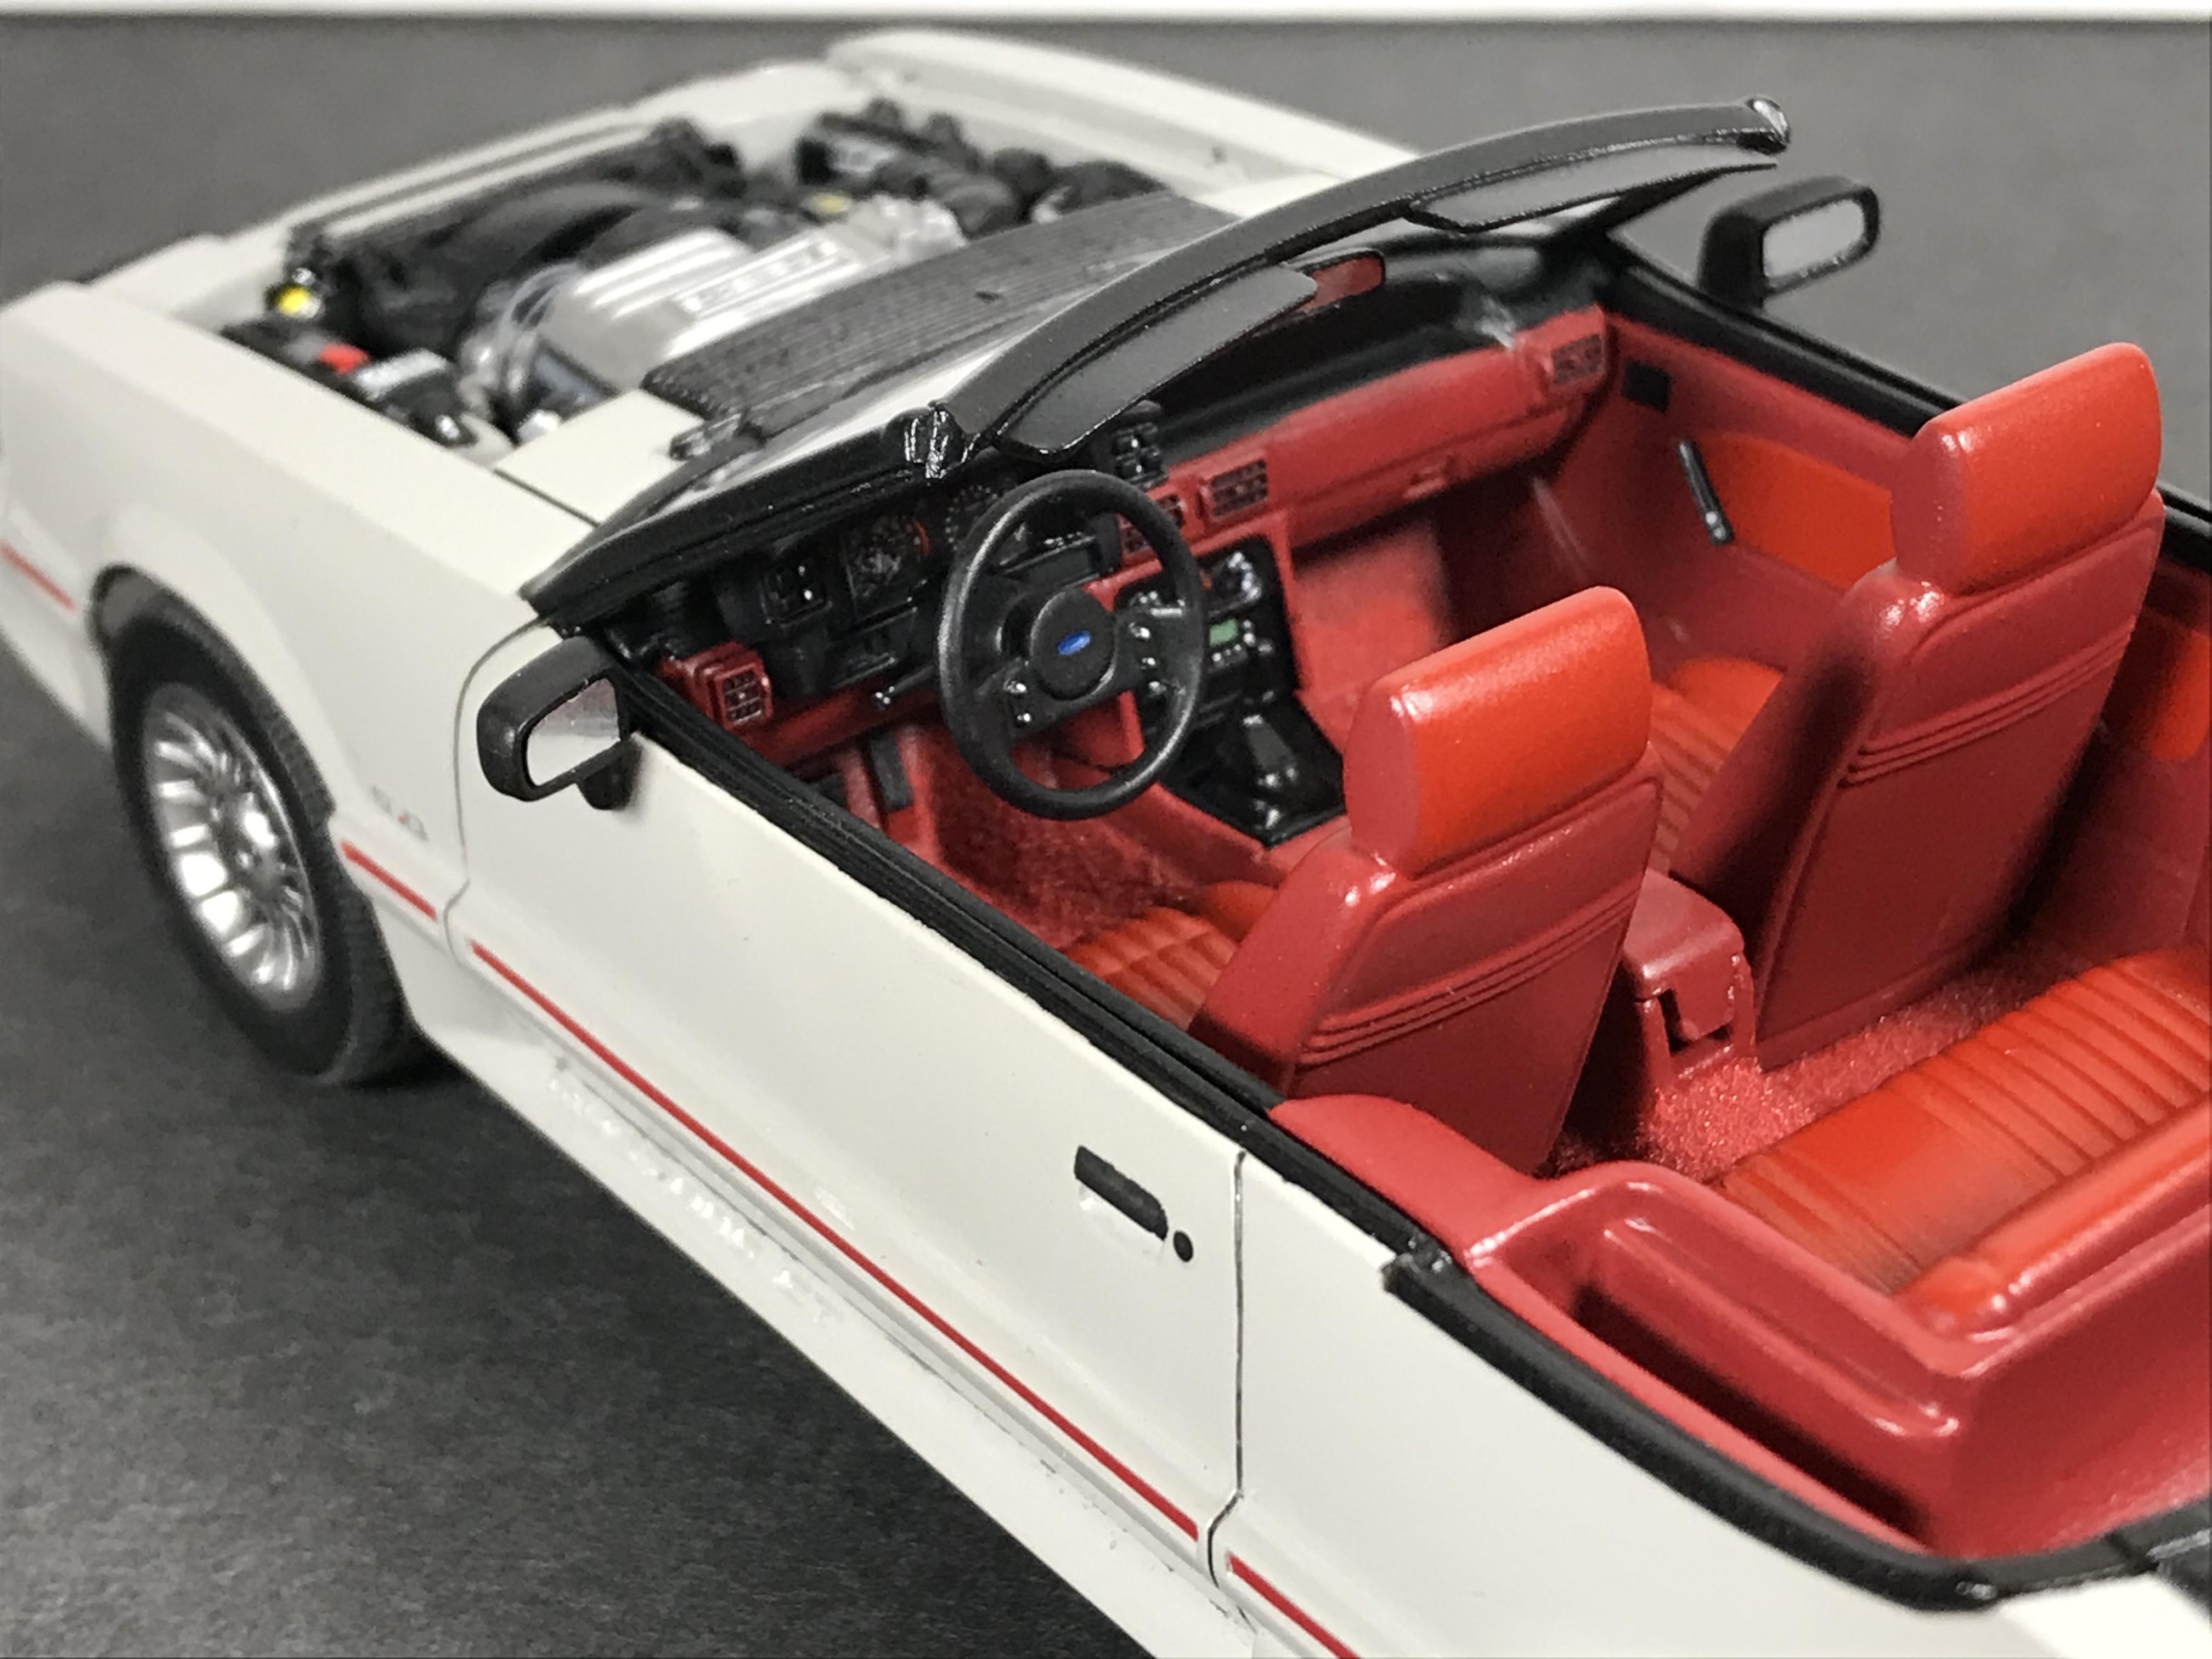
It has been nearly a year since I finished a build, but it’s nice to finally have another lump of styrene for the display shelf. This ‘89 Mustang GT was started early last year and after making quick progress on the drivetrain and interior the work stalled for a while as other builds and shiny objects grabbed my attention. The body was prepped and primed, then doused with some vintage DupliColor Ford Light Gray that I’d spotted for 99 cents at Ollie’s about 10 years ago. It was a color I remembered from the 70s and 80s and just needed a build to suit it. After the color and clear coats, it was sanded and polished before mating it with the interior and chassis. These 80s and 90s Fox platform Monogram kits are rather simple yet I prefer them to the MPC/AMT variants of the same era. I remember buying the first version of these when it was released in ‘87 as The New Monkee’s Mustang. That kit incorrectly had the pre-‘87 interior, engine, and chassis but the body seemed more accurate for the ‘87+ than the MPC version of the GT Hatch that was also just hitting the KMart shelves. Later releases of the Monogram ‘Vert like this one corrected the interior and included a reasonably accurate updated 5.0 HO with F/I. This later version also had an accurate decklid luggage rack that the Monkee’s version lacked. It went together relatively easily without much fuss. The most challenging aspect of these kits has always been the simulated louvered taillights. If Monogram hadn’t penny pinched, they could have molded the tails as two or three piece units with separate lenses and louvered covers. As they are, however, it makes for a tricky and stressful bit of work to get them reasonably accurate. It could be worse, though, as the MPC/AMT kits had the entire lens/louver units molded into the body. There’s a great low mileage example of this car and color combo that a quick web search located, so it became the reference for the build and its details.
-
Love it! It'd make Lee Iococca proud, too! This was one of those kits I'd wished would be issued in 1:25 but would be too obscure to be viable. At least Lindberg was willing to take a chance on it along with the Cordoba, Thunderbird, and a few other 70s era barges. You've done it justice!
-
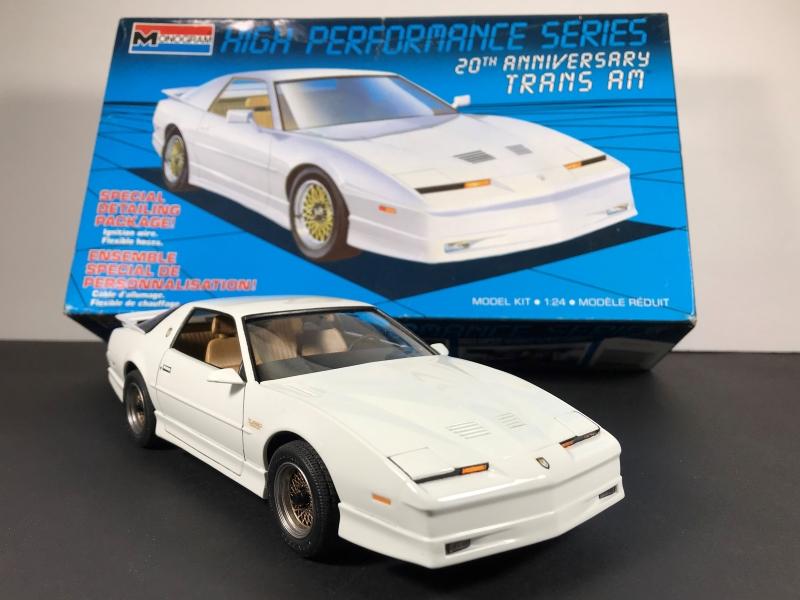
Monogram 1989 Pontiac Trans Am Turbo 20th Anniversary
polybius replied to polybius's topic in Model Cars
Excellent point, thanks! I don't have the '87 kit for comparison but I see the battery placement in the '85 is different than the '89, and the Formula has a separate battery to accomodate the intake hose. By the time I borrow parts from two or three different kits it might be best just to drop the bucks on the original '87 kit. I appreciate the insight!
-
Beautiful build! The original Gone in 60 Seconds is among my favorites, and a few times I got the urge to build one along with some of the other cars seen in the movie. The unmarked Montego police car and the light blue Satellite that got t-boned on the test drive are among some that I thought might be interesting to build and replicate. You've done great work pulling it all together for this build, and it's a delight to see it!
-
Wow, very interesting subject matter and great detail work! I'm a fan of the color choice as well. Very nice work!
-
Great color choice! The grille detail is very nice and I like the interior details as well. Nice job!
-
Excellent! I love these full size 1980s sedans and always wished the kitmakers would offer more like them. You've done a great job of capturing the look, well done!
-
Great color scheme on this and nice details!
-
Very nice, and great lightbar! The black and chrome trim all around the car can be tricky but you nailed it! These Crown Vics were so plentiful back then but now they're rarely seen, and it's great to see one built so nicely. Well done!
-
Monogram 1989 Pontiac Trans Am Turbo 20th Anniversary
polybius replied to polybius's topic in Model Cars
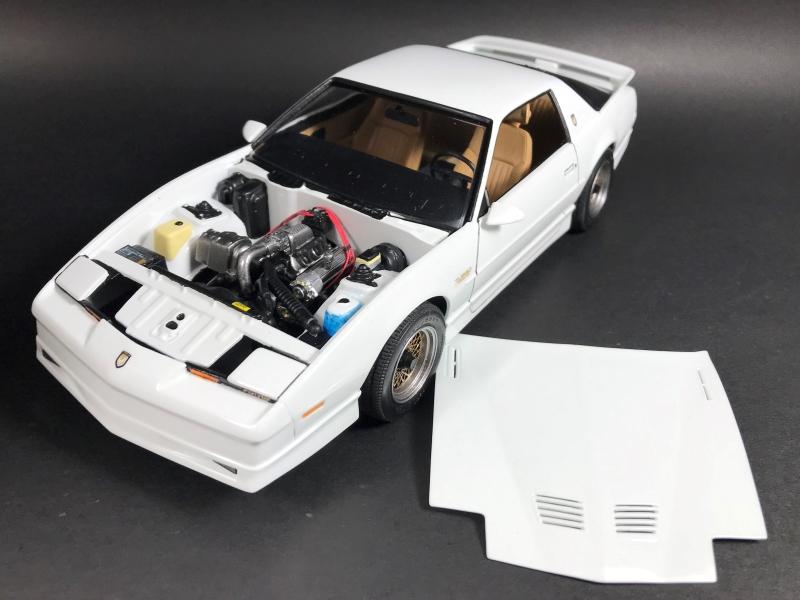
Thanks so much everyone, I appreciate the comments and the stroll down memory lane! As a kid in the 80s I built the '85 T/A and '87 GTA but they came out as gluebombs and ended up unfortunately like most of the F-bodies of the era in a scrap heap. I remember being excited to have gotten a nice grey metallic finish from a Testors enamel rattle can on the GTA, but couldn't wait for the paint to dry before globbing it all together in a matter of hours. By then the paint was smudged and the tube of cement was empty. Fastforwarding a few decades, the plans are to build all of the '82-92 Monogram/Revell iterations including the '85 and '87. I have the '85 kit but the '87 GTA is getting scarce and pricey. This '89 version would be an easy conversion since the body is molded with the GTA badging that had to be removed for this Turbo livery, and these kits seem to be easier to find at a reasonable price. It helped that the tail lights were molded in smoke clear to begin with, but it'd be nice to have the rest of the clear parts including the fog lights molded in clear rather than tinted. After masking the inside of the tail lights with thin strips of tape, first horizontally then vertically, they first got the black grid laid down and then Tamiya clear red. On the frontside, a thin strip of foil with a coat of clear red was used for the reflector strip. A small section of black vinyl tape with some gold accents simulated the turbo-specific center, and the bird was dry brushed in gold with white accents carefully dabbed in. I swapped out the tinted windshield for a clear unit from the later Revell Formula kit but kept the original kit's tinted hatch glass. There are still some inaccuracies such as the missing Indy wing&wheel emblems on the front edge of the side skirts. I found several decals that would have been suitable but none were gold, and I didn't want to risk a catastrophe trying to hand-paint them. Thanks again for taking a look and for the encouraging comments!!
-
Stunning! It's great to see one so accurately built and well done. The color, finish, and details are spot on and one is tempted to get in and drive it away!
-
I've seen only a few of these built and it's refreshing to see one especially so nicely done! Great job!
-
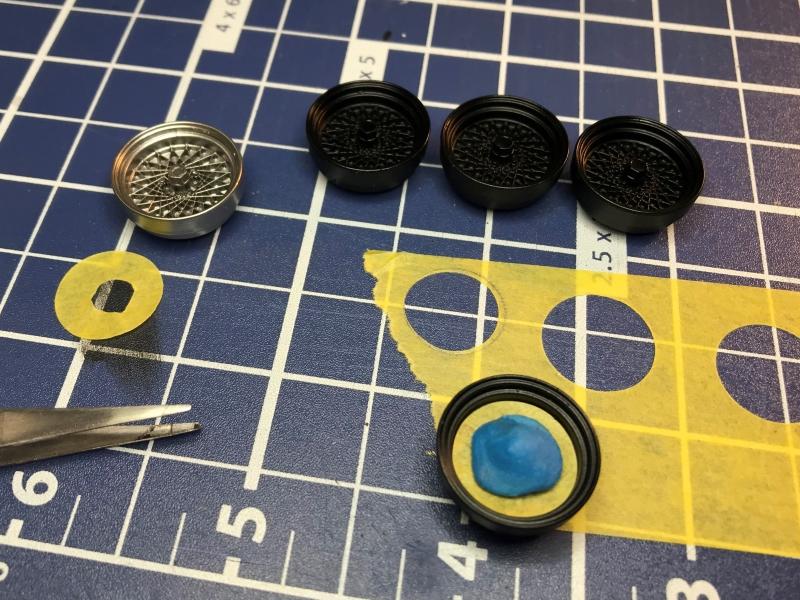
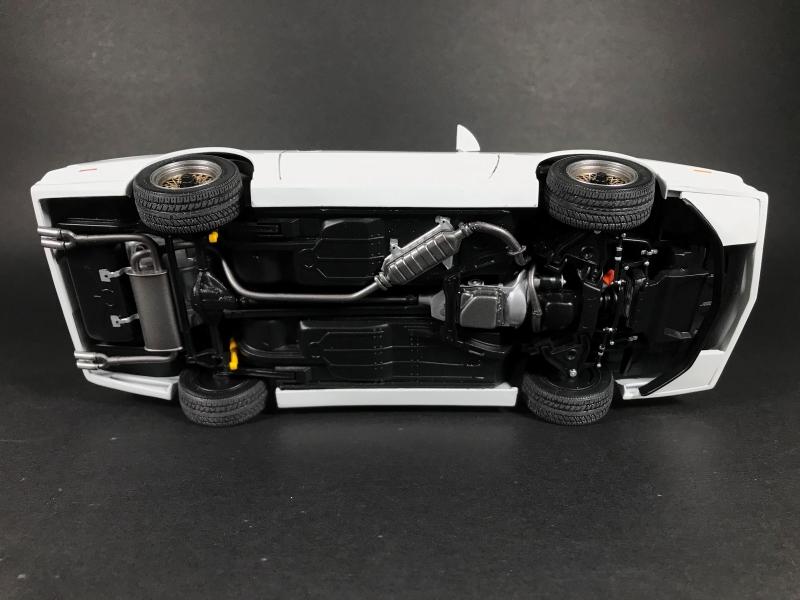
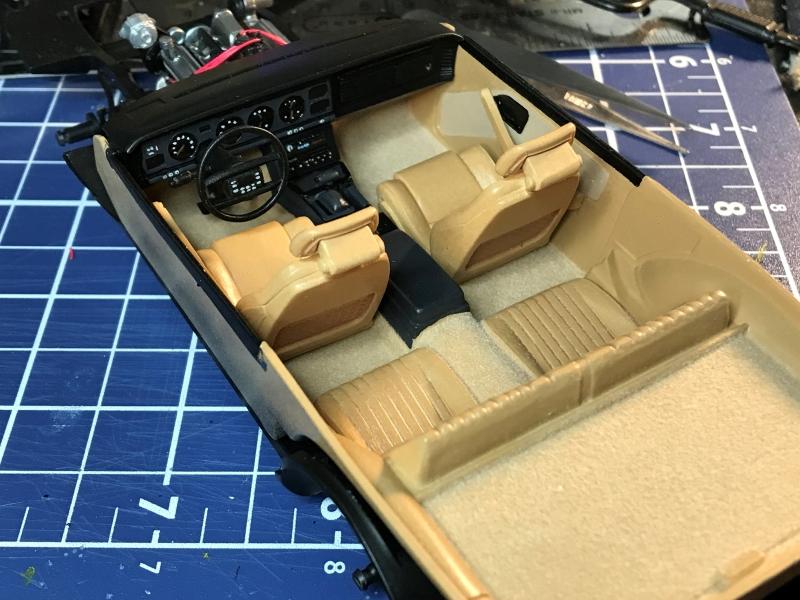
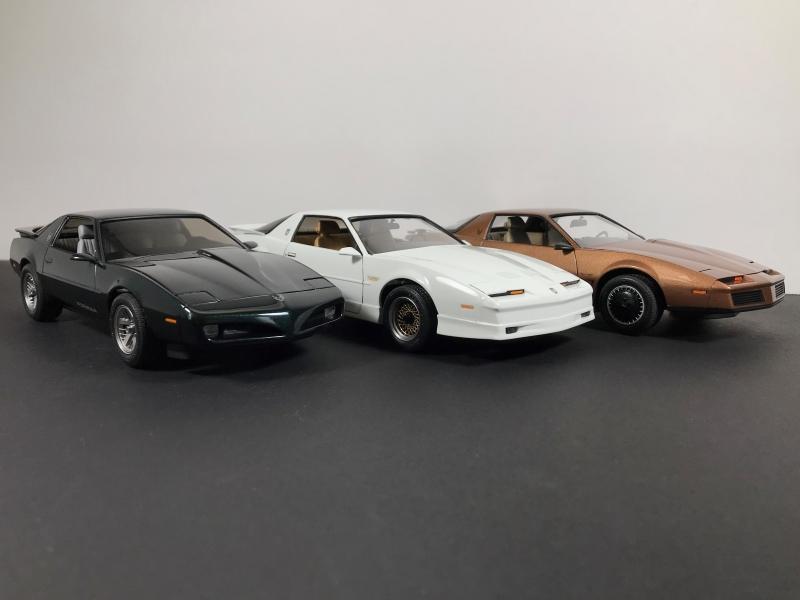
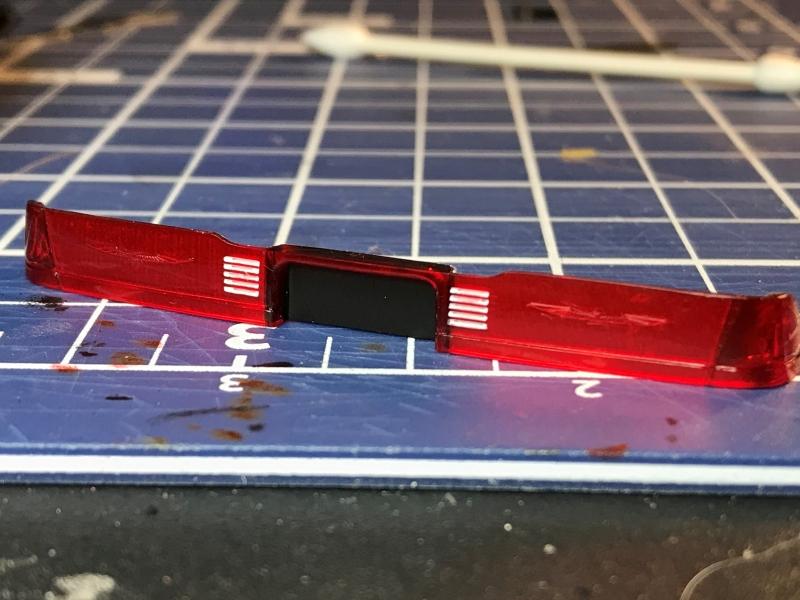
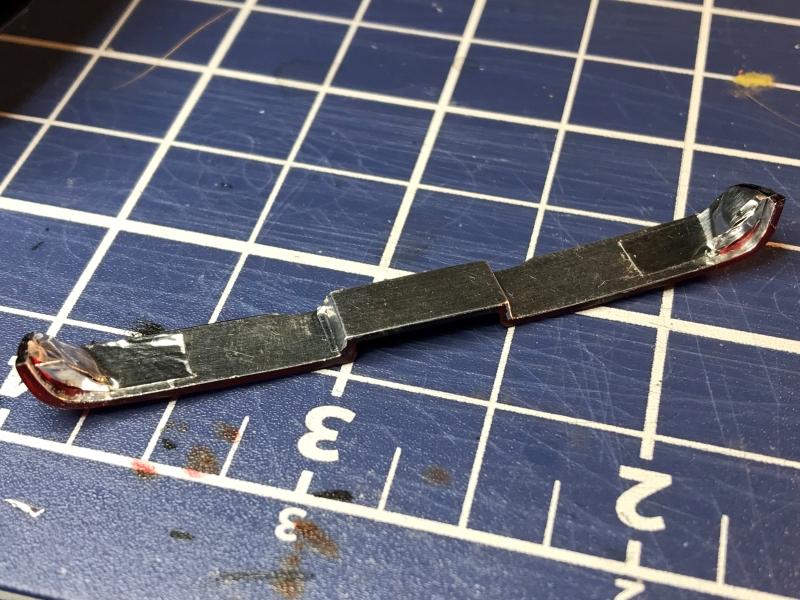
This '89 T/A Turbo is the third in a series of 3rd generation F-body Pontiac builds that started with an '82 T/A and will end whenever I build the last one. I'm less a fan of GM F-bodies and more a fan of 80s Monogram kits like these. I had two of these kits on the shelf and one will be converted to into a GTA, so this one got the box stock 20th anniversary V-6 turbo livery. It was going to build it with the Indy Pace Car door markings but around the time the paint was drying I looked at the decal sheet and saw there were no Indy decals. Then it hit me that it was the AMT version that came with the Indy decals, and without any in my stash it was destined to be a showroom stock T/A Turbo. At least the color choice was easy since they were only offered in white. The interior work came first and it was converted from the kit's 5-speed to the correct 4-speed automatic by scratchbuilding a shifter, removing the clutch pedal, and enlarging the brake pedal. In 1989 the T/A had a fancy new steering wheel with duplicate radio control buttons. The kit, however, offered only the earlier three-spoke wheel. After studying the correct 1:1 steering wheel, I found a spare AMT 1990 Taurus steering wheel with four spokes to use as a start. The wheel was trimmed, smoothed, and scribed, and with some detail painting it was close enough for my eye. The rest was painted two-tone camel and tan, and it got some tan flocking for the floor and cargo area carpeting. The engine and chassis were assembled, painted, and detailed with the kit's ignition wiring. The kit's dull chrome wheels were stripped and airbrushed in Vallejo duraluminum, dry-brushed Mr. Color gold lacquer, and acrylic black wash. Finally the bodywork began. The bumbers and side skits were fitted, but the kit's parts lacked the endcaps for all of the skirts resulting in gaps at the lower wheelwells. Endcaps were cut and trimmed from thin sheet styrene and were blended with the bodywork for the correct OE look. The hood vents were opened up by filing away material underneath. The exterior finish started as rattlecan Plastikote Super White acrylic lacquer until two coats in when the can's nozzle freaked out and spewed buckets of white paint all over me, the floor, and the body. I stopped immediately and let the body dry, then sanded the globs and splatters while deciding the next steps. After trying different spray nozzles it was obvious there was a defect in the can and there'd be no way to finish the remaining coats using it. Since it was the only can I had, the remaining paint was decanted and the final color coats were airbrushed. The glosscoats were my usual rattlecan Rustoleum clear gloss lacquer followed by some wet sanding and polishing. The kit's decals were 30 years old and very difficult to work with. No amount of decal solvent seemed to settle them down but at least they survived the hot clearcoat. While Monogram made some effort to convert their existing GTA tooling to the T/A Turbo, they overlooked some of the badging and other details so I did the best with what they offered. The tail lights were particularly tricky but some 1:1 reference photos were handy. Overall this one really fought me the whole way it seemed, much unlike the previous two 'Birds that seemed to go together a bit easier. Regardless, it looks at home with its two siblings on the shelf and plans are in the works for more sometime down the road.
-
Thank you everyone! All of the comments are appreciated! I started work on an Oxford White '89 XR7 to make it a trio, but keep getting sidetracked with other projects but hopefully it'll be off the bench soon. Regarding the back-up lights, the kit's once-piece clear red unit has the appropriate recesses for the slots. It would have been nice to have a clear unit to start with, but a thinned wash of Vallejo flat white filled the recesses and the slick nature of the clear red plastic made easy work of wiping off the excess. Besides the aforementioned reflector buckets, the bird logos were picked out with some Molotow liquid chrome and a sharpened toothpick. After installation the seam lines got a wash of satin black to accentuate the individual lenses. For some kits the lenses are often some of the trickiest parts. Getting white or silver paint on clear red plastic to look 'translucent' is close to impossible. I'd love to do a few AMT 89-91 Taurus SHOs but those chrome headlights and red molded tail lights are the holdup. I've been experimenting with the clear UV-cured epoxy to cast duplicates in clear, but haven't come up with the ideal solution yet.
-
Tamiya 1/24 Nissan 300ZX Turbo Fairlady (Z32)
polybius replied to Italianhorses's topic in Model Cars
Great looking build! I agree with kelson, simply beautiful! -
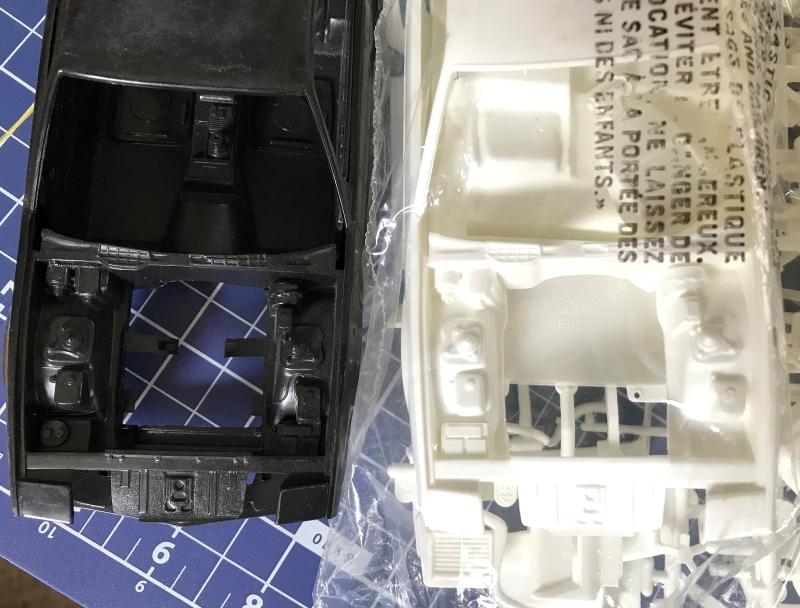
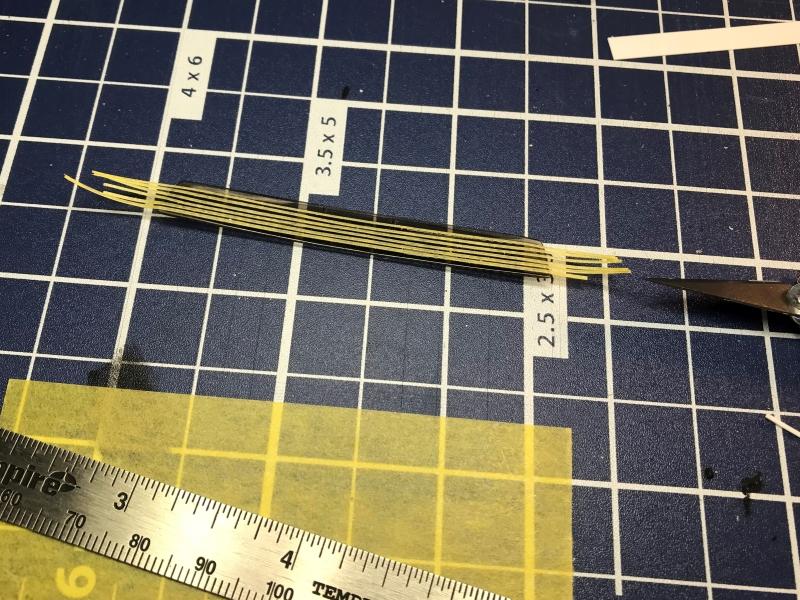
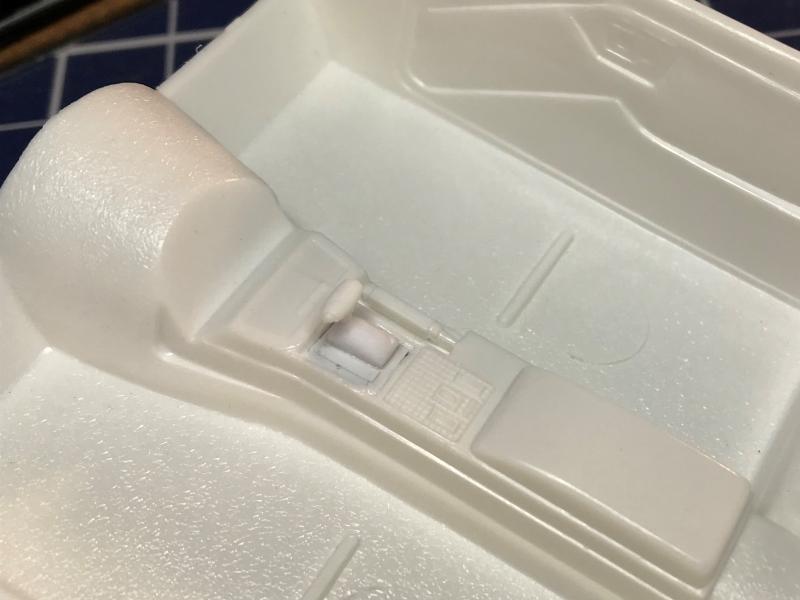
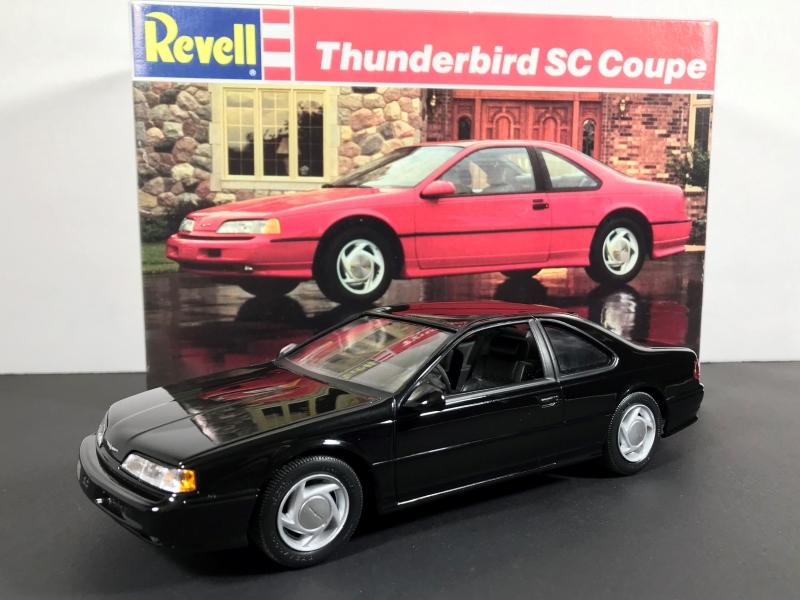
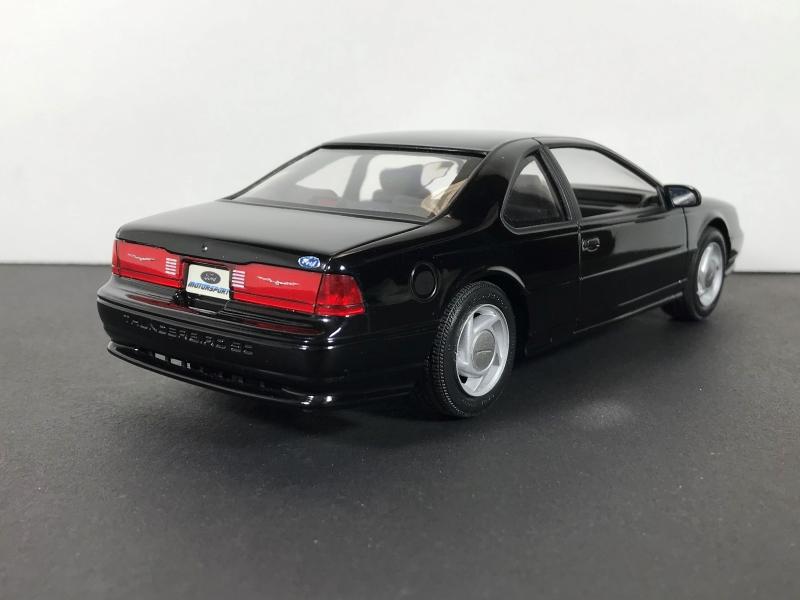
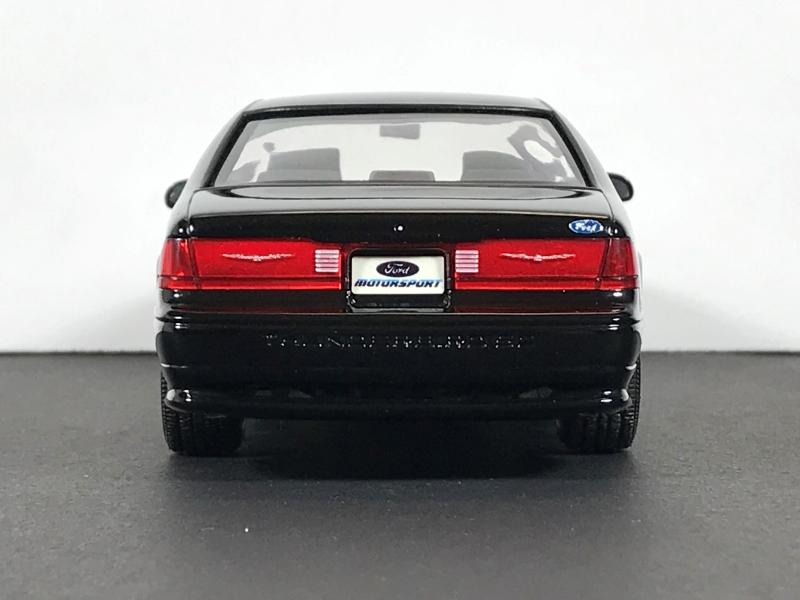
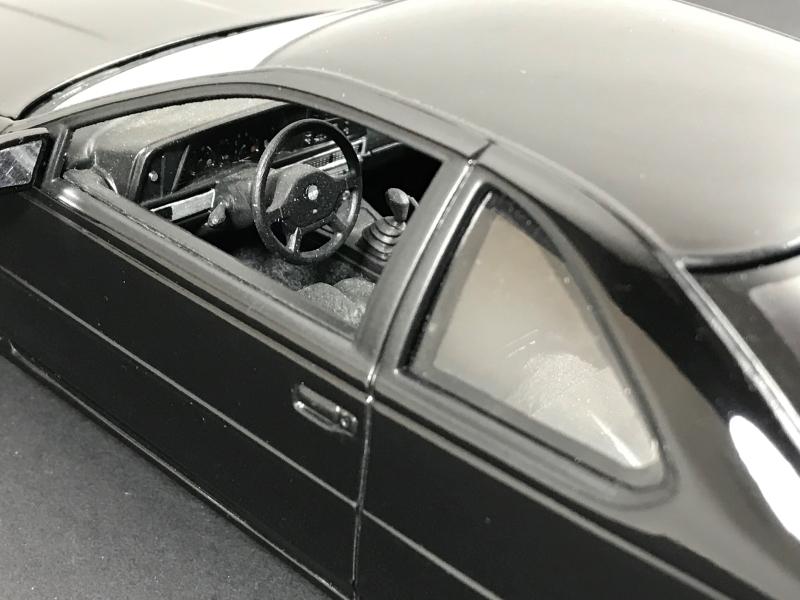
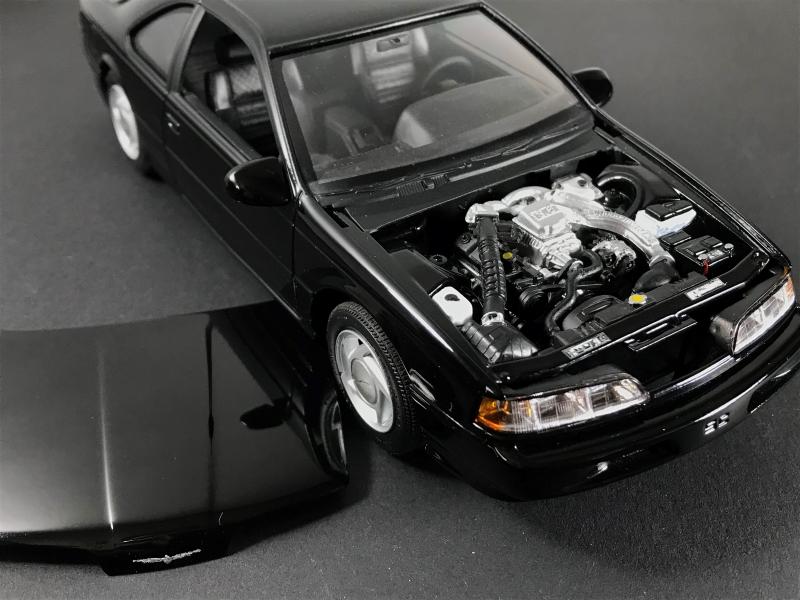
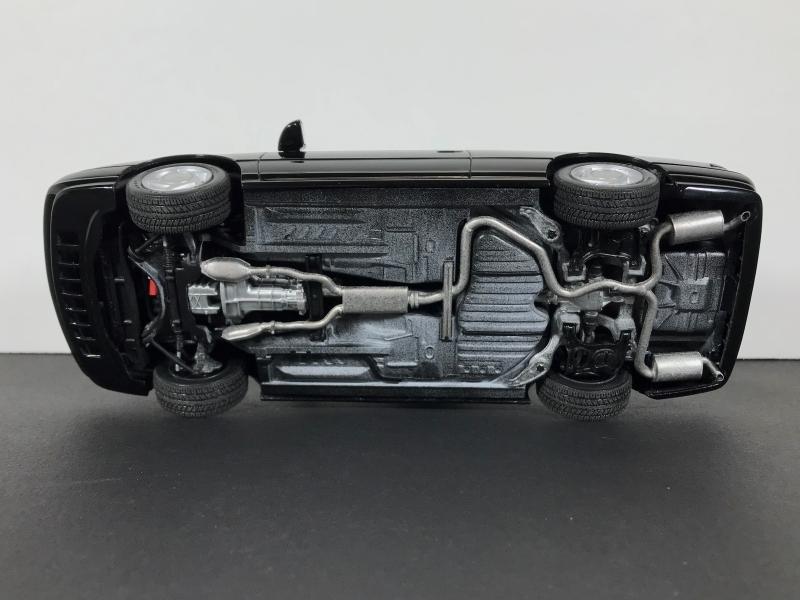
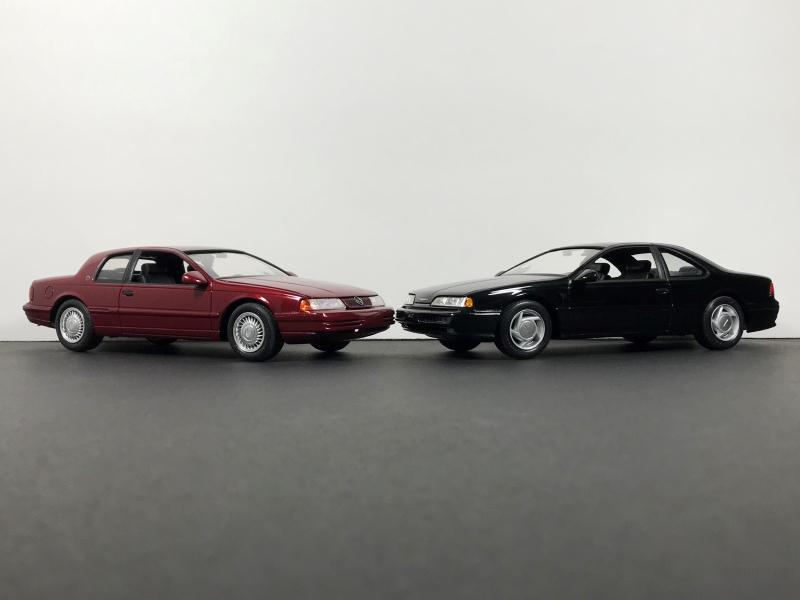
This build just rolled off the bench with a sordid past. I've been a fan of Rustoleum's clear gloss lacquer so I set up two bodies to paint for an experiment using Rustoleum's gloss black lacquer. I'd used it on trim pieces and as a basecoat for metal finishes, but hadn't been brave enough to hose it all over a carefully prepped and primed body. And so it went. One build received primer and only the gloss black lacquer, and the other build received the same treatment except with an additional step of several typical coats of the clear gloss lacquer as clearcoat. The result of the experiement yielded one body that was very pleasing to my eye, and one body that had to go to the dunk tank. This Revell '89 Thunderbird Super Coupe was the one that got straight-up gloss black lacquer wet sanded and polished without a clearcoat, so for the experimental purposes it was the success. The build is otherwise mostly box-stock. After building a few of these back in the day I knew there were some tricky areas that would need some closer attention. The bumpers were attached during the body prep, rather than as a final assembly step. This allowed some reinforcement of the attachment points, and all the light lenses could be test-fit to make any adjustments. Fortunately this kit, despite being the original 30 year old tooling, was in fair condition without much body warpage as I've found to be common with the early issues of this and the Cougar. Attaching the bumpers before the chassis is mated presents a few minor issues. The rear corners of the chassis must be trimmed to allow it all to mate without putting too much pressure on the delicate bumper attachments. I learned this the hard way while recently building the Cougar variant so I took extra care to trim, trim some more, and even more, rather than risking it. Once the chassis slides into place the trimmed areas are not noticeable so it seems to work out doing it this way. Some flocking was added to the interior carpet and parcel shelf. Whereas the Cougar version provides a reflector bucket for the tail lights, the Thunderbird versions have no such mounting surface. After some trial and error with different paint and materials, I settled on fabricating some reflector buckets for the outer tail/stop lamp segments. Using some HVAC metal tape that isn't as flimsy and cruncy as plain aluminum foil, I cut some small pieces and formed them into reflector buckets that were then attached to the backside of the light unit with some super glue. This ended up working out fine for the look I was aiming for, but it took a lot of time and patience. Despite some fidding here and there, it was a fun build that took me back to the 80s and 90s for a while, and I'm glad to see it finally on the display shelf instead of in the box or on the bench. It has already found a friend in the '91 Cougar XR-7 that recently made the same a similar giant leap.
-
Beautiful build! Very nice work!
-
It's great to see this! Well done!
-
Beautiful color and finish, and very nice work all around!
-
Very nice! I can envision those green Coke bottles that match the era. The classic white and red is a good looking contrast, too!
-
Very nice build and great color! You've done a nice job with the details and it looks showroom fresh!
-
1970 Torino Cobra and GT, 1976 Torino, and 1973 Cougar
polybius replied to heyjohnxx's topic in Model Cars
Beautiful Fords! They really capture the era nicely, great work!! -
Great to see it brought back to life! Nice work!!