Rockford
-
Posts
1,933 -
Joined
-
Last visited
Content Type
Profiles
Forums
Events
Gallery
Everything posted by Rockford
-

Peterbilt 352
Rockford replied to Rockford's topic in WIP: Model Trucks: Big Rigs and Heavy Equipment
Thanks gents, as you can see I tried putting both comments in the box and messed up big time. -
Peterbilt 352
Rockford replied to Rockford's topic in WIP: Model Trucks: Big Rigs and Heavy Equipment
-
I've always loved the look of the AMT Peterbilt 352 Pacemaker cabover. It's very compact and beefy looking. However, the prices are nuts and I've quite a fleet of 1/32 trucks now so I'd like to stay in that scale. I fell on the Snaptite double sleeper 352 for a good price so I'll have to cut it down and shorten the chassis too. First to reduce the cab to a single sleeper. I decided to cut around the locker door so I don't have a line going through it. It also keeps the air vent and the holes for the grab handles. Quite terrifying but taking care with my marking out and cutting it seems to have gone ok.

-
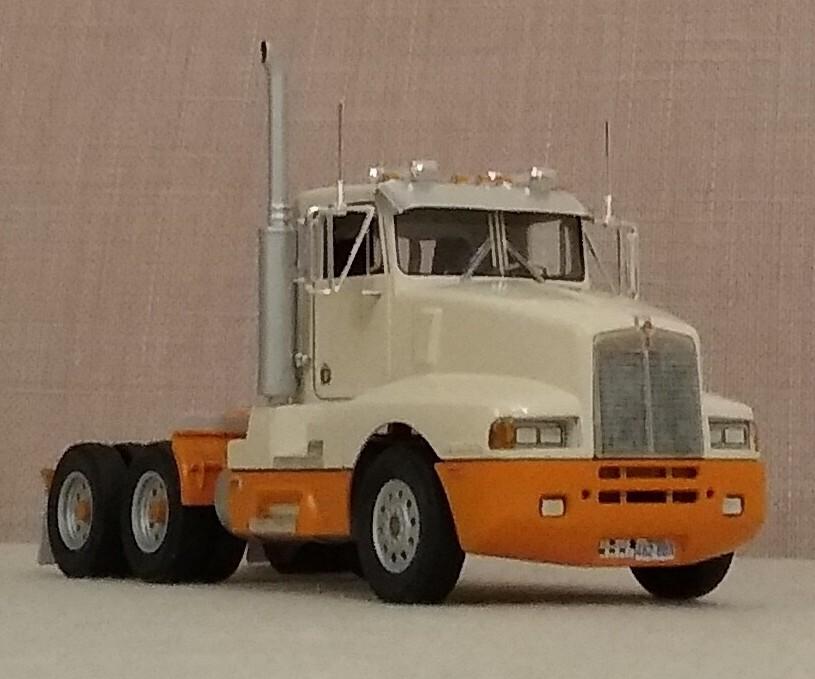
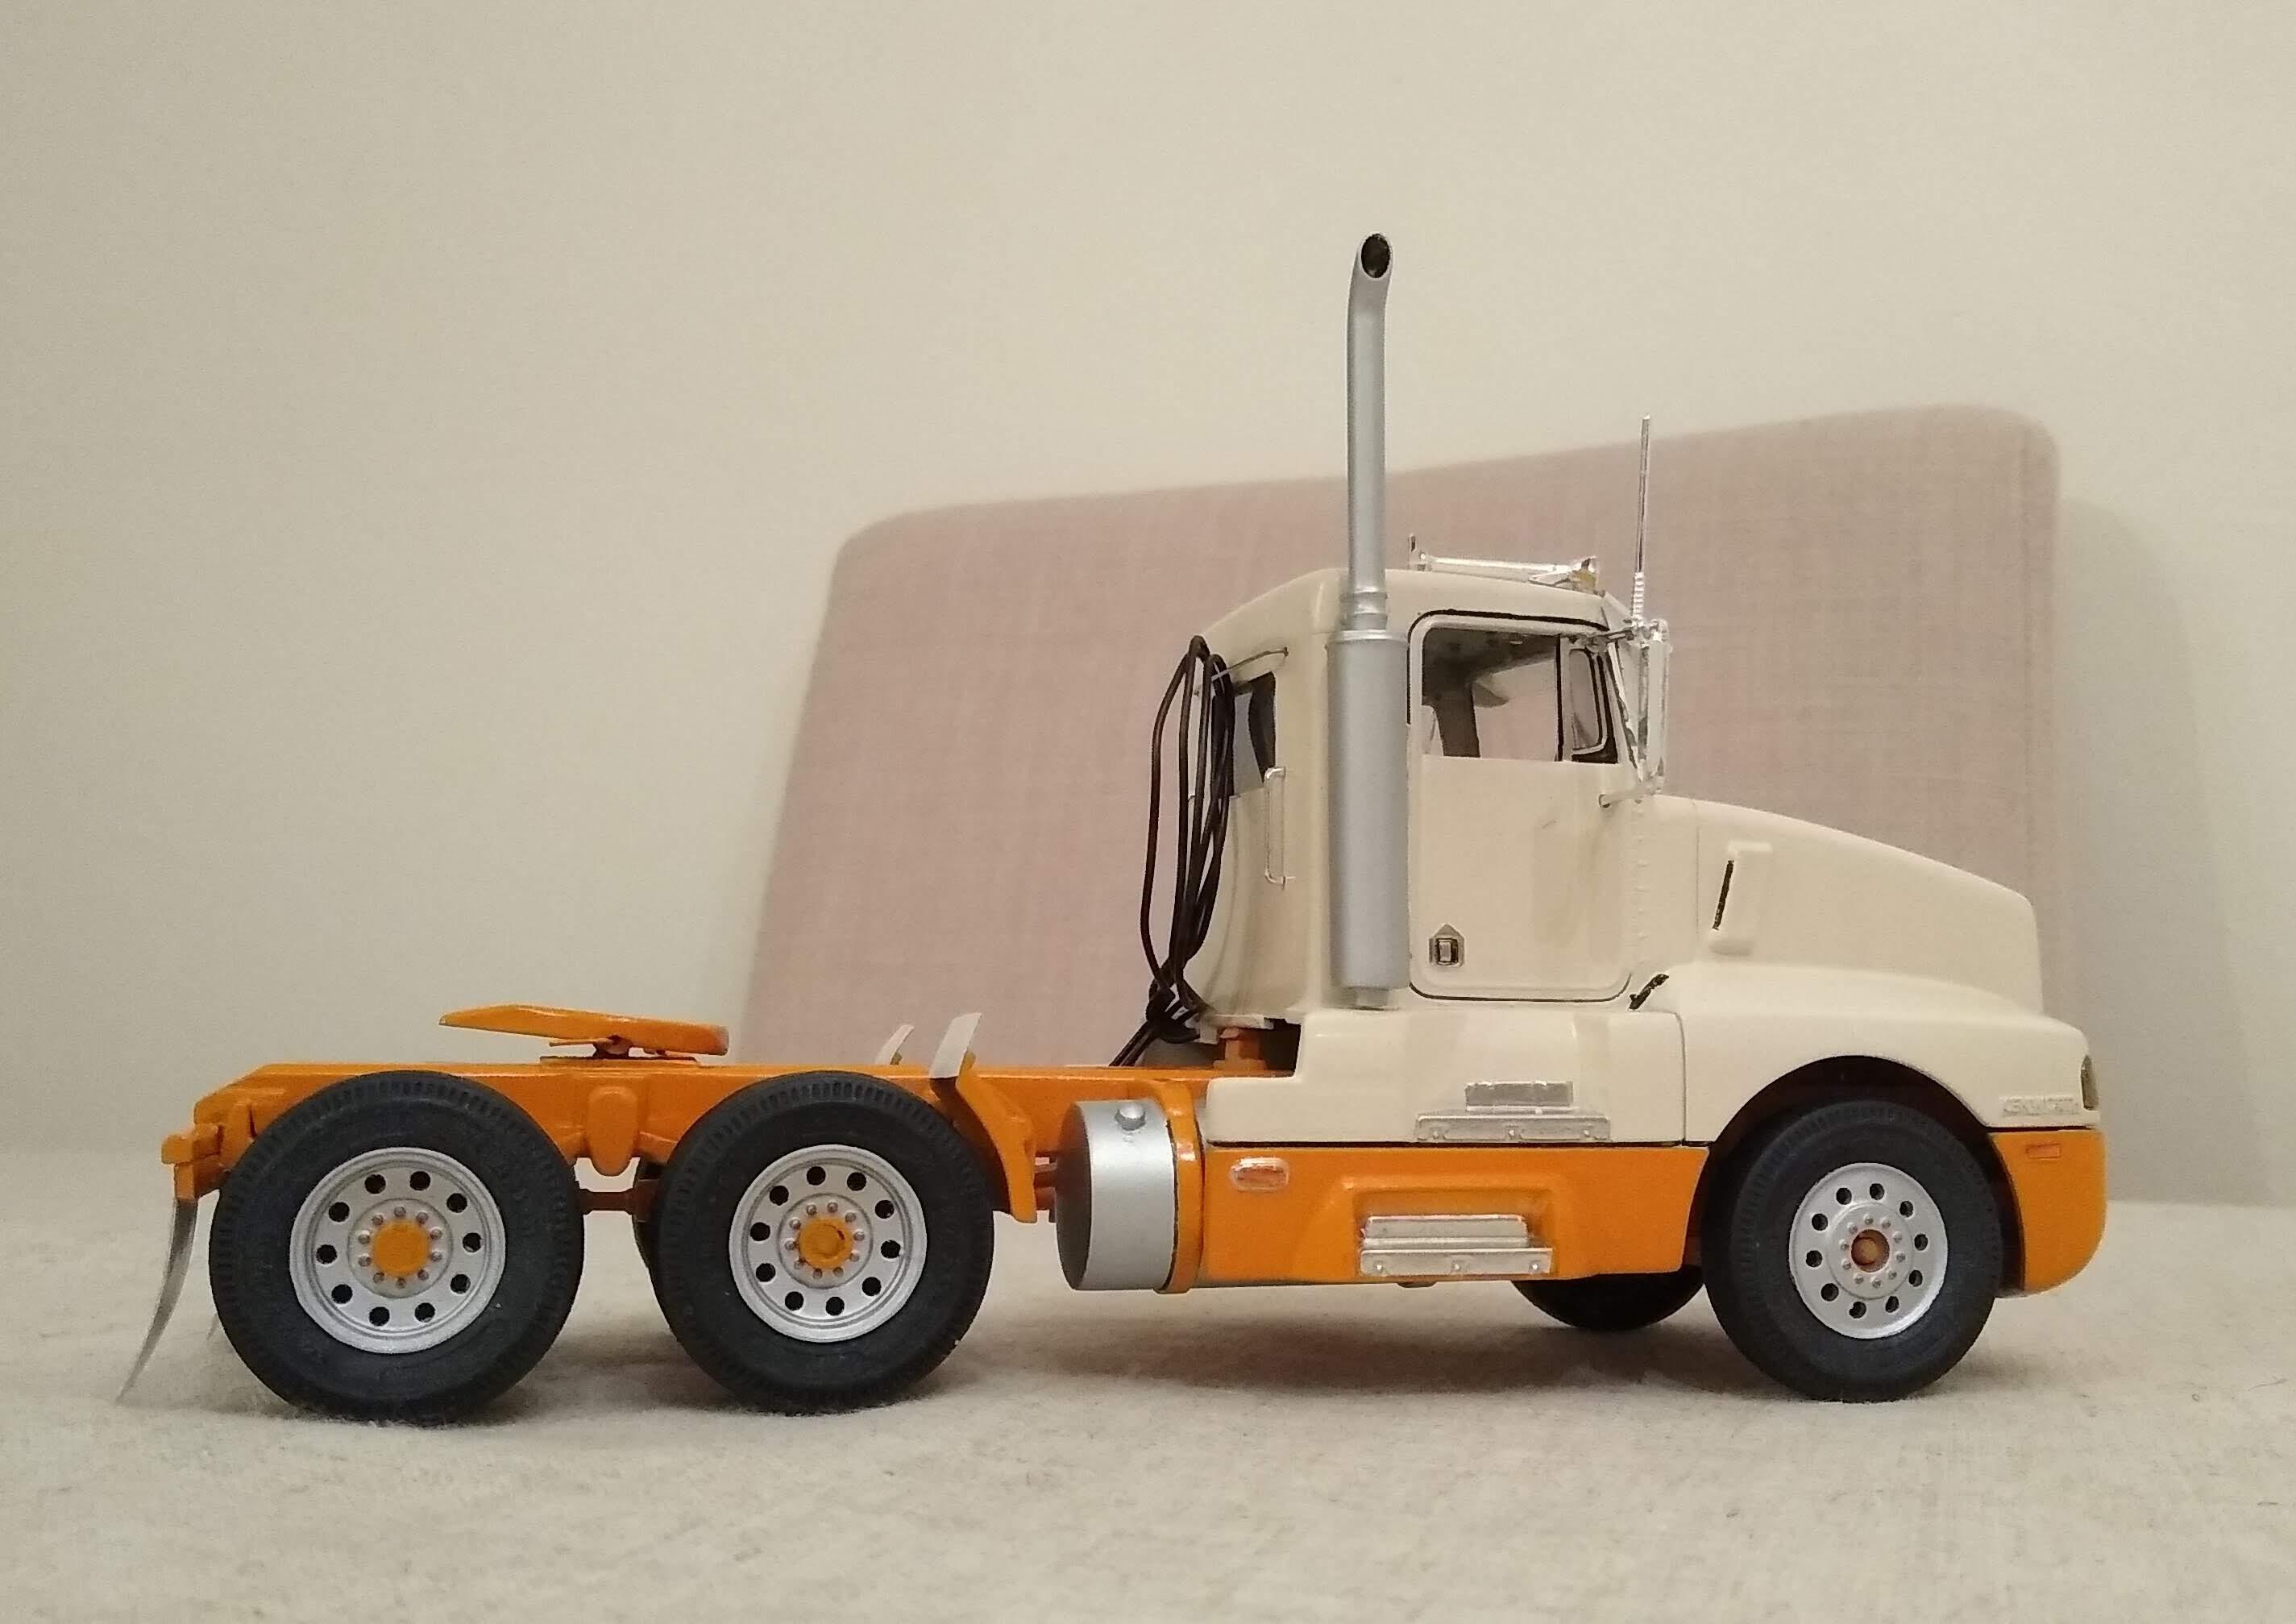
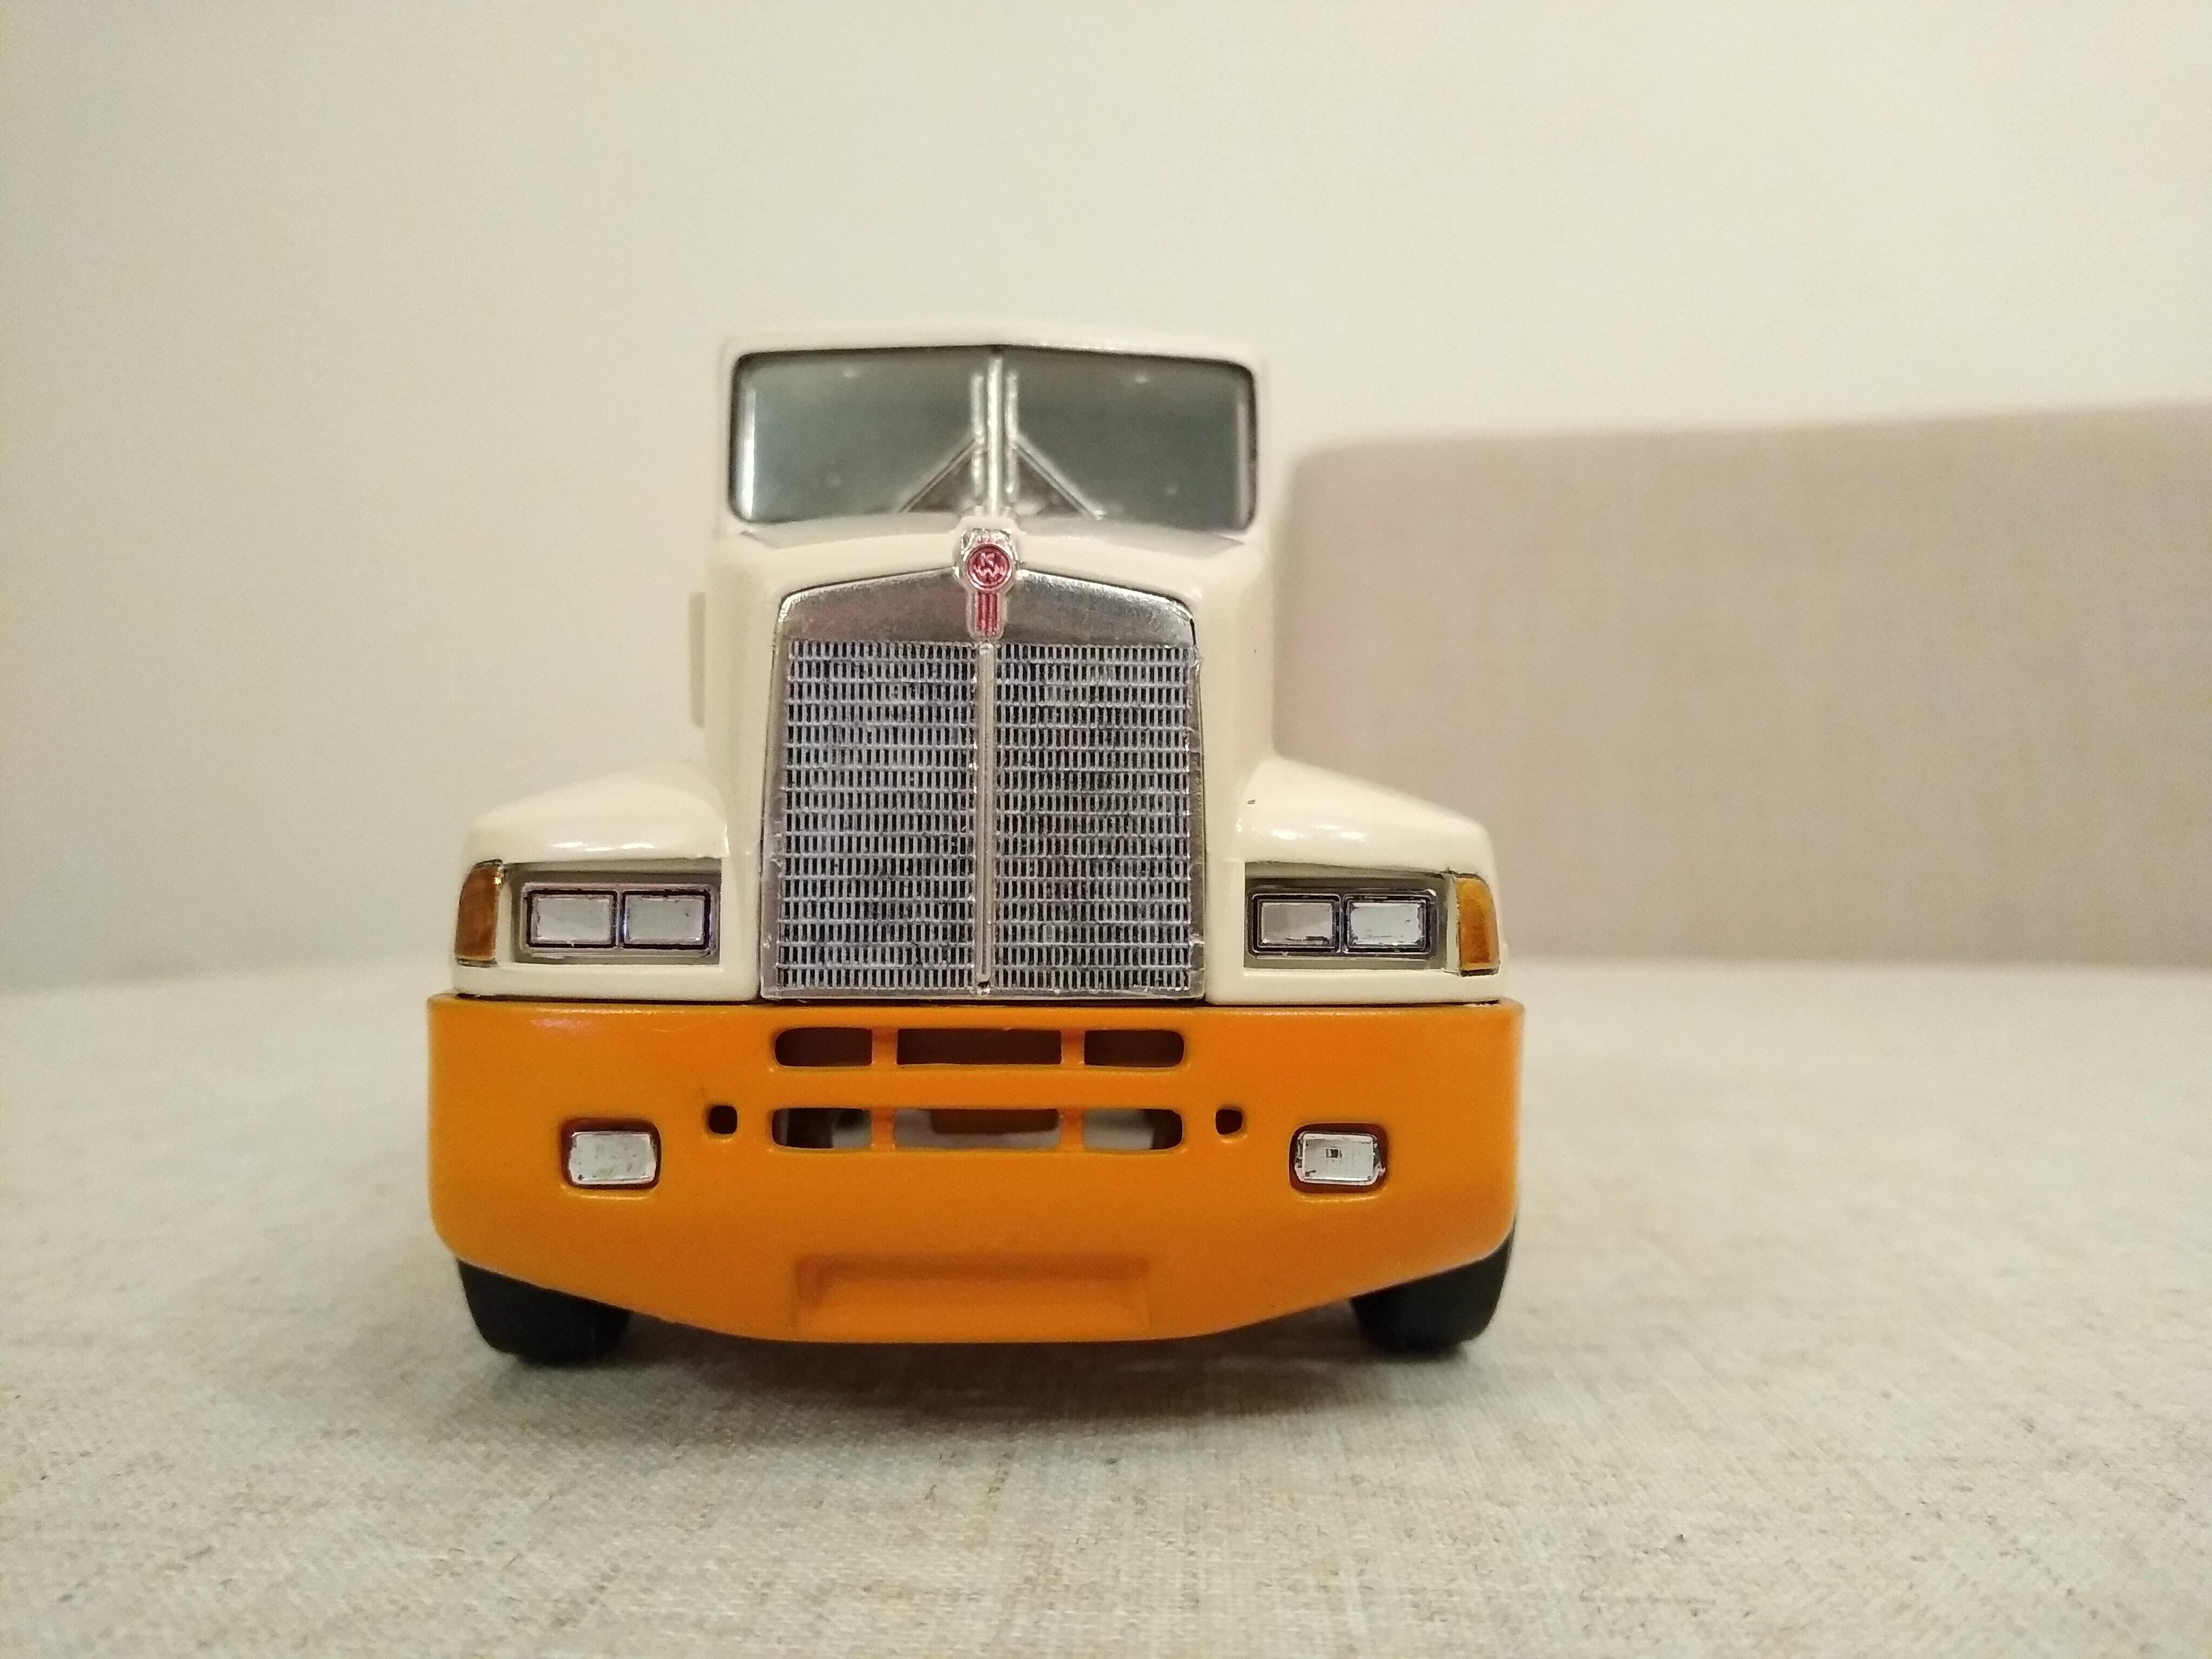
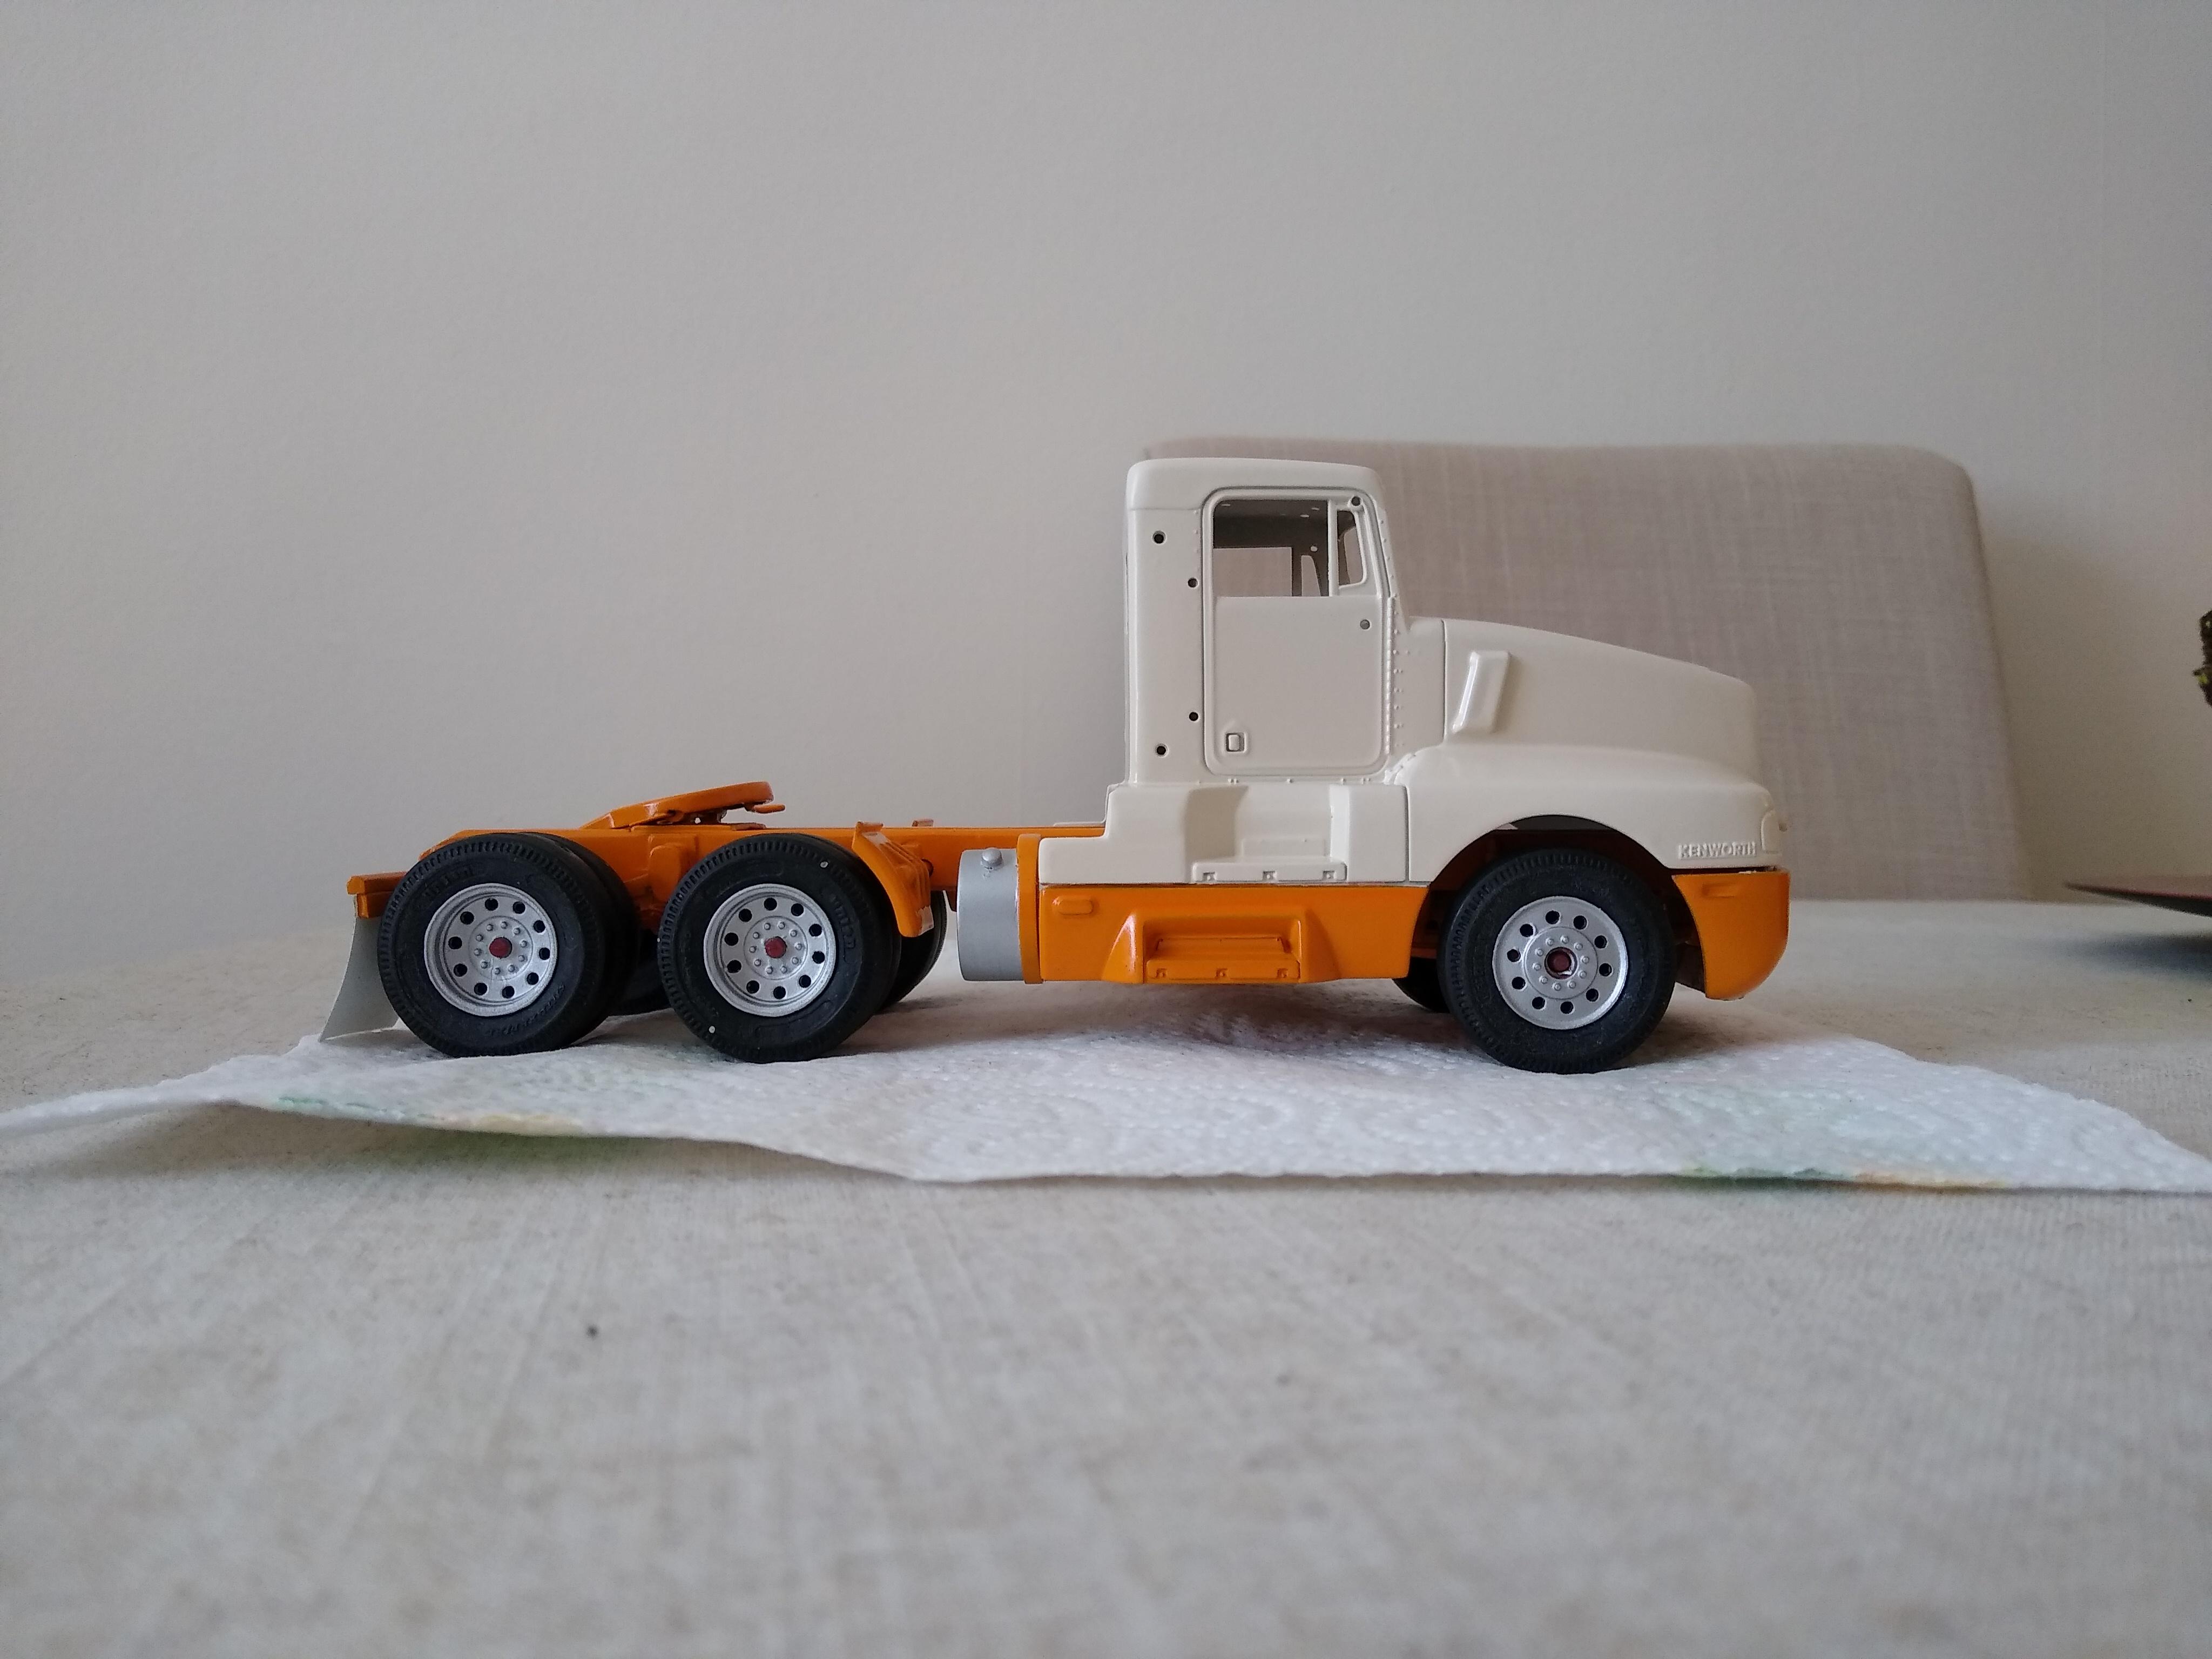
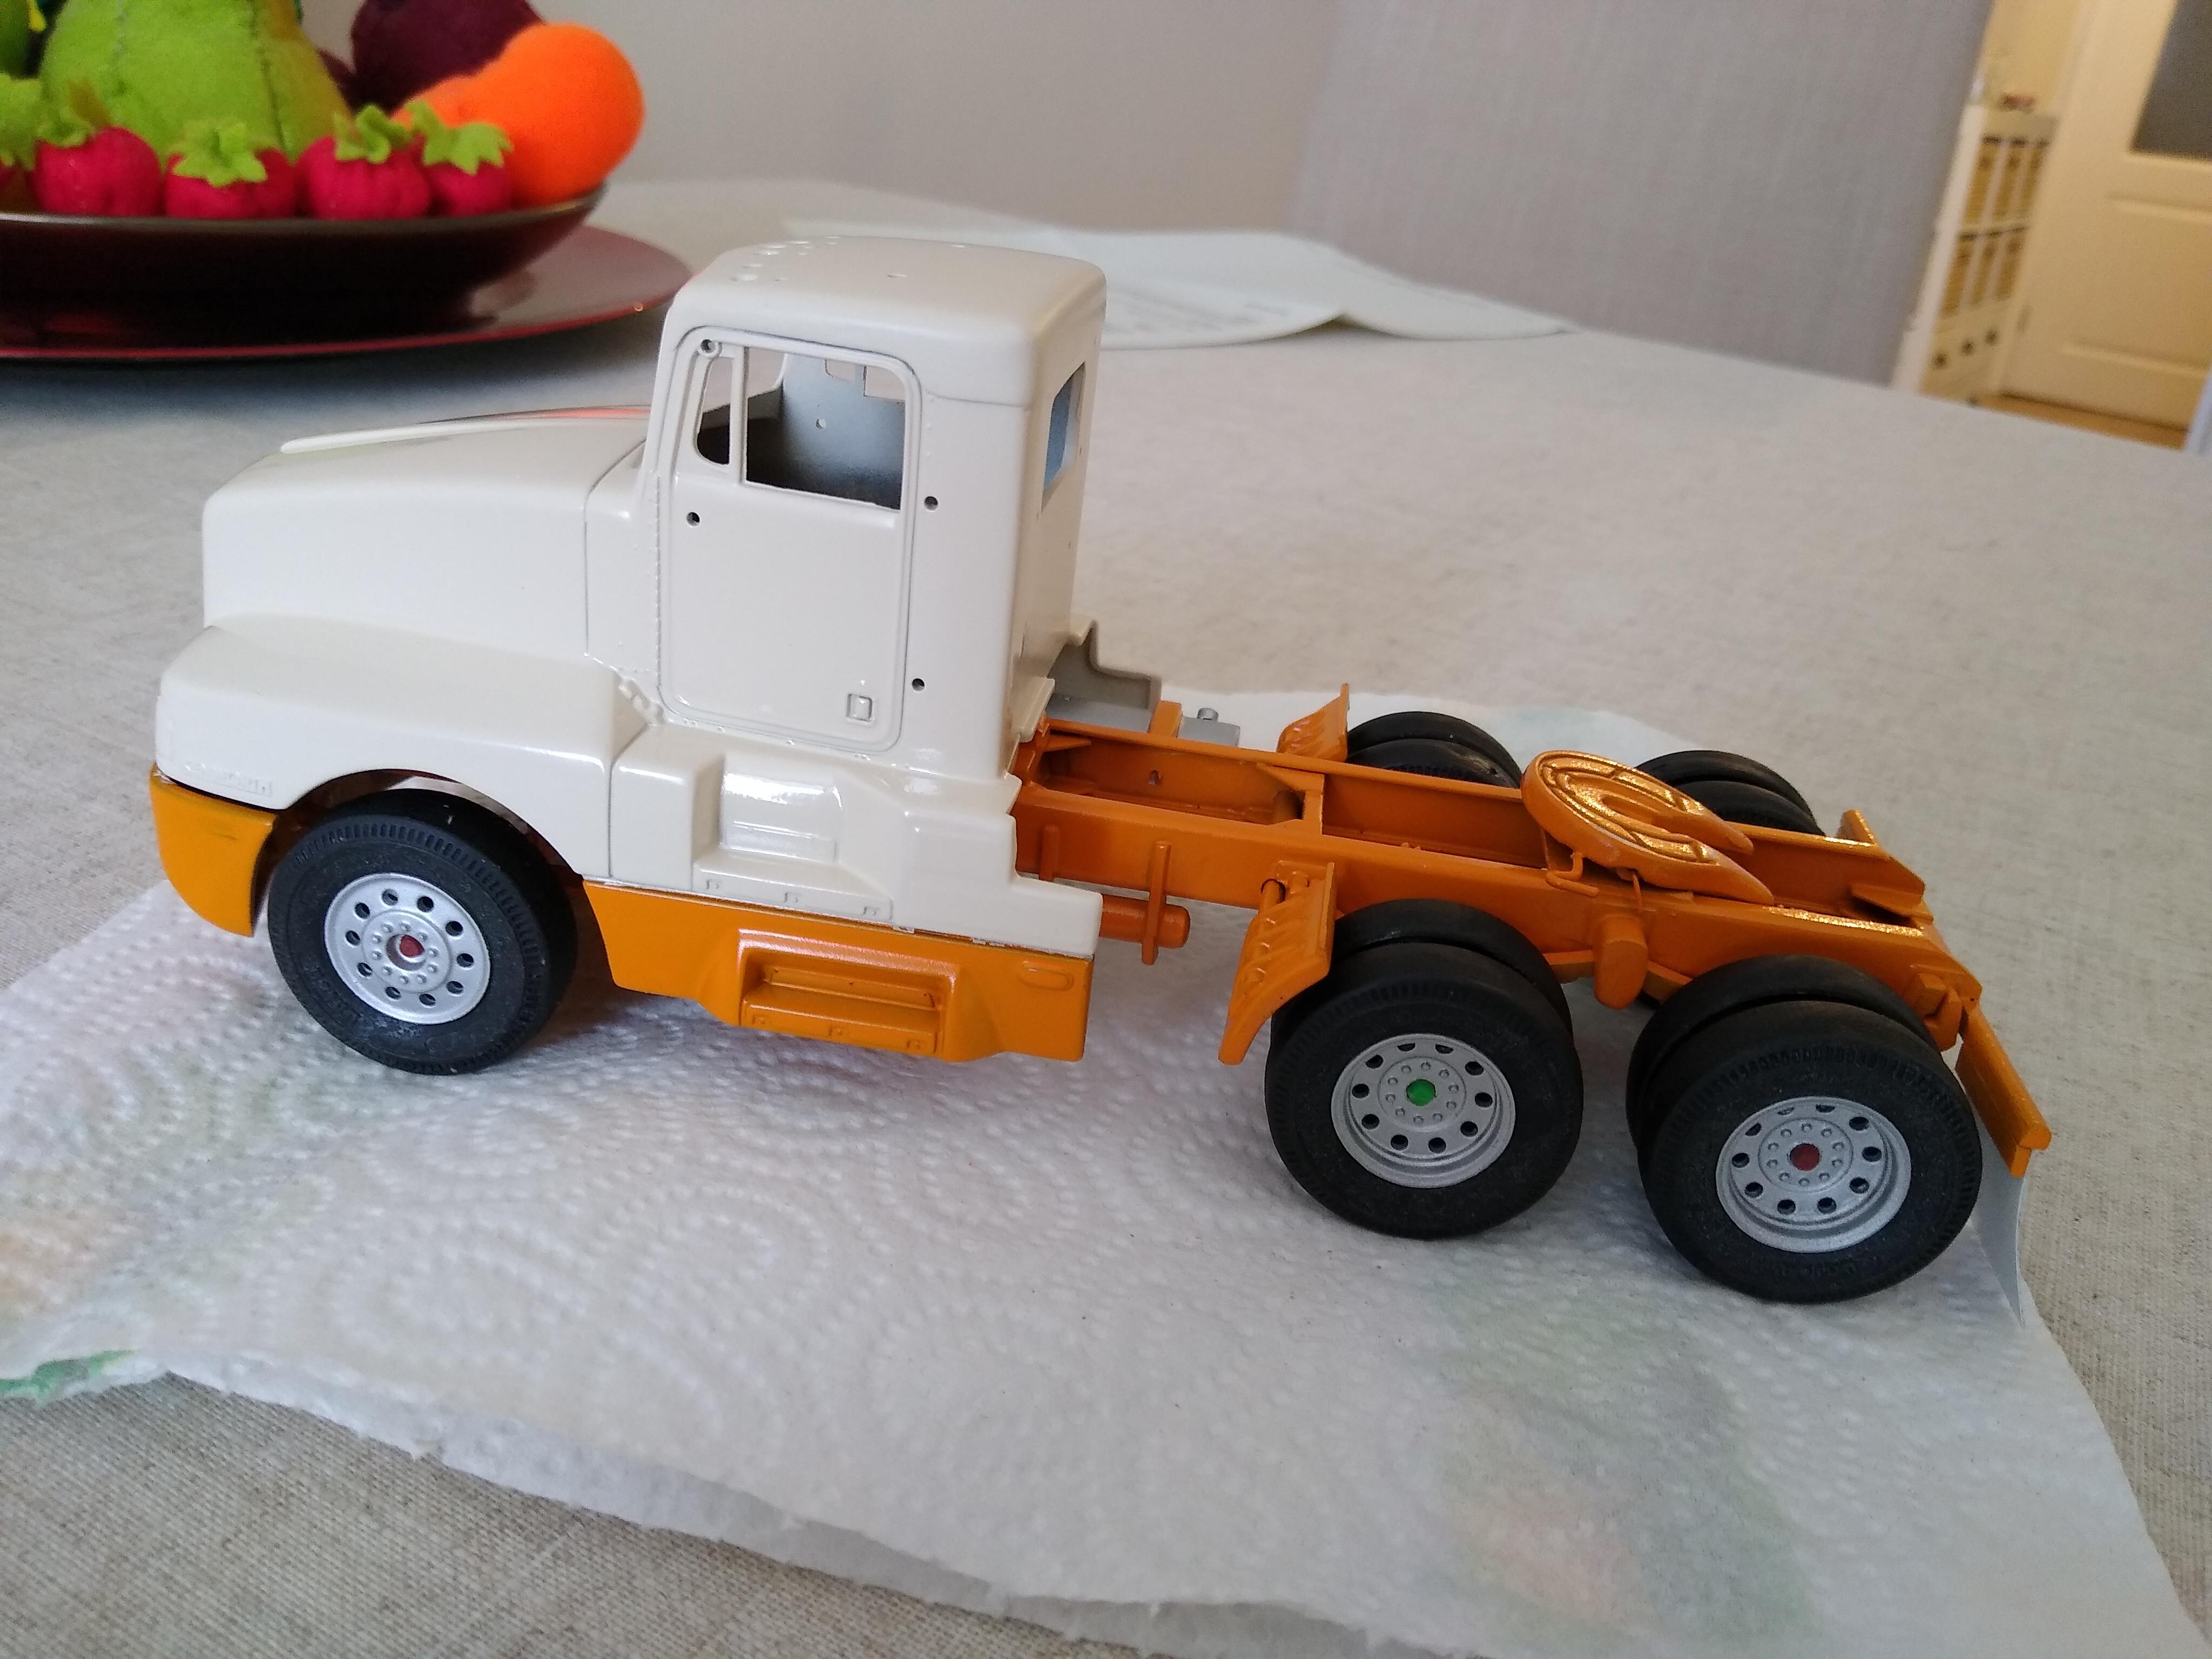
I'm calling this done for now because I can't think of lettering or stripes at the moment and it looks good enough. It's the Snaptite 1/32 Kenworth T600 with the sleeper cut off, chassis shortened and detailed. Drive axles filled and shaped. Dechromed the fuel tank and exhaust. Made mudflaps out of electrician's tape. Rehinged the fifth wheel. Made a visor out of sheet aluminium. Added brake chambers and airlines. I'm fairly happy with the result.
-
Another T600!
Rockford replied to Rockford's topic in WIP: Model Trucks: Big Rigs and Heavy Equipment
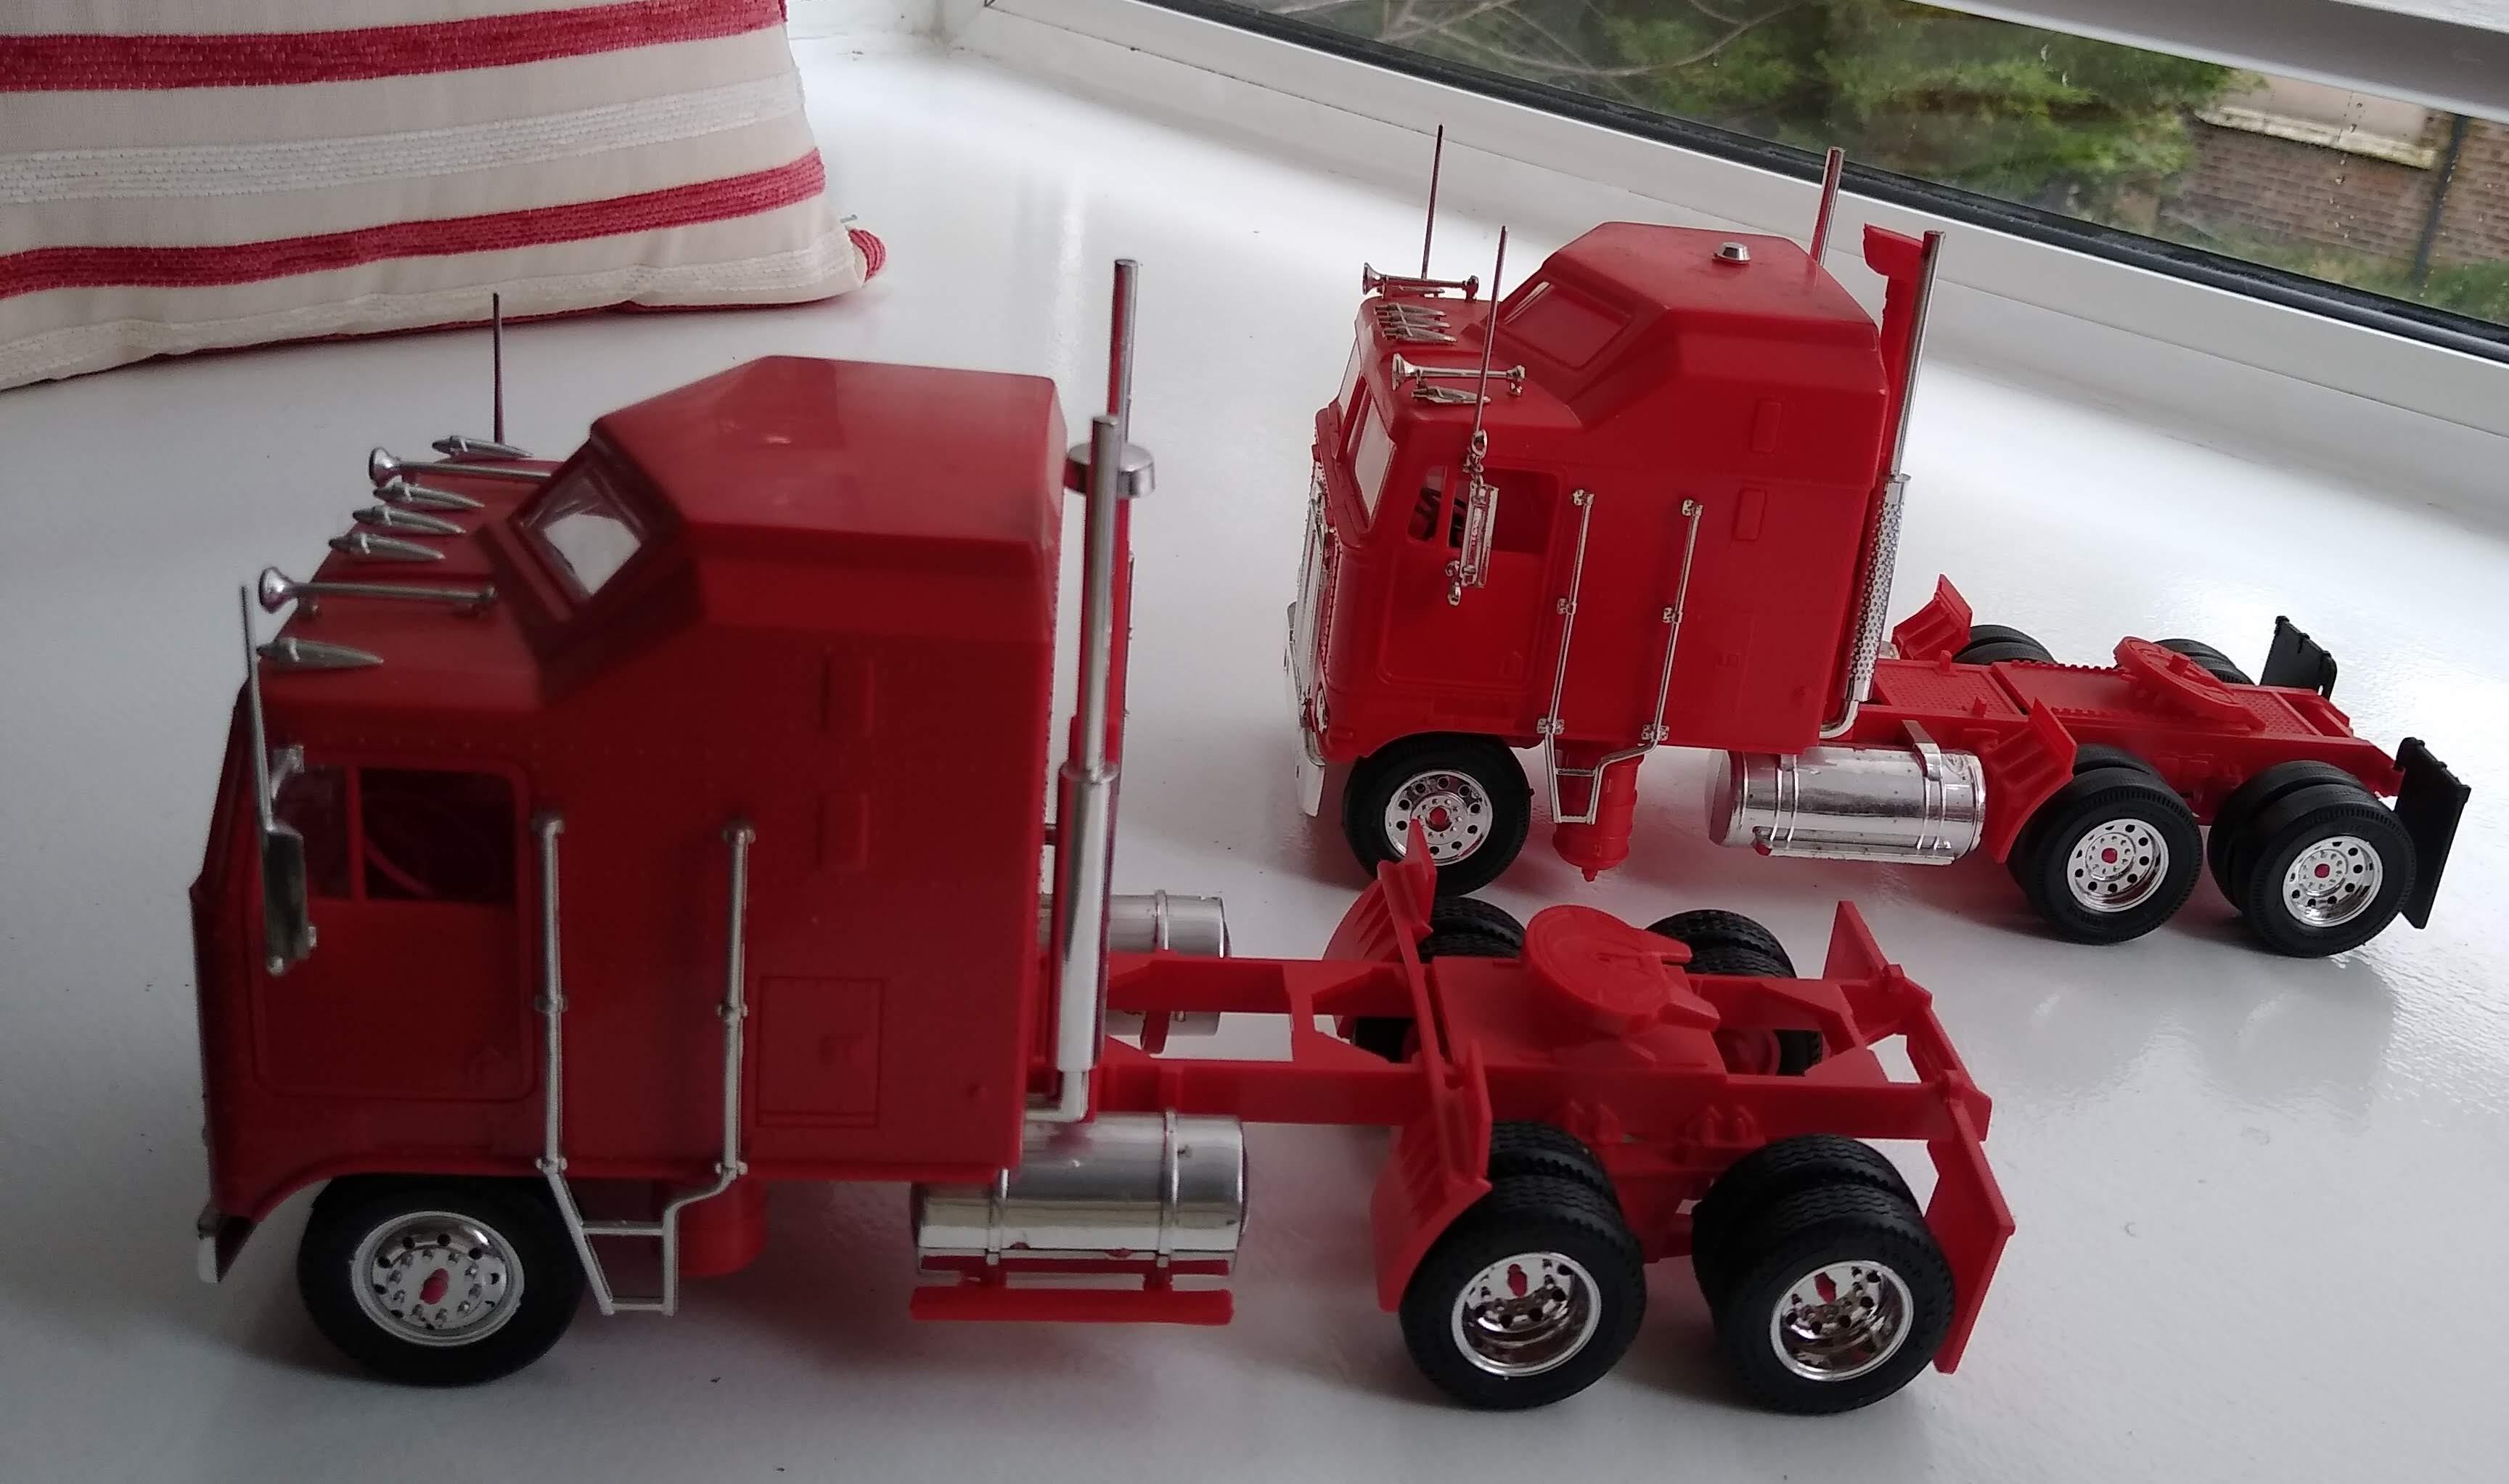
Pretty much finished with this one. Formed a visor out of sheet aluminium, added a sliding rail on the back of the cab for the airlines. Made some rear axle hubs out of 6mm plastic rod and some sprue. Got to think of lettering and/or livery to complete. I know it's only a snapper but it looks fairly good to me. If only it was the Snaptite W900 but they're as rare as hen's teeth now, so too the Freightshaker cabover. I'll keep looking out for them though.
-
Another T600!
Rockford replied to Rockford's topic in WIP: Model Trucks: Big Rigs and Heavy Equipment
Started putting the makeup on the T600, bit of BMF and some panel lines. I added fuel lines to the fuel tank and made my mudflaps from electrician's tape. It's looking good. Still a lot to do.
-
GMC Astro95
Rockford replied to Bronzekeg's topic in WIP: Model Trucks: Big Rigs and Heavy Equipment
Such a great image seeing it sitting in the workshop with all the tools on the bench. Cab looks great, it's going to look really sharp when it is finished. -
That looks great. I don't think the axle is too far forward, you do (did) see them like that. Just your typical little workhorse truck pottering around the neighbourhood doing its job.
-
1/25 Peterbilt 352
Rockford replied to dragstueck's topic in Model Trucks: Big Rigs and Heavy Equipment
What a great job! Love the weathering and the plumbing. Look forward to seeing the trailer. -
Nice Job on the interior. The chassis looks great too, the drive tyres look mean.
-
GMC Astro95
Rockford replied to Bronzekeg's topic in WIP: Model Trucks: Big Rigs and Heavy Equipment
Excellent work on the chassis. Always thought the Astro design was way ahead of its time. Just look at that dash, the way it curved right around the driver and the big glass area for good visibility and well cooked drivers in the summer! If the engine didn't cook you the sun would! -
Well gents, as ever I'm impressed by your experience and willingness to help. Many thanks. I took the advice and used primer and topcoat in the intervals mentioned by the manufacturer, 15 minutes before recoats, applying that to primer and topcoat. The finish is excellent with no adverse reactions and it has enabled me to get the job done in one day before the weather gets too cold or humid to be able to spray paint anything. It used to take me weeks to paint anything. Once again, thanks for your help.
-
Another T600!
Rockford replied to Rockford's topic in WIP: Model Trucks: Big Rigs and Heavy Equipment
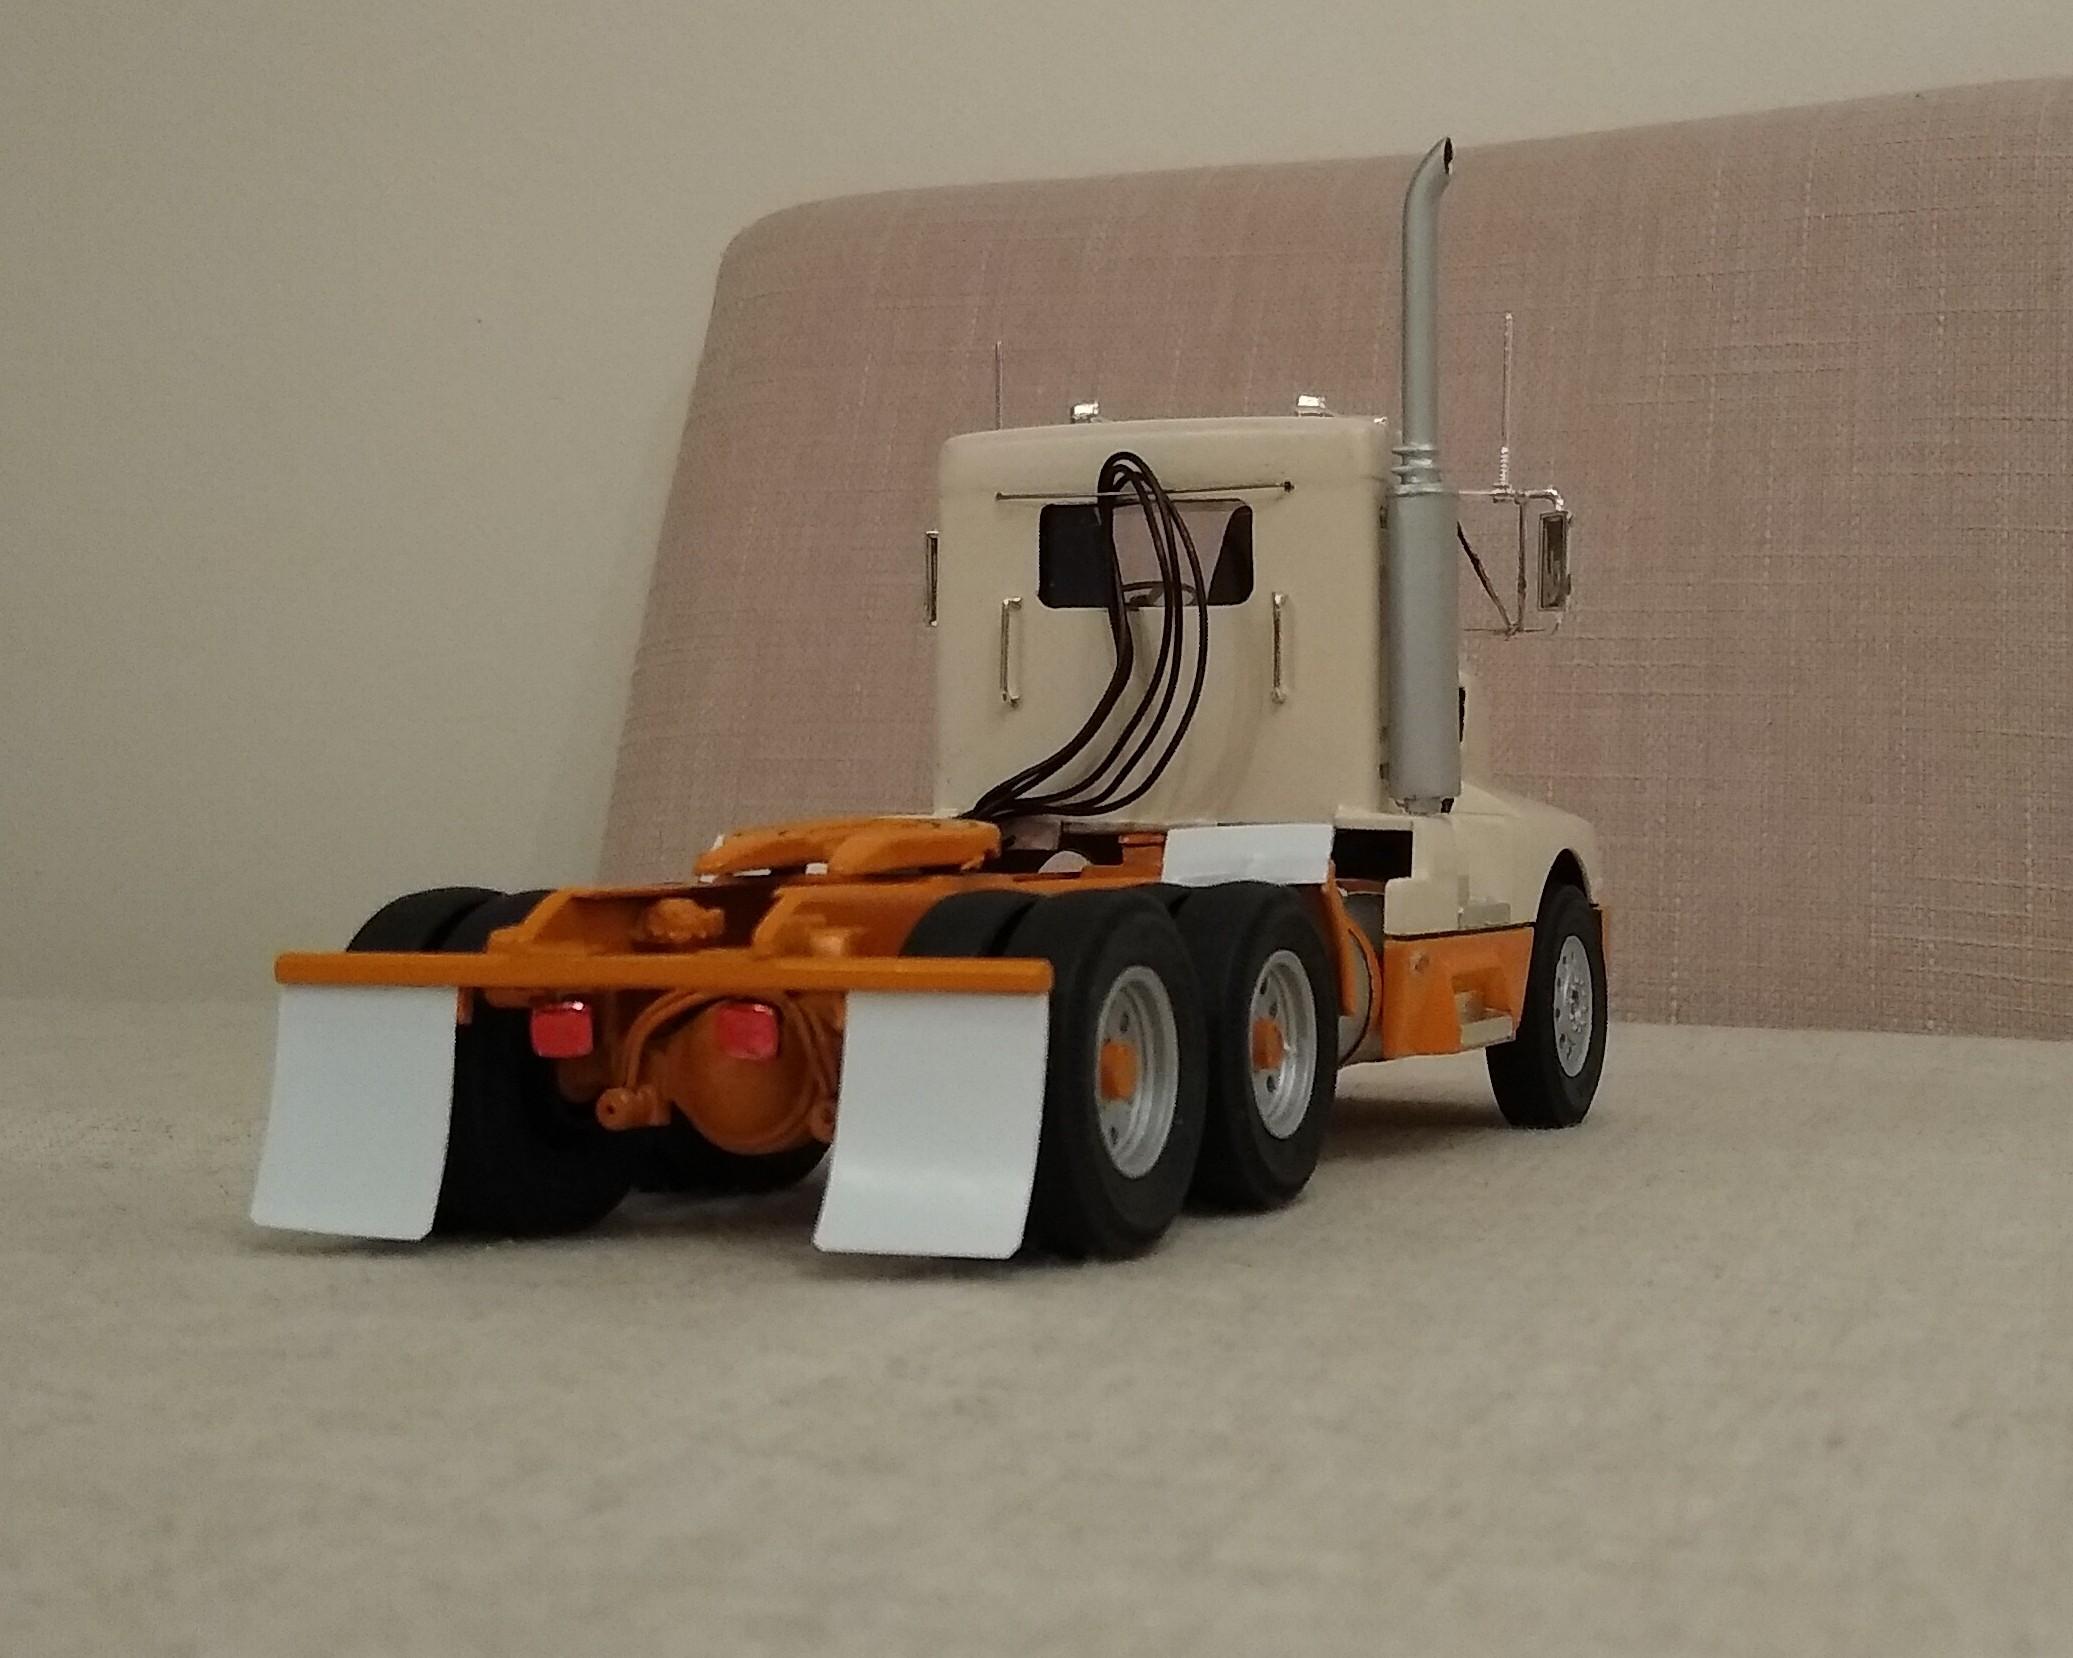
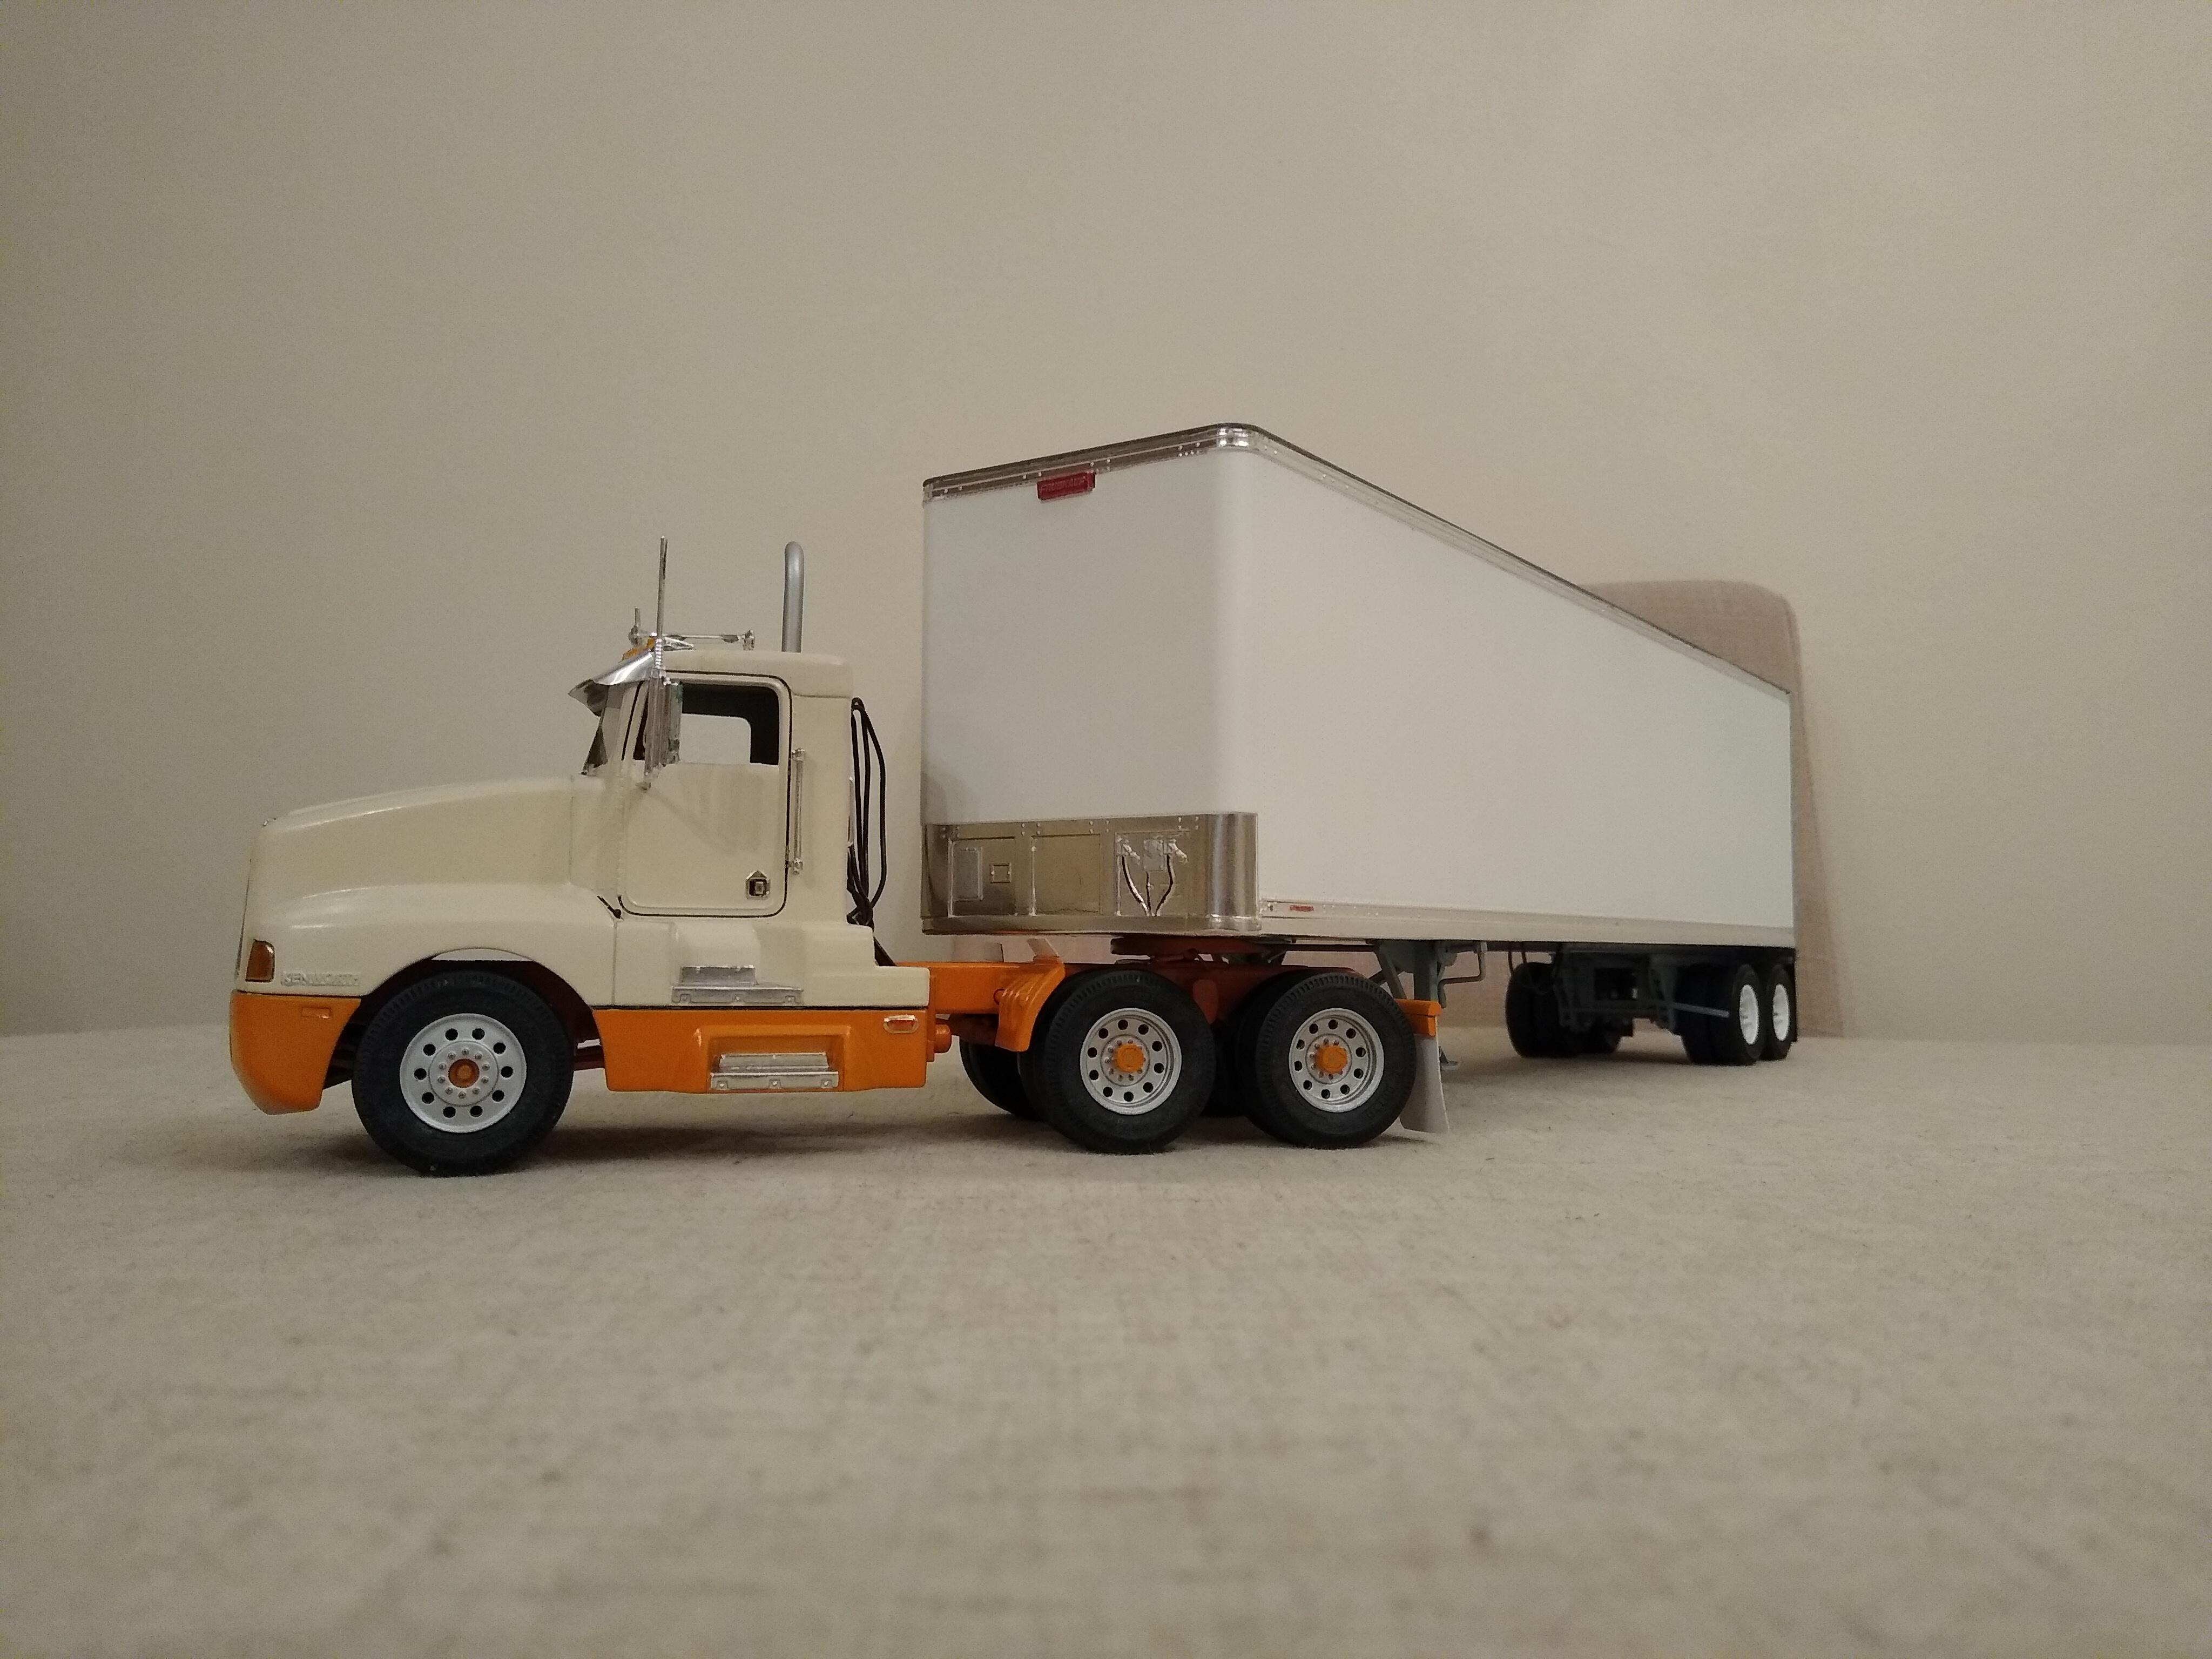
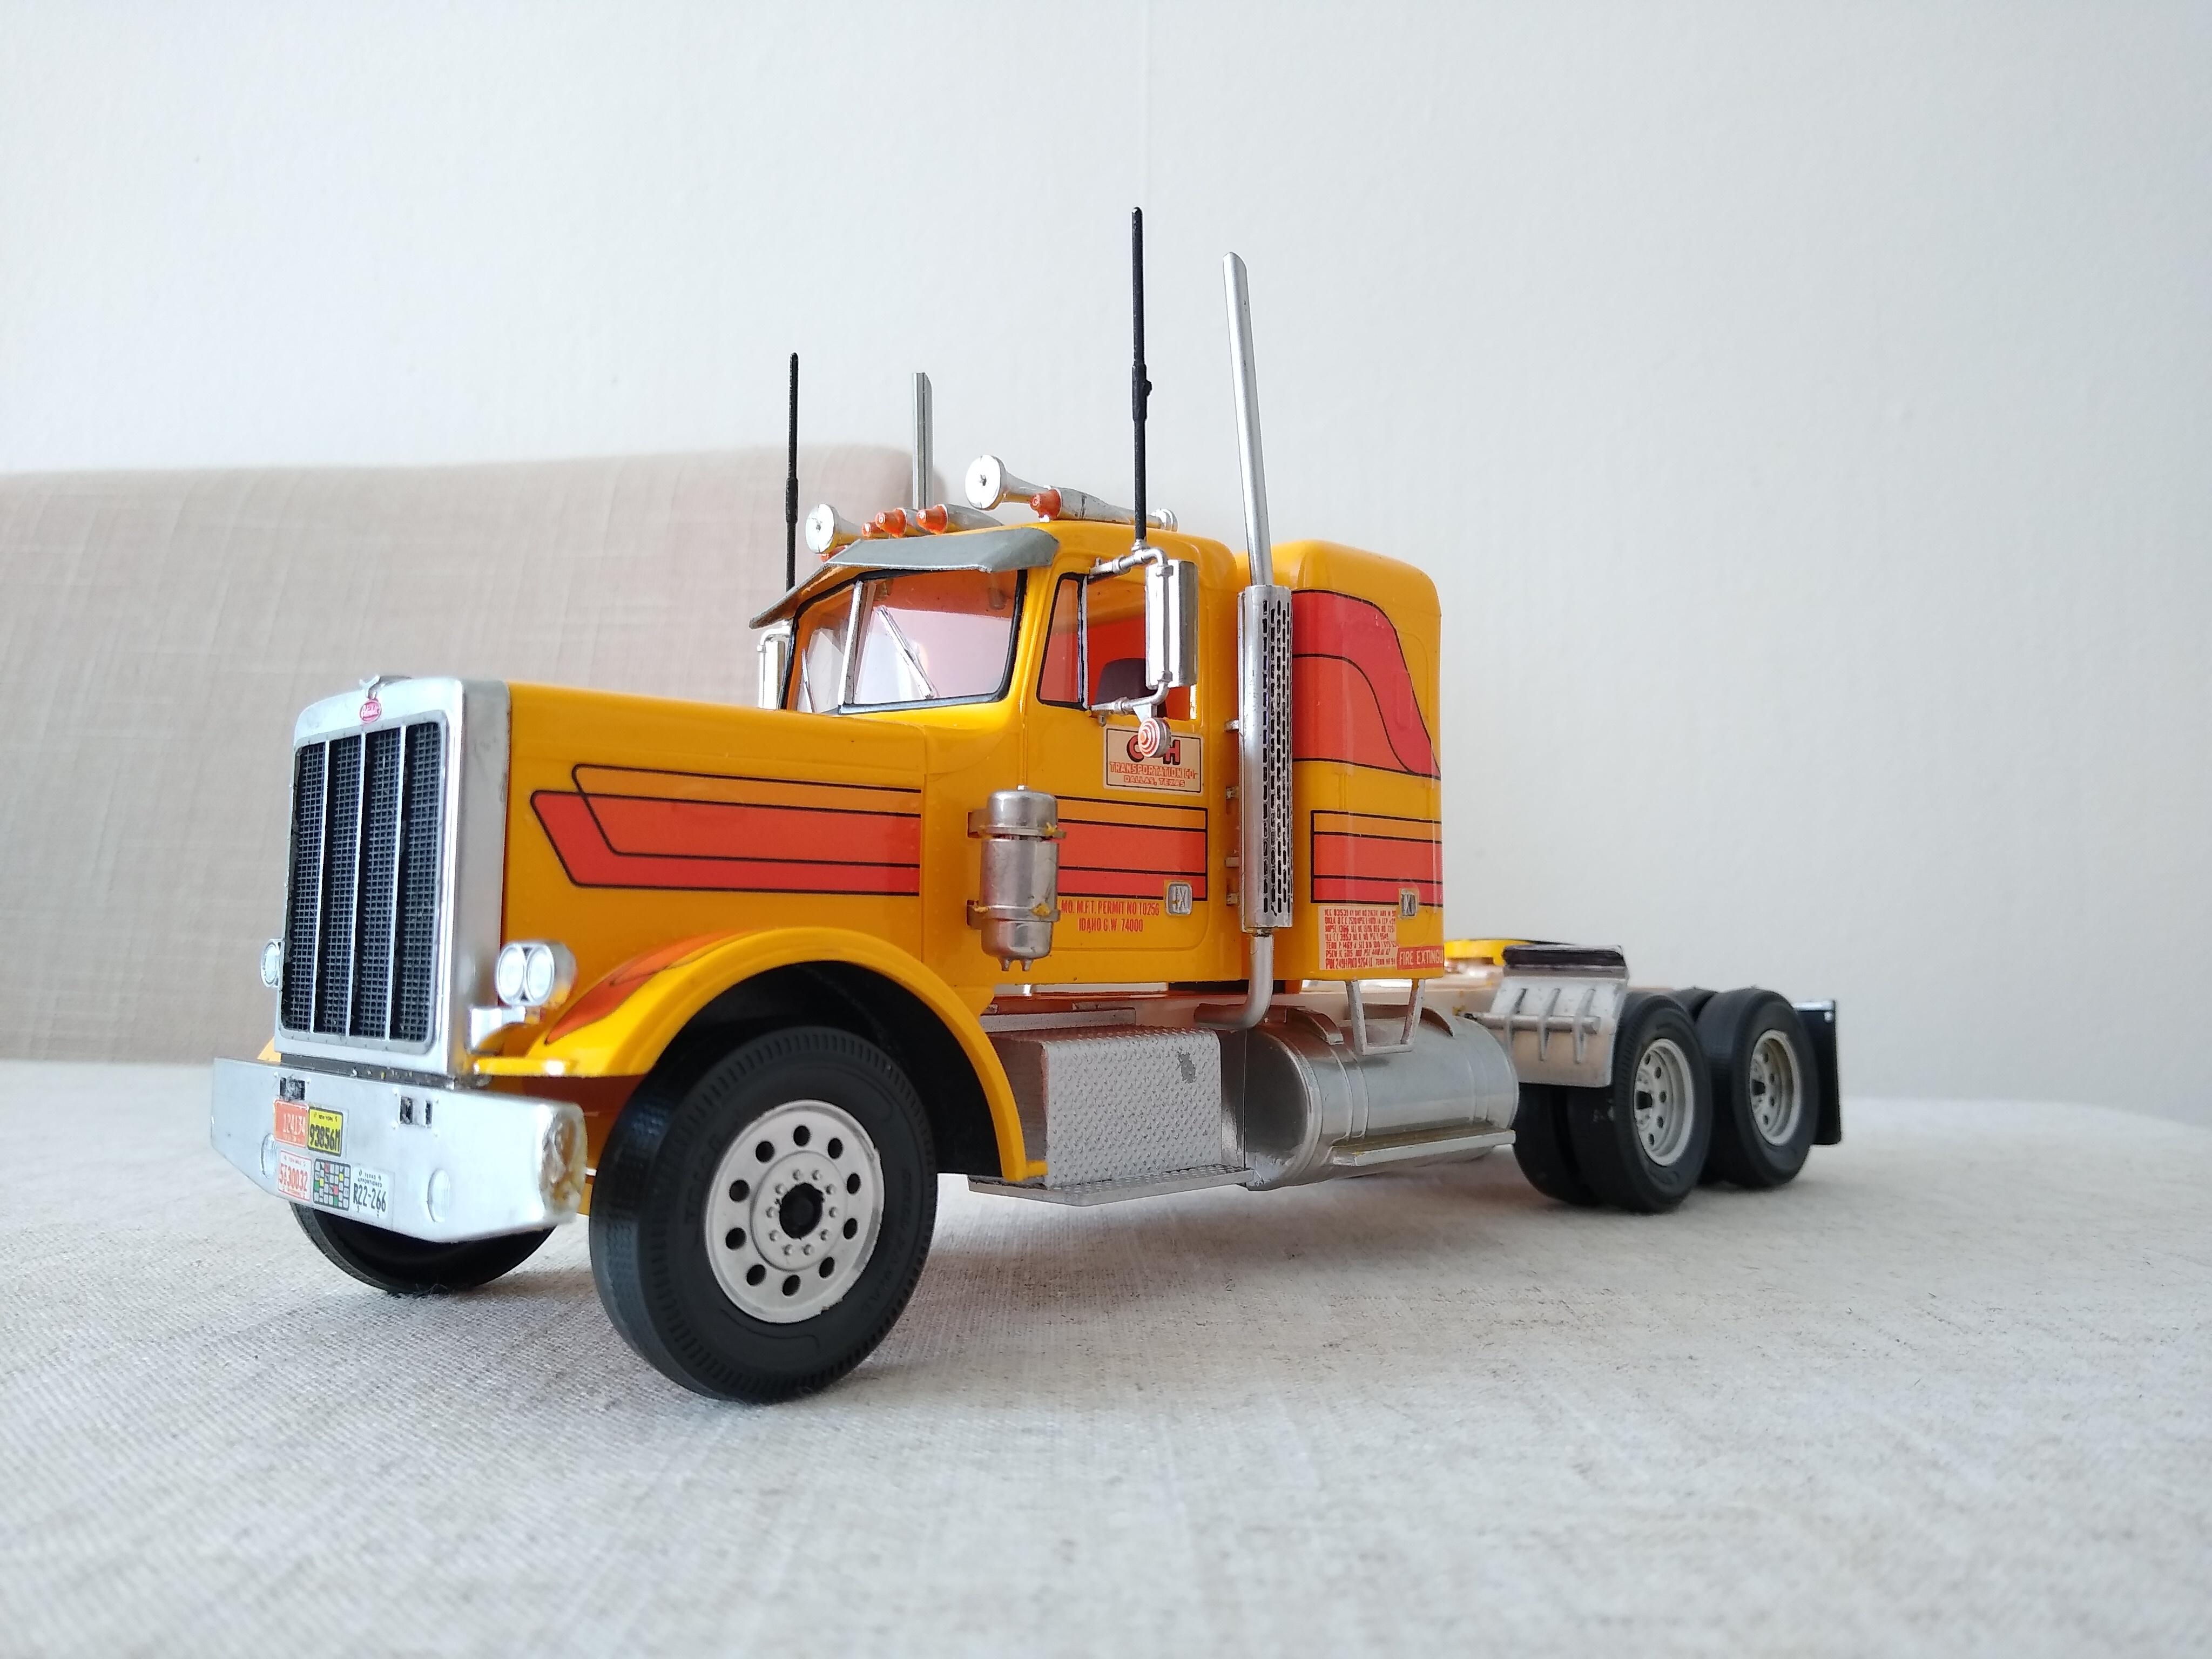
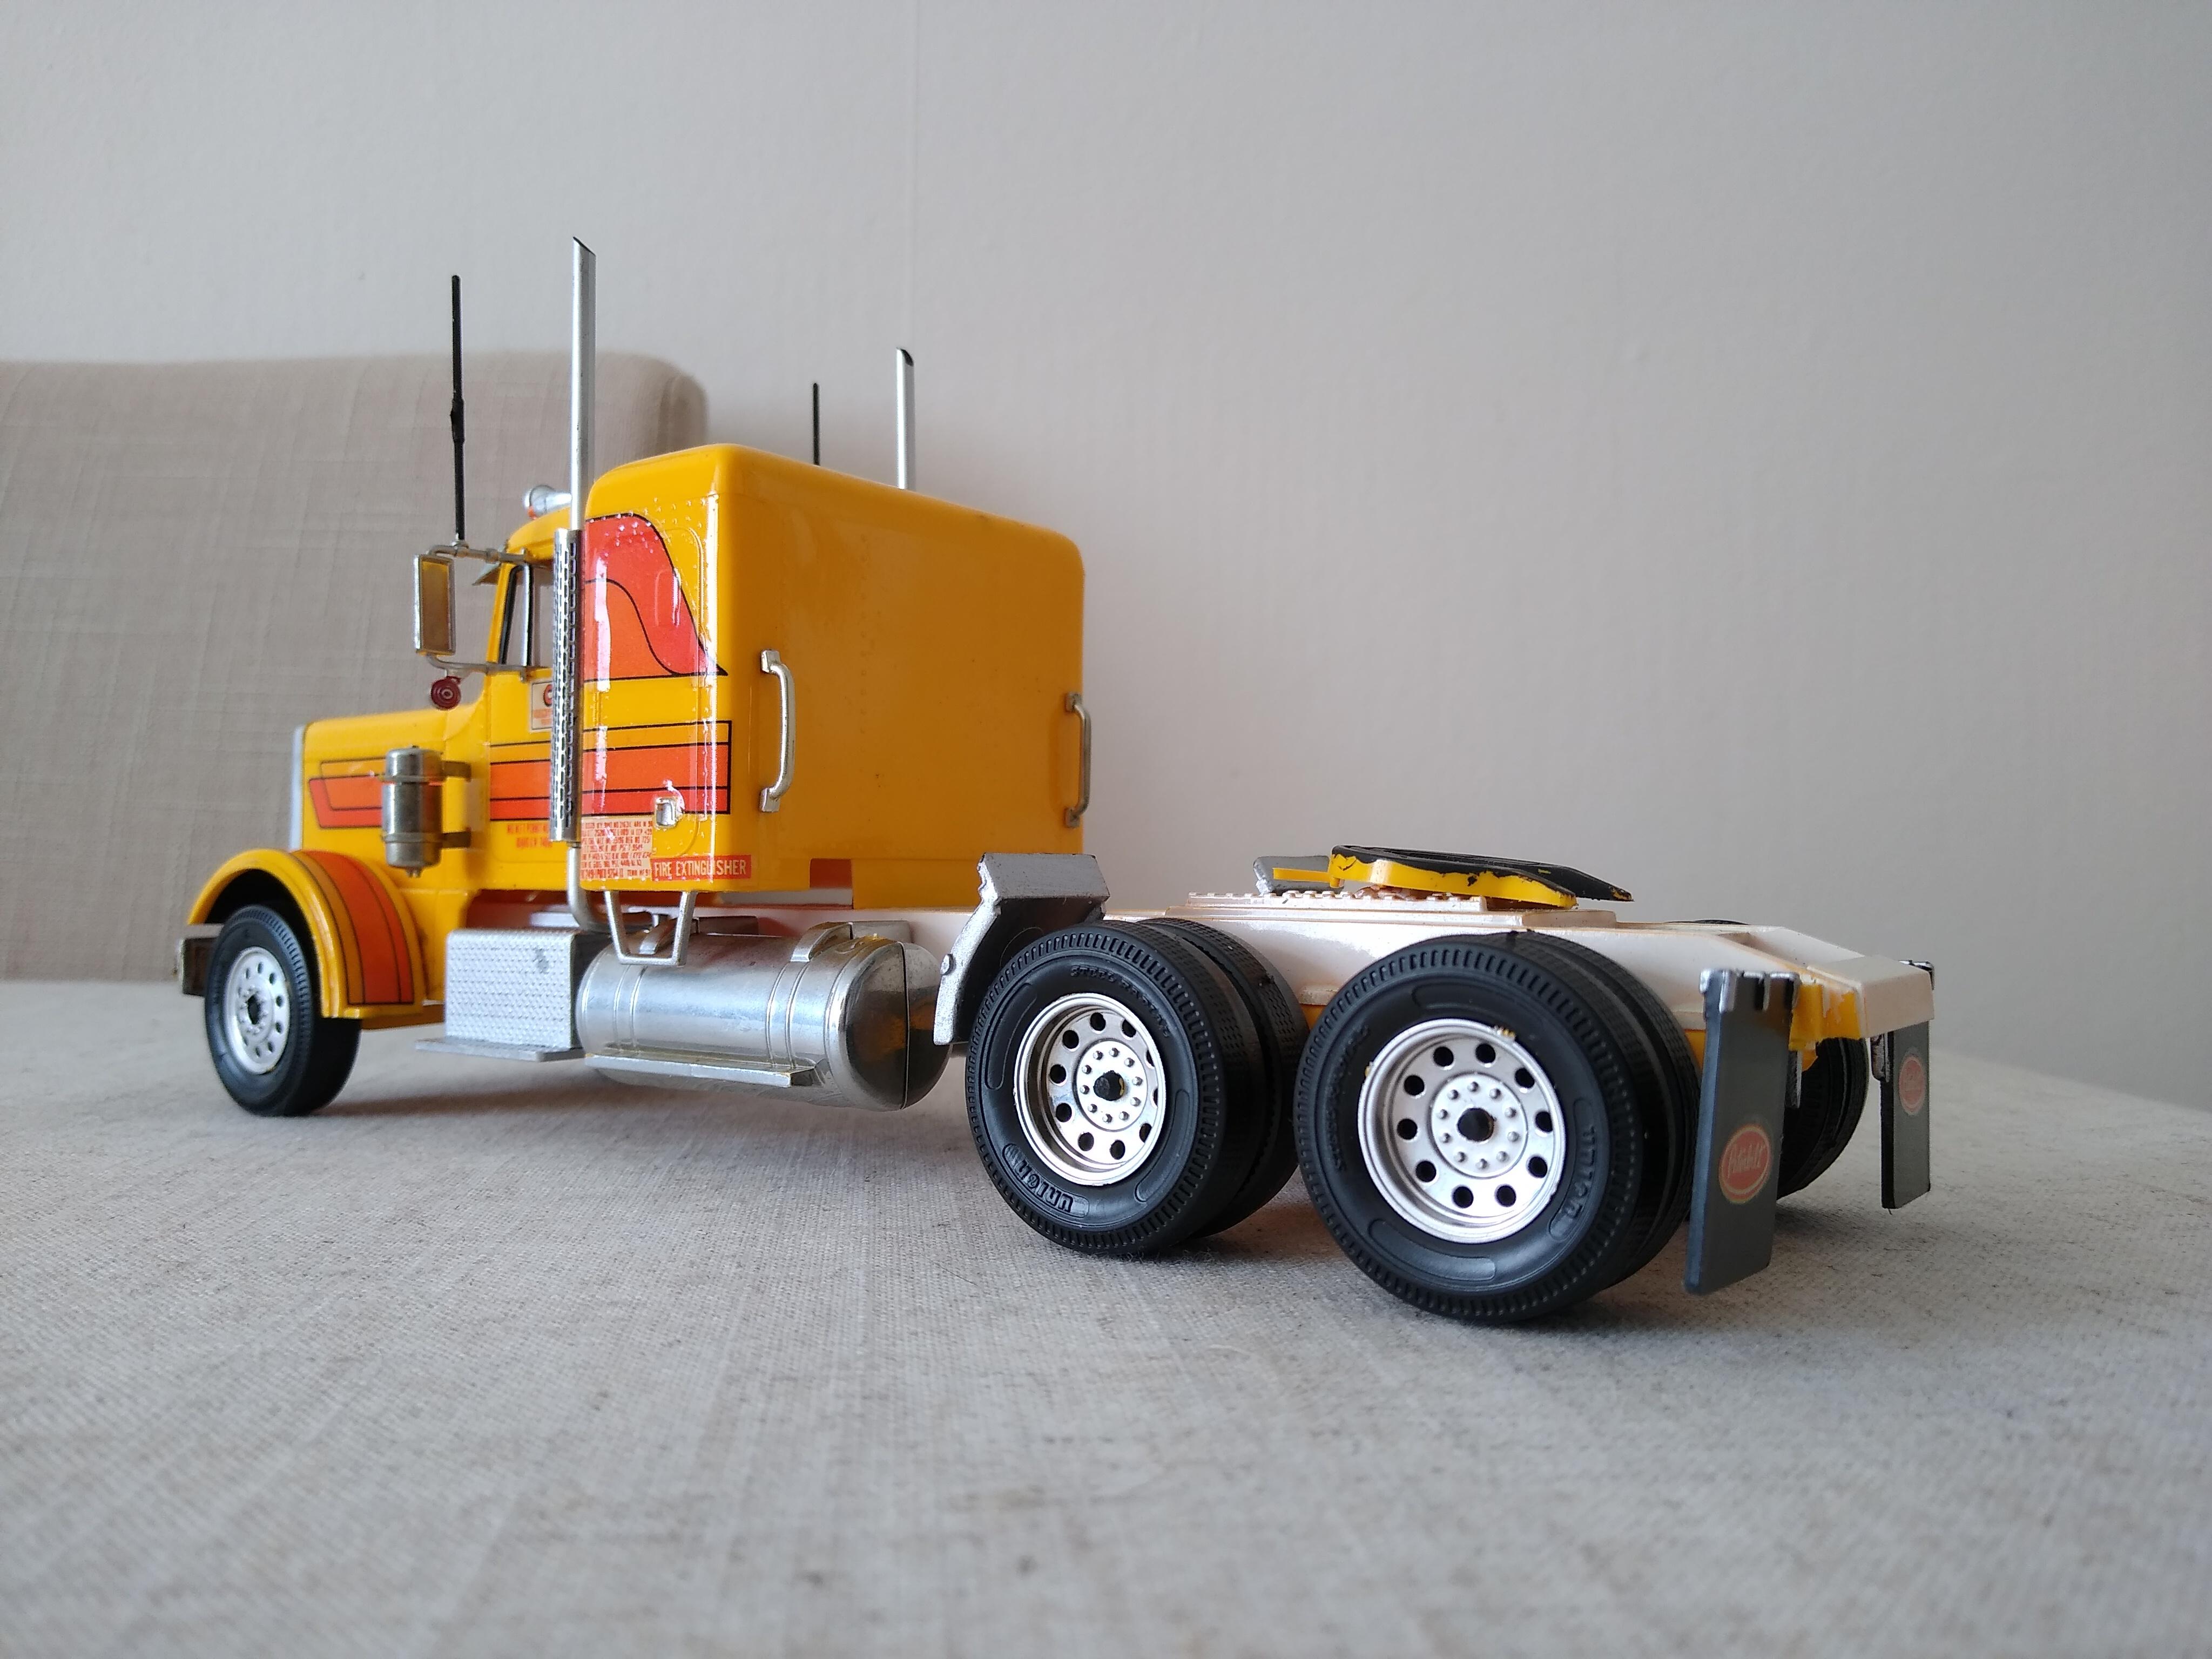
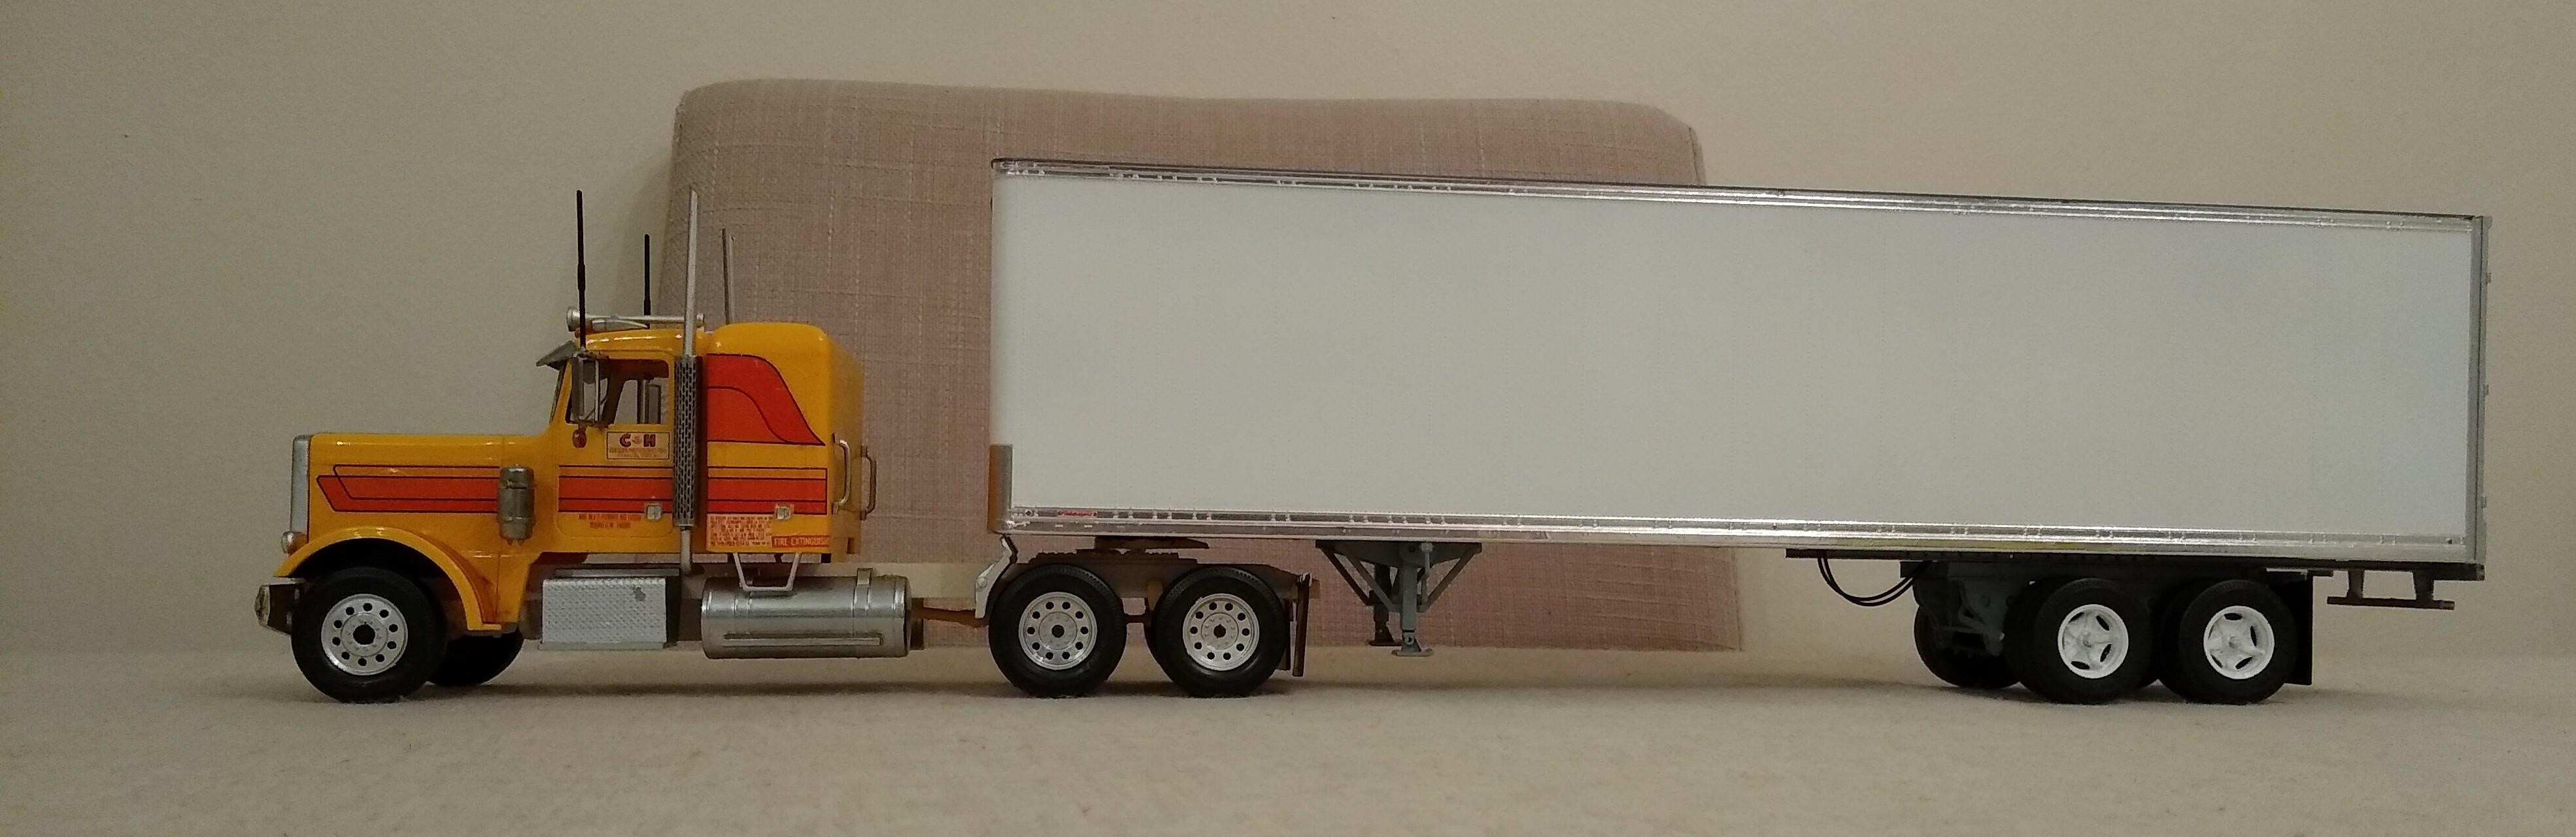
Thanks for the kind comments guys. Weather hasn't been too bad last few days so I managed to shoot my colours. I've added a couple of brake relays which are actually 1/25 carburettors from the Revell Z28 kit. I masked the lower apron of the aerokit with Tamiya tape (amazing stuff), also painted the fuel tank aluminium and masked off to paint the mounts and straps. Plumped for a Ford burnt orange, (can't remember the name) and Ford Ivory White for the cab. The two blend well together I think. Painted the tyres then covered them in white overspray, D'oh! I'll revisit them. Lot of work to do still but now that it's painted I know I can finish it in the lousy British Autumn/Winter weather.
-
Sorry gents, I use automotive paint generally because you get more product than the dedicated modelling products like Tamiya and Humbrol.
-
I'm a rattle-can person when it comes to painting bodywork and I always leave a week or so between primer and top coats but I've often wondered just how soon you could put topcoat over primer. For instance, on the automotive stuff I use it says to leave 15 minutes between coats. Now I take that to mean "coats of primer" if that's what I'm using or "coats of topcoat" if I'm spraying that. Would it be possible to wait 15 minutes after I've put my primer coats on and then shoot the topcoat in 15 minute intervals too? Would it be too much at once? Would it cause gassing out problems or possible reactions? With the rubbish weather in this country I'm looking for anything that can help make more use of any weather windows. Thanks for your attention gents. Looking forward to hearing your thoughts and experiences.
-
Another T600!
Rockford replied to Rockford's topic in WIP: Model Trucks: Big Rigs and Heavy Equipment
The primer really highlights any flaws in your body work and I knew the rear wall seam would look horrendous after I'd primed the cab. So a couple of skims of stopper and then 800 grit wet and dry paper tidied that up. Fuel tank looked bare after I'd removed the moulded in straps so I made some from plastic sheet and machined a filler cap from sprue. Weather's going to be rubbish this week so won't be able to recoat for a while, but in the background you can see the two built Aerodynes I got off Evilbay for £8 each. They'll keep me busy. I've shortened the chassis on one by a scale foot and it looks "righter" than the stock kit version.
-
Another T600!
Rockford replied to Rockford's topic in WIP: Model Trucks: Big Rigs and Heavy Equipment
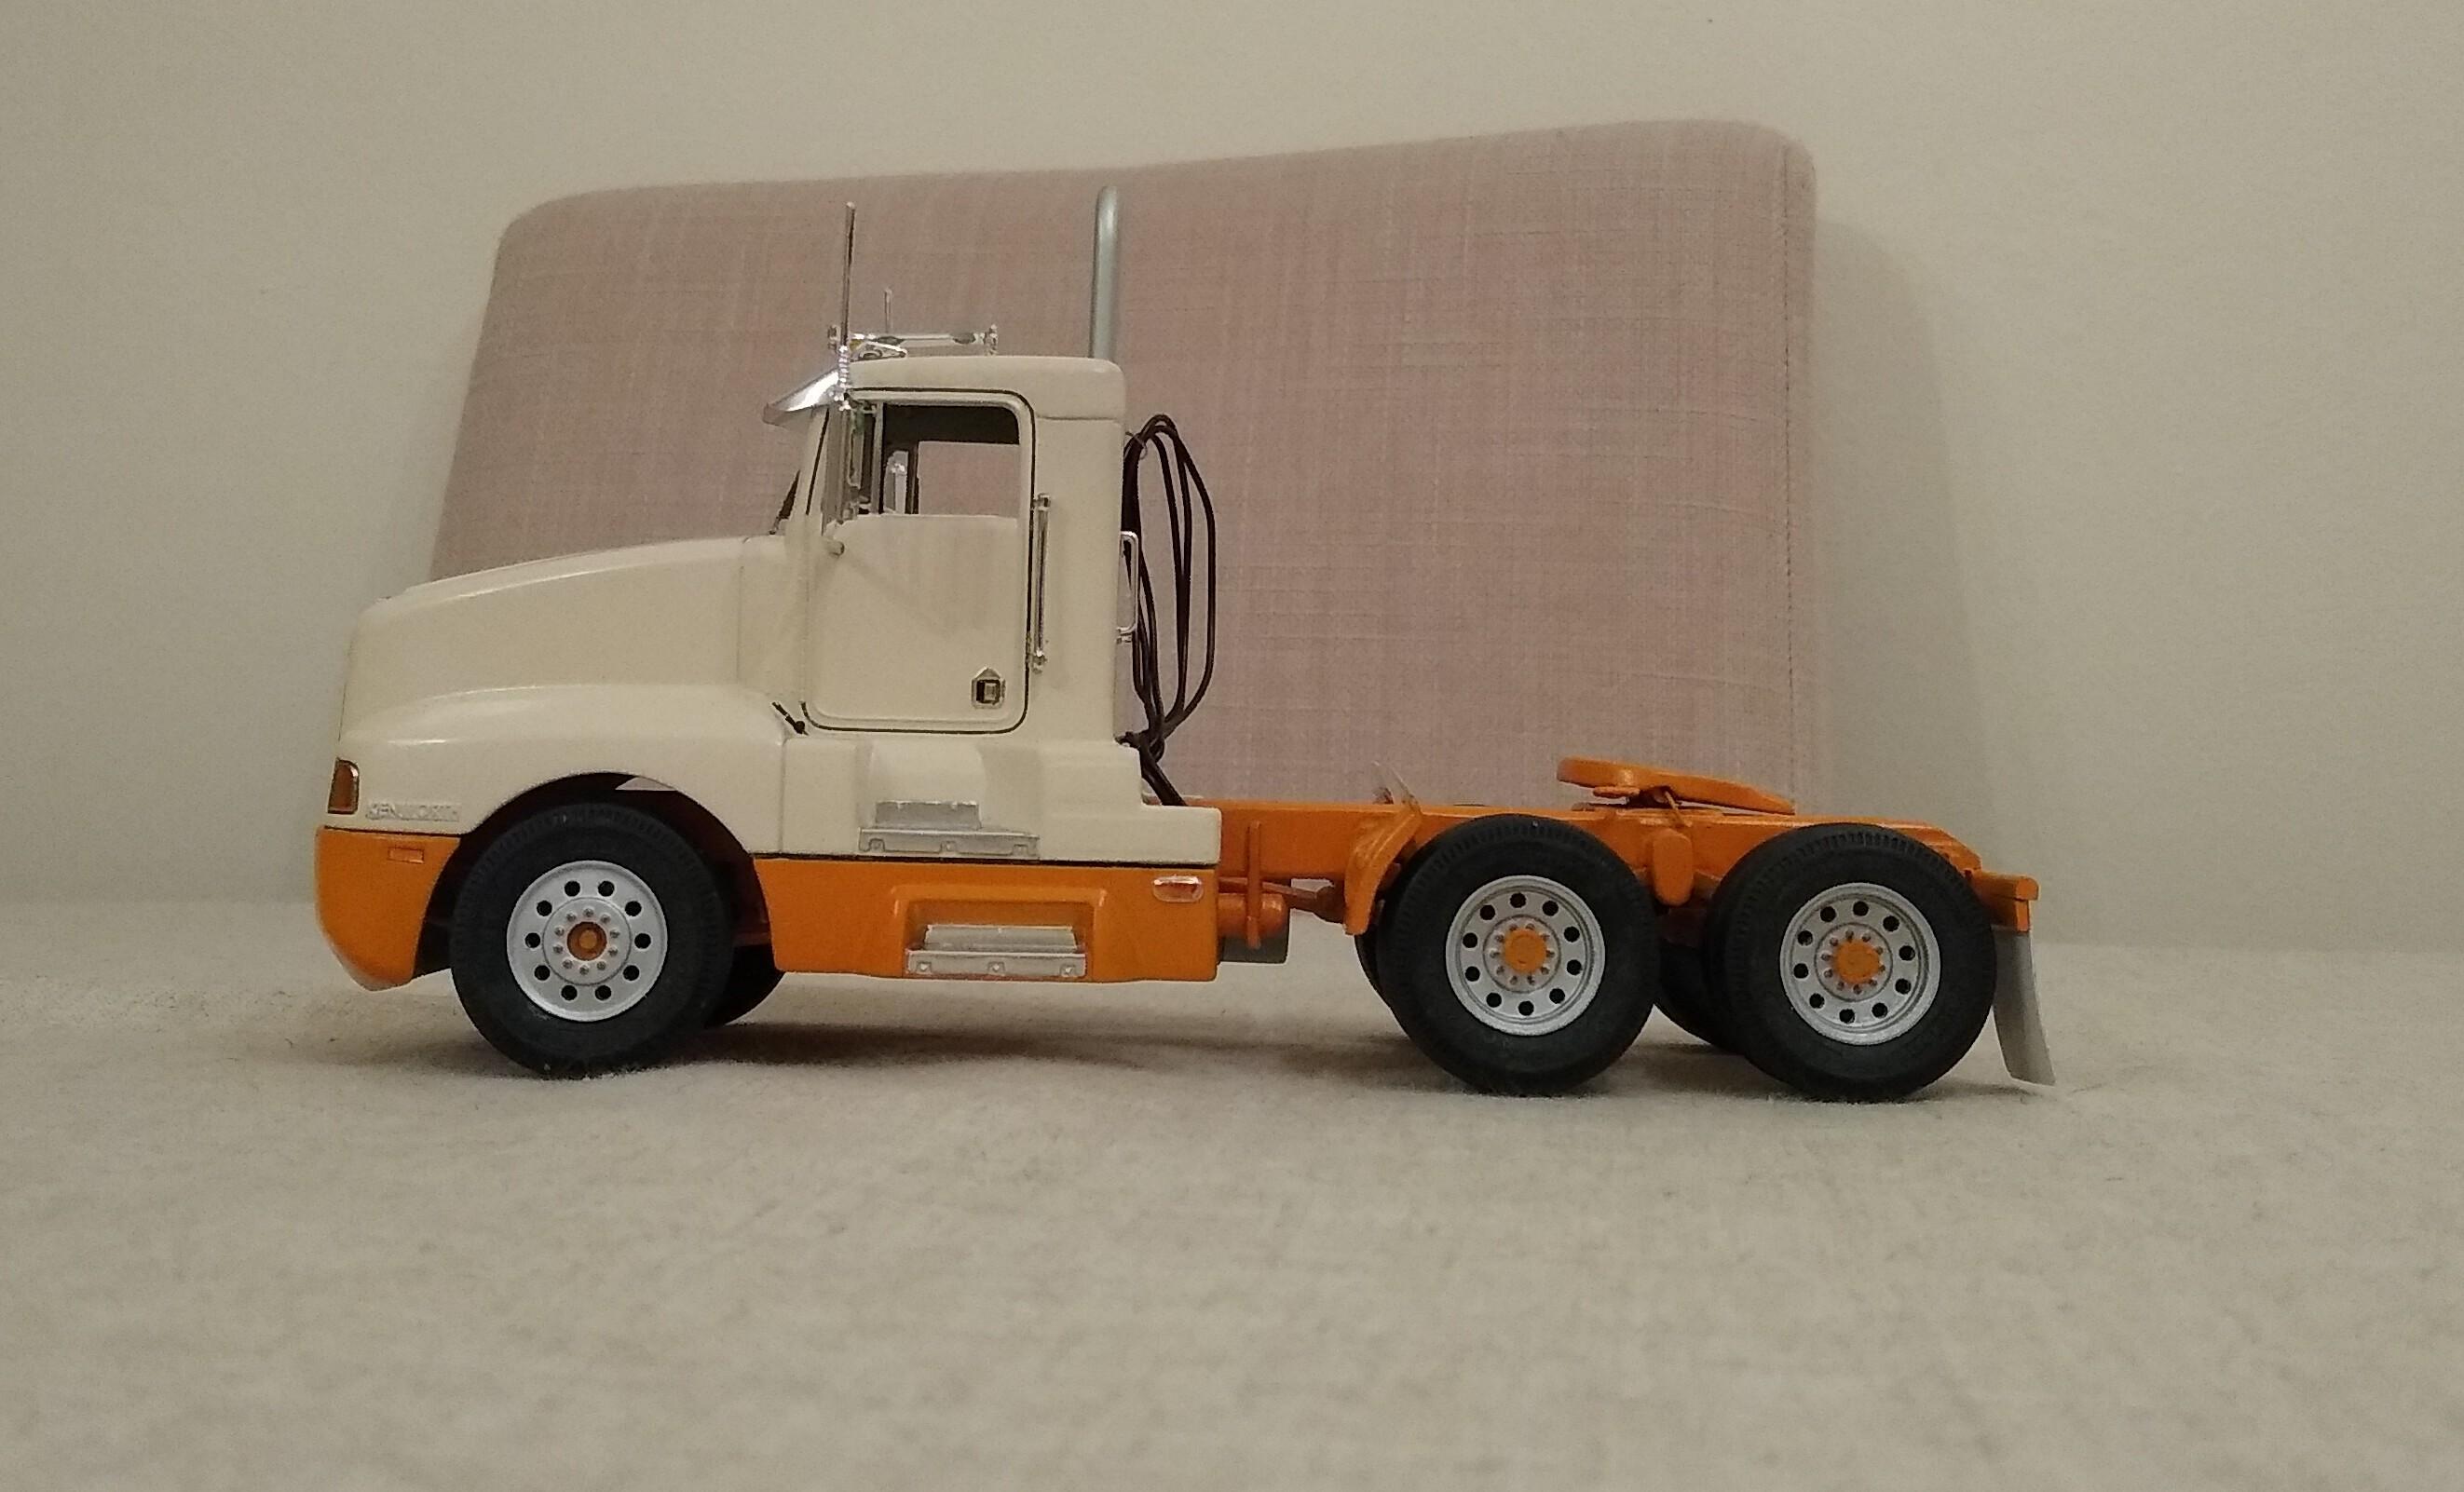
Got sick of looking at the green of this kit so got some primer on the thing today. Looks better because you can't see all the additions to the chassis, it just looks like one unit now. Looking at a red chassis and lower panels on the airkit and cream cab. Not sure about lettering or stripes yet.
-
What kits do you collect?
Rockford replied to carbuilder1950's topic in General Automotive Talk (Trucks and Cars)
I like to think I don't collect, I store for future use. I have over 100 1/25 car kits. -
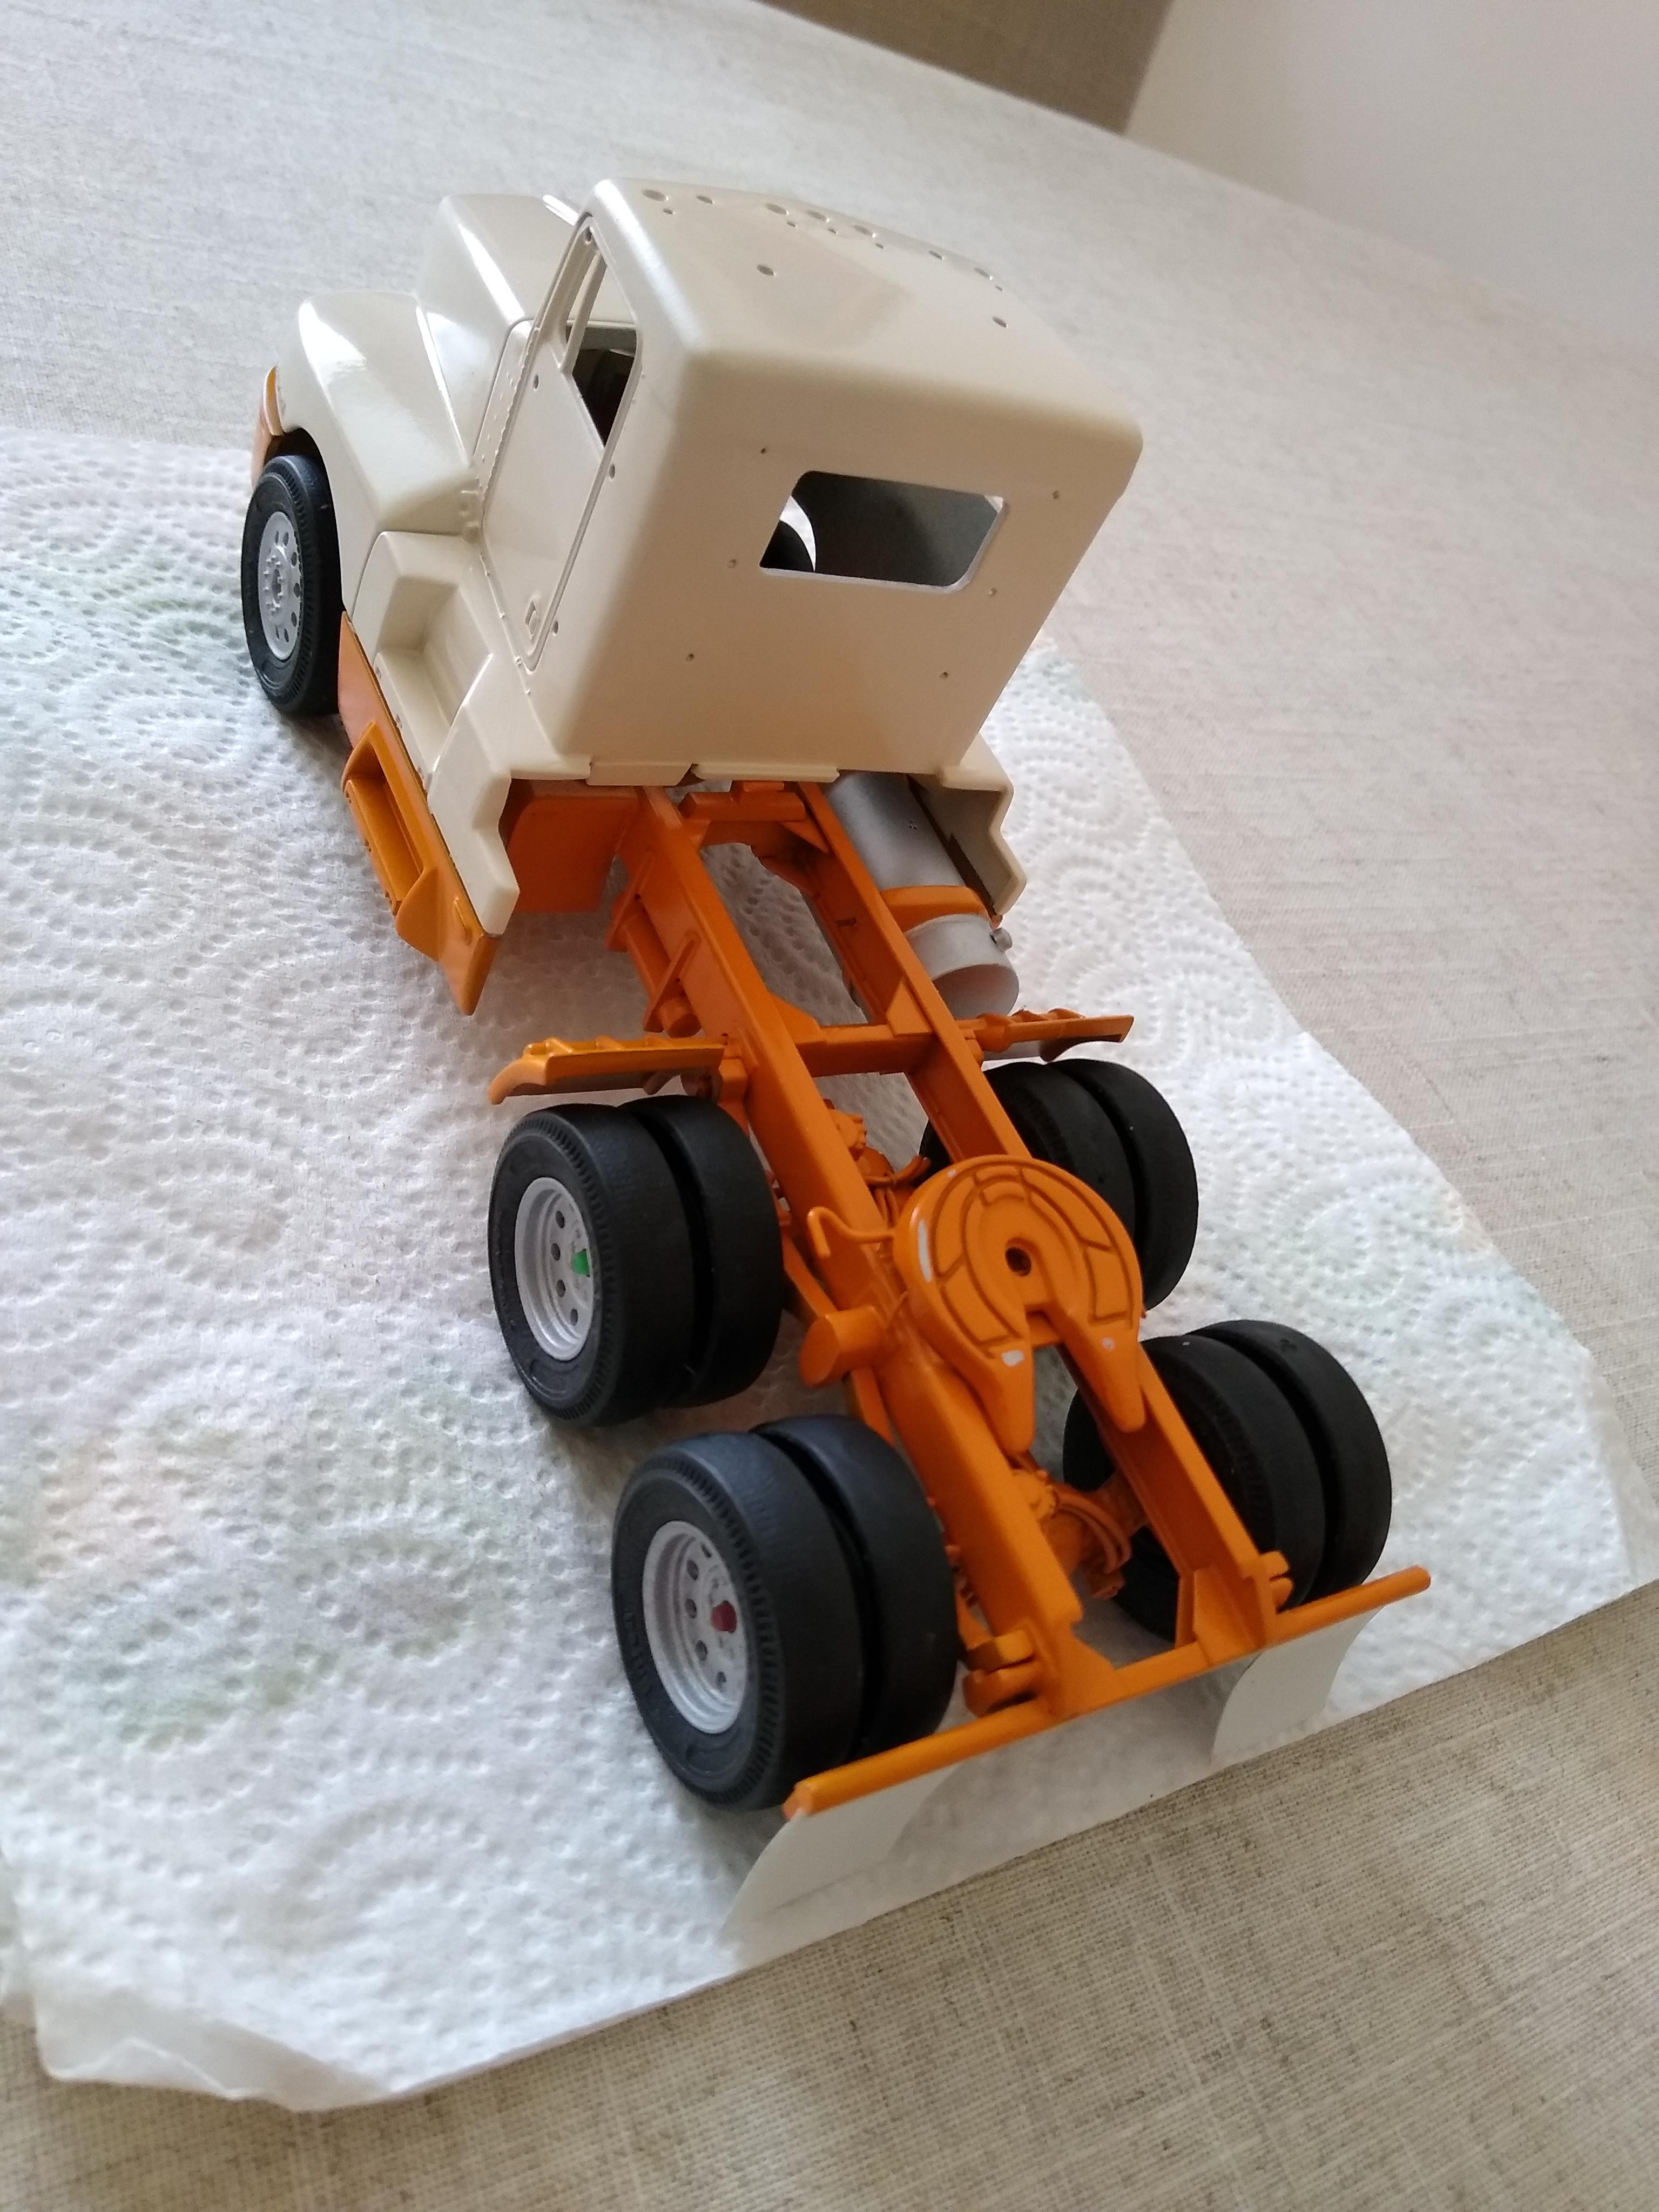
Got these two old timers off Evilbay, they're assembled unpainted. I suppose they're snap-bombs rather than glue-bombs because they're both 1/32 snappers, one AMT the other Monogram. They were only £8 each. It's interesting to see the two different treatments of the same truck. Overall I'd prefer the Monogram version. The cab is so much more accurately rendered, the AMT being a bit bland and toy-like. The stacks and the subframe are much more detailed and accurate on the Monogram, the AMT air intake just stops in mid air. We all frown on the deckplating all over the monogram kits but on the AMT the frame is all open and you can see into the gaping, hollow differentials. Also the front axle is set too far back on the AMT and the wheels and tyre combo is too small, something you can get away with on the trailer but on the unit it looks a bit odd. I must say, the fuel tanks on the AMT are more realistic than the generic Monogram tanks. I'm thinking of shortening the Monogram chassis ever so much, just pulling the tanks up to the battery box. The AMT I'm thinking of de-Aerodyning it to a standard K100 flat top. Obviously I'll be painting them in due course.
-
The Odd Ball General
Rockford replied to Cat Racer's topic in WIP: Model Trucks: Big Rigs and Heavy Equipment
Apparently the General was like a class 8 Chevy Monte Carlo! Great interior on them. They sold well too. Looking forward to seeing this come together -
Pete 359 at last
Rockford replied to Rockford's topic in WIP: Model Trucks: Big Rigs and Heavy Equipment
Thanks gents, I think one of the things that drew me to American trucks was the unique stance the Bridge Law gave them, although in the pre-interweb world I had no idea why the tandems were at each very end of the trailer. My first sight of an American truck was Movin' On, Sonny Pruitt's KW stole my heart at first sight. In GB everything was set up for manoeuvrebility, all squeezed together. -
Another T600!
Rockford replied to Rockford's topic in WIP: Model Trucks: Big Rigs and Heavy Equipment
Chubby Sprue - sounds like a Country and Western singer! -
Pete 359 at last
Rockford replied to Rockford's topic in WIP: Model Trucks: Big Rigs and Heavy Equipment
You're exactly right mate, they build to the nearest inch as I remember, my statement wasn't very clear. The look I wanted was like this, the standard, single sleeper workhorse that has just enough to get the job done.
-
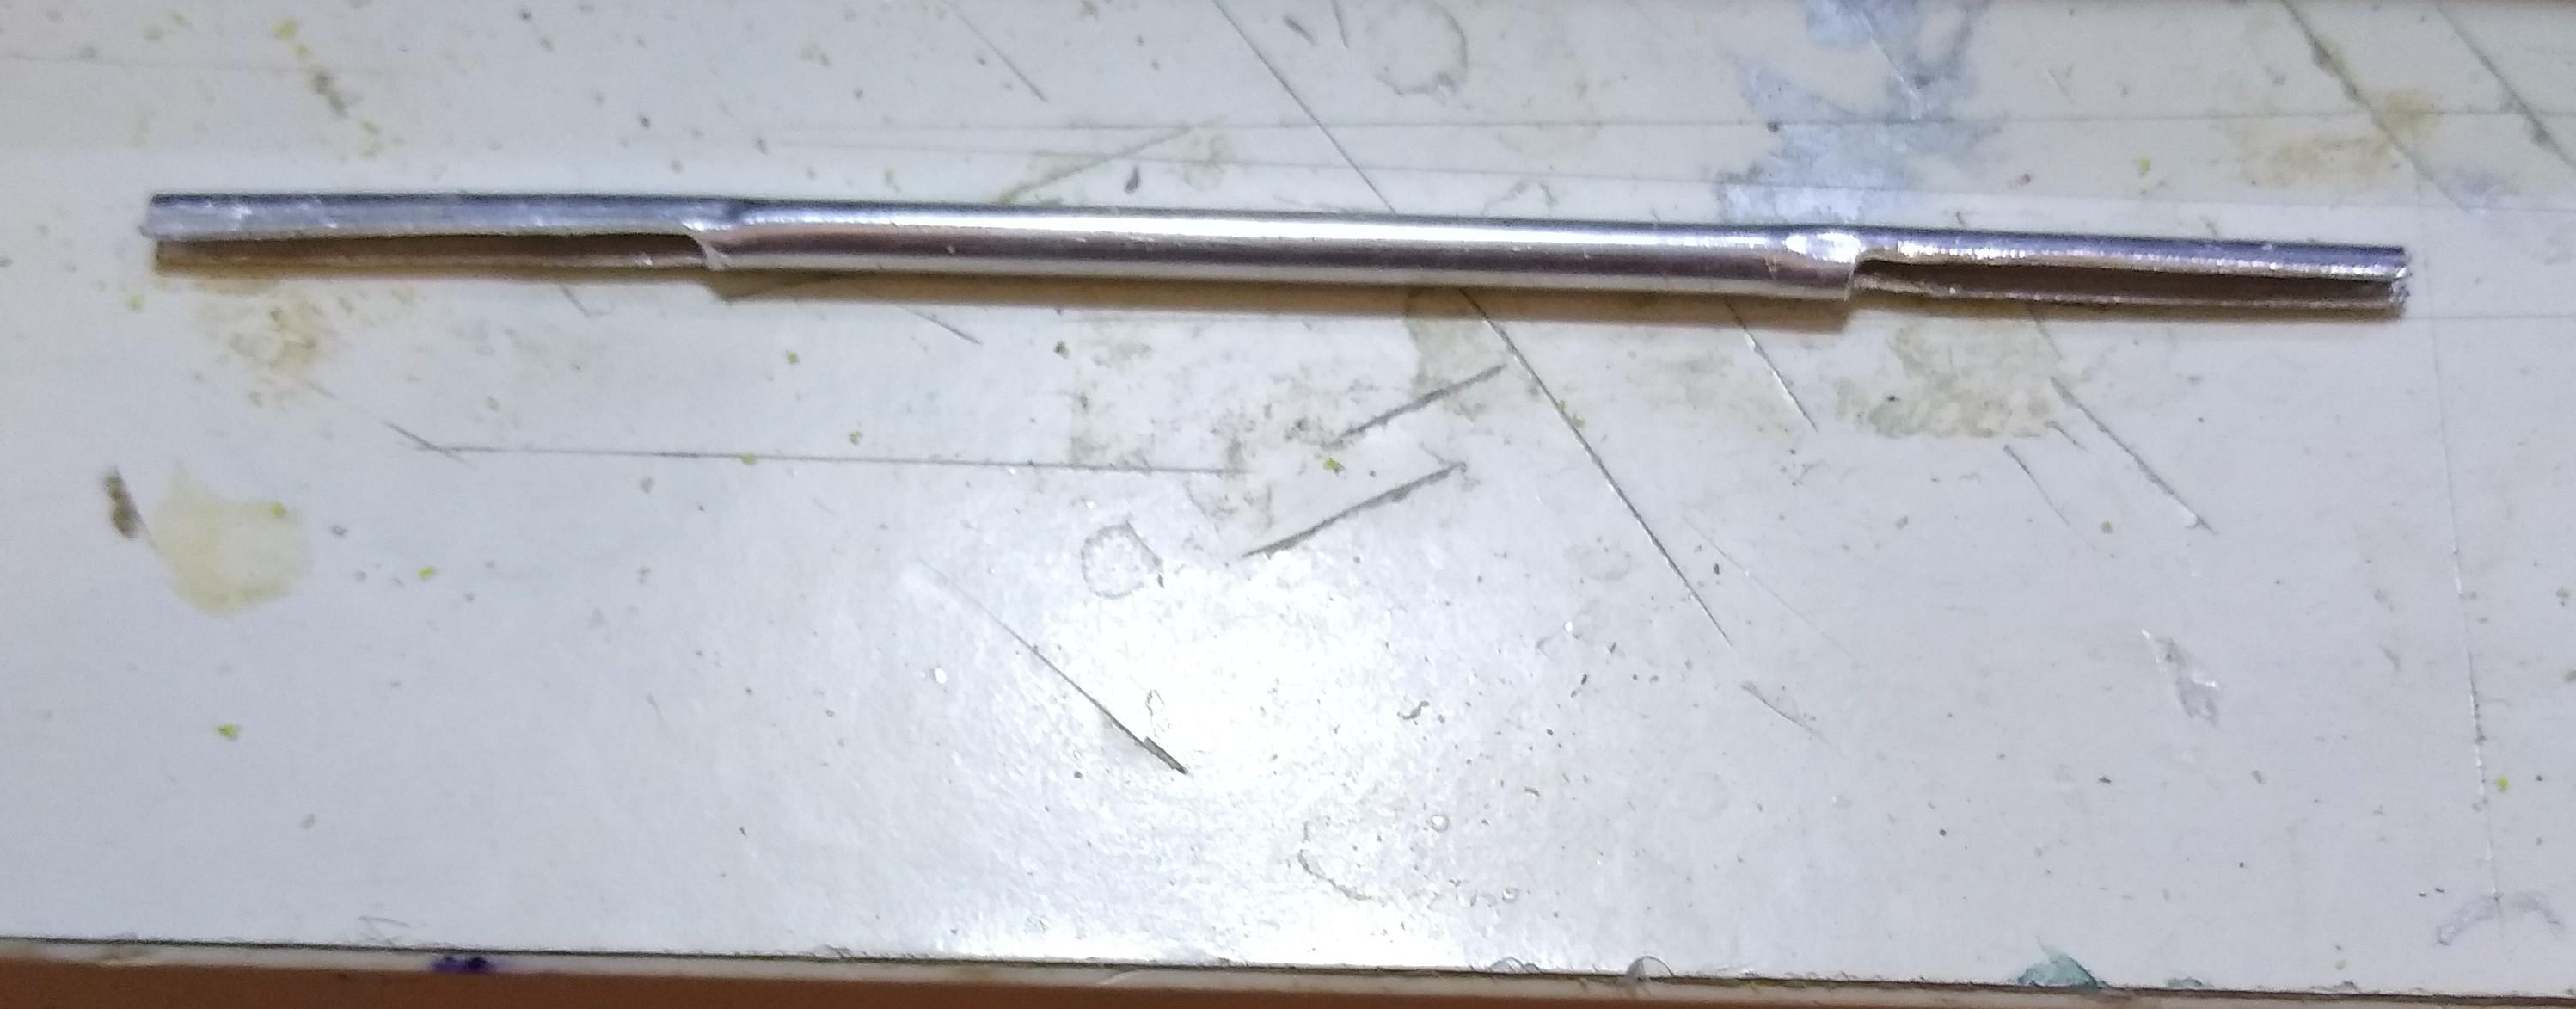
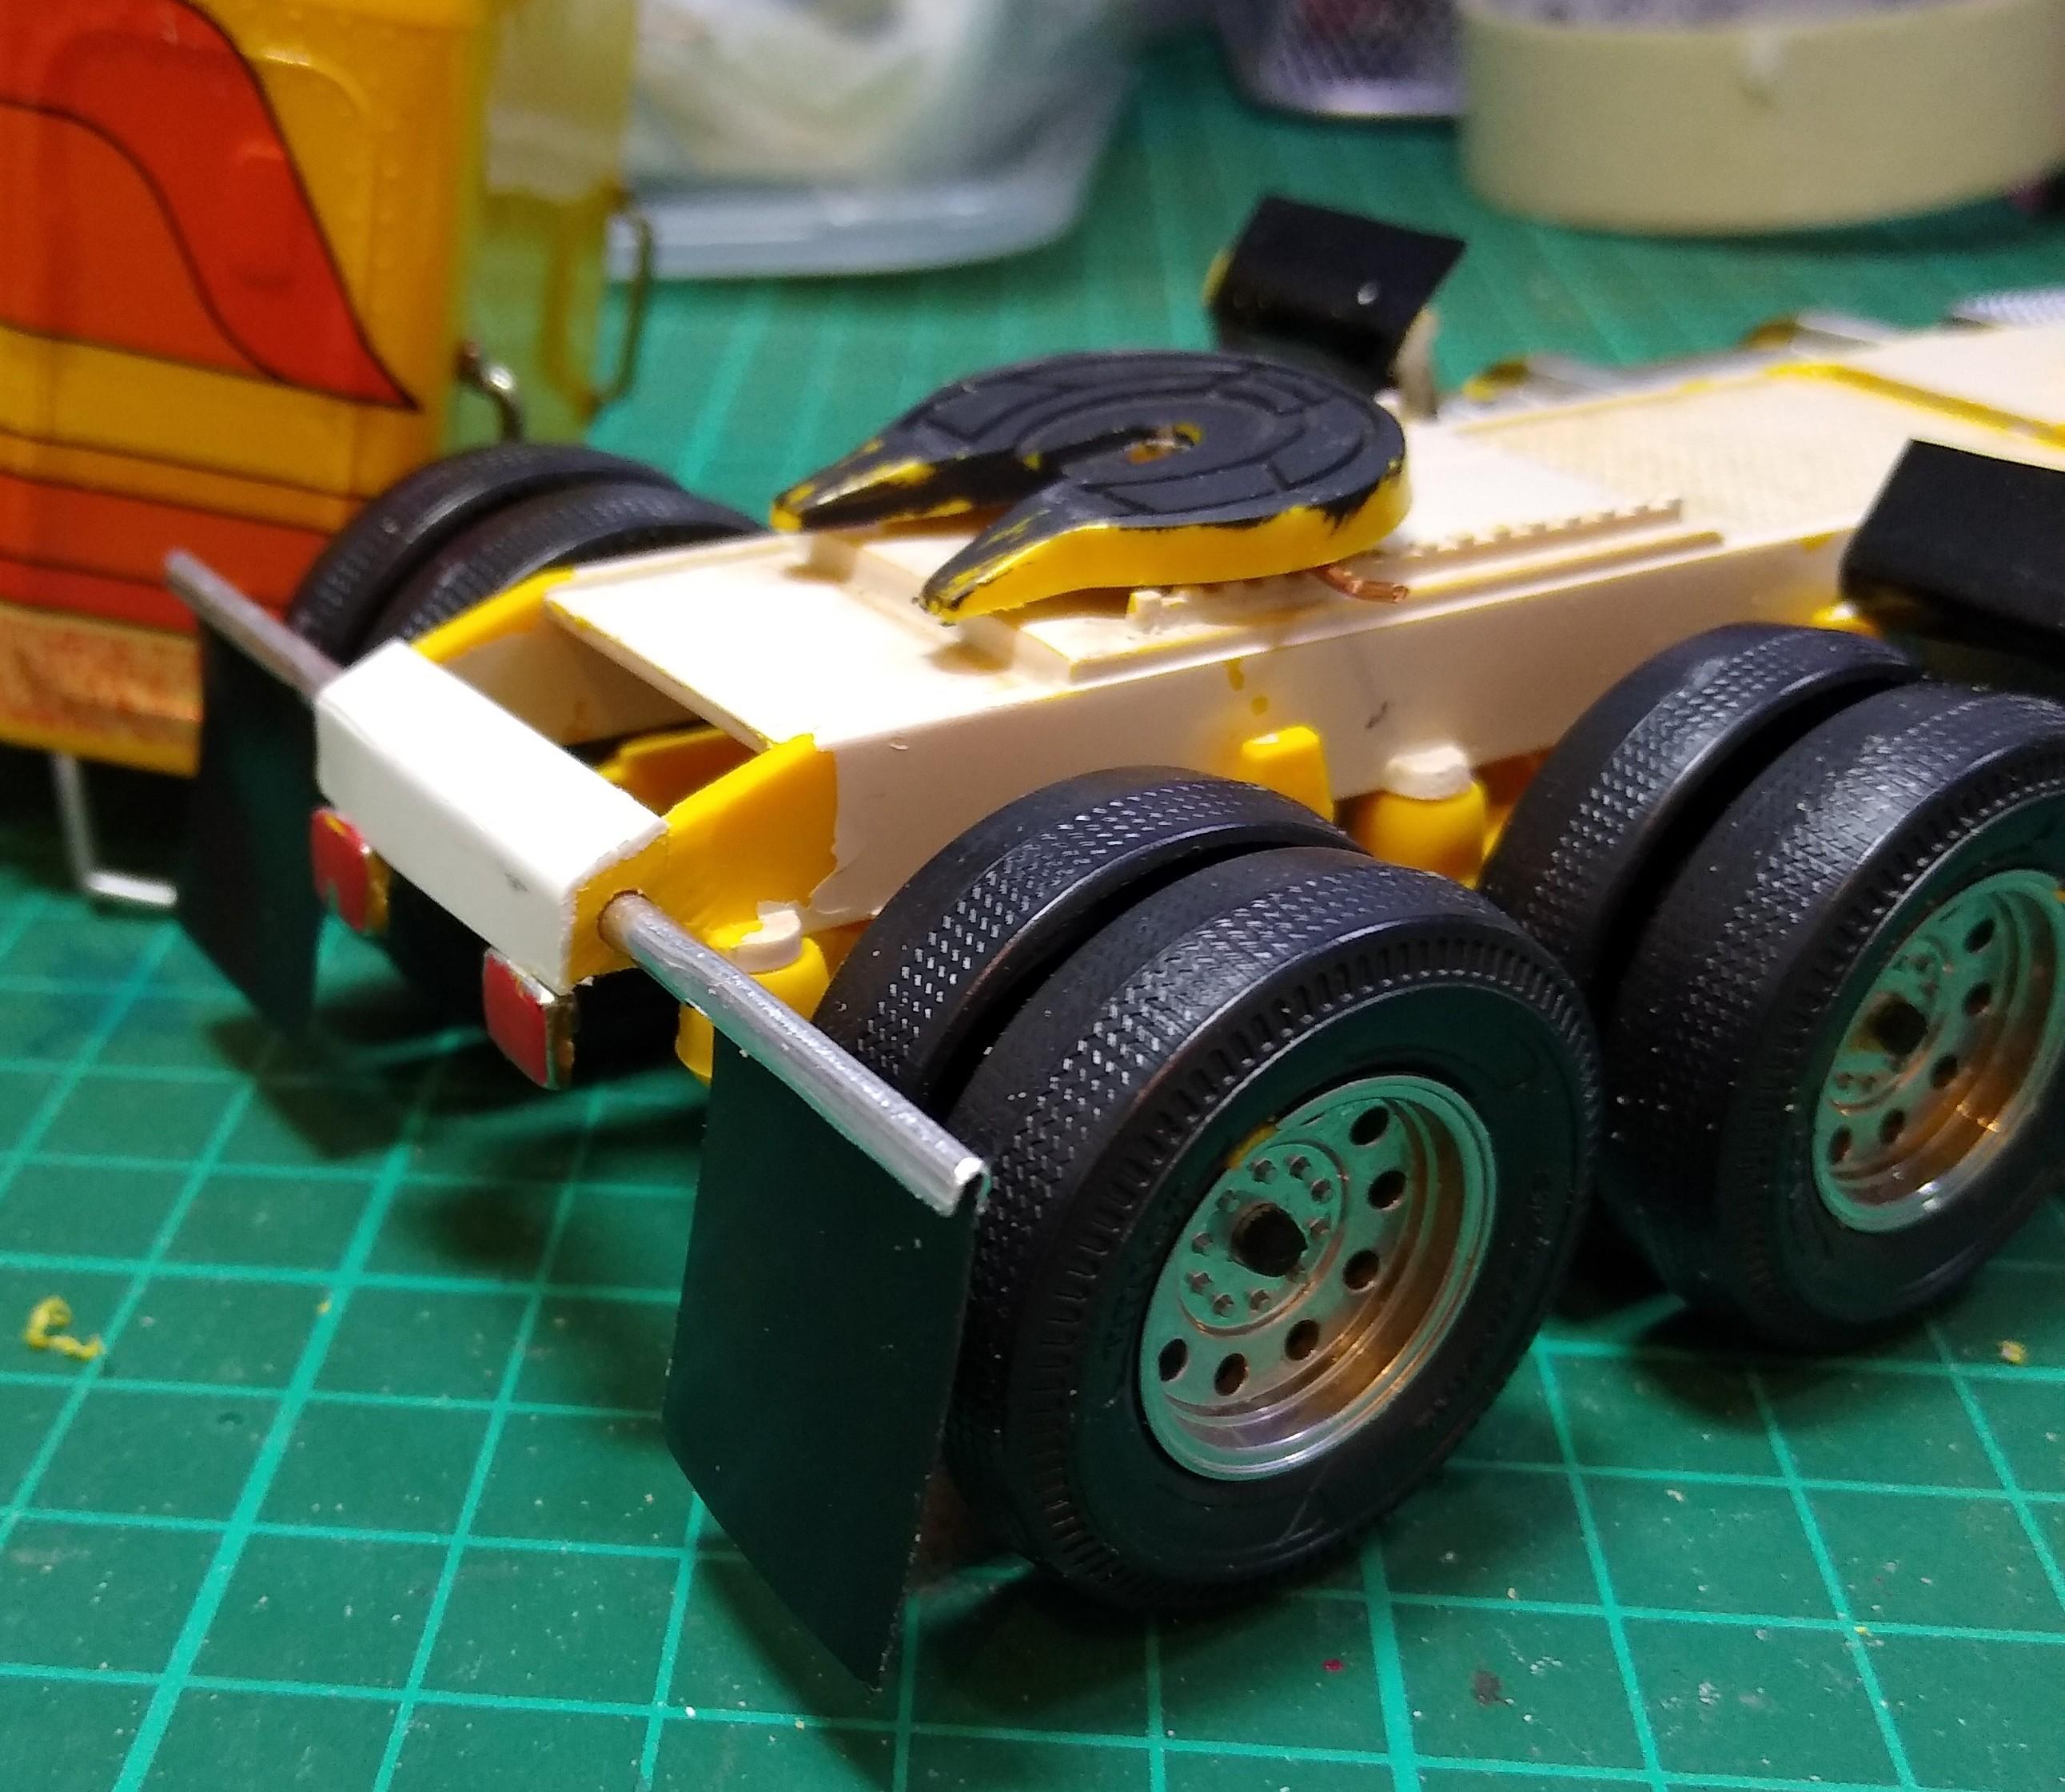
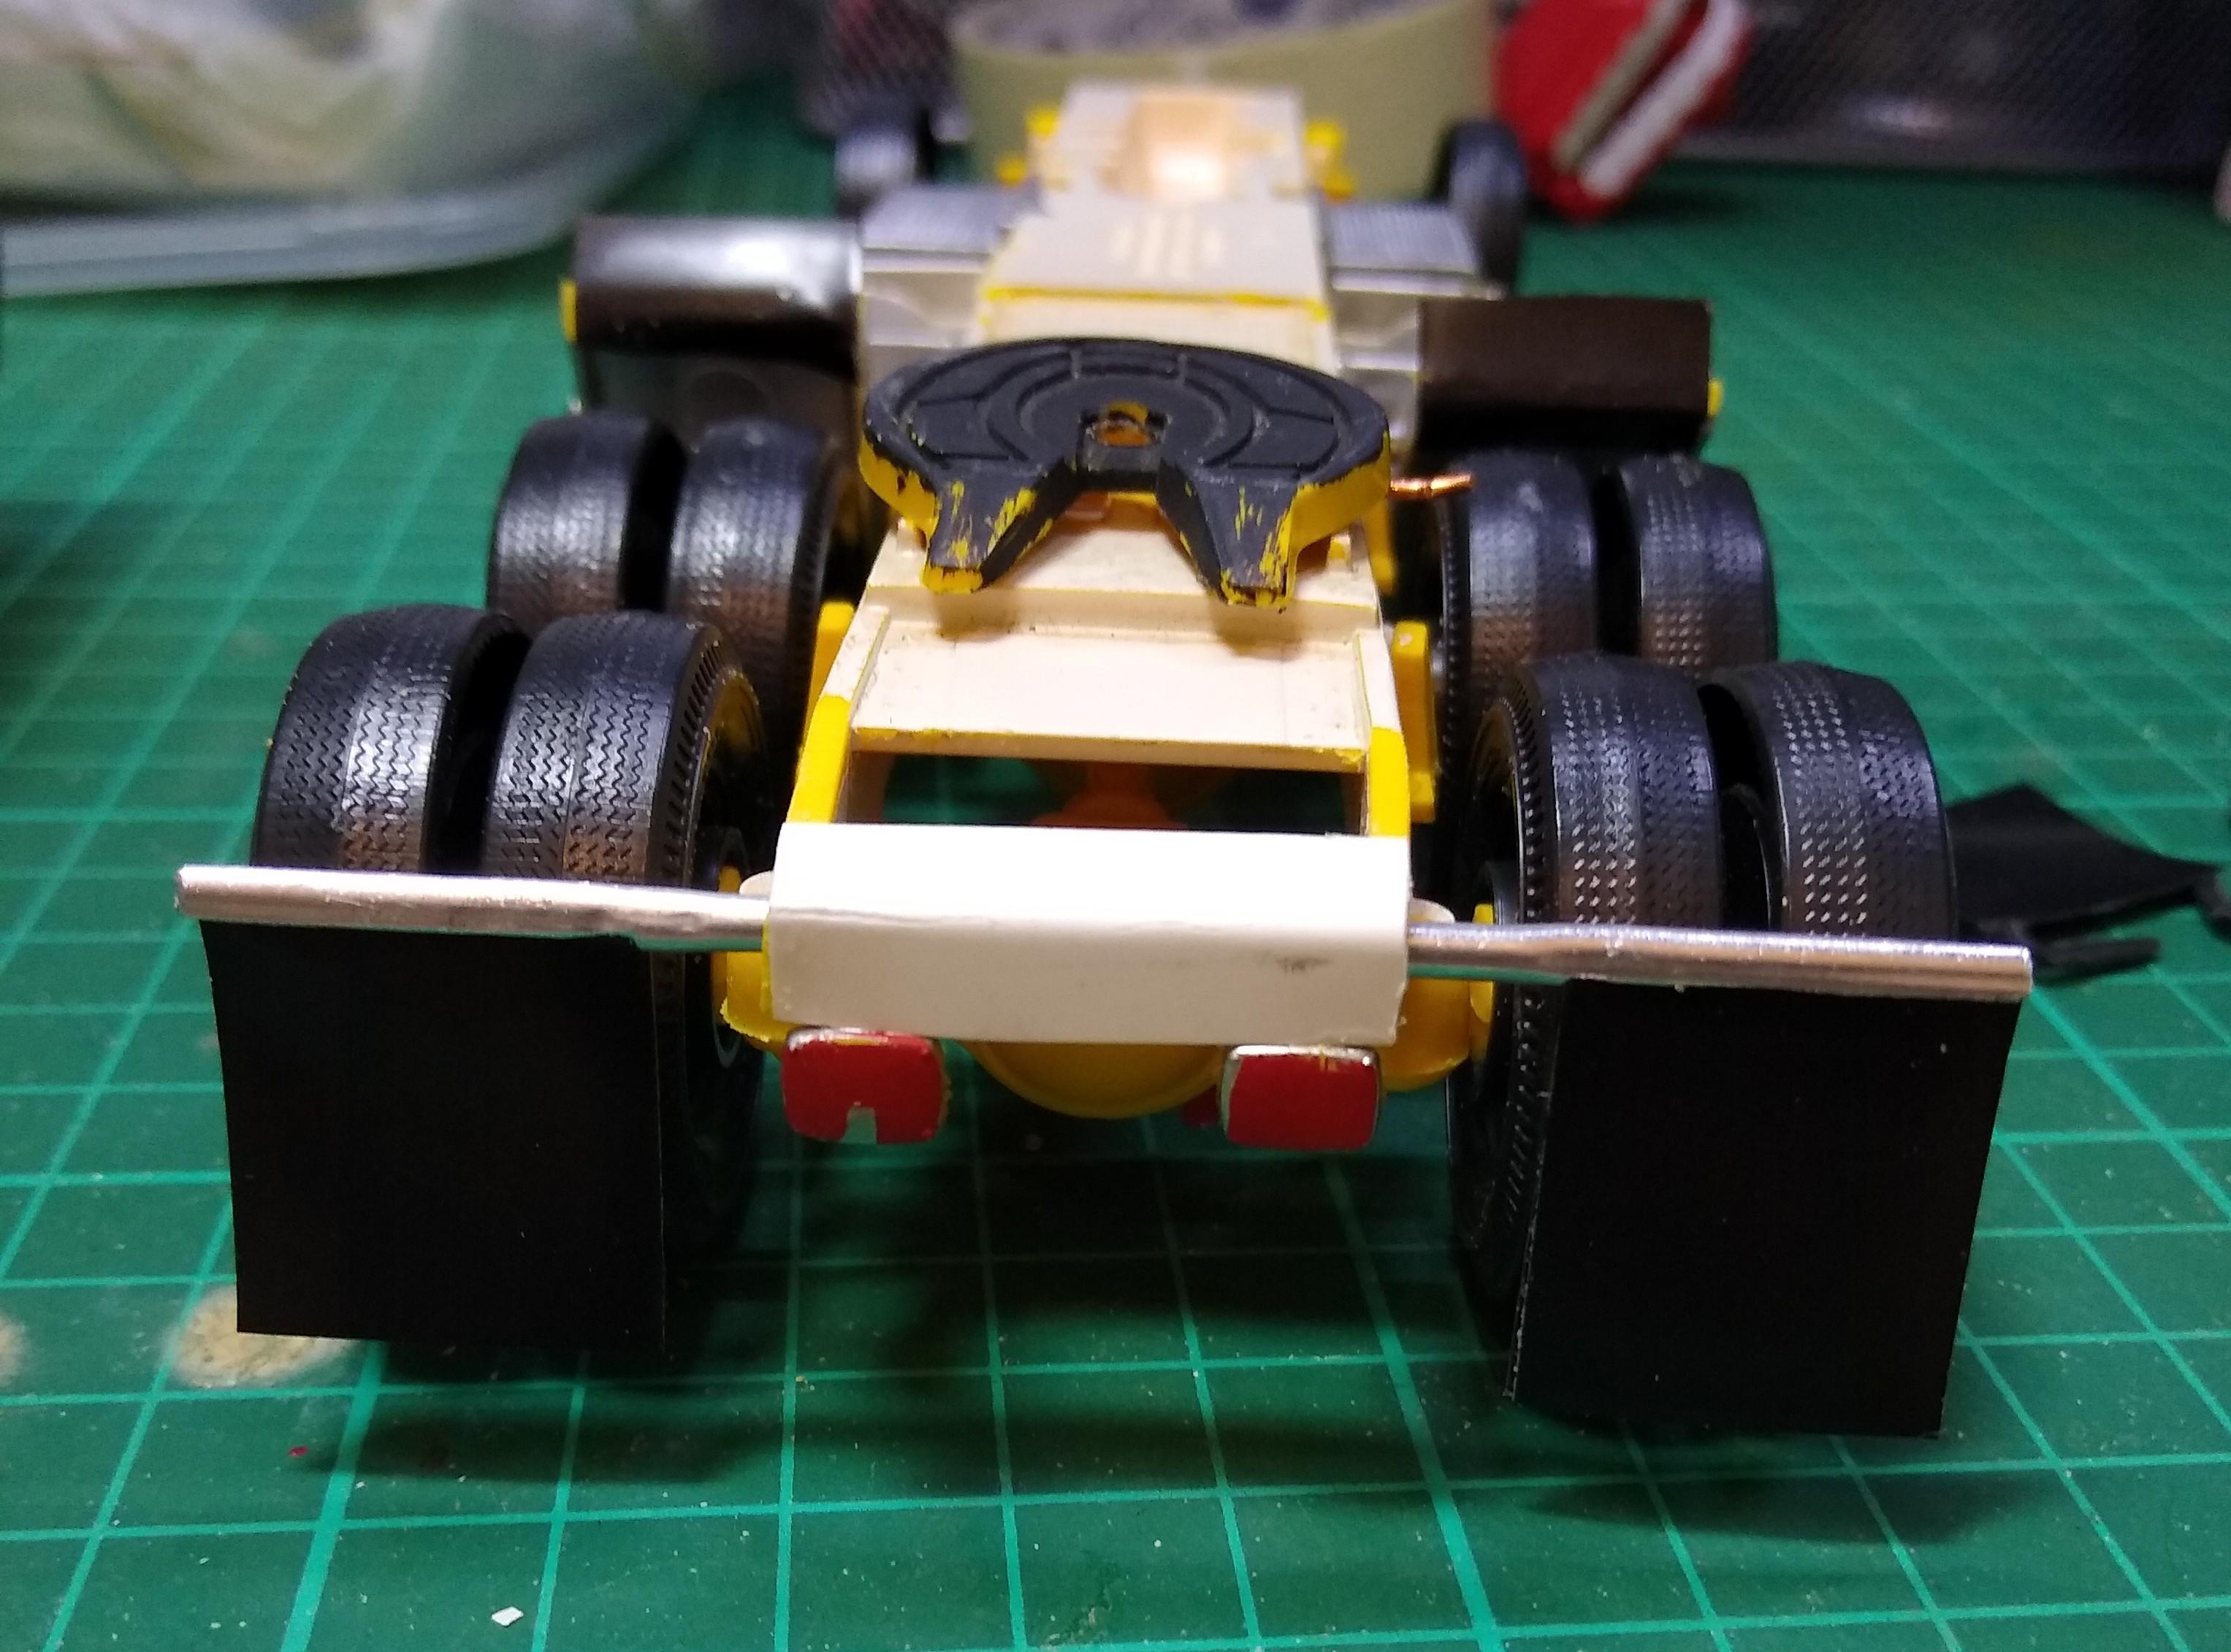
I've been scouring Evilbay for the original Snaptite trucks. I'd love the KW Aerodyne conventional and the Freightliner cabover but the other week I scored this, a built 359 Peterbilt. It had the original decals in good condition though the chassis was painted white. It had all the usual Snaptite problems that I have to deal with, awful mudflaps, quarter fenders too high and I just couldn't leave it like that. I relocated the quarter fenders and wanted to adapt the Monogram mudflaps to take my electrician's tape versions but it looked clumsy. Then I had an idea, I took some aluminium tube I had, crushed the ends in a vice until they were oval, then filed one edge through to form a U shaped channel into which I can insert my mudflaps. I drilled a hole through the chassis, threaded it through and bingo! The whole thing is much sturdier than the kit version and looks more realistic. Then I thought the truck didn't look right overall. After much thought I worked out that it was too long, Peterbilt wouldn't waste weight on a needless length of chassis so I removed 14mm from the chassis which brought the quarter fenders right up to the fuel tanks, a much more realistic appearance that I'd seen in many photos of real trucks. Then I gave the chassis a quick coat of semi gloss black. End result looking much better and I can let it sit happily now until I get round to doing it properly.
-
Another T600!
Rockford replied to Rockford's topic in WIP: Model Trucks: Big Rigs and Heavy Equipment
I started this WIP and it's bad manners not to finish it I think. I fashioned an airtank out of chubby sprue and worked some brackets for it. I also removed the ugly mounting boss for the fuel tank and filled the hole. I actually filled the hole first, from inside with offcuts and sprue, then left it to set and filed the boss away. I piped up the brake chambers too and bent up a new handle for pulling the pin on the 5th wheel. All was going well and then I scored one of the crown jewels... a Snaptite Peterbilt 359 off Evilbay for only £10!!!! It was built and needed work and I just couldn't wait so I got diverted. Anyway, it's presentable now and I can come back to the T600.