Rockford
-
Posts
1,931 -
Joined
-
Last visited
Content Type
Profiles
Forums
Events
Gallery
Everything posted by Rockford
-

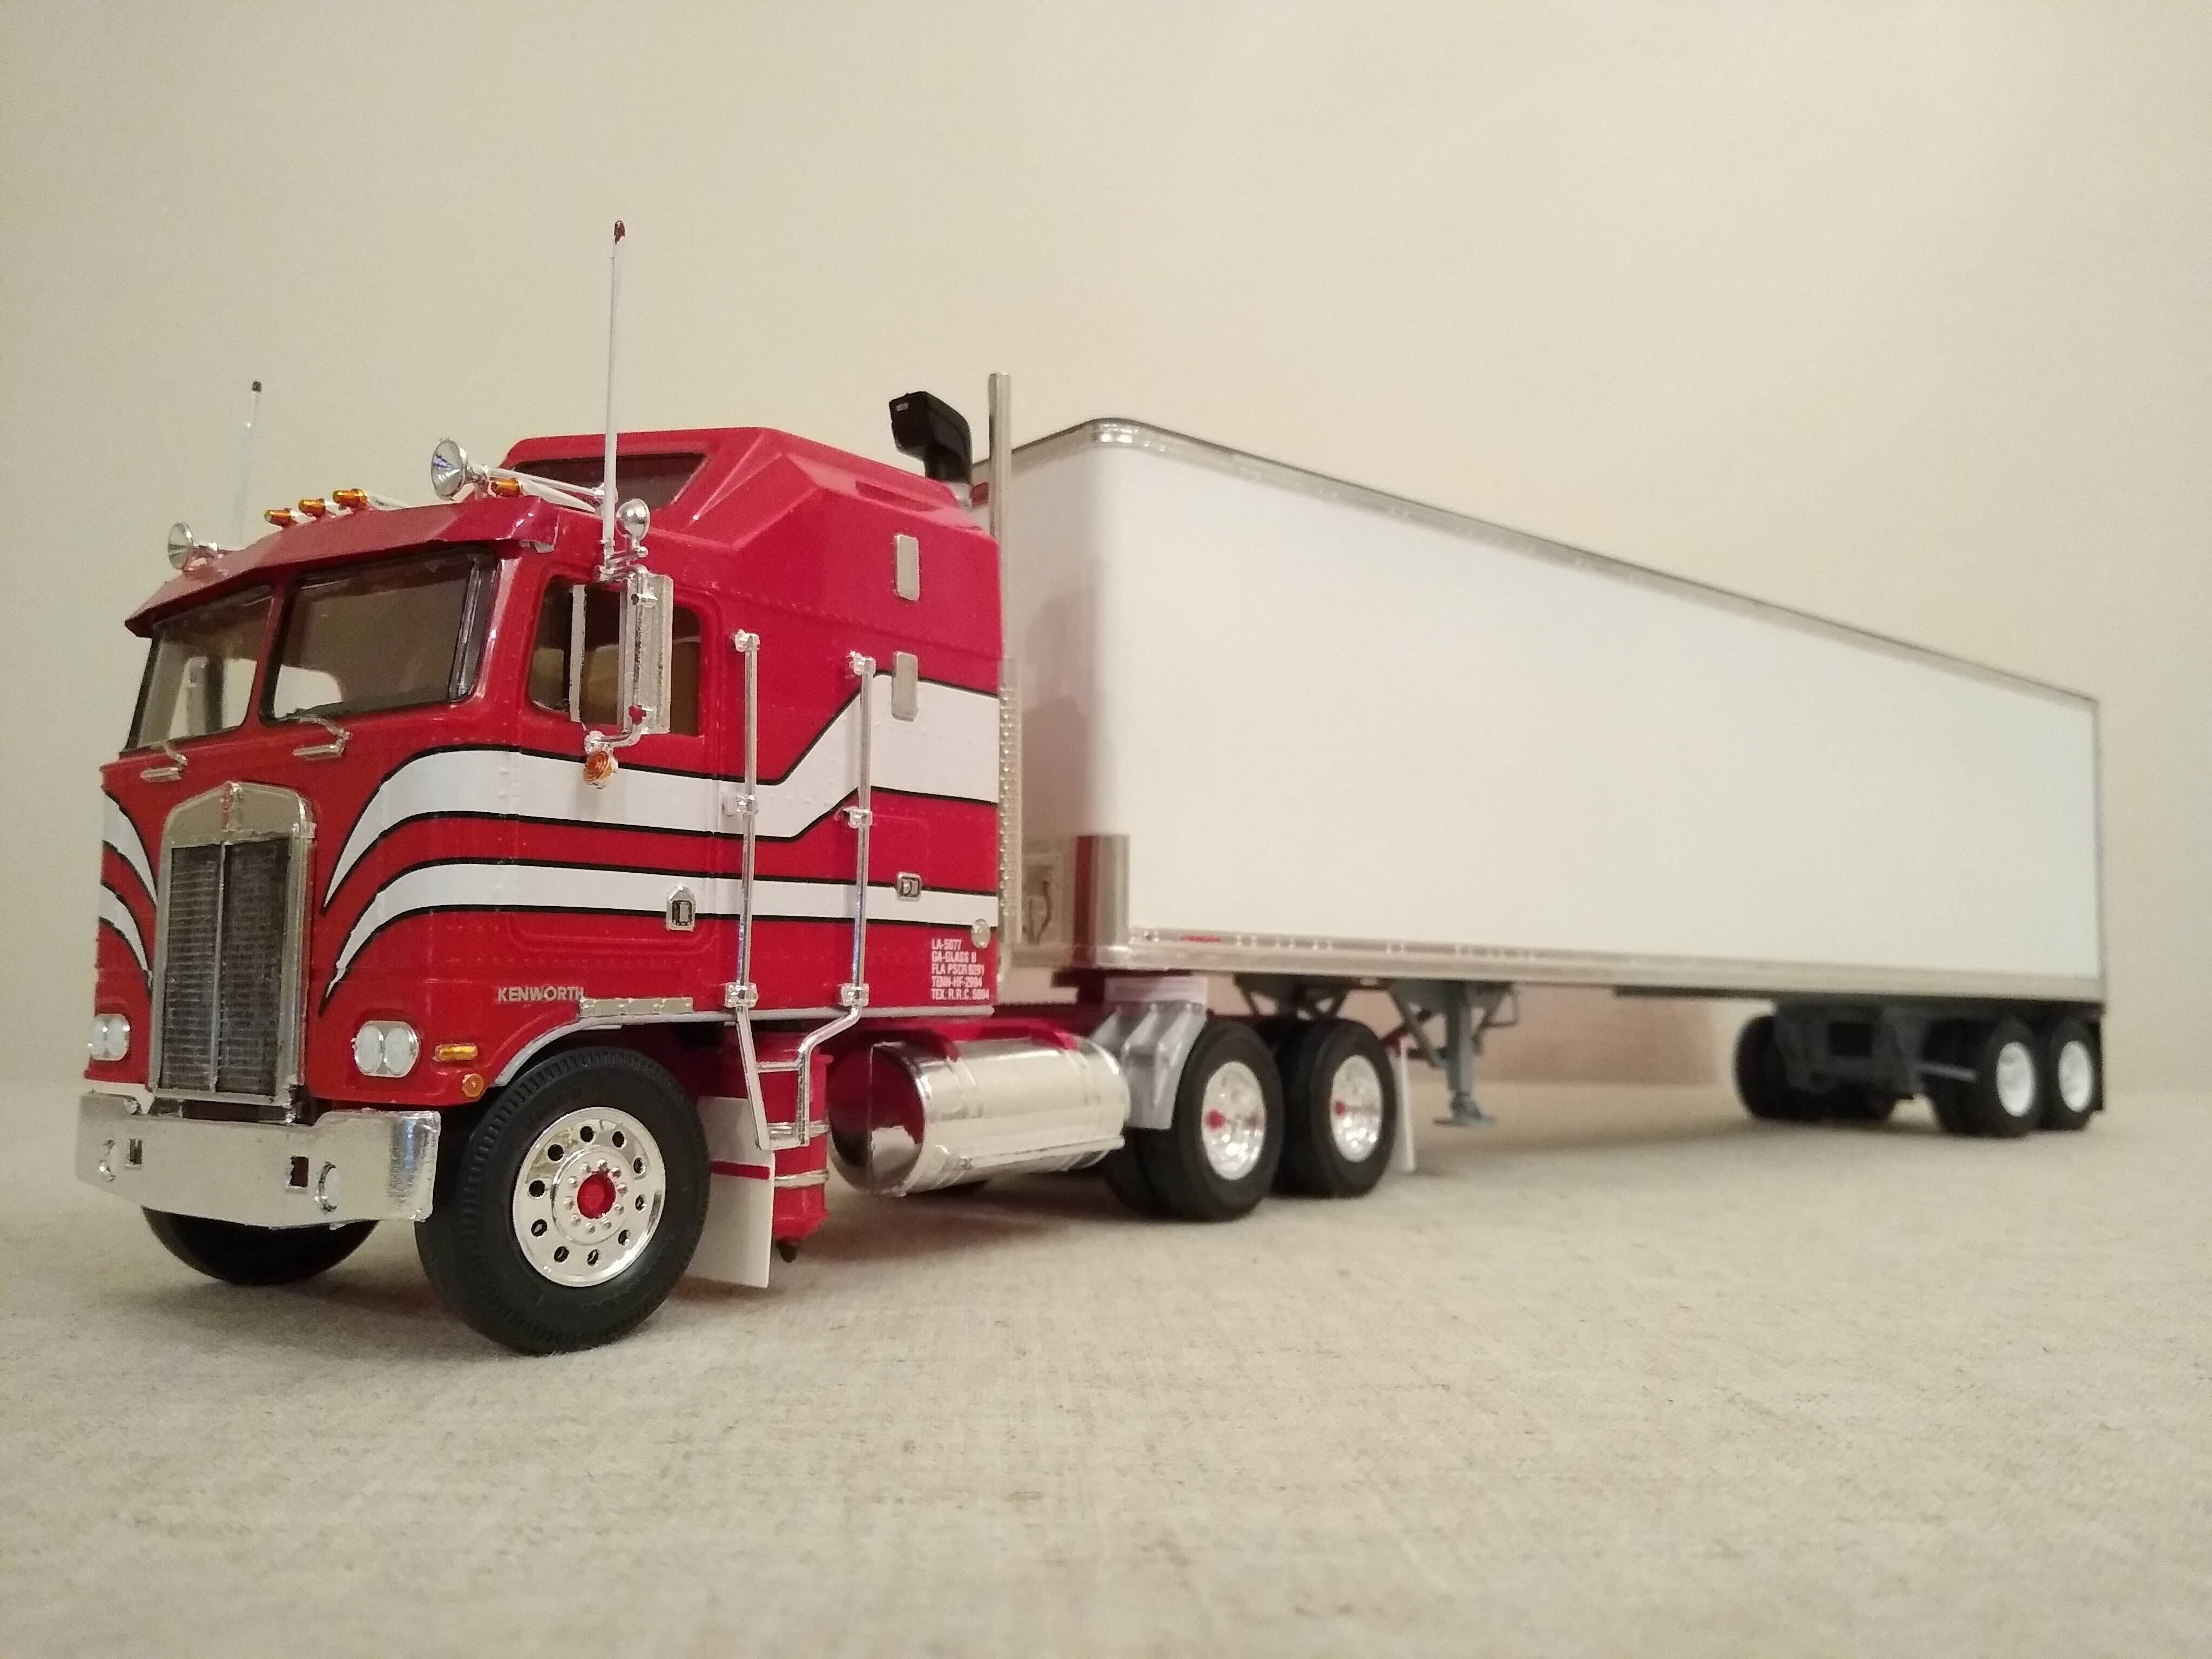
A tale of two trailers
Rockford replied to Rockford's topic in WIP: Model Trucks: Big Rigs and Heavy Equipment
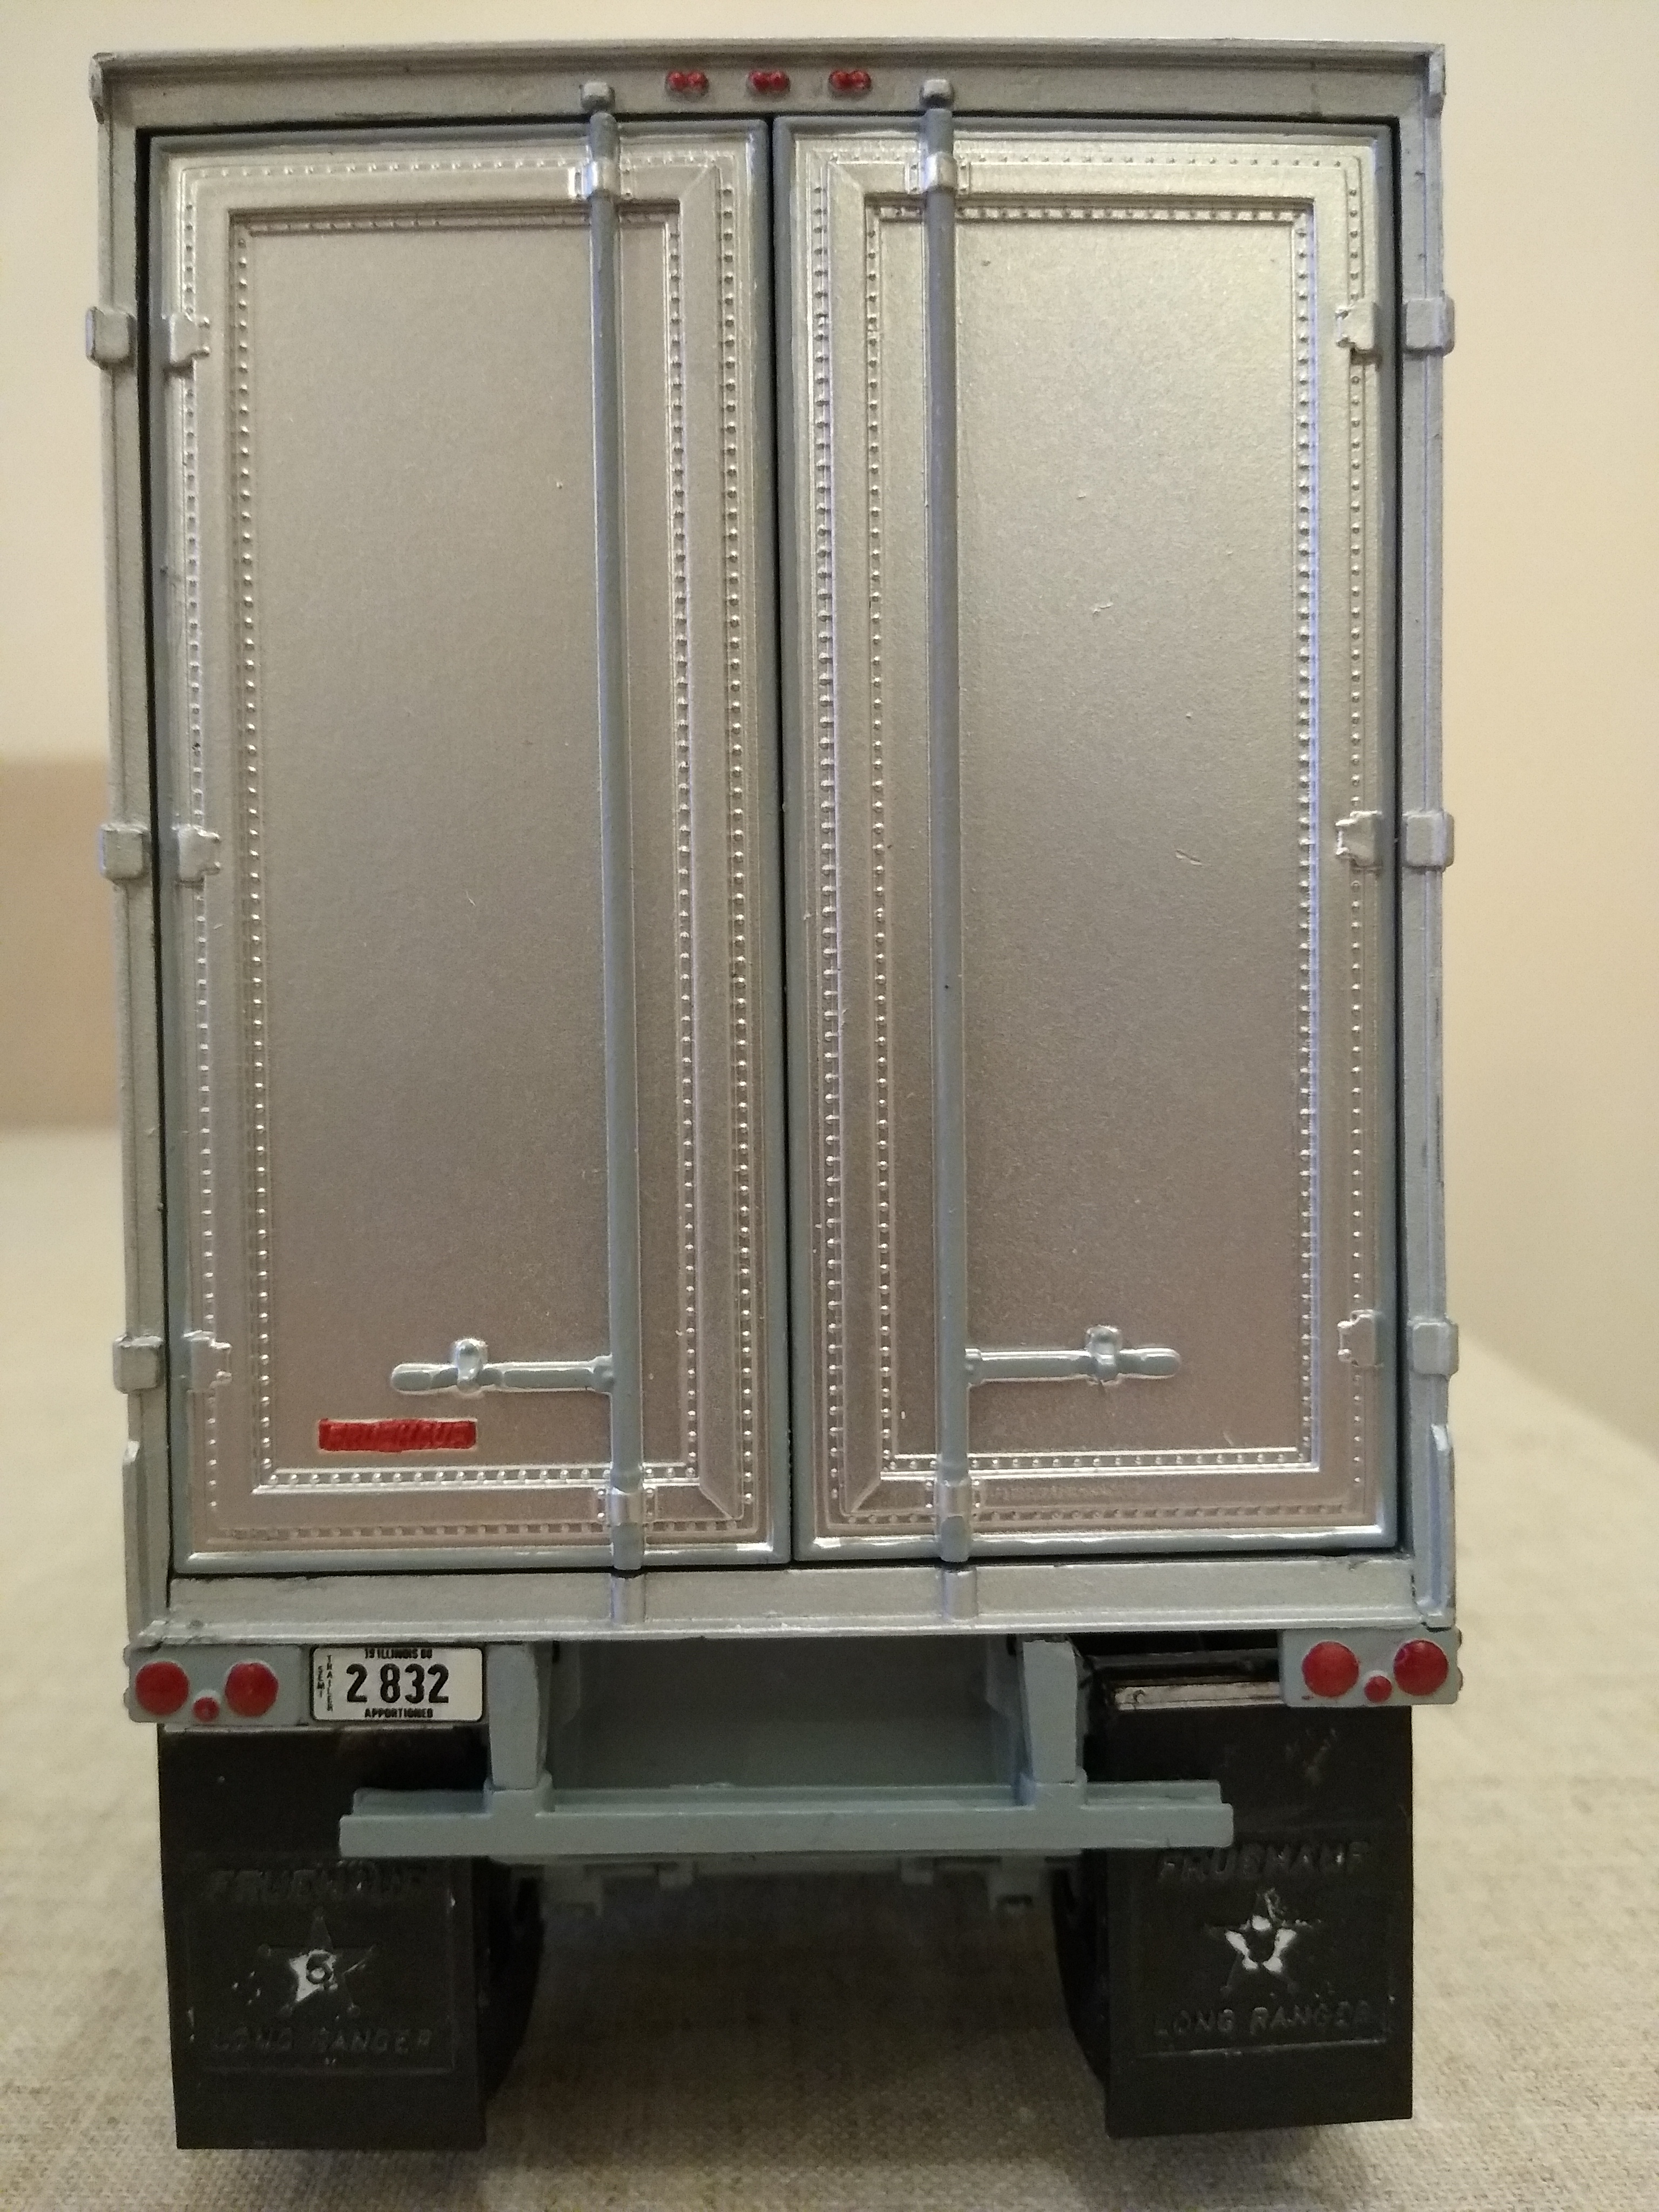
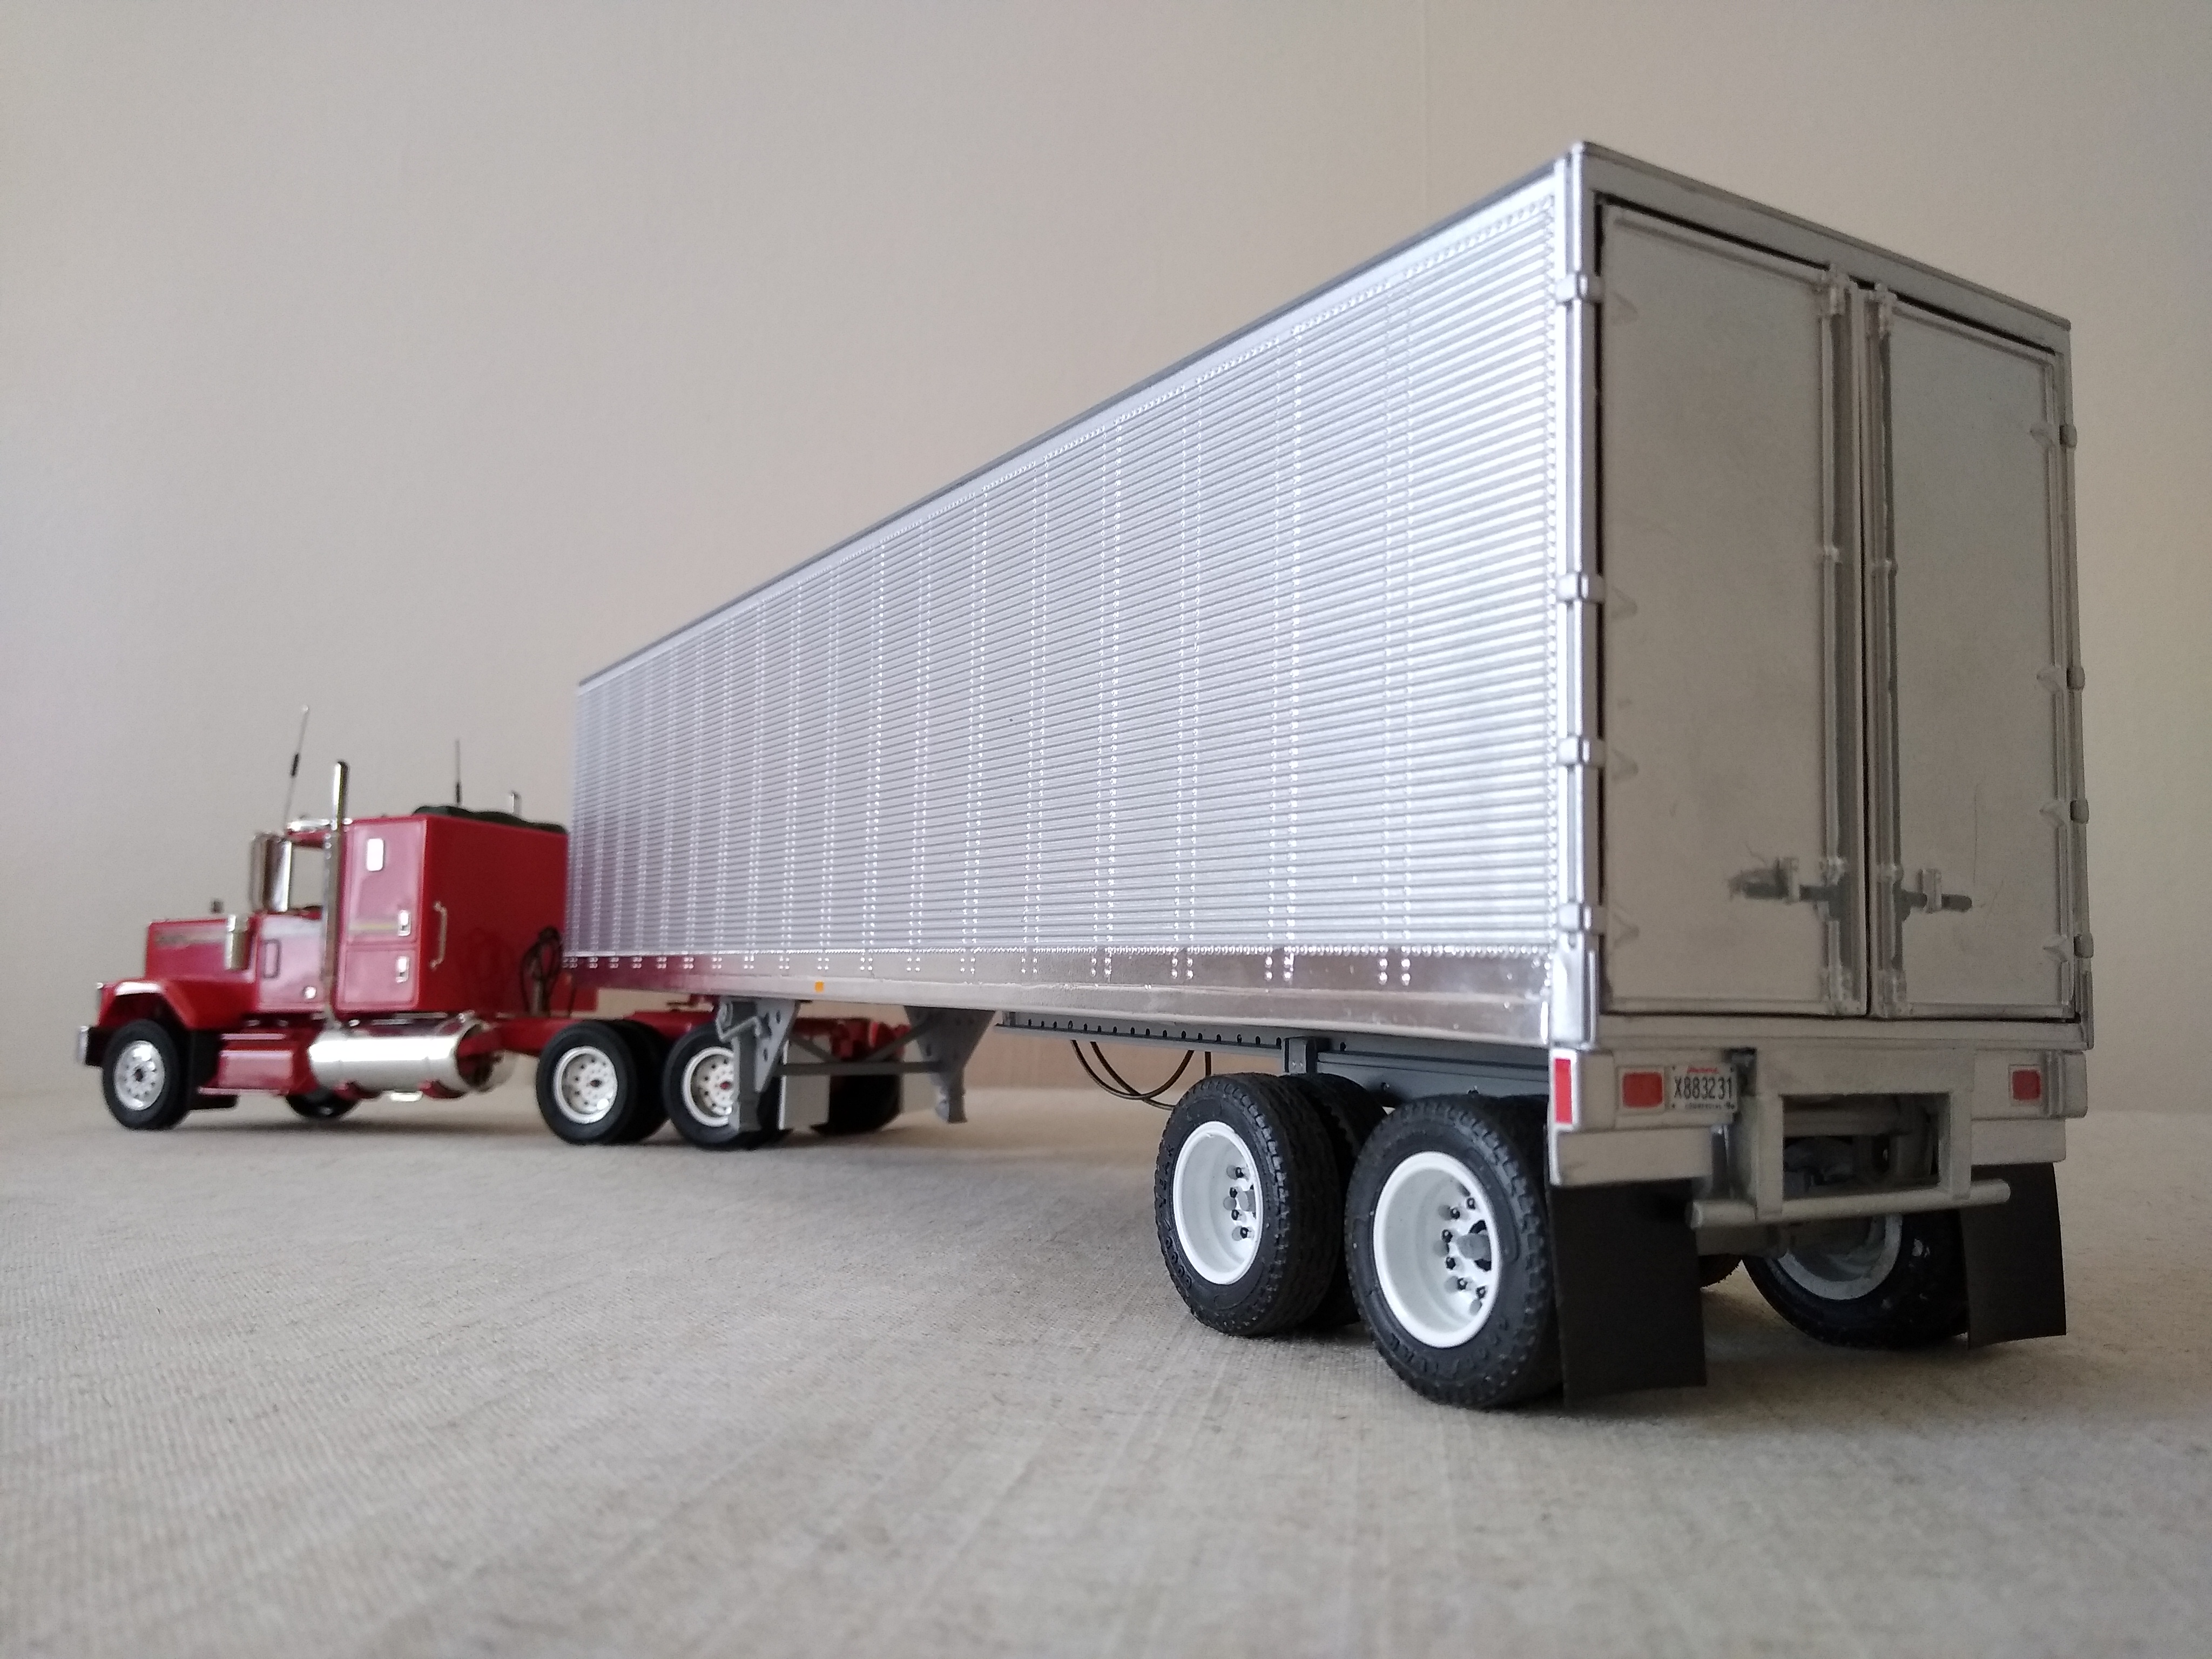
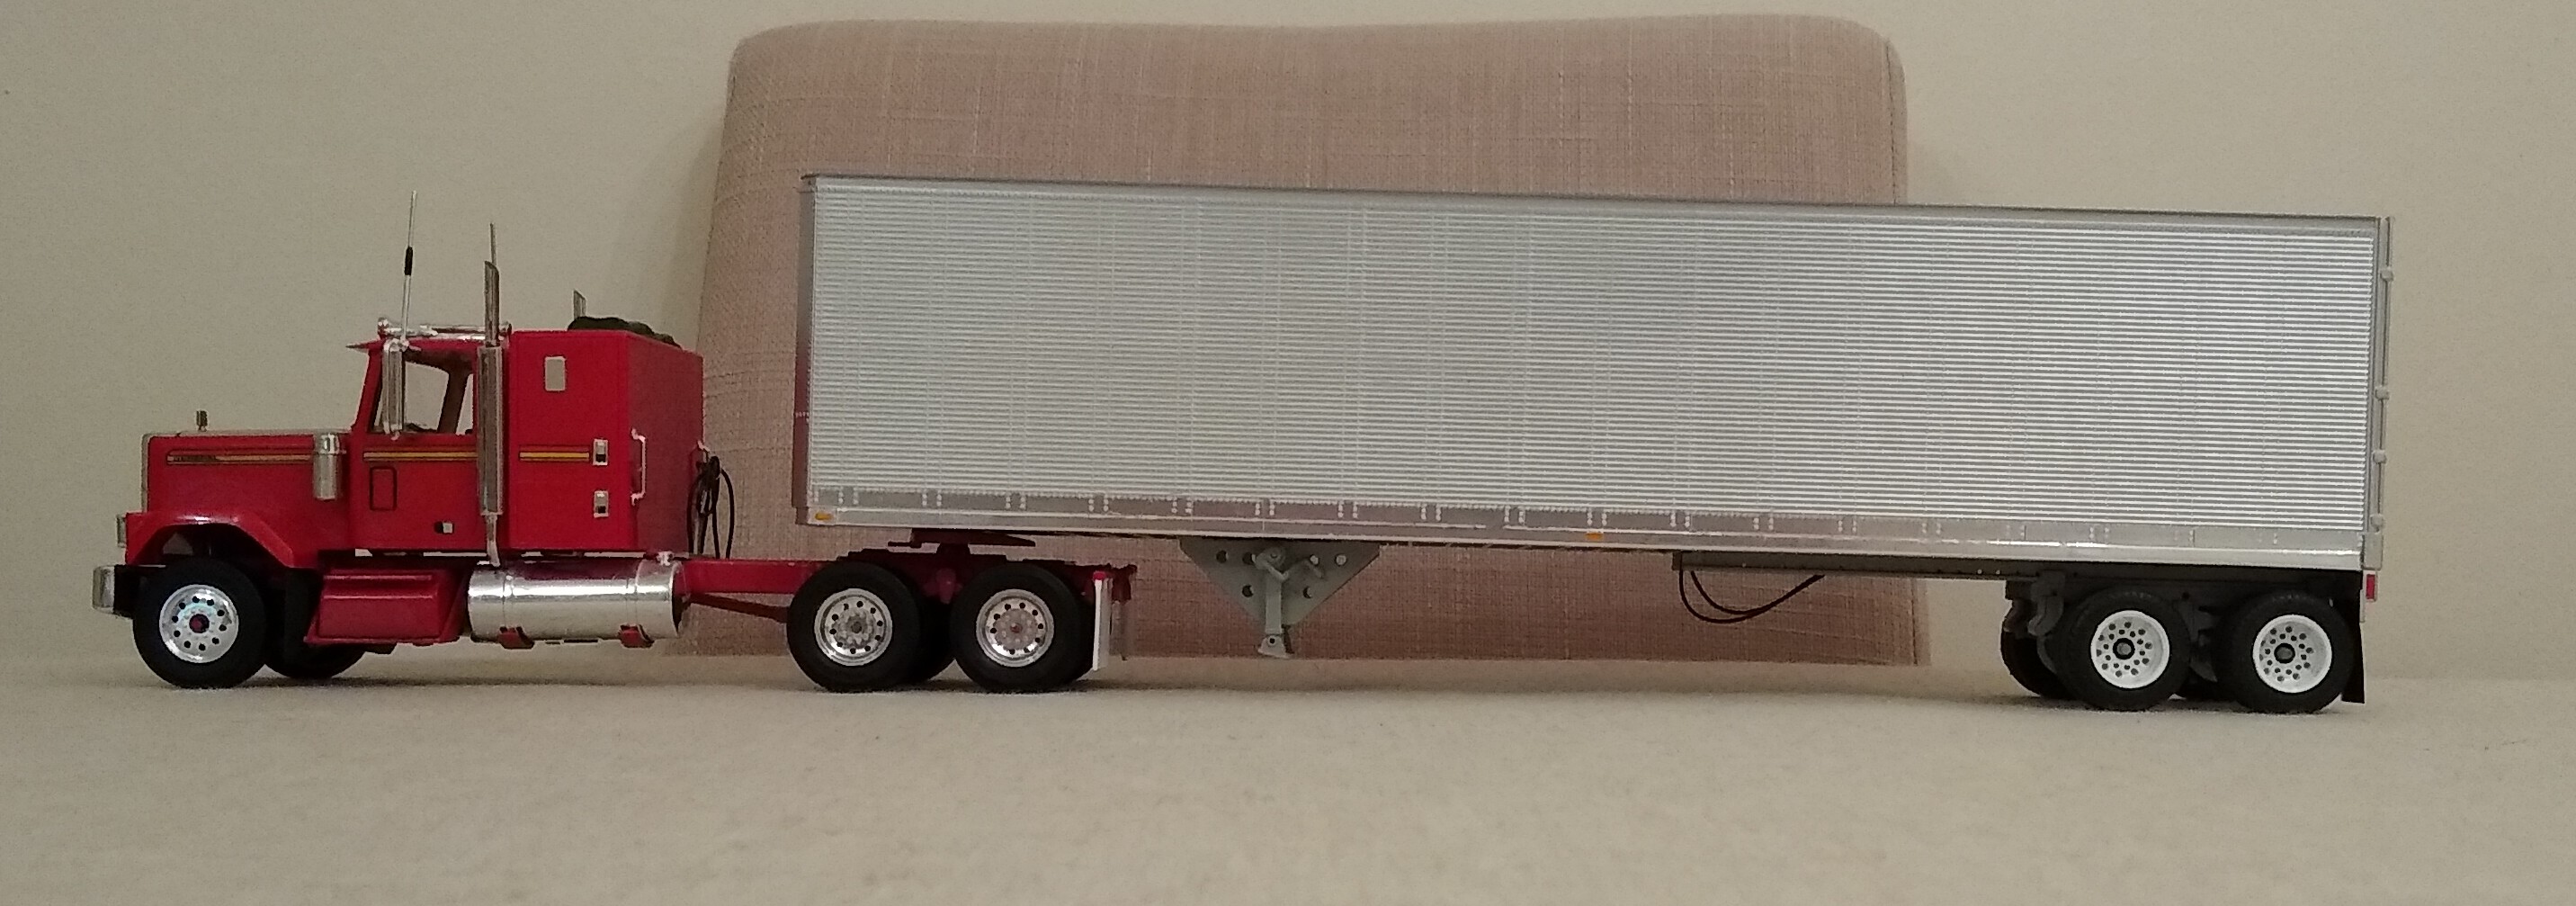
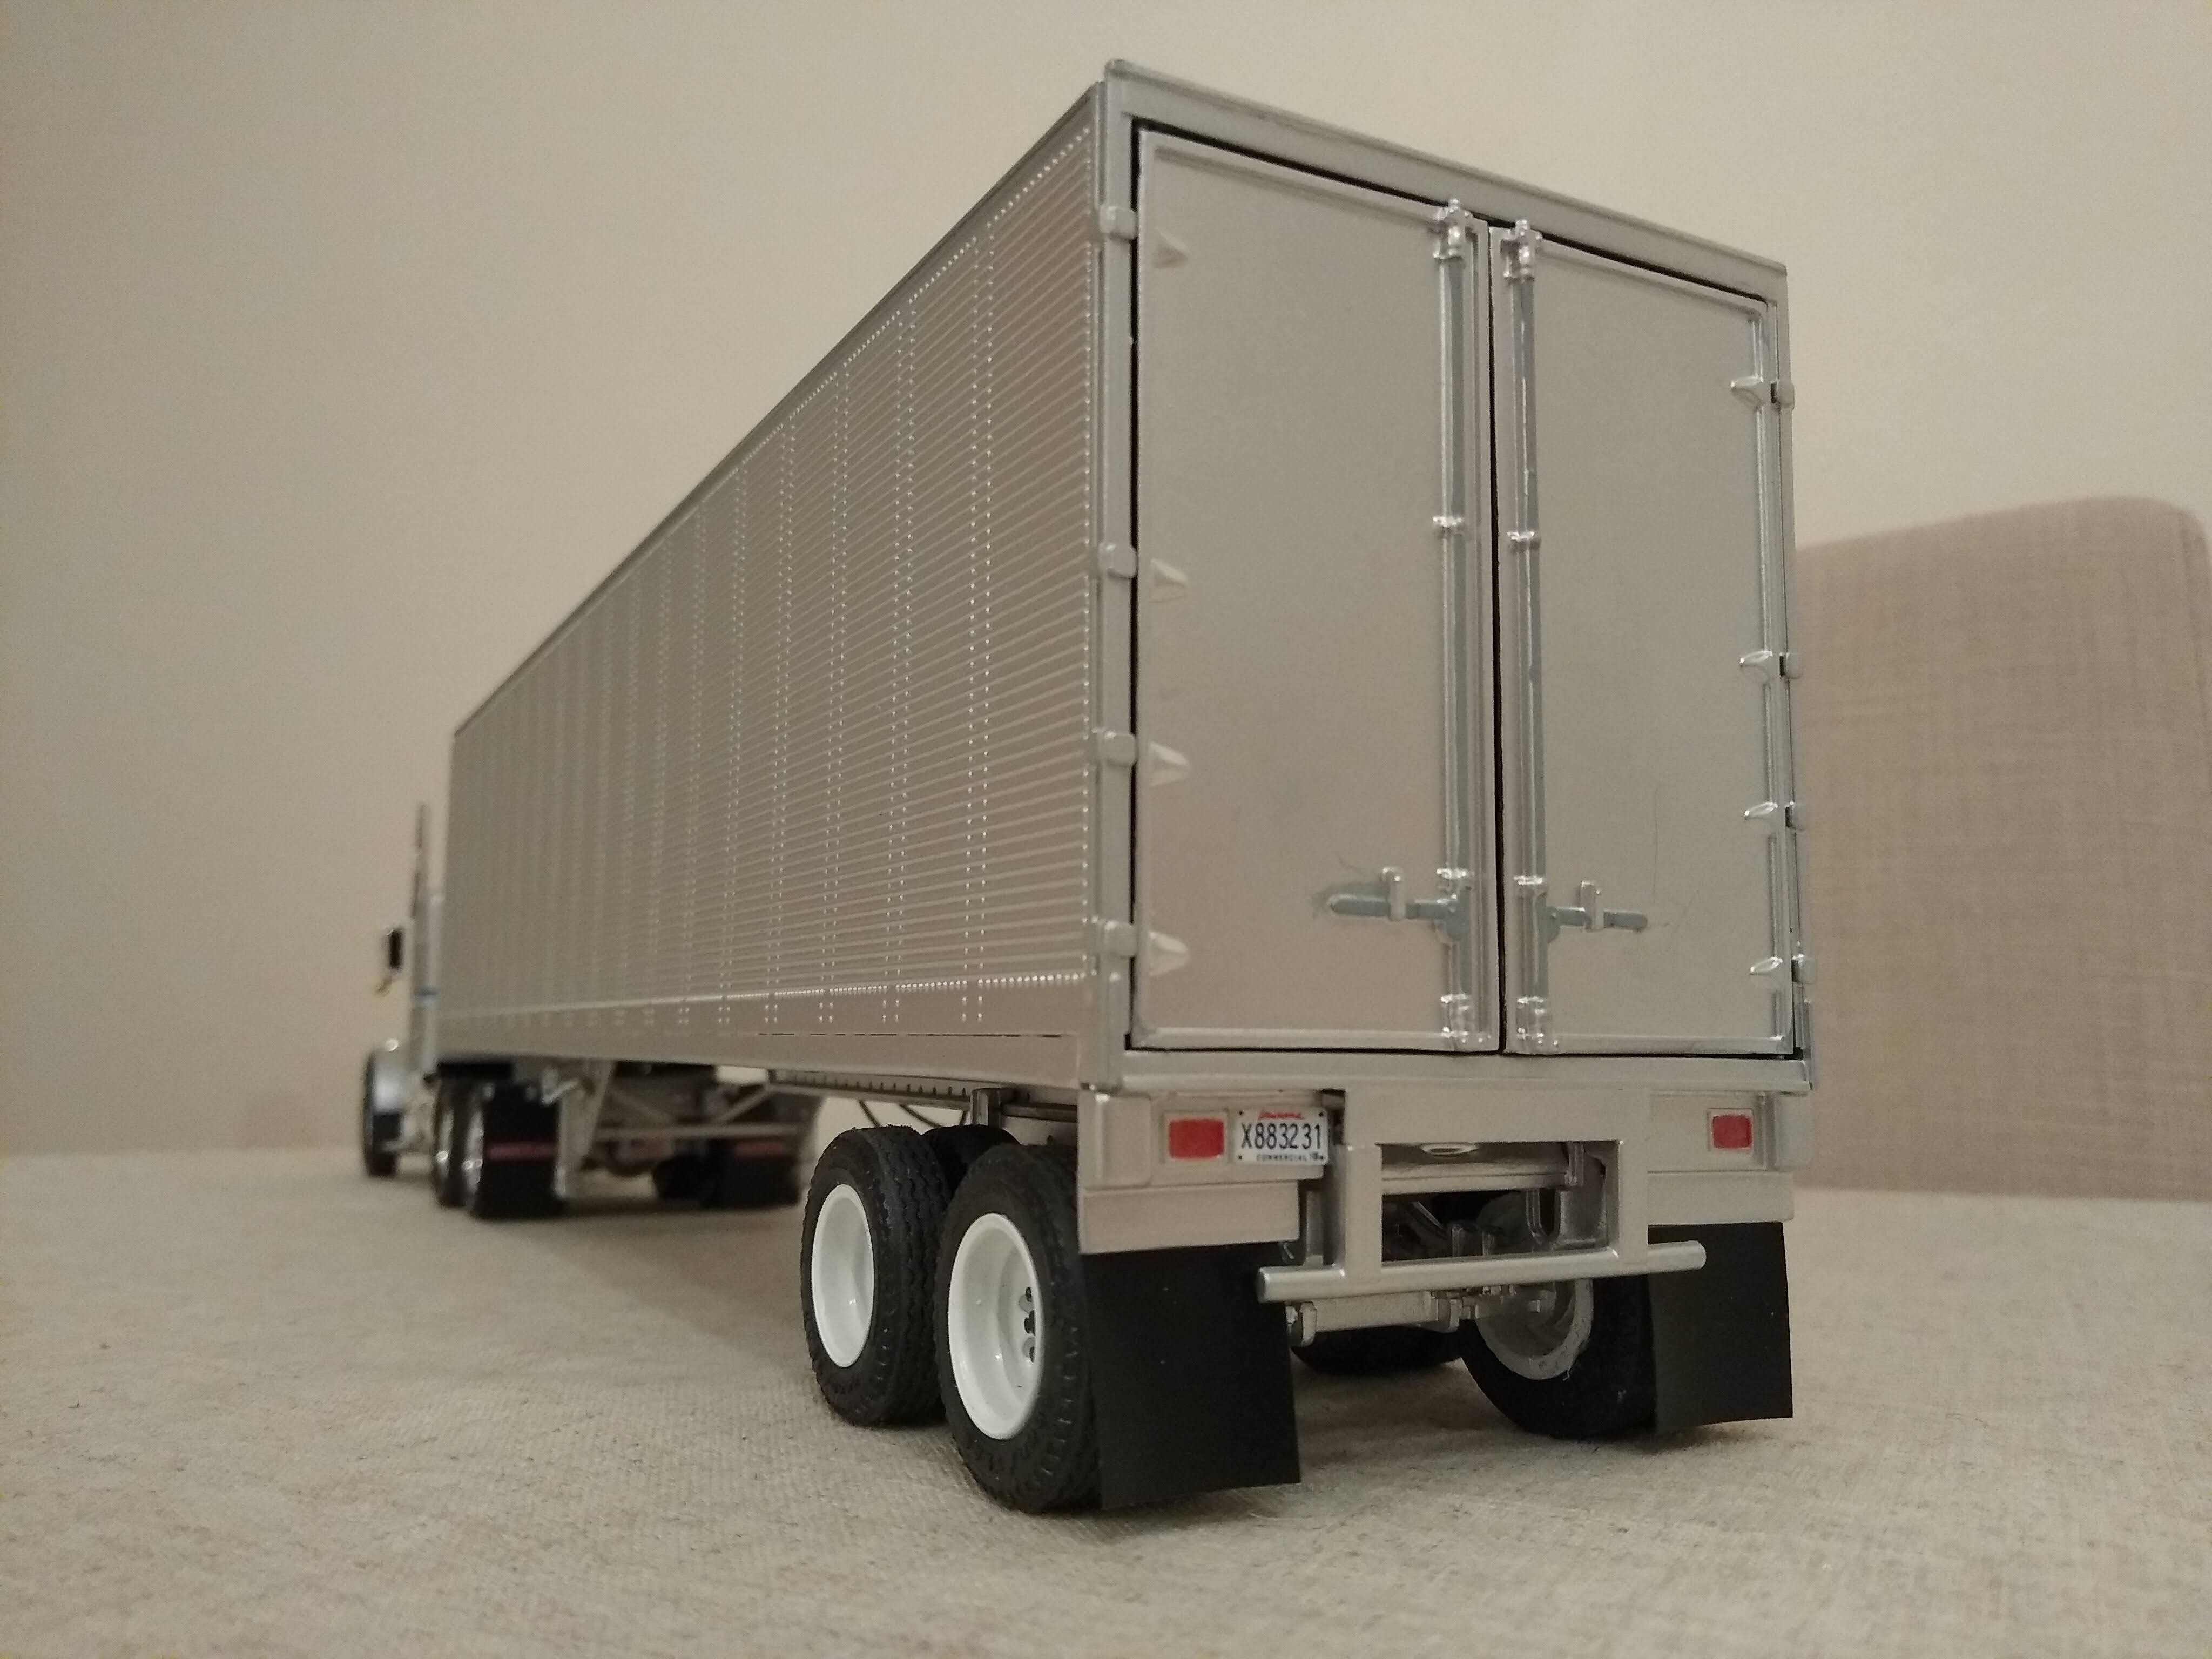
Finally finished the trailers. Added the air lines for the sliding tandems on the Fruehauf and just detail painted the locks and seals on the rear doors.
-
The Official EBay Discussion Thread
Rockford replied to iamsuperdan's topic in General Automotive Talk (Trucks and Cars)
I agree, everyone thinks they are entitled to a fortune for a piece of junk. If you look at an item Ebay start sending you emails hyping it up, trying to get you to jump and buy it. It's no longer the place where you can find a like minded individual who would appreciate your unwanted niche item and put it to use for reasonable fee, but a system for extracting the maximum amount of cash from people for what is a lot of the time, junk. I'm sorry to hear the troubles sellers have had and it's a shame a useful tool has over developed its model [no pun intended] -
Lego Mack Anthem and container trailer
Rockford replied to Dutzie's topic in Model Trucks: Big Rigs and Heavy Equipment
Amazing stuff sir, not like Lego I had when I was a kid. -
Americanized AMT Container Trailer
Rockford replied to hct728(Bob)'s topic in WIP: Model Trucks: Big Rigs and Heavy Equipment
I look forward to following this, it's amazing how many little differences there are between a US and a European skeletal trailer. Mind you, I haven't seen a spread axle set up like that kit for decades, everything inn the UK is triaxles now with super single tyres and adjustable frame lengths. I Americanised the 1/32 scale ESCI 20ft container trailer a while ago, which was interesting. Look forward to seeing your progress! -
AMT Peterbuilt Wrecker
Rockford replied to OldTrucker's topic in WIP: Model Trucks: Big Rigs and Heavy Equipment
I built this truck years ago and wouldn't have thought to narrow the body, but now that you mention it, it makes tremendous sense. The truck will look much more muscular. -
BRBO2021 Autocar dump truck
Rockford replied to Bronzekeg's topic in WIP: Model Trucks: Big Rigs and Heavy Equipment
That just looks so real! Congratulations on a great truck. -
1958 Ford F 1000
Rockford replied to leafsprings's topic in WIP: Model Trucks: Big Rigs and Heavy Equipment
Impressive work on the cab, what a great looking old truck! -
The level of detail is fantastic! You could spend forever on this one truck. Looks brilliant.
-
I think I was a 20 year absentee and am still trying to get back into things. Looks like you're doing a great job on this project anyway! You'd never dream you'd been away!
-
A tale of two trailers
Rockford replied to Rockford's topic in WIP: Model Trucks: Big Rigs and Heavy Equipment
They were just these things, I've never seen them before and probably won't again, but at least I know I'm looking in the right area. I use the middle section from the top.
-
A tale of two trailers
Rockford replied to Rockford's topic in WIP: Model Trucks: Big Rigs and Heavy Equipment
Thanks Jim, they add weight I feel. Looks heavier, adds gravitas! -
A tale of two trailers
Rockford replied to Rockford's topic in WIP: Model Trucks: Big Rigs and Heavy Equipment
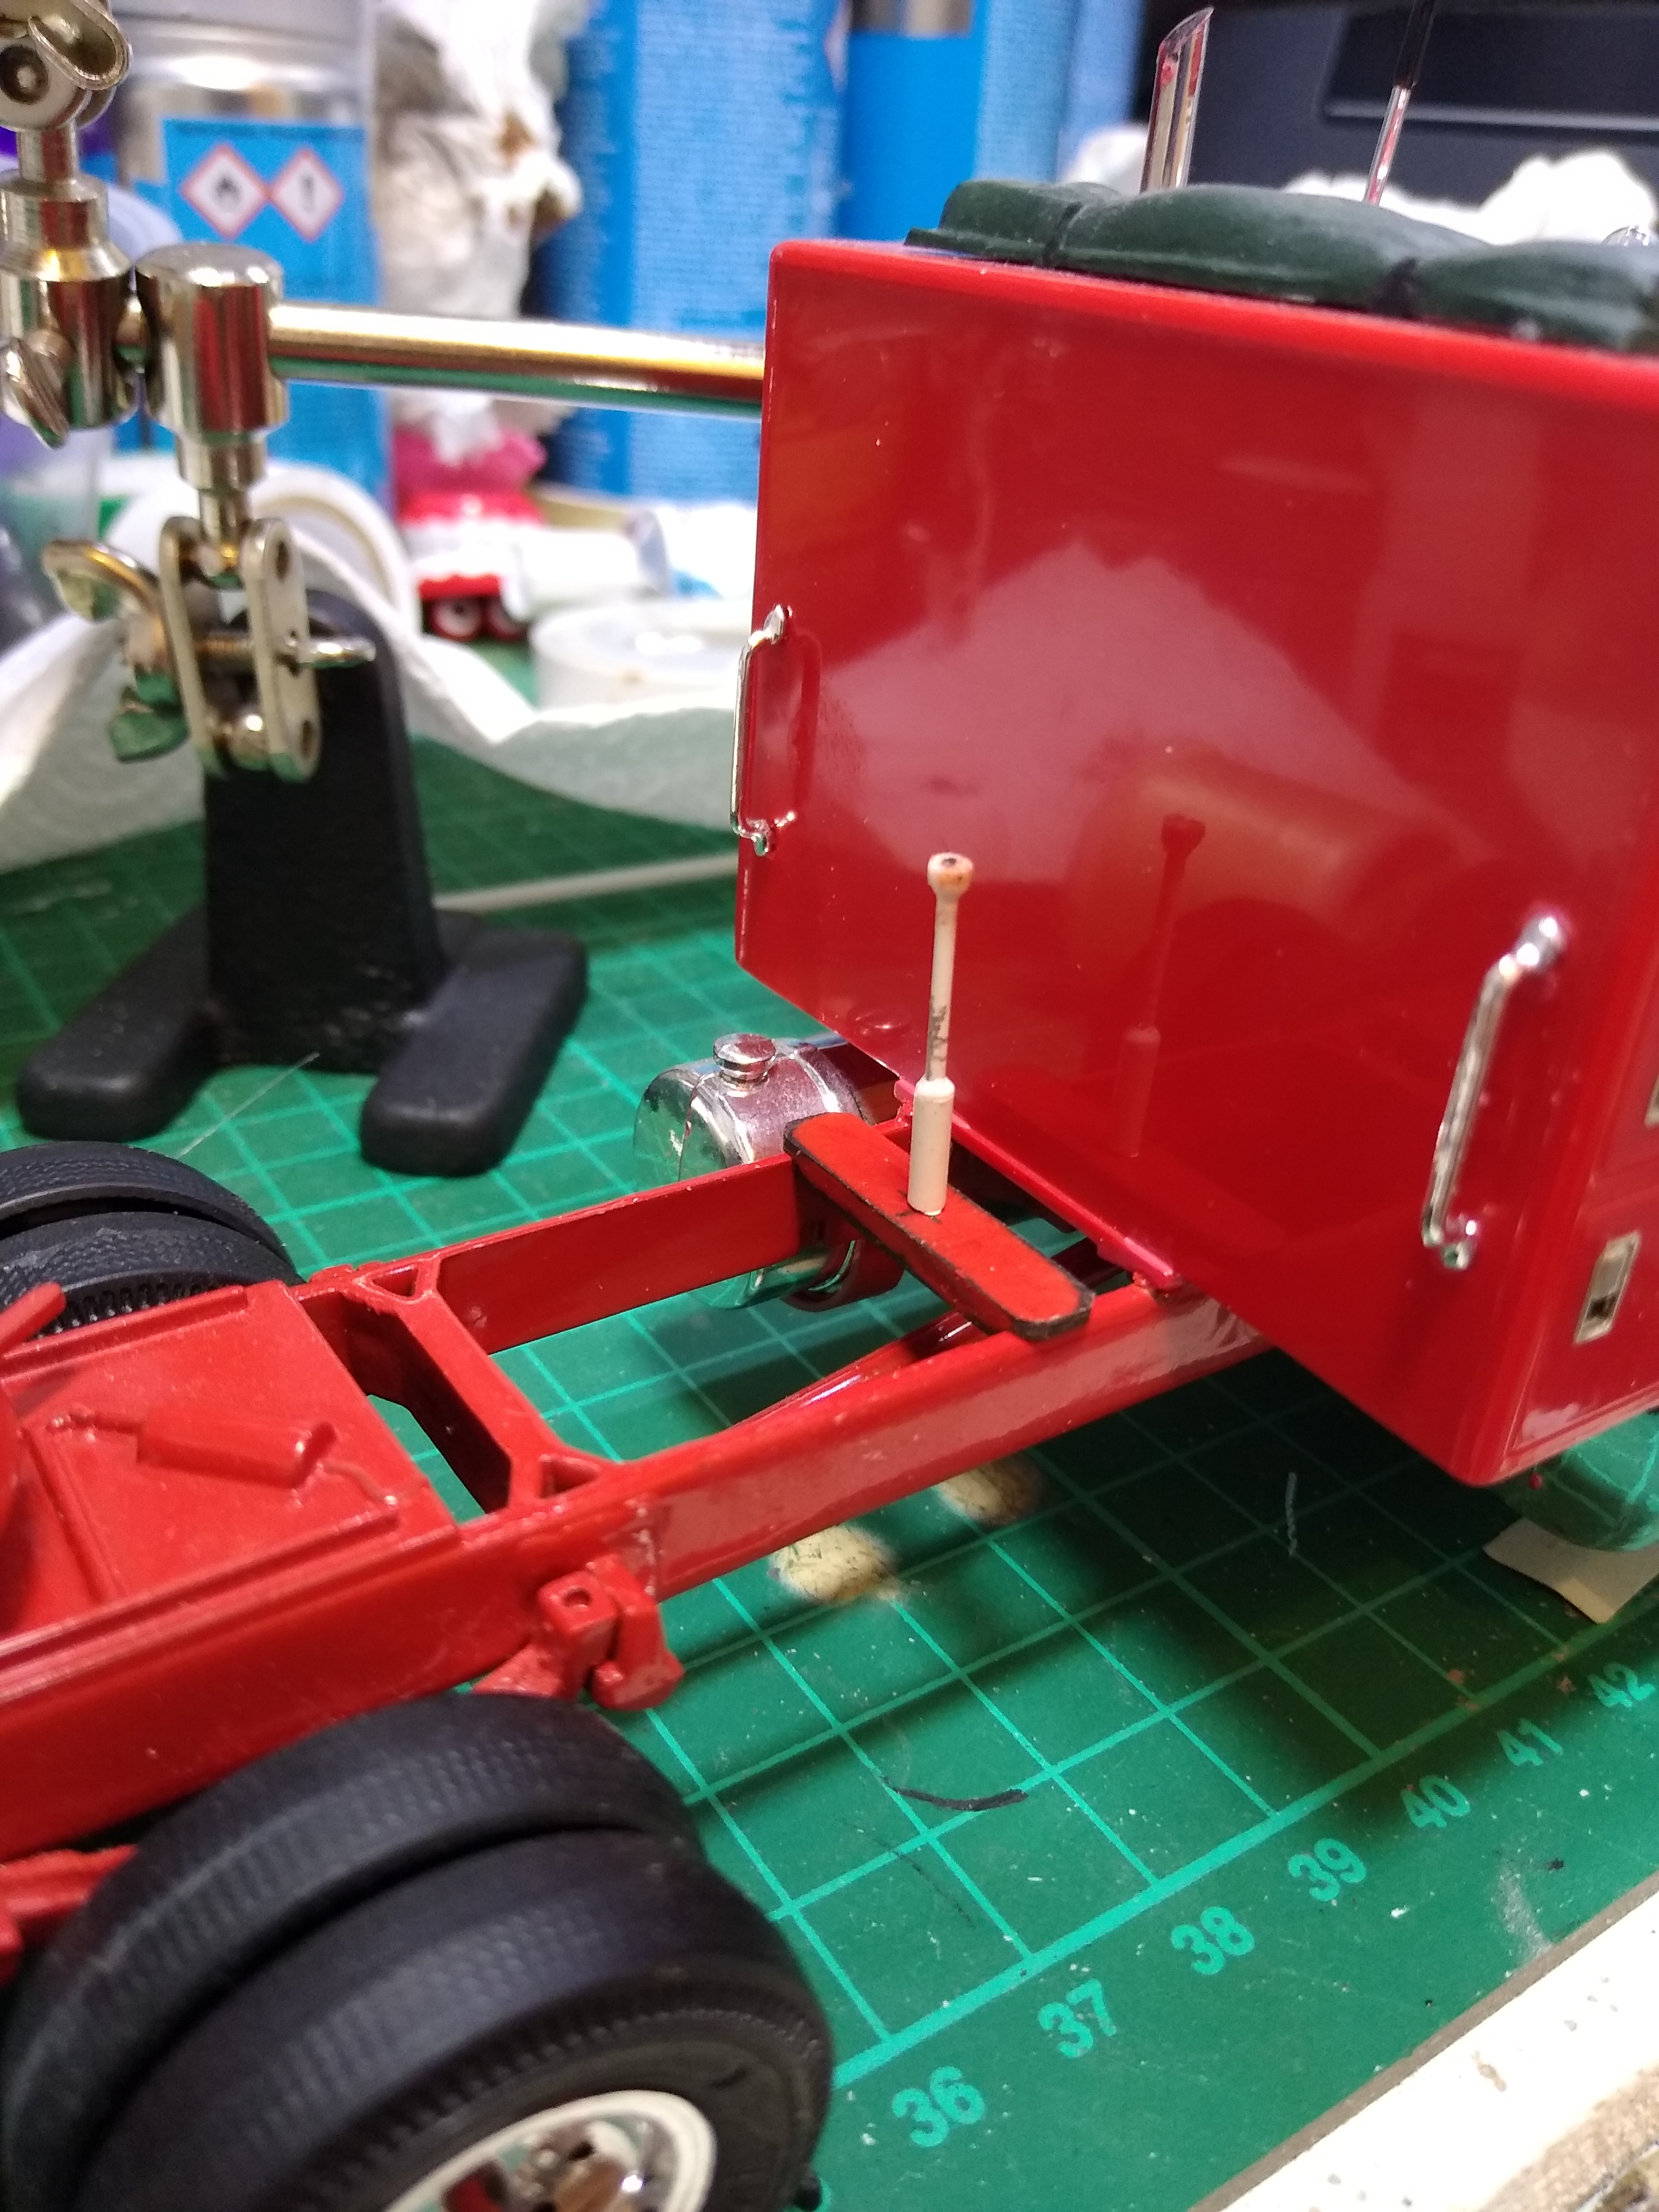
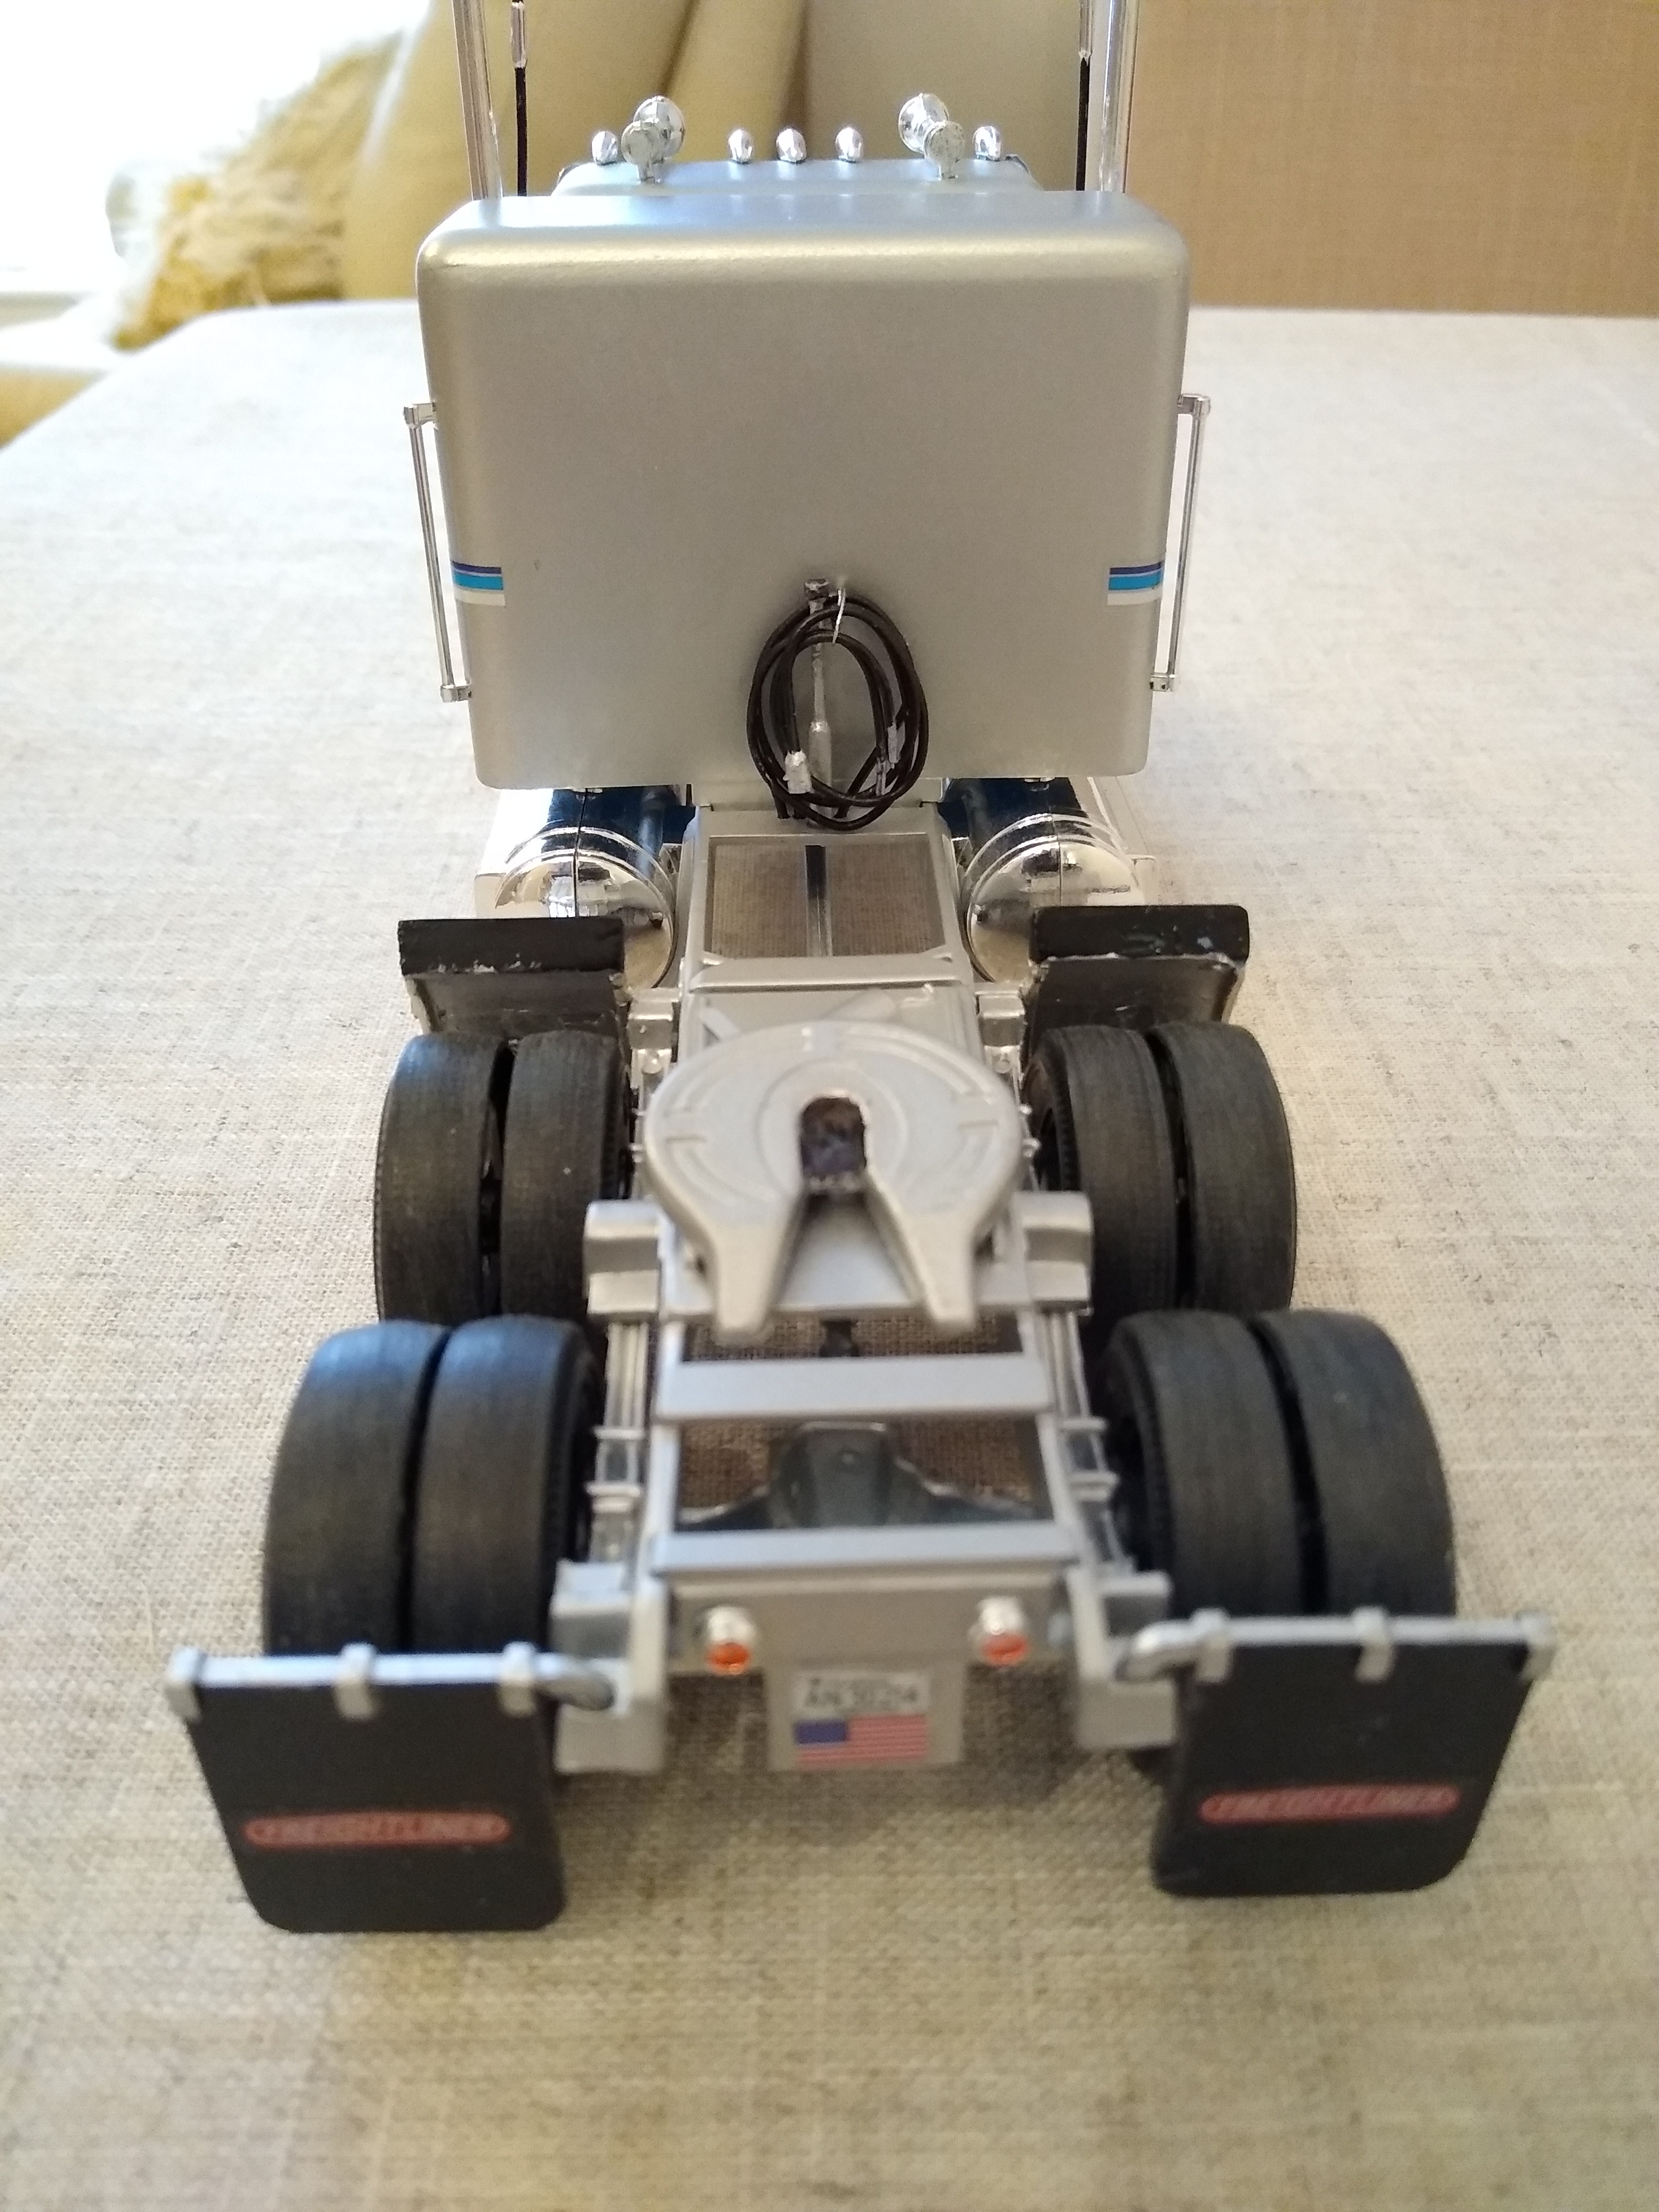
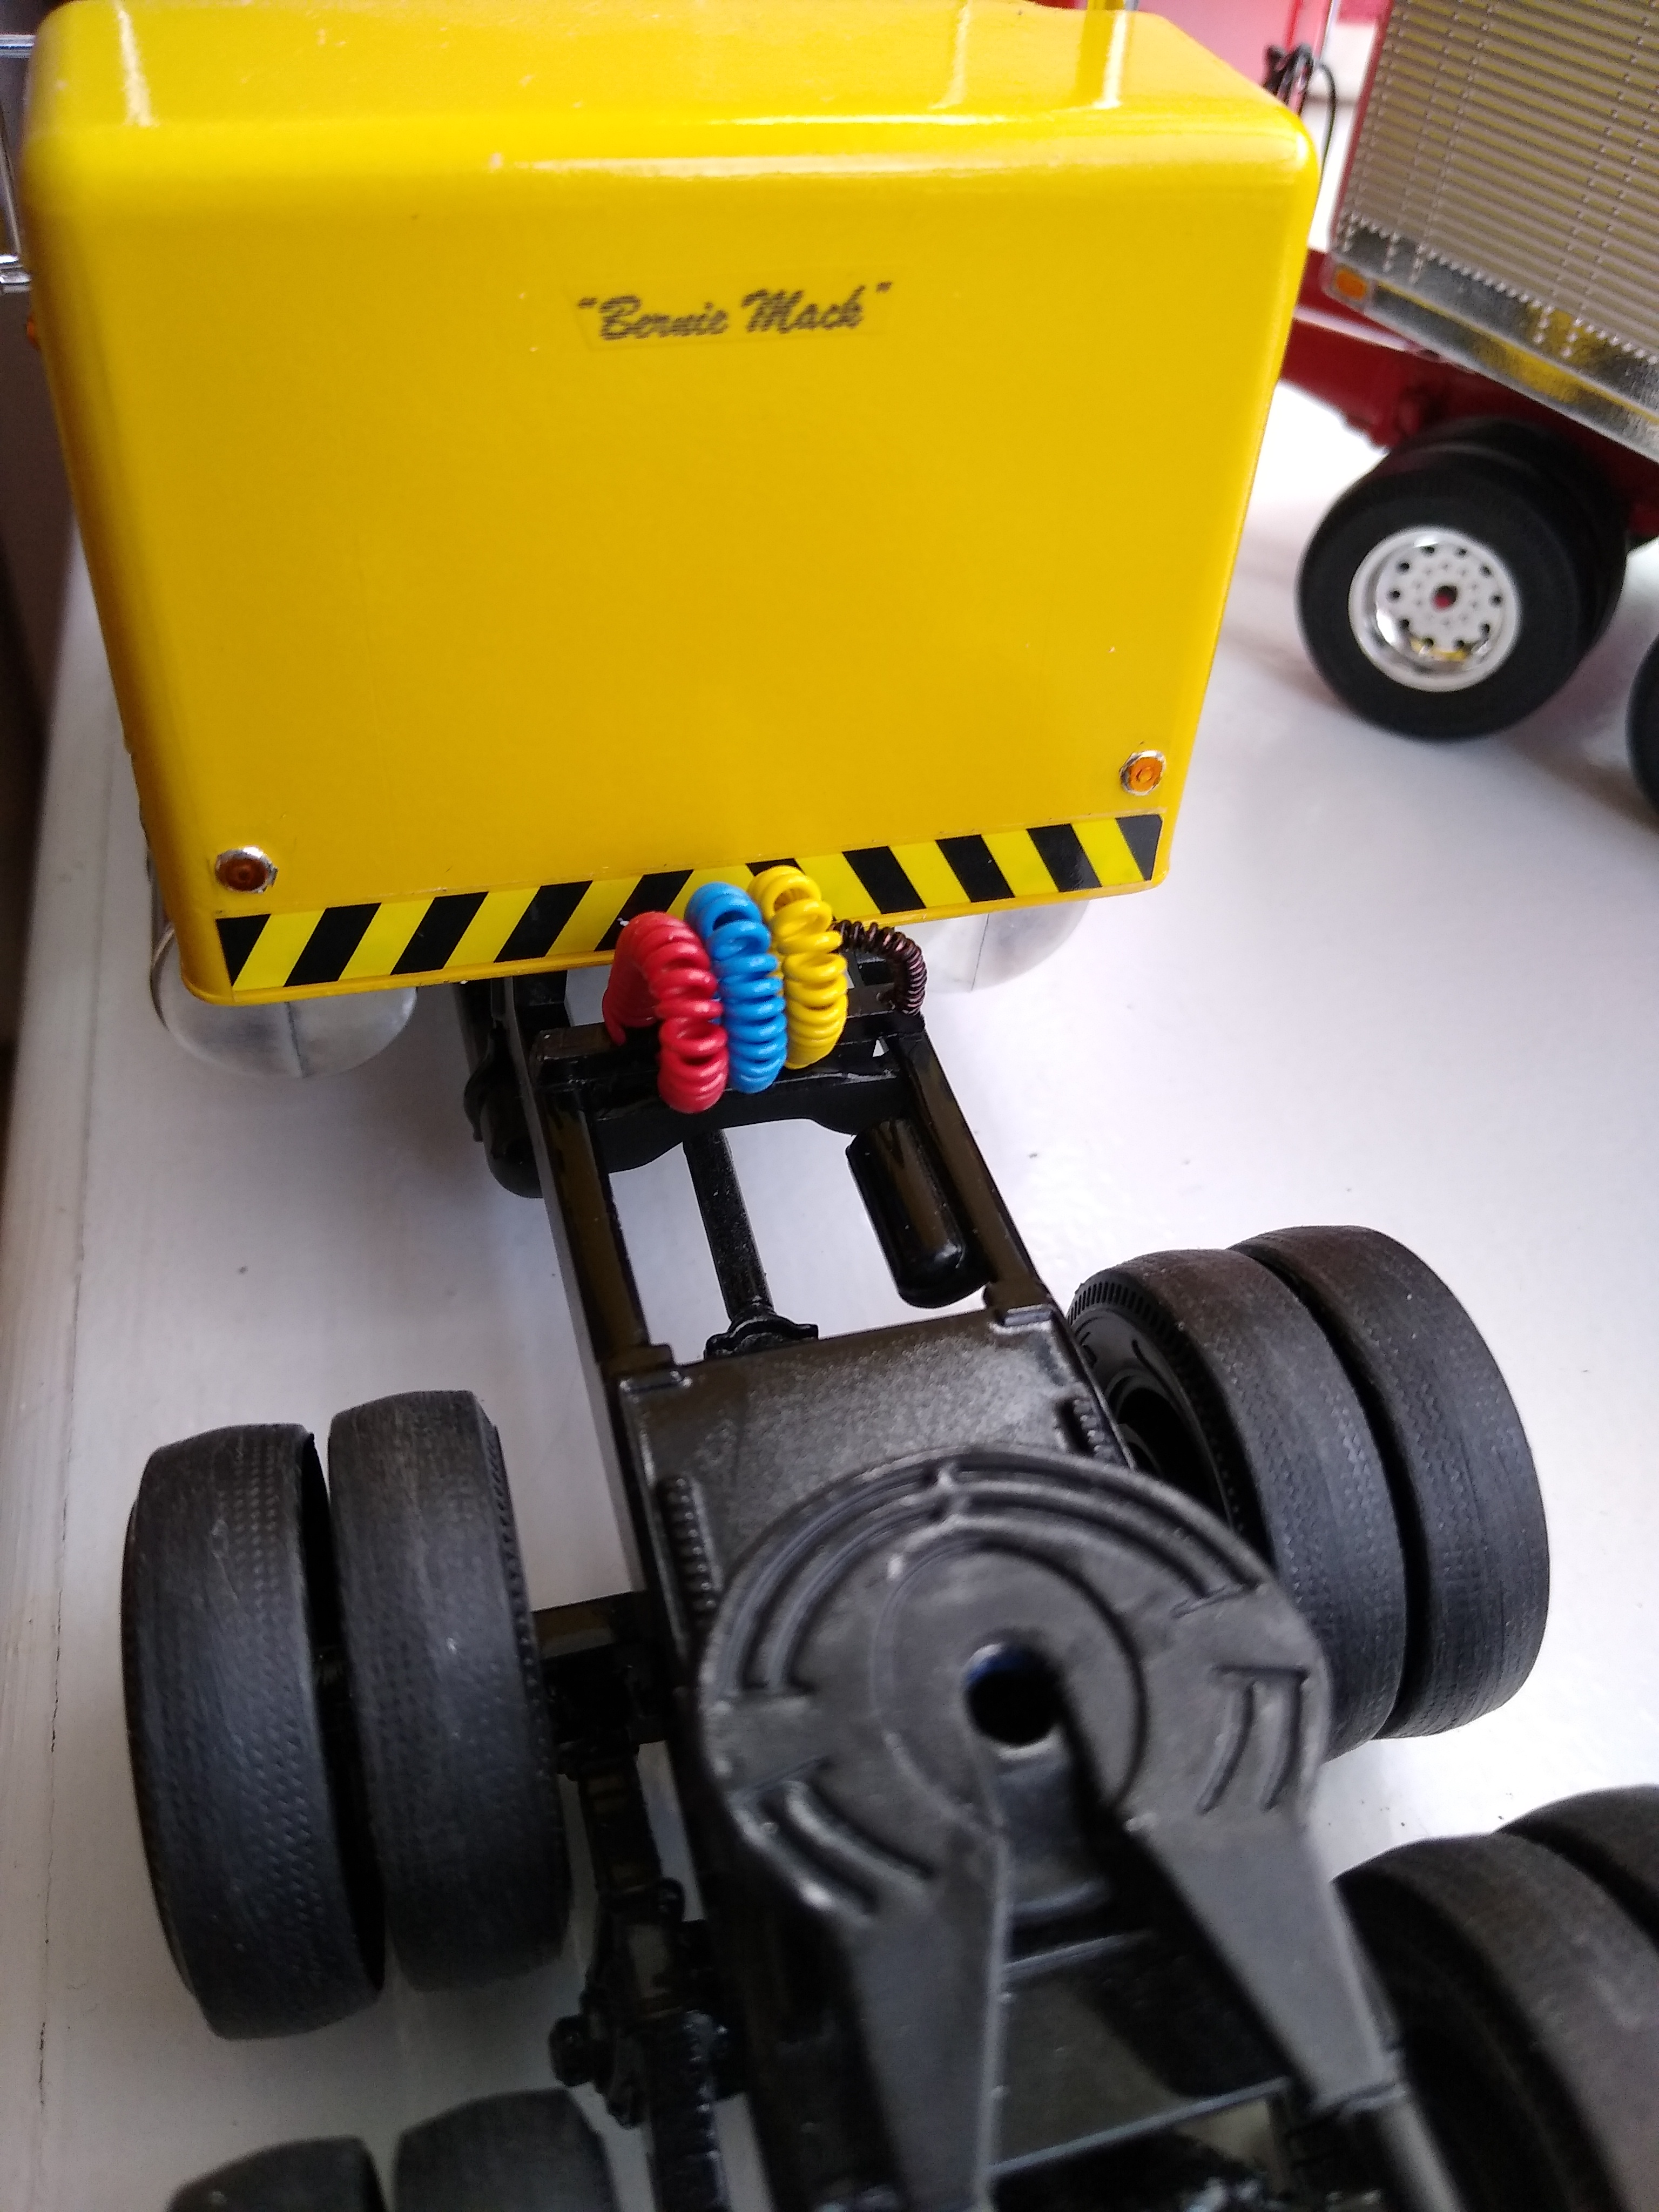
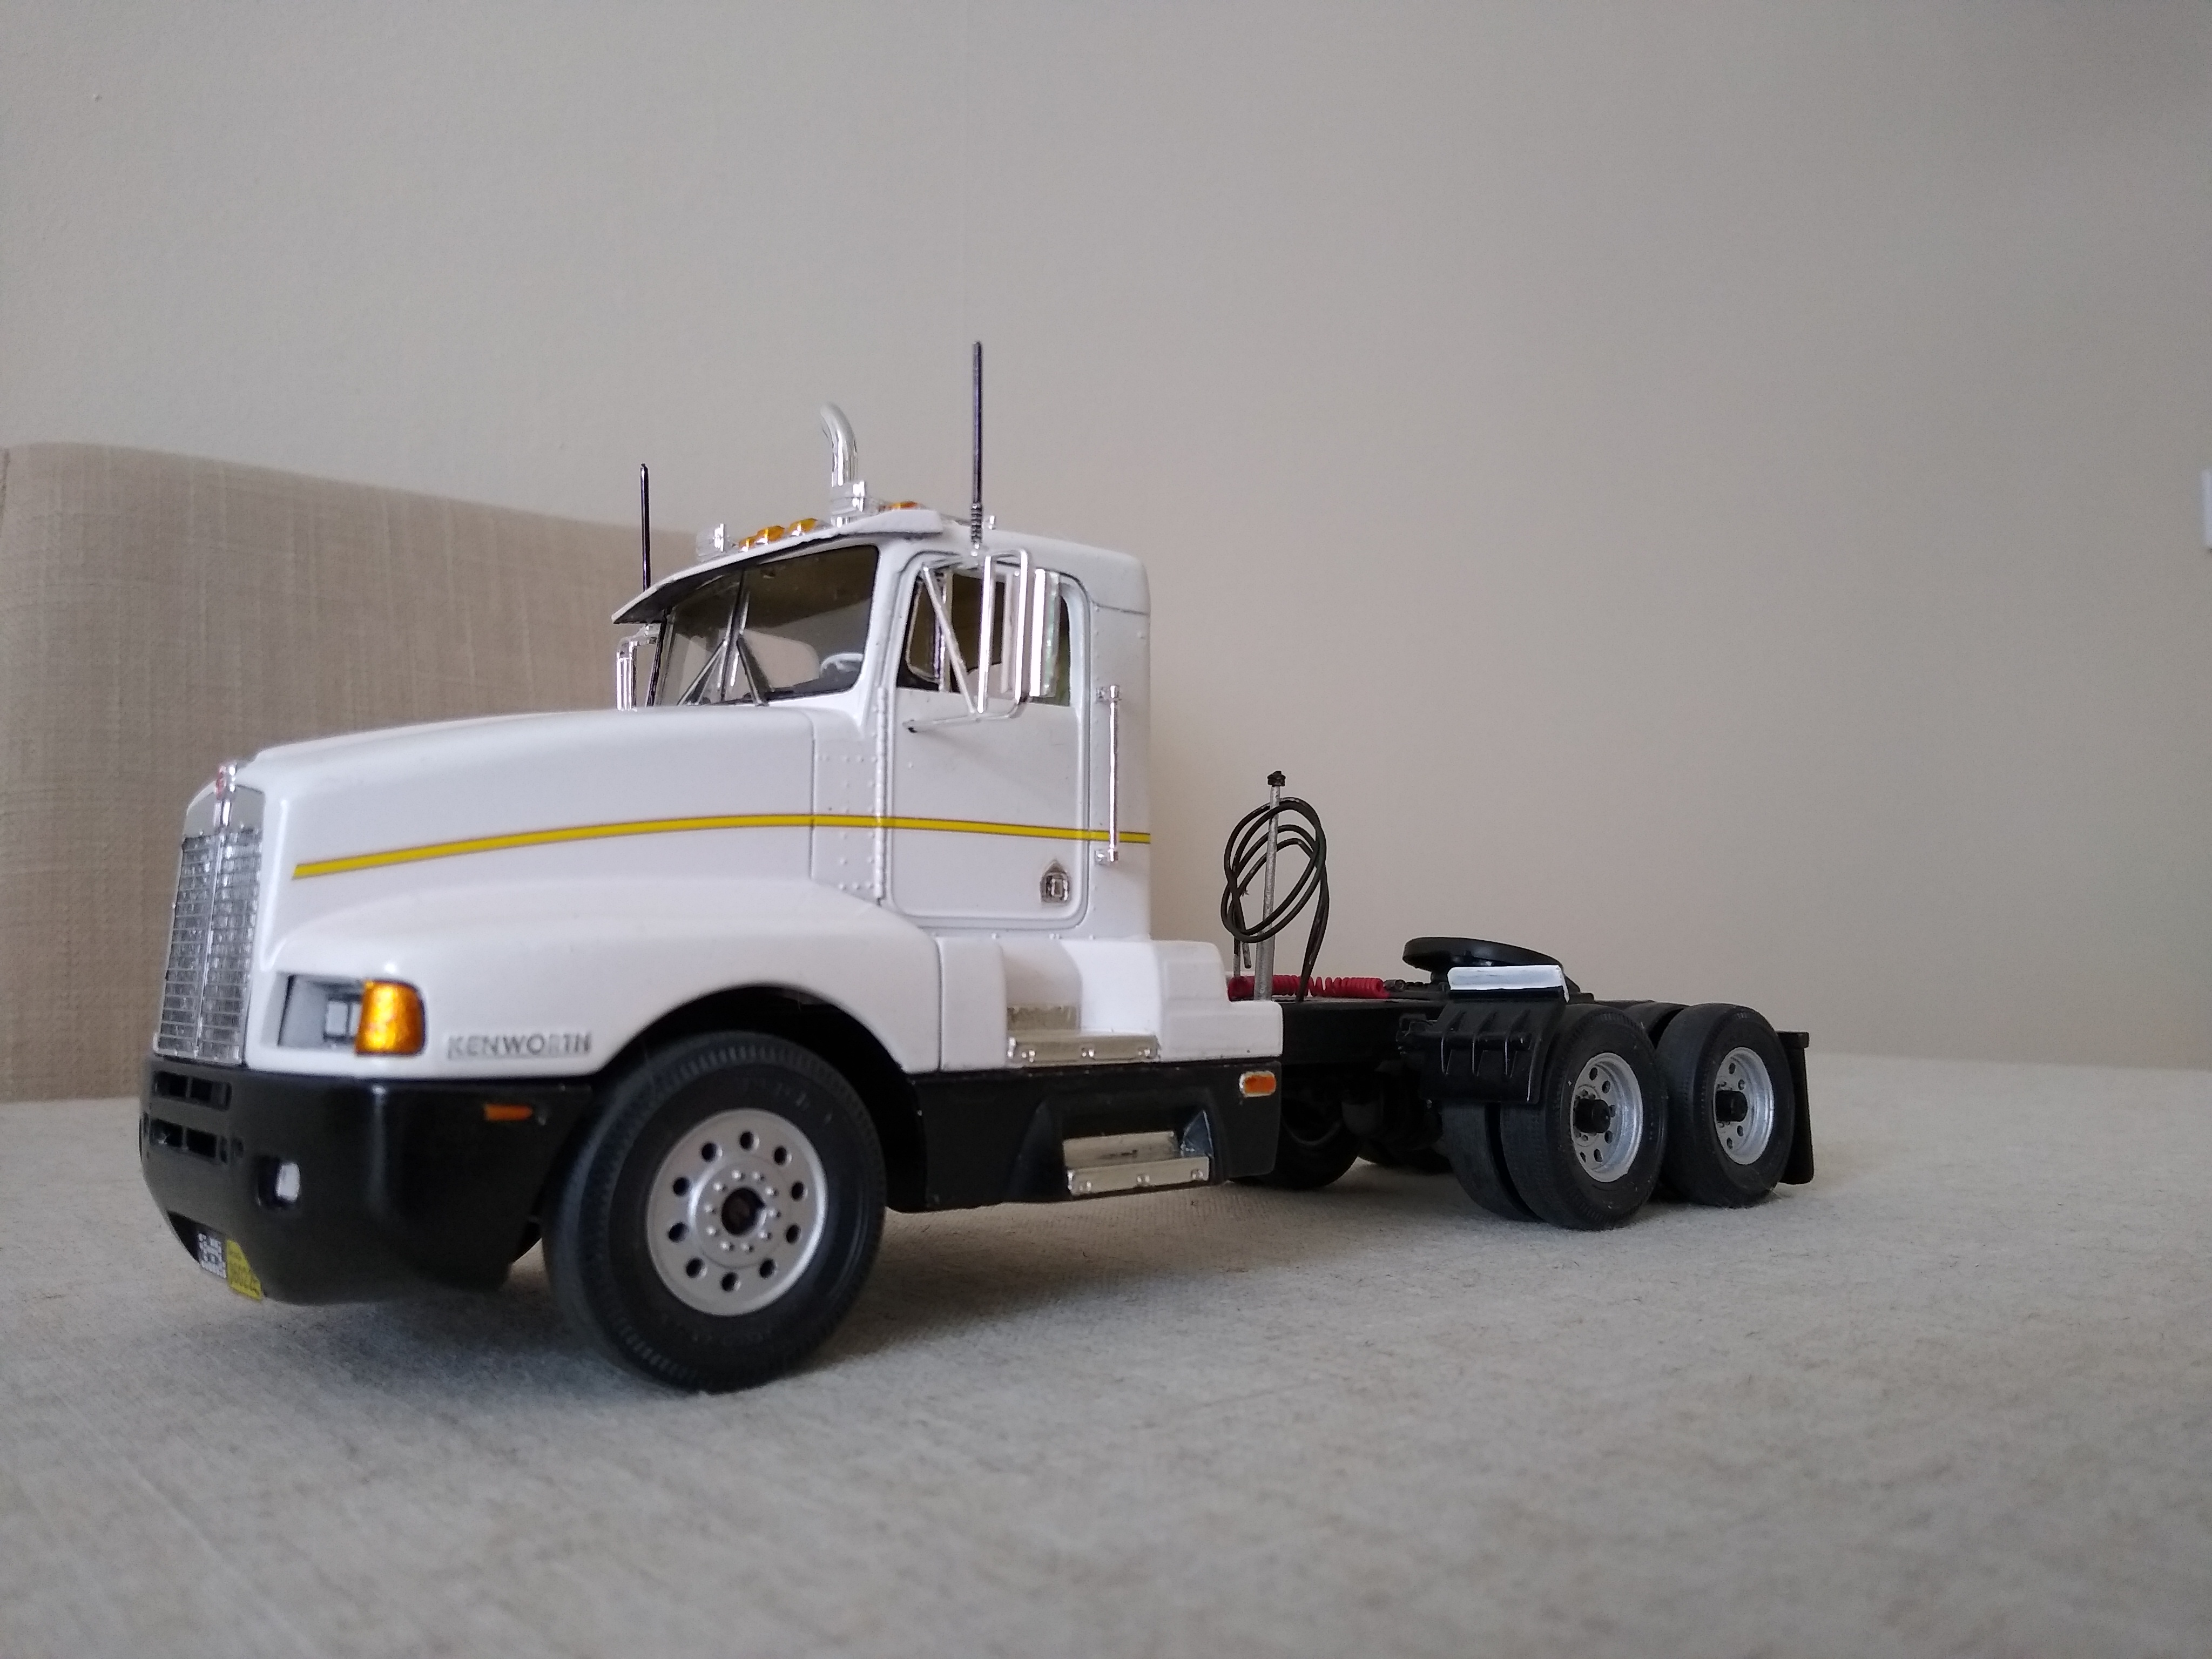
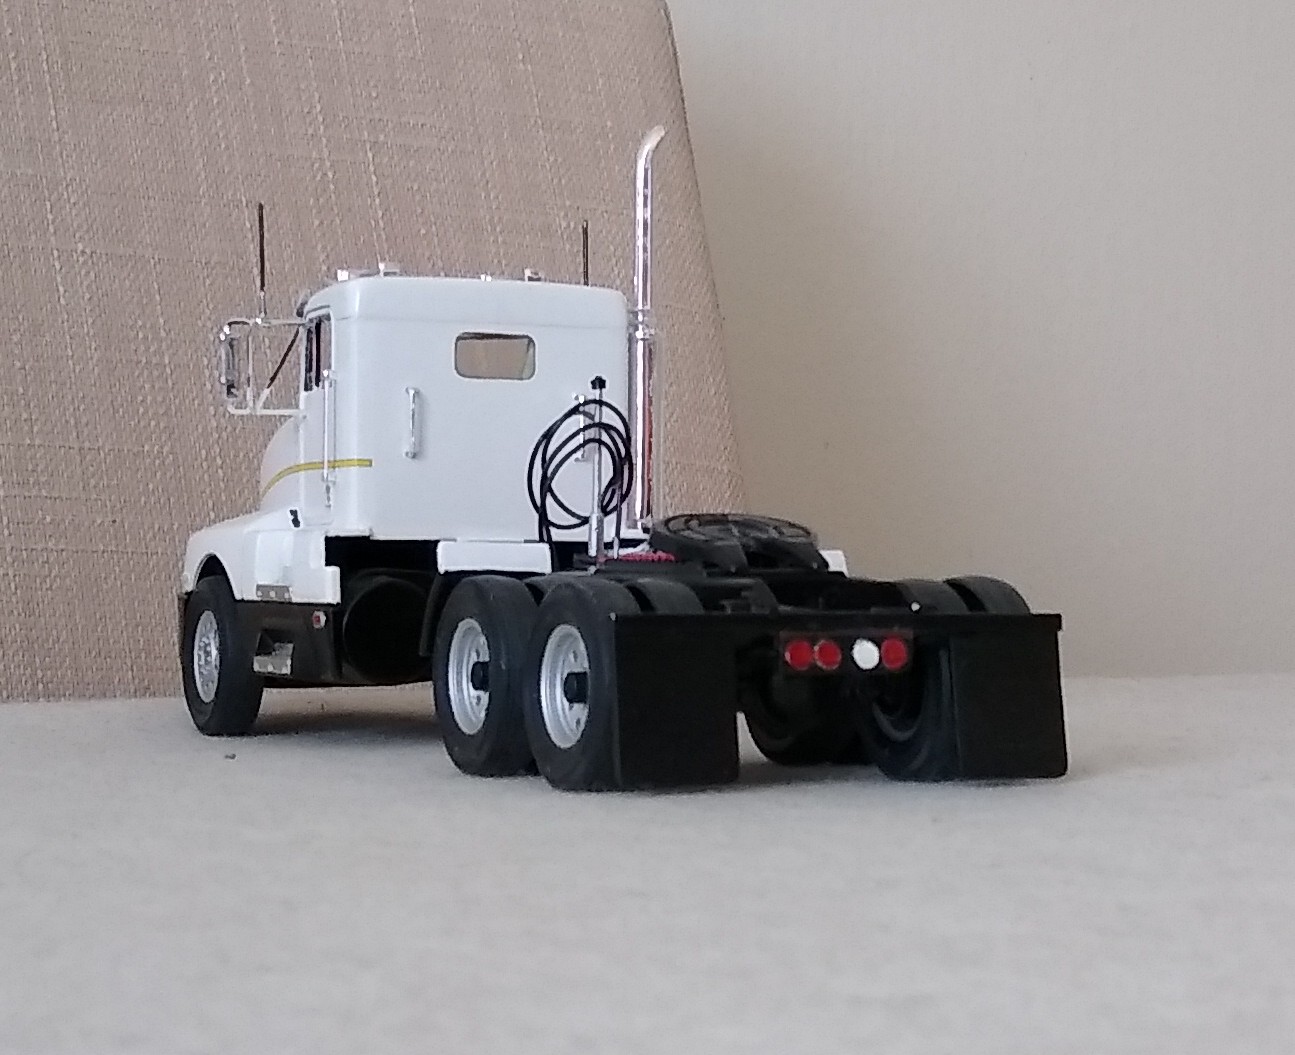
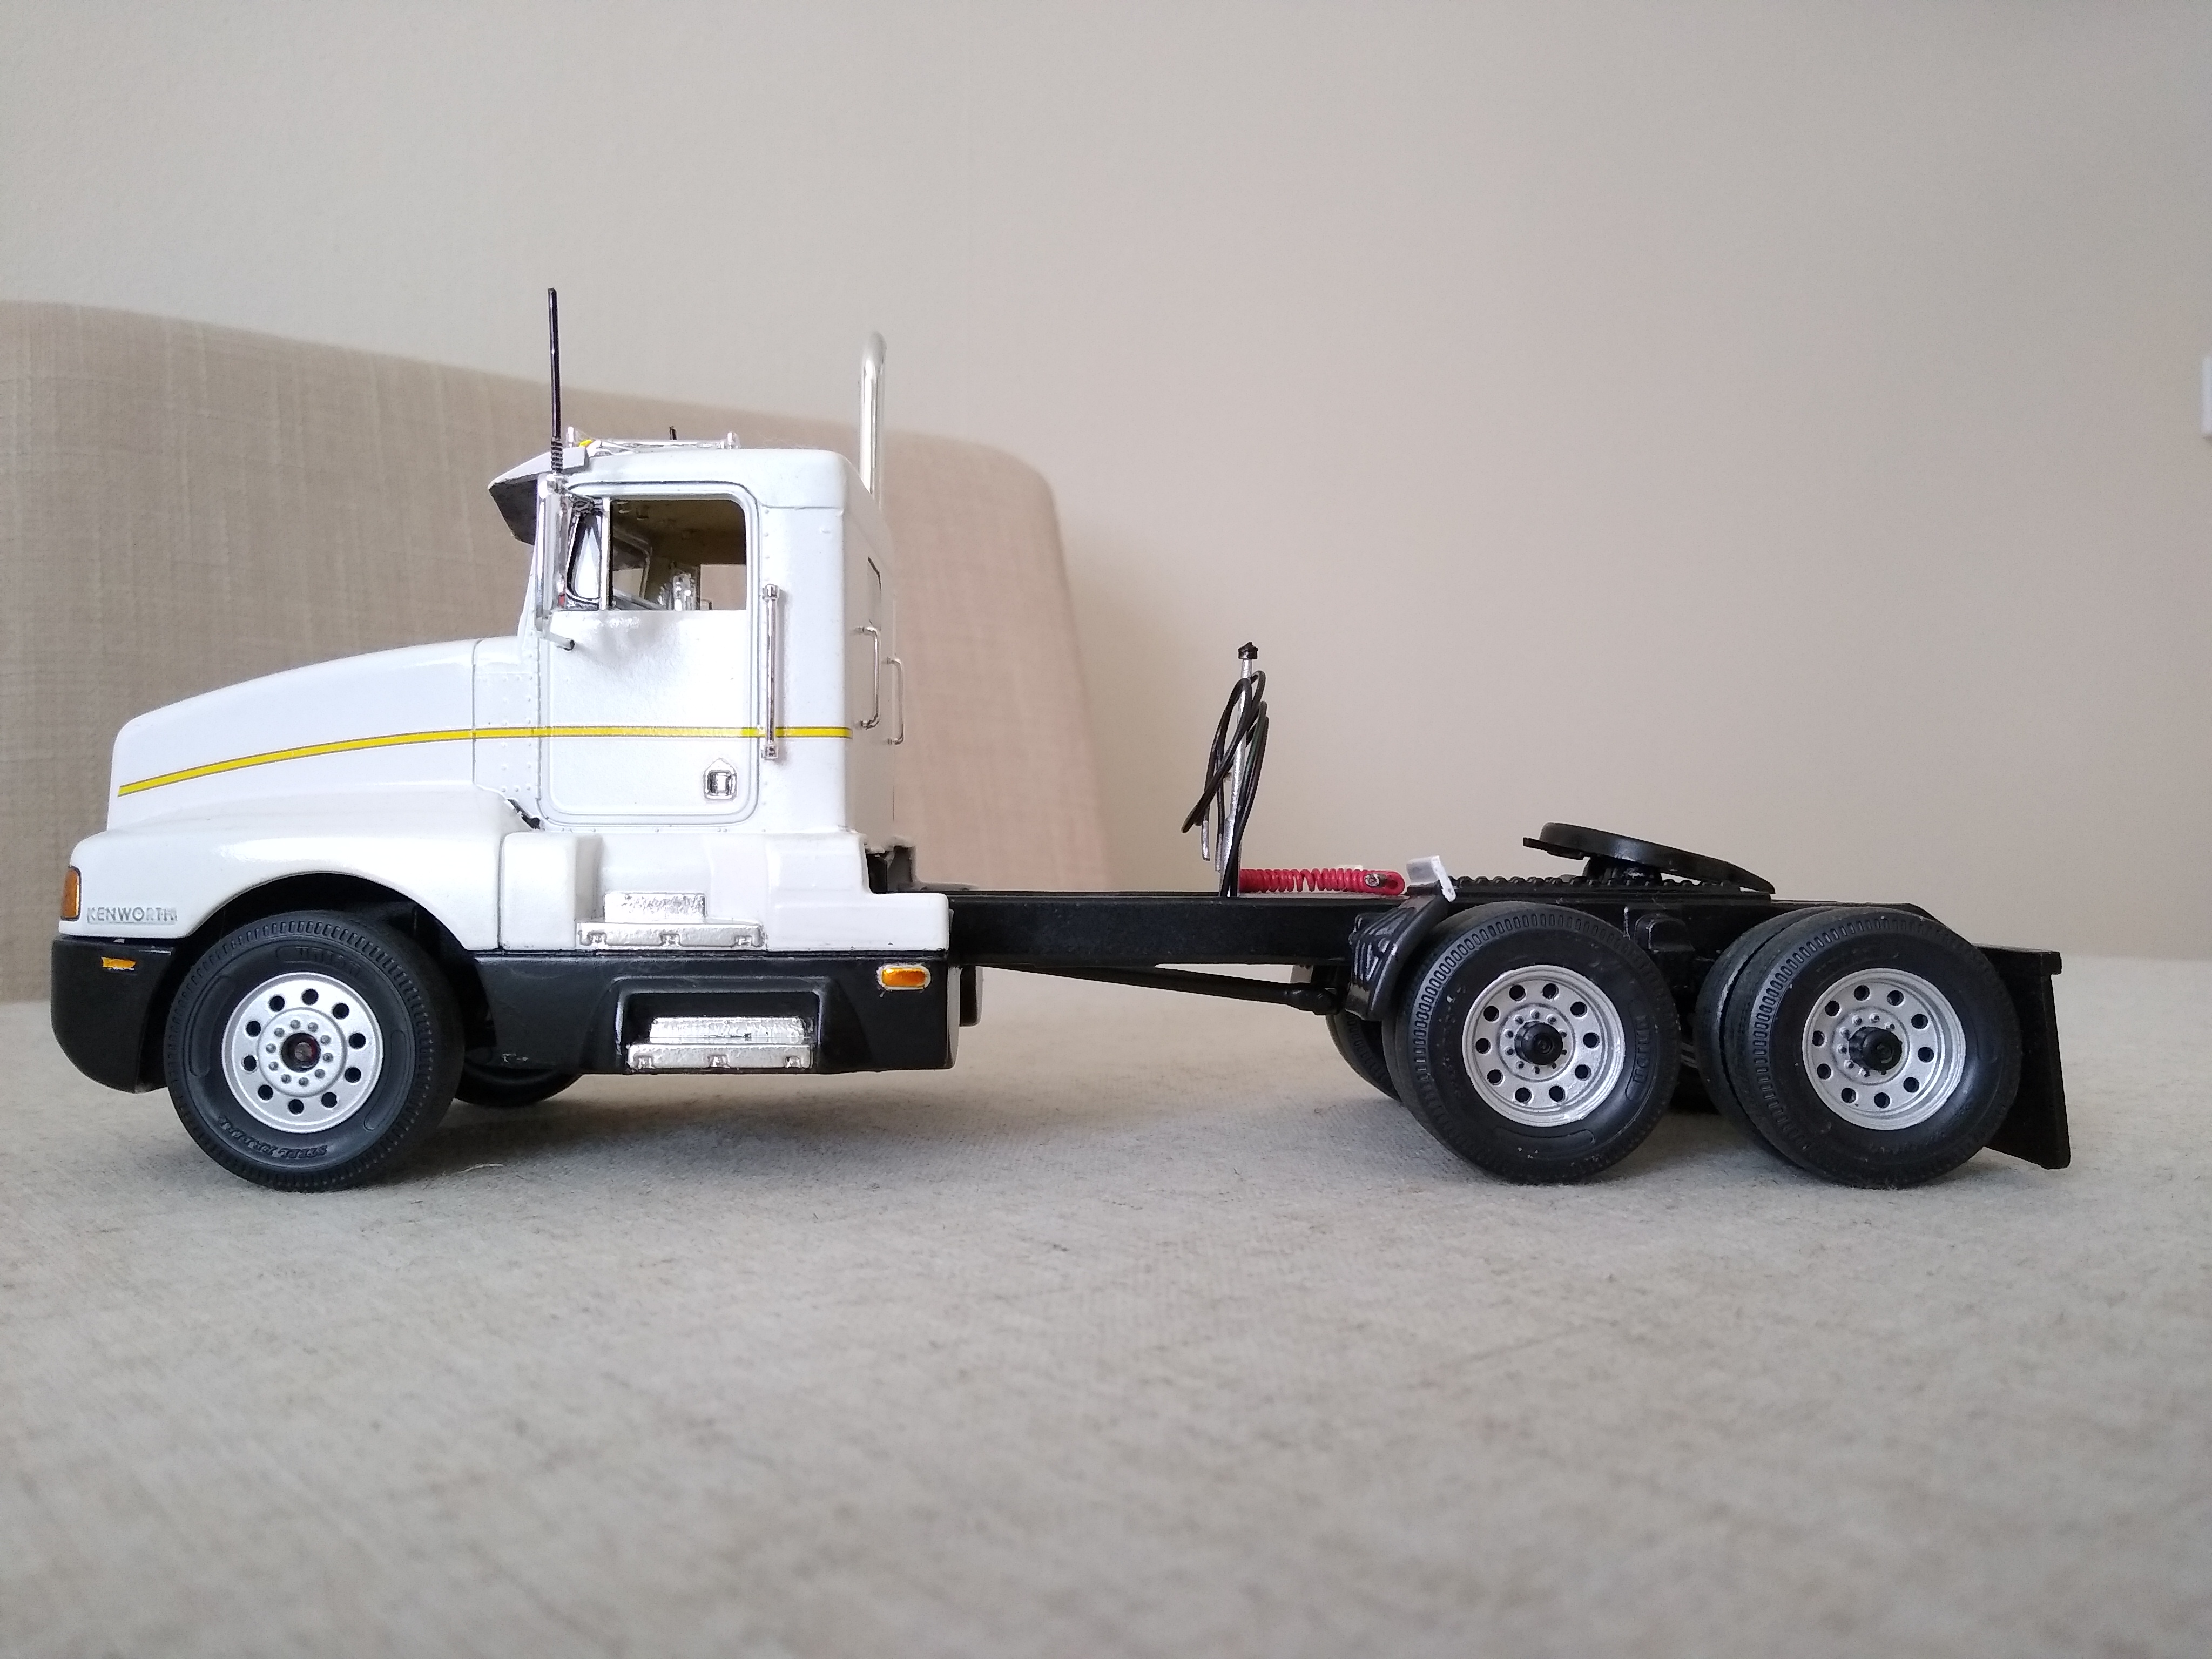
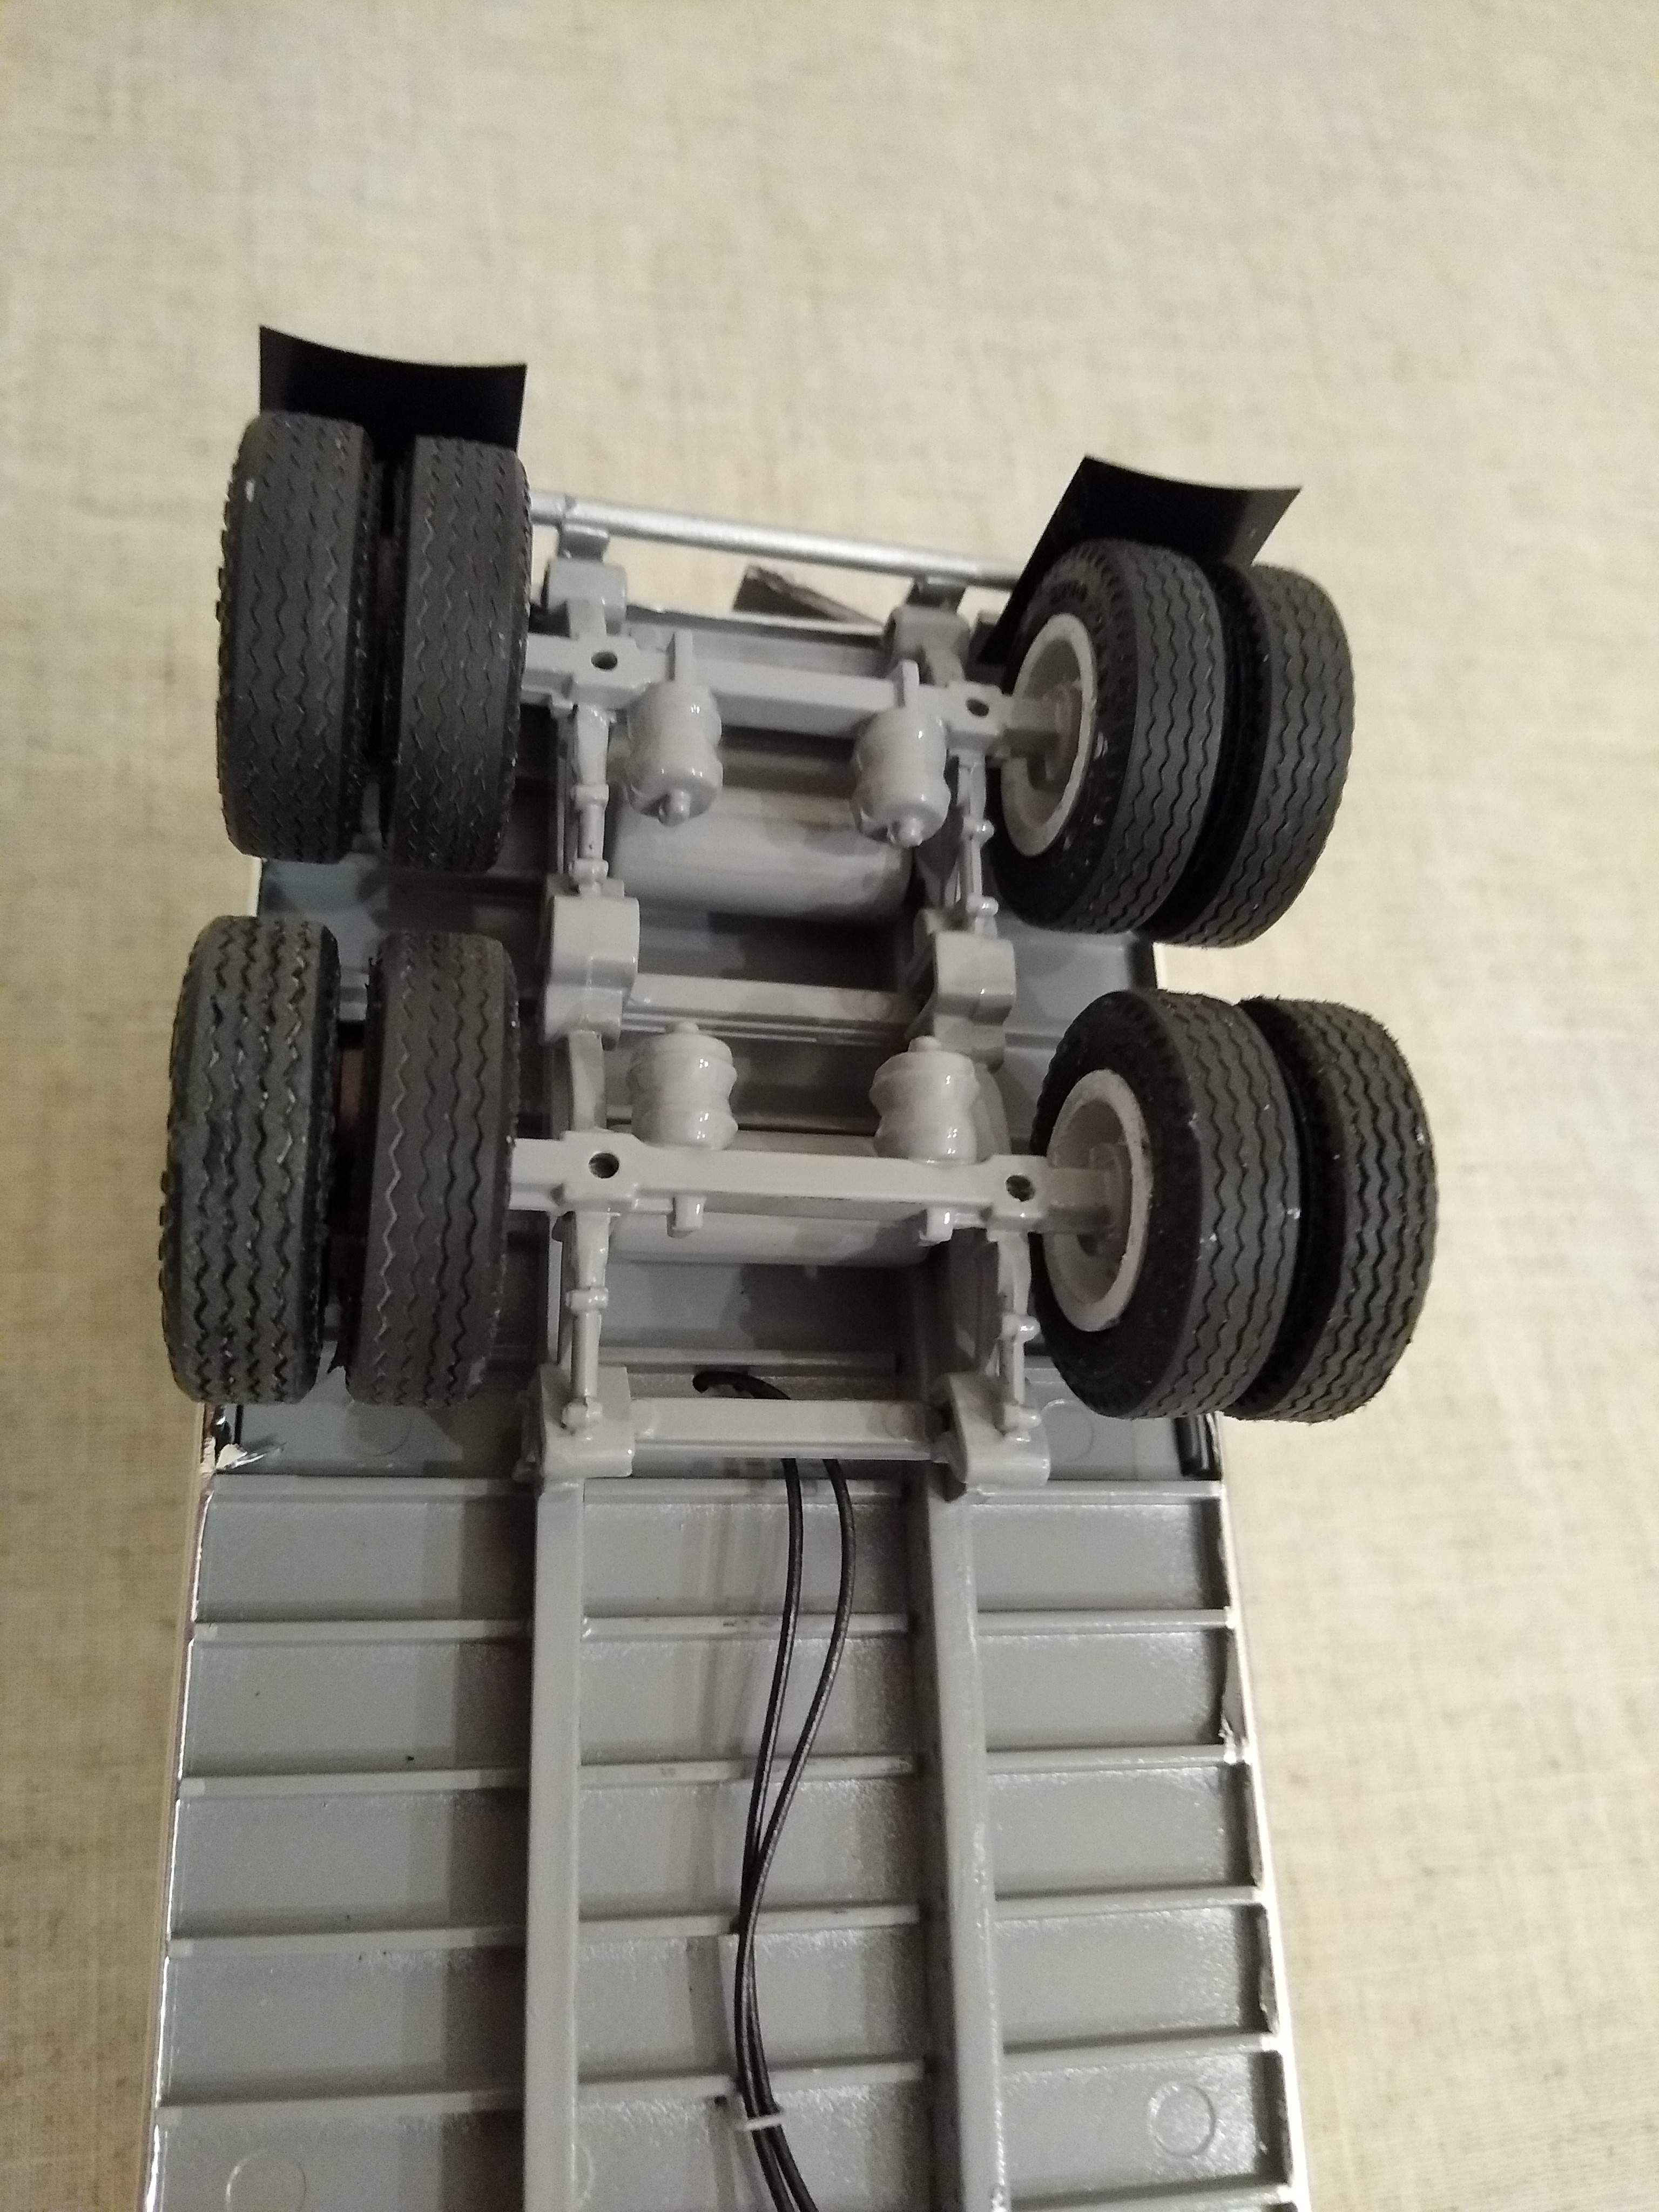
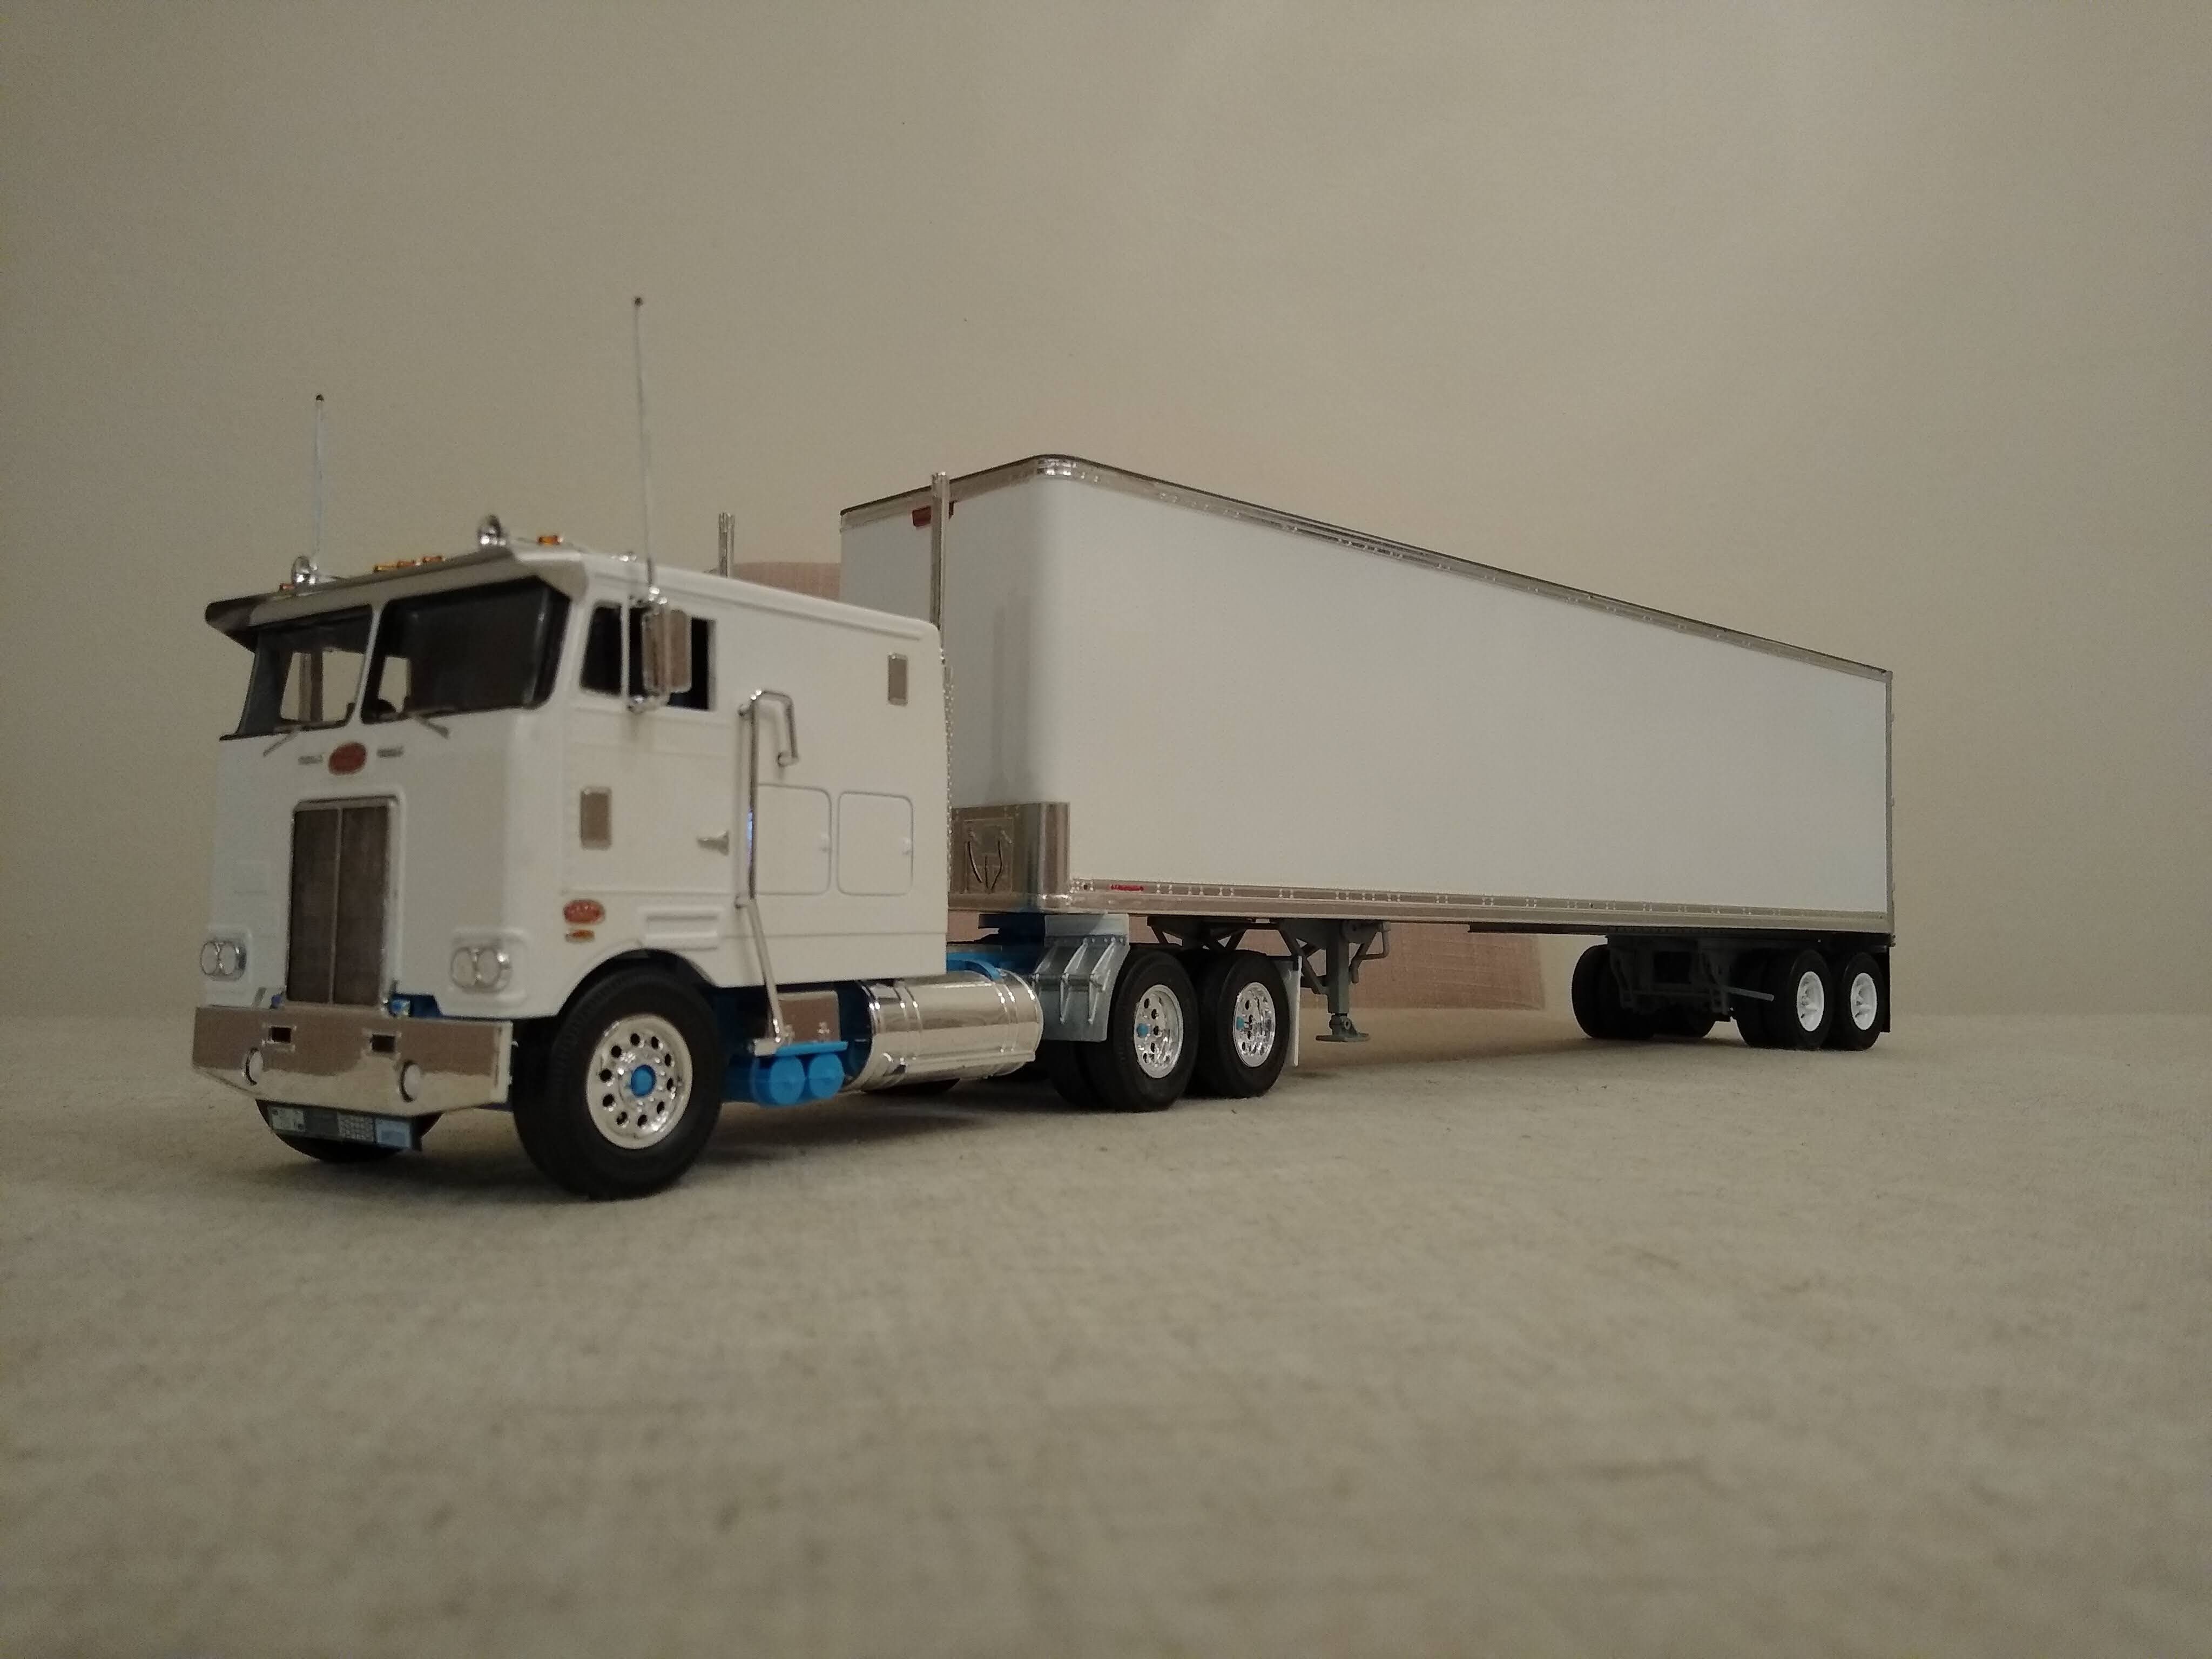
I'll add this to the WIP too, I'm trying to add the little things that make these snappers more realistic to the eye. Something I've wanted to do is the airlines for the trailer. Using garden tie-wire coloured black with a Sharpie I have formed the air and electrical lines, then either draped them over a convenient crossbar or made myself a pogo stick out of stock plastic tube of different diameters. I still can't replicate gladhands but they all look better. The yellow Mack has the livery of a Liverpool UK company on it so I used the old English three line system for that, all neatly stowed. Red for supply, blue for emergency and yellow for service with a narrower electric suzie on the right. English trailers of the era didn't use spring brake chambers, so the emergency line supplied reservoir air from the tractor to the trailer chambers and the tractor front axle only, using a lever called the Dead Man. So called because if you had to use it you were... I've also managed to deal with another issue on these kits, the lack of hubs on the drive axles. I found some cheap pens that have end caps the right size. I just cut them down, paint them and glue them on. Done the KW T600 so far but instantly looks better (righter?) to the eye. Before, it was like looking at a left hand threaded bolt! Just didn't look right for some reason. Now I've just got to buy another 24 pens!
-
A tale of two trailers
Rockford replied to Rockford's topic in WIP: Model Trucks: Big Rigs and Heavy Equipment
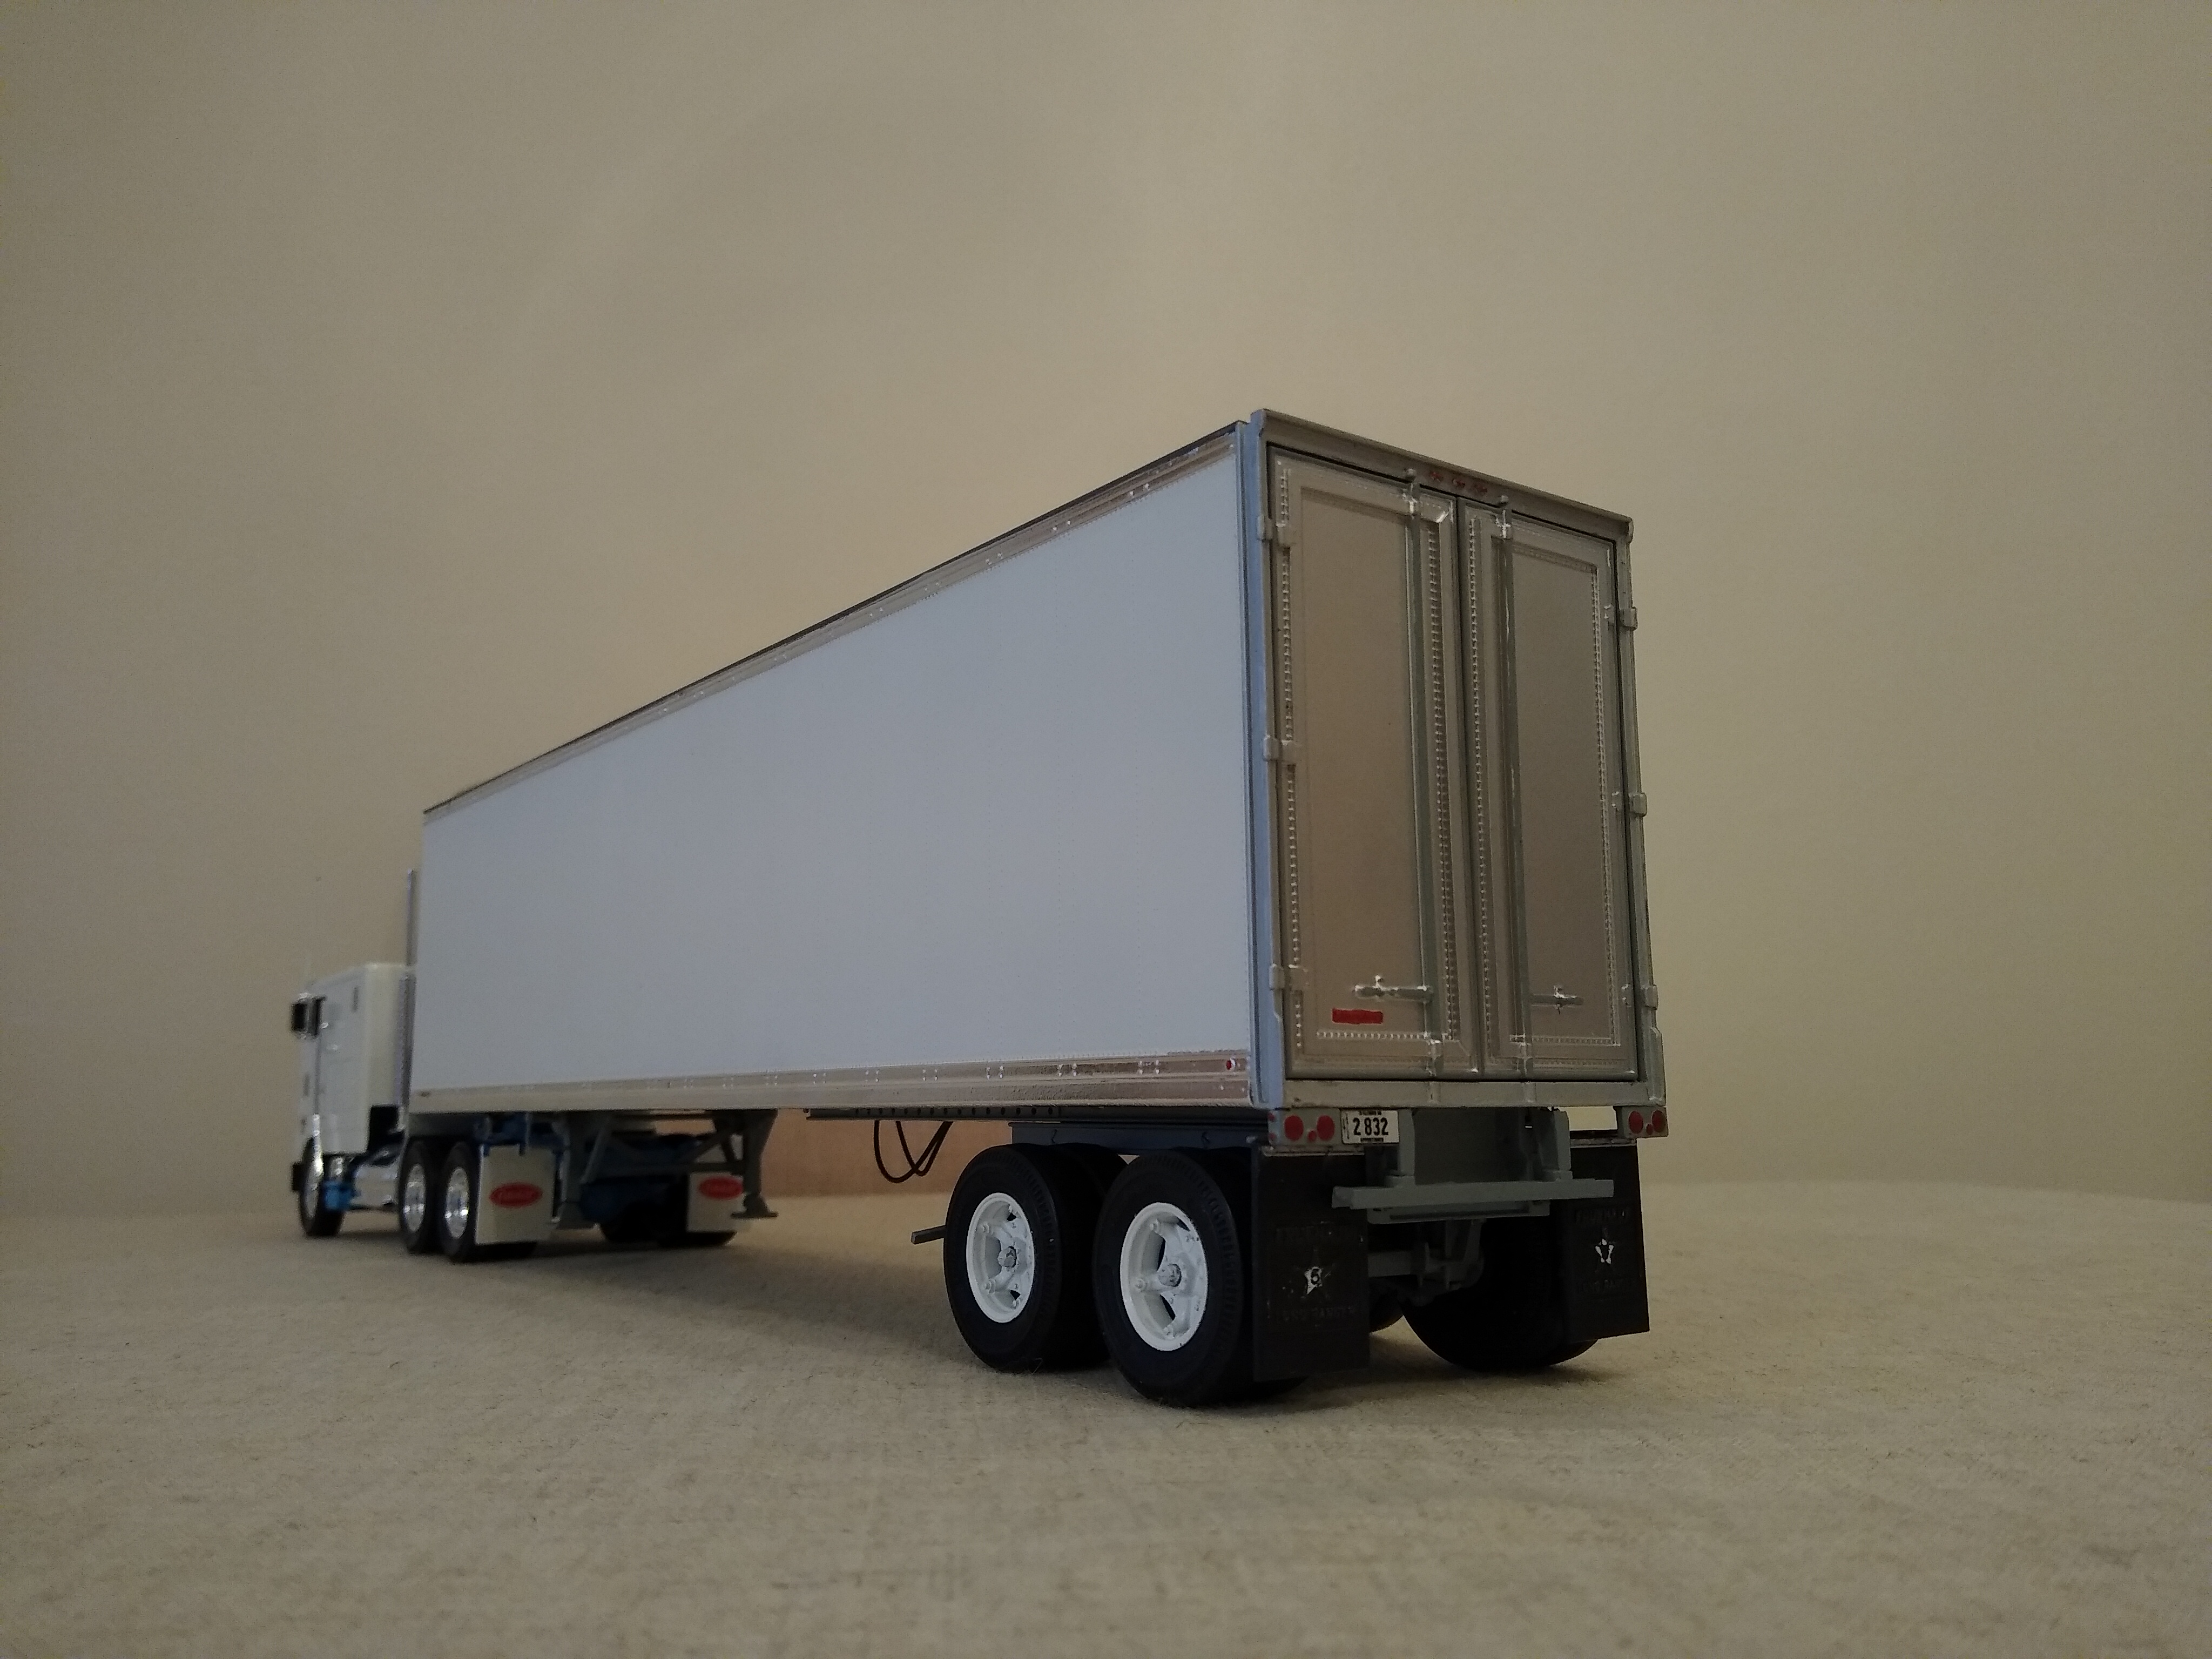
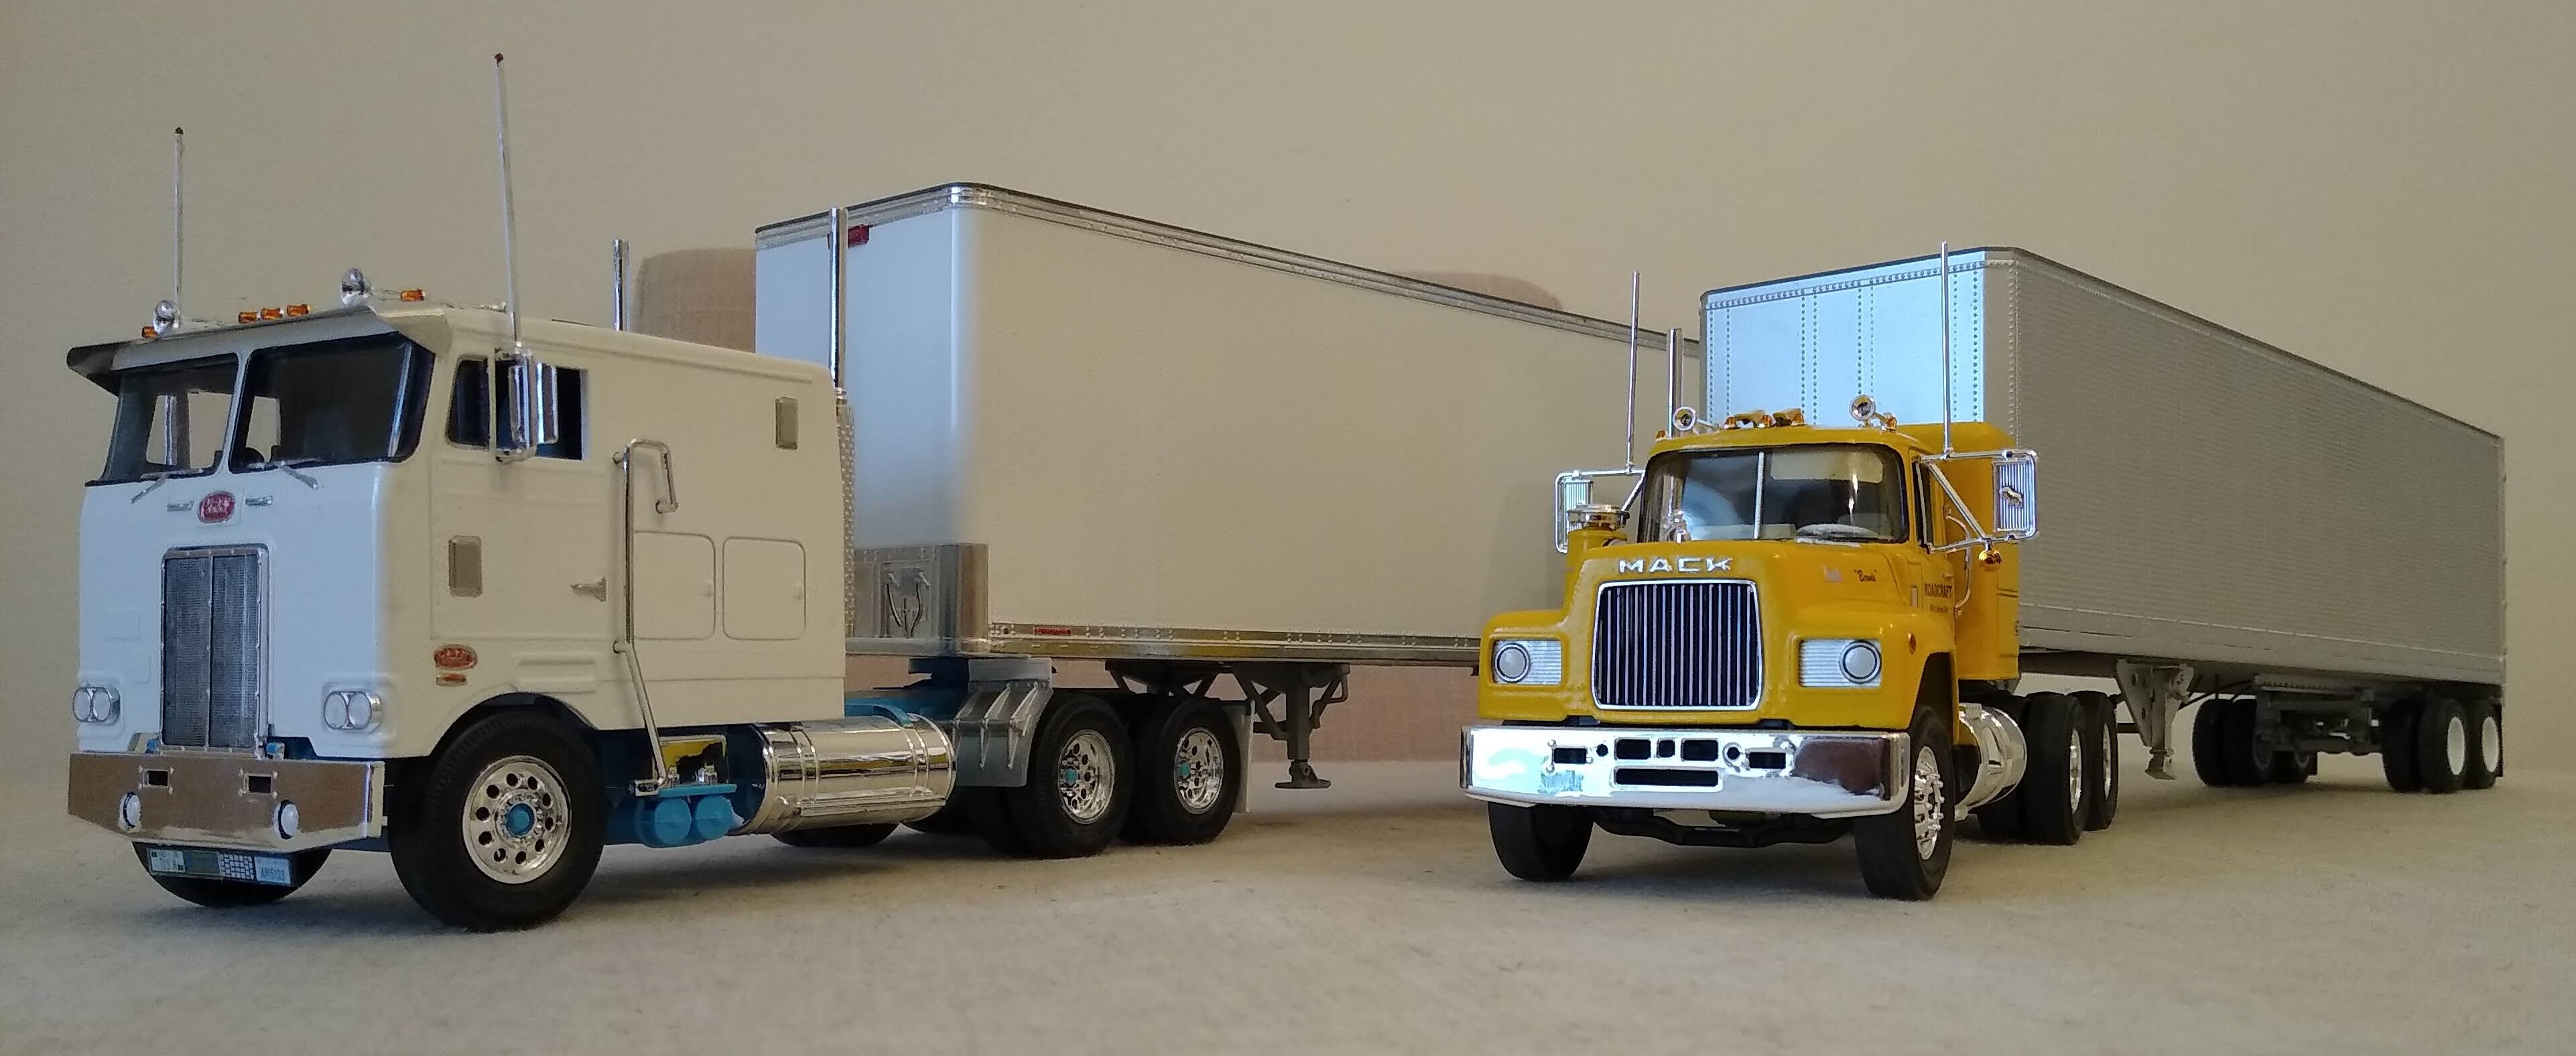
All work pretty much stalled on things because the mother in law had a stroke to add to her Alzheimer's and schizophrenia. Try untangling that lot in an 89 year old brain, you can't work out where one illness ends and another begins, so it's been a turbulent month or so. Anyway she's stabilised in hospital now so life is a bit more settled. Been looking at the Trailmobile and regretted painting the whole thing silver. Always intended to do the chassis and underfloor in a grey colour. I don't know why I didn't. I had already bought the paint so I masked the box off and then DROPPED IT ON THE GARAGE FLOOR! Nearly had a stroke myself until I examined it and found all the masking had saved it. Shot the grey and all went well, no reactions etc... and I like the contrast between the silver panelling and the grey chassis. The grey doesn't stand out as much as the silver so the sides stand out more. To add more contrast I decided to use Ultra Bright BMF on the bottom rail. Looks good. Started adding reflectors and marker lights to break the sides up and add a bit of realism. Few more to add.
-
What did you screw-up today??
Rockford replied to TransAmMike's topic in General Automotive Talk (Trucks and Cars)
I've made my fair share of pig's ears over the years but I find the most frustrating thing about trying to build any kit now is that I drop everything. I'm sick of spending 50% of my modelling time with my head between my knees looking for something on the floor. At 57, putting your head between your knees isn't easy either! Its good seeing other mistakes though, makes me realize that it's not just me. -
1973 Peterbilt 352 Cabover
Rockford replied to Pete68's topic in WIP: Model Trucks: Big Rigs and Heavy Equipment
It looks grand! It's longer than the kit chassis but not overly much. Looks like something you would see on the road in the day. -
AMT Mack Cruise-Liner
Rockford replied to doorsovdoon's topic in WIP: Model Trucks: Big Rigs and Heavy Equipment
Looks great mate, very brave on the masking for paint on the cab, I just can't summon up the courage (or the patience) to jump in and mask stuff off, too scared of ruining a job. This turned out fantastic. Well done! -
1973 Peterbilt 352 Cabover
Rockford replied to Pete68's topic in WIP: Model Trucks: Big Rigs and Heavy Equipment
Looks good, why are you doing it, for the longer chassis or is a leftovers job? -
does bare metal foil spoil?
Rockford replied to youpey's topic in Model Building Questions and Answers
I've had one sheet tarnish after about 10 years, but have suffered a lot of sheets cracking but I feel that might be due to rough handling in transit and storage, too much flexing etc... I've only ever had one sheet of Ultra Bright Chrome - never again. So brittle you ruin it getting it off the sheet, never mind trying to shape it over something. Standard chrome is my choice and no, I've never had adhesion issues. BMF does spoil, but usually only part of your day!! -
I use garden tie wire, it has soft single core wire inside because it is not for use in electrics. It also easy to pull the wire core out so that you have a realistic flexible rubber tube, then you just drill and insert pigtails made from the core wire at each destination and slot the outer sleeve onto them once they're secure. When it use that way it gives more realistic curves with no links or obvious bend points. Yes it is green but it colours easy with a Sharpie marker. I've had one roll that I've had for years and it does for all sorts of lines and cables. The inner core is good for fuel and brake lines. I'm not overly concerned about the scale diameter, I just know it looks right to the eye for heater hoses on 1/24 & 1/25 kits.
-
AMT Mack Cruise-Liner
Rockford replied to doorsovdoon's topic in WIP: Model Trucks: Big Rigs and Heavy Equipment
So, looks like the steering box is fixed to the front axle and not (as usual) to the frame. So whereas on other trucks the steering shaft down to the box is fairly rigid, this one has to flex enough to accommodate spring deflection on the front axle. You can see it's that way because the drop arm is at 90degrees plane to that of a normal box. I think the piece sitting on your cutting board, the left hand end sits on top of the axle, next to the spring u-bolts, or drops down in front of the axle beam and butts right up against it with the output shaft housing sitting on the axle beam. Maybe it was to eliminate bump steer, or confuse AMT builders. I know I probably haven't helped there. -
My most loved hobby from my youth...
Rockford replied to Teddie's topic in Welcome! Introduce Yourself
Welcome Teddy. I came back to the hobby after some time and you soon start getting back into the swing of things, I'm sure you'll soon be building kits like you never could before! -
I recently used the Ultra Bright BMF and it was pretty awful. Nothing like the older ordinary stuff. Terrible adhesion and really brittle. That car is beautiful though! Great job ?
-
Great execution of a very good kit!
-
A tale of two trailers
Rockford replied to Rockford's topic in WIP: Model Trucks: Big Rigs and Heavy Equipment
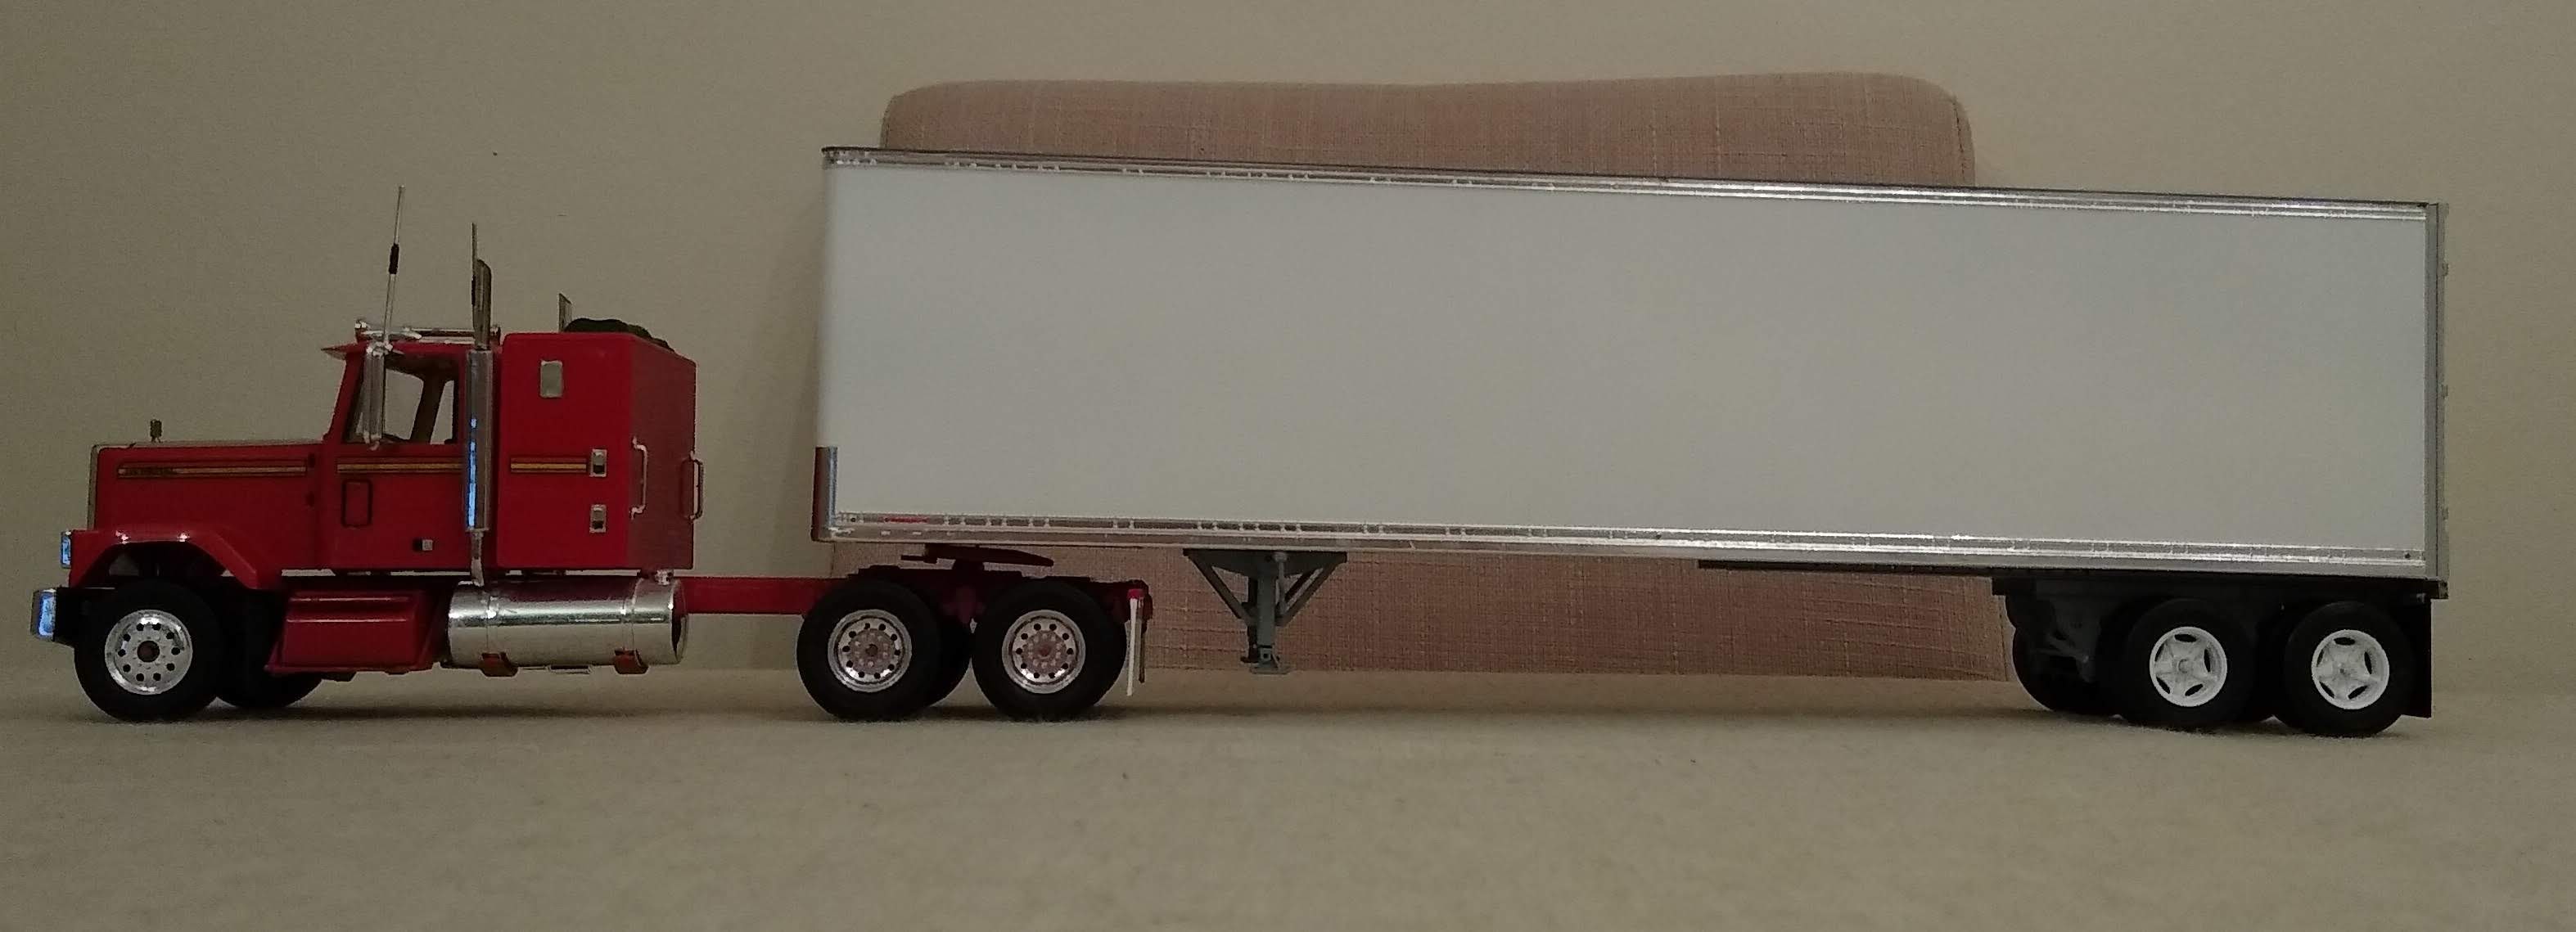
I feel I've achieved the look I wanted. The Fruehauf is looking good. So pleased with the paint finish using a Hycote rattle can. With such a big flat surface ang blemishes would stand out but all turned out excellent! I used the extra bright Bare Metal Foil on the upper and lower rails. That stuff is a pig to work with, brittle, doesn't stretch like the ordinary foils, doesn't adhere as well either. I took ages with a cocktail stick working it into all the rivets etc... but I got there. Used ordinary foil on the bulkhead at the front. On the Trailmobile In experimenting with my mudflaps using electrical tape I've realised I can change the colour as it suits me, so I've gone to black. Looks ok. I still need to finish the pipe work and few other things I can't remember. The two are looking good together. Still want to work out a way to replicate the airlines between the tractor and the trailer.
-
A tale of two trailers
Rockford replied to Rockford's topic in WIP: Model Trucks: Big Rigs and Heavy Equipment
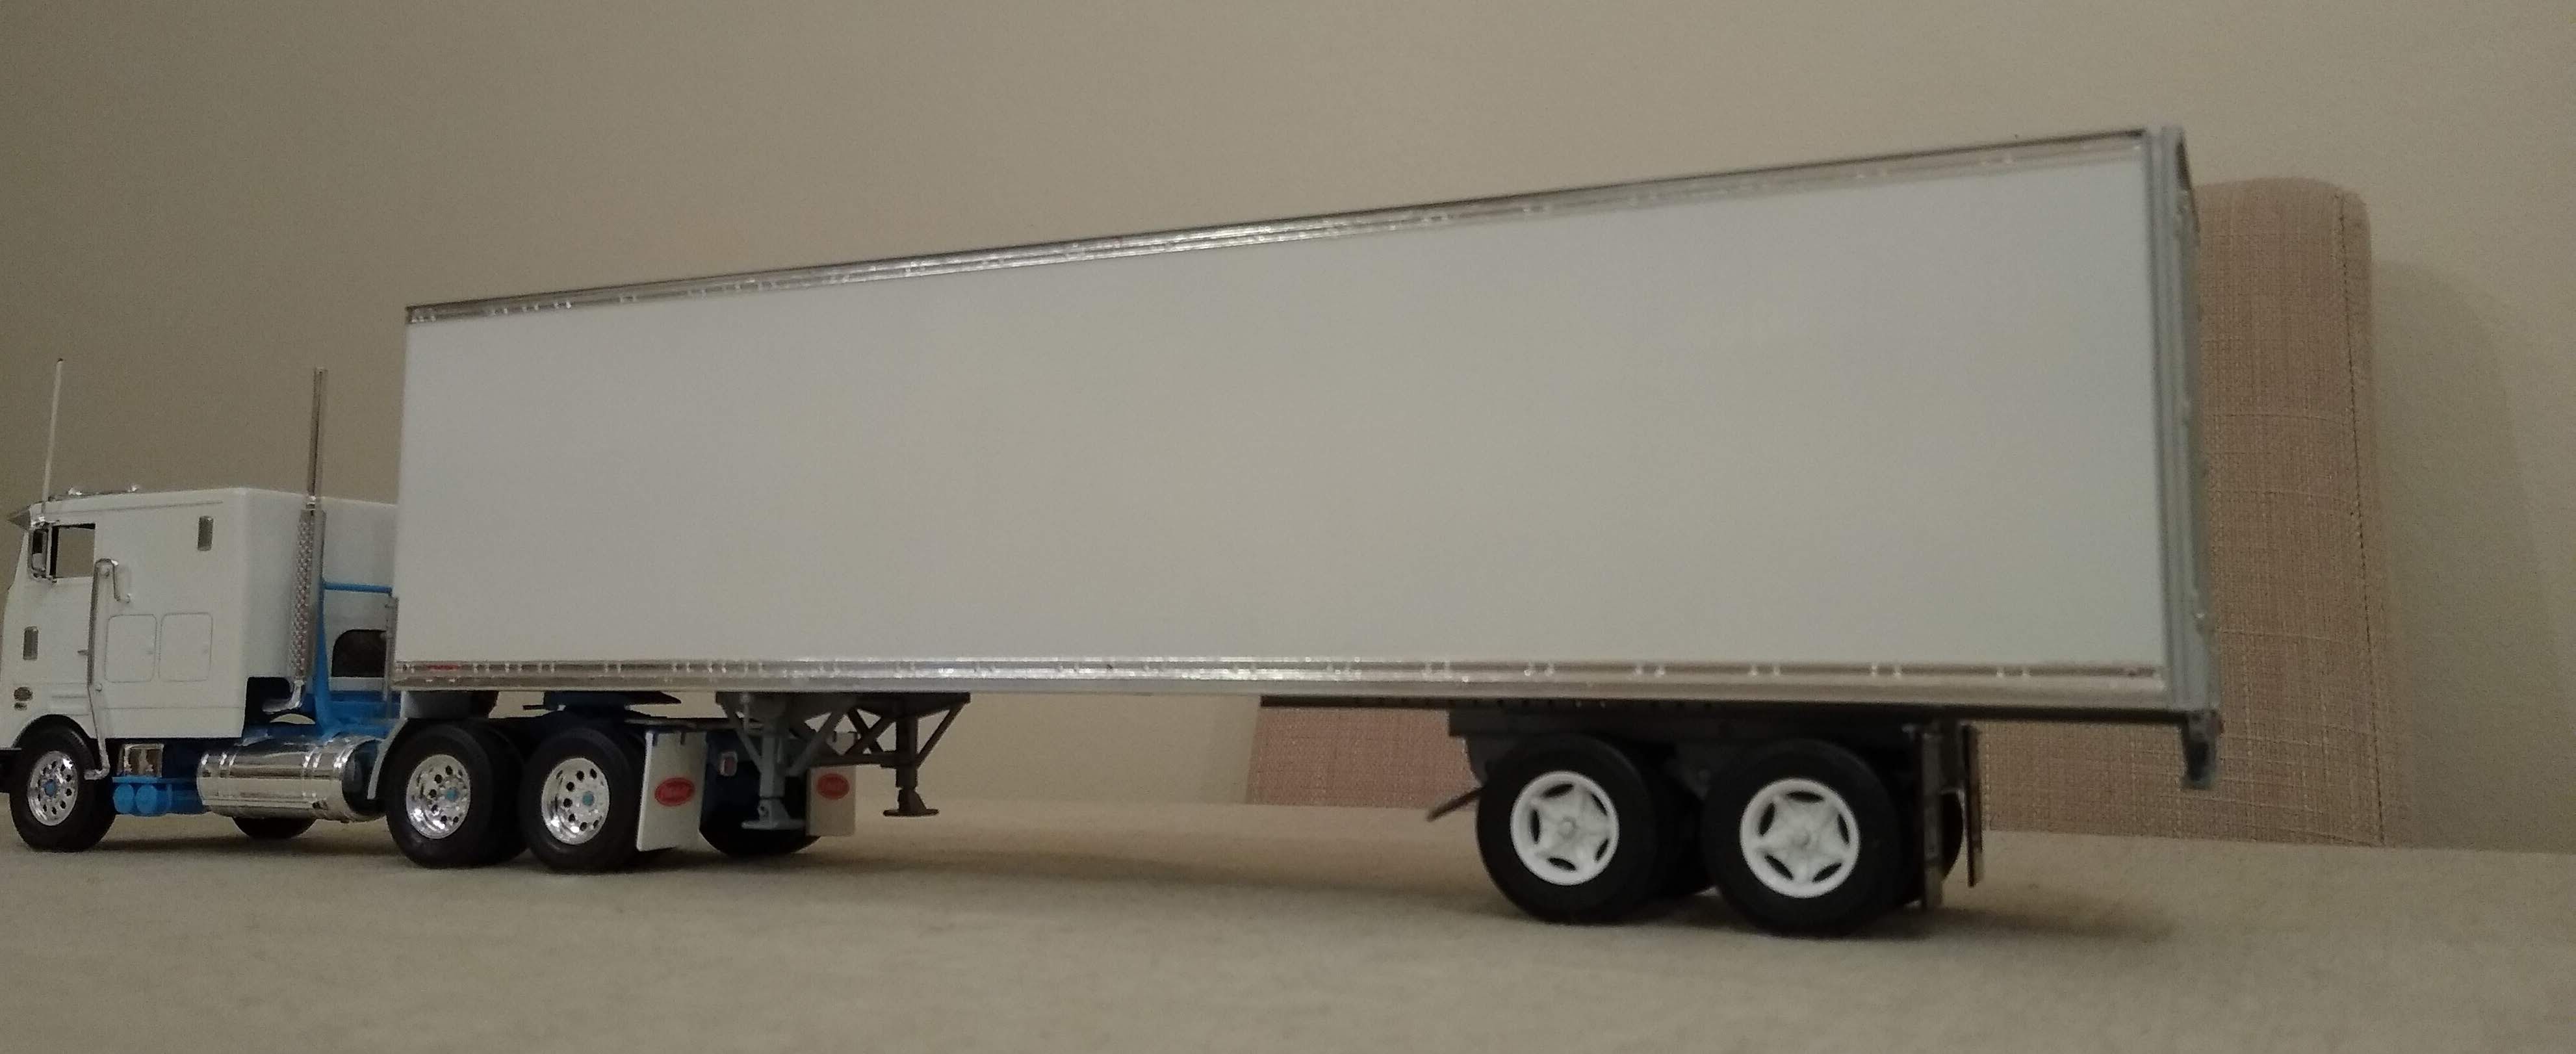
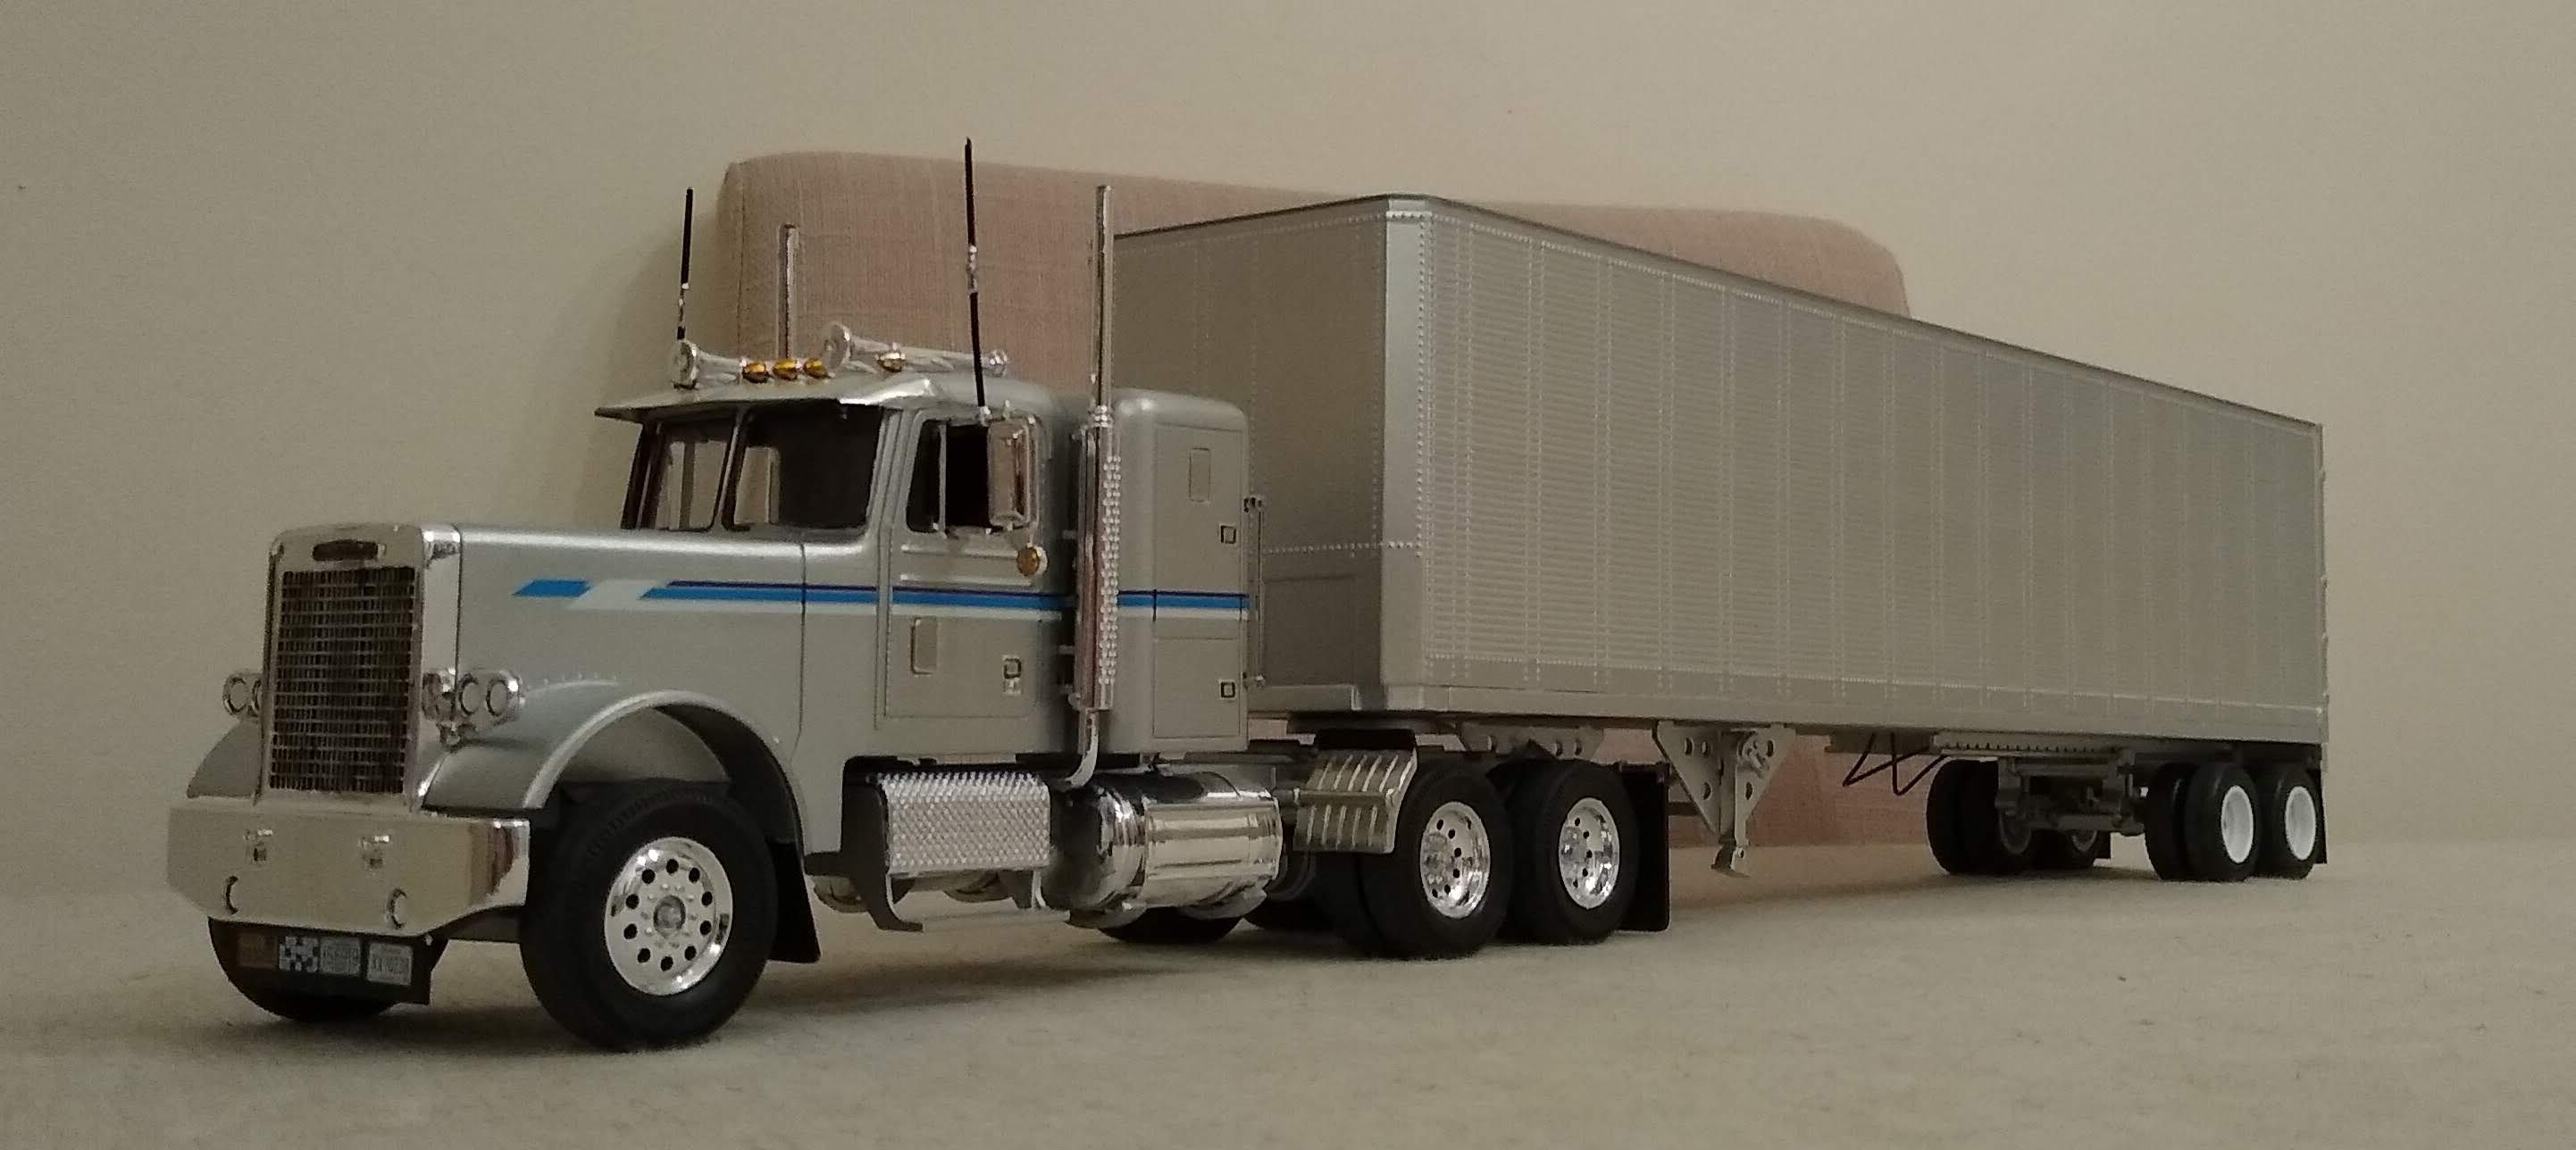
For me, this is the perfect stance for the American truck, and that is what I am trying to achieve with my trailers. The bridge law gave American trucks a look that no other country had, with the duals spread as far apart as possible.