Lunajammer
-
Posts
4,050 -
Joined
-
Last visited
Content Type
Profiles
Forums
Events
Gallery
Everything posted by Lunajammer
-
We'd done this topic before. I just didn't think it's been more than ten years already. YEESH! I guess we're due for a refresh.
-

No need to buy new kits now
Lunajammer replied to junkyardjeff's topic in General Automotive Talk (Trucks and Cars)
For $50 I filled a Ranger pickup bed with boxes of glue bombs from a collectibles garage sale. Lots of garbage but a bashers paradise. Most enjoyable and long lasting $50 I ever spent. -
It's just another facet of car culture and understanding that part of it that excites us and invites us to learn more about our interest area. For many, if not most, artistic expression deepens the dimension. Your wife could ask that question of anybody, including her friends, about the interests that fill their pastimes.
-
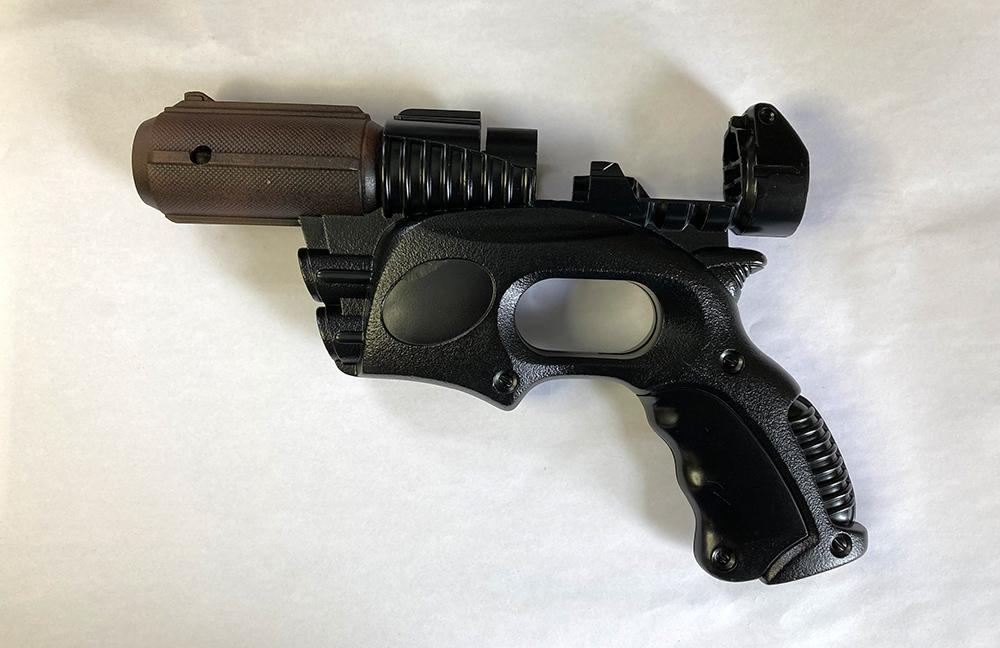
While doing a Nerf gun sci fi blaster conversion, I wanted a REALLY flat black, so I used Rustoleum 2X ULTRA MATT. It was ultra-not-very-matt at all. Semi gloss at best. In this case everything worked out fine, but buyer beware.

-
Which to me begs the question, "If you can't see it, why go looking for it?"
-
1966 Mercury M-250 4x4
Lunajammer replied to Mercuryman54's topic in Model Trucks: Pickups, Vans, SUVs, Light Commercial
Wow, wonderful piece you have there. Nice work! I even learned something today, a Mercury pickup in '66? -
?
-
I don't see anything about it that really sounds my alarms other than it doesn't seem like a very big operation and has limited supplies, heavy on military and aircraft. Then again, you don't get to see what your shipping price is until after you enter all your shipping, email and contact info.
-
Cool. I spent way too much time thumbing through almost all of it. Certainly an optimistic view of wagon life.
-
C-1 Models "Shooting Brake" AKA Camaro Wagon
Lunajammer replied to BDSchindler's topic in WIP: Model Cars
Whoa! I REALLY like that color. Great choice. -
That's what I'm talkin' about! Get it on!
-
Yep. Lacquer over enamels. Happens every time and it's seldom if ever forgiving. It tells you immediately when it's angry. It should strip off pretty easy so give it a swim and jump right back in before you let the bad mojo kill your momentum.
-
Thanks guys, means a lot! Yes, it's liberating to do a build like this because mistakes and flaws, within context, may not be mistakes at all. So I won't point them out now but a keen eye can find a few that are not within context of the subject matter ?. Paint flaws, BMF, buffing burn through, splotchy dash details, CA glue fogging, etc; all things that are laboriously managed on clean models don't much apply on builds like this. Plus, the kit's pretty simple so it leaves time to play around with fun ideas.
-
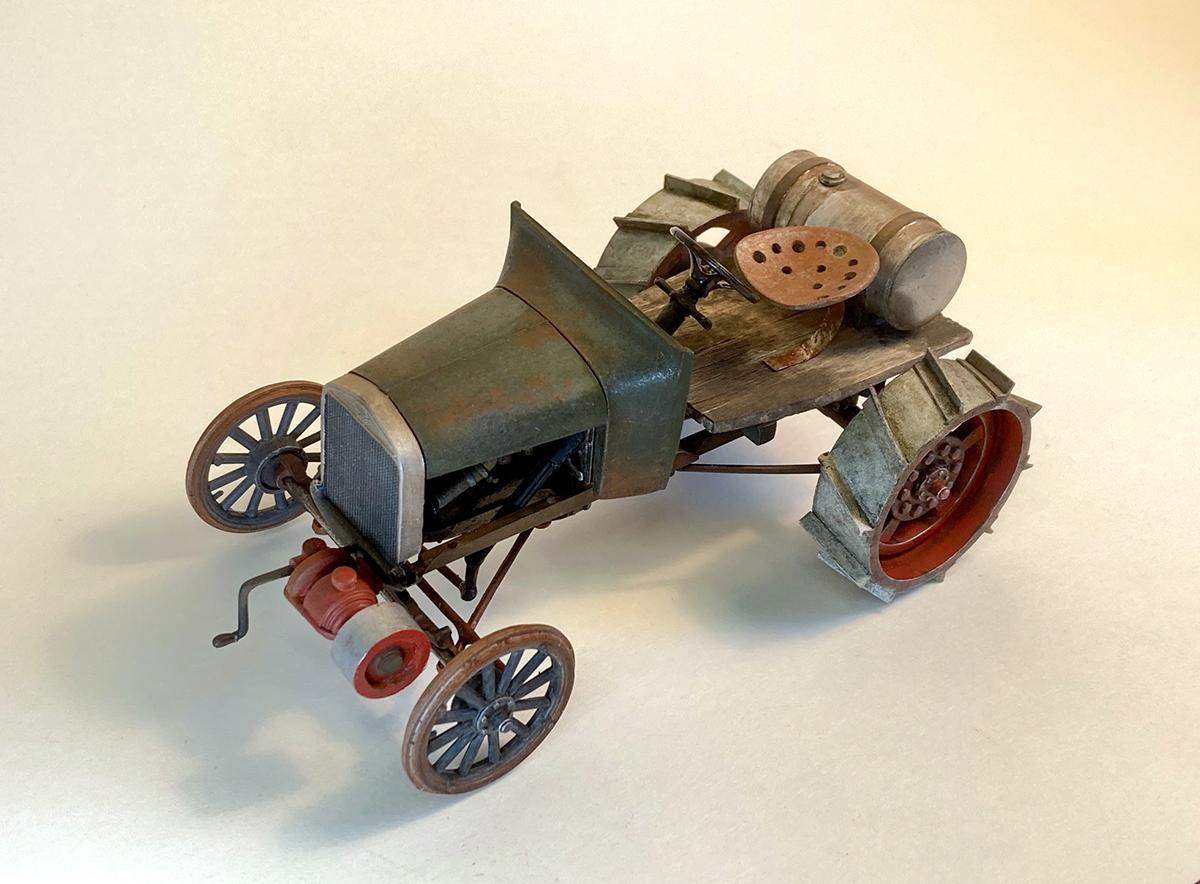
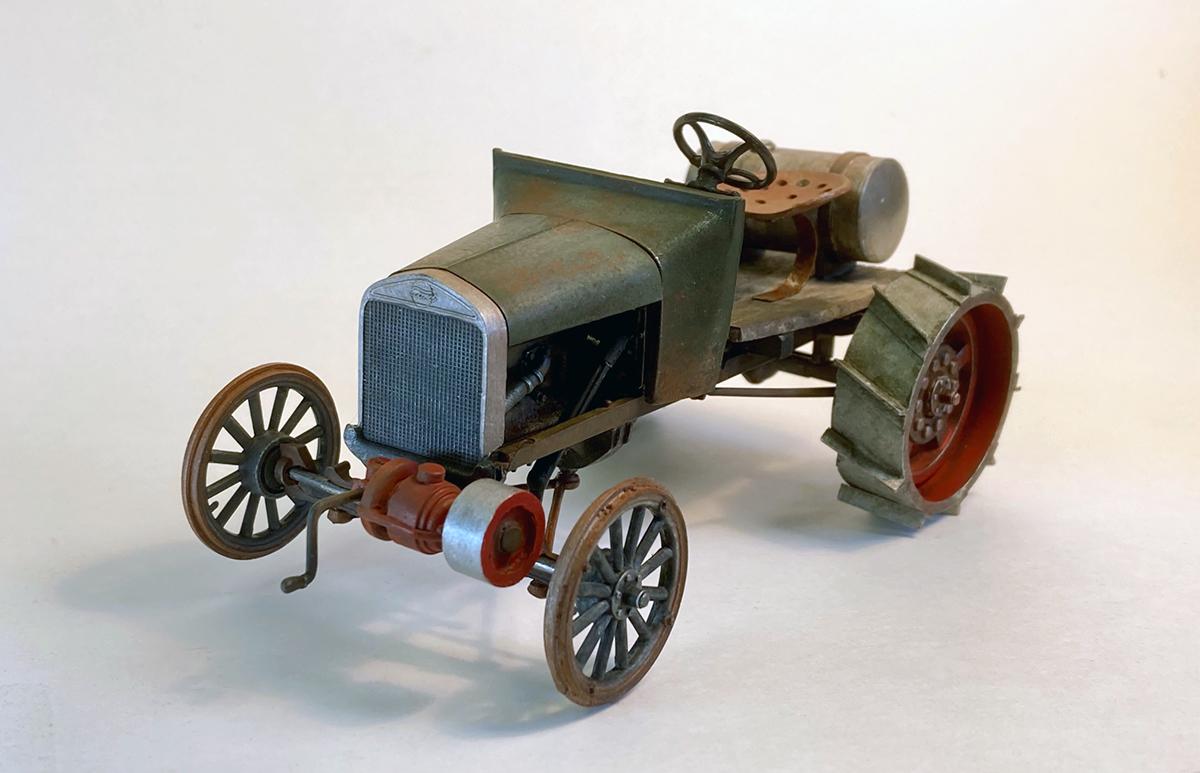
Love the last photo. I'm not sure I've seen a pic of one in use as a field plow. That's how I could see it used to its greatest value to a strapped farmer advancing from a two horse team.
-
Thanks Mike!
-
To WIP or not to WIP
Lunajammer replied to atomicholiday's topic in General Automotive Talk (Trucks and Cars)
A WIP thread helps keep me motivated. I feel more obliged to finish telling the story once I've committed to the project. For that reason, I start taking pictures before I post anything. Once I feel like it's a project that I'm pretty serious about, I'll start telling the story. The feedback helps keep me interested too, particularly when I hit snags that I don't want to deal with but I push on through to keep the thread from dying. Makes me feel like I'm not modeling all alone. -
Could anybody tell me what this logo is?
Lunajammer replied to Tenki-33's topic in Model Building Questions and Answers
Looks to me like "Paint by Mike Shields." -
I mean... why, yes... that's what I meant to do. I mounted it upside down. In fact it actually steers.
-
Much appreciated Alan! Kind of looks like an upside down steering wheel, but it's actually a parts box find. The kit wheel was a turd, so this was what I had that I thought was at least period appropriate to the 30s or 40s.
-
Thanks, Jim!
-
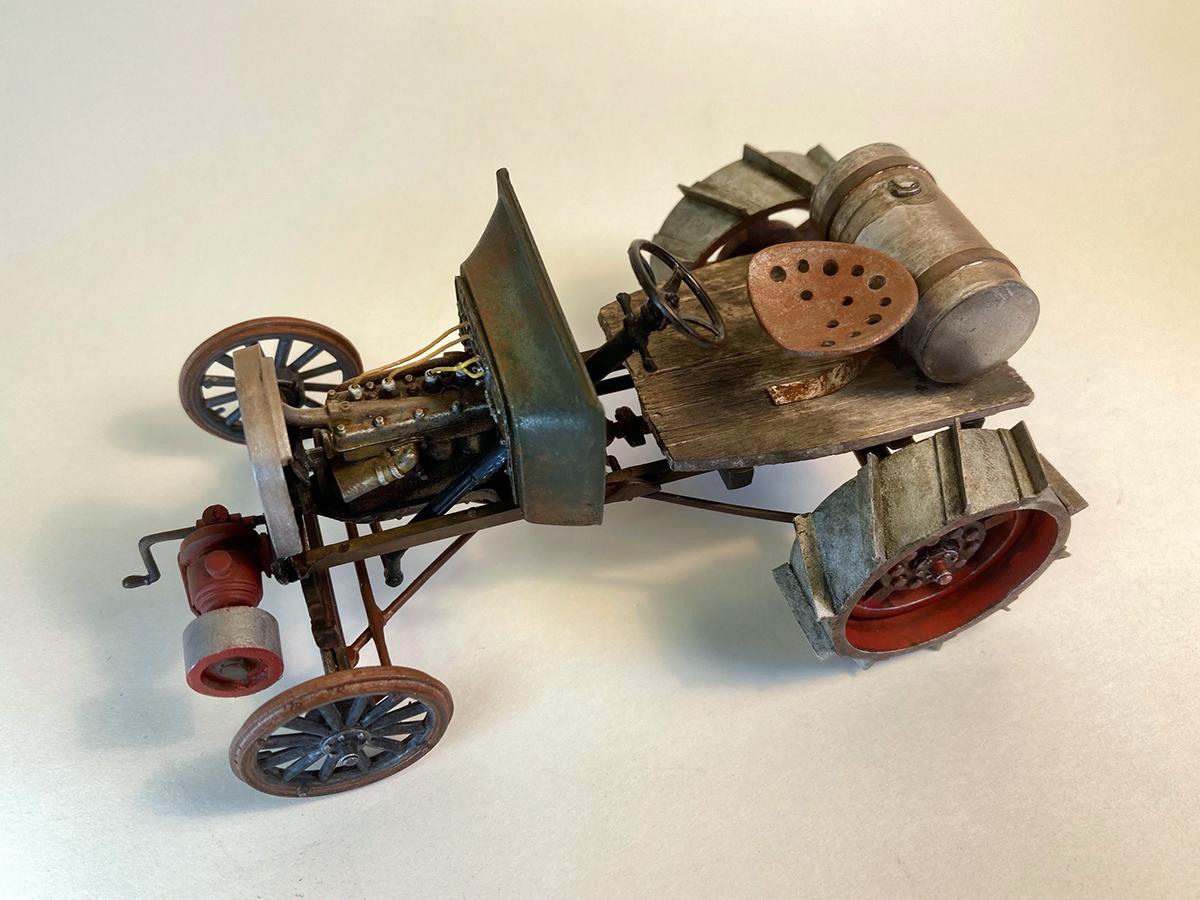
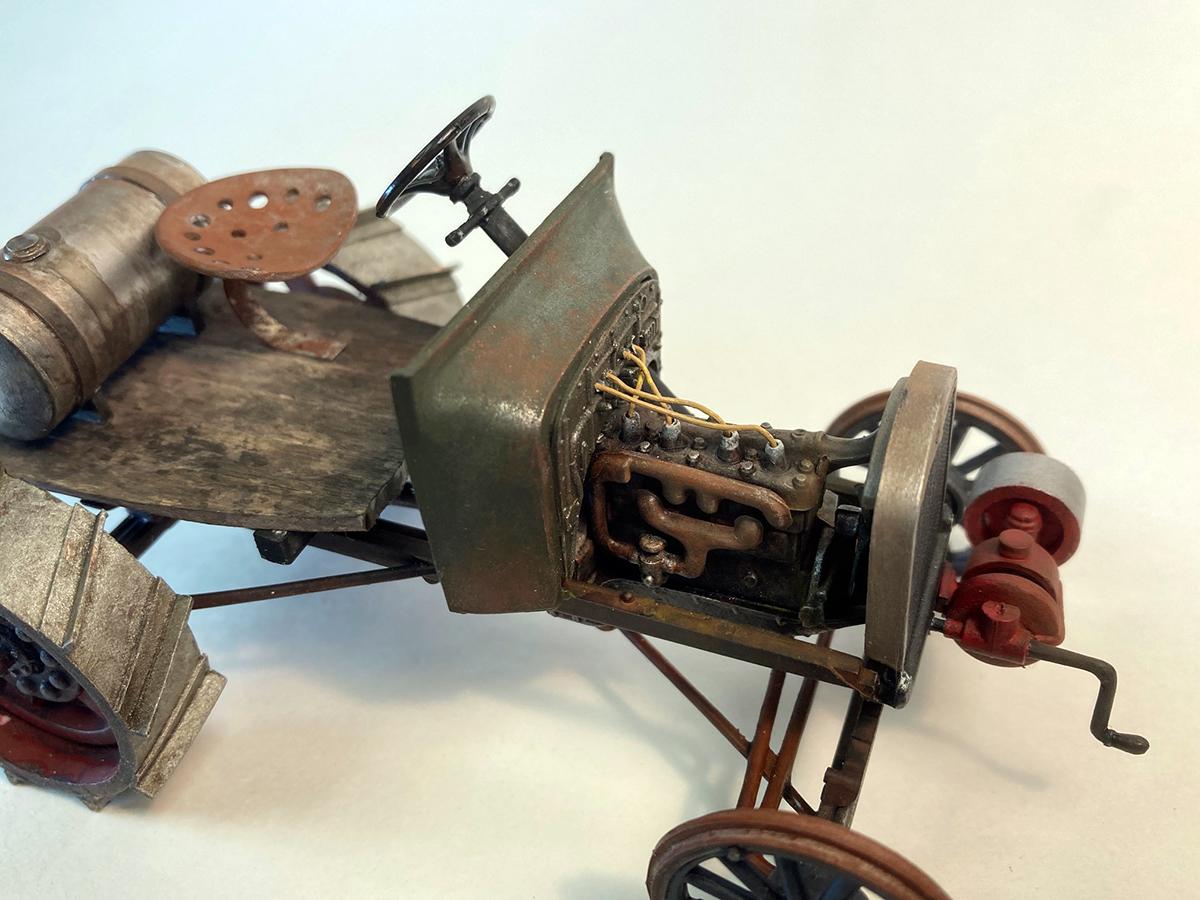
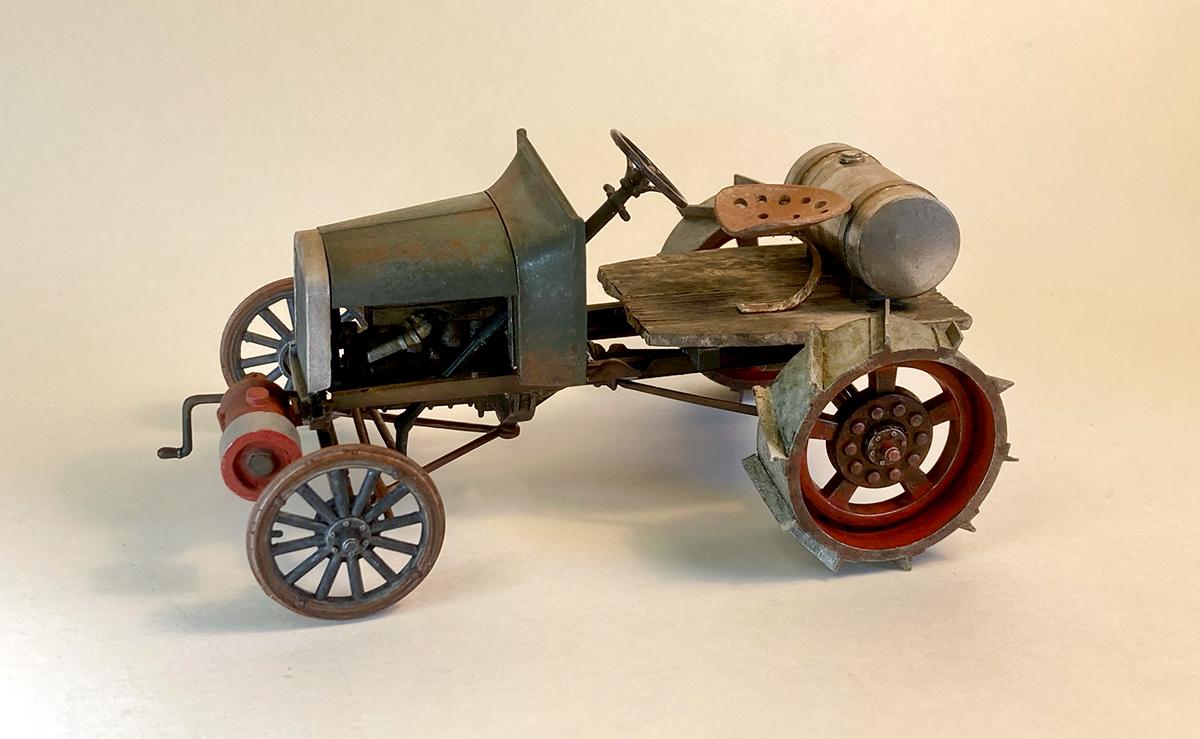
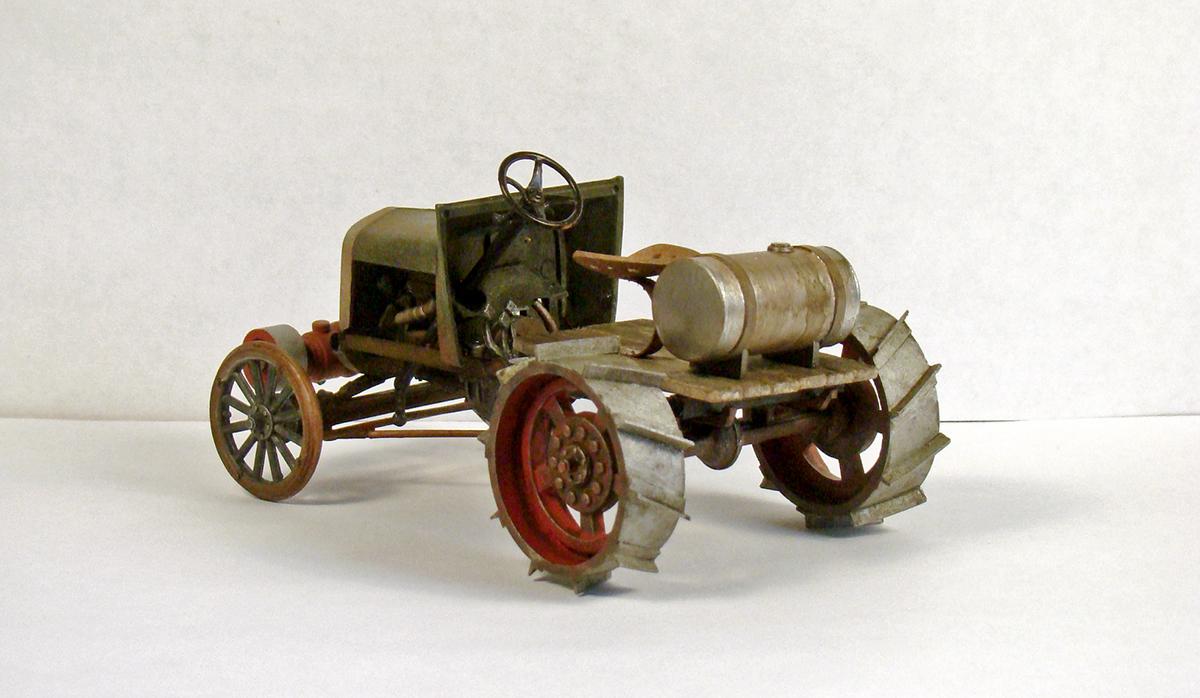
Inspired by the article posted on this thread, I converted an AMT Model T to a doodlebug tractor. I didn't have any good truck wheels to have rubber drive tires so I made cleated wheels using slices of PVC pipe and steampunk buttons. The front PTO belt drive was scratch built using six or seven pieces from my parts box. The AMT Fruit Wagon double kit provided the vehicle. Build thread is here. It was more fun than I was expecting and scrounging to scratch build parts keep me in the spirit of the doodlebug practice. Weathering with oil and acrylic washes took a little practice and I didn't fuss over setbacks so there will be plenty of mistakes to spot.
-
A few days of playing with washes with mixed results I finally finished it this weekend and struggled to get some decent photos after the natural light faded from my room. The floor is made of coffee stir sticks which scale out to be 2x6 planks. I had my 1/25 resin farmer dude figure to keep reminding me how small this vehicle is. It's easy to think it's bigger than it is without a human reference. Check out the finished, glamour shots here.
-
I made a gas tank using small diameter PVC pipe and evergreen. For the ends I cut a couple disks from sheet plastic and firmly pressed them into the carpet with a screwdriver handle to give them a little concave shape.