Codi
-
Posts
2,675 -
Joined
-
Last visited
Content Type
Profiles
Forums
Events
Gallery
Everything posted by Codi
-
Stunning pieces. Love the way you did the throttle linkage and gives me some ideas that I might "borrow" as well. Can't wait to see what you put these pieces to. cheers, tim
-
Nice, VERY nice.
-
Apologize for the delay in responding. Thank you Art for the wonderful sentiments. It was a long time coming that's for sure. Same to you Dave (Goatguy) and the next time I see you I'll be sure to show you the car. Cheers fellas!
-
I wanted to reply to Kurts question about research. Going on-line has been most helpful. Go to Facebook page "Nostalgia Pro Stock" as I noted above and you'll find tons of great pics / info. I also spent a couple hundred dollars buying old early 70's magazines that featured these cars. The most useful IMO were Car Craft, Super Stock and Drag Illustrated and lastly Drag Racing USA. There are a few good books you can buy as well (Sox & Martin among them along with books on Pro Stock racing back in that period) Lastly, I've turned to some great contacts for certain info that is just hard to come by. Dave (Com1839) has provided me with great renderings/measurements for the Holley Dominators and Boss 429 heads and valve covers. Makes machining these pieces infinitely easier. THANKS DAVE!!! I have many hours of time so far in research and have two 2 1/2" binders filled with pertinent info. 1 for the Hemi Colt and 1 for the Maverick. Lastly, I found on the Gapp On-Line site great info as well and conveniently a copy/outline of the NHRA rules for Pro Stock for 1973. Great transitioning year for the class. Hope this helps. Cheers, Tim
-
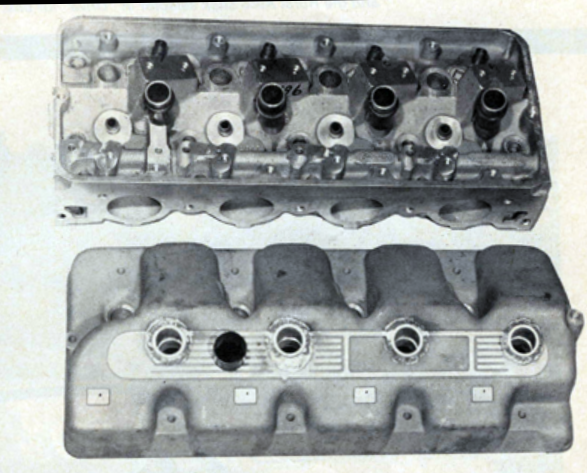
Hakan, I think if that Maverick in the pic had slicks under it the stance would be virtually identical. I think it's on the right track. thanks too. Chris, thanks too.........Starting with the valve covers. TodayI spent some time "proofing" the valve cover detail. I wanted to see how well I could replicate the ribbed detail on the original Boss 429 valve covers. As mentioned, the valve covers I want to replicate are the experimental twin plug heads that Wayne Gapp had been developing. Only a single pic of these exist that I could find so I wanted to see how close I could mimic them. Pic one shows the detail without the plug & oil breather holes drilled. The 2nd pic has them drilled and I think it's REALLY close to the pic. The valve covers on this car are highly visible and I want to do a decent job copying them in 1/25th. btw, the ribs are only .2mm in width. cheers, tim The original experimental valve cover

-
A most sincere thank you Niko & Jim. The Maverick is starting to take on a life of its own. The planning is starting to snowball into something a bit more than I originally intended. Hope you continue to follow along on the new build. Cheers ! btw, Niko, love that wheels up shot of your drag car.
-
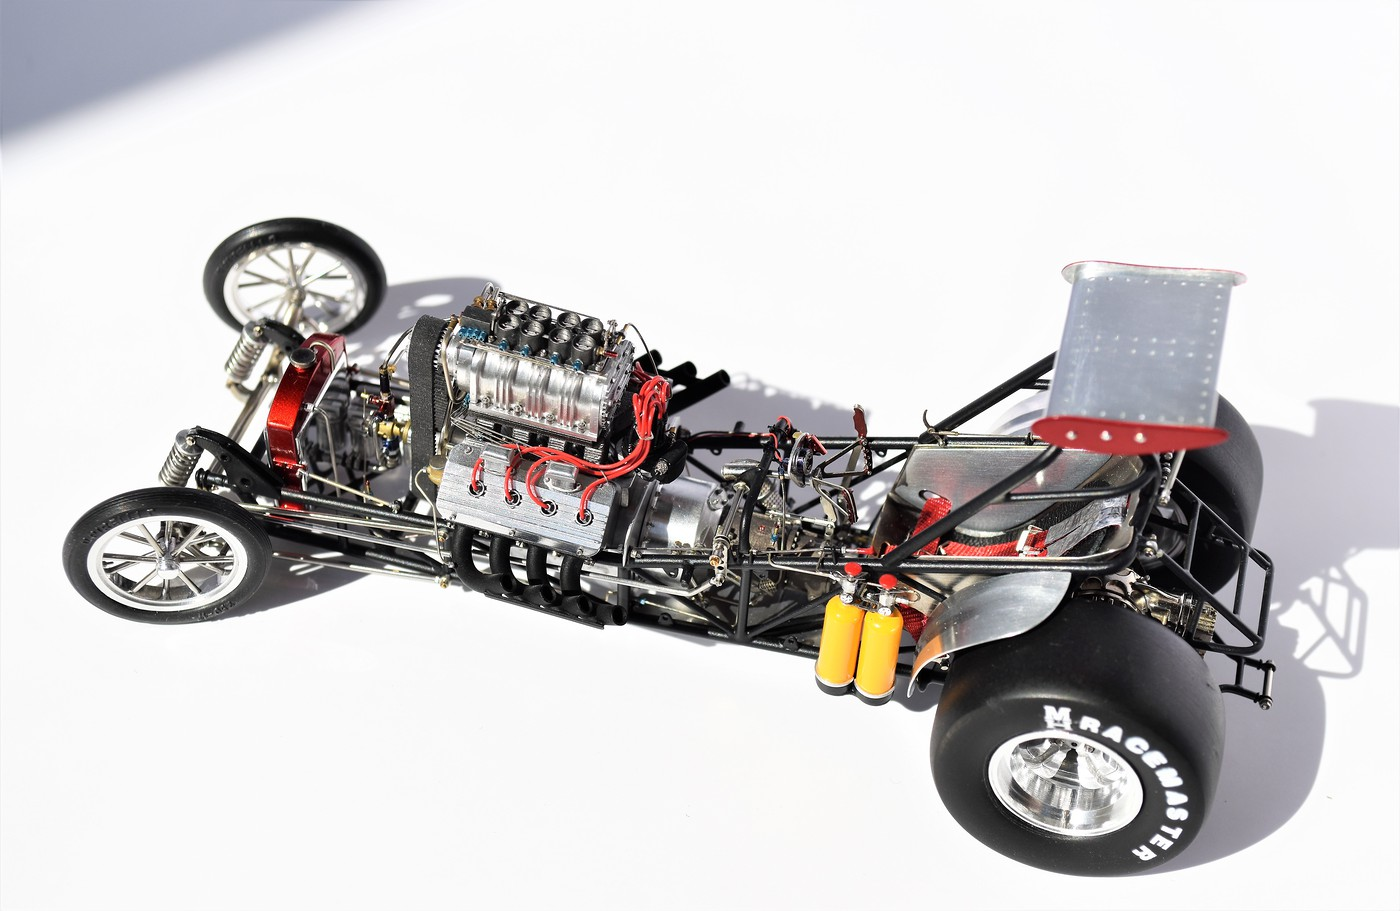
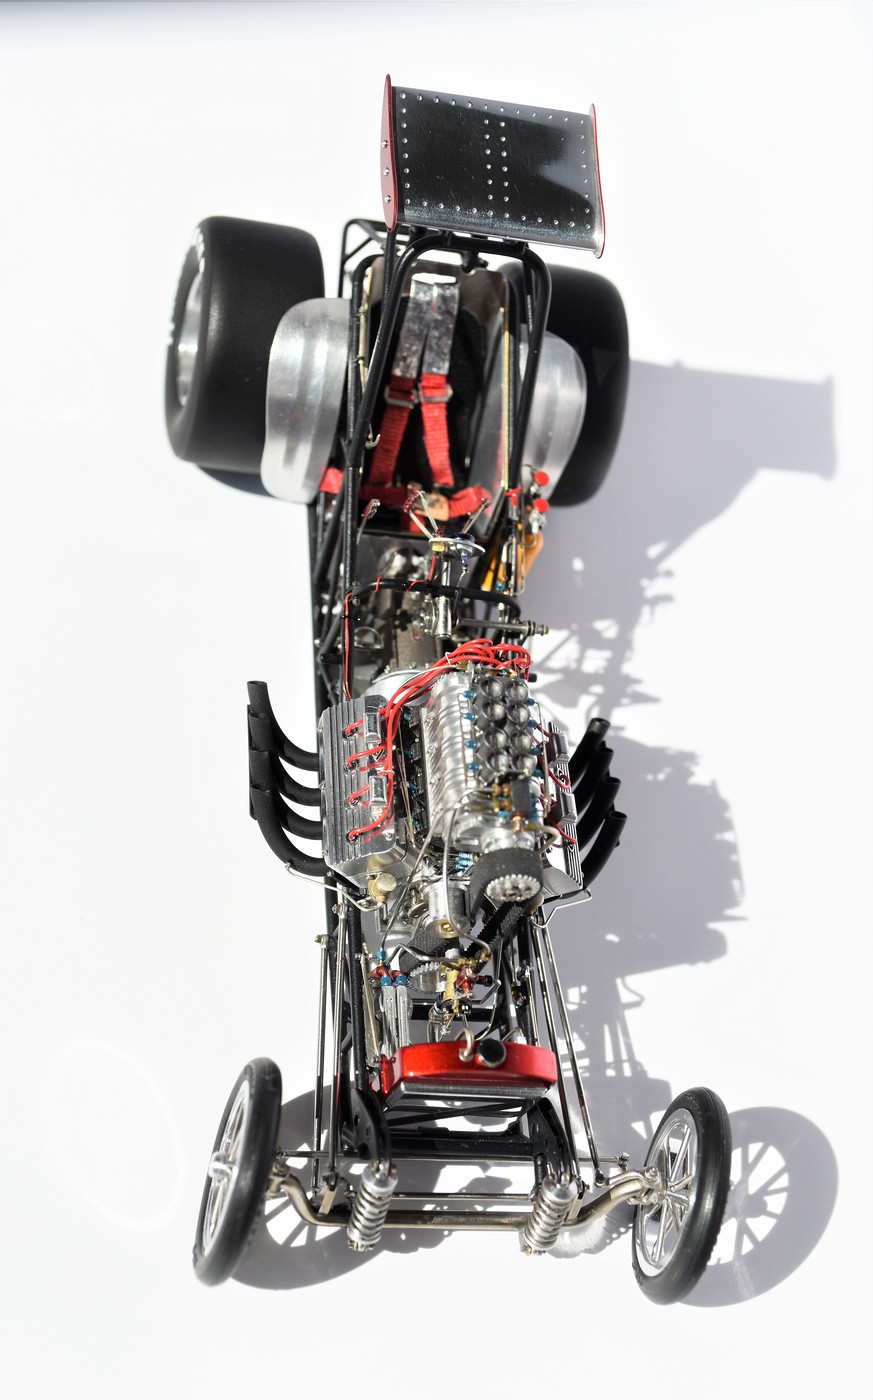
Thanks for the laugh Derrick. I didn't have one but we remember the days well. I wanted to share that the last week or so I've been doing tons of research and planning on this new build. I found a great site for those that like 70's Pro Stock cars that has hundreds (think more than 500) that was a wealth of insight. Visit "Nostalgia Pro Stock" on Facebook. It's a public site and I'm sure you'll enjoy it. With that in mind, many details have been set to paper. It will have a scratch-built brass / alum. chassis to replace the stock kit. I'll likely use the interior tub, make a new firewall and follow the NHRA 1973 Pro Stock rule book. This was an interesting year as it was during this time that prominent existing and new chassis builders were coming to the fore. I'll be putting in a lenco 4 speed as well. A lot of new ideas were being put to practice and I'm going to incorporate them in the car. I'll have to scratch build my headers, frame rails etc. as part of this. I always loved the stance of the early 71' Mavericks but I wanted to push this towards the direction that the chassis builders & pro stock teams were starting to explore. I'm dropping the stance among those changes to this car. The rubber slicks are from Futurattraction. His 32x15" which I sanded down about 1.0mm on my lathe. A couple pics to give you an idea.......btw, the Boss 494 I'm doing for this will have one of the earliest dry sump systems in drag racing so the engine will sit a wee bit lower in the chassis as well. That will help to meet the NHRA rules stating that the hood scoop can't exceed 7" in height. I'll be modifying the mailbox scoop on the car to reflect this as well. Cheers!!
-
Has anyone heard from Shawn lately? I'd love to see his updates on this particular build but it is truly interesting. cheers, tim
-
Hi Mike, so appreciate your comments and that you like the finished product. I'm well into the planning on the Maverick now. Hope you follow along again. cheers, tim Chris, thank you my friend. I so miss your work and hope you have something soon for all of us. If you need something give me a ring. cheers Michal, thank you sir. Not often I get a comment from the Czech Republic. Cheers, Tim Randy D. - I can't express what your kind words mean. You're a phenomenal scratch builder that I've always followed. After seeing your cars, I dug up old posts of your trains and trucks. You can do it all. Like Chris S., I sincerely hope you both come back soon with some updates on your projects. The forum is better for it as it's something we can all aspire to. cheers, Tim
-
You captured those details beautifully Kurt. Impressive skills. cheers, tim
-
That's a sweet looking car Guido. To clarify regarding pictures, I'm most interested in chassis shots of either stock or race (Pro Stock class circa early 1970's) pictures. I think I'm going to end up fabricating about most a chassis when all is said and done. We'll see. Thanks in advance and if you'd prefer you can send me a PM and I'll reply in kind regarding pics. Cheers, Tim
-
Chris, a most generous offer which I would never say no to. Anything you have of the period from 72' to 74" would be most helpful to say the least and chassis photos in particular would of great interest to me. Btw, any updates on the 71' he bought to make into a pro stock and what engine is he planning on putting in it? Thanks again for the offer of assistance. Cheers, Tim
-
Daniel, thanks man for the compliments. You've been quite generous and I hope you find the next build interesting too. Dave, (comp1839) I owe a bunch to you.....be it the knowledge and friendship you shared as I've learned my way around a mill and your patience with me when it must have seemed I was asking endless questions. I certainly could have never made this car 3 or 4 years ago and I share that credit with you. cheers!! Ken........yup a big ol' smile for sure. My actual feelings when I took the pics and put it on the shelf was one of "ah, finally".........I was more than ready to move on to the next build. Brad - Quite the compliment sir. Let me know when you update your diorama next, I've not seen it updated lately and I am curious as to how you shrink a pic down to a teeny tiny size. Sincerely, thanks for following the last 3 years on it. Hakan - my only complaint was that it took me so long but I wouldn't do it any differently if I had the chance. cheers! Chris & Justin, much appreciated and I'm certainly glad you like it too. Pete.......oh Pete. You called that one. I can't do any better and I'll admit that here and now. Next one should be a quicker build (my goal is 1 year) and only my personality stands in the way of that. I've been going over and over what my vision is for the Maverick build and I keep catching myself getting carried away with it. Gotta stop doing that. Cheers to one and ALL!
-
You surely did the 1:1 car proud Danny. cheers, tim
-
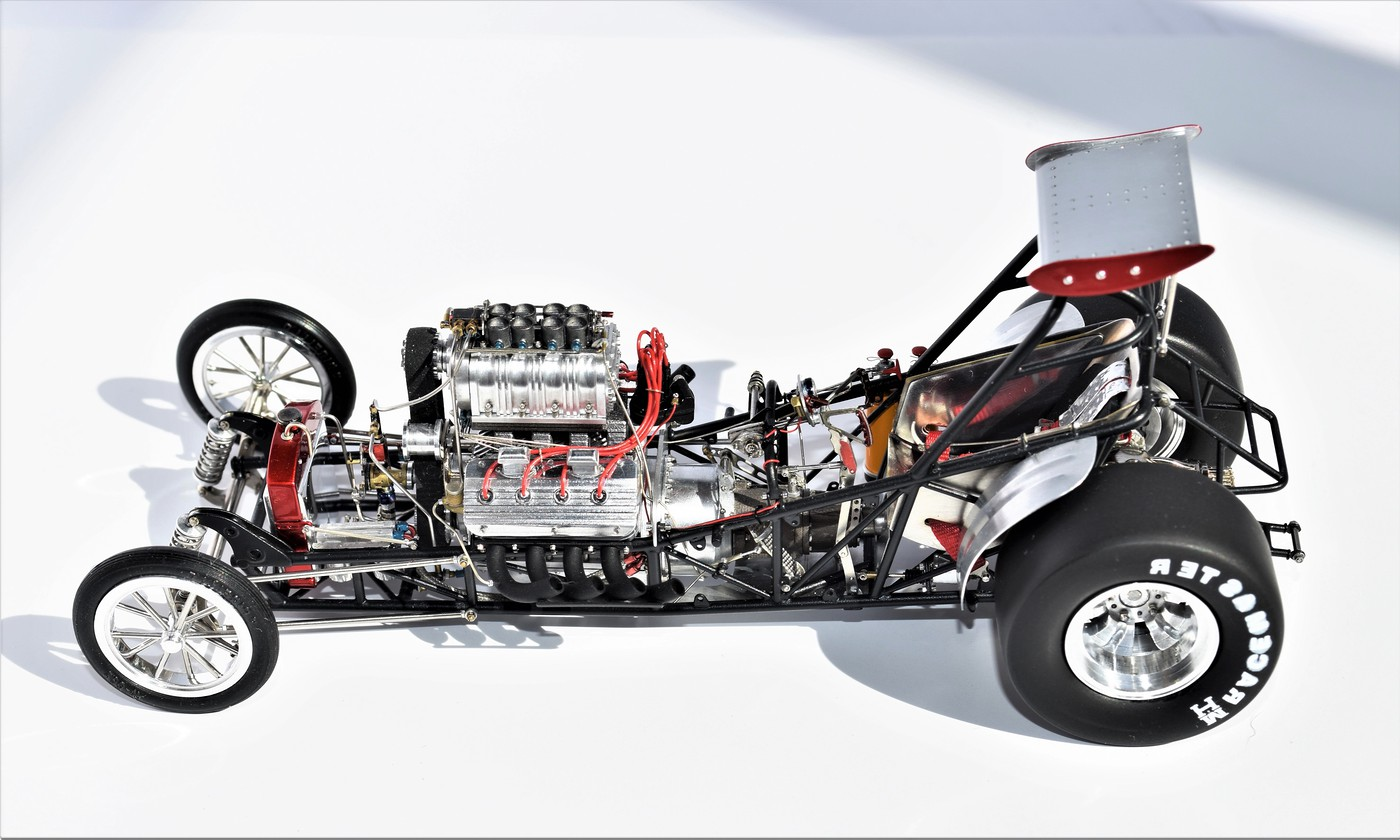
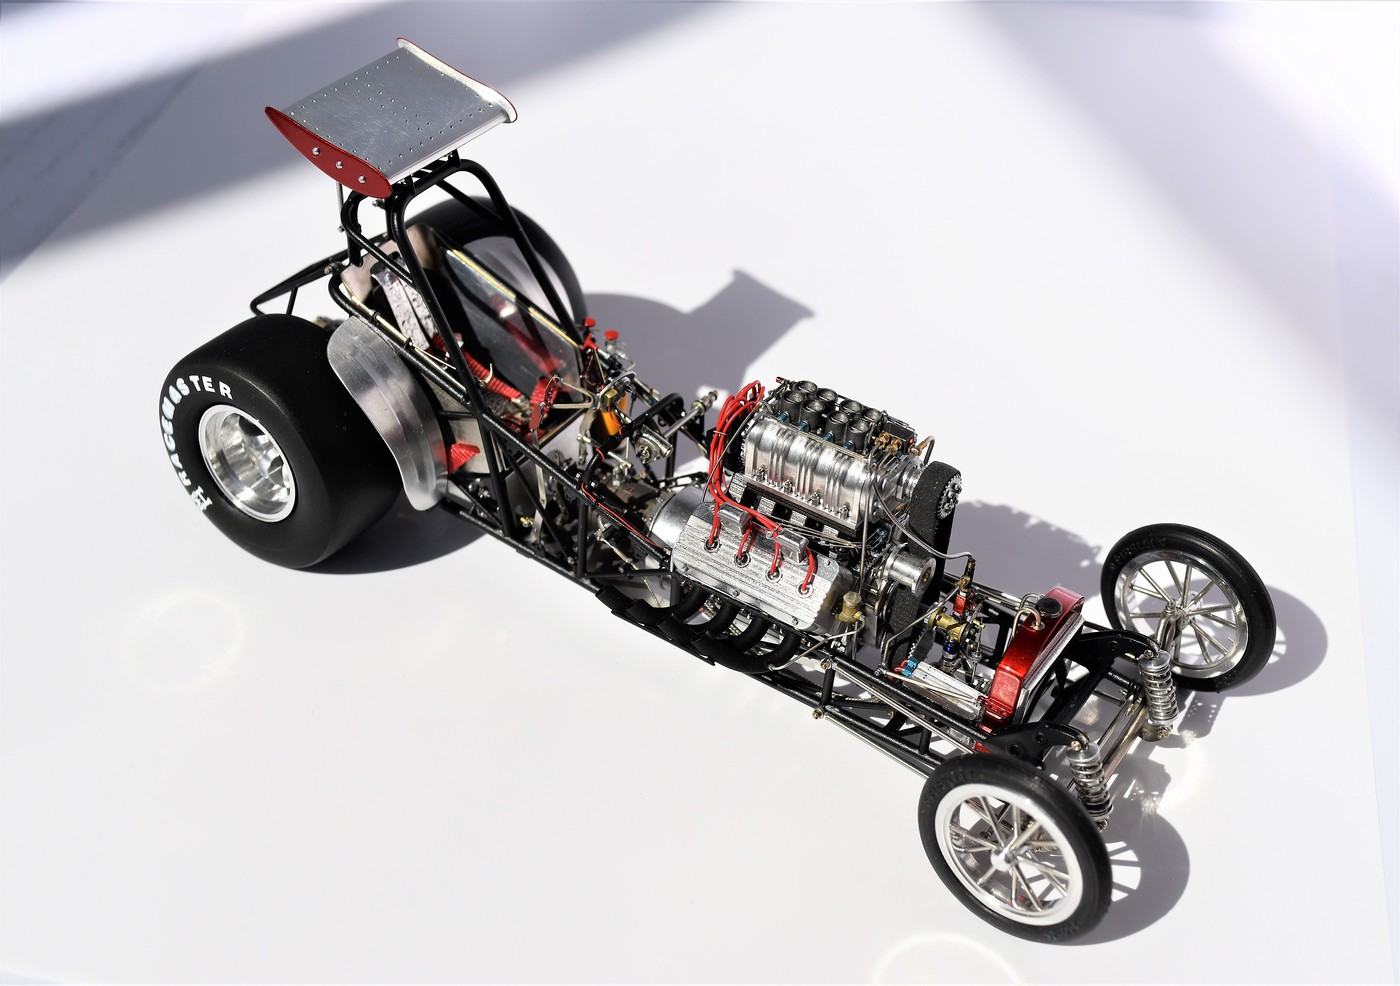
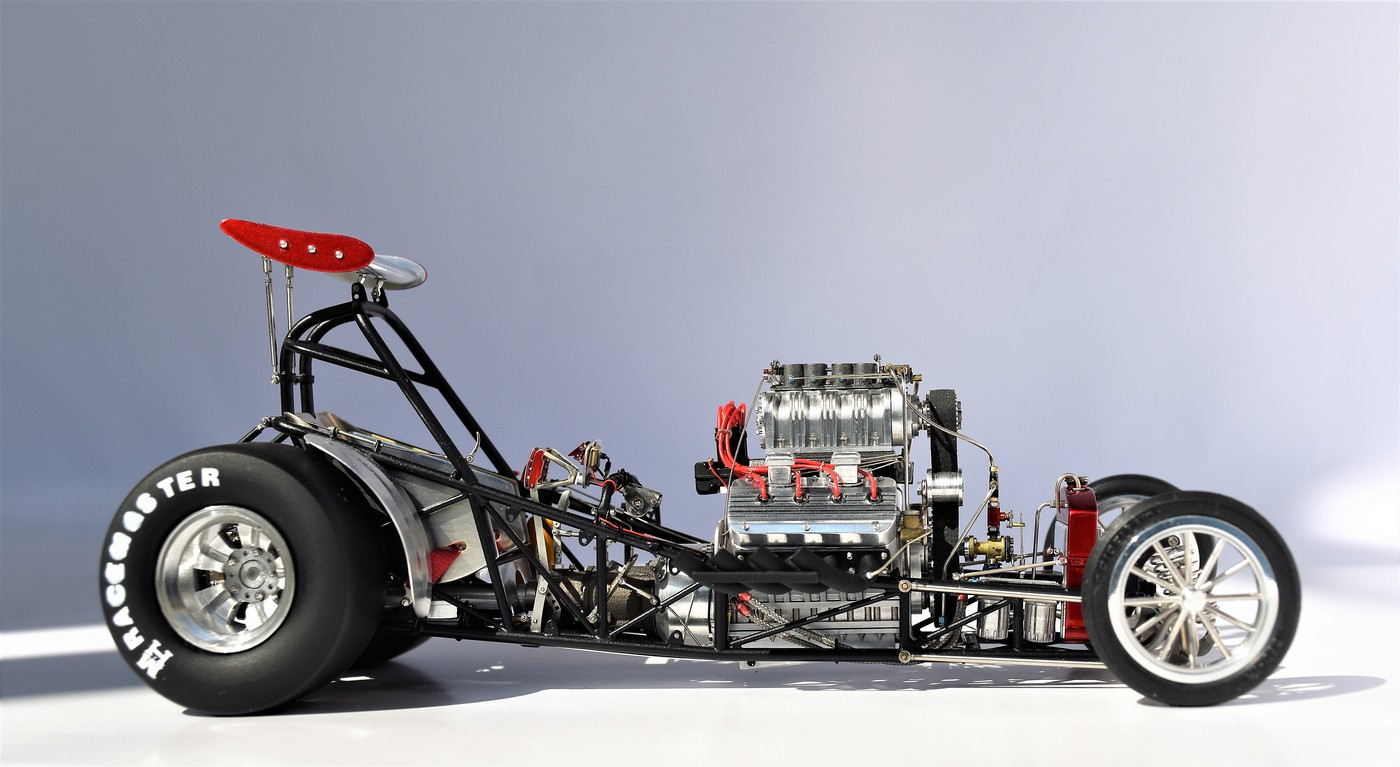
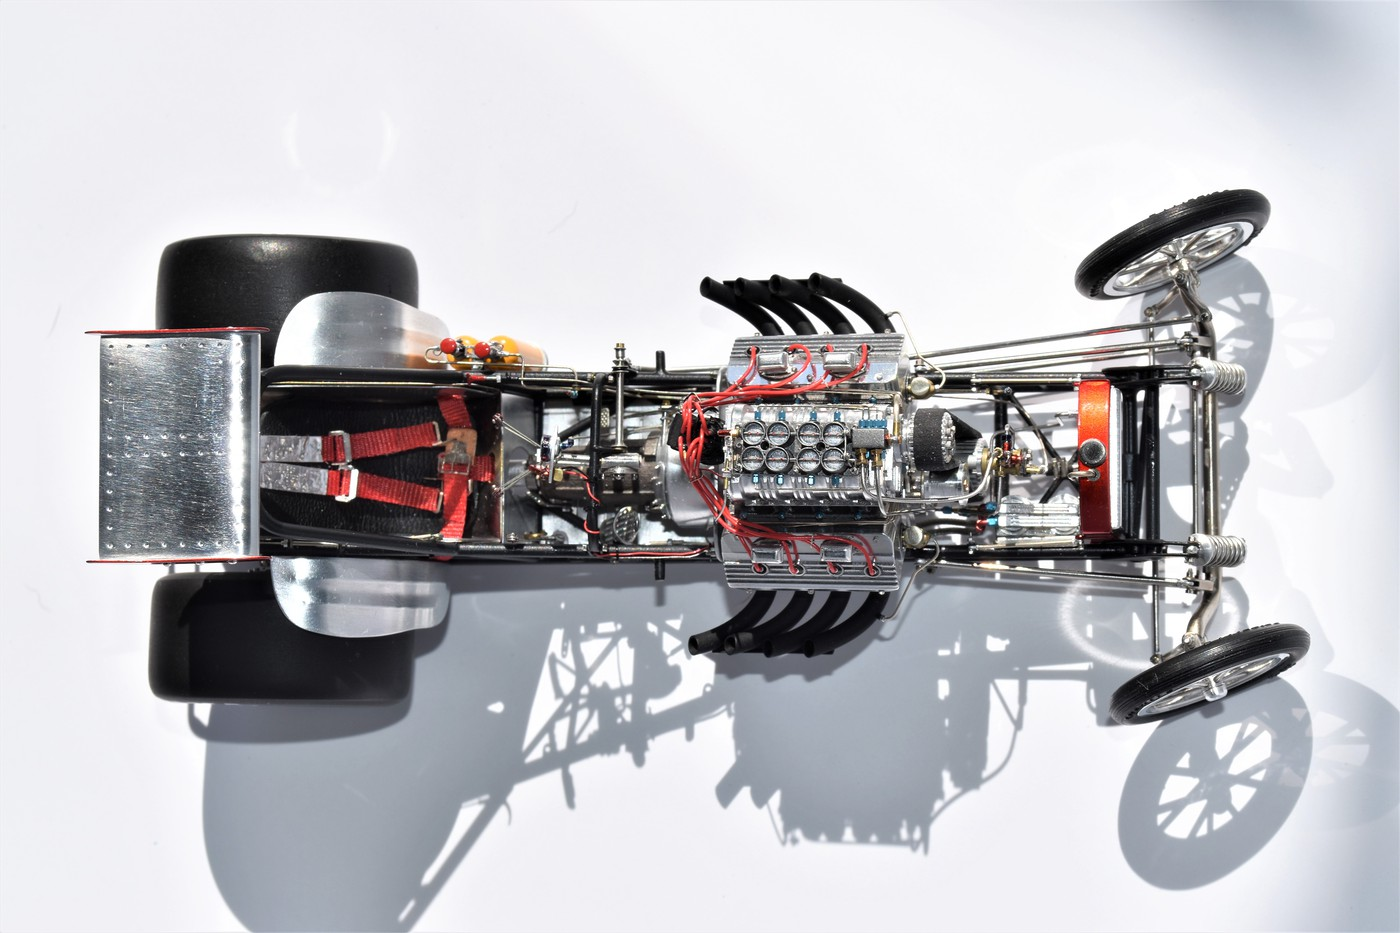
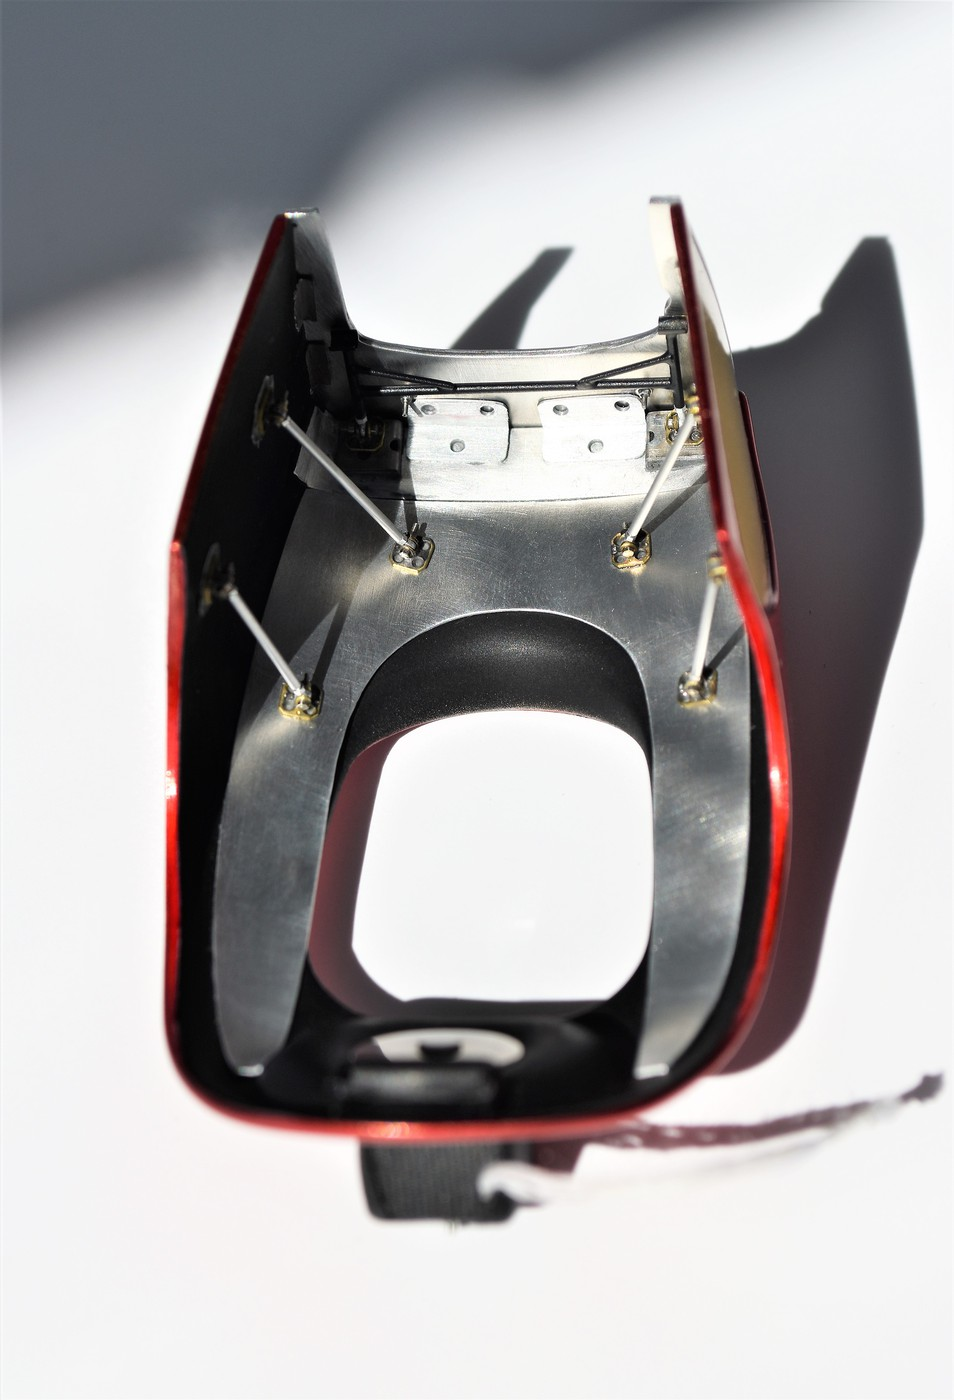
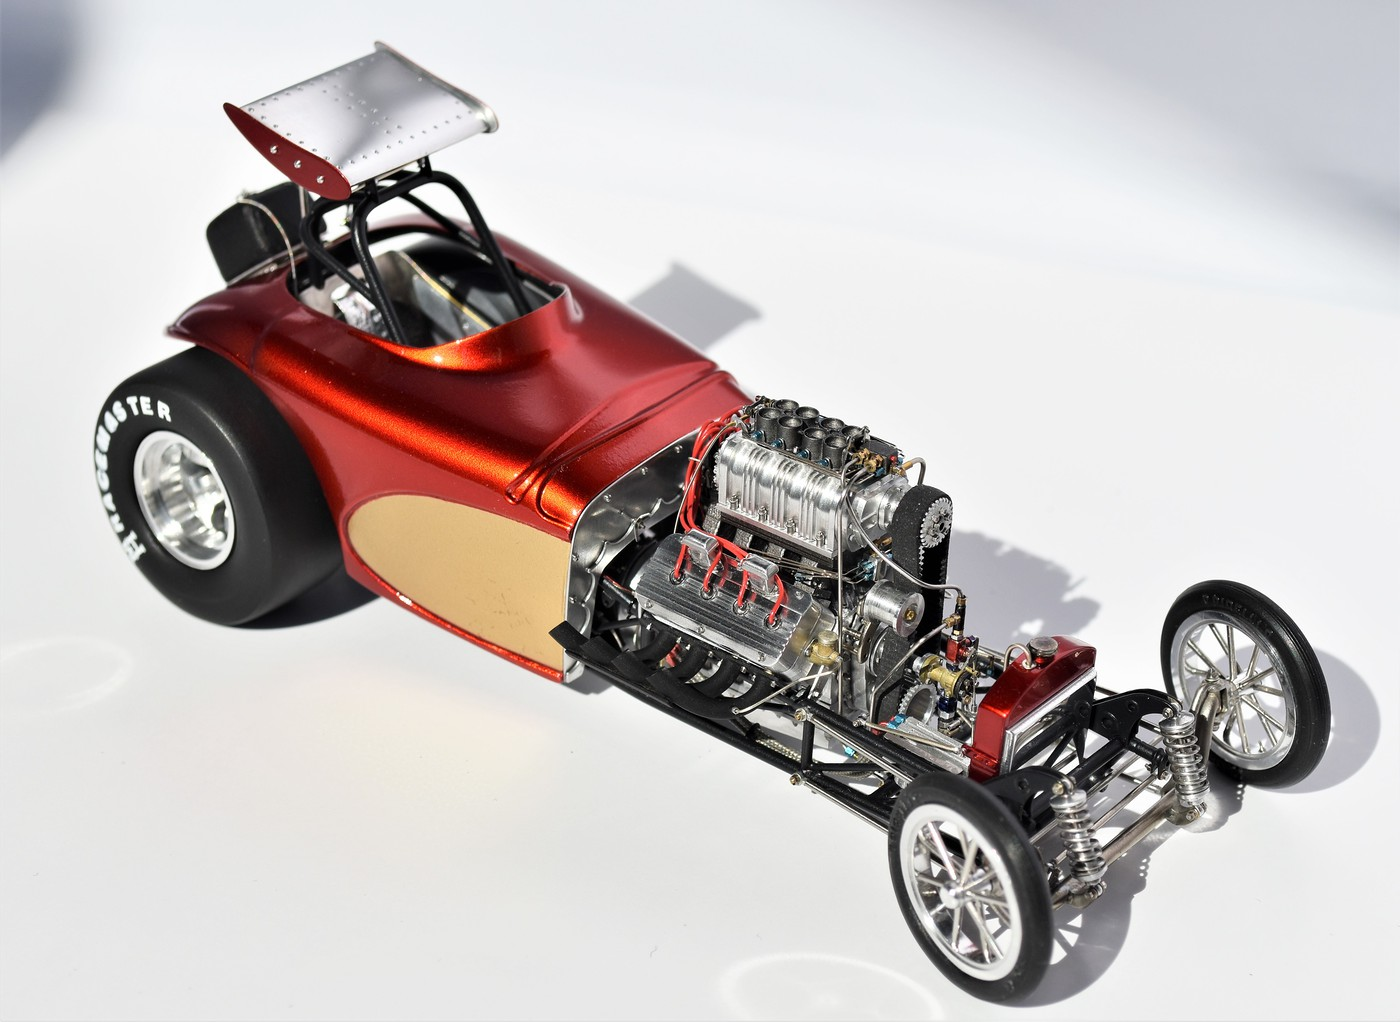
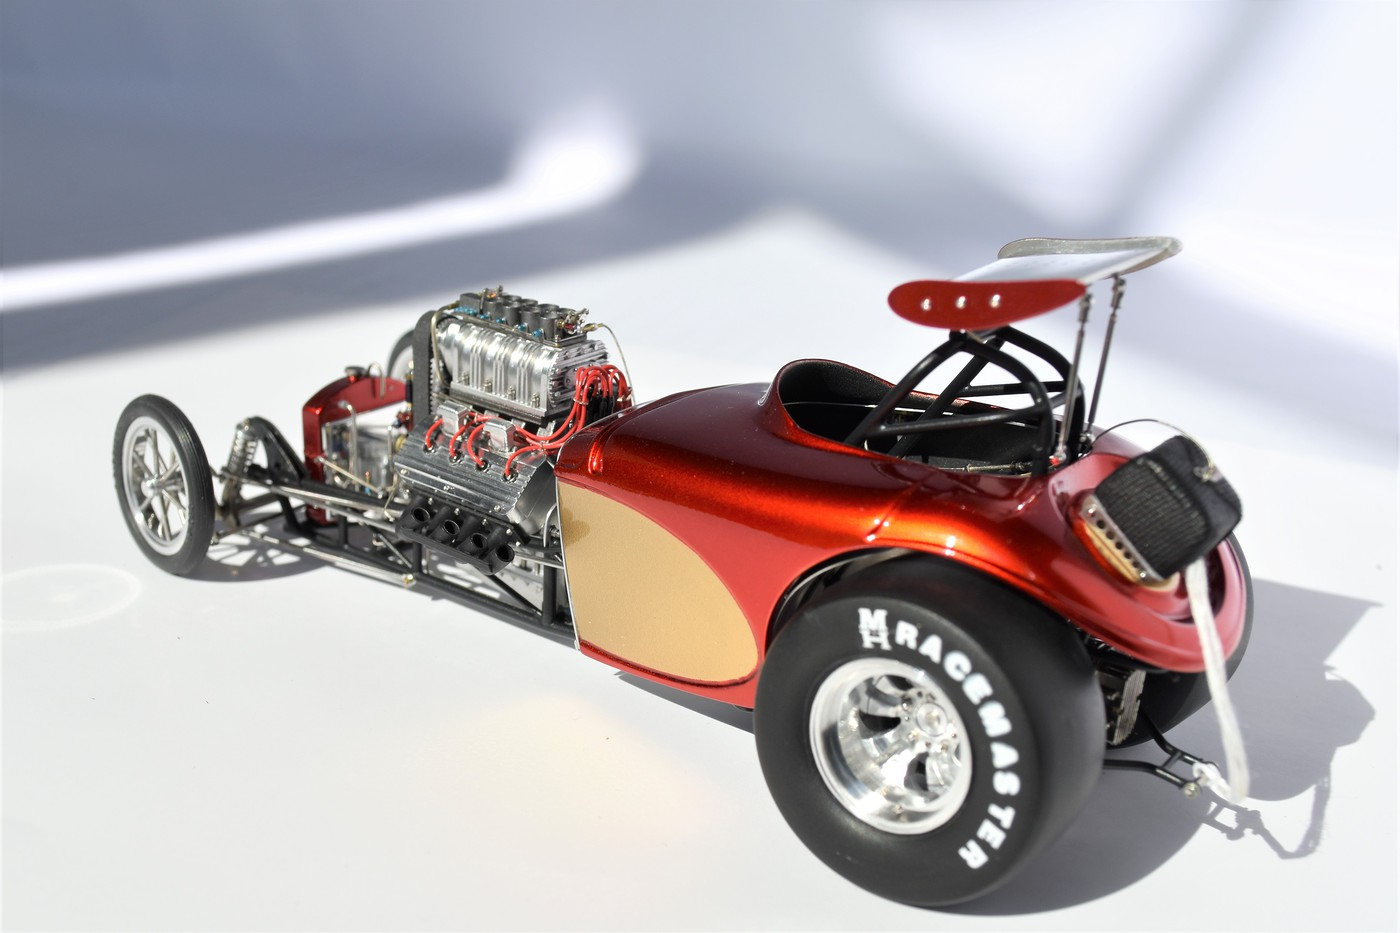
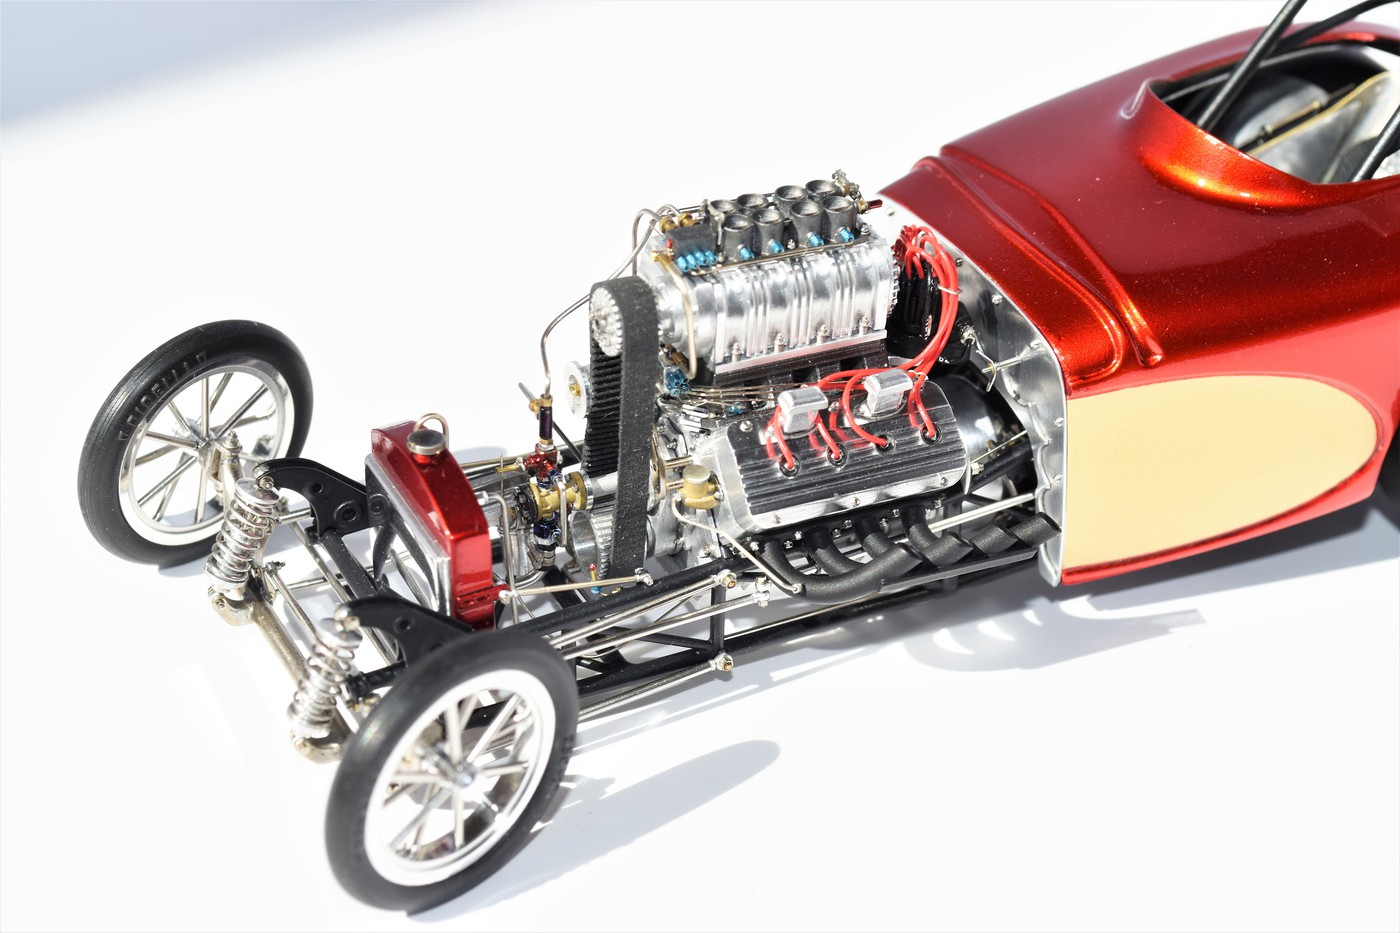
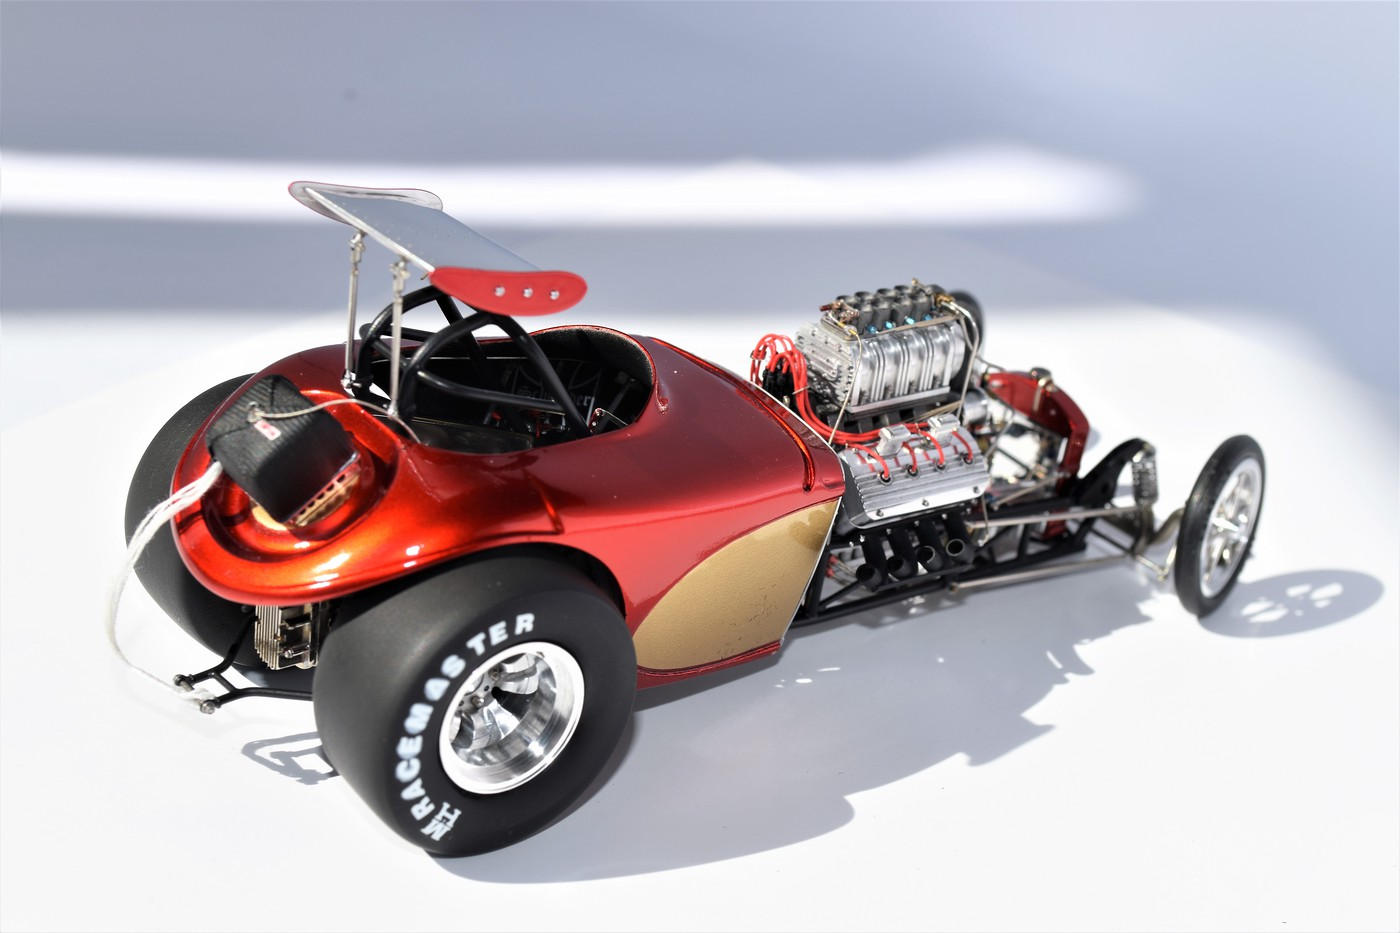
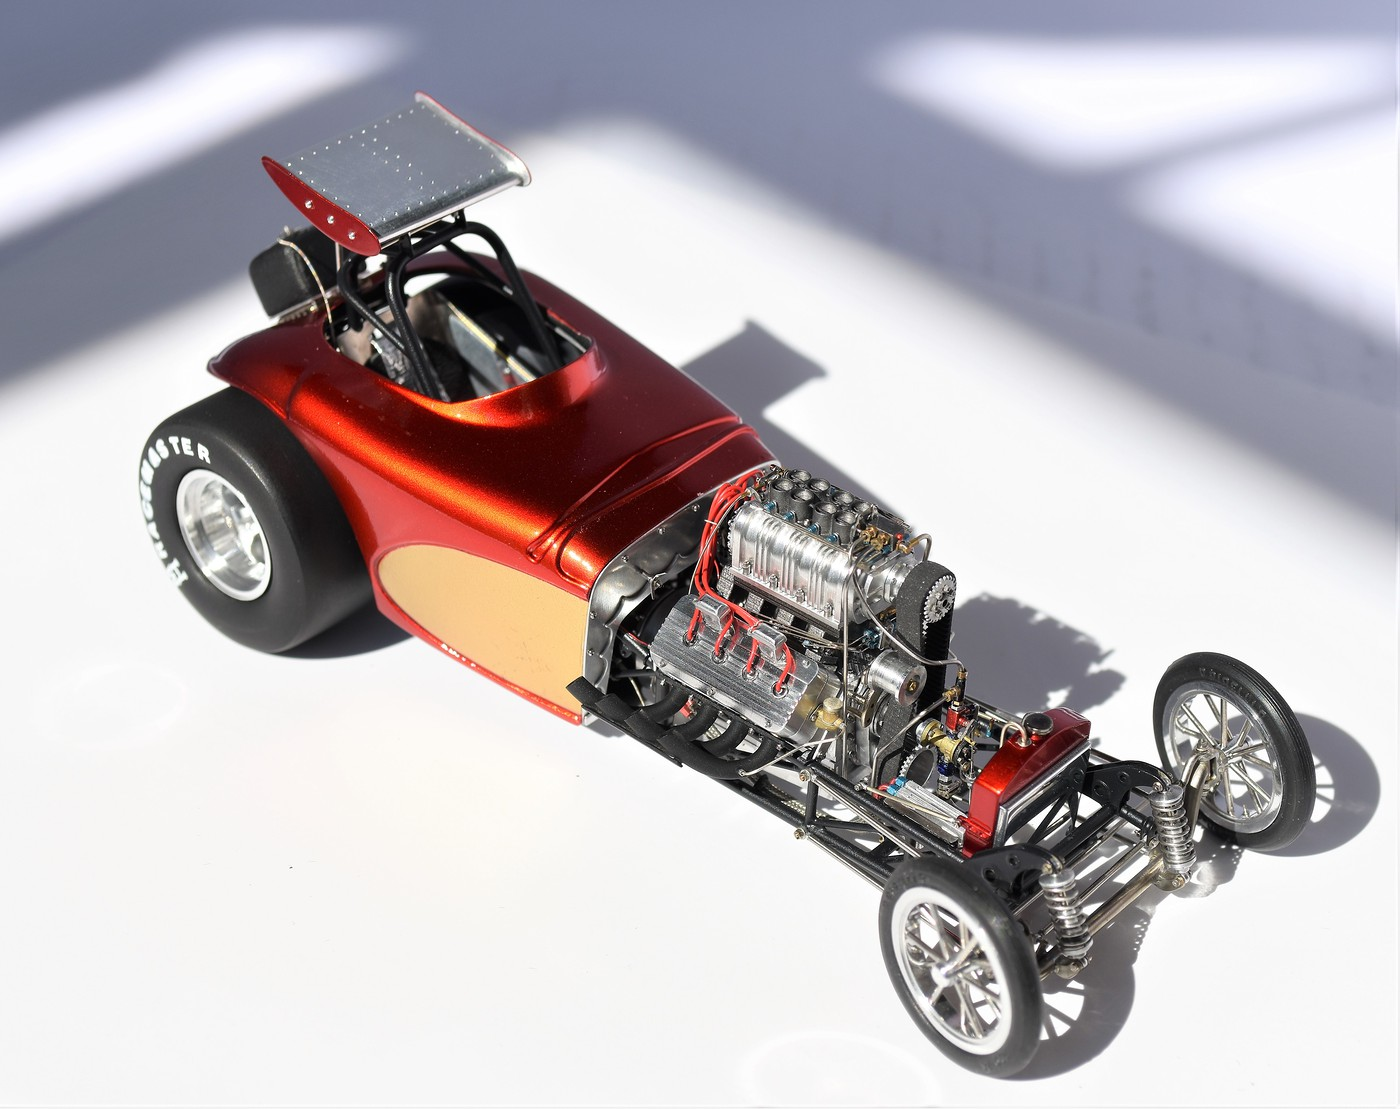
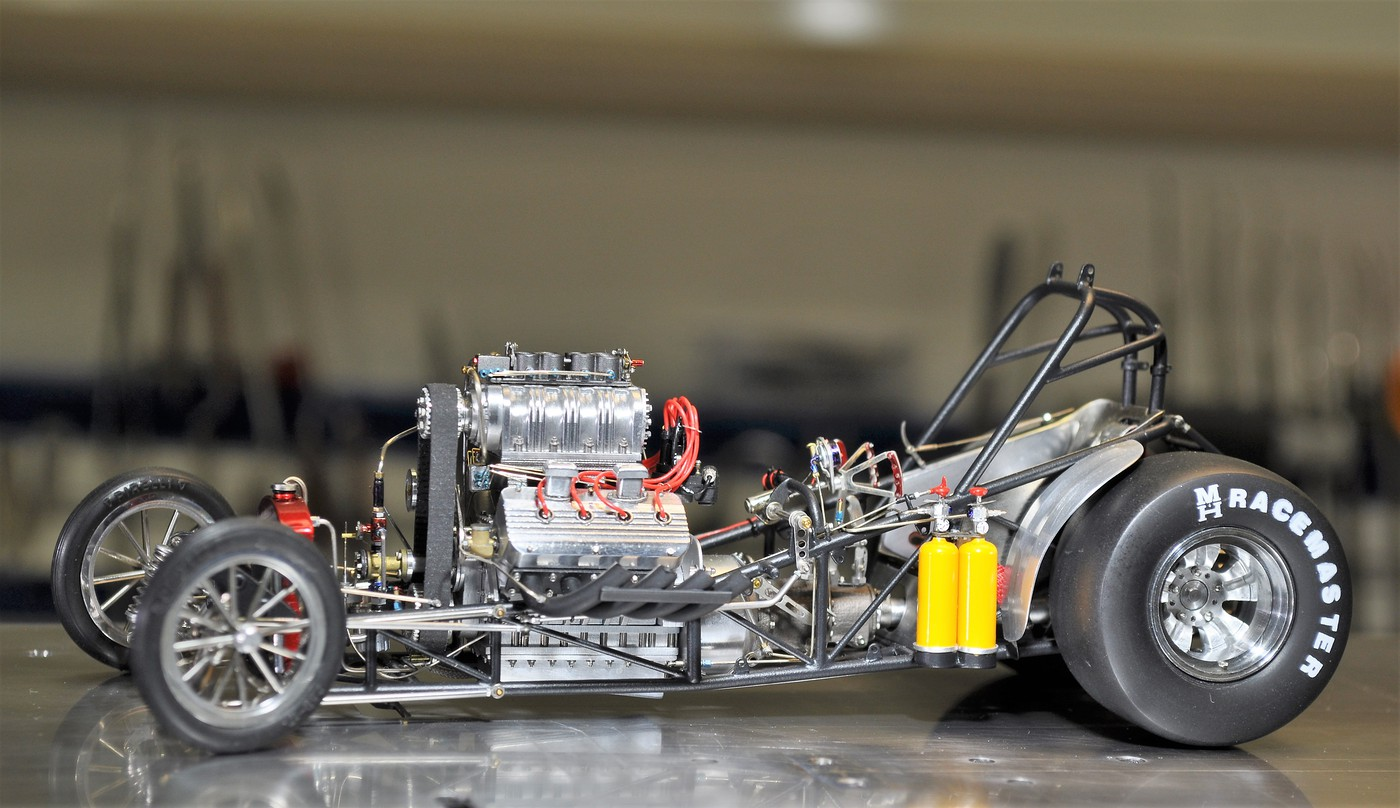
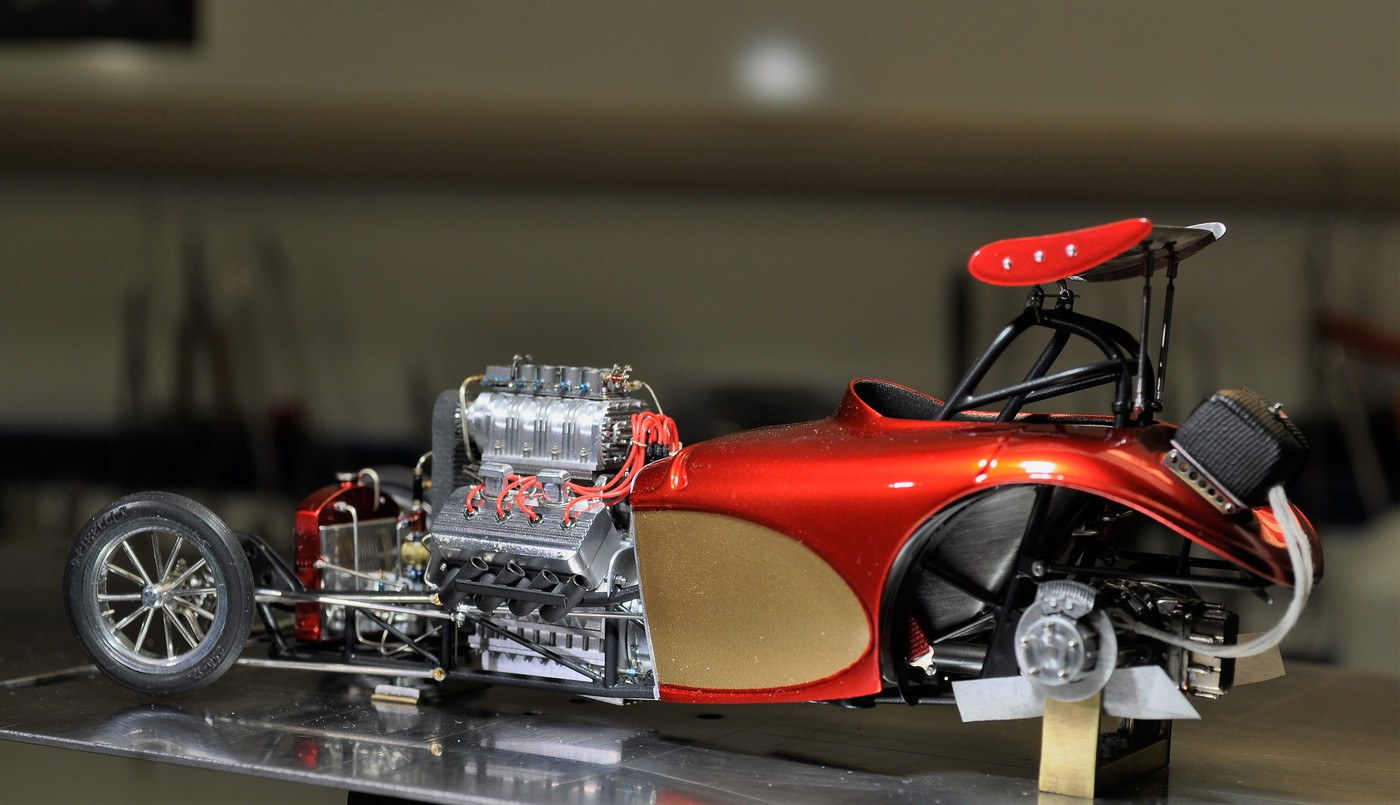
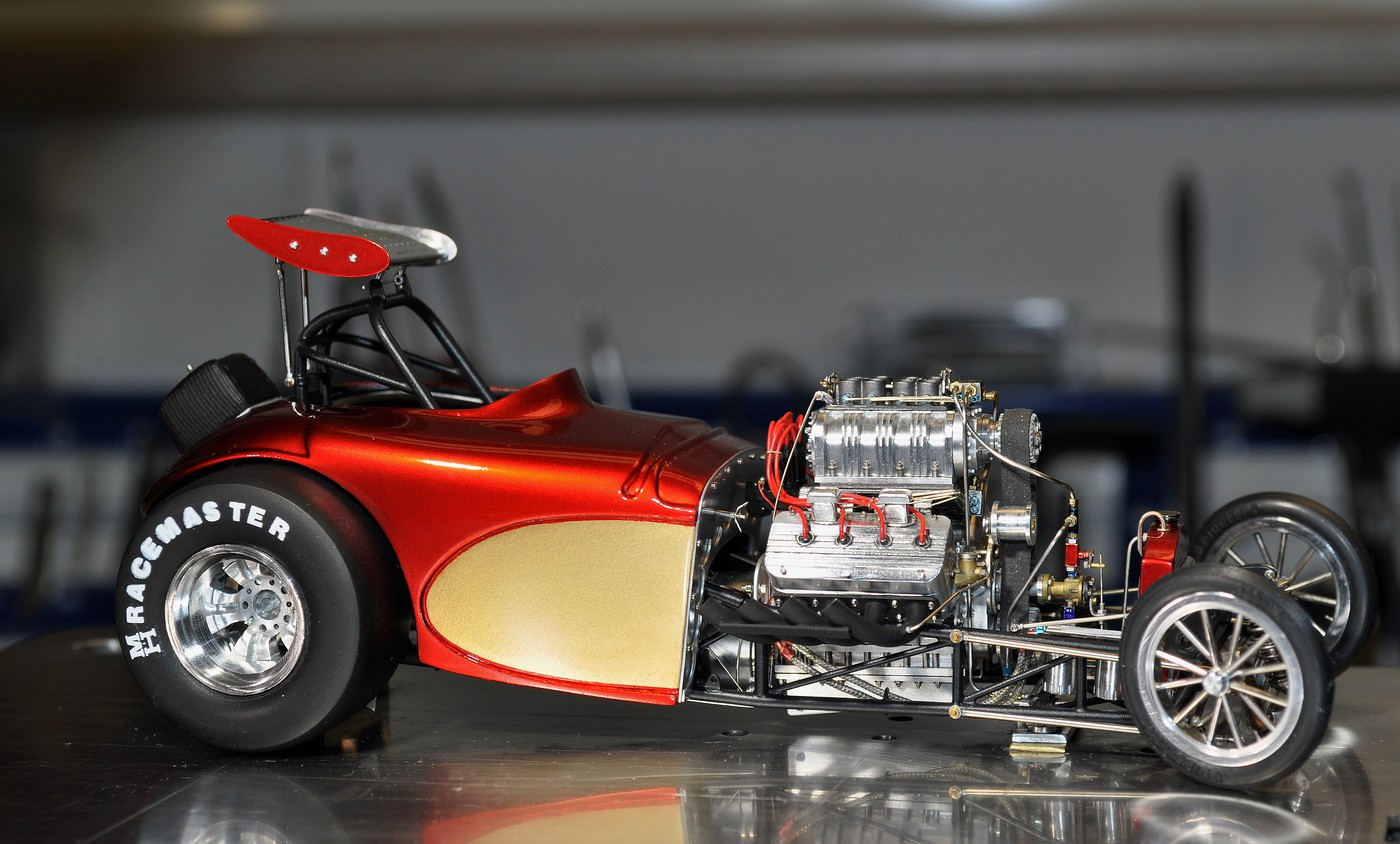
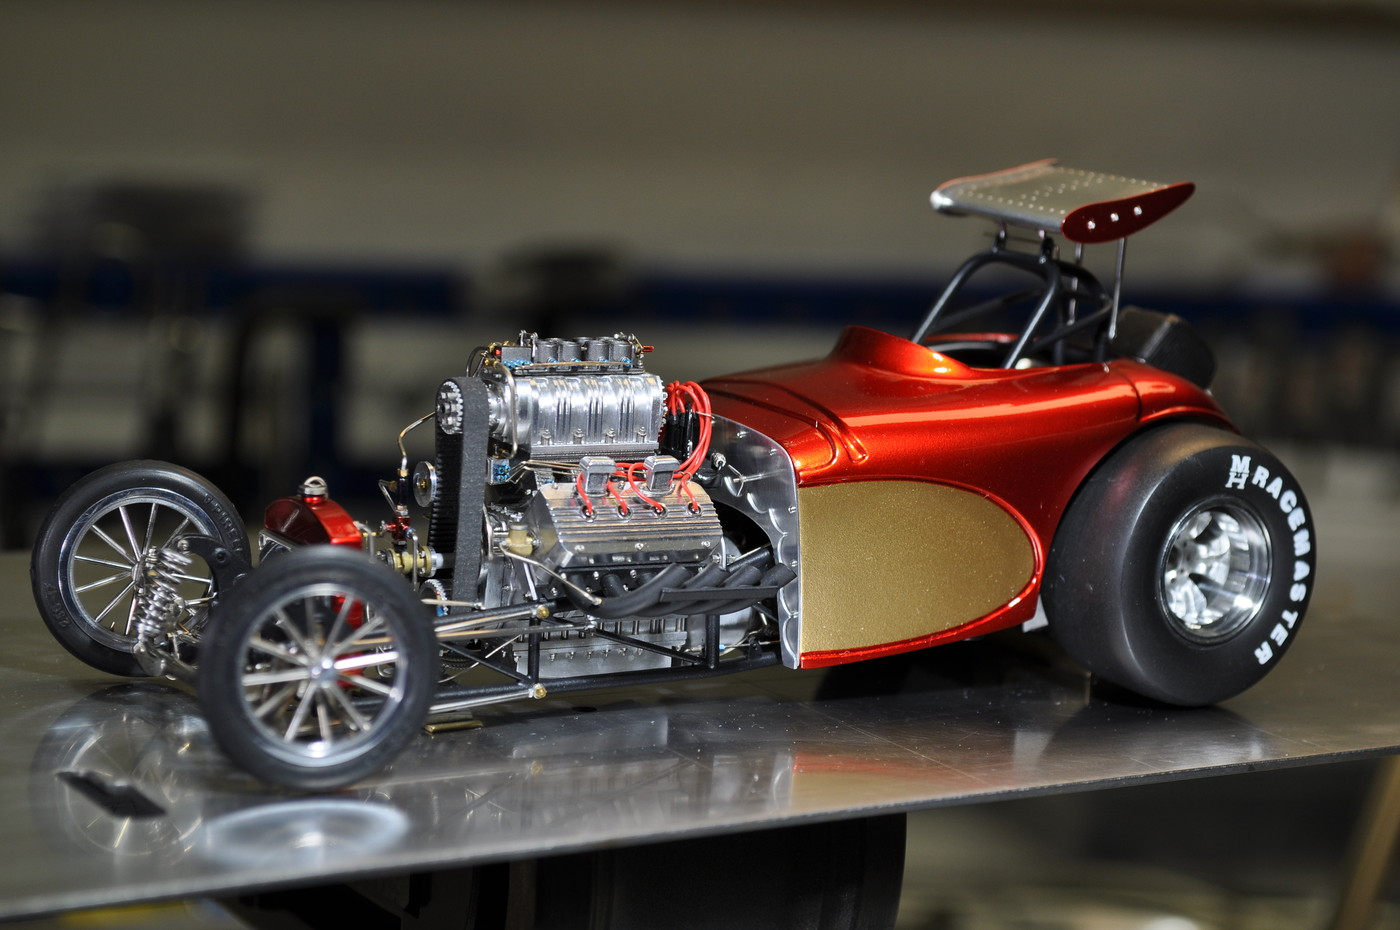
Hi guys. This will be my final post with the last pics of this build. I think what you'll see compliment the earlier pics with the body on. She's on the shelf once and for all. Thanks to everyone again for the interest in it and to answer Bruce, the major components (engine, wing, slicks obviously, front suspension and a few others) are bolted in. BUT.....nothing is coming out or off of it (at least not on purpose). Again, my sincerest thanks to one and all. Tim
-
Thank you Dave. Having wrapped up the final pics on the bantam, it's time to clear the decks and finish the planning on this one so I can get started. cheers !!!
-
Some sweet pics you found on HAMB Kurt. That engine is really really nice. It'll look great in your car. cheers, tim
-
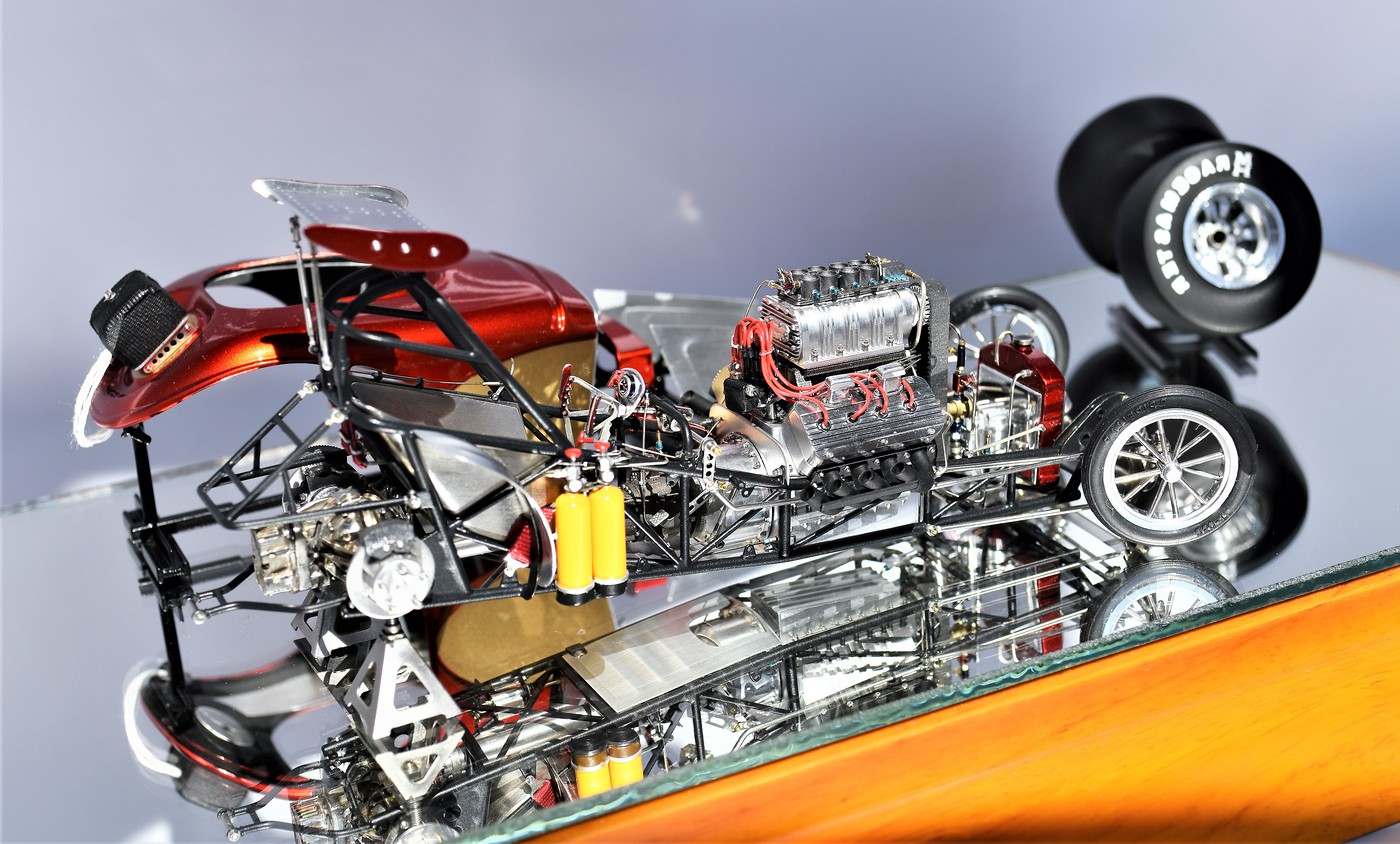
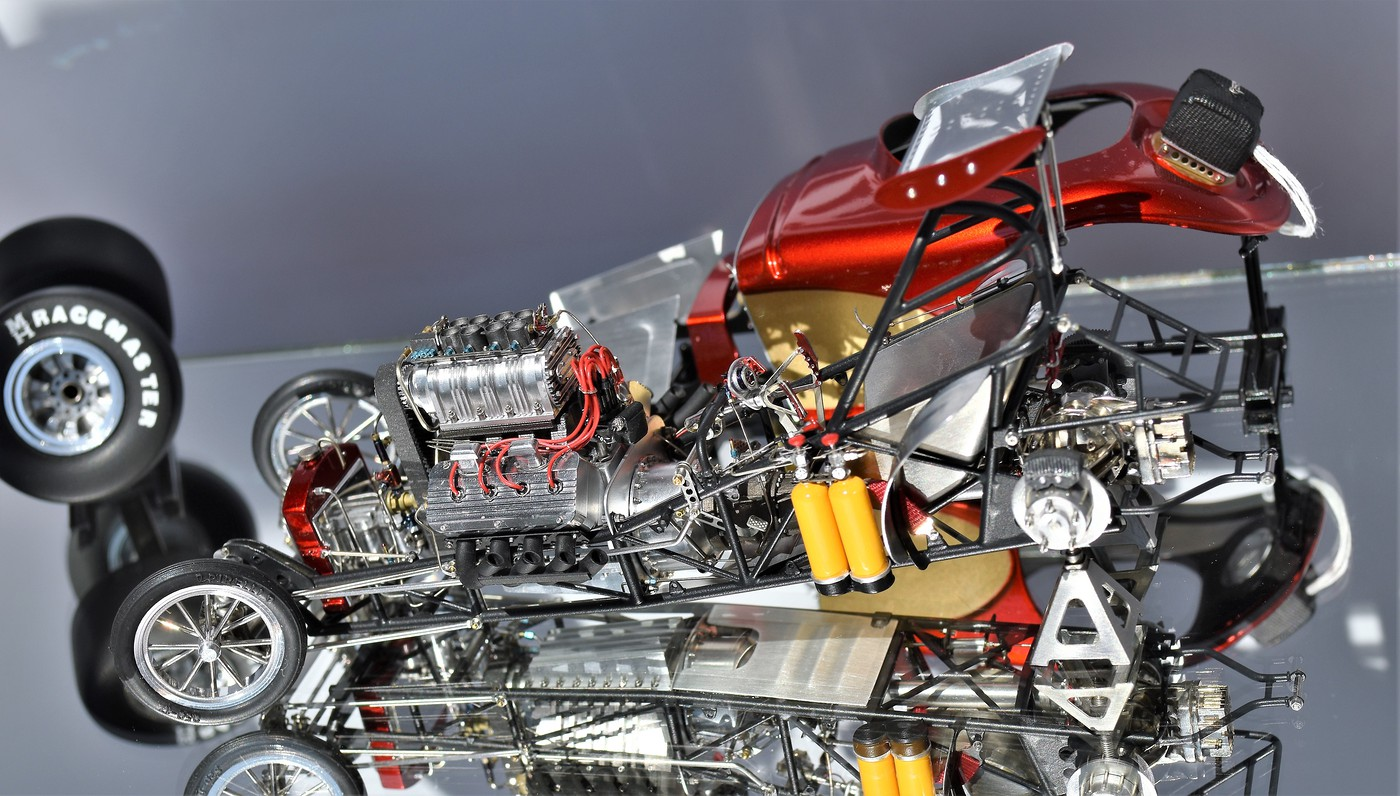
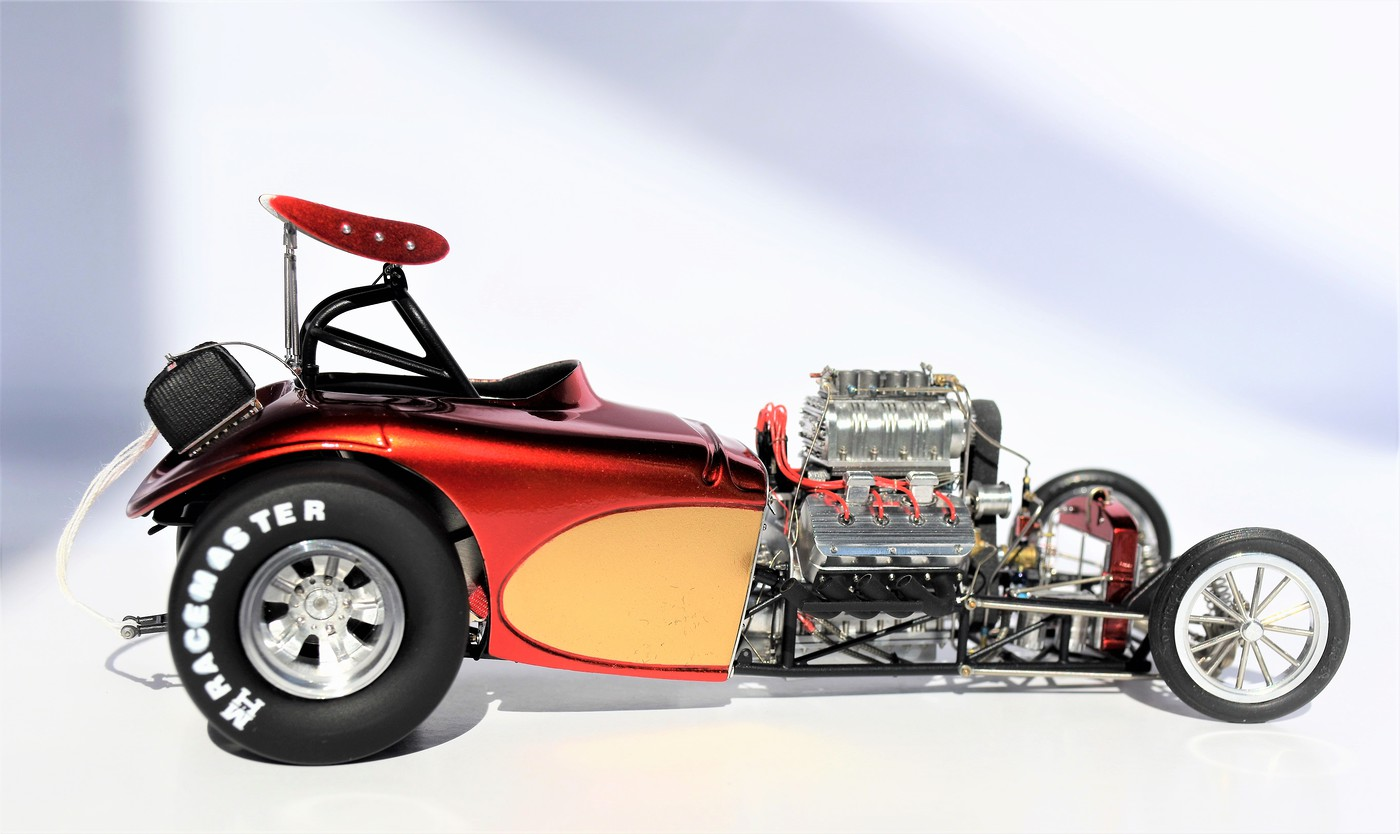
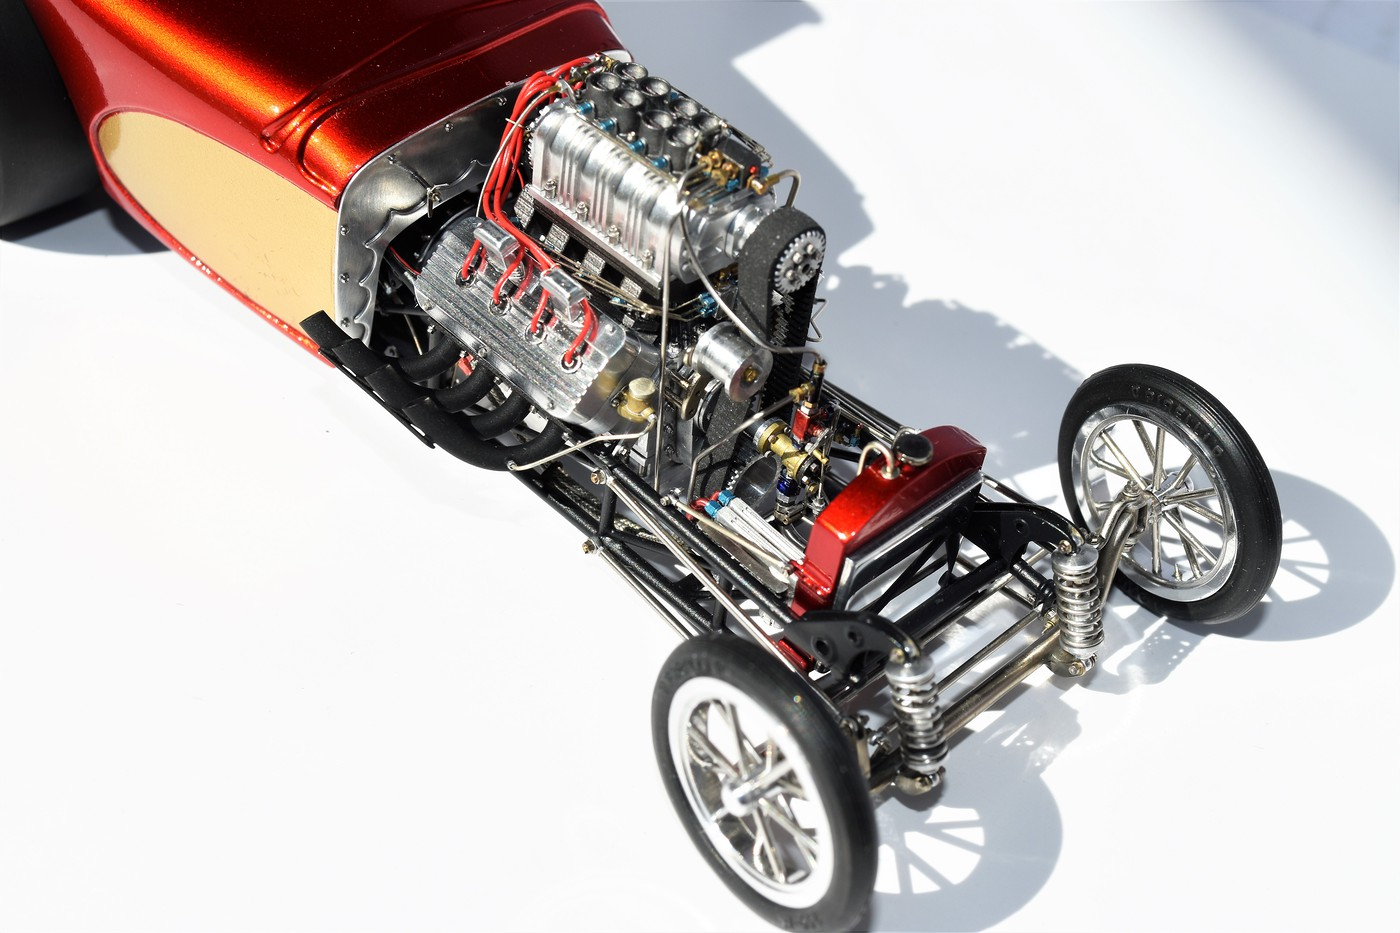
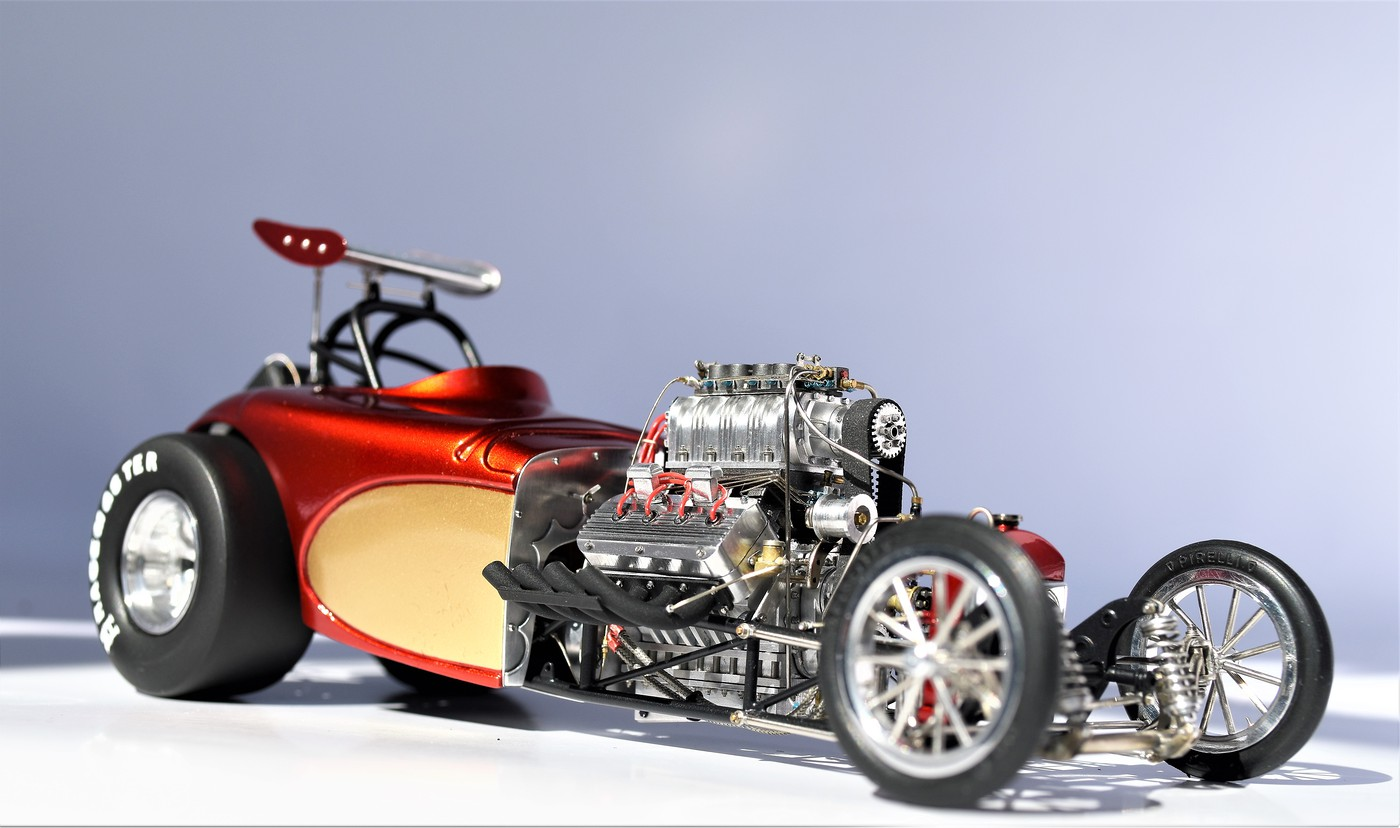
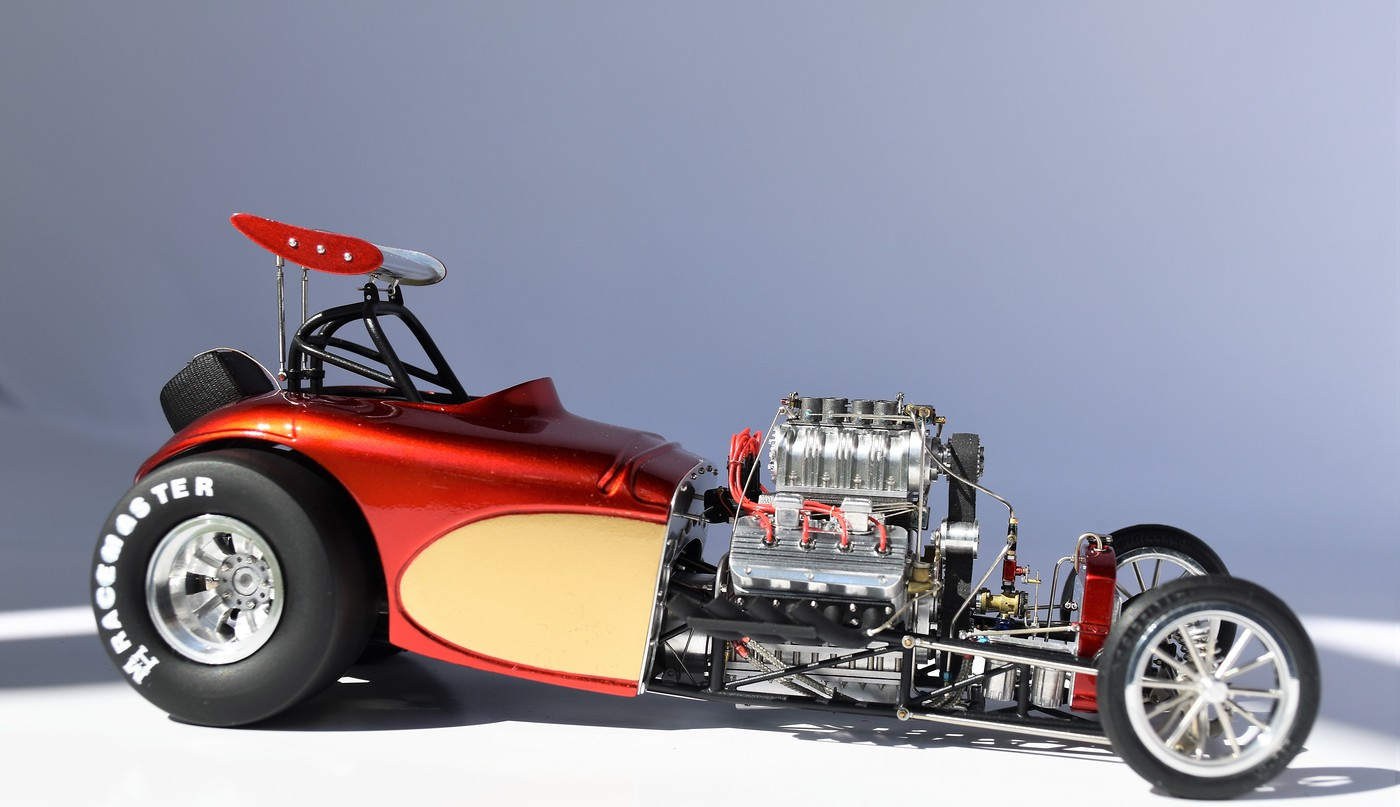
Hi guys....today was a sunny day and I took advantage to shoot the car in natural light. I don't know if I'll be able to post them all at once, but if not I'll post the others later. Still have to shoot a few "detail" pics before I put this one on the shelf! Cheers, Tim
-
Interesting piece you found for the horns. I'm not doing injection however, I'm going tunnel ram with 2 Holley Dominators for the car. cheers
-
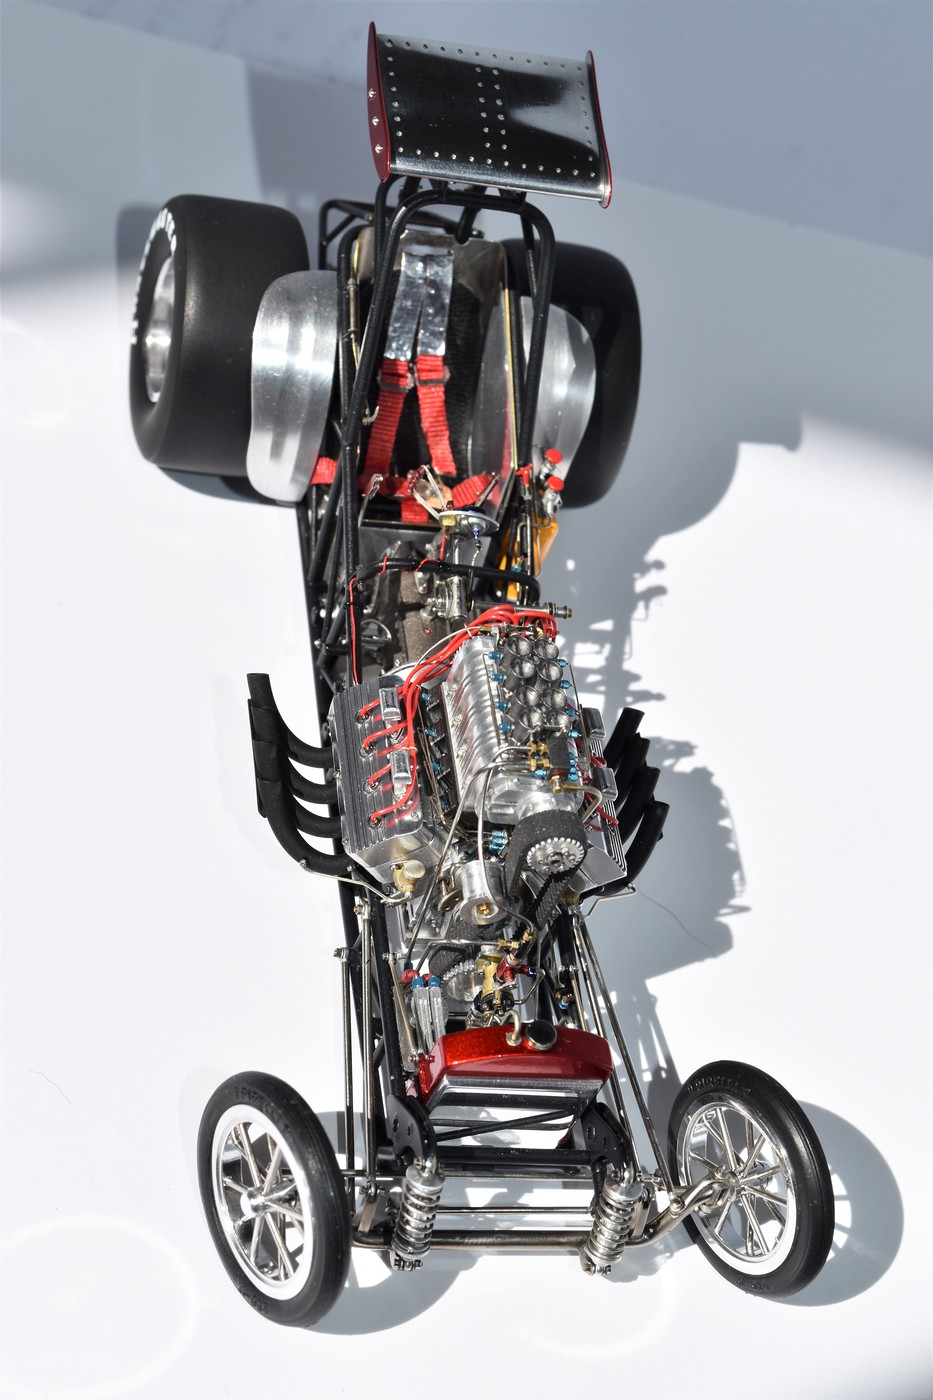
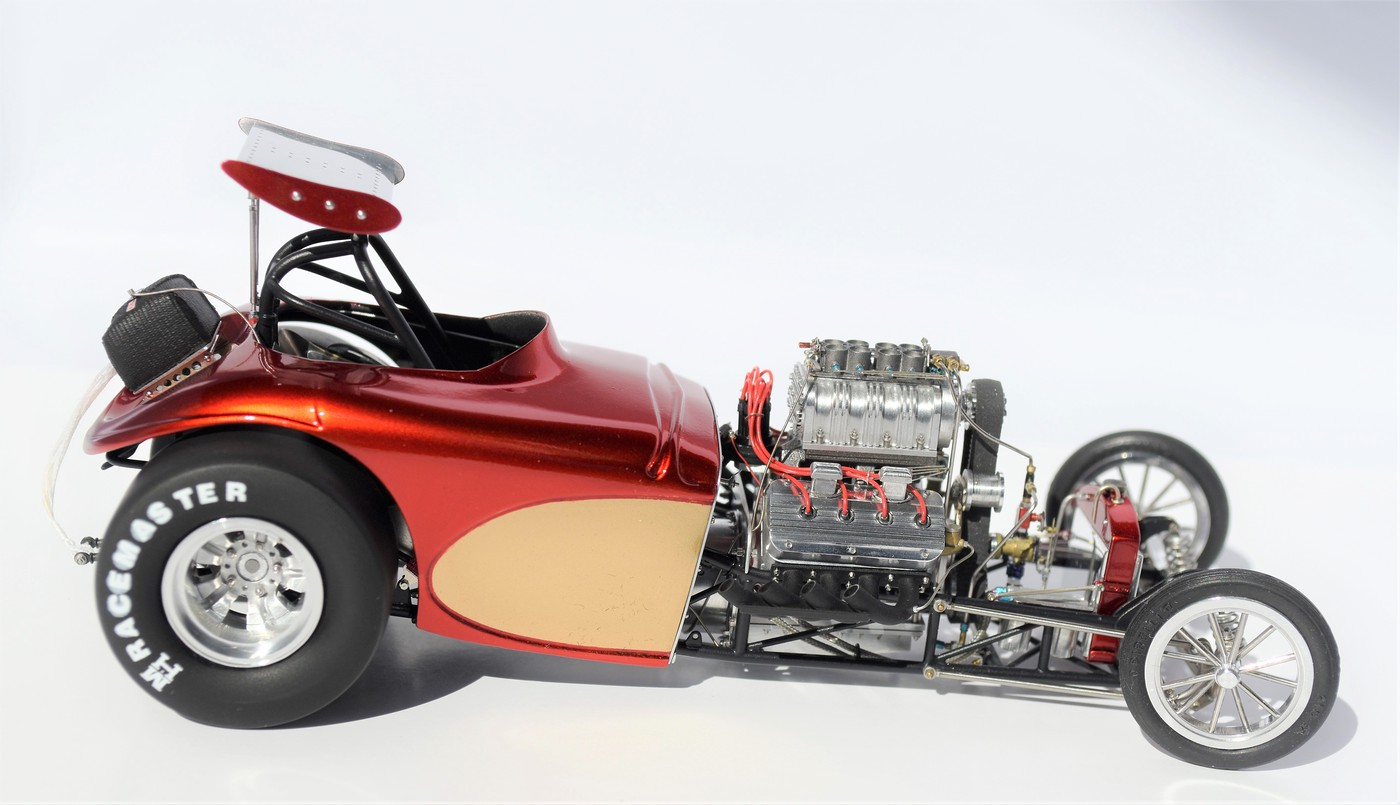
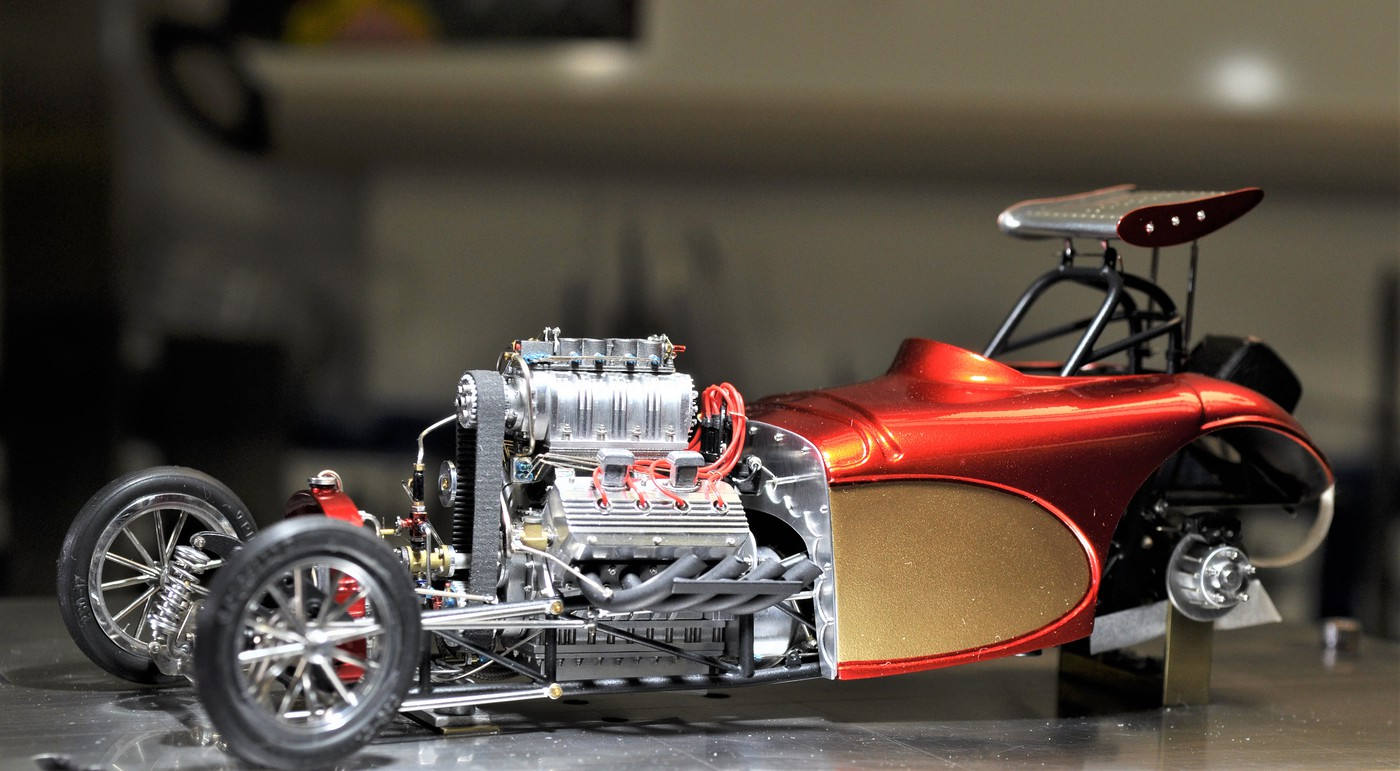
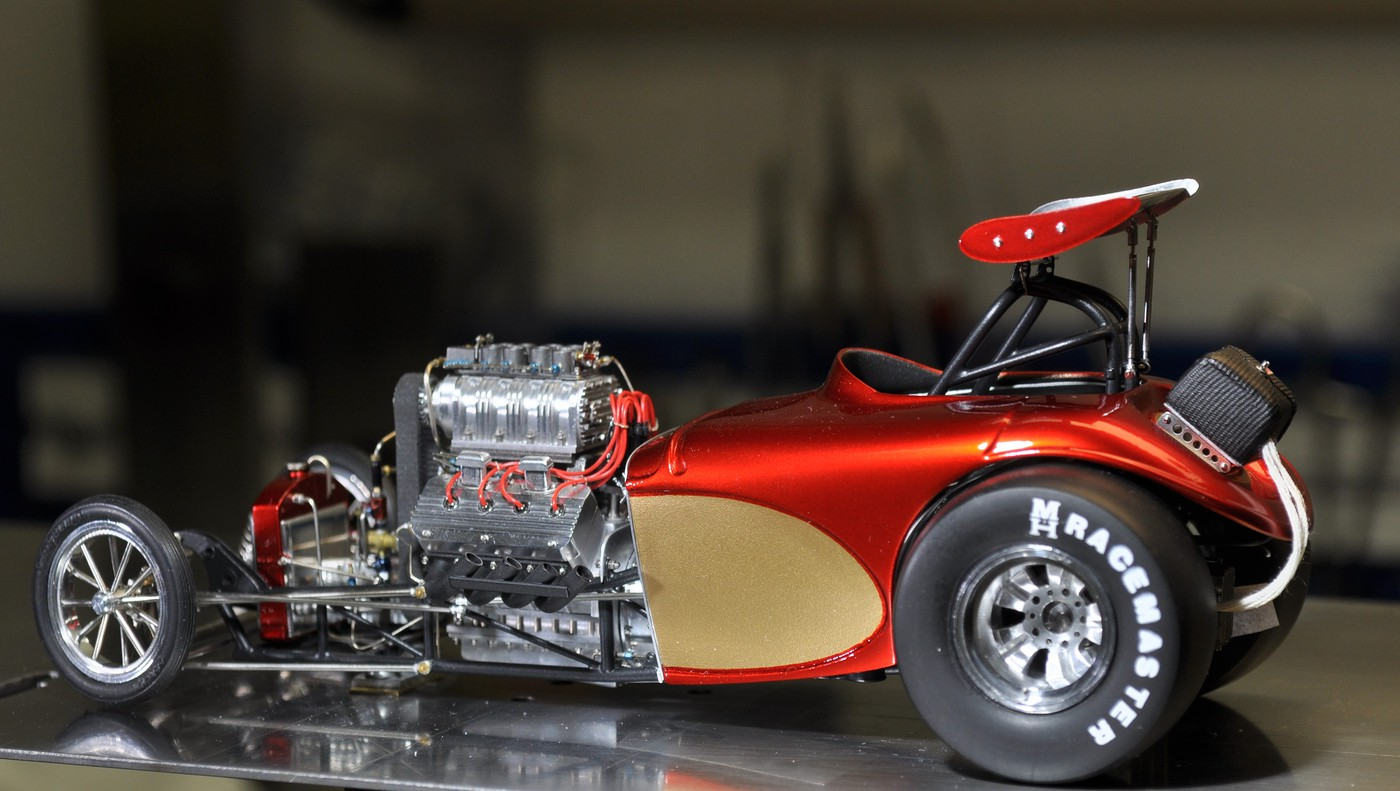
Ta-Da. I remember the day I dropped the Henry chassis and started the Bantam a few weeks later. I thank each of you that have followed along from beginning to end. Your comments and encouragement mean/meant a lot the whole way. I've also made some great new friends and learned OH SO MUCH.................So again, my sincerest appreciation. These pics matter even though they're of poor quality. She sits on all 4 and I took the jig apart after 3+ years. I promise better quality pics very soon. Cheers to each and everyone of you! Tim
-

Bondo 801 "Professional Glazing & Spot Putty"
Codi replied to Ace-Garageguy's topic in Tips, Tricks, and Tutorials
I love this stuff and have used it for some time as well. The mixing tips are very helpful and I'll print this out for future reference. One "trick" I stumbled upon when using this bondo is that when I'm done sanding it down and getting it pretty much where I want it, I take Zap a Gap "THIN" glue in the pink bottle and "seal" the bondo with the glue with a simple applicator. Not a lot btw. Just enough to seal it and make it appear semi-glossy. Then I go back with 800 / 1000 grit sandpaper to knock it down a bit and to a perfectly smooth surface. I started doing it as a way to eliminate any "ghosting" effects wherein the bondo will be visible underneath. If I have a spot that's not quite right still, I'll just sand it down a little bit, re-apply the zap a gap and follow the same steps. I've done several models with body work (some was extensive) and none of them have experienced the ghosting that can / might appear occasionally. Hope this helps others in some way. Again, great product !! cheers, tim -
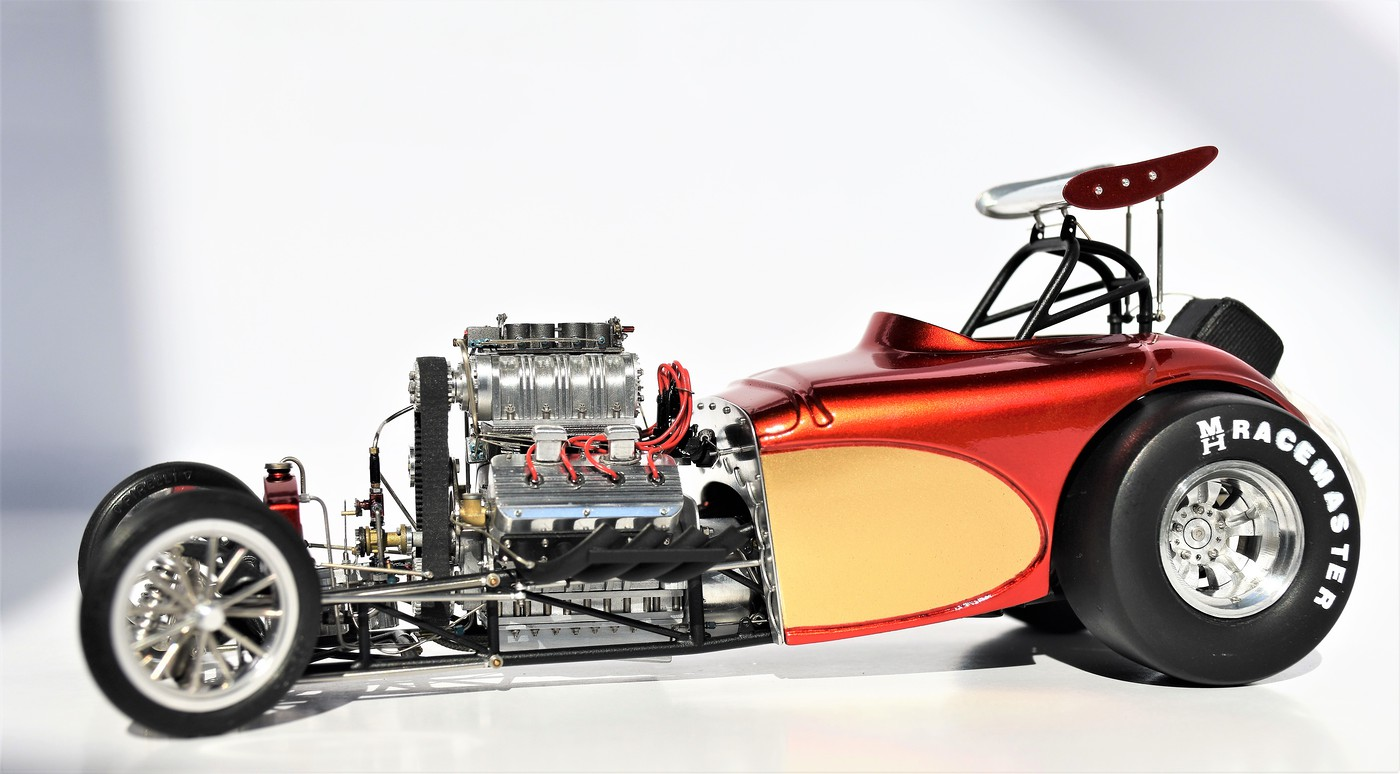
Some "almost" finished pics. I'll have some more in the near future with some underneath shots of the body with the tins & brackets installed along with the body jig & some other stuff I made for it. It's pretty much done now. All the tedious and nerve wracking assembly bits are done!!! Yeah!!! Interestingly on the drivers side when I looked at the pics it appears that there was a paint chip or flaw........I thought "oh no" and went and looked at the car to see if I had messed it up somehow.........ahhh, not the case thankfully. I don't know what it is in the pic or why but it's all good. Anyways........Cheers, Tim
-
Precision. Nothing but pure precision. Gotta marvel at the work you do Mark. cheers, tim
-
Imagine the hours spent just drawing this up to be able to print it in the first place. Somebody has some great reference material and patience to do that. Let alone passion. I don't see how anyone could do that as a job and make money selling 1/24th scale engines at $55. euros a pop. Or can they? I just don't know enough about it but I'm sure someone that does will share more info. It IS incredible looking. cheers, tim
-
Gorgeous car sir! Reminds me of my high school days. cheers, tim