Codi
-
Posts
2,675 -
Joined
-
Last visited
Content Type
Profiles
Forums
Events
Gallery
Everything posted by Codi
-
Loving this thread already Kurt. Especially like the entire initial thought process you're going through and how you want to realize it. Oh, and the car itself is going to be just wild. Like a better looking 918 on steroids. cheers, tim
-
Nicely done Tim. The black paint looks fantastic too!
-
Great idea Brad, next round of pics I have to share I'll include one. Daniel, thanks sir. Dave (Goatguy) just dropped by yesterday and I shared your Zip Tie method with him too. Dave, thanks my friend. You can see a lot of what you taught me along the way in that shot. I think I passed the Professors class.
-

Techno Bubble 41 Willys Bonneville car
Codi replied to Claude Thibodeau's topic in WIP: Drag Racing Models
Now that's stretching ones imagination Claude. GREAT concept and nicely executed. cheers,tim -
Been working on a framework to support the body and assorted panels for display purposes. I'll have some pics to show pretty soon. I'd like to acknowledge some people today and a nice gesture by a friend. Dave Ambrose, I'm glad you've enjoyed this thread. It's been quite the journey right? I want to say thanks to you and all the other administrators / owners of the Forum. You're efforts & work are not given the credit for which they deserve. I would not want the responsibilities but I DO appreciate having such a venue to share our hobby with. Thanks........and to you especially Gregg! Bill (Ace) Honestly, it tests my patience at times but I'm enjoying this part of the build especially now. It's a bit much on this one but I've learned a bunch for the next build. Thanks !! Bruce, always good to read your posts and sentiments. Just know I enjoy your builds as well. I've said before how apparent it is that we like so many of the same cars. cheers, Kurt, I always love a good chuckle and the nitro incense pot visual made me LOL. thanks for that and for stopping by to check out the build. Randy, thanks sir. Always a fan of ANYTHING you're building. Hopefully you'll have something to share soon. It can be anything.....anything at all. wink-wink! Bob, that sir is high praise indeed. It's inspiring to keep pushing ahead with it even though it can be a mental slog at times. Then those moments pass and well..........here we are. Almost done! Yeah right?! Hope you like the rest of it. In closing, I want to say thanks for the nice gift I got in the mail today from John Teresi. It was a GSL contest T-Shirt but what makes it special are the signatures and sentiments shared by several people that most of you will certainly recognize. In no particular order; Gregg (our very own Forum Editor of MCM & the Forum, Mark Gustavson, Art Laski, Chris Sobak and of course John himself. The heartfelt invite to the 2022 GSL contest (the final one) will not be ignored and I promise to make every effort to attend and bring the Bantam as well. I always look forward to the GSL results as I find the level of builds to be simply extraordinary. Truly one of the best in the country. If you win, or for that matter, even place at that show, that's saying something. So to one and all, many thanks for thinking of me even though I couldn't make it. Cheers, Tim
-
Ray AND Bob, thank you guys for following the build as always. It is getting exciting as it gets closer to being finished. Already working on the Pro Mod that will take the place of my Henry J thread. Mike, ahhh, good timing. This week I'm making a jig to support the body and some panels for display purposes. The body will be removed to show off the detail of the car. Thanks for asking. John, thanks sir, I'll have plenty of pics with the body on but see above my reply to Mike. Mike Flynn - thank you for the comments and the source I use for scale hardware is modelmotorcars.com I used to buy hardware from a firm called T2M as well but they've gone out of business. Good luck! Tim
-
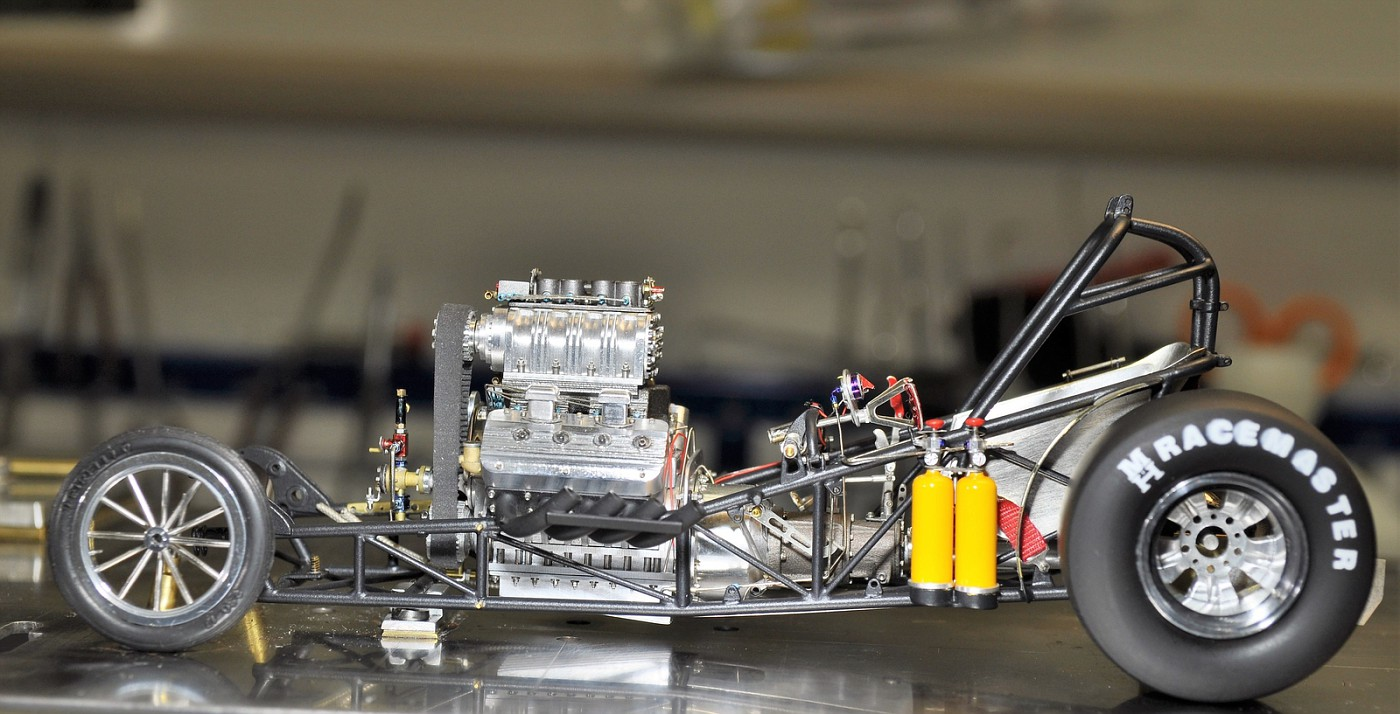
Thanks Scott & Dave.... Hoping for beautiful May paint weather..........come on 80 degrees and low humidity. Chris your comments are high praise indeed considering your Vega build. I learned a lot of great tips along the way from you. Thank you! Gary, thanks too for your post. I did get the Crower 8 port, valve covers & brakes installed over the last 2 days. The list is getting shorter. Everything in the pics below is permanently installed. cheers everyone!

-
Tony, that is such a cleanly executed build. Great colors and decals as well. congrats on it! cheers, tim
-
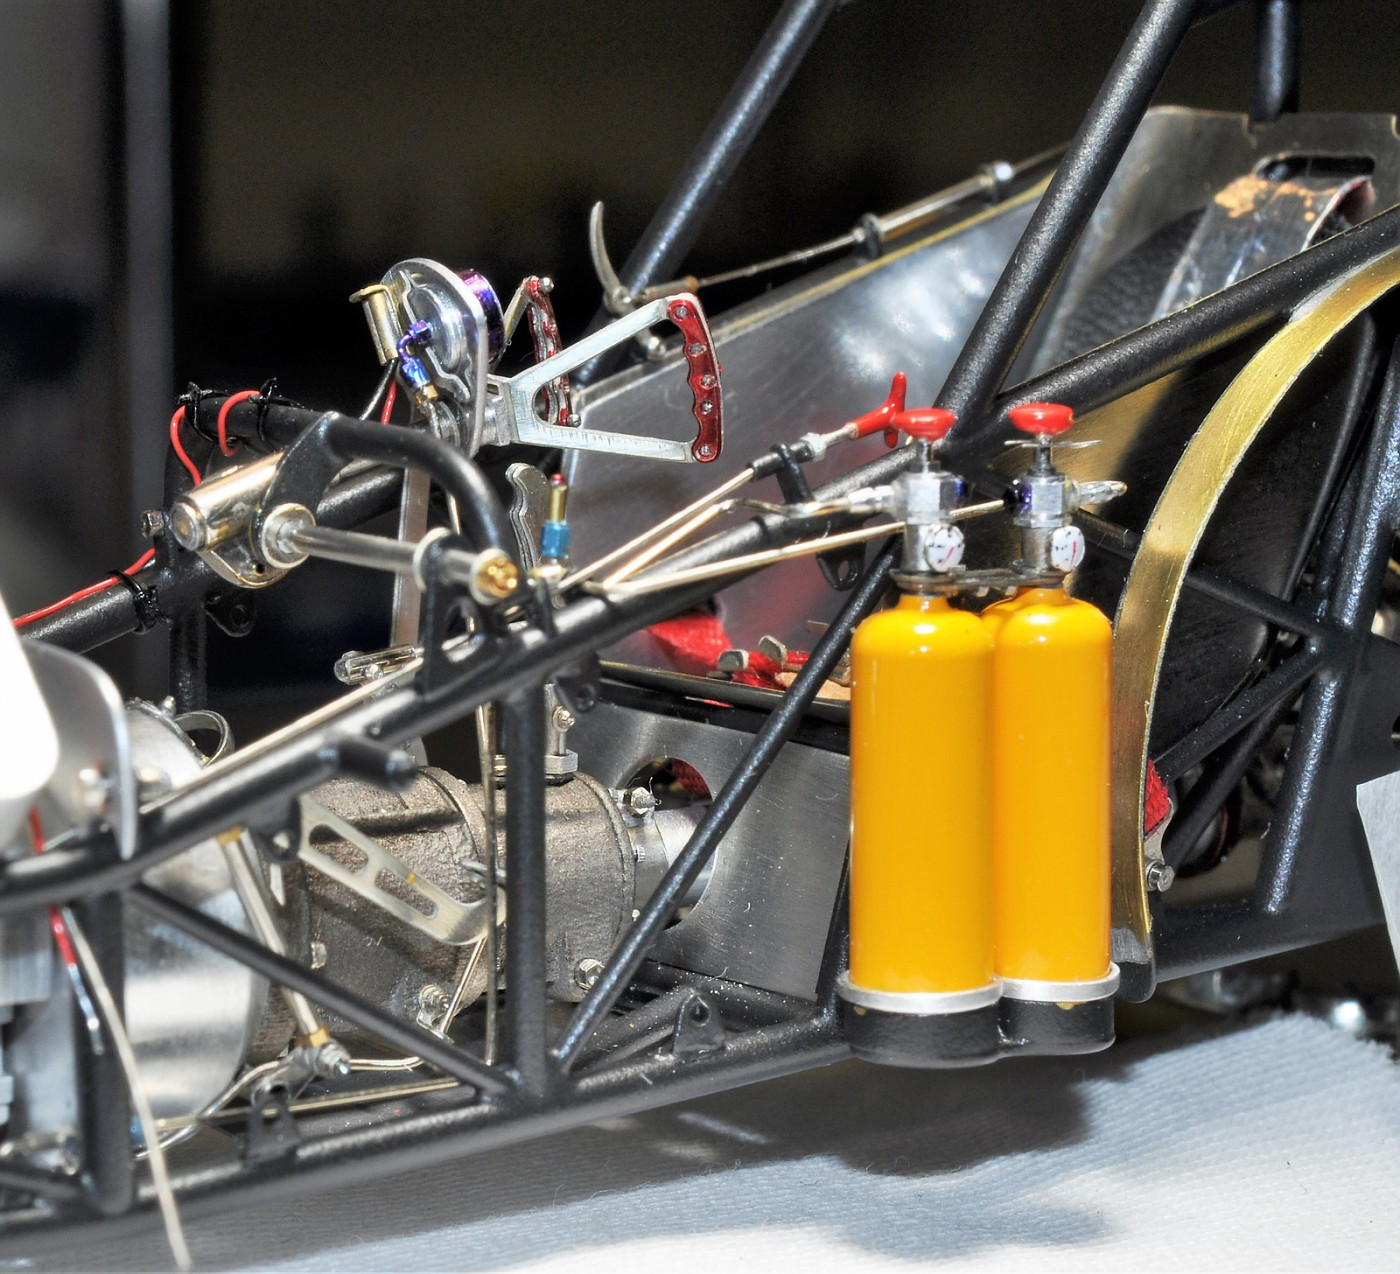
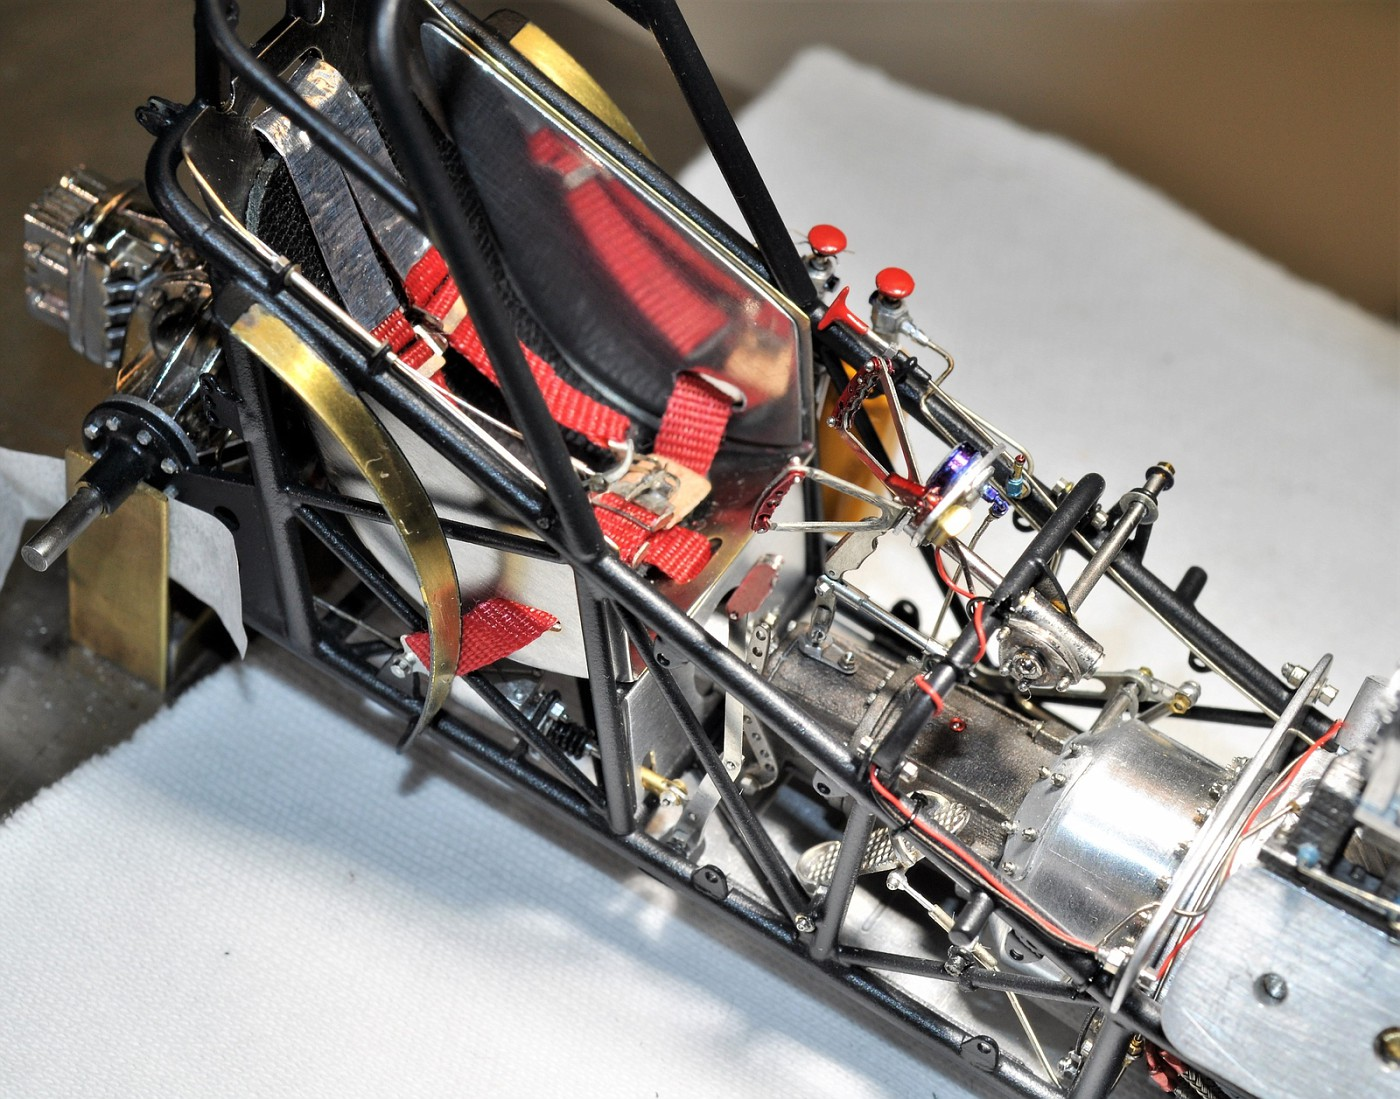
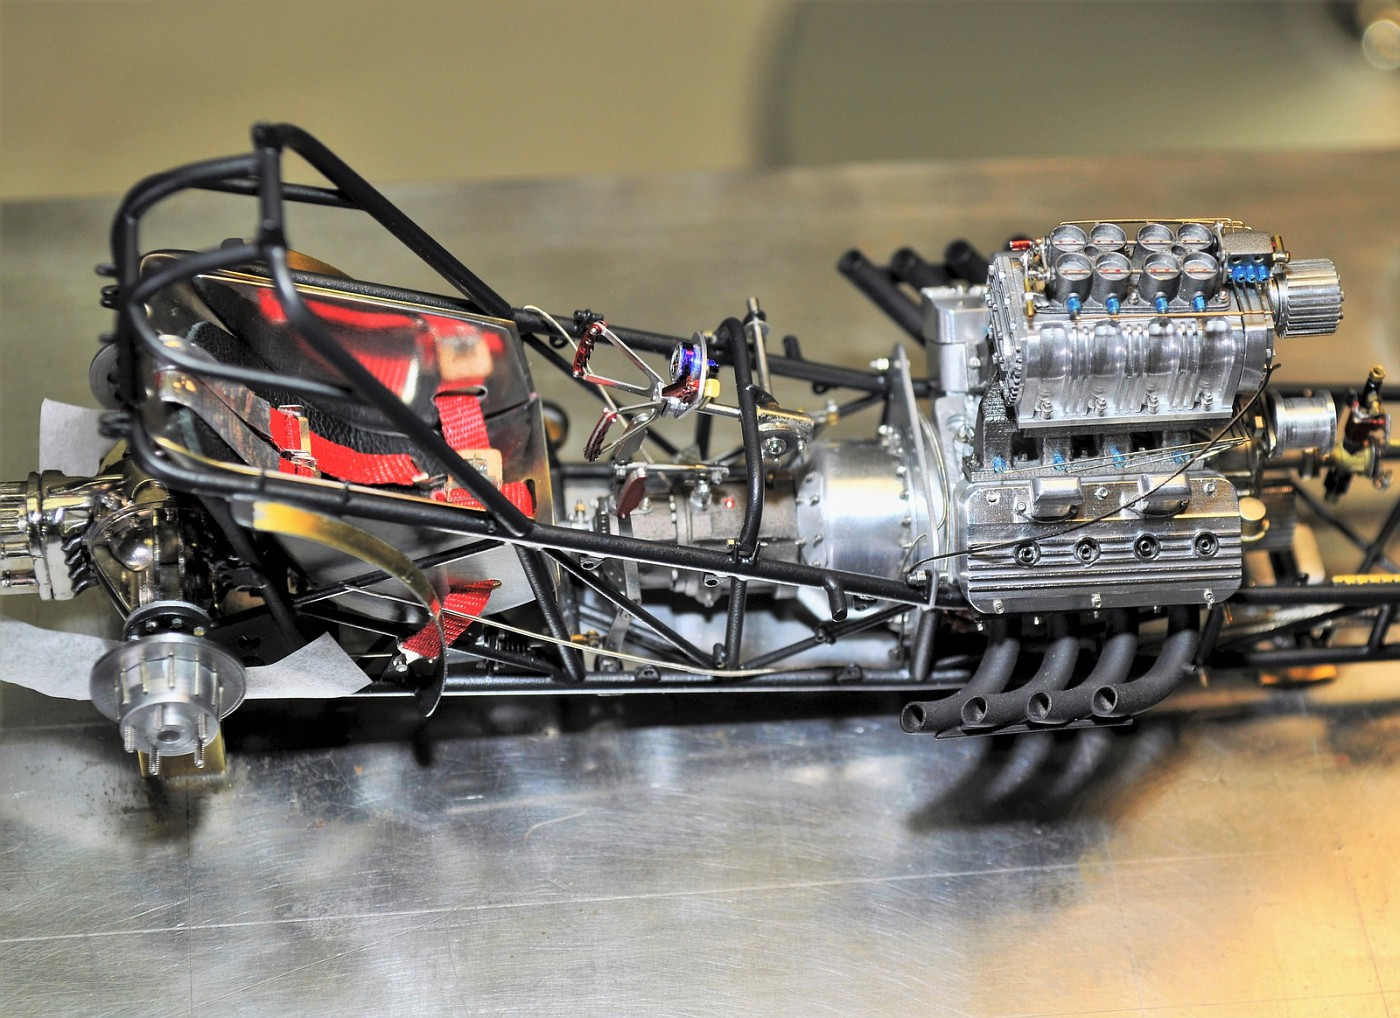
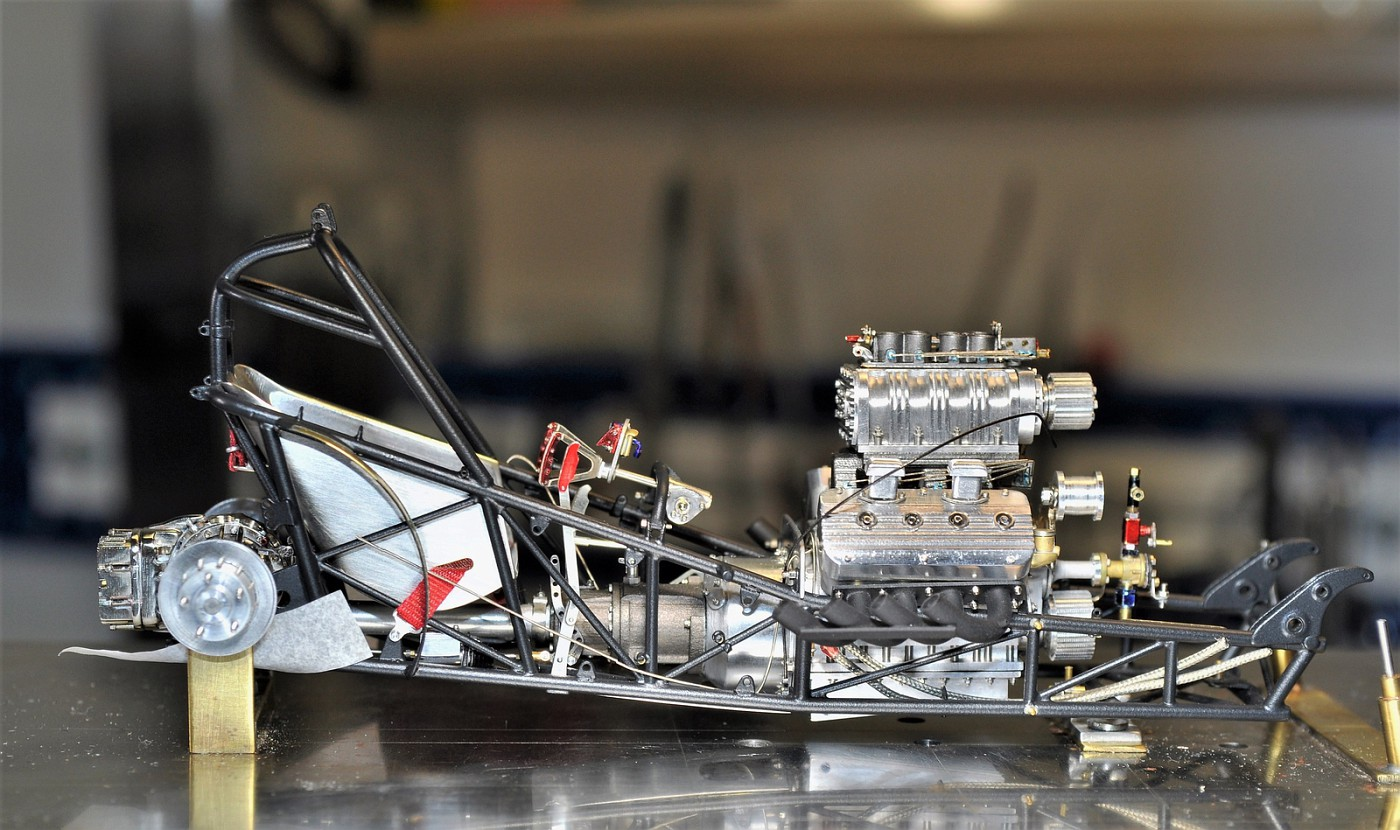
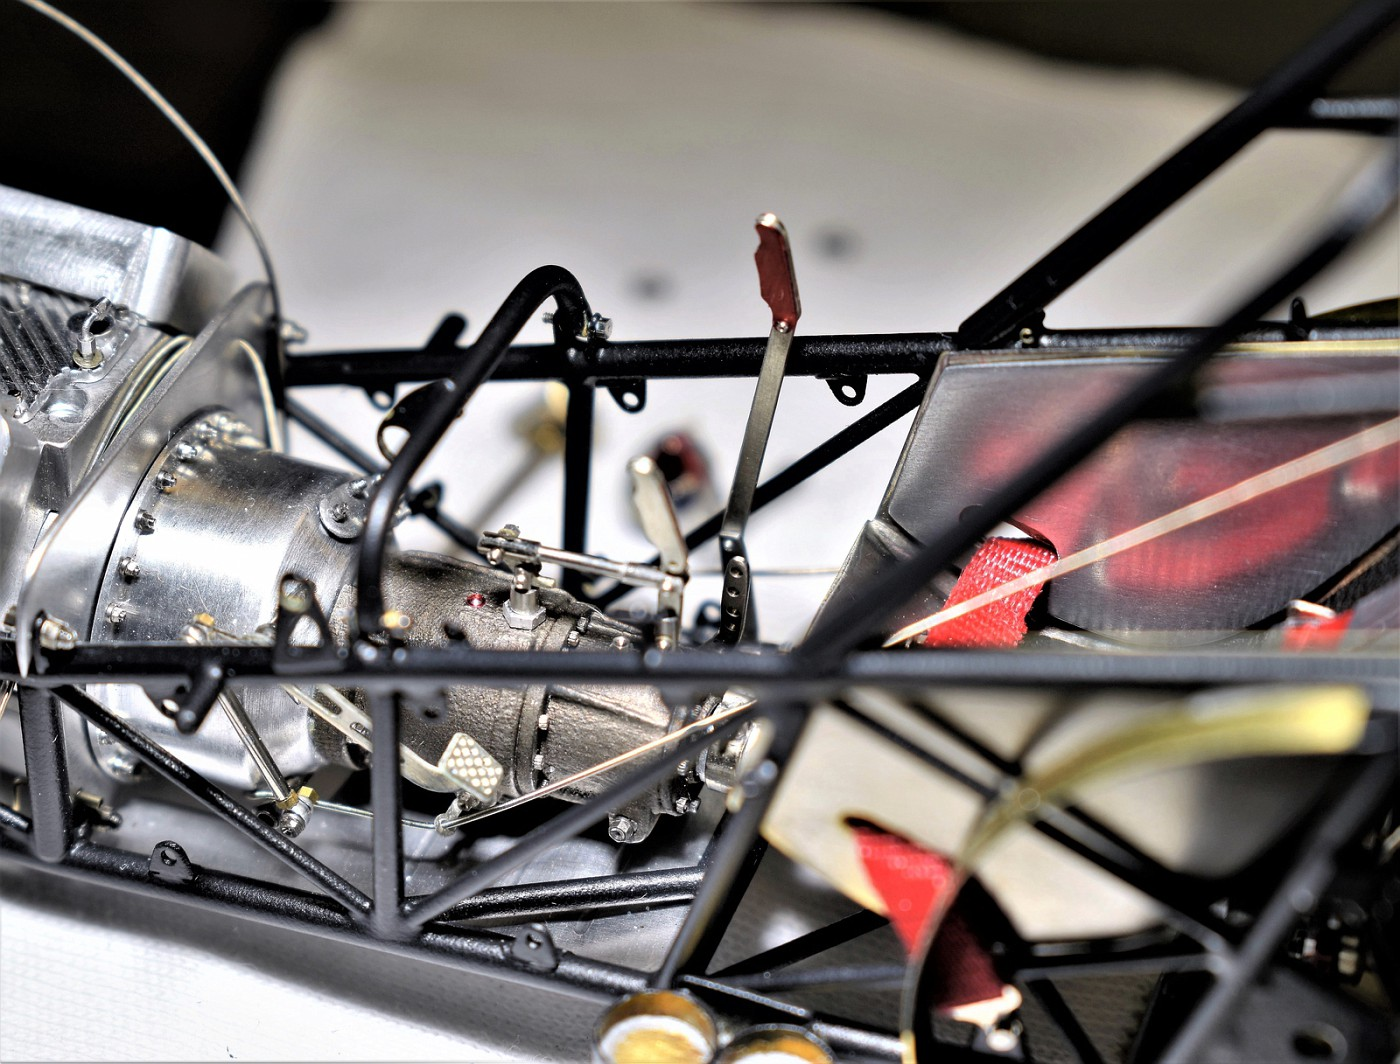
It's been 3+ years now since I started this thread. It's coming to an end soon and I wanted to say thanks to each and every visitor to the thread whether you commented or not. It's been fun & I've gotten a lot of experience out of this one. The forum is a great venue (the best IMO) to share and learn. For those builders that helped with their tips and knowledge along the way, I especially want to say thanks as it helped a lot to get to this point. The interior and controls are basically completed now. They include: Fuel cut-off, Mag kill switch, gas & clutch pedals, handbrake, chute release, twin fire-bottles including their hard-lines & nozzles (you'll have to look closely) oil pressure gauge (with John Teresi's retention strap idea on the back of it),the lenco shift & reverse levels. Please ignore the small paint chips in the pics as they're few and tiny. If not for the close-up pics I don't think anyone would be able to see them.....they'll be touched up at the end of course. Oh, and the left fire bottle safety pin has to be added...................Thanks so much fellas and cheers to all, Tim. In this pic you can see the kill switch flip cover.......that thing was a bugger to make.
-
That IS wild Chuck . Very imaginative. cheers, tim
-
Glad I stopped to check out this thread Jay. You've done this car and kit tremendous justice. cheers, tim
-
You're off to a great start Trent. This should be an interesting thread and it's nice to see you doing a WIP on it. cheers, tim
-
Love the chassis / suspension pics you shared Dann and your goal of replicating them. That will be phenomenal. cheers, tim
-
Thank you Edgar, I'll have to post pics with a ruler or something in the pic for scale reference. I did get the gas pedal in and lines hooked up among other little details addressed. Blower is finally mounted to the engine so I took time to do a mid-assembly mock-up. The fire bottles aren't permanently installed yet as the hard-lines are quite fiddly. Cheers, Tim Sorry for the quality of the pics.......not sure why the lighting wasn't co-operating.
-
Don Hardy chassis help for blue max build
Codi replied to MoparMark's topic in WIP: Drag Racing Models
Like many others have stated Mark, I'll be sure to follow as well. This is a great subject and the Blue Max team was always one of my absolute favorites. cheers, tim -
Just had dinner John and you serve up dessert. Yum. cheers, tim
-
Lee, look under "Tips, Tricks and Tutorials" on the site. Daniel posted it there with the header of "Zip Ties". He did a nice job documenting a how-to. I used .25mm black monofilament line. They sell it on Ebay and have info on various sizes as they sell it by how many pound test the line is. I think .015" was 38mm. To pierce the hole in it I used a small hypodermic needle for a great result. cheers
-
Keep churning these beauties out Clay and you'll convince me to try building a Nascar racer some day. Thanks too for sharing the link on your new site. I book marked it right away. Tell me you're either going to keep your Fotki page too or transfer all the great builds you've done over the years to the new site..........Cheers Sir!
-
Hi Chris, I can only imagine what went thru your mind when you were down to the last few steps on your Vega. The last week or so has been very satisfying to see it come together like this. I can see the whole thing in my mind and if I don't mess it up now, it should be pretty cool when done. I did mock up the car with the body, wing and slicks on it. You'll like it! Dave (comp1839) well, after all the input and knowledge you shared, I think it's coming together too. Thanks so much for the friendship and mentoring along the way. I won't forget it. Bruce & John, I couldn't help but notice the emoji you both used. Co-incidence? Either way, I appreciate it........ Davewilly, thank you as well but I assure you, it's been anything but easy at times. Finally getting a lot of satisfaction though in how it's coming together. Daniel (Straightliner 59) as always, thank you very much......btw, today I tried out your tutorial on Zip Ties. NICE! No pics yet but I tried your method and I'm happy with how they turned out. I had tried to do this based upon some other suggestions a year ago and it just didn't work for me..............but YOUR well documented tutorial helped me get a great facsimile made. thanks again! Cheers to all.
-
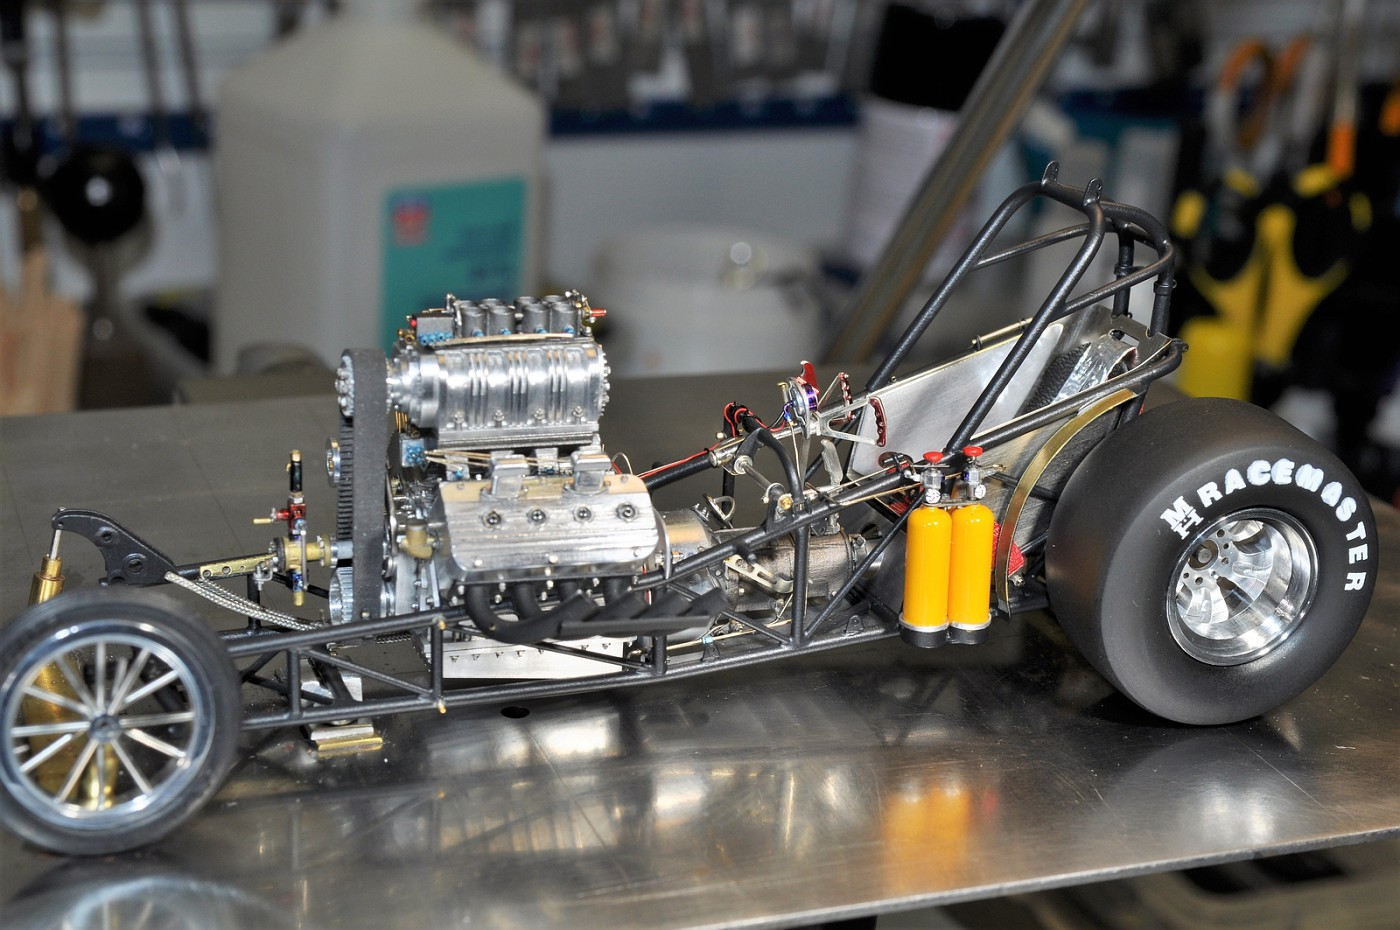
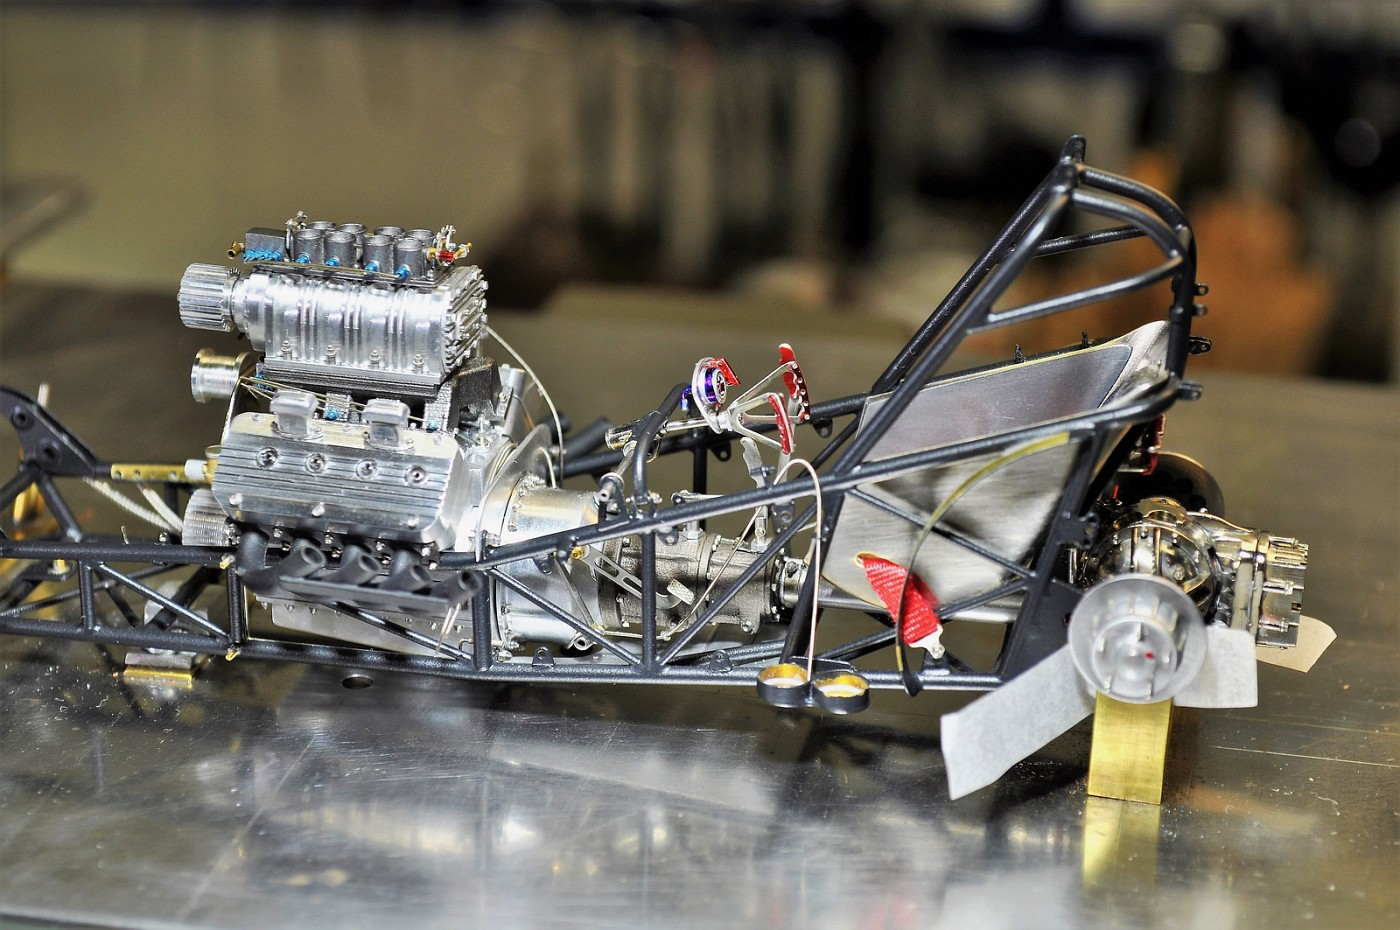
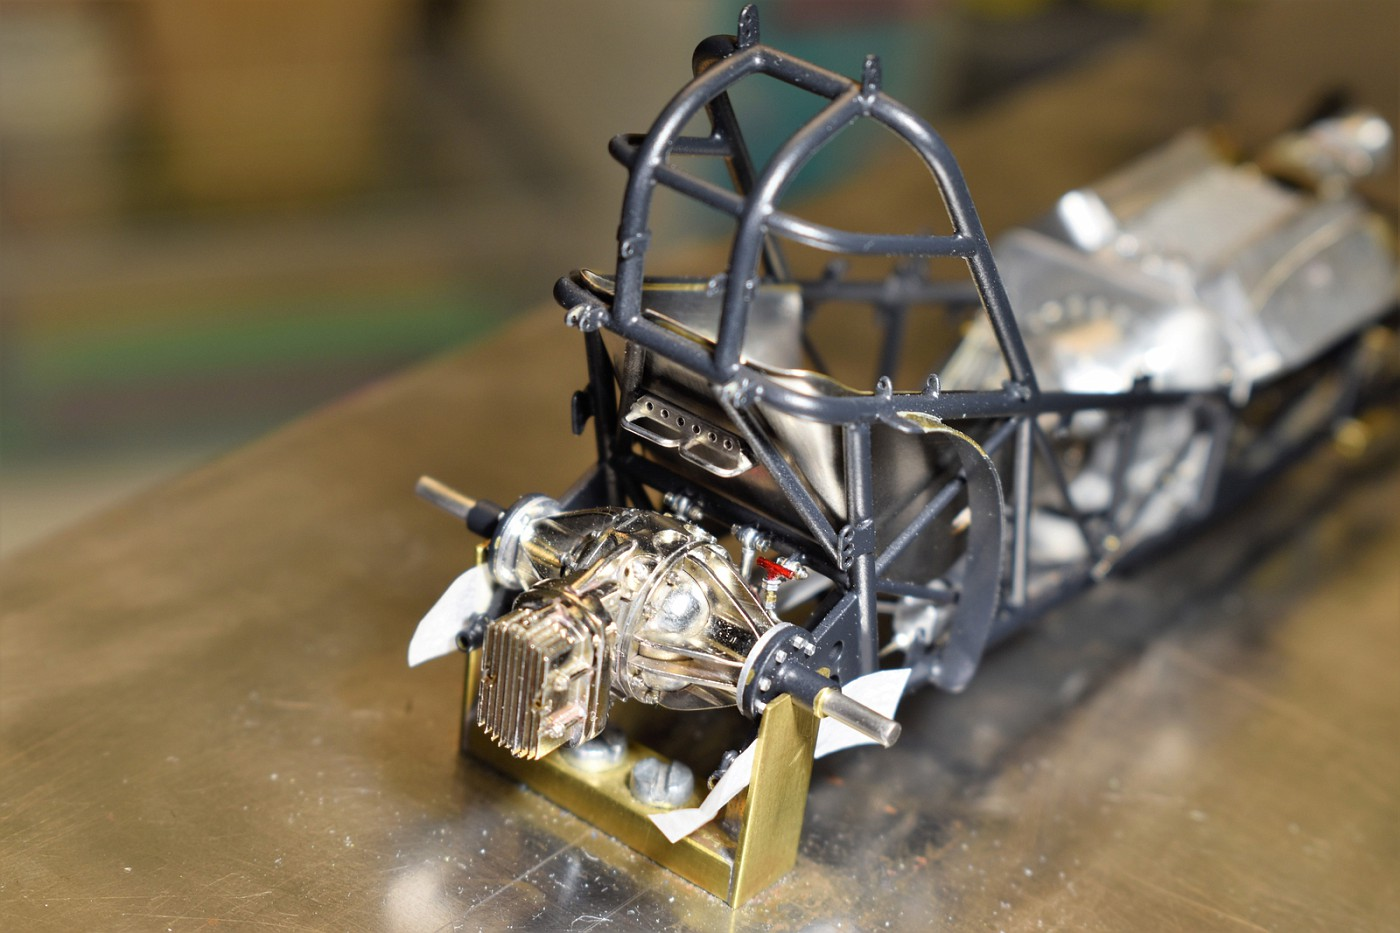
Hi guys..........thank you both gentlemen, I wanted to share what I thought were a couple great shots I took later this afternoon by mocking up a few engine parts....they're not permanently attached just yet but these shots have me really enthused to get her done. Hope you like them too. Cheers
-
Thank you John, Brad, Dave and Chris....some pics today of the steering column / wheel install. You'd think something this straightforward would take but 30 minutes. Uh, nope. Fought me a bit but I think I won out. Throttle pedal and then the blower are next up. To those that observe and celebrate the holiday, Happy Easter! Tim
-
Hey everyone and especially to those that commented, thank you for the encouragement and comments. I'm moving along now, sat down just to do one or 2 things and 5 hours later.............well, anyways, here are some pics where I started adding the handbrake, reverse, shift levers and running wires / cables around the car. Very soon I'll mount the blower and start doing some detailing on the motor. I did see a snag coming up in a few weeks wherein I need my fuel tank to be installed but with last years poor paint weather I never got the Candy Red on the car. So I'm hoping for some early warm weather to get it done. Cheers!!!!!
-
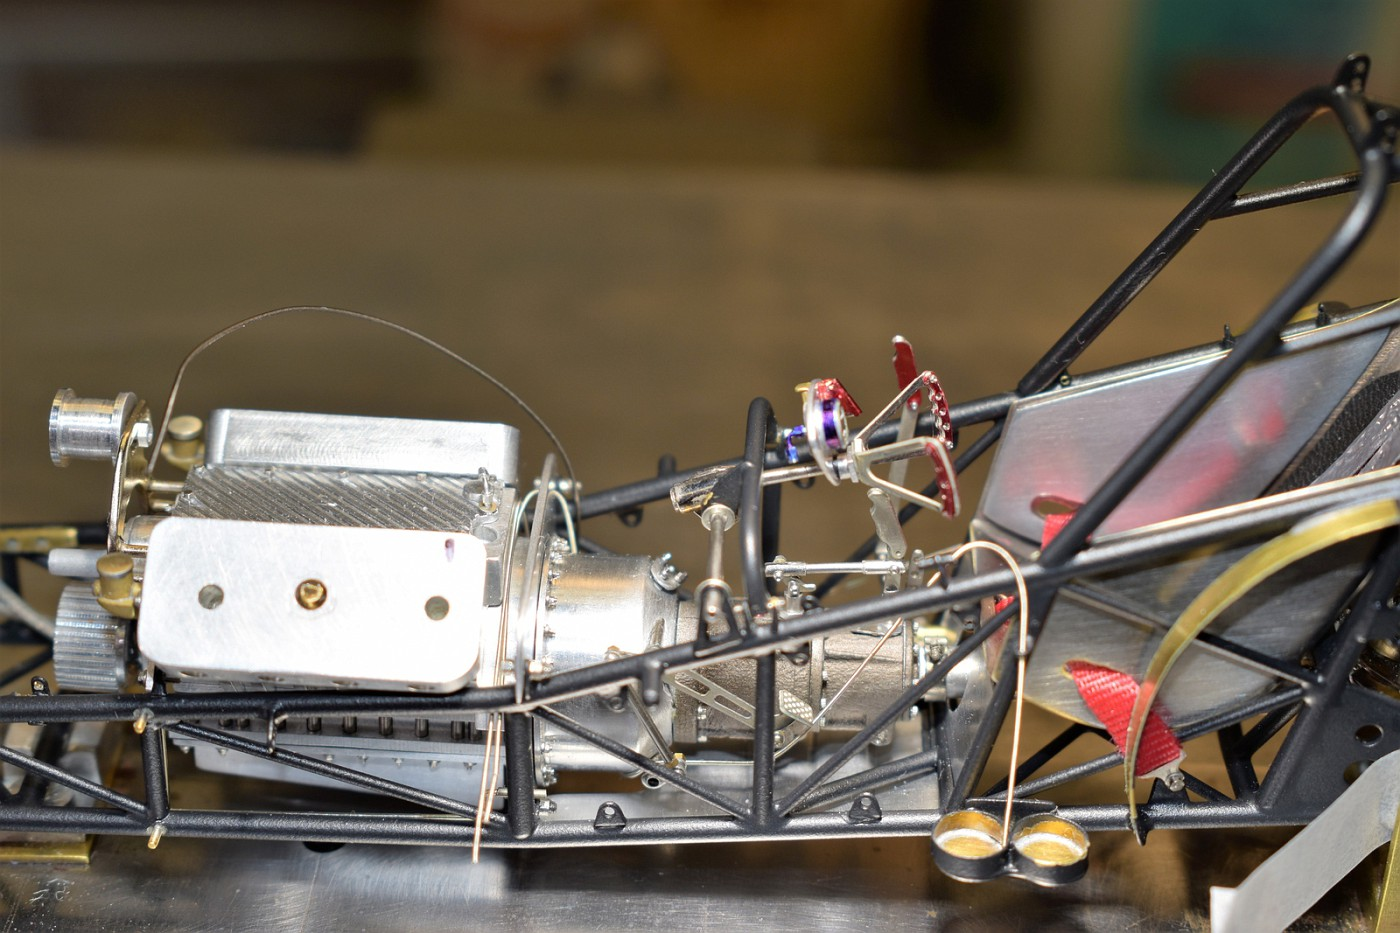
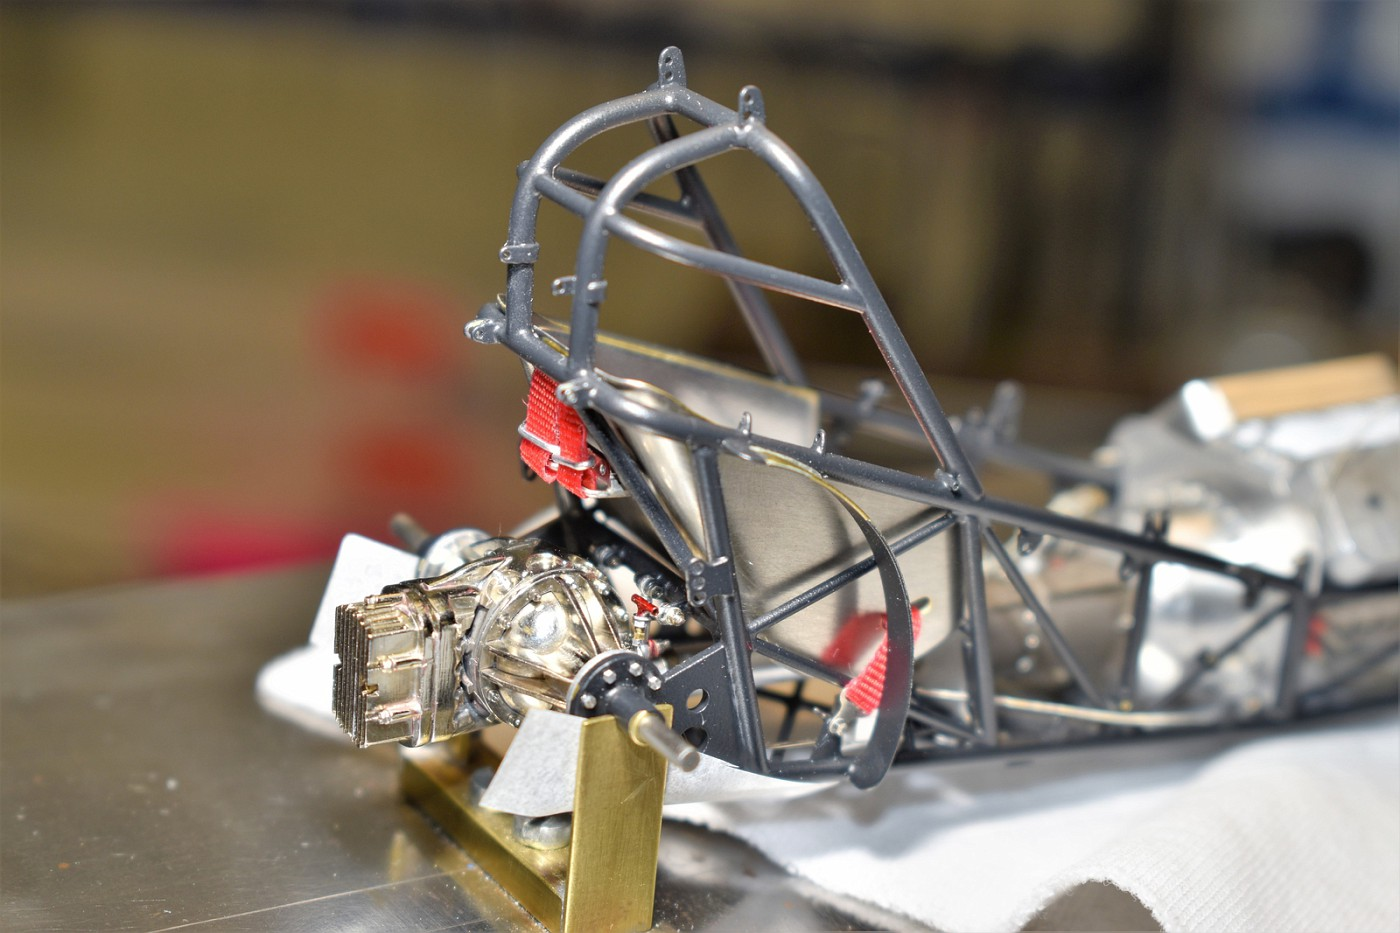
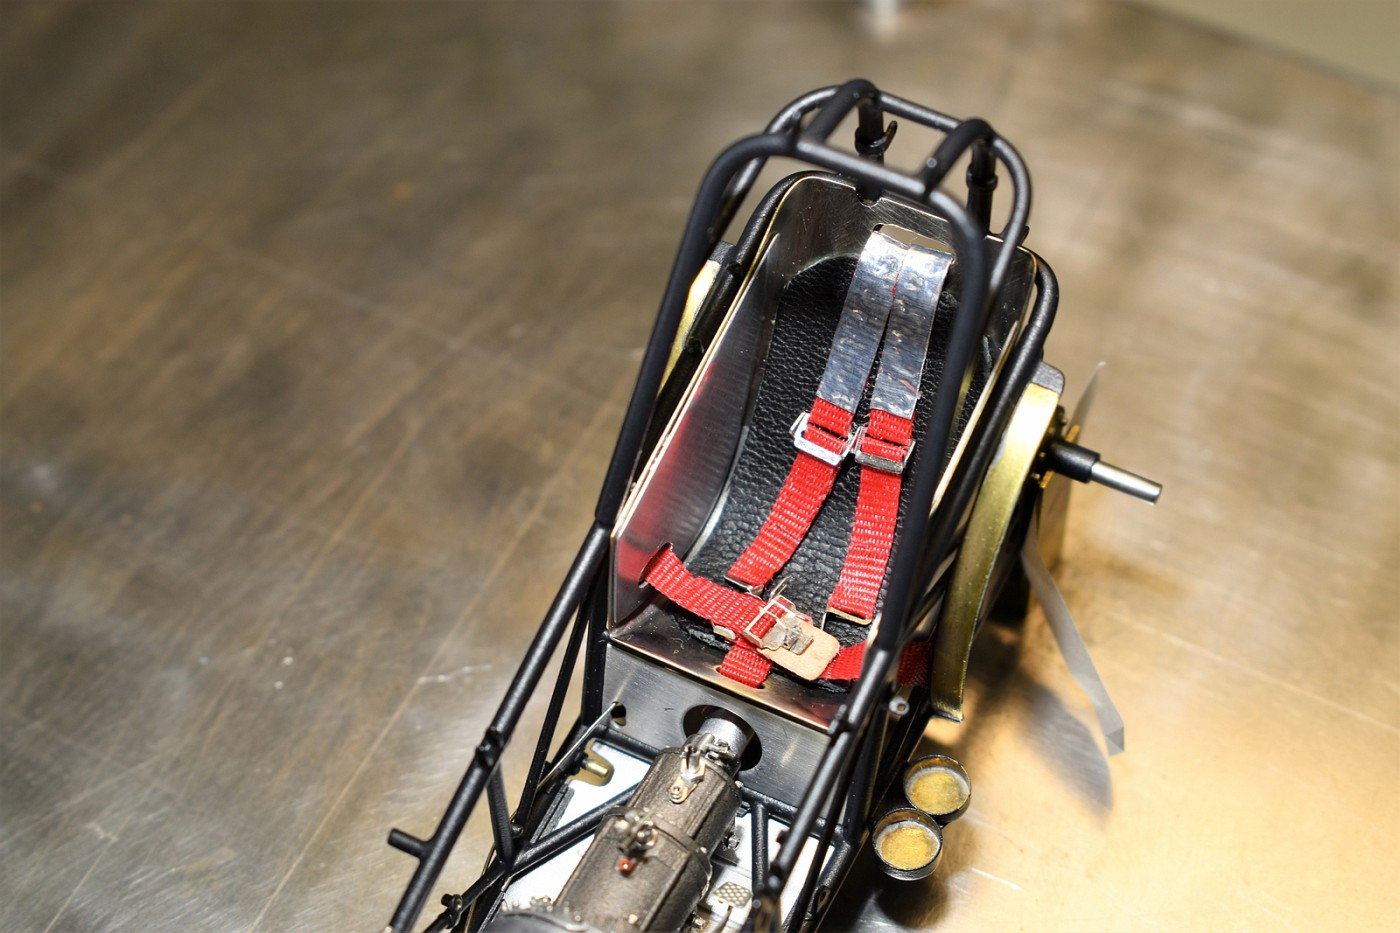
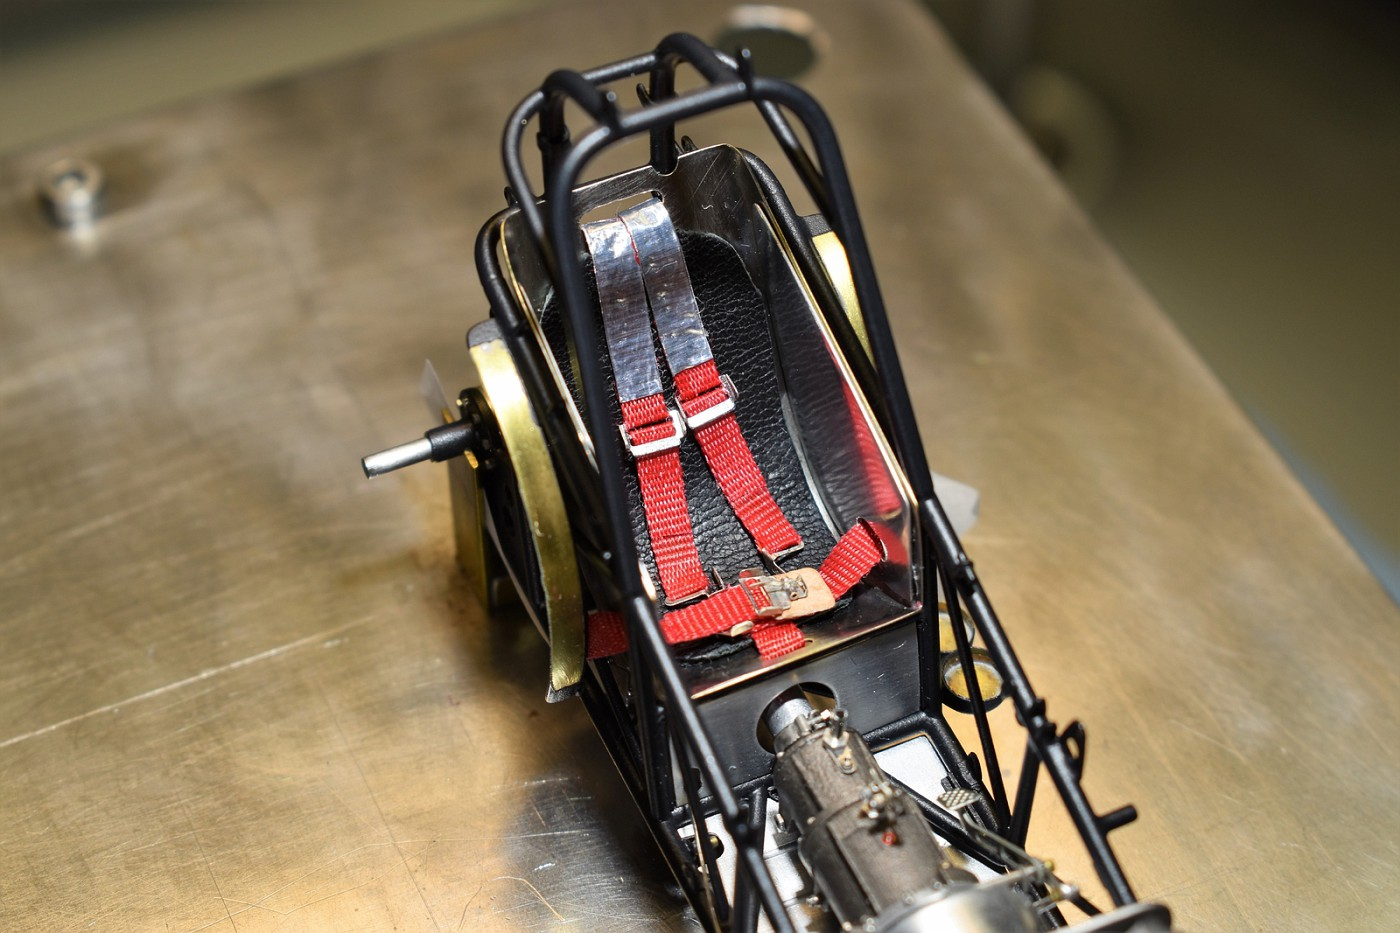
Thanks gentlemen. I wanted to answer Brad's question..........yup, it has "substance"........haven't weighed it yet. Off the top of my head, everything is either brass, aluminum, stainless steel and even a wee bit of titanium. The body of course is plastic, the trans and the blower manifold were 3D printed. Tires are compresin items. I've been working the last several days to get the seat/belts installed. I made a brass (plated afterwards) bracket for the should belts to attach to..........the original chassis bar and seat back were just too close together. Also had to modify one of my tiny .5mm wrenches to get nut onto the lap belt bolt from the bottom of the chassis. Moving on........cheers!!!! This is a pic of the brass (chrome plated) shoulder belt bracket.
-
1/8 Scale Racecar Chassis Update
Codi replied to regular guy's topic in WIP: Other Racing: Road Racing, Land Speed Racers
I love sarcasm as much as the next person.........so if you think about it........what's the point of telling us you ordered basswood strips on-line. Kinda silly if you think about it. I did. -
1/8 Scale Racecar Chassis Update
Codi replied to regular guy's topic in WIP: Other Racing: Road Racing, Land Speed Racers
For what it's worth, you might find you'll get people to reply if you would post actual pictures of what you're working on. You caught my attention with the original post and headline, and now I'm just shaking my head wondering what's the point. Not trying to stir the pot or get the moderators attention, just stating the obvious.