Codi
-
Posts
2,675 -
Joined
-
Last visited
Content Type
Profiles
Forums
Events
Gallery
Everything posted by Codi
-
Hey Wayne, I'm trying to figure out how you kept the dust bunnies out of it. I experimented with the same 2 part clear coat over the summer and was amazed at how goes down and how hard it is but my test bodies always ended up with too many bits of dust in it. I know you can sand those out within reason but the type of clear just seemed to attract the buggers more than any other clear I've tried. Yours looks pretty flawless. Nice job! cheers, tim
-

1/12 Tamiya 312T
Codi replied to nickfzr61's topic in WIP: Other Racing: Road Racing, Land Speed Racers
Now that's a line-up Nicolas. The pics with the body removed are quite inspiring too. The details you captured truly make this an incredible build. Congratulations on completing it! Tim -
You've got the entire "tool-box" covered with the skills you have Mark. I chuckled at the trip odometer knob as it seems soooo obvious to make one (kidding of course) and it's a very cool little detail. Then you share your CAD work and it makes me just smile in admiration. I'm too old to take the time to learn those skills but to all of those builders that possess them all I can say is your imagination is your only limitation. This entire thread and build is pure fun to watch. Cheers, Tim
-
John, Chris, Pete & Guido, thanks guys. Once I get some last minute pre-winter house chores done this week I'm back on it. Clay, been a while sir since you've posted one of YOUR builds........we'd all love to see something soon. I did check out your nascar build on fotki.......as usual, just sublime. Thanks too for checking it out and your comments. cheers everyone! tim
-
Porsche Junior
Codi replied to zaina's topic in WIP: All The Rest: Motorcycles, Aviation, Military, Sci-Fi, Figures
Never thought I'd comment on a tractor build but how could anyone not appreciate what you've done with this. I'm truly impressed. cheers, tim -
1/12 Tamiya Ferrari 312b
Codi replied to Chris Smith's topic in WIP: Other Racing: Road Racing, Land Speed Racers
Ugh, just ugh Chris. Consider this additional encouragement however as I know you'll get it right. Cheers sir! -
That was clever. "Less is more" and that really shows off the car beautifully. cheers
-
Good luck at the show(s) Art. It turned out fantastic! cheers, tim
-
Hey John, so, I turn my back for a few days and now you've gone and started this one in the truck section. I can't believe what you're willing to tackle, and then make it happen. Such an outrageous build but if anyone can pull it off it's you. Now you'll excuse me but for some reason I have a real sudden urge for some swiss cheese. Cheers !!
-
Willy's pick-up
Codi replied to Pat Minarick's topic in WIP: Model Trucks: Pickups, Vans, SUVs, Light Commercial
Pat, I'm remiss in not following the truck portion of the forum on a regular basis but I must say how fantastic those body mods were executed and the finished product. You've got some real talent sir. cheers, tim -
This looks like a great thread you've picked up again Alex. I'll be certainly following as well. cheers and good luck! tim
-
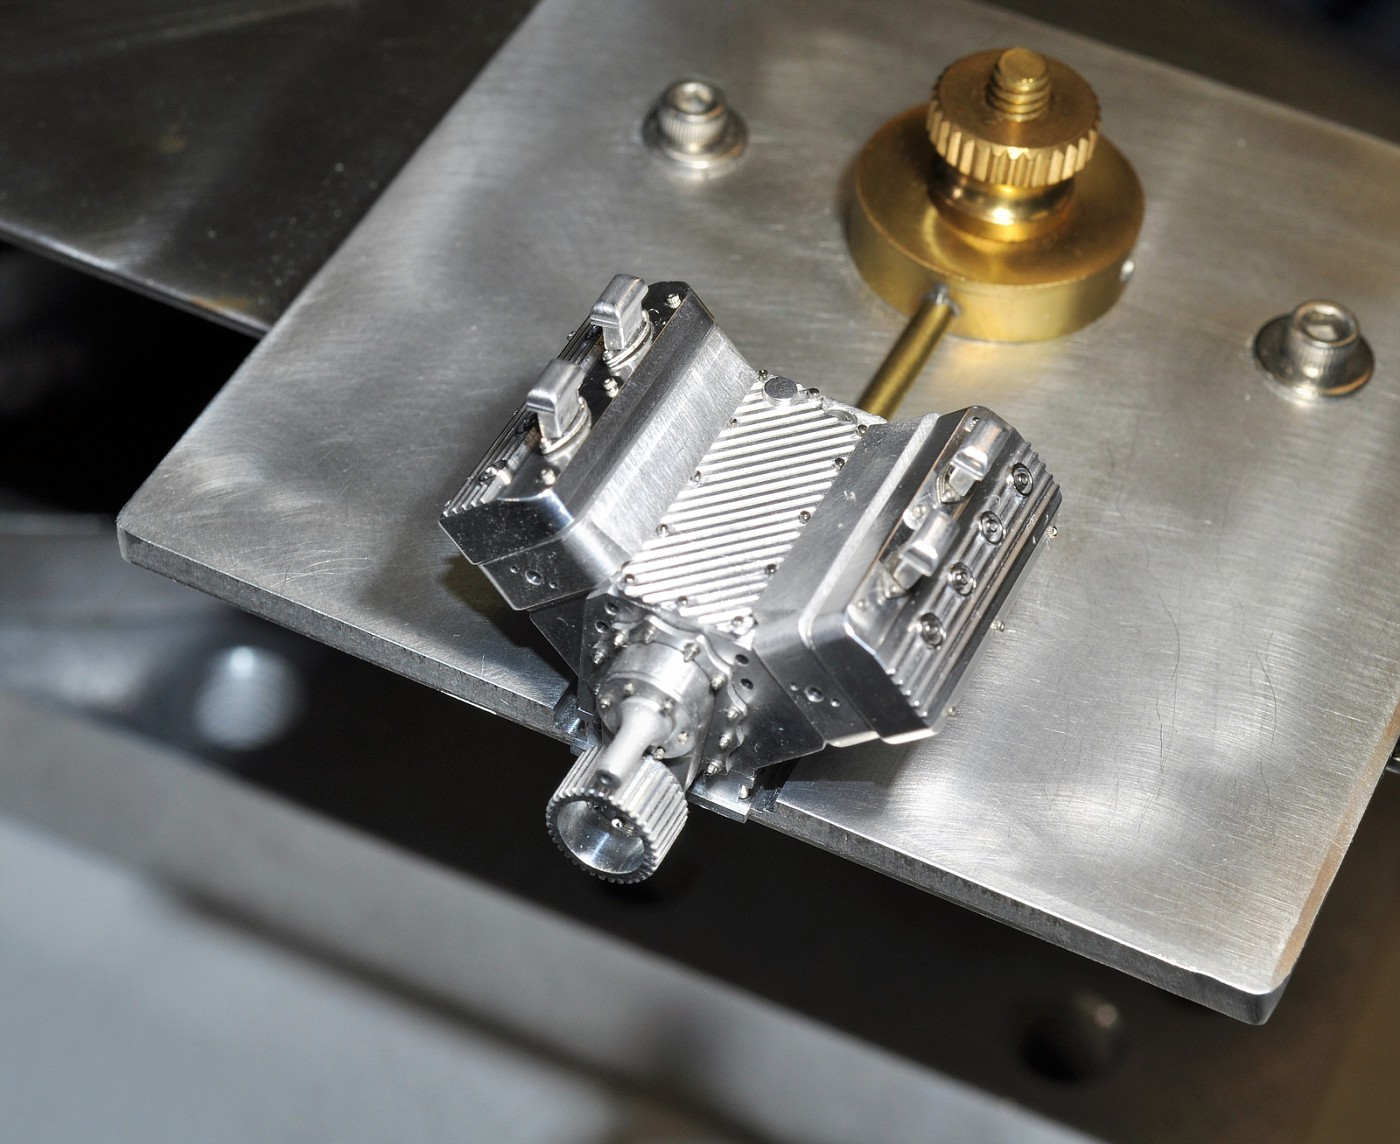
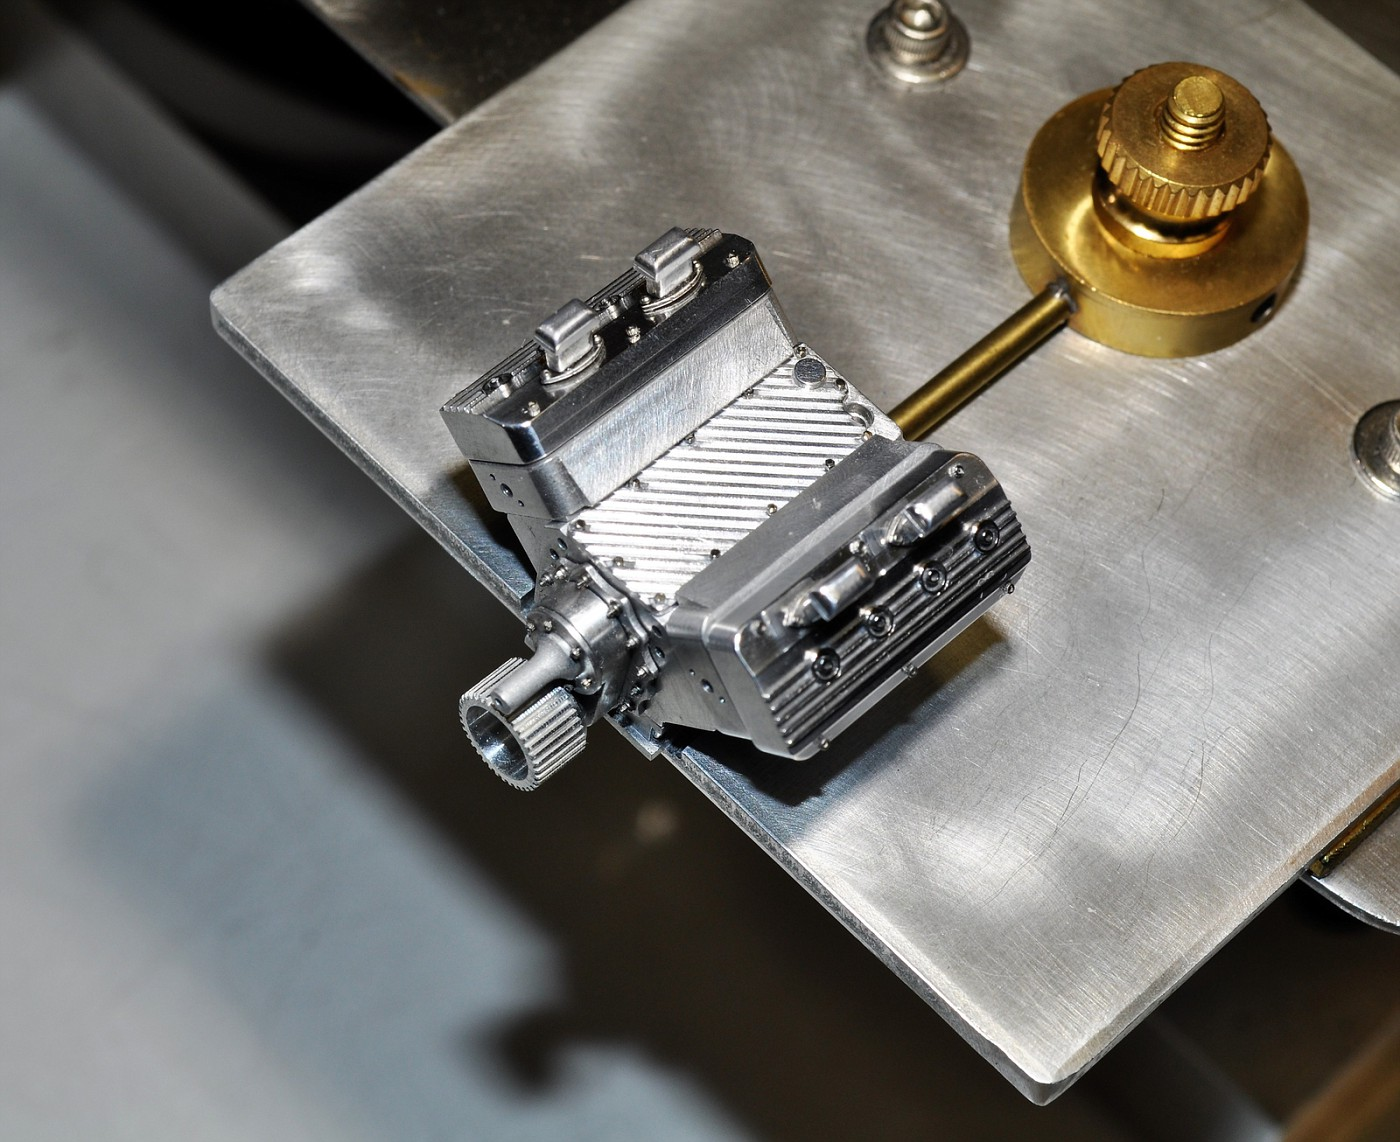
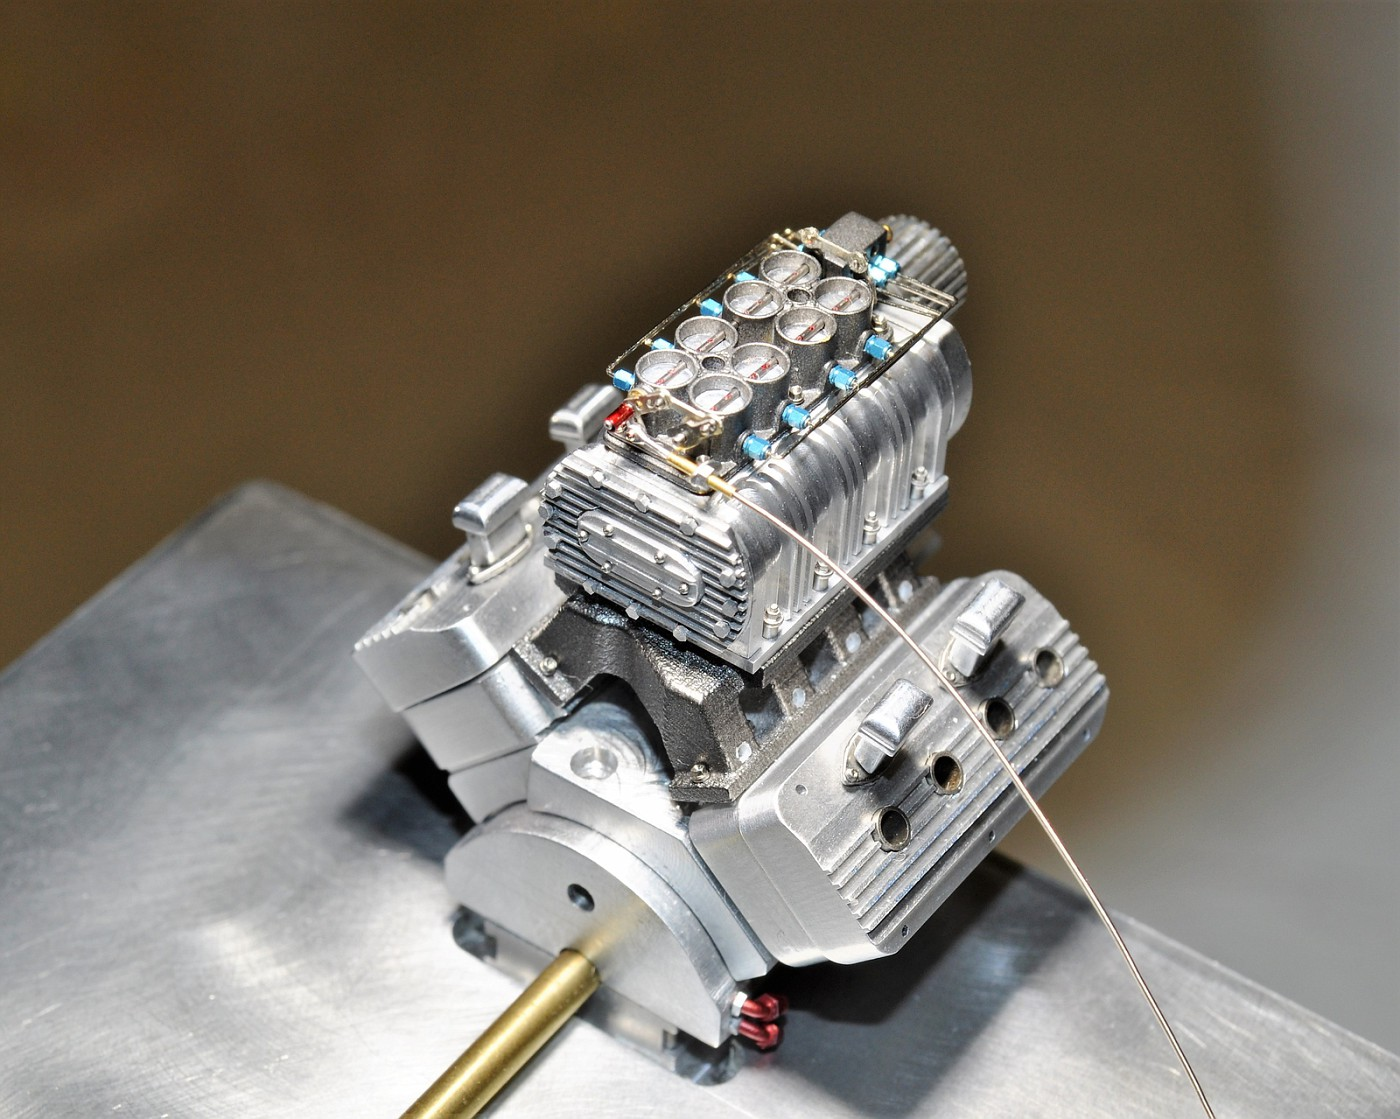
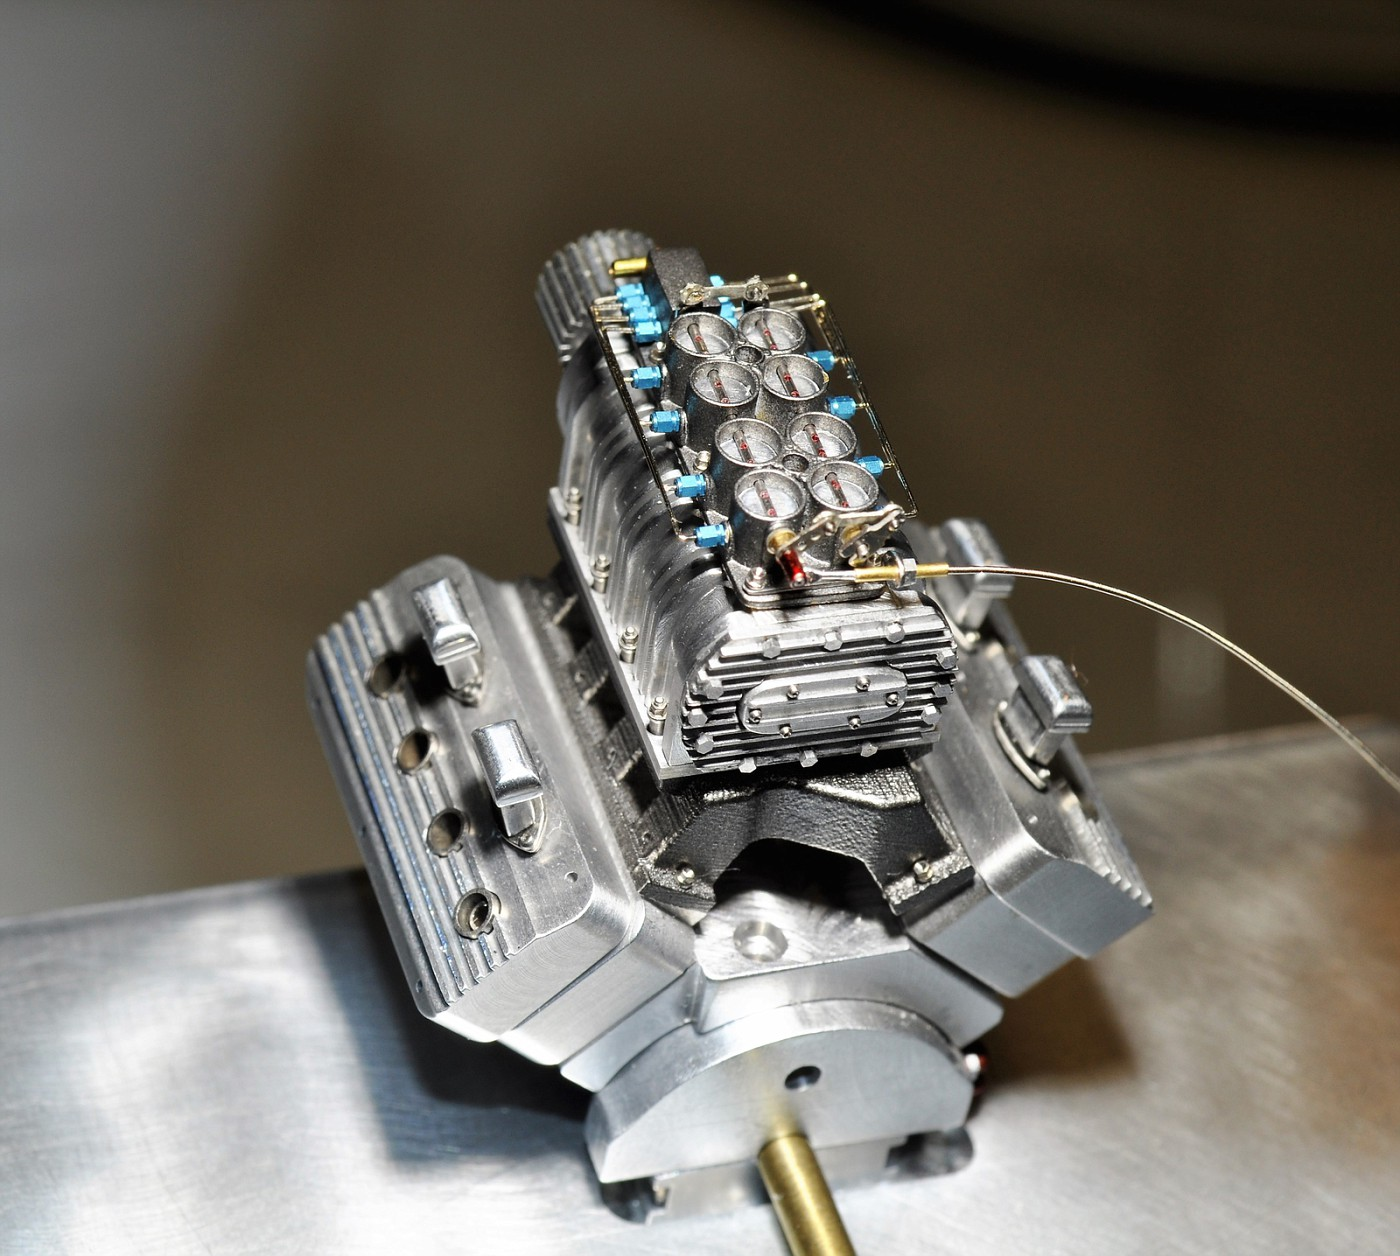
Lee, I'm not THAT crazy............that's something Randy D. would / could do. GoatGuy, might see you at the Larson dragfest if you're still going..........I'll send you a note. Thanks too !! Appreciated Chris, I am getting a bit antsy however as I'm waiting (like many others) for ANYTHING that you're working on........hint hint Davewilly, nice to see you back sir. Art & Dave......thanks guys. You're right Dave, suddenly I've got a fire lit again and it's fun to see it now. I thought the tedious stuff right now would drive me a bit crazy, but so far so good. Mike, thank you for stopping by and getting caught up on it. You made me laugh at the sit on the couch comment, always welcome a good laugh. Well, on my way to do the manifold hard lines I decided to take a small detour and detail the valve covers and oil galley cover. I polished them as well and I couldn't be more pleased with how they turned out. It's only been 18 months or so since I made them......bout' time right? Manifold is next though. Cheers, Tim Took a bit of time to get the plug tubes right but the plug wires will be red and when I mocked it up...............it was pretty cool looking I must say.

-
Super Luis. congratulations on a fine build. cheers
-
Thanks Erroll, this one dropped off my radar as well. Hopefully we'll see something soon. Just pure craftsmanship on every part of the build so far. cheers, tim
-
Always was a sucker for the rear engine funny cars. The scratch building will really add to the thread. cheers, tim
-
This pics for Cubeman and GoatGuy. Thanks one all guys for the comments too!
-
Fully detailed Airfix James Bond Aston Martin DB-5
Codi replied to Dann Tier's topic in WIP: Model Cars
Haven't followed this in a bit Dann but I'm glad I got caught up. The insights you shared on your techniques are fantastic. That scratch built steel awl you made up in the pin vise has the potential for multiple applications on my bench. Good tips and the results to match. That interior piping is phenomenal. cheers -
Garry, Love the subject you've come up with here and the attendant engineering commentary that has followed. There is going to be a LOT to learn (I have already btw) from this thread. Good luck sir! tim
-
Nice detail Art. Just curious how you did all that bodywork so quickly yet it's perfect with NO ghost lines. I've always had some issues with ghosting but have learned to minimize or eliminate altogether but I've never attempted the kind of body work you're doing here. Amazing sir. cheers, tim
-
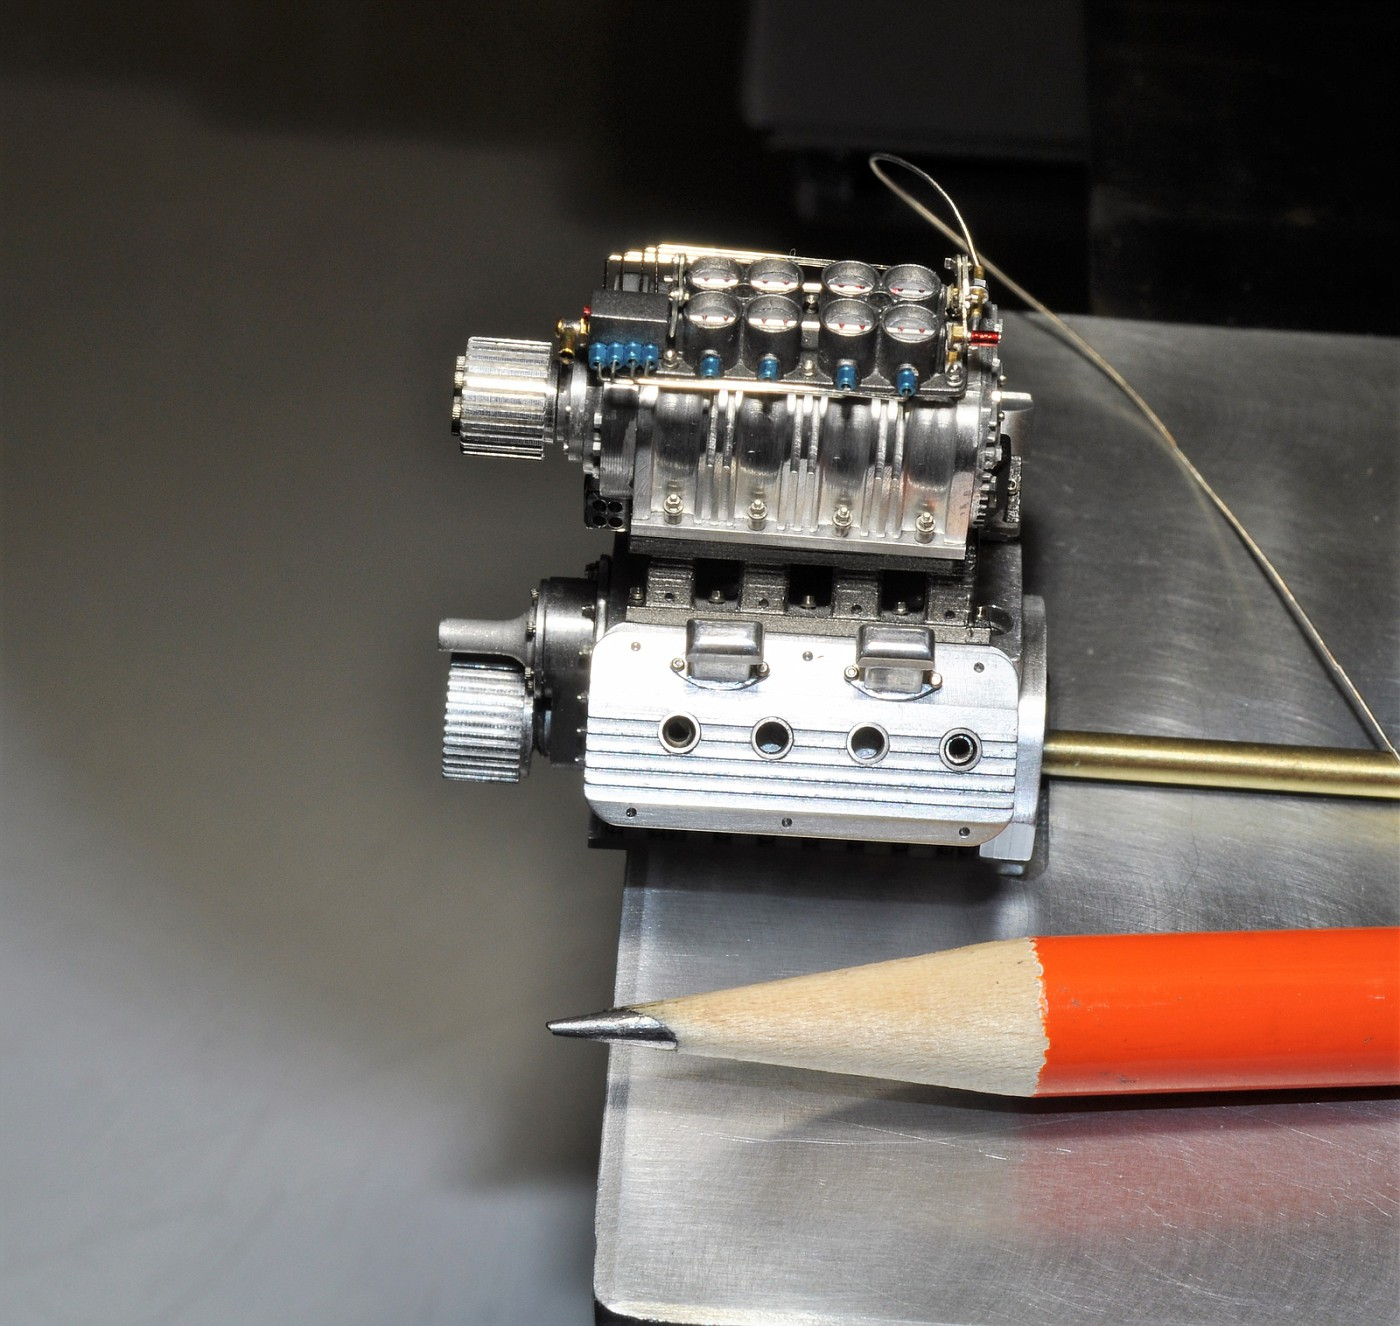
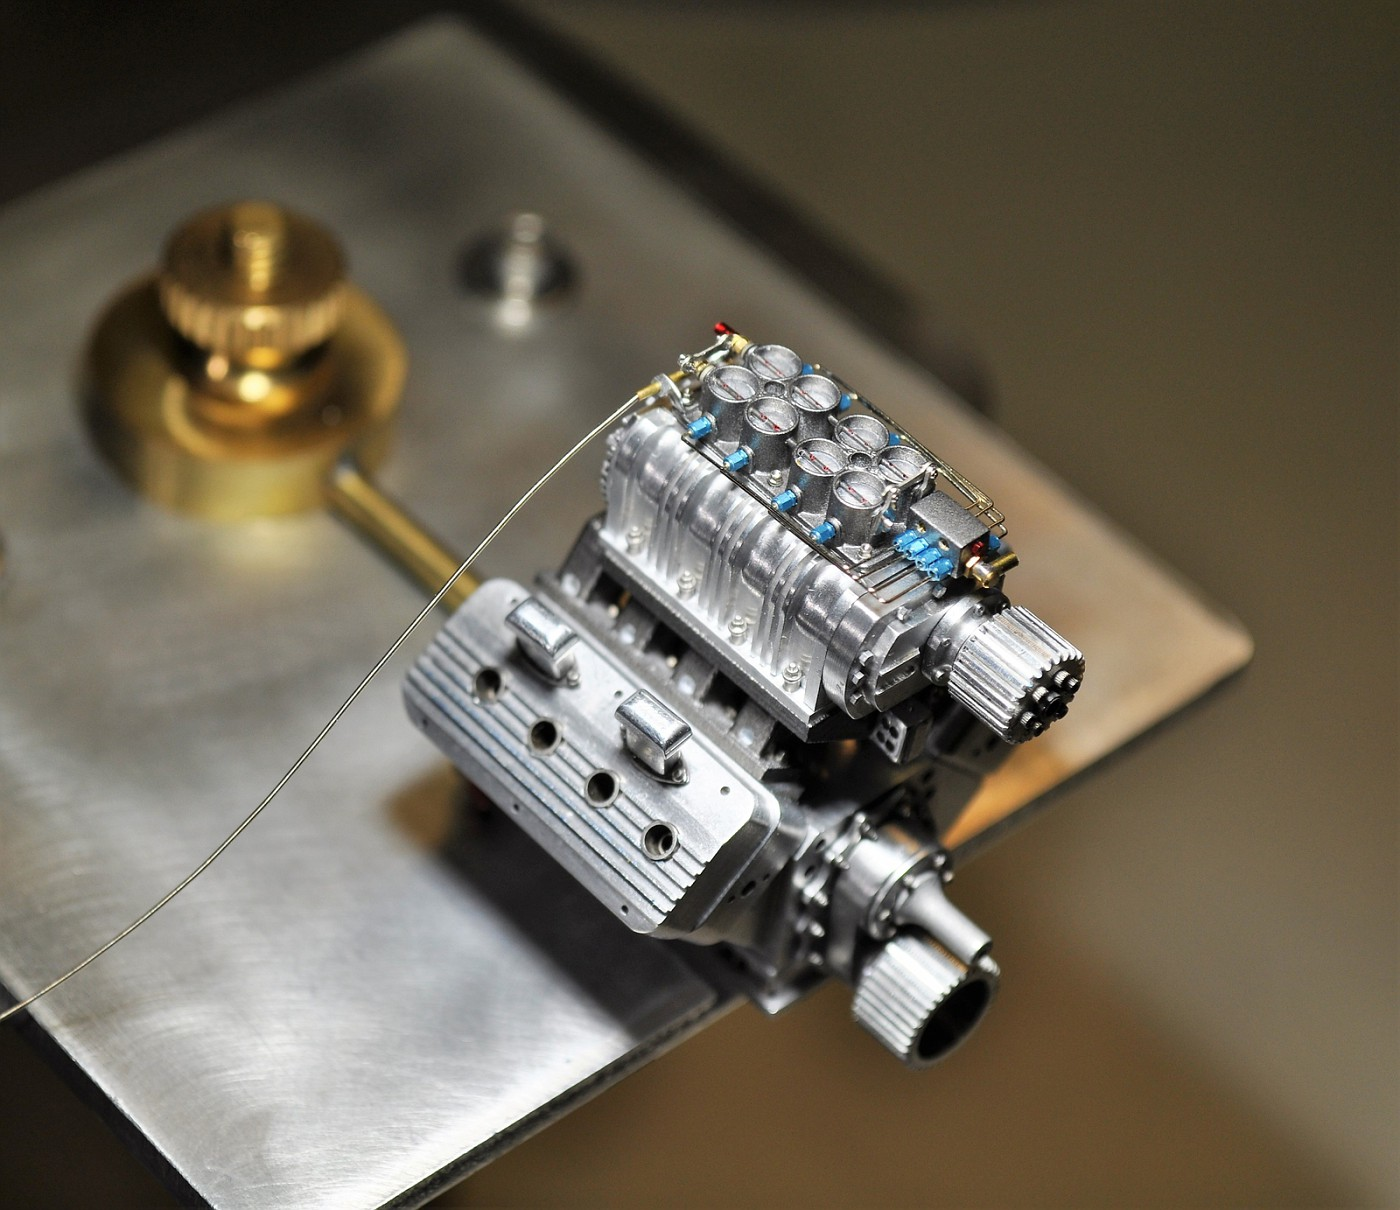
Mike, thought you'd like to see it with the linkage finally on. All in I've got 35 hours just installing the fuel lines and linkage.......thanks too!! Brad, a whole bunch of .2mm albion nickel silver rod all over the place............teeny tiny pieces.........watch where you step.........cheers iBorg, thanks for picking that out. If I explained how I did that you would call the authorities as I'd be described as insane...........Cheers!!! Show me someone that says they like doing throttle linkage and I'll show you a liar............btw, in the 1st pic you'll see at the front of the fuel block a scratch built brass fitting for the fuel line that connects to the manifold fuel block, I made 4 custom brass pieces in total. I'm proud of those as they were tricky to make. Thanks
-
Thanks Chris AND John, I've seen and admired your respective skills when doing hard lines like these, I got nothing on you guys, your standards are really high. Again, thank you. Dave, I've had the best mentor possible (yes, I mean you) and I never could have achieved what I've made to date with out your willingness to share your knowledge and experience. Now's the fun part as I like seeing it come together after all the time and effort. BTW, just saw the article on your 37' Chevy at Dragzine. For those that haven't seen it yet, check it out at Dragzine.com...............too cool. Congrats man. Dave (GoatGuy), been a while since I've done a "penny" shot. Once a get a few more bits and pieces on the motor I'll take a few pics to show the scale a bit more accurately. As an fyi, the engine is approx. 1 inch in length if that gives an idea. Cheers as well.
-
Thanks Chris........I've got the linkage figured out and ready to install, but after spending a day and a half on just 8 fuel lines, I had to share. To all those that have done hard fuel lines in ANY scale, you have my utmost respect. Cheers, tim
-
Art, thank you sir. I've learned so much from others here at the forum and been inspired by their work and learned from their sharing of techniques & methods. Great hobby we have huh? (rhetorical) cheers jc, appreciate the comment but I wouldn't go quite that far. I'll show the car a couple times and then I'm going to donate / give it away. Keep up the good work yourself, I took a peek at your recent rig and car you posted..........that's some nice work in it's own right! Mike, you've been a consistent follower/commentator on the thread and always in a very positive way. Thanks as it provides a bit of encouragement at times when I hit a "slow" patch. As an aside, I've put almost 20 hours into throttle linkage etc. on the Crower 8 port, should have it wrapped up by next weekend. Gotta say, it looks pretty cool on the bench right now and I can't wait to get it done. The manifold lines are going to be a bit trickier. Cheers to all!! Tim
-
jc, that is VERY cool. I was thinking of doing a transporter but it wasn't nearly as ambitious as yours. The entire rig AND car look great together. I've gotta re-consider a transporter someday if I could make it that sweet. hmmmmmm.........a build to be proud of. cheers, tim
-
Like everyone else here, I miss Tyrone's regular posts and build threads. Always did some truly nice work! If you're reading this Tyrone, come on back !!! Cheers, Tim