Codi
-
Posts
2,675 -
Joined
-
Last visited
Content Type
Profiles
Forums
Events
Gallery
Everything posted by Codi
-
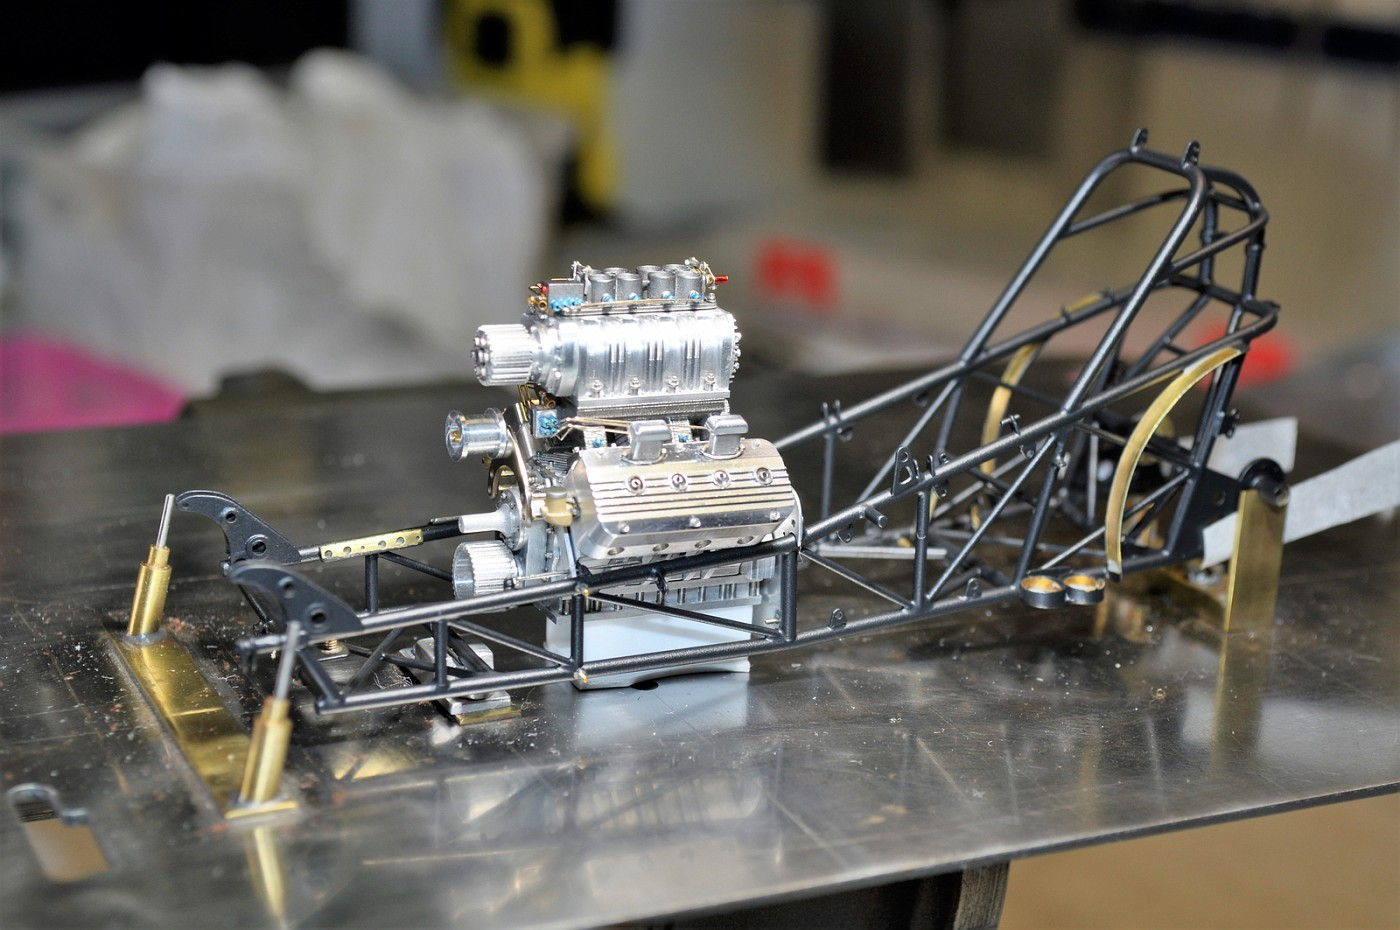
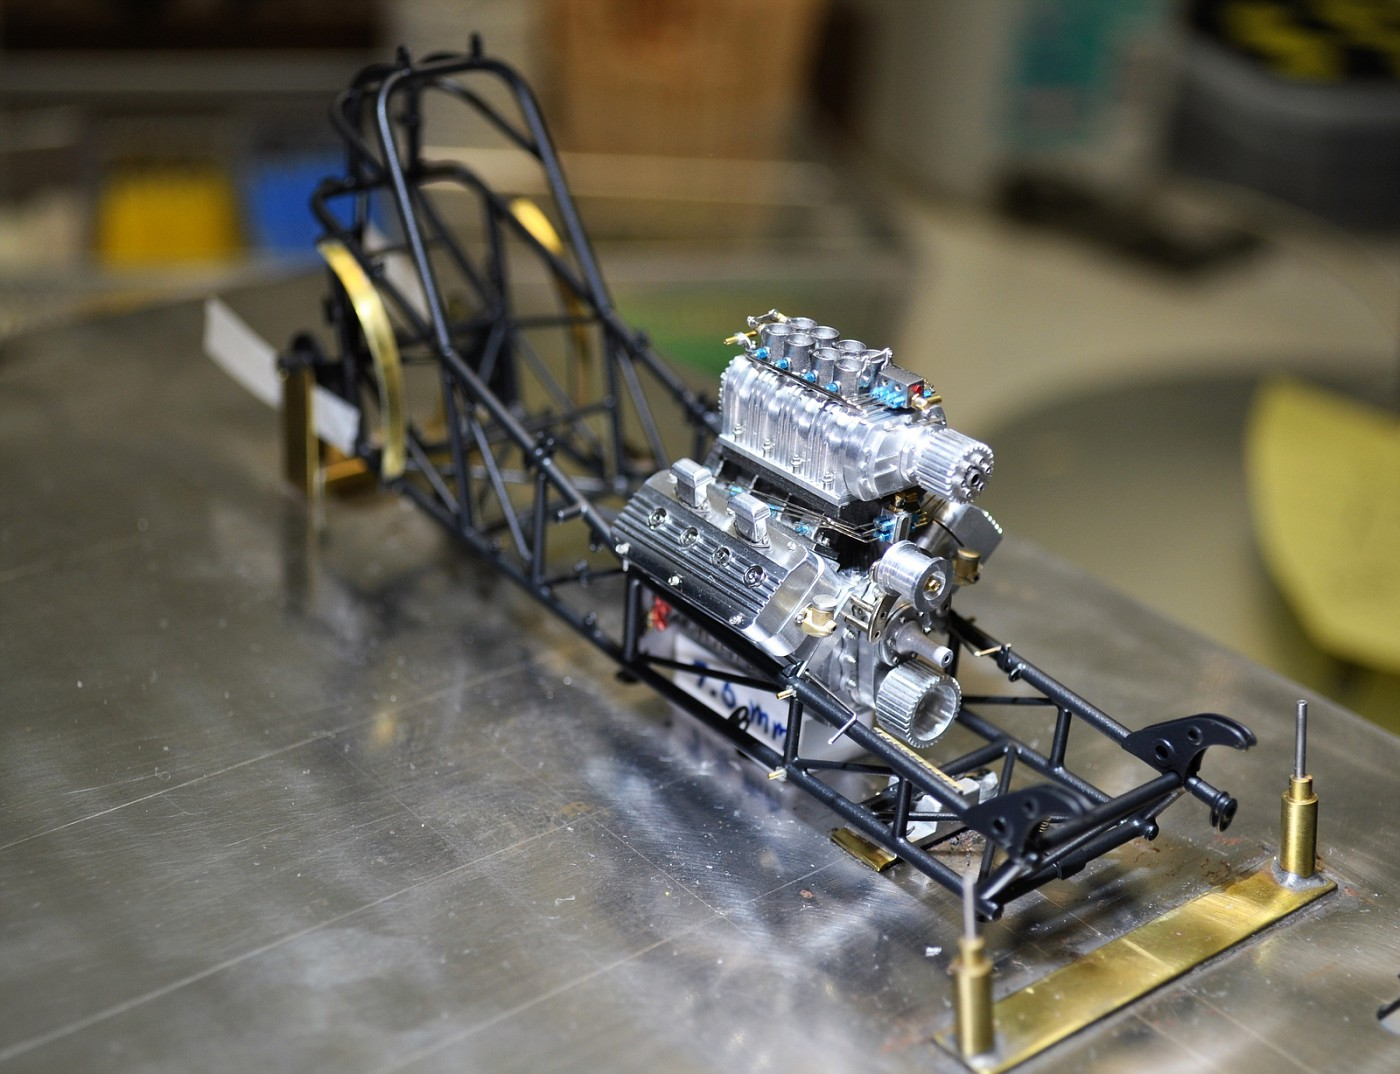
Hi Eric, thanks for the info.........as of today, still can't update the header / topic on the first page. Hopefully soon or this thread will be updated with "new pics" on 1-7-19 forever. I'm planning on attending the NNL east show just not sure what I'll bring yet. It would be nice to see you again as well and what you've entered! Hey Dave, hope you might join me in going to the NNL east this year. I'll drop you a note. So, the printed list you see is the result of all the pics of assembly instructions / insights as I've gone along. When scratch-building of course, there's no instruction sheet. I think what I've got planned will work really well. The other pics I'm sharing today are just a quick confirmation that the motor mounts, engine, mid-plate etc. line up square & tight. I'm please how they look so the assembly should go well in that regard. Next is to remove the engine and start prepping things from the inside out of the chassis. Once the motor & trans go in, it will be tight all the way around for assembly. Cheers everyone!

-

Otaki 1/12 Lamborghini Countach Twin Turbo...Mission Statement
Codi replied to Dann Tier's topic in WIP: Model Cars
Man are you good Dann. Not a question, just a statement. Great details you're capturing and the execution (as always) are sublime. Cheers -
Cool build Tom. The modified b pillar is very cool and changes the look in an early 60's Ferrari kind of way. Can't go wrong with that right? On the front valance / bumper.........I know you want to replicate the pic of the original but did you consider doing a 70 camaro split bumper look which would open up the radiator opening and might make it even more aggressive looking? Keep up the great work on it and I too look forward to your next update. Cheers, Tim
-
Hey John, I think that is one of the most stellar paint jobs you've put down yet. Just POPS!!!! Beautiful build and appreciate the update! Cheers, Tim
-
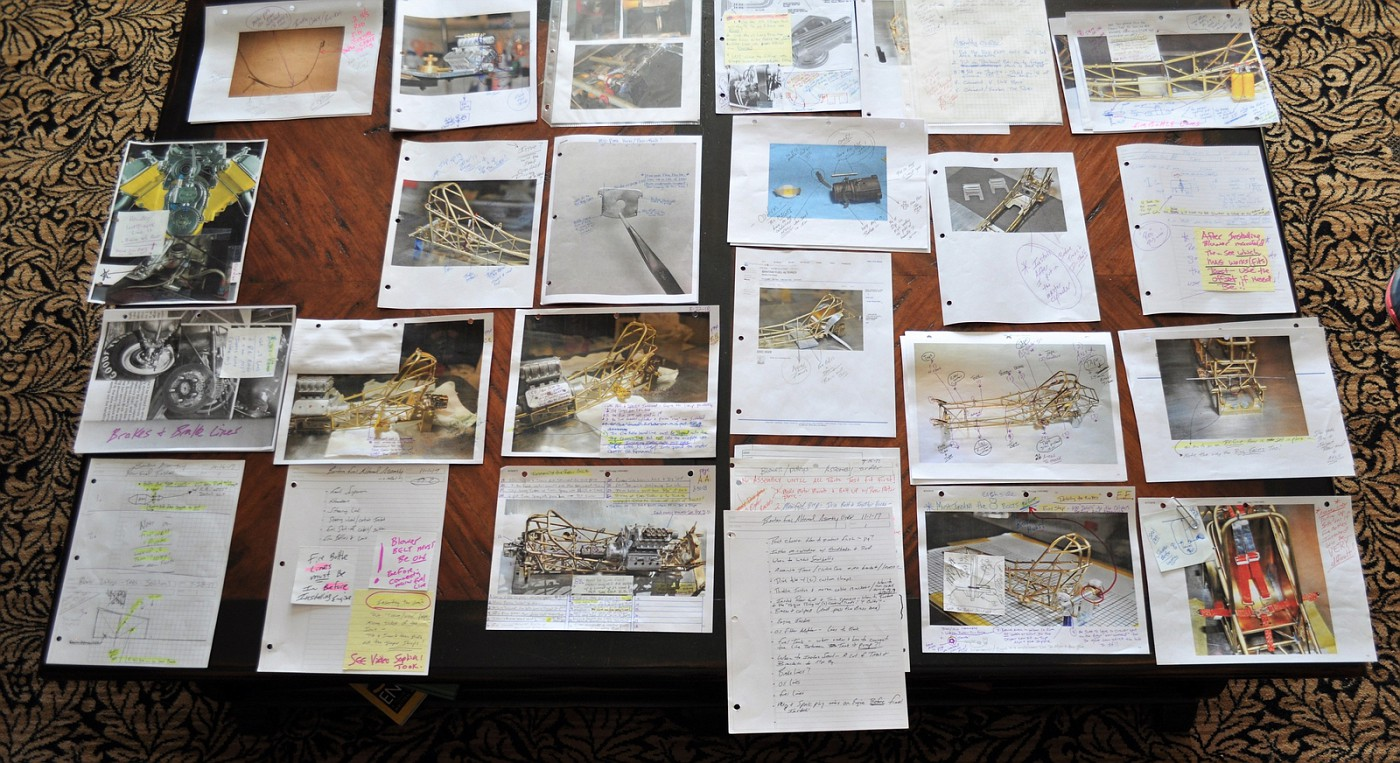
Oops, busted. I've been snoozing on it for a few weeks. All the "dumb stuff" is now completed and the single pic I have to offer is a shot of all the notes / pics I've taken regarding assembly (actually a few are not in this pic). Gives an idea of what I'm about to begin..........but now's the time and I'll post some true progress pics in the next week or so. Can't wait to get the engine/trans and rear end in it. Cheers and thank you too for all the comments & continued interest! Cheers, Tim BTW, I went back to page 1 of this thread to edit the header with "Updated Pics and the Date"...........there is no edit button or ability for me to update that at this time. Anyone else running into this and any ideas on how I correct that?
-
I'm not sure where the school is located but I just have to sign up for classes that you and Randy D. graduated from. Like I said about Randy's thread................"see the picture, make the picture". Awesome scratch-building John. Cheers
-
THIS is simply as good as it can get. STUNNING no matter what the scale but even more so being 1/25th. You really need to post a pic showing a dime next to the suspension/chassis so everyone can appreciate the sheer scale of this. I saw a pic on page 2 of this thread where you're holding the chassis..........gives a great idea of it. I'm convinced that you model with one thought......."see the picture, make the picture". Cheers sir!
-
Bugatti T 50 resurrection: Thread deleted mistakenly
Codi replied to CrazyCrank's topic in WIP: Model Cars
Thierry, I certainly don't have your skills but I'm totally fascinated in the thought processes your sharing. Best of all your way of a "work around" solution to a problem (no 5 axis machine available in your case) to still get it done. Truly admire the creativity. Cheers!! -
OH YEAH.......so nice to have you back posting Randy. Like many others, I look forward to each of your updates and always learn a thing or three along the way. My only request is that when you post future pics could you shoot them with a bit better lighting? And if you can't, well that would be okay too..............just keep posting sir! Oh, and the Dedion axle is awesome. Cheers from your biggest fan, Tim
-
Bugatti T 50 resurrection: Thread deleted mistakenly
Codi replied to CrazyCrank's topic in WIP: Model Cars
Tres' manifique Thierry. I have no words in the English language to describe your car so I thought I'd try this in French (even though I do NOT speak French). As an aside, I recently discovered issues on my thread in the Drag Racing portion of the site as well. Many pictures were posted where they shouldn't have been and pictures were missing that once resided in a given section. I cleaned up some of it but I have neither the time or desire to re-build to it's original format. I'll count myself fortunate that the entire thread wasn't "lost" like yours. Thanks for coming back to the forum and posting these wonderful pictures. Tim -
A Thought about the Magazine, etc.
Codi replied to Ace-Garageguy's topic in General Automotive Talk (Trucks and Cars)
I remember when Harry passed and we had this same discussion over a year ago. My opinion on the subject (which has the same value as anyone else's posting here) is that the Forum is the here and now. The pure effort involved to put out the magazine has obviously become too much. I don't want to do it, and I'm pretty sure no one else is going to come forward and offer to attempt to publish it themselves. I don't have the answer other than the magazine has become a "distraction" in the dedication of limited resources (time especially and as importantly, money). Bill has some great ideas about the topic and they should be seriously considered. The magazine has always been a good read and informative, but beyond the pictures, why can't the content and information be shared here on the forum going forward. An "Editor's Corner" could be something added wherein featured builders or how-to articles could be on a pay basis. Or something like that. The "Editor" could post whenever time permits and offer insights based upon forum member suggestions / requests. With no attendant demands upon themselves. The best part of the notion is that there are no constraints on what you might do and how to do it. Let your imagination run wild and try some things. Some will be popular and catch on quickly, and others will flop...........use the knowledge garnered from the magazine itself and glean what was most important and attempt to work it in here. When making a commitment to provide a product (the magazine) on a stated date or number of publications annually, you set yourself up for criticism and disappointment. Instead of tarnishing a good reputation by continually missing said publications, make life easier for yourself and improve the product you(we) have and share. That being the Forum. Whew, sorry bout' that this post but the real jewel in the crown as I've proposed all along is the Forum and that Gregg and others could benefit as well in dedicating themselves to one OR the other, not attempting both. Cheers fellas -
A naked Dragonfly
Codi replied to Madhatter's topic in WIP: All The Rest: Motorcycles, Aviation, Military, Sci-Fi, Figures
Well that's different...................AND fantastic. You sir have some real talent. As others have stated, don't be a stranger and I look forward to more of your builds. How about a "WIP" on whatever you're working on? I've no doubt I could learn something from you. cheers, tim -
Told you I found it John. You ALWAYS have something on the bench I just have to look around sometimes to find you/it. I read the comment (Chris?) about you being 1 week into the build. Just shaking MY head at that. Oh, and yes John, it's VERY cool. cheers
-
Oh my goodness Geoff. I have nothing else to add other than I wish it were mine. What finish and execution in every single pic. Congratulations sir. cheers, tim
-
Aw, come on Peter. A build this nice just deserves more than 1 pic. More please!! cheers, tim
-
Love this build Bruce. I can't stop shaking my head over how nice it looks. cheers, tim
-
Great job Seth. Your work is quite spectacular. No one has asked so I thought I would. The backs of your white bucket seats show some beautiful "chrome" trim pieces. HOW did you do those? They're fantastic. cheers, tim
-
Gorgeous Andrew. You're one heck of a scratch-builder. I did chuckle with your description of the missing bezel. I don't know if I could shrug it off as easily as you, but hey, it does happen. Always scratch my head over where in the heck those missing pieces actually ended up. Great build is all I can say sir. cheers
-
You have fantastic taste in cars Pico. Stunning car. cheers, tim
-
Really like the solution you hit upon Rickard on the door issue. Learned something new again from you. The whole build is exciting to see as you progress. Time for another post yet? hint-hint
-
NHRA Super Gas '66 Chevy II POW Tribute Car
Codi replied to Mister Twister's topic in WIP: Drag Racing Models
I can only echo what the others have said Darryl.....cheers! -
Mickey Thompson 69 Mustang Mach 1 Funnycar x 2!
Codi replied to Alan Barton's topic in WIP: Drag Racing Models
Neat story and project(s). Can't wait to see you next update. cheers -
Looks great in the natural light Stu. Nice color choice. cheers, tim
-
Junior Fueler--More Of These (Darn) Injectors?! 02/01/19
Codi replied to Straightliner59's topic in WIP: Drag Racing Models
Great car you're building Daniel. The bodywork is stupendous. I'm still cursing your name however as I saw the stacks you're working on and I can't get out of my head how I'd try to make them. Your efforts are well worth it and I've no doubt you'll hit upon a solution that's worthy. They will be front and center and certain to grab eyeballs. Sorry, I digress but count me too as a fan of your car. cheers, tim -
Fabricate transmission tunnel
Codi replied to R.D.F.'s topic in Model Building Questions and Answers
Richie, may I suggest forming the tunnel in pieces as Bill stated but try them in alum. (flashing material would work too) or brass if you're going to paint it anyways. It will hold the shape you come up with. Lots of info on the forum on how to form the panels should help you if you decide to give it a try. cheers, tim