Codi
-
Posts
2,675 -
Joined
-
Last visited
Content Type
Profiles
Forums
Events
Gallery
Everything posted by Codi
-
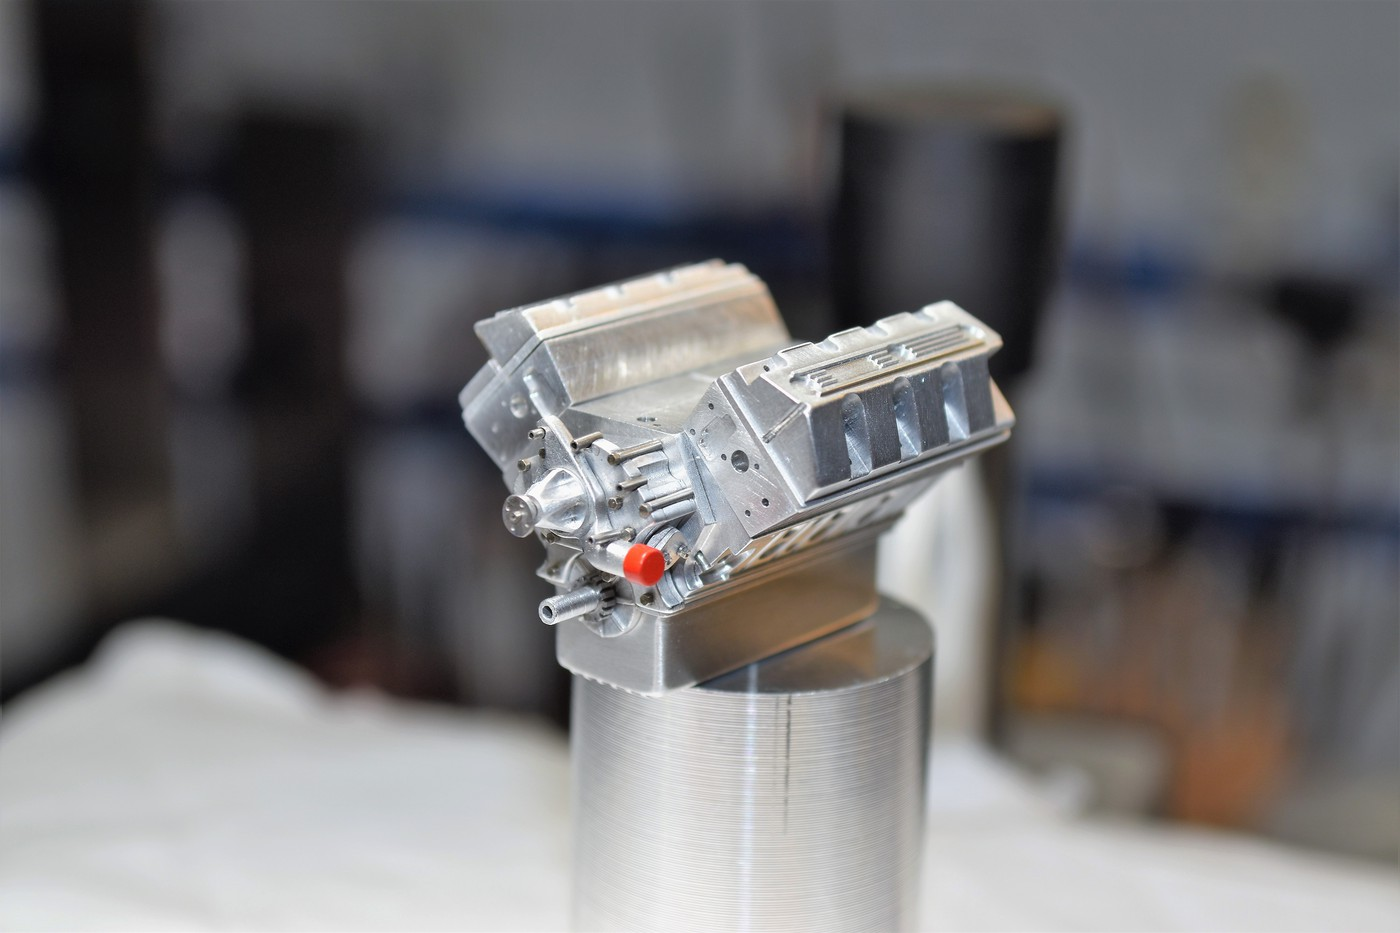
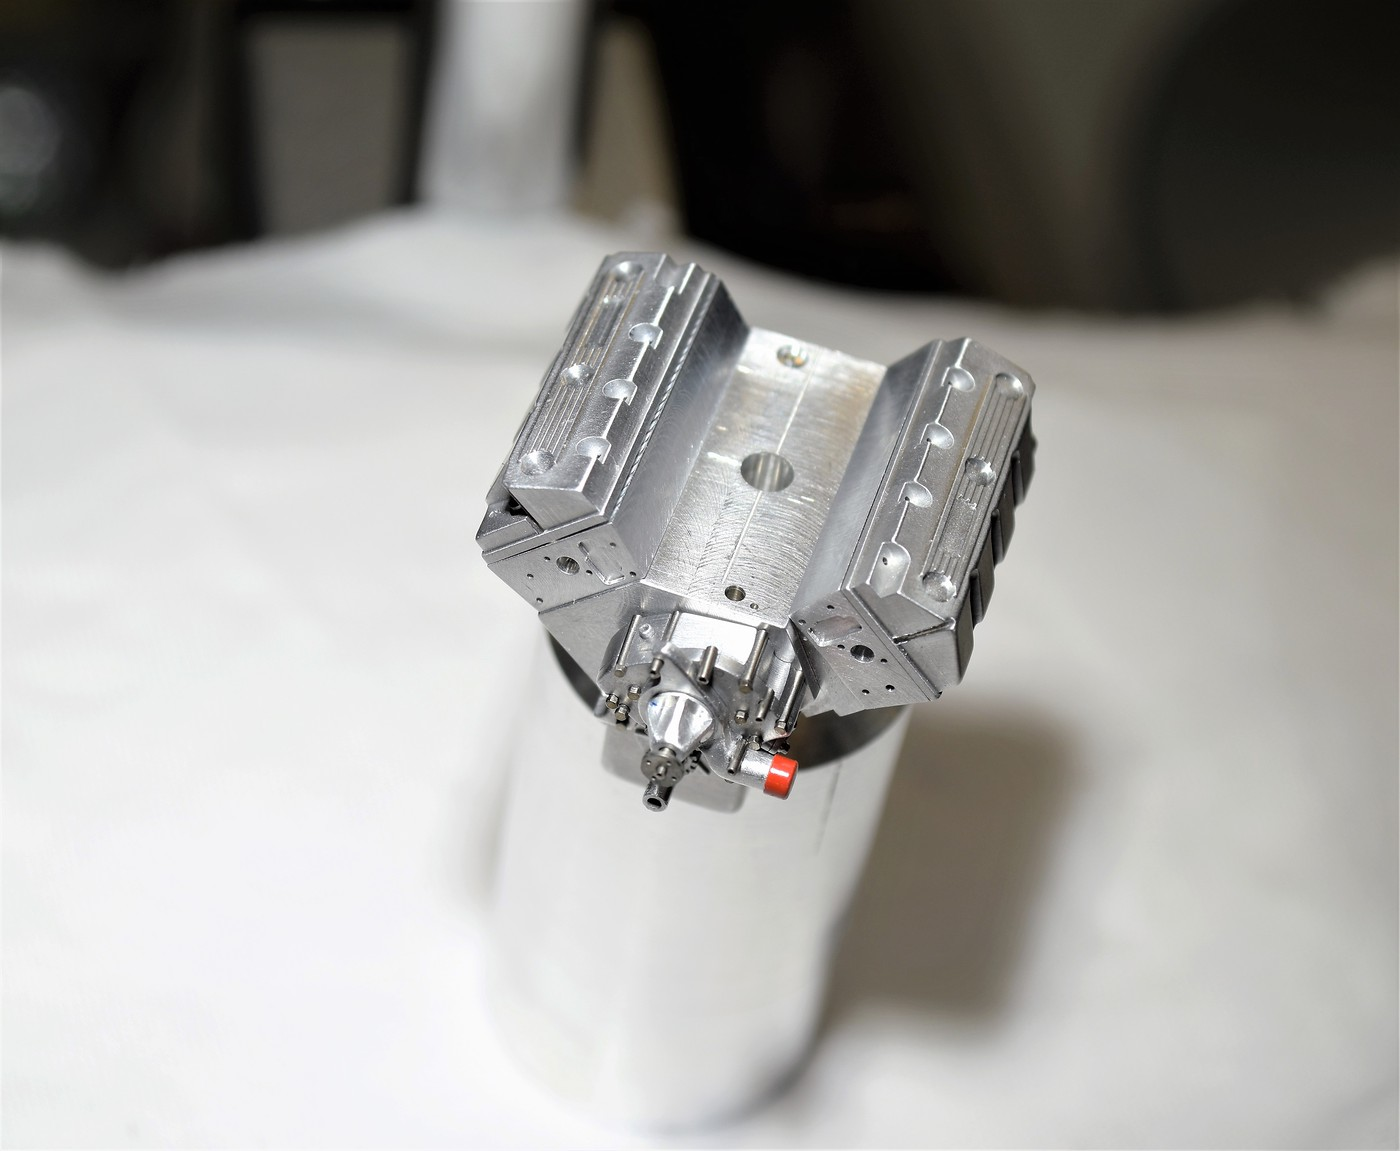
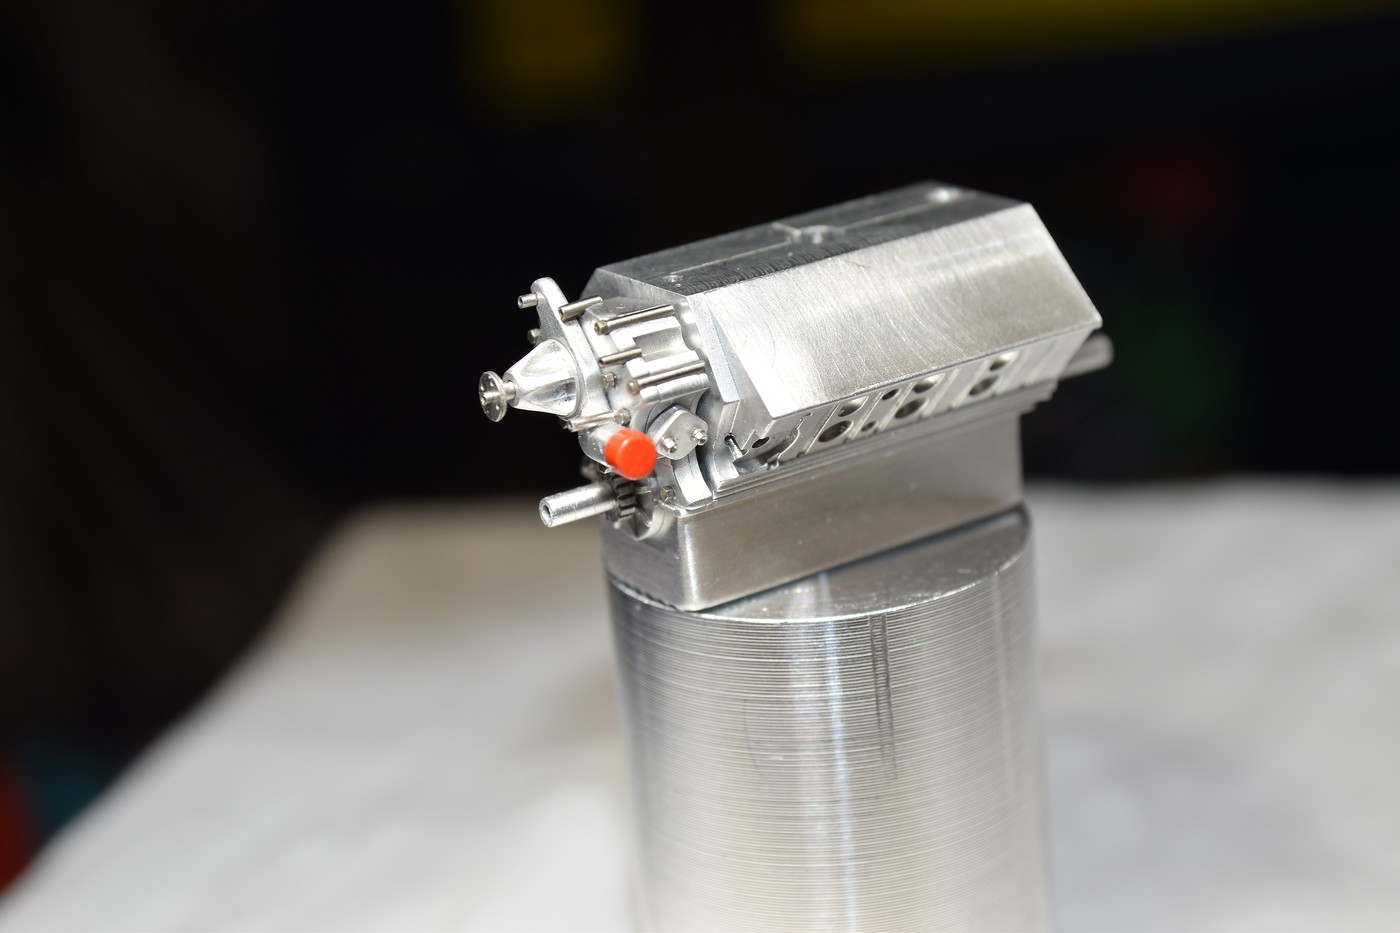
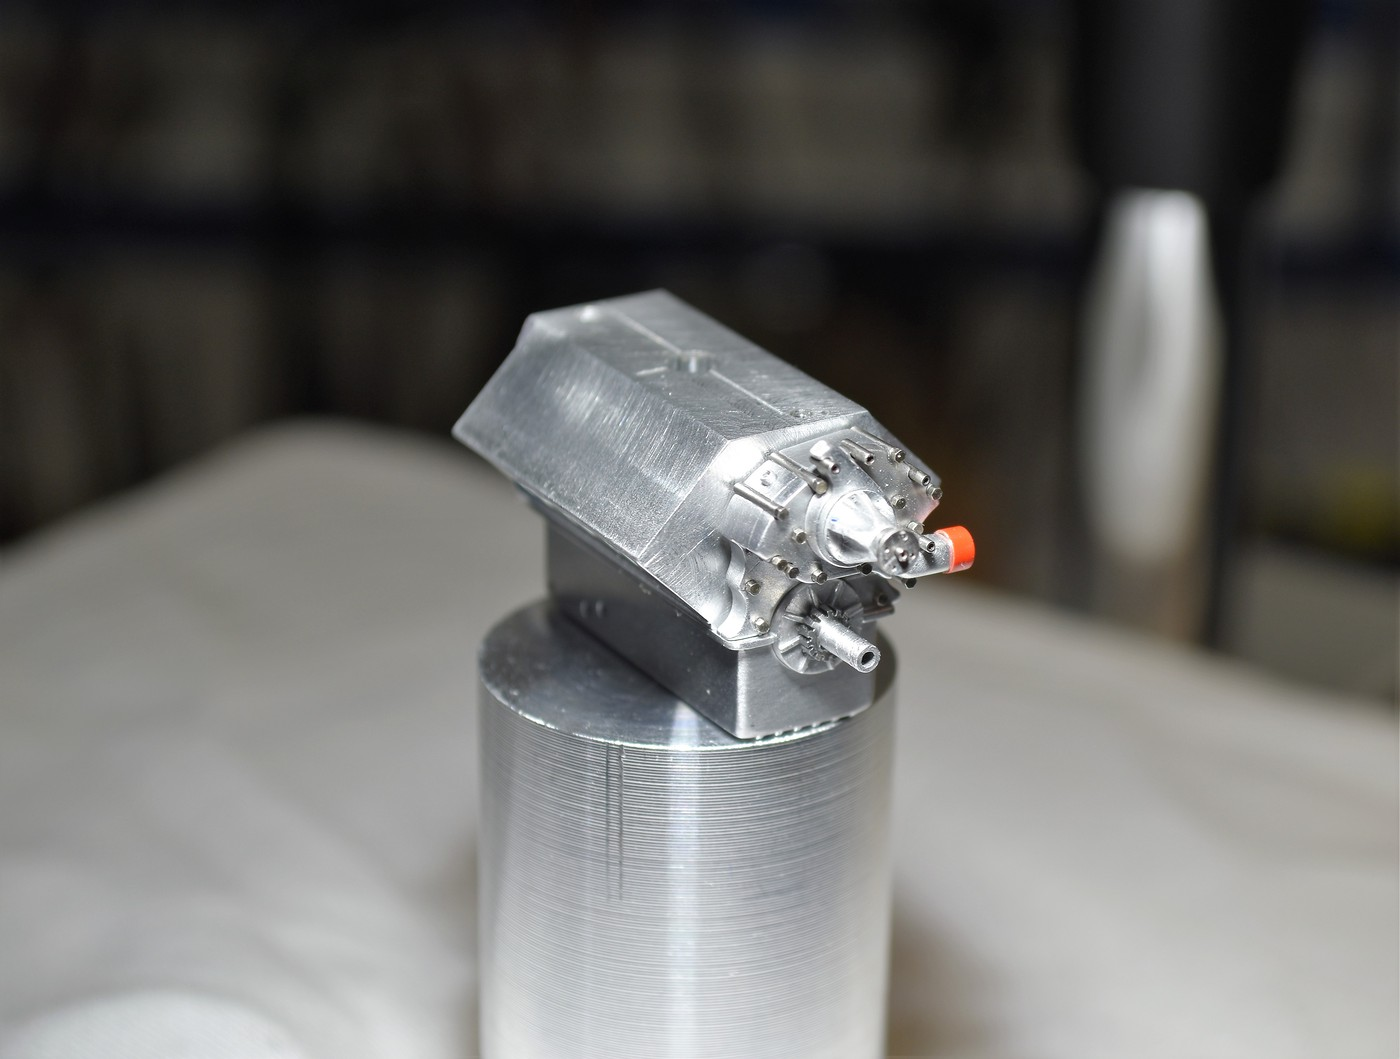
Thanks for the chuckle Claude. The cap is actually machined on the lathe from alum. and painted red but I'm glad it looks realistic. Some days are more productive than others. I added the bolts to the pan and I'm going to start doing some experimenting on some ideas I have on how to make the carbs. 1 more pic but it's hard to get everything in focus on some of these shots. cheers, tim
-

64 Dodge D100 Pickup Pro Street
Codi replied to AmericanMuscleFan's topic in WIP: Drag Racing Models
I like the red a lot on them Francis. That will make the engine stand out even more so. cheers -
Wayne, a most interesting subject for a build. I like the length of the chassis and mods you've done to the body. Will certainly follow along like many others. cheers, tim
-
Wow Glen. I live 40 minutes from York and remember these cars & the dealership well. That's a great representation of the car. Congrats, tim
-
Thanks everyone. Block, heads, v.covers detailed. Oil pan yet and then onto the carbs. cheers, tim
-
Dave & Scott......appreciate the sentiments and YES Dave, I saw those 2. I'll be sure to get em' off when I do final assembly of it. Heads are done and I did a quick mock-up (nothing is glued yet). Next I'll detail the valve covers, the block and oil pan. I've yet to make the distributor & coil but next on the fabrication list are the Auto-lite carbs then I'll do the manifold. cheers everyone, tim BEFORE I FORGET......Thank you to my friend Dave(comp1839) for the dimensions/detail he shared for me to tackle the heads and valve covers. Made it a lot easier to say the least. Cheers Dave!!

-
64 Dodge D100 Pickup Pro Street
Codi replied to AmericanMuscleFan's topic in WIP: Drag Racing Models
Thank you for the kind words Francis. We all take our inspiration from someone. I'm flattered that you like my work. Your engine looks great (no surprise) and the heads are super detailed. cheers, tim -
A VERY unusual combo Ray BUT it works fantastically. I never would have thought that until I saw it. Great job. cheers, tim
-
Really like the cars stance and appearance. congrats on a job well done. cheers, tim
-
I don't know how you managed the paint bleed issue but I don't see a hint of it. Nicely done Joe. cheers,tim
-
Nice one Fred. Congrats on a very clean build. tim
-
64 Dodge D100 Pickup Pro Street
Codi replied to AmericanMuscleFan's topic in WIP: Drag Racing Models
As always Francis I've learned some new things & I like the different techniques/approaches you're using. As an aside, I WHOLEHEARTEDLY concur with your sentiments in replying to CrazyJim. He brings up a good suggestion, but one cannot really appreciate what you're doing unless they've tried it themselves. It certainly is not for everyone and to do what you're doing..............well, it's certainly unique and one of a kind. You've got some real talents sir. cheers, tim -
Thanks Mark. Bruce, Thanks too......the progress slowed down obviously but in the near future I'm onto the body and designing the chassis. This will NOT be a one year build as hoped. Joe, appreciate your comments coming from someone that shares my interest in Mavericks. Mike (Magic Photos) appreciate your stopping by and the comment. I'm enjoying it but I wish had more bench time. (don't we all) cheers Pete, sorry to hear what's been going on. Obviously something fairly serious. I wish you the very best and a quick return to the bench. I miss you posts and the tips you share in how you do things. You have a lot to offer all of us. Take care, Tim
-
Nicely executed Nick. Would love to see more pics of it, maybe indoors so we can see more of the detail. Great looking no matter what. Cheers, Tim
-
64 Dodge D100 Pickup Pro Street
Codi replied to AmericanMuscleFan's topic in WIP: Drag Racing Models
Sexy Francis. You should share a bit more on the technique and products though.............just because I'm curious. ? Cheers, Tim -
Danno, great idea in light of all the cancellations. I'll be sure to sign up. Cheers, tim
-
Greatly appreciated iBorg......I wish I had the knowledge/skills to do CNC but......all of my equipment is Sherline too btw. cheers Thanks as always Dave. Learned most of it from you. Thanks Francis.....you crank out an entire block and I'm foolin' around with this thing. sheesh....... CabDriver, I did it out of aluminum and machined it on the lathe. Painted it Testor's Guards Red. I love that color. Andy, that's a cool story..........they ARE unusual and to my eye very trick looking. I think they'll truly set the engine off if I can figure out how to make them. They'll be tricky. Cheers everyone, Tim
-
Appreciated Joe & Carl. Bench time hard to come by as I'm now a substitute teacher......but I had to get something done. So I finished detailing the water pump. Put the pump snout pulley bracket on, machined and attached the fuel pump housing & machined a red cap for the water pump pipe. The pump is not attached to the block or pan as of yet as an fyi....cheers, tim
-
Hey Joe, I can envision it with the bumpers on already. The blacked out rear on it really pops now. You got this! cheers, tim
-
64 Dodge D100 Pickup Pro Street
Codi replied to AmericanMuscleFan's topic in WIP: Drag Racing Models
I'm LOVIN' it. cheers, tim -
I want to be respectful of those that have left a comment.. Cheers to all, tim JC, Mark, Scott, Iborg and Ray.........thank you as always. I've appreciated your interest in my builds since the Bantam. Hope you like the rest. Francis....the pump gave me a real taste of the challenge what the carbs will be like. thanks too. Kurt, I got the giant tweezers at the giant tweezer store of course. ? Ray, thanks for the thought, the engine though won't be in the car. I'm going to fab an engine stand for it.
-
64 Dodge D100 Pickup Pro Street
Codi replied to AmericanMuscleFan's topic in WIP: Drag Racing Models
Now THAT'S a radiator. I have that same screen photo etch but haven't used it yet Francis. Really makes all the hard work on the shell stand out all that much more. I chuckled at your soldering "jig"........effective for sure and very imaginative. I'll try that one sometime myself. cheers, tim -
Well executed Christopher. The paint and chrome really set her off. Cheers, tim
-
1/12 Fiat 806 Grand Prix Italeri
Codi replied to primabaleron's topic in Other Racing: Road Racing, Salt Flat Racers
I can only repeat the other comments here. Jaw dropping build sir. cheers, tim -
Ferrari 312T
Codi replied to Chris Smith's topic in WIP: Other Racing: Road Racing, Land Speed Racers
I can't wait to see the completed build Chris. First Gran Prix I ever attended was at the Glen and this car was my first taste of a Ferrari F1 car. The sound of that v12 was unlike any other. It just screamed whereas the other cars were "simply" howling. You could tell where it was on track even though it was out of sight just from that engine. I have polaroids of walking through the garages on Friday and seeing the cars AND drivers in person. Times have certainly changed. Great job man! cheers, tim