truckabilly
-
Posts
789 -
Joined
-
Last visited
Content Type
Profiles
Forums
Events
Gallery
Everything posted by truckabilly
-

IH 4300 Dump Truck
truckabilly replied to Mach1revo's topic in Model Trucks: Big Rigs and Heavy Equipment
Very nice build. The truck looks good with the dump body and lift axle. The engine looks great and I don´t mind the floats at all. What is that box behind the batteries? A hydraulic pump? -
Cat D8 repair compled
truckabilly replied to mackd's topic in Model Trucks: Big Rigs and Heavy Equipment
Very nice job on weathering. I like the scratches on the last picture. Wonderfull scenery for the pics too. -
Beall trailer & LoneStar with Flames
truckabilly replied to Mopar - D's topic in Model Trucks: Big Rigs and Heavy Equipment
The flames look nice. They match the truck better than any other. Congrats to great job. -
Peterbilt 379 with D.T.U.
truckabilly replied to truckabilly's topic in Model Trucks: Big Rigs and Heavy Equipment
Making this build would not be possible without the help from a few people. Thanks Pavel for getting me the hub covers and new set of decals, Tony for getting me the winch line, guys from CTM for making awesome PE parts, Tim for sharing his knowledge of Peterbilt trucks and all of you for your interest and support. Thanks a lot, guys. -
Peterbilt 379 with D.T.U.
truckabilly replied to truckabilly's topic in Model Trucks: Big Rigs and Heavy Equipment
-
With the sun in the sky on Sunday I took the outdoor pictures of my finished Peterbilt 379-119 Long Hauler with detachable towing unit. Those of you who watched the progress in "On the Workbench" know that the model underwent some modifications, like stretching the frame, reshaping the hood, changing the front springs, rearranging the firewall, adding the ultra roof, and some other things. Not only have I changed the truck but I also scratch-built the detachable towing unit (D.T.U.) and the headache rack. The unit is inspired by Holmes Miller unit. But with no dimensions available I can´t guarantee the dimensional and proportional accuracy. The unit is fully operable with the excetpion of the winch. The front supports can be extended and dropped. The desired position can be fixed with the pins, just like the real deal.
-
Long Hauler 379 - 119
truckabilly replied to truckabilly's topic in WIP: Model Trucks: Big Rigs and Heavy Equipment
Thank you all very much. I have almost finished the build. The last item I have yet to add is the front mud flaps. I forgot to paint them in time. The following set of indoor photos is without them. First, the tractor alone. Now with the D.T.U. attached I hope to be able to take the outdoor pictures as well soon. Thanks for watching. -
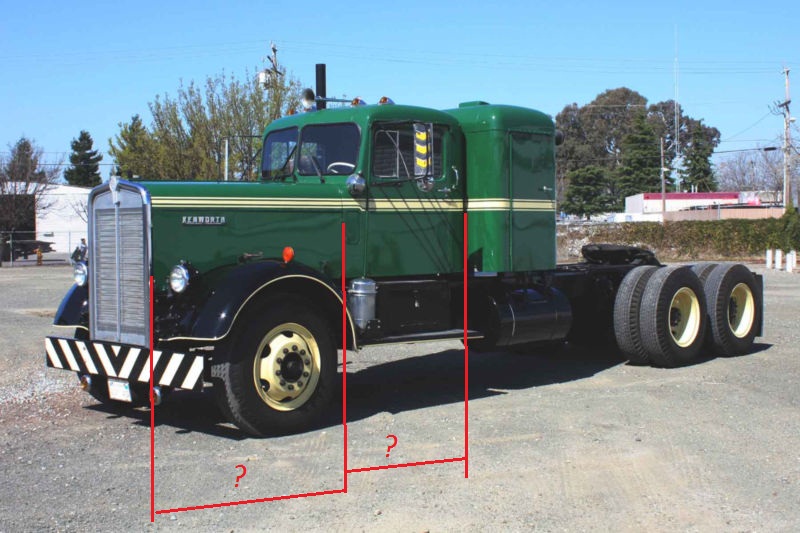
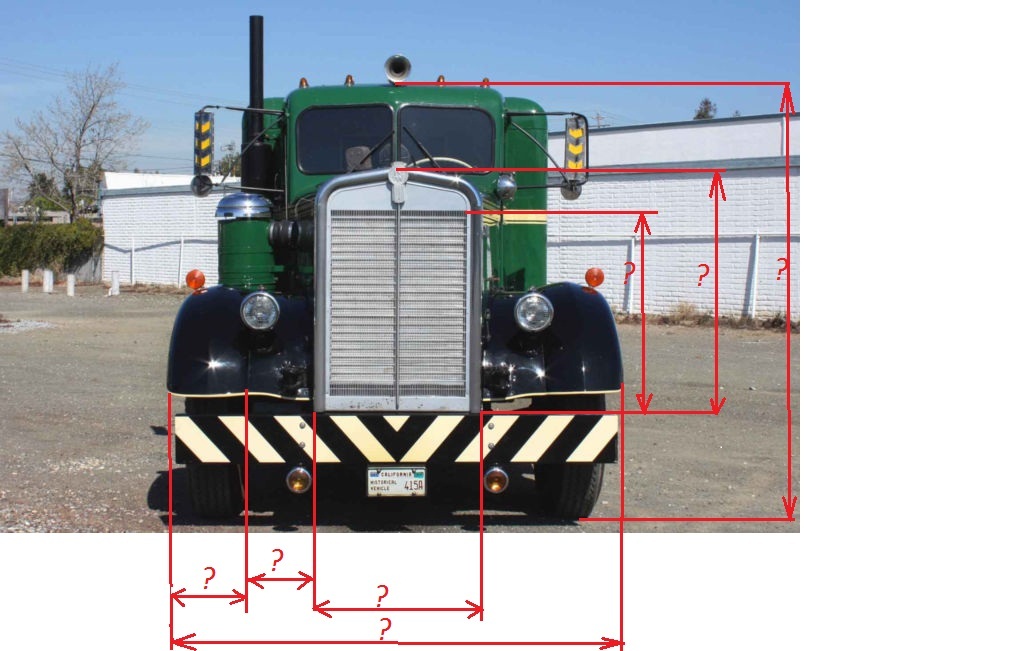
Narrow nose KW dimensions needed
truckabilly replied to truckabilly's topic in General Automotive Talk (Trucks and Cars)
Right, but this is going to be completely new transkit, more detailed with photo etched parts included. Buying from overseas is not a choice in this case. It is probably impossible to find a truck like this here in Europe. If someone has an access to this old KW a help with taking the measures would be highly appreciated. A complete transkit for only production cost would go to the guy who is willing to send the correct dimensions. -
I would like to ask the KW experts for a favour. A friend of mine is working on this narrow nose KW and he would like to know some dimensions. I attached the pics that he sent to me and they show the what dimensions he needs. Is anybody willing to fill in the figures, please? Thanks in advance.

-
Hello everyone. I plan to build Peterbilt 351 logging truck. Can somebody tell me what is the usual wheel base of the logging trucks and what kind of rear suspension would be correct? I would like to build an original factory release, not a modern restoration style. Also, what is the difference, appart from the flat fenders, between the 351 and 351L loggers? Thanks in advance for any help.
-
TRT Widening trailer
truckabilly replied to Hessel's topic in WIP: Model Trucks: Big Rigs and Heavy Equipment
It looks like a great project. I am looking forward to seeing the progress too. -
Long Hauler 379 - 119
truckabilly replied to truckabilly's topic in WIP: Model Trucks: Big Rigs and Heavy Equipment
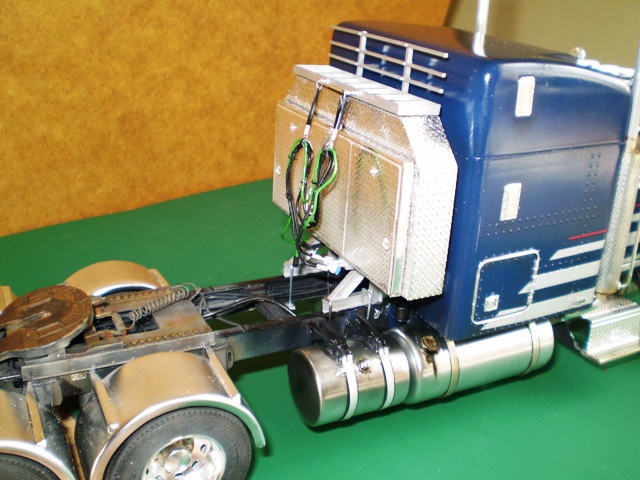
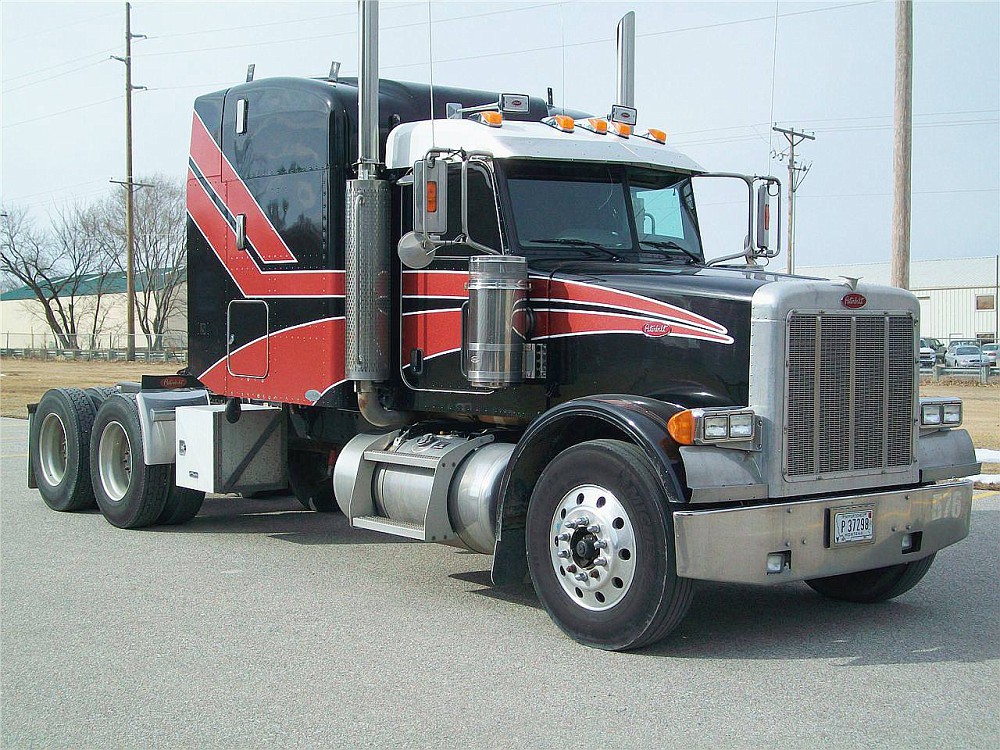
Thanks Chris. I worked on the exhaust system a bit. With the cab position being lowered down I had to adjust the parts a little. The alignment is not perfect but all the major parts came together somehow. The headache rack is in its place too. I was inspired by this picture here My version looks like this The U bolts are there but they do not hold the headache rack. It is firmly glued to the frame and the U bolts are left just for show. The hoses and cables are tied by the PE binders of CTM. The springs holding the harness are made of a plastic rod wound around by a CU wire. The housing is a black painted cigarette paper. If you are looking for Christmas candy string, it is there too, somewhere around the engine and the frame. Probably not in the pictures that posted yet but I will have another set of pictures soon.
-
Long Hauler 379 - 119
truckabilly replied to truckabilly's topic in WIP: Model Trucks: Big Rigs and Heavy Equipment
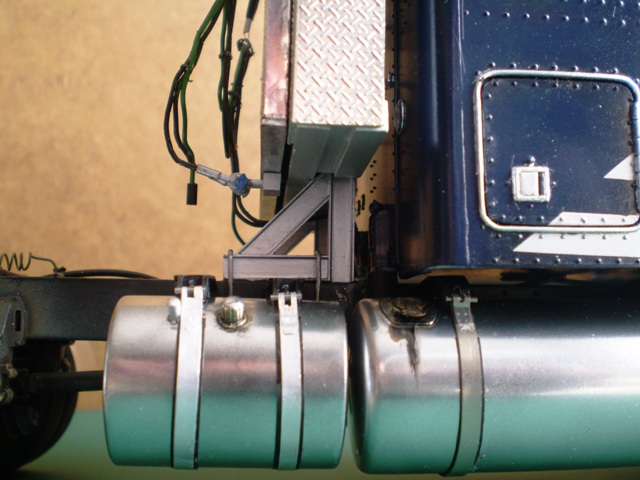
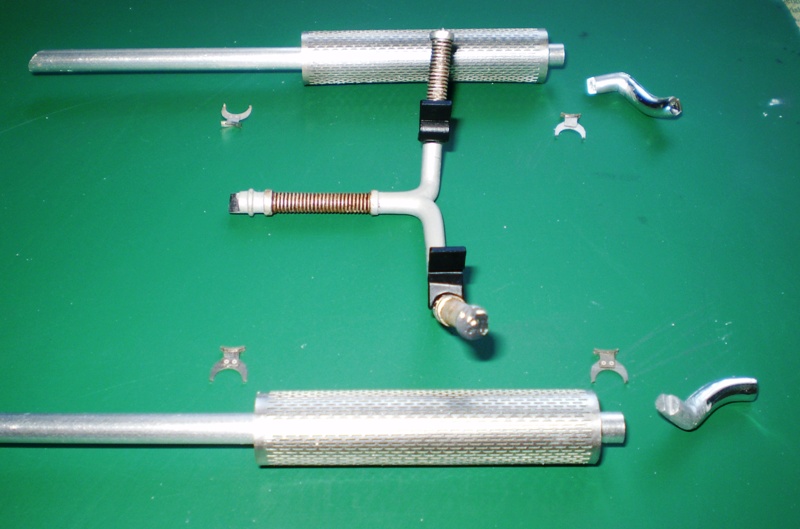
The credit for this detail goes to the guys of Czech Truck Model (CTM) team. Recently a new set of PE parts for International Prostar is about to go out. Coloured dashboard and other details. I used their exhaust covers and mounts for this Long Hauler. I added a bit of rust to the mounts. It looks overdone in the pictures. The camera enhanced the rusty look. The smoke stacks are yet to be connected with the rest of the exhaust system. I have got the elbows ready. I added a brake valve under the floor and a part of clutch pedal linkage. Won´t be visible too much but, you know... And a view to the lowered rear mounts of the sleeper. All for now. Thanks for looking.
-
Long Hauler 379 - 119
truckabilly replied to truckabilly's topic in WIP: Model Trucks: Big Rigs and Heavy Equipment
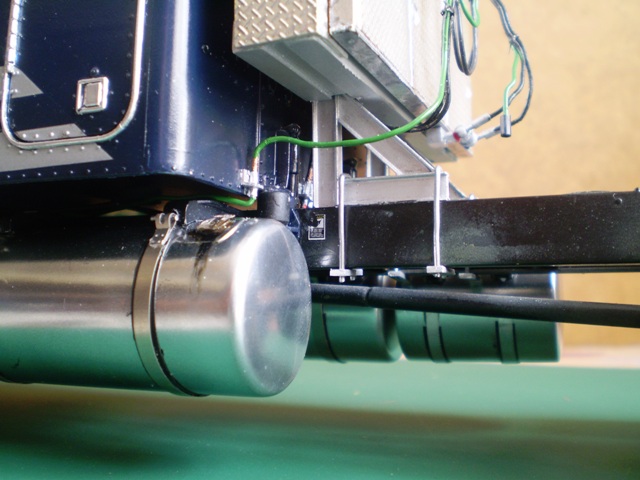
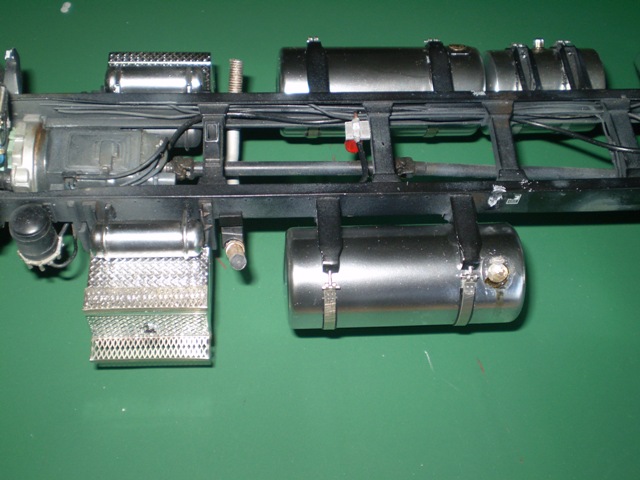
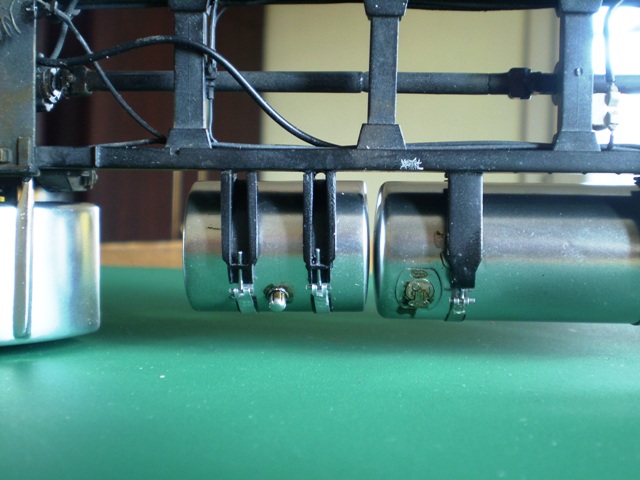
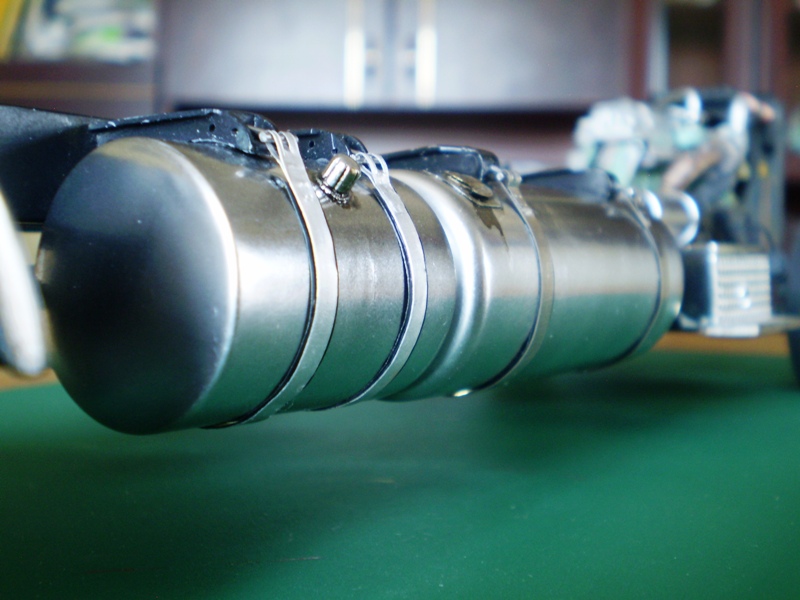
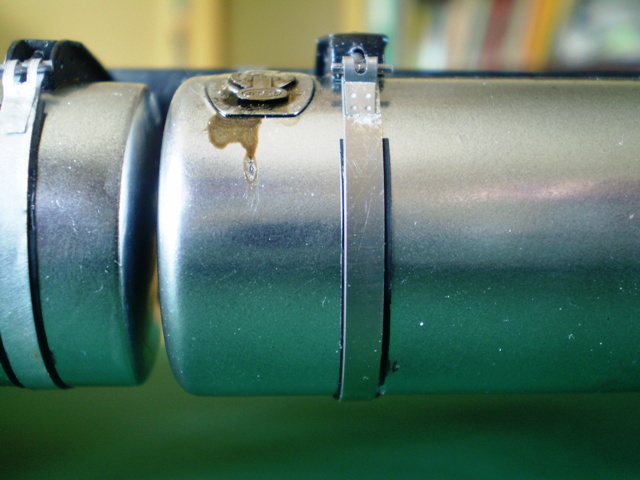
I usually do not install the fuel tanks before the cab is glued to the frame. A- the alclad chrome that I use can be rubbed off easily, B- I have better view to the cab mounting points that way. But this time I decided to do it the other way. So, I could take pictures of the fully assembled chassis. The stripes holding the fuel tanks and the tank caps are PE parts by the CTM. The black stripe underneath is a foil taken from a wine bottle. The smaller tank for hydraulics has its stripes made of aluminium sheet, again with the wine bottle foil. The cap is made of a plastic rod. The grime around the tank caps is made with AK Interactive Fuel Stains and Engine Oil colors. Will try to make them look a little better.
-
PETERBILT WRECKER, HOLMES
truckabilly replied to foundationsedge's topic in WIP: Model Trucks: Big Rigs and Heavy Equipment
That sure´s got a style! Looks like a cartoon chatacter or a comics book hero to me. I think I haven´t seen more interesting flames. Would be nice to have them on the wrecker body too. -
Long Hauler 379 - 119
truckabilly replied to truckabilly's topic in WIP: Model Trucks: Big Rigs and Heavy Equipment
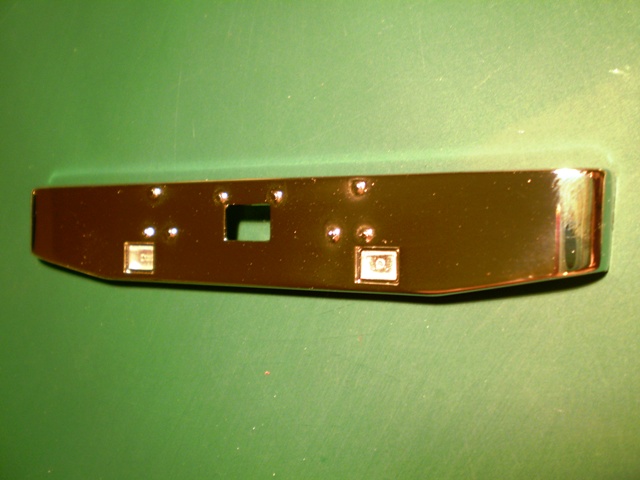
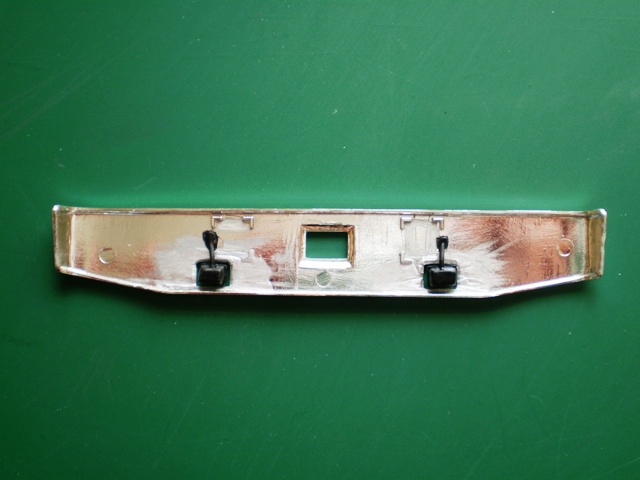
Thank you all very much. I added yet another modification. The kit bumper has integrated lights. They look well but not much realistic. The real truck has the lights separated from the bumper and I want my model look this way. So I cut the lights off, reshaped them a bit and the glued them back again leaving the gap around them. I hope the pics will explain it better than my words. real thing before modification modificated lights - front view modificated lights - rear view I also painted the mud flaps. They are photo-etched parts, the red oval is a kit decal and the flap holder is an Evergreen channel. The bolts are made by Plus Model. There is no weathering yet, but I am working on it.
-
PETERBILT WRECKER
truckabilly replied to foundationsedge's topic in WIP: Model Trucks: Big Rigs and Heavy Equipment
Wonderful mix of two kits and scratch building. I like it a lot. SBFA will look good on this one. -
Kenwork T 800 snow plow
truckabilly replied to mackd's topic in WIP: Model Trucks: Big Rigs and Heavy Equipment
Very realistic! I would just repeat what Richard said. Great school of model making. -
london Routemaster Bus
truckabilly replied to bowtieboss's topic in WIP: Model Trucks: Big Rigs and Heavy Equipment
This is nice start. I was thinking of the Zerro Paints myself. But then I was offered different color. Are you satisfied with the paint? Is it user friendly, so to say? -
Another vintage Kenworth cabover
truckabilly replied to BigBad's topic in WIP: Model Trucks: Big Rigs and Heavy Equipment
The chassis looks really great in the sun. Really nice to look at. -
Kenwork T 800 snow plow
truckabilly replied to mackd's topic in WIP: Model Trucks: Big Rigs and Heavy Equipment
It is a very interesting truck to me. I like the components you have built so far. Great details. -
white western star ext.hood
truckabilly replied to Q tip's topic in WIP: Model Trucks: Big Rigs and Heavy Equipment
Wow, this is going to be a great model. Excellent scratch building. I really enjoy looking at the pictures. Impressive progress, indeed. Top marks from me. -
Long Hauler 379 - 119
truckabilly replied to truckabilly's topic in WIP: Model Trucks: Big Rigs and Heavy Equipment
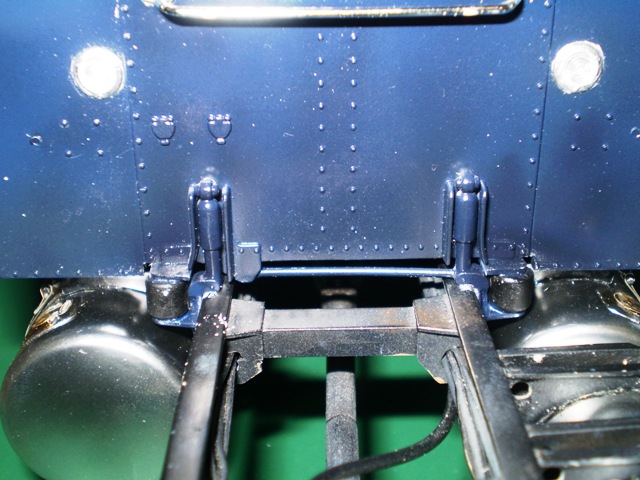
I glued the fenders to the frame. I was affraid of the correct position and alignment. But I think it turned out well. When I test-fitted the air filters I found the breather tubes to be too short. I could easilly see the open ending of the tube inside the round hole of the cab. Unlike the treal truck, there is no gasket in the kit. I stretched the breather tubes with a straw painted GSI Alumine. The black rings are the added gaskets. The exhaust piping will be quite a challenge. With the lowered cab it is necessary to modify the position of the pipes and mounting points. I hope everything fits well at the end of the day. The cab and sleeper are glued together. That has been my progress over the weekend.
-
Long Hauler 379 - 119
truckabilly replied to truckabilly's topic in WIP: Model Trucks: Big Rigs and Heavy Equipment
Do you mean the BMF lining, Chris? I cut four stripes for the door rims, wide enough to cover the rim plus some reserve. Say 5-6 mm wide stripe. The length is corner to corner. After peeling the paper off I softly apply the foil stripe over the raised portion of the rim with my finger, trying to make it stick only on top of the rim. Then with a help of a soft brush or a cotton bud I gradually press the stripe to one side of the rim. If it is necessary I use a toothpick to get the foil to the corner. Once the the foil is firmly stuck to the one side I carry on with the other side in the same manner. Then I cut and peel off the excessive foil so that only the rim was covered. I continue with the other stripes untill the whole rim is finished. If a part is missing here and there, like in the corners, I just add another piece of foil. The stripes should overlay one another and the joints are barely visible. The job is the same with the handles. I usually need two pieces of foil per one handle. If you clear-coat your cab, you better do the BMF job before spraying the clear. The foil will be sealed under the clear. -
Another vintage Kenworth cabover
truckabilly replied to BigBad's topic in WIP: Model Trucks: Big Rigs and Heavy Equipment
It is very nice build indeed. I like the job you have done so far. The painting looks top class and no problem with the cracked decals in those pics. I like the scheme too. It is a good idea to paint the mud flaps black first. Make sure to do that next time. Keep on the good work.