truckabilly
-
Posts
789 -
Joined
-
Last visited
Content Type
Profiles
Forums
Events
Gallery
Everything posted by truckabilly
-
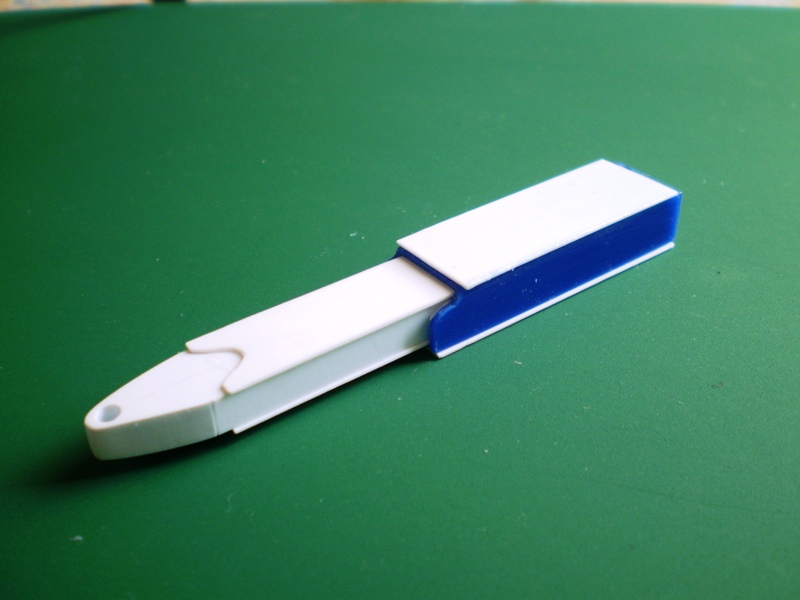
 I painted the inside panels using revell 331 colour as the instructions say so. Some debris got into the first layer. I have taken the photo after I cleaned the surface with a fine sand paper. I will add one more layer when I have time. The floors of both decks are painted also. But, again, it takes some more care to get the final coat. I cut the seats and frames from the sprues. Cleaning the 32 fragile seat frames is not exactly my idea of modelling but I finished it without any damage to a single frame. I did not follow the instructions when painting the wheels. Instead of revell 331 I chose revell 37 with a few drops of humbrol 62. A gloss laquer and dark wash will follow. I made a pair of pens which are a bit off scale but I put them in the cab anyway. I also added a pair of cables running from the steering column to the dash board. Now it takes painting and painting. I hope it will be finished within the next week.
 -
That is an interesting idea, Mark. But I will probably stick to the box version with this build. It is true that the kit has a great potential for conversions of all kinds. Mayby some day I will make another one with some changes to it. This particular build represents the memories of my visits to London. Even though I never took a ride, these Routemaster buses, among other things, are the very meaning of London to me. But I have some plans for Australian or maybe New Zealand build too. My idea is an old school MAN of... say 1970s. If you happen to know where to look for pictures like that, I would be greatful. Thanks for the idea of viewing platform.
-
The seat is attached to the back wall with the window in place. There is a decal with "OFF-FUEL-ON" sign in the kit that is supposed to be applied onto the fuel valve of the engine. In the real world it is a flat plate with a round hole in the middle strung on the fuel pipe. I just cut out the decal but did not plunge it in the water. I only painted the back of the decal with black colour, pierced the round hole in it and placed it onto the fuel pipe. I borrowed this idea from Adam Norenberg of UK. It works just fine.
-
Here is another update. The driver´s cab is painted and weathered. The weathering is a bit overdone. I did that because the whole cab is black and I want the details stand out from the darkness. The fire extinguisher is tied to the floor with a stripe. Even though there is a decal for the driver´s seat upholstery in the kit, I used an imitation leather. It was my first attemp in upholstering, so excuse the imperfections like patches and fabrics waering through, please.
-
Auslowe Kenworth K108
truckabilly replied to griffin's topic in WIP: Model Trucks: Big Rigs and Heavy Equipment
That is really nice. The tanks are cool. -
Yes, the Routemaster buses can be found in different parts of the world. Even my country the Czech Republic is a home of a few. They are in private collections, some of them serve as promo vehicles on various occasions. I was on board the other day when a motor show was held in my hometown. But the bus was just standing, no opportunity to take a ride. I am using the PE parts made by modellers from the Czech Truck Model Team. Some of them are identical to the ones offered with the Revell label. But the CTM set is more extensive. Here is how it looks like untouched. Some of the PE parts improve the driver´s cab. The parts include also the mesh to cover the heating channels on both decks. Unfortunatelly, they are a bit wider than the channels. But I took advantage of it by slightly bending the edges which lifted the mesh above the channel and thus created the effect of space underneath the mesh. This made the task of super glueing a little more difficult. The mesh does not look even any more. The mesh on the long channels consists of two or three parts. Here is the joint between the two. This is a kick protection cover under the seats. There is a lot more PE parts in the CTM set. They improve the look of many details in interior and exterior too. The truth is, they almost doubled the price of the bus for me. But I think it will pay off in the end.
-
GMC Astro AMT 1:25
truckabilly replied to Pavel A.'s topic in WIP: Model Trucks: Big Rigs and Heavy Equipment
It looks a lot better now with the "shoe lace" removed. I like what you have done so far. The frame is well weathered. Keep on the good work. -
Thank you all very much. Today I have a few pics of the bottom side of the bus with some grime on it. It is not finished yet. What you see is just silver, black and gun metal. I also used salt and hair spray to create some effects. The exhaust pipe is painted with revell and humbrol colours. The dark brown is the base and the lighter shade is applied with a sponge. Also with a sponge I applied the rust to the front axle. Later on I will add some dust, when the mud flaps and wheels are on.
-
With the radiator off the vehicle you can see the whole structure quite well. I tried to make the first cross member using the Evergreen "I" beam 1/4" (6.4 mm). The bottom side is simplified in the new concept manner. It is okay with me because I think the model has its highlights somewhere else. But there is one thing that I could not accept and it is the Panhard rod. One end is connected to the axle and there is no joint on the other. Even though I have no idea how the the thing looks like on real deal, I made at least some sort of connection the the vehicle. The bottom side is painted silver. As you can se it is quite flat and freatureless on the model. My next step will be adding some grime to this clean platform.
-
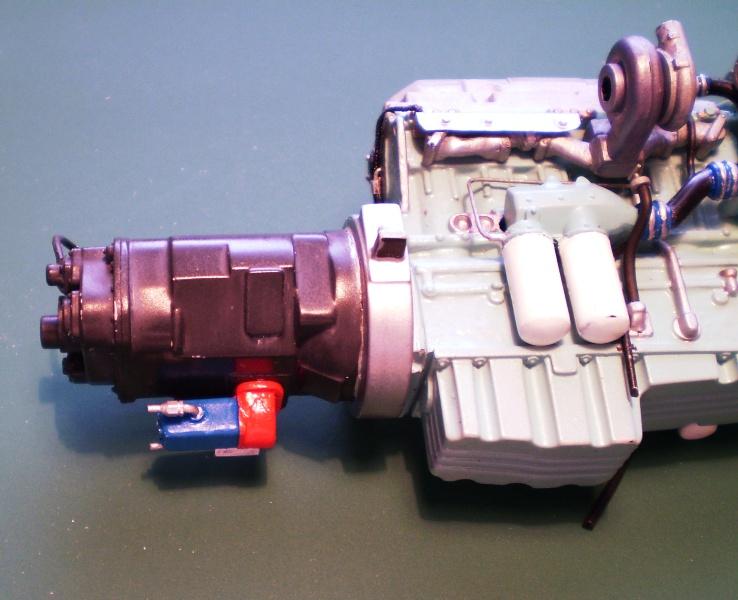
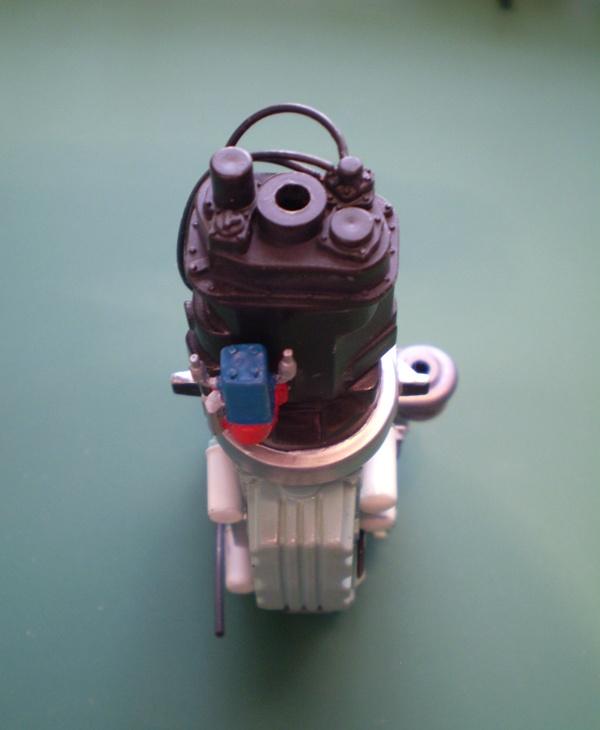
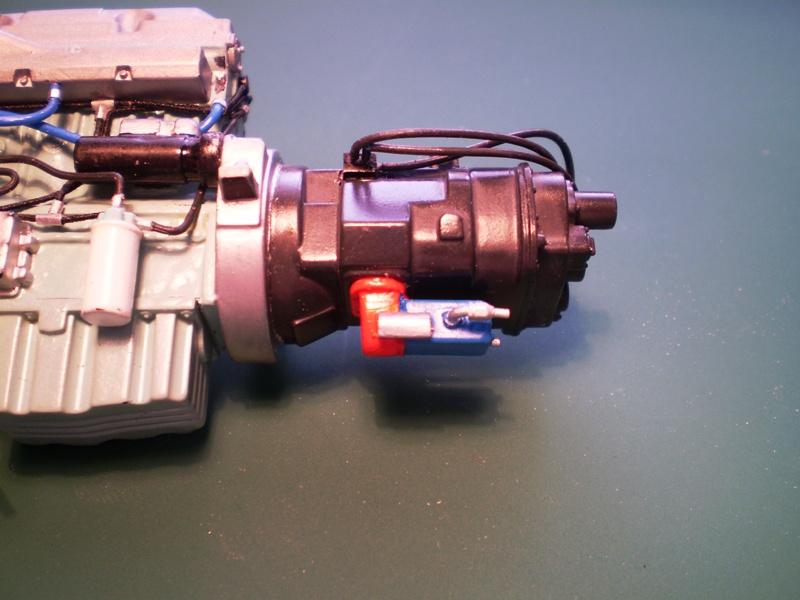
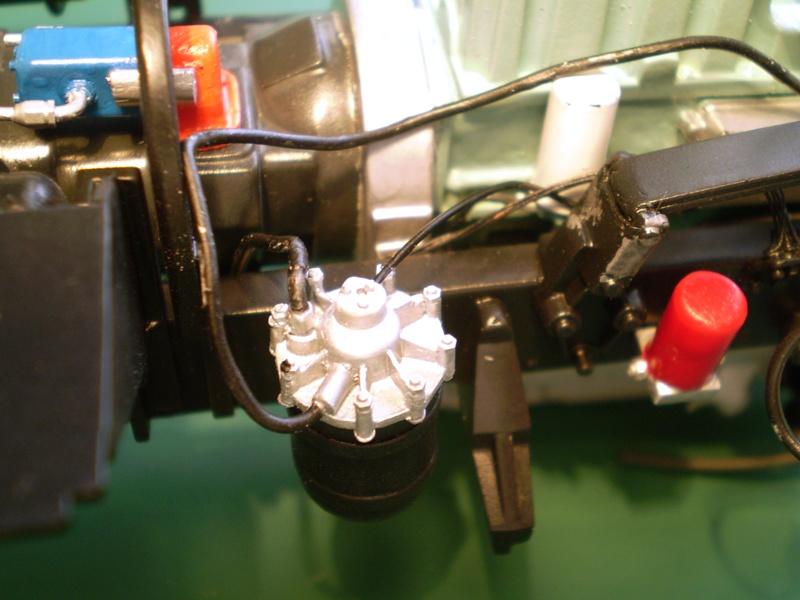
Okay, okay. I could not resist anymore. This giant box rested on my wardrobe for a while but the every time I glanced this direction, I was tempted. The buses in general are not much attractive for me. Not as the modelling objects. But this half-bonneted double-decker from behind the English Channel (La Manche, if you please) is a different story. Even though they do not take the passengers on regular lines anymore, they are still unthinkable part of the London atmosphere to me. The box is big. So big, that I thought they sent me an LCD TV set instead. And it is crammed with giant amount of plastic. Eventhough the kit has its shortcomings, I think it represents the legendary bus very well. I started out with the engine, like I always do and it is also the fist step per instructions too. There is a two engine option in the kit which is quite extraordinary. The first one is labeled Leyland by the instruction sheet. But it is AEC AV590 9.6L more likely. The other option is Scania engine which was installed in the Routemaster buses from 1996 as reaction to the legal emission limits. My choice was simple. The British bus - the British engine. This one represents the original quite well. I only added the diesel injection nozzels and tubing and some hoses too. The first shortcoming I had to deal with was the radiator. Since I plan to use a PE mesh as the grille, I needed to change the shape of the radiator. The one in the kit is much too wide. The mesh of the real bus reveals the whole supporting structure of the vehicle. I cut a part of the radiator off, fixed the edge and superglued the PE mesh on both sides. I was not carefull enough with the superglue and later on the surfacer revealed the imperfections.
-
1/16 Scale Peterbilt 359 Large Car
truckabilly replied to Kenny B's topic in WIP: Model Trucks: Big Rigs and Heavy Equipment
Wow, I am totally blown away by that engine. I was also trying to get some info and pics of the twin-turbo 3408. One of my dream models is "Papa Clyde" of the Bill Signs Trucking fleet. I found a few pics of the engine but the turbo set up and the whole tubing is different. Let me know by PM if you want more.
-
Long Hauler 379 - 119
truckabilly replied to truckabilly's topic in WIP: Model Trucks: Big Rigs and Heavy Equipment
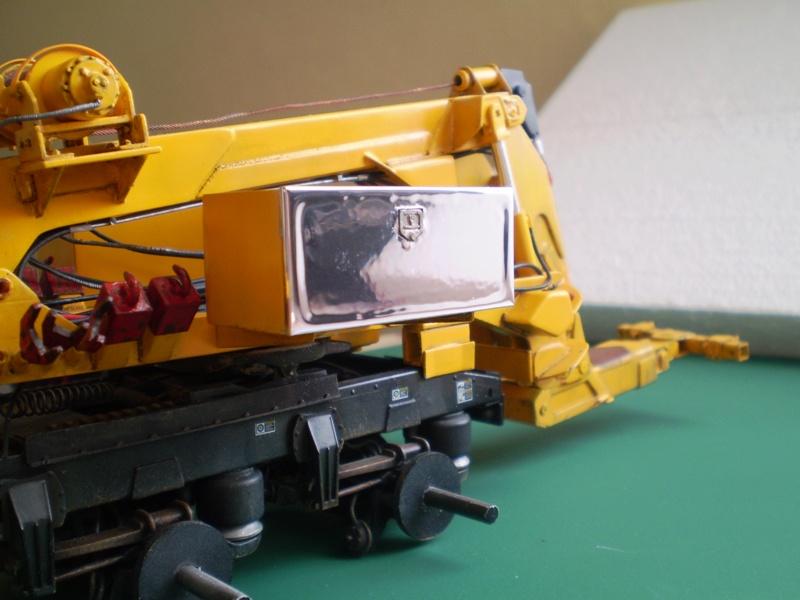
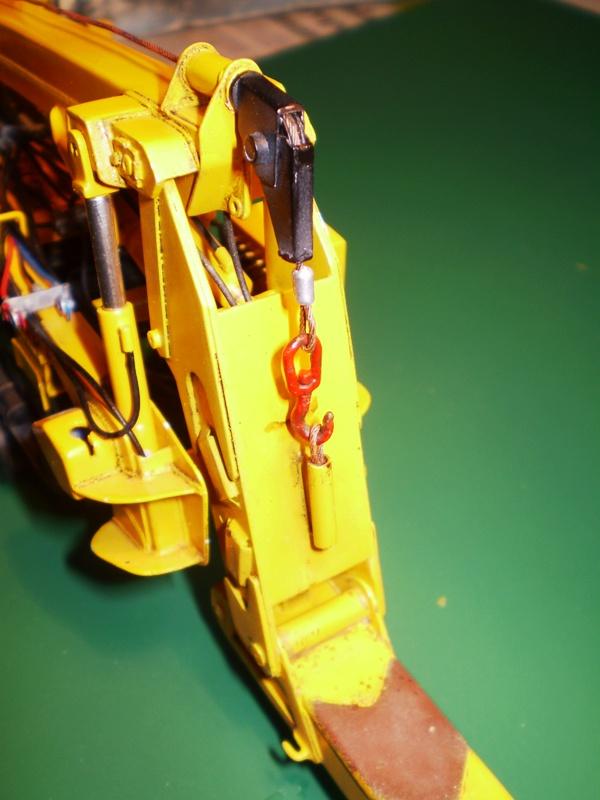
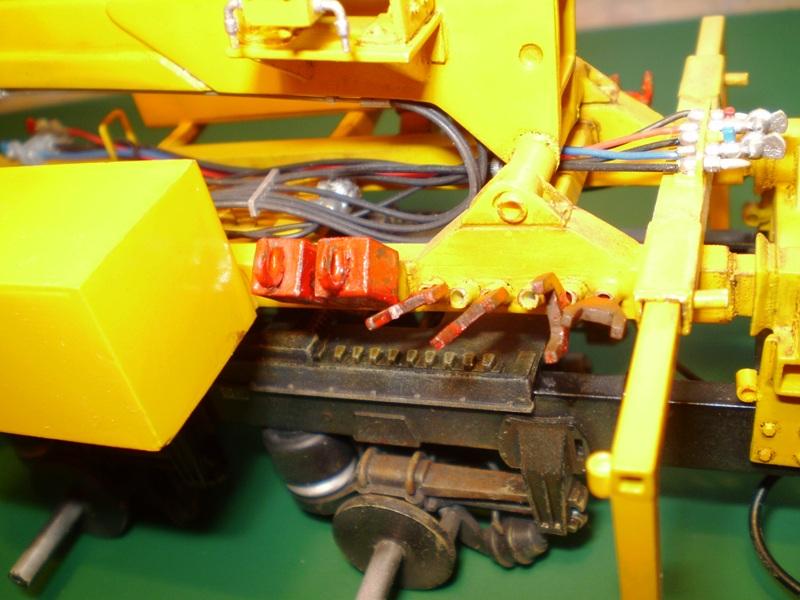
Thanks a lot. Well, not everything goes as smooth as I wish. And this is where I really hit the wall. I tried a mirror foil to cover the tool box doors. I wrapped the door panels in the foil so that both the face and edges were of the same quality. Unlike the BMF, this foil does not stick to the edges too well and it stepped back from them over night. This is how it looks now: The photo raised the details a lot more than it actually is. But I have to come up with something different anyway. Another small item that I added is this pair of hooks on chains. I am very sorry for the doors. They have to go off. Maybe I should have sprayed them with the alclad chrome. But I was not quite successfull with it so far. And each imperfection on this part would scream out loud. A chrome from a rattle can maybe...
-
Long Hauler 379 - 119
truckabilly replied to truckabilly's topic in WIP: Model Trucks: Big Rigs and Heavy Equipment
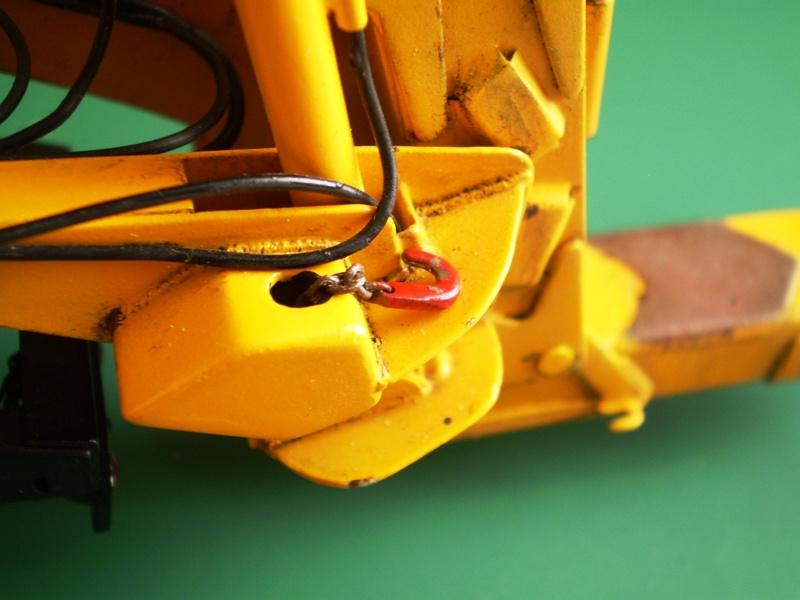
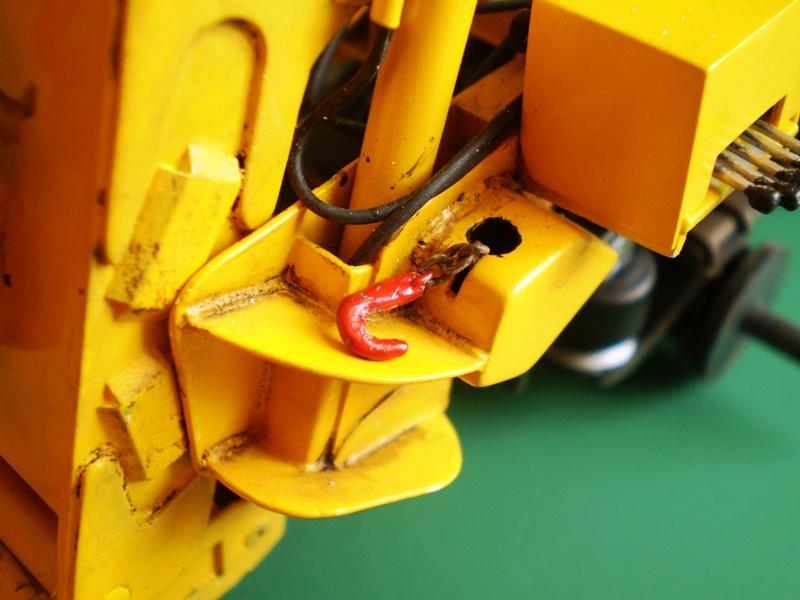
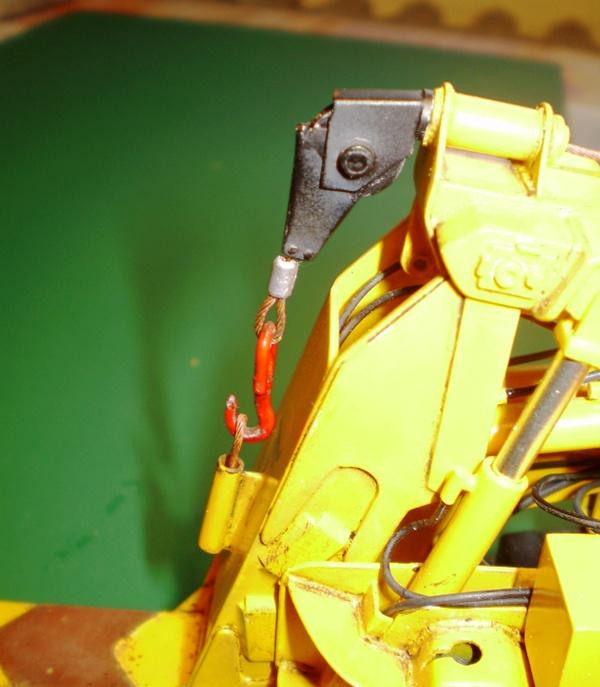
Thank you guys. Even though I have a few different hooks, non of them looks like the one I needed. So I produced one of my own. I bended Evergreen rod above the candle flame and shaped it with a file. The eye comes from a russian battle tank IS-3 kit. It is slightly modified and the hook turns in it just like the real one. I also added T-handles to the front supports. That´s all for now.
-
Scania R143 Streamline
truckabilly replied to the4thlord's topic in WIP: Model Trucks: Big Rigs and Heavy Equipment
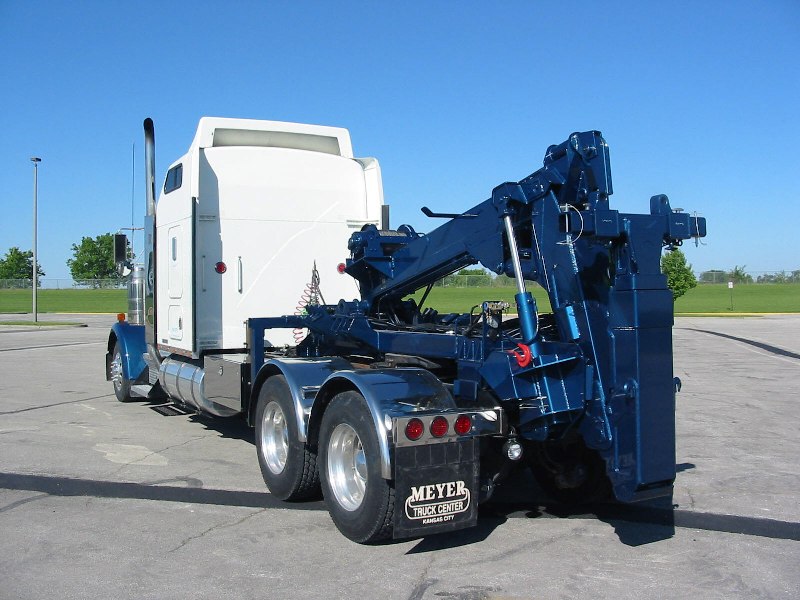
The paint scheme that you have chosen is really nice. I tried to find some wiring myself and so far I found only this. It is a different model line but the basic scheme should be the same. http://documentationtruck.picturepush.com/album/143660/5280094/Scania-142-143/scania-r112h-cutaway.html#column2::/album/143660/detail/5280635 The hand-drawn diagram has notes in the Czech language but I think it is pretty obvious what is what. The red parts are the air tanks, the blue ones are air springs and the green are the air distribution valves. I hope this helps a little. -
Long Hauler 379 - 119
truckabilly replied to truckabilly's topic in WIP: Model Trucks: Big Rigs and Heavy Equipment
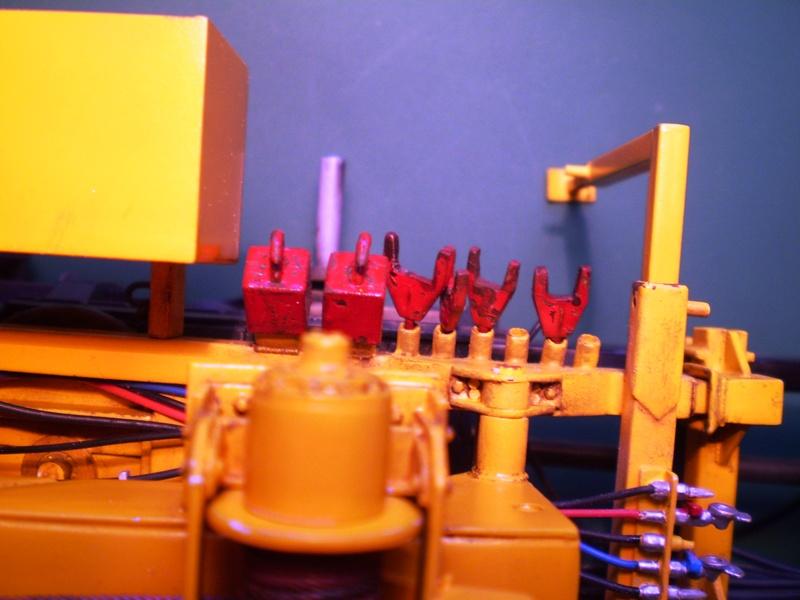
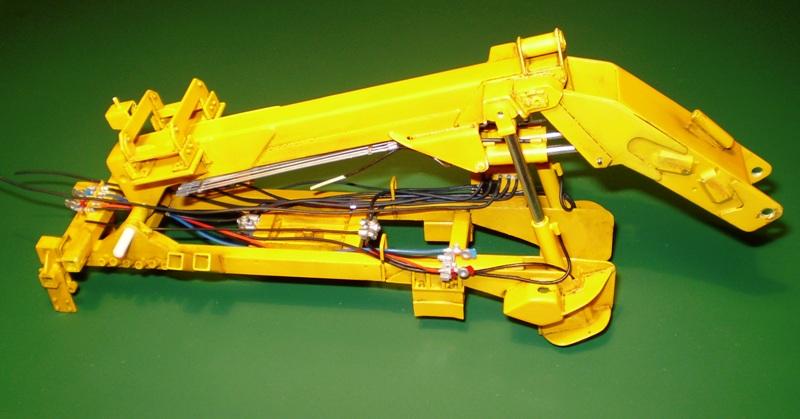
Thank you Steve. I have added somo more items, like the coppery cable, the fork-shaped extensions and some other equippment and some more hoses. There is yet a few more details to be added but the unit is getting to the finish line. Then I will focus on the truck.
-
Peterbilt 359 R/C
truckabilly replied to rcdave's topic in WIP: Model Trucks: Big Rigs and Heavy Equipment
Nice dash! I wish I could see it glow in the dark. Great job on this one. -
Long Hauler 379 - 119
truckabilly replied to truckabilly's topic in WIP: Model Trucks: Big Rigs and Heavy Equipment
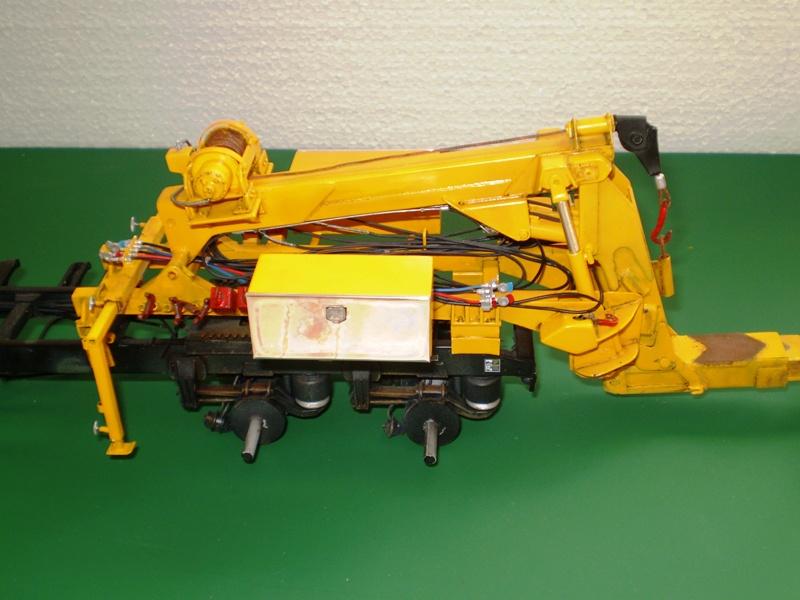
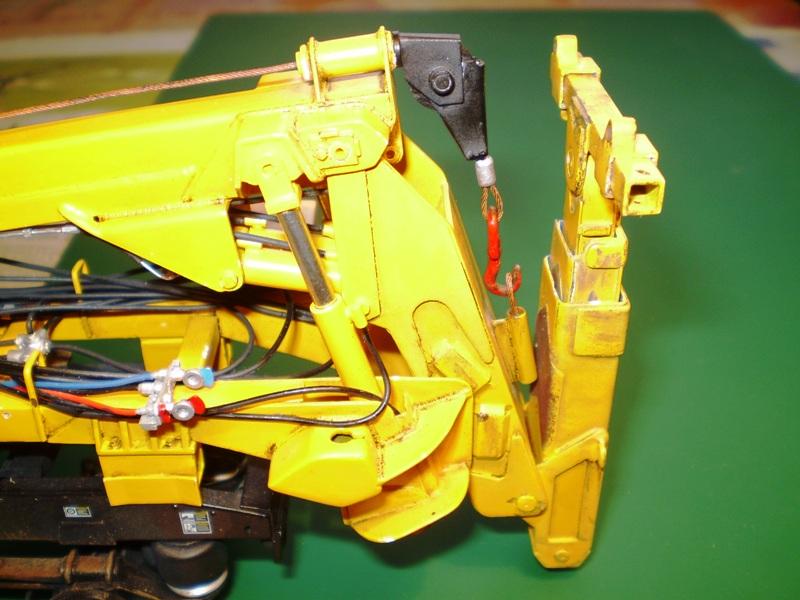
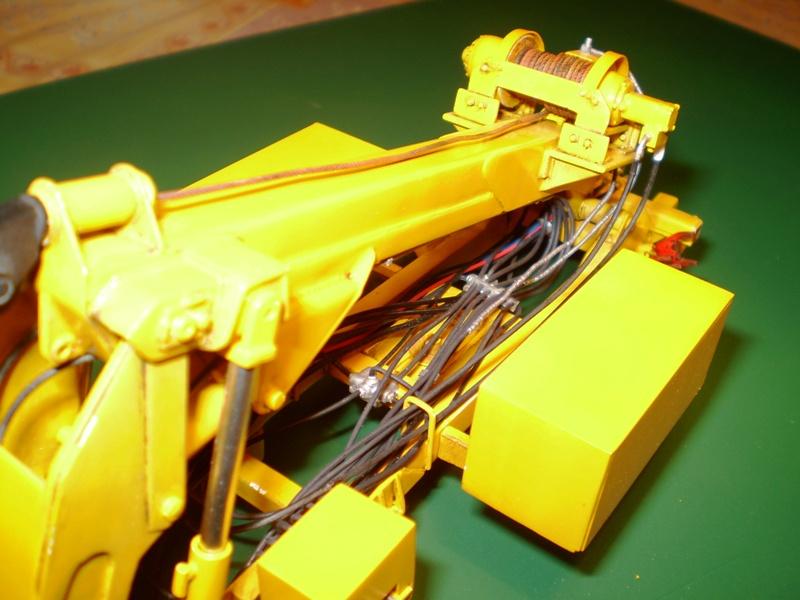
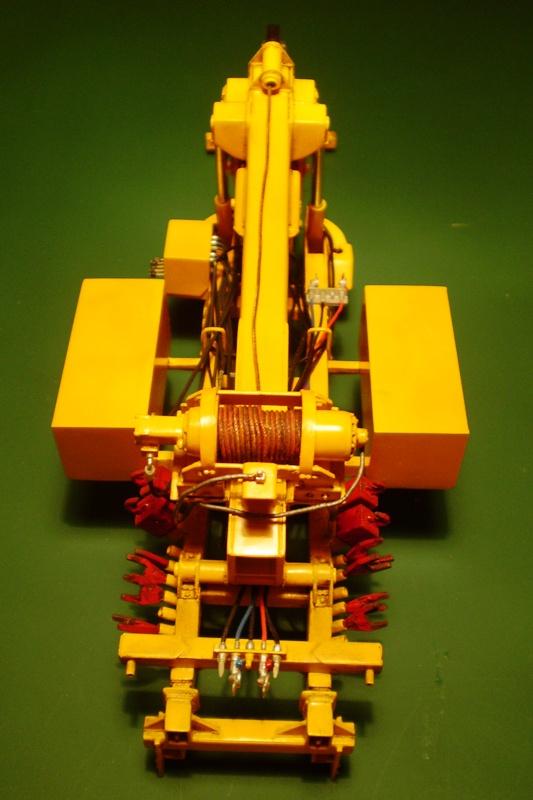
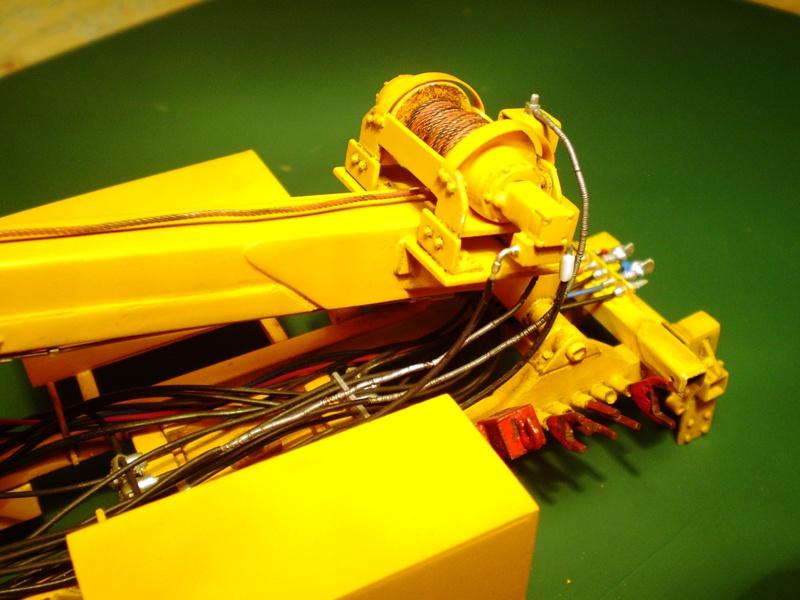
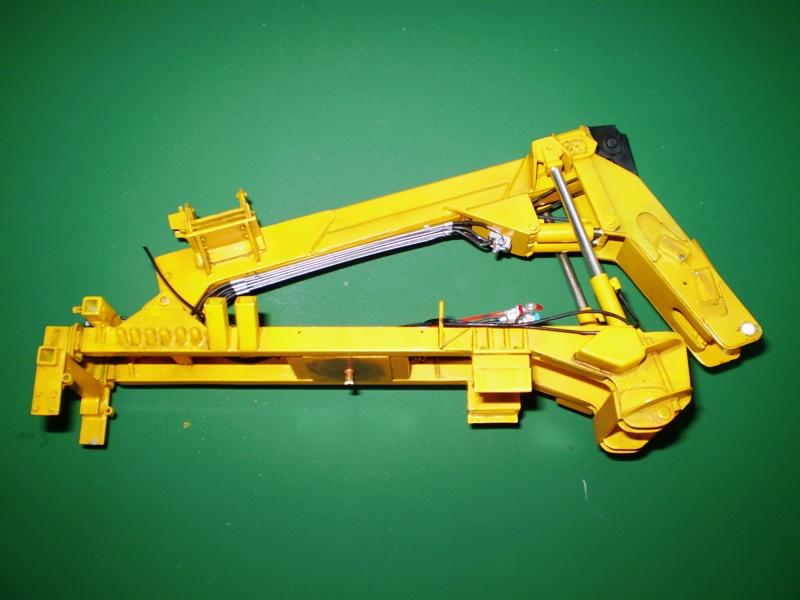
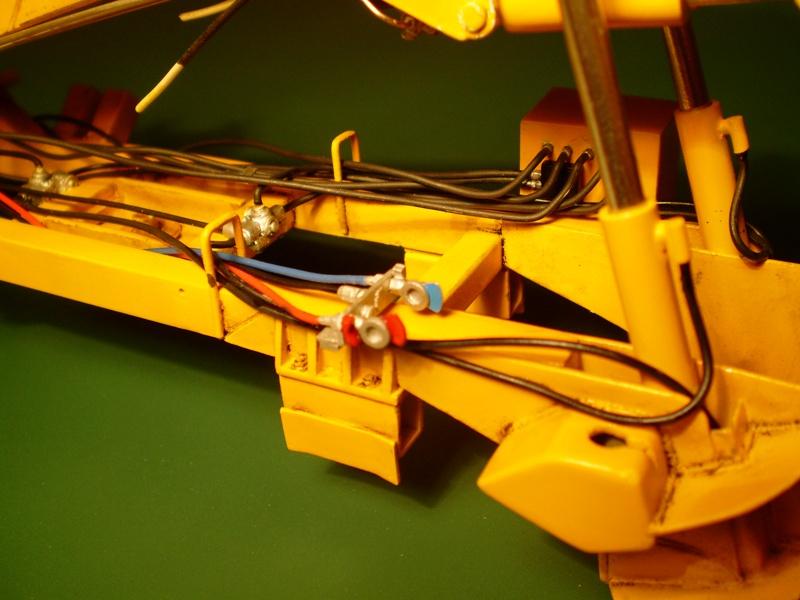
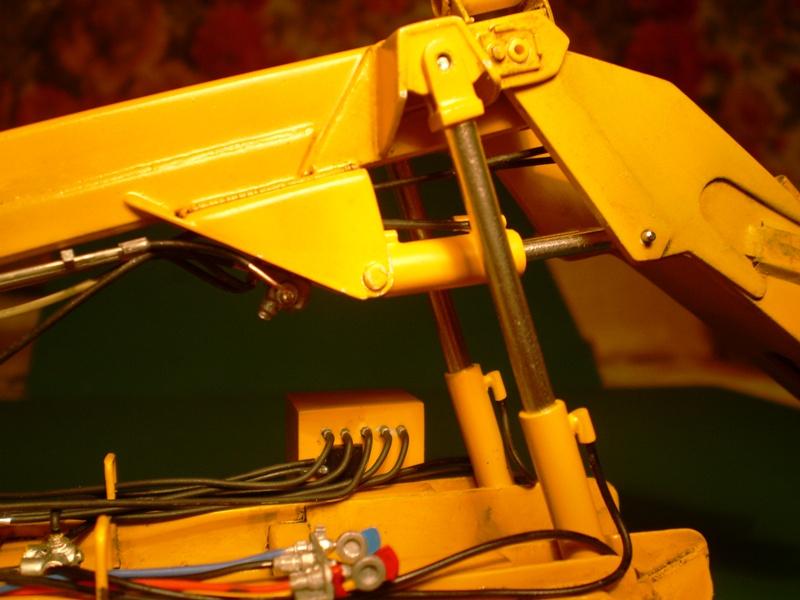
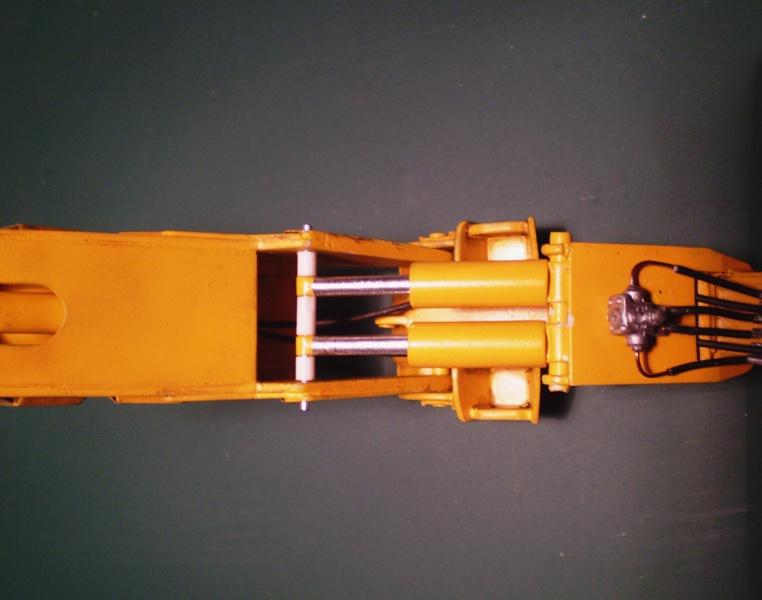
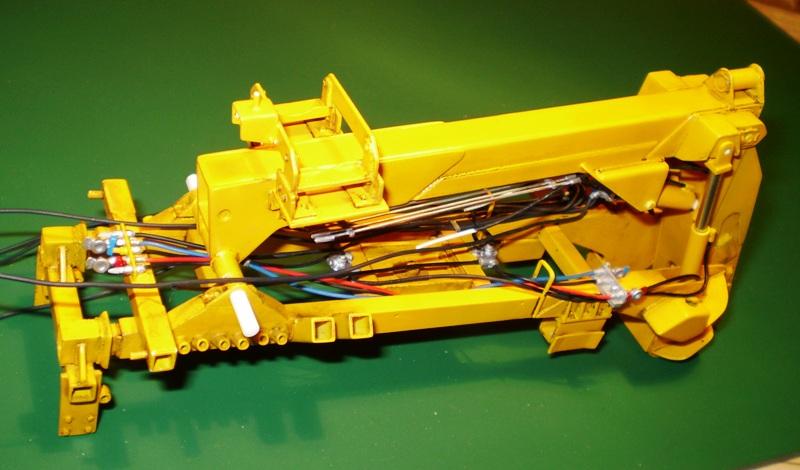
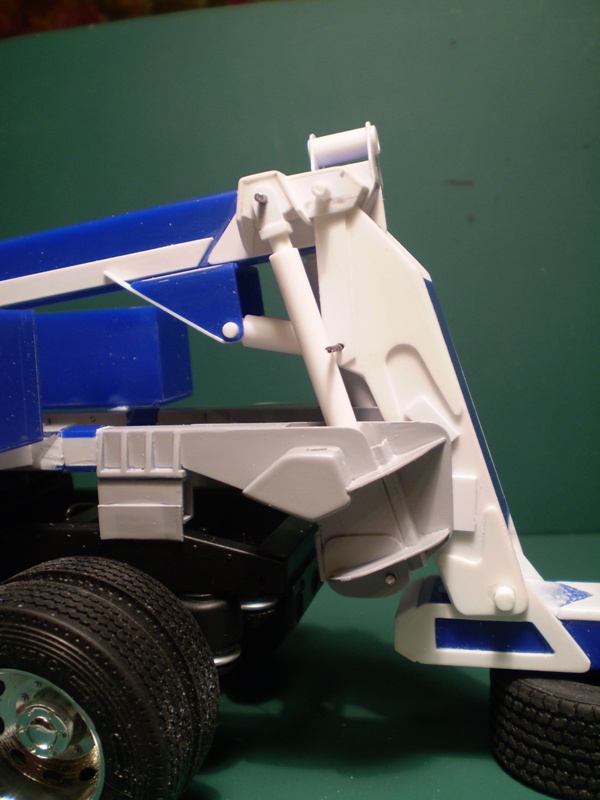
Thank you very much for your kind words. I attached hoses to the tubing on the lower side of the boom. It took a lot of my patience and still I am not quite satisfied with the result. I should have used a different material for the tubing and a different kind of glue. This one have eaten the plastic of the hexagonal joints and they are not in line too much now. I just hope it won´t be seen too much when the boom will be in its normal position. I haven´t seen a detailed pic of this part, so it was a kind of guessing game anyway.
-
Long Hauler 379 - 119
truckabilly replied to truckabilly's topic in WIP: Model Trucks: Big Rigs and Heavy Equipment
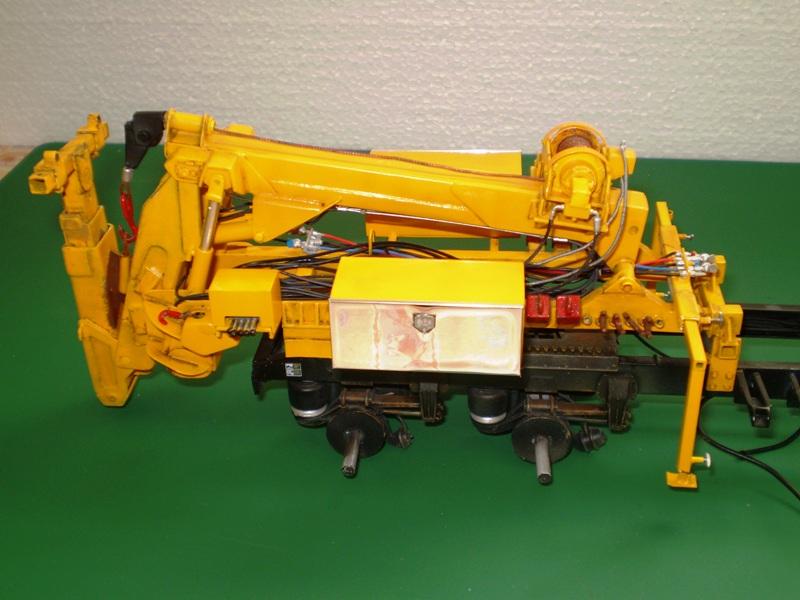
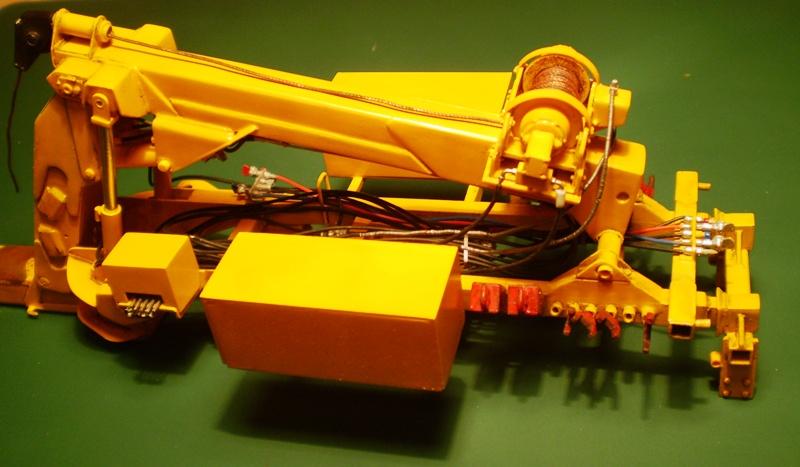
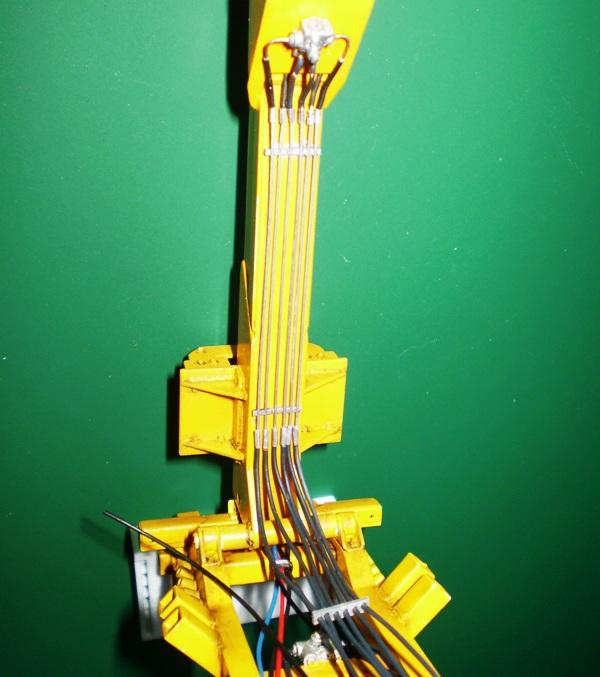
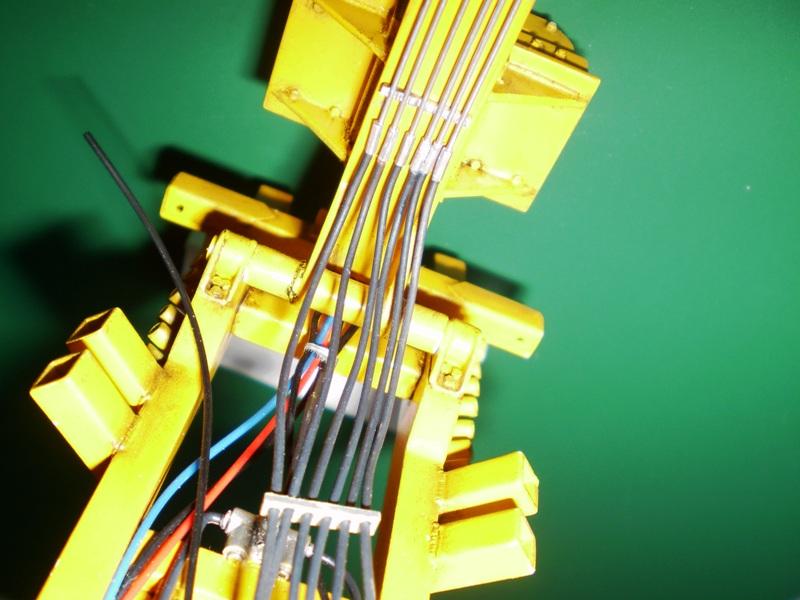
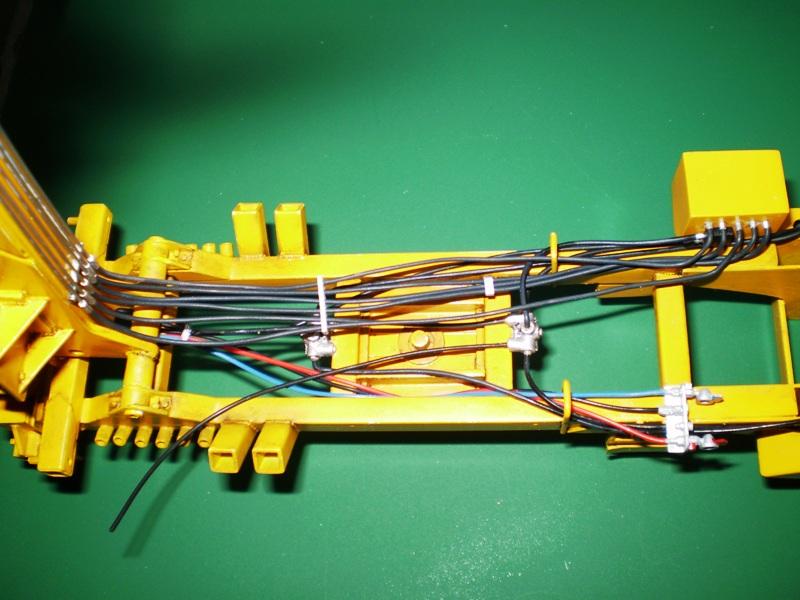
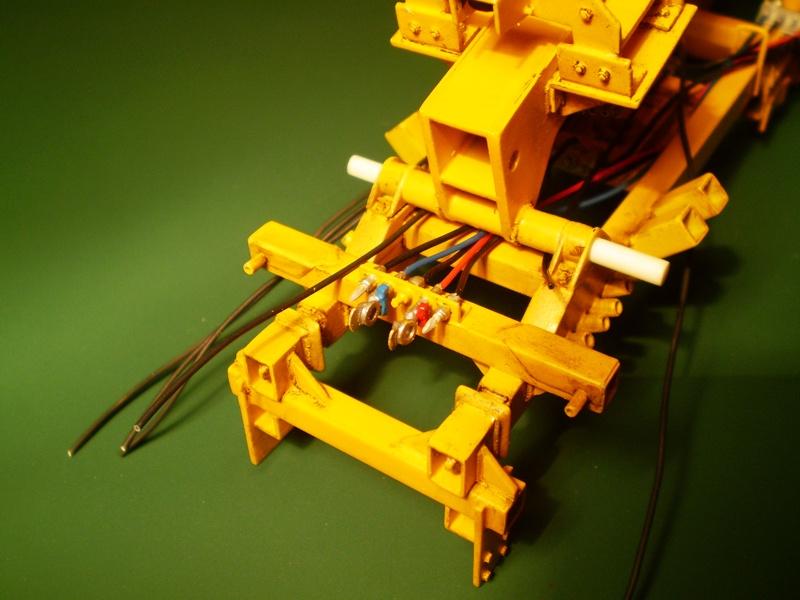
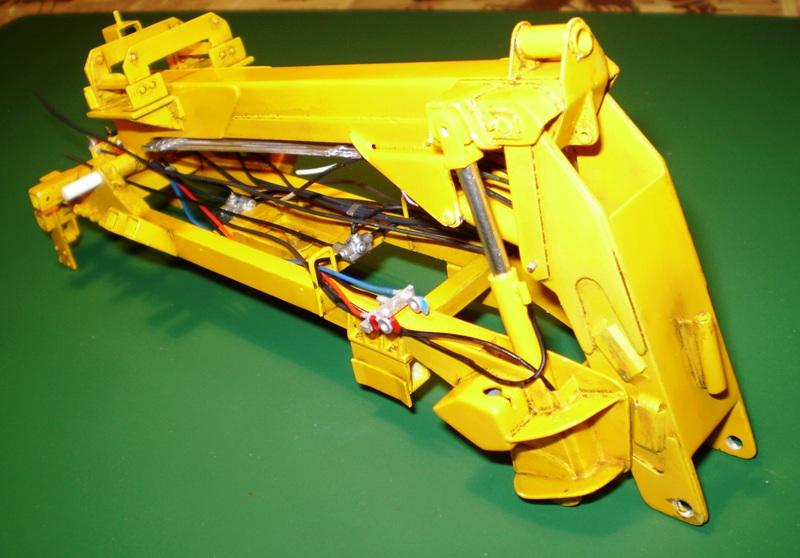
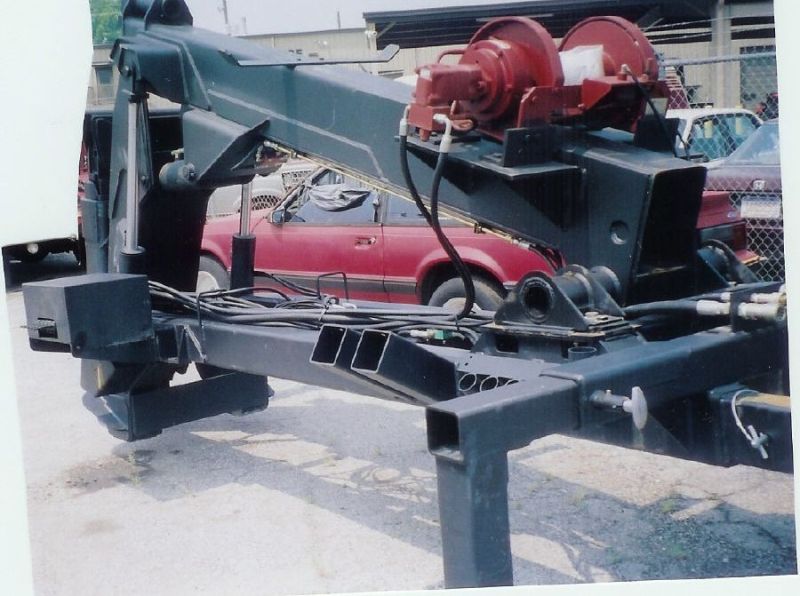
A little more done on the DTU. I added a few lines and valves. The glad hands and electric connectors are scratch built. The other valves are from the KFS chassis valve set. The hydraulic pistons are BMF covered.
-
Kenworth Aerodyne COE
truckabilly replied to k100's topic in WIP: Model Trucks: Big Rigs and Heavy Equipment
Great job on shortening the cab. Looks really nice. -
Long Hauler 379 - 119
truckabilly replied to truckabilly's topic in WIP: Model Trucks: Big Rigs and Heavy Equipment
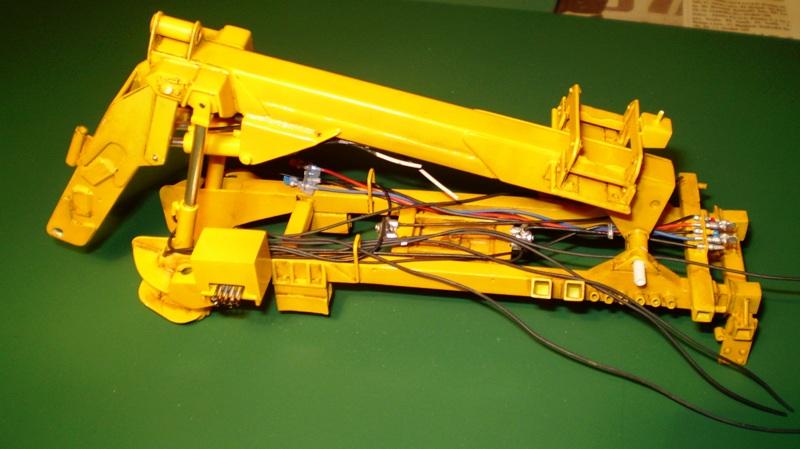
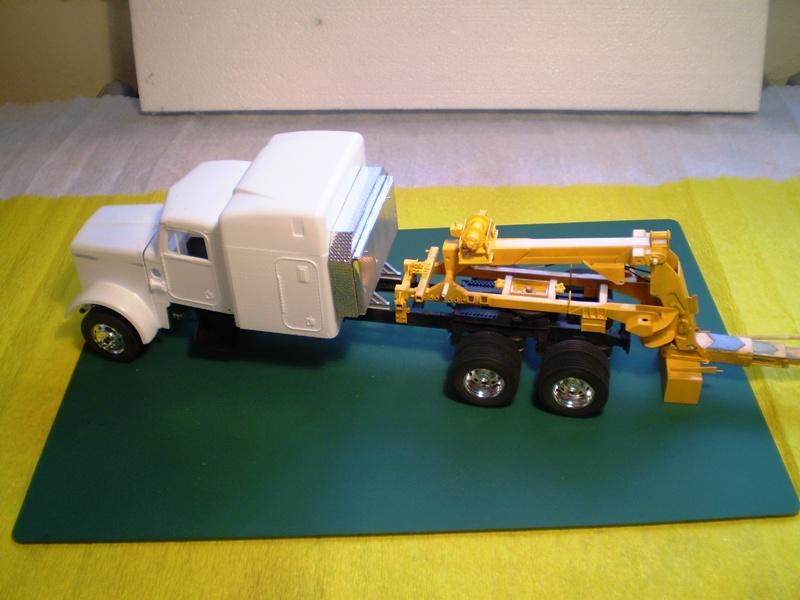
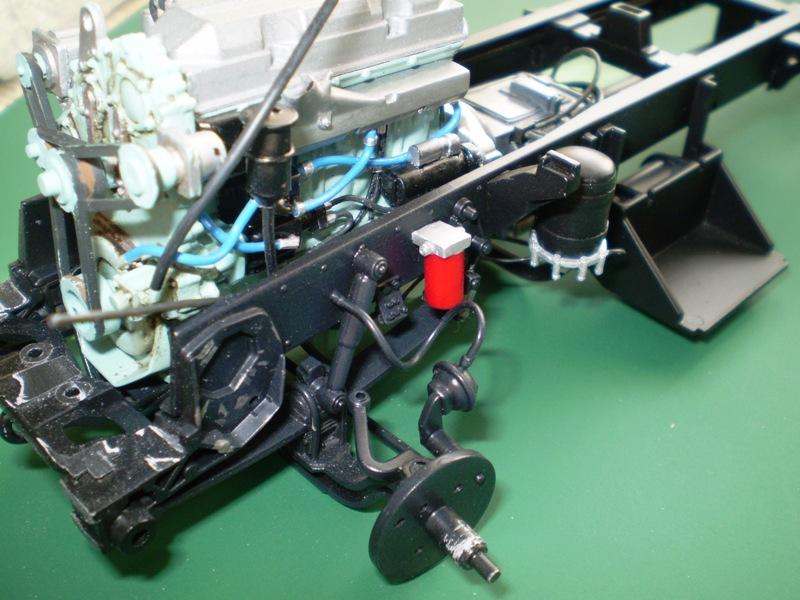
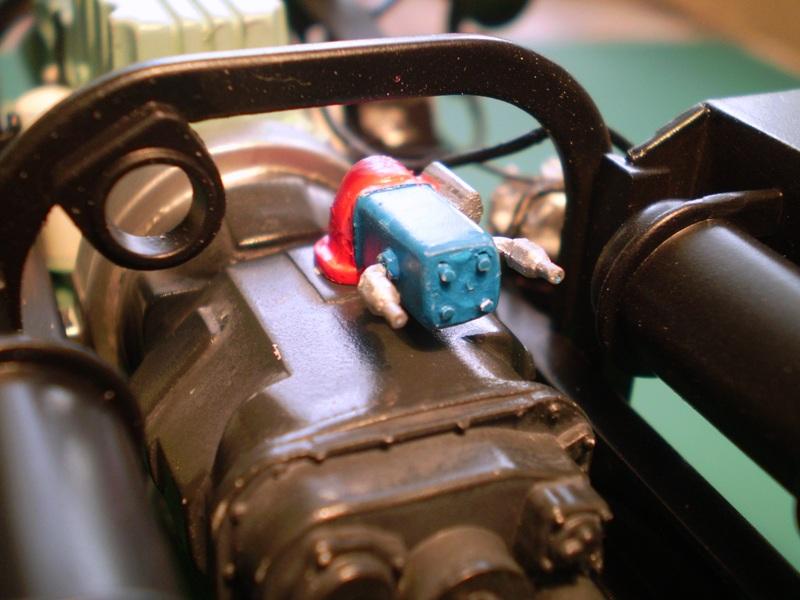
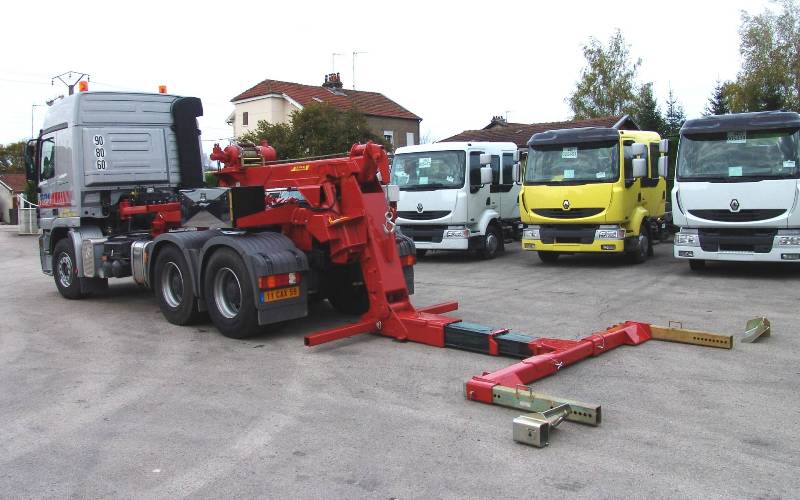
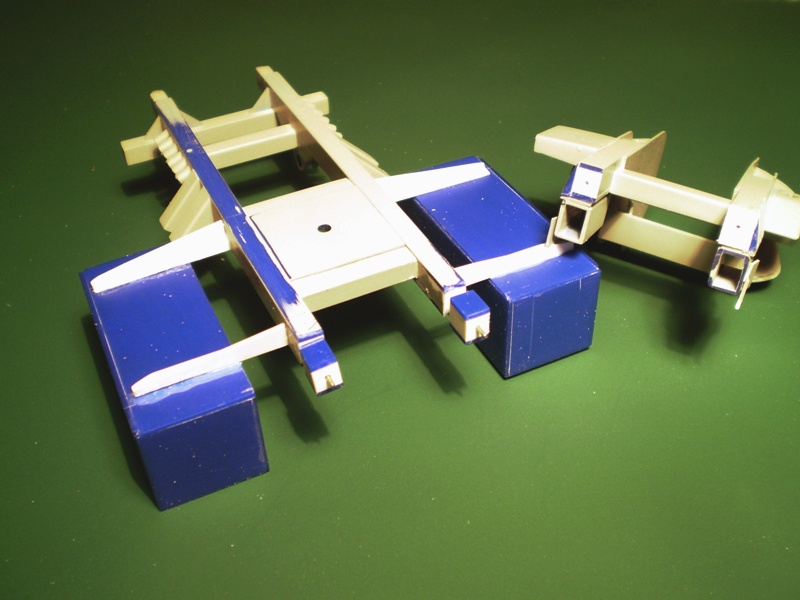
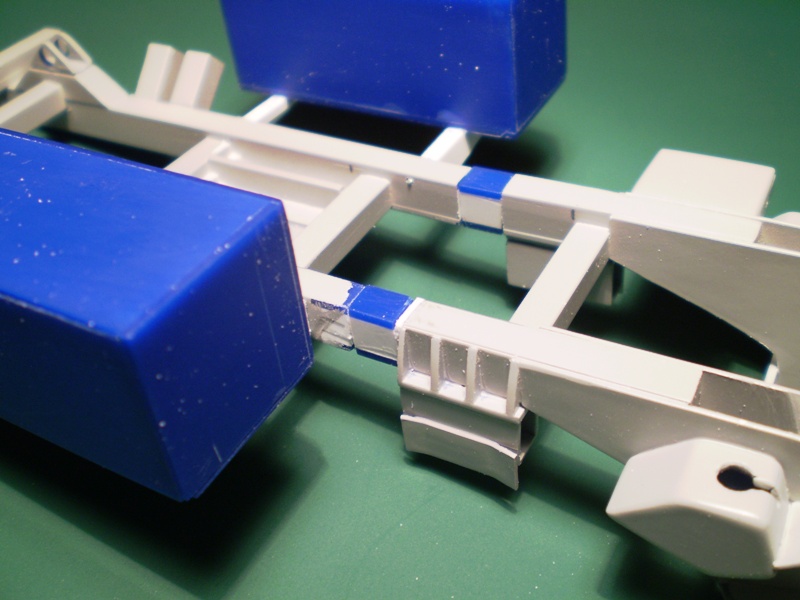
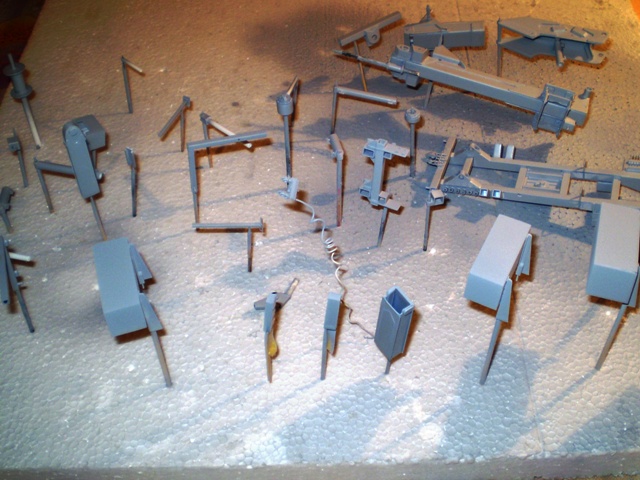
A fuel filter... thanks a lot for the info. I needed to check if the components fit alright onto the frame. I took a few pics on that occassion. Everything just sits on the frame, nothig is glued yet. So, don´t jugde the alignment and geometry yet. I will take a better care of that when the time comes. , , , , The front mounting points of the DTU get in collision with the hydraulic tank brackets. I will have to make some changes in placing those on the frame. In fact, I cut them off already. Maybe I will have to make some new tanks as well. Will have to think it out. Till then, thanks for looking.
-
Long Hauler 379 - 119
truckabilly replied to truckabilly's topic in WIP: Model Trucks: Big Rigs and Heavy Equipment
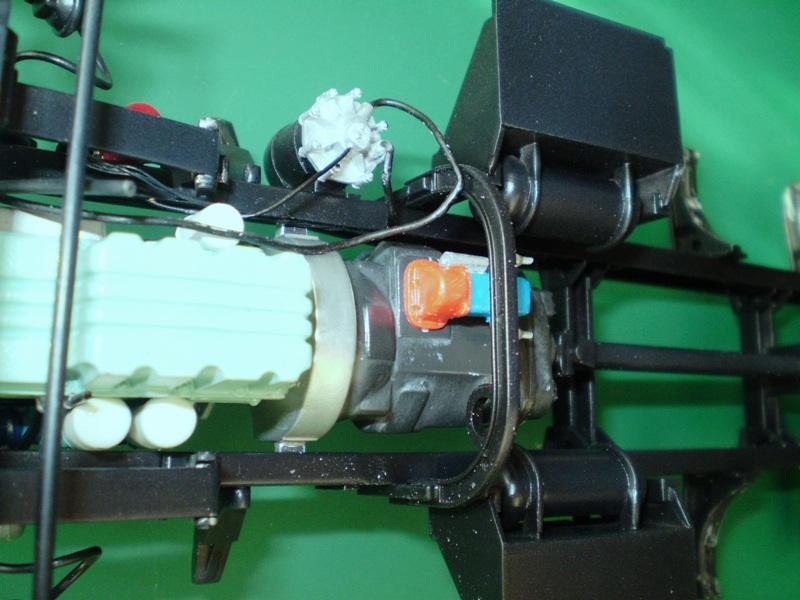
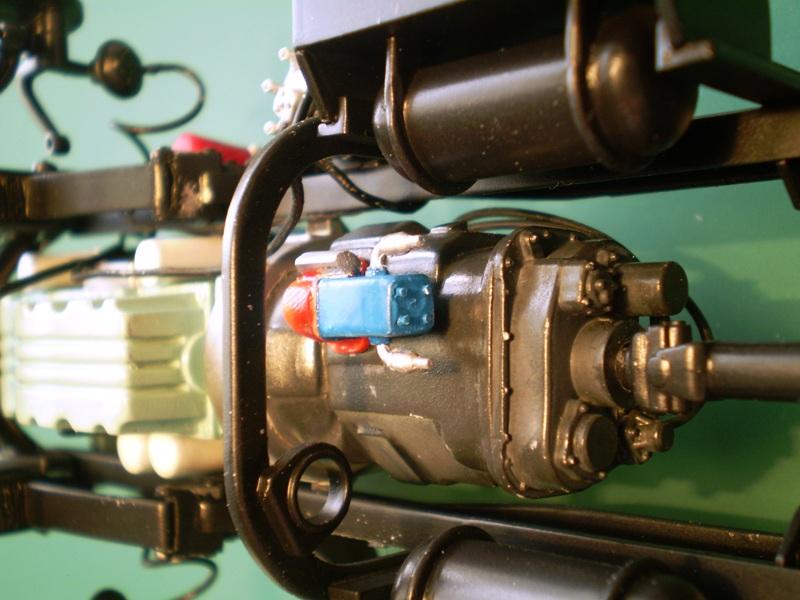
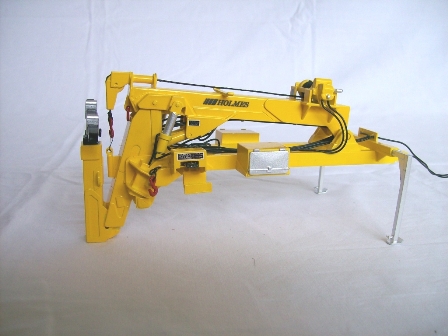
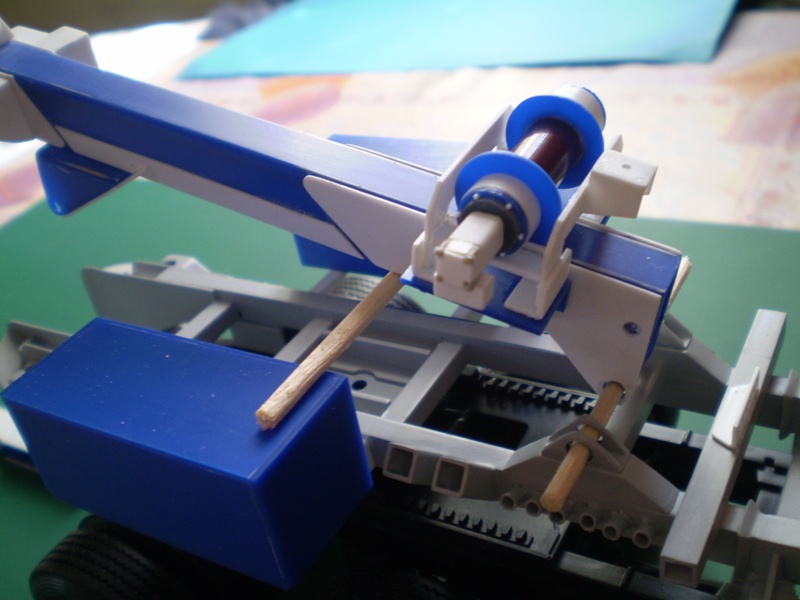
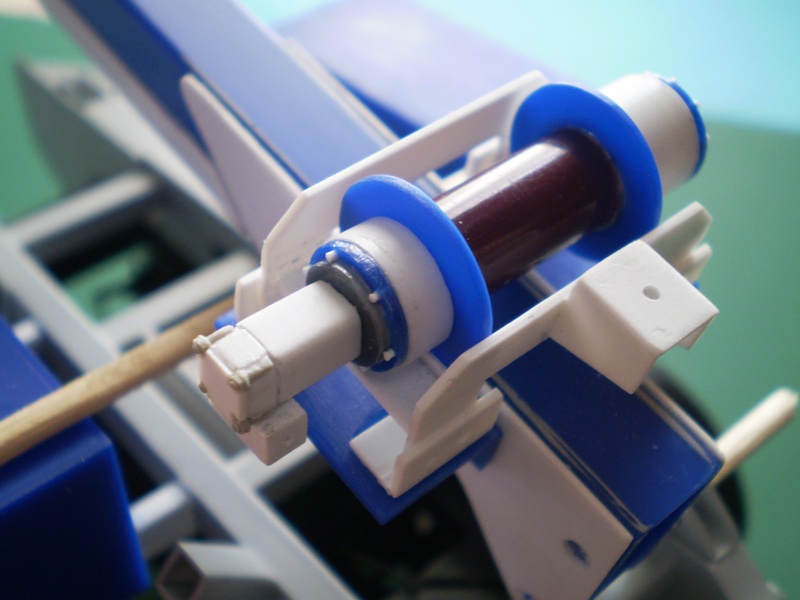
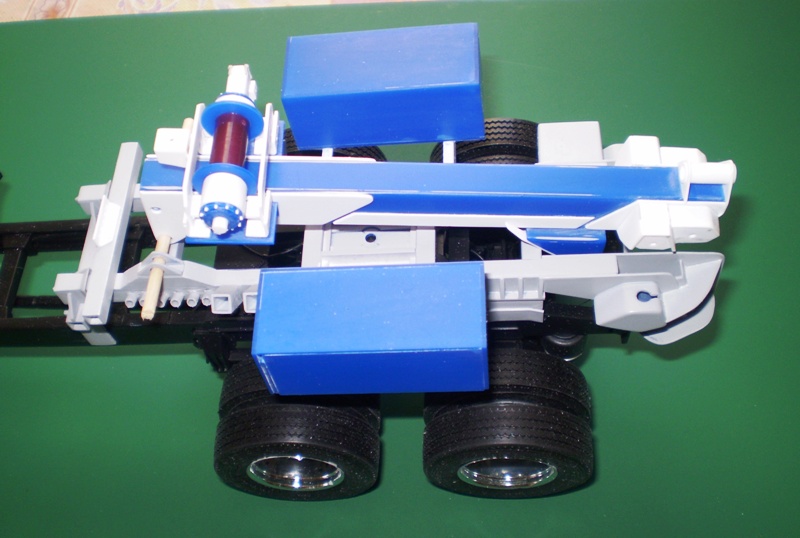
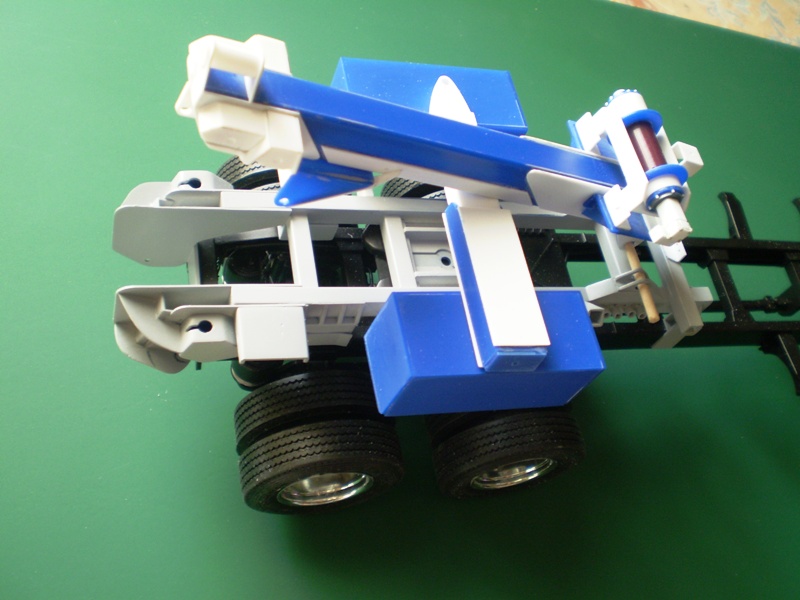
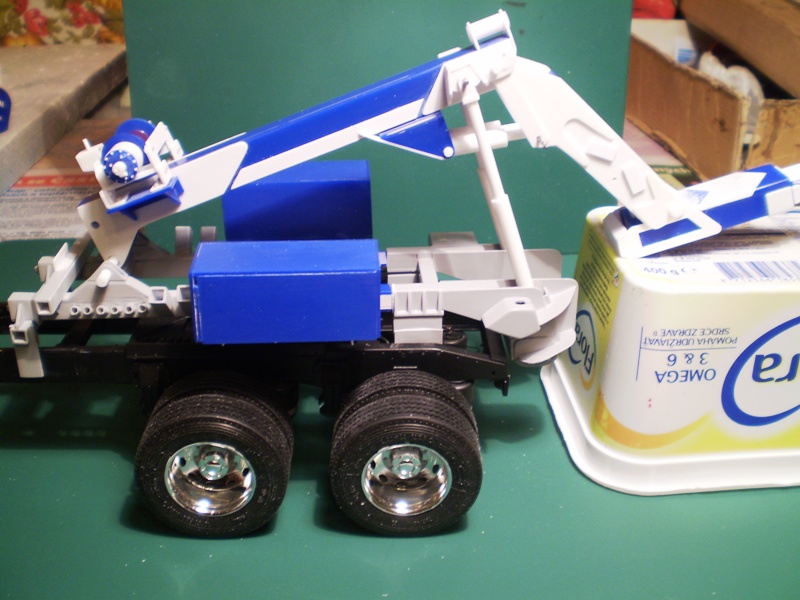
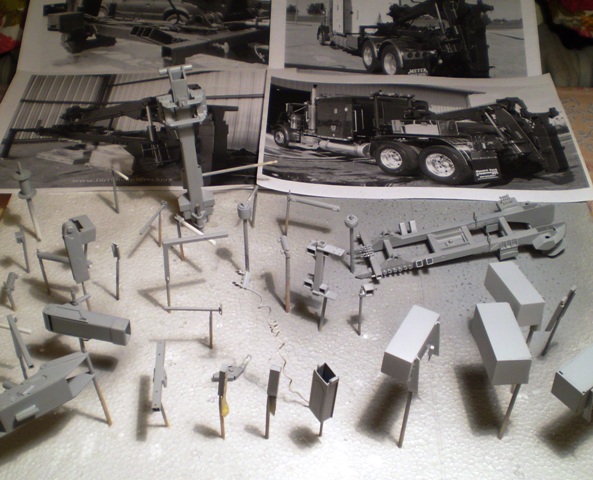
Here we are in 2013 and the Earth is still turning so love and happiness to you all. I am working on a few different parts for my build. Like the smoke stacks that I have made using the CMT photo etched parts and aluminium tubes. The same way as with my 377. I attached the PTO and hydraulic pump to the bottom side of the transmission. Maybe it is too big for this scale but I did not have the real dimensions. , , The air dryer needed the bottom cover. The shape is a bit complicated. It took me three trials before I came up with this. Here is a few other views: , , , I wonder what is the red can on the frame rail. It might be the air filter on the compressosr output line or a fuel filter. Can somebody tell me what that could be? Thank you.
-
Long Hauler 379 - 119
truckabilly replied to truckabilly's topic in WIP: Model Trucks: Big Rigs and Heavy Equipment
I do not quite understand how these computer things work and interact with one another. Since I got only one complaint, Sean, it looks like there really must be a problem on your side. But in that case you should have problems with another photobucket based pictures as well. If you do not, then it is a mystery to me and I really do not know what to do about it. The Photobucket changed the outfit (probably a wrong word but I hope you know what I mean). Things are arranged differently and yestarday the image links were hidden from me. I post pictures by copying the image code from the photobucket and paste it in the reply field of the forum. Yesterday the image links were hidden. The lines were still there but they got blank (blackened in fact) as soon as I moved the cursor towards them. I did what I used to do anyway. I copied the blackened line and pasted it to the reply field. And it worked - the pictures are here. But it was pretty inconvenient. Maybe there is a better way how to post the photobucket pictures but I have not found it yet. I know I can use the attach files feature of the forum and I did several times. But the data limit kinda bothers me. I will switch to this method next time if I remember to do so. So, till next time -
Long Hauler 379 - 119
truckabilly replied to truckabilly's topic in WIP: Model Trucks: Big Rigs and Heavy Equipment
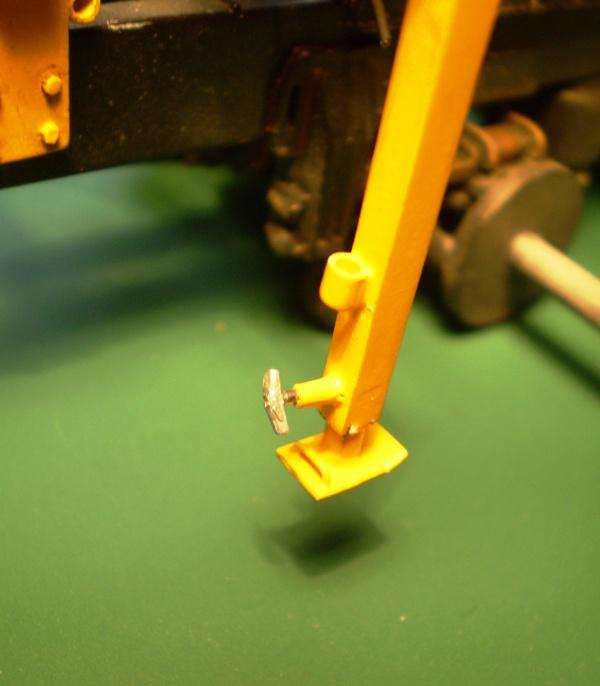
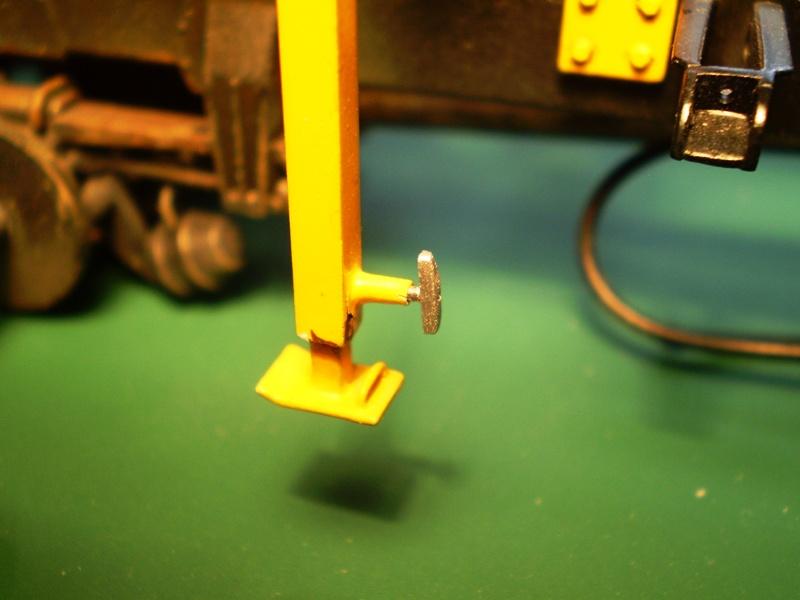
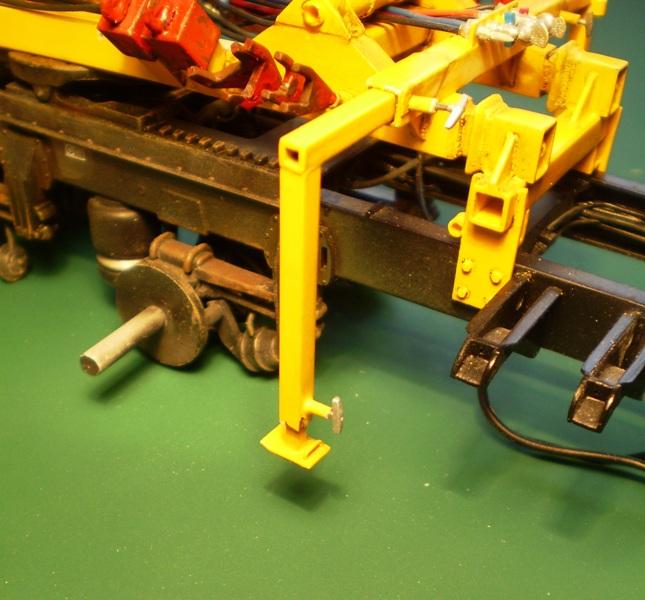
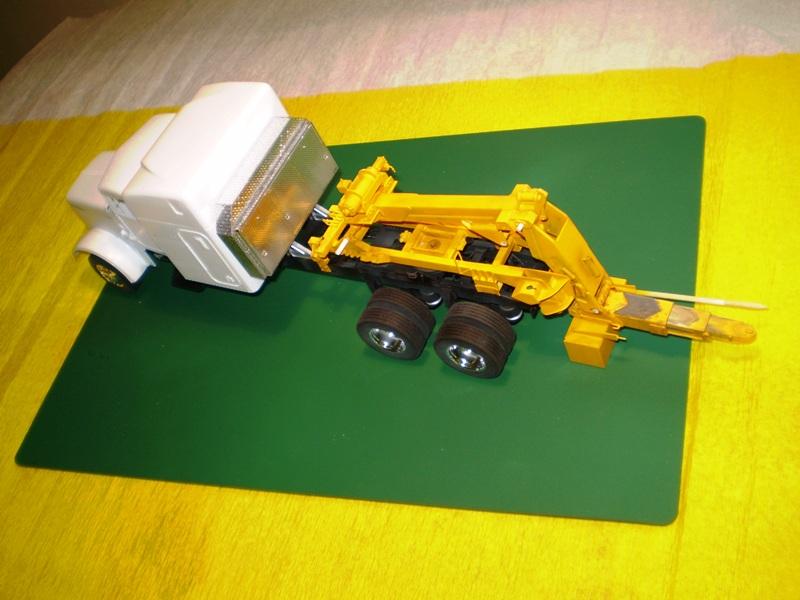
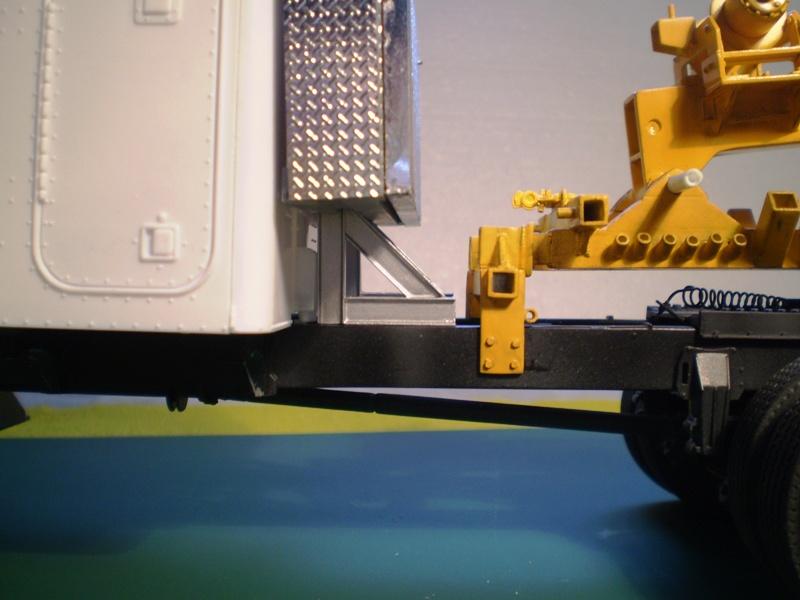
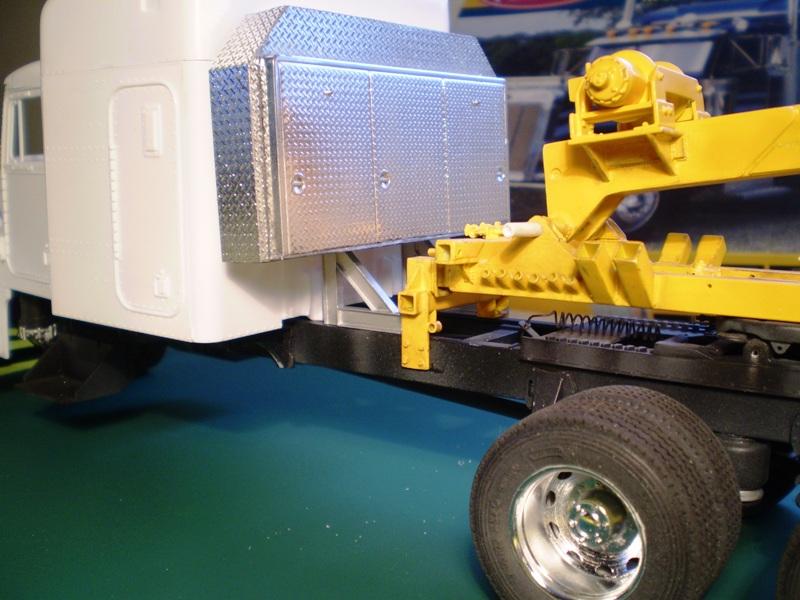
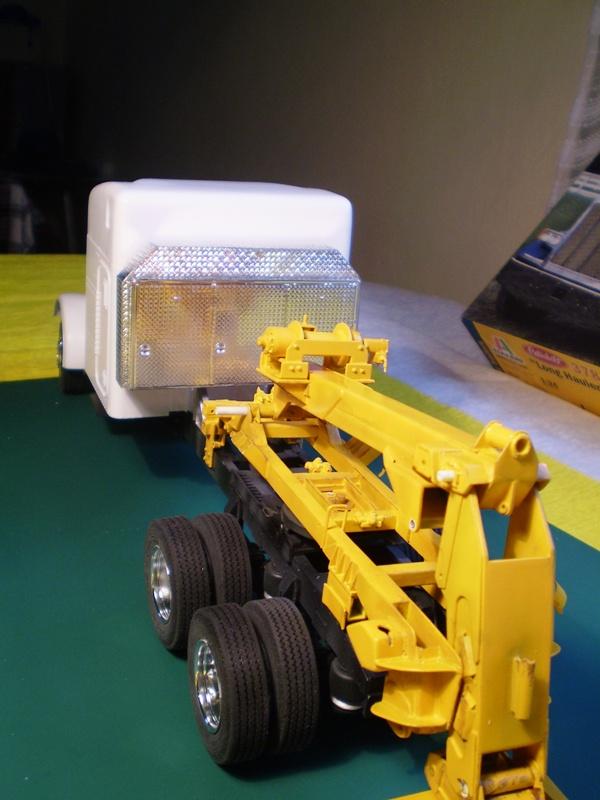
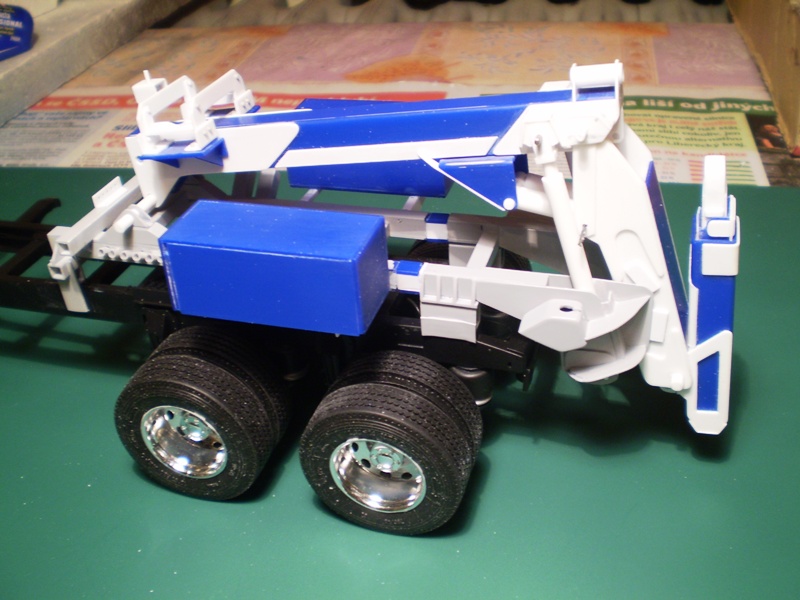
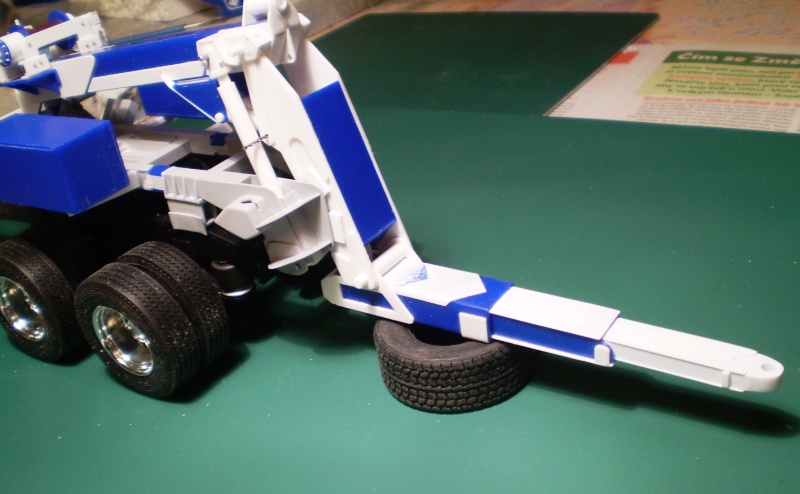
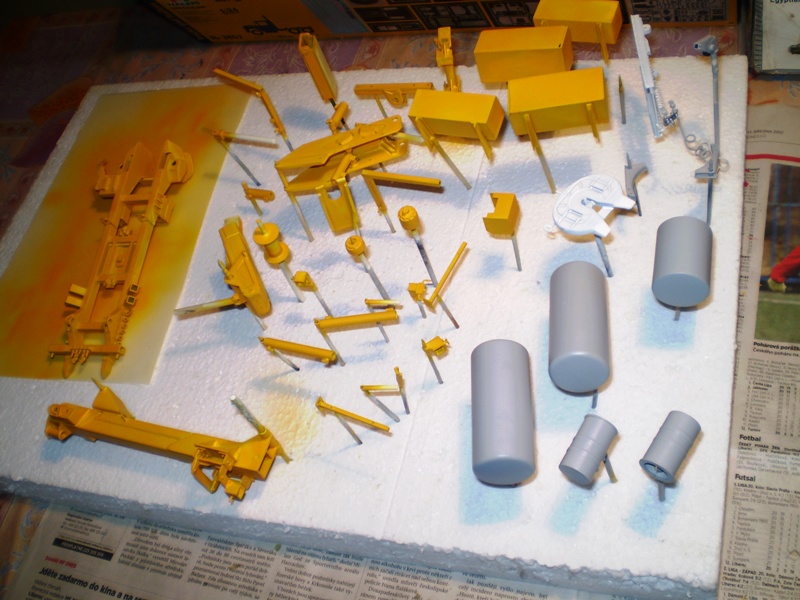
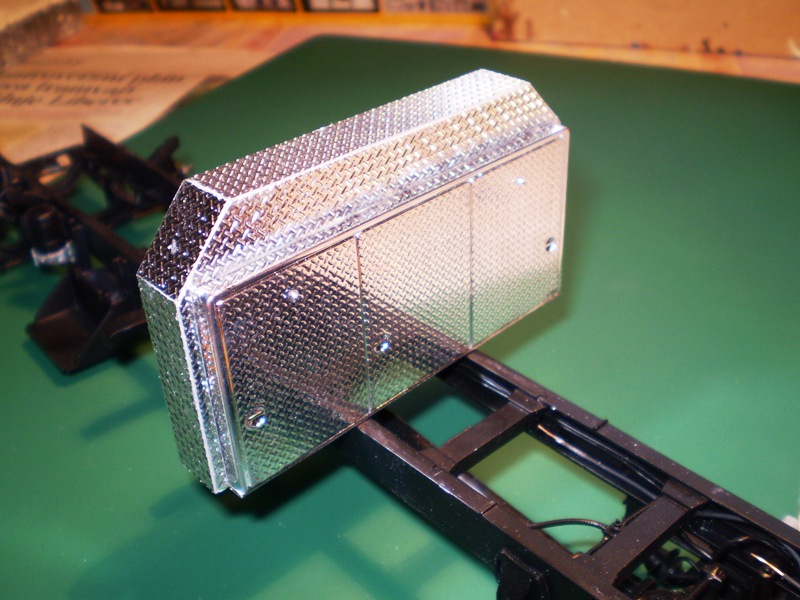
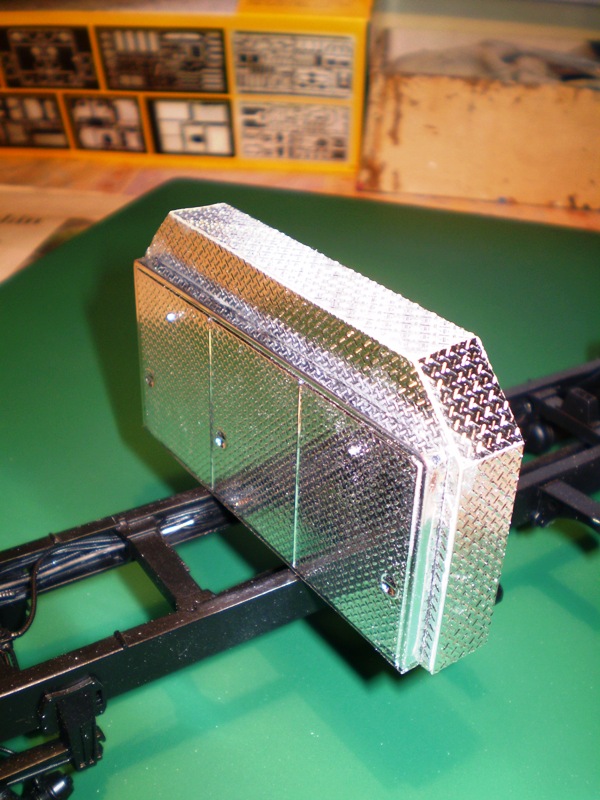
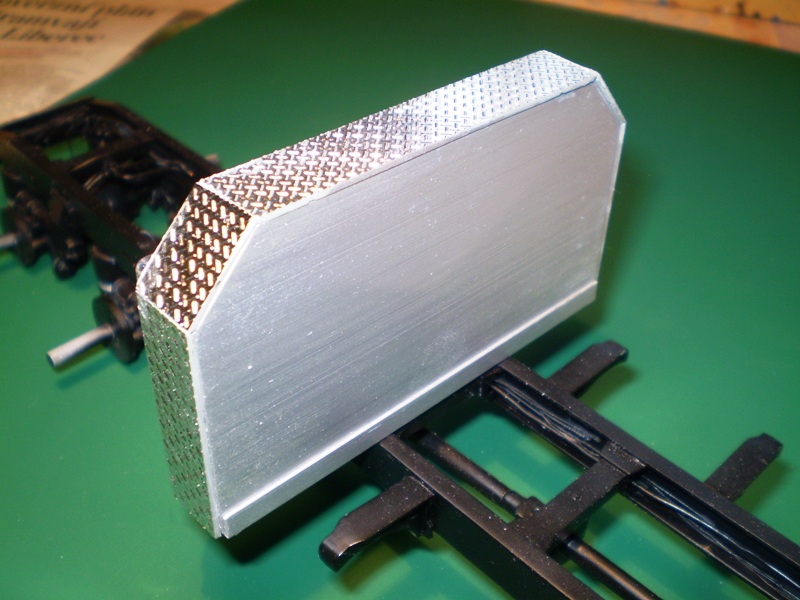
Okay, I try my luck with yellow. I will have to play with the finish a little but this is how it looks after the first coat. Besides the yellow DTU parts you can see the tanks, the brackets, the breathers and a reshaped fifth wheel ready for painting. The pair of fuel tanks are the kit parts while the short one for the hydraulic liquid is scratchbuilt. The headache rack is made of the RoG parts. I still need to produce the base for it. The back wall is cut to shape off the scrap piece of sheet, brush painted the humbrol silver. I did not take too much care of the looks as it will be facing the back of the sleeper. The conditions for painting are not excellent at this part of the year. I wonder when I am able to continue with the paint job. There is not much to do on the model till the painting is finished. Plus, I am waiting for some aftermarket parts, so the progress will not be any faster. But stay tuned, I will update now and then.
-
Paulie Hauling's "Love Machine"
truckabilly replied to Sergey's topic in WIP: Model Trucks: Big Rigs and Heavy Equipment
If you told me that these were pictures from a Mack brochure I would buy it with no doubt. It is incredible. Big respect from me. -
Auslowe Kenworth T904
truckabilly replied to Bennyg's topic in WIP: Model Trucks: Big Rigs and Heavy Equipment
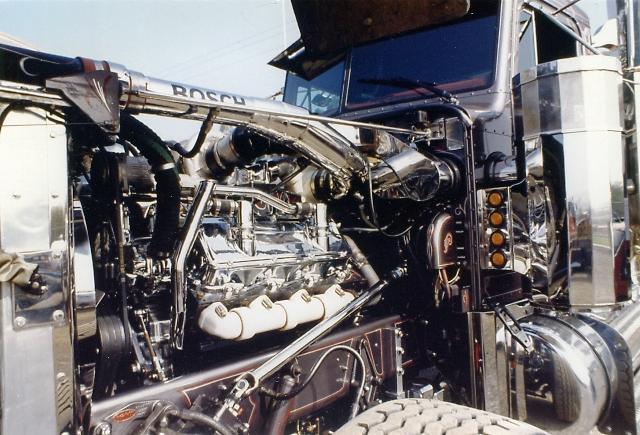
It looks great. What engine is it?