truckabilly
-
Posts
789 -
Joined
-
Last visited
Content Type
Profiles
Forums
Events
Gallery
Everything posted by truckabilly
-

Long Hauler 379 - 119
truckabilly replied to truckabilly's topic in WIP: Model Trucks: Big Rigs and Heavy Equipment
I have finished the rear fenders. I did not take pictures of making them. I used two spray can covers cut in the middle and shaped them with a help of plastic sheets and putty. I painted them with Alclad II chrome. This is how they turned out at the end. It looks more like a polished aluminium than chrome but that´s alright with me.
-
Long Hauler 379 - 119
truckabilly replied to truckabilly's topic in WIP: Model Trucks: Big Rigs and Heavy Equipment
Thanks a lot. Here is the cab with decals applied. The door rims and handles are covered with BMF. I used the aluminium foil this time but I haven´t noticed any difference from the chrome one. I added a few details to the fire wall. Things like wipers motor, AC accumulator, beeper, new washer bottle and a few lines. The air duct should be in line but Italeri thought different. I have noticed that much too late to fix it. Maybe some other time with a different model. A few shots of cab and hood and sleeper resting on the frame.
-
Long Hauler 379 - 119
truckabilly replied to truckabilly's topic in WIP: Model Trucks: Big Rigs and Heavy Equipment
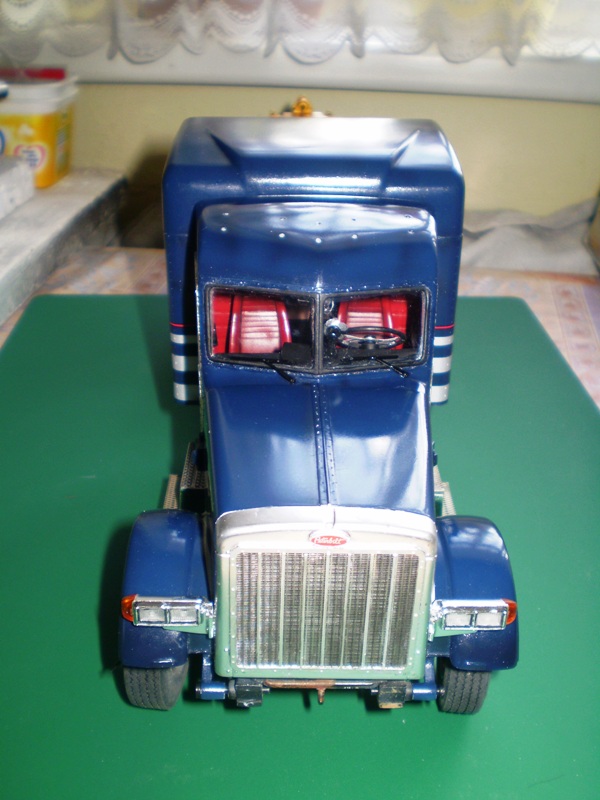
I tried to come up with a very dark blue colour and I think I did. But it appears a lot more lighter in the pictures than it is in reality. The flash ruins it a great deal but even with the flash off it looks much brighter. The first picture is probably closest to actual shade of blue.
-
Thank you for your positive replies. I moved a bit forwards with this build again. One of the shortcomings of the kit in my view is the thick windows framing. There is no such thing in the real bus. It is more like a wall with windows cut in. In order to get a look like that, I covered the windows with a 0.3 mm sheet which I glued to the frames and then I cut off the windows. Now with a surfacer applied it looks like this. It needs a bit more work on the shape and surface but I think that this modification helps the interior look better.
-
So, here is the weathered engine bay. I sprayed well diluted shades of brown and grey humbrol enamels over the red color as well as the AK Interactive enamels like streaking grime or fuel stains. This is a brake valve under the cab floor. A sort of... It won´t be much visible behind the grill. But it is there to fill the space under the cab. The surrounding panels are only brushed for the same reason. It won´t be visible. I had to clean this wall six times. For whatever reason I could not get rid of some debris. And when it finaly looked satisfactory, a silver finger print appeared on there. So... this is after the final cleaning. The stairway tower is in place for good. The aluminium strips are partly made of BMF and the rest is painted with GSI Alumine. Instead of time-table I framed in a truck scheme from the KFS decal sheet. I did not have the time-table. All for now. Thanks for looking.
-
Stepp´s CAN DO
truckabilly replied to truckabilly's topic in WIP: Model Trucks: Big Rigs and Heavy Equipment
Thank you guys for positive feedback to my old build. I took this model to the Panthers Model Show, one of the local contests, back in 2012 and I ended up in the third place. It was a category which combined the 1/25, 1/24 and 1/87 scales. I learned a lot making this model. Thank you, again. -
You are doing a great job on this one. Some day I hope to make my own engine out of some scrap plastic too.
-
Okay, thank you Geoff for the info. This way or the other, my bus has the cover fitted already and I think I will leave it there. After a few weeks of thinking of the outside colour for the bus, I´ve chosen the RAL 3002 that is reportedly used by London Transport for local colour repairs. It is two-component colour used in 1:1 world. As such, it gives a much deeper shine, that it should be on a model. I will handle that later. I sprayed these first panels separately because I need them to: A- complete the engine bay B- fit the inside left-hand board of the lower deck to it I took the pictures in poor lighting conditions. We have heavy rains here these days. I will try to soften the shine a bit with filters and post-shading. The engine bay will be covered with some grime and dust.
-
Nice conversion. You are on the right way to build an attractive and clean model.
-
Long Hauler 379 - 119
truckabilly replied to truckabilly's topic in WIP: Model Trucks: Big Rigs and Heavy Equipment
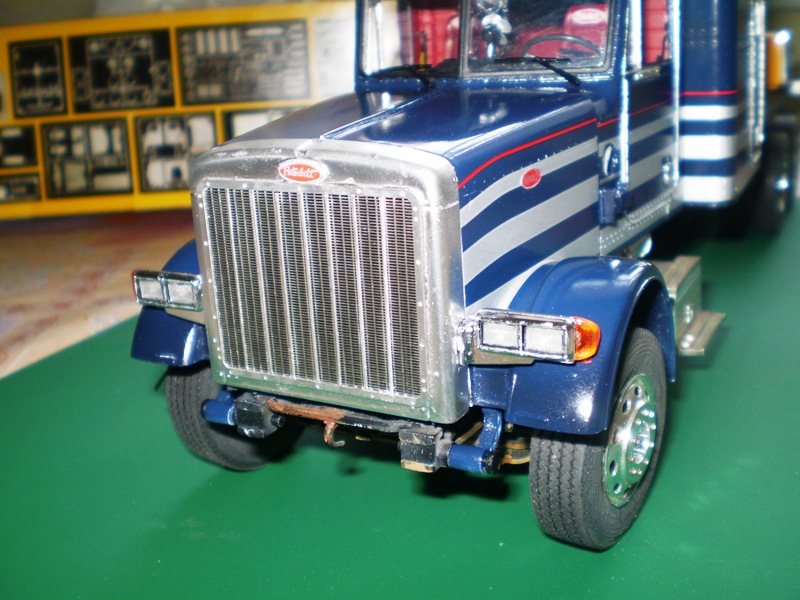
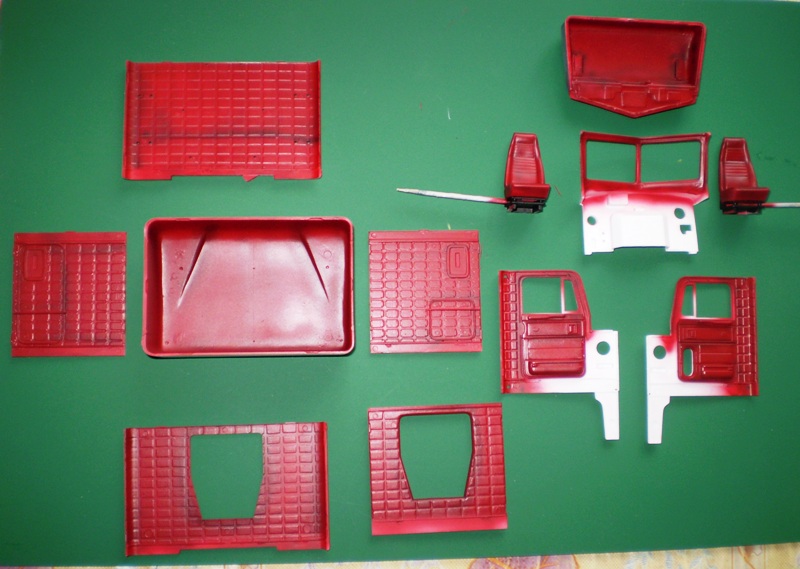
Thank you. The cabs and hood are getting ready for paint booth. The first layer of primer is on. The chrome parts are ready and waiting to be installed. The molded stripes are off and they will be replaced by photo-etched parts. The breathers and exhaust cover mesh is also photo-etched. Everything is sprayed with Alclad II Chrome.
-
Long Hauler 379 - 119
truckabilly replied to truckabilly's topic in WIP: Model Trucks: Big Rigs and Heavy Equipment
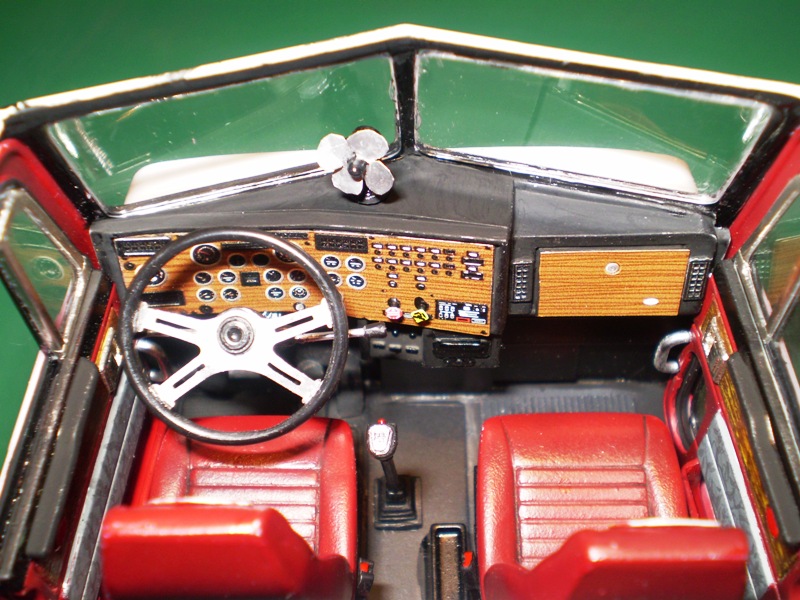
My attempt to create a fan in the cab is a failure. I have the fan but not the cover. I tried several times to make one but I gave up. Some interior pics: Using the ultra roof required some fitting effort but nothing too serious. The standard grill has 3 vertical bars. I have seen 7 bars grills as well. I made mine adding four more bars from the spare PE sheets. I won´t use the sleeper extensions. So, the appearance of the truck should be something like this:
-
Dodge Big Horn Dumper
truckabilly replied to Mopar - D's topic in WIP: Model Trucks: Big Rigs and Heavy Equipment
Nice looking rig. -
Long Hauler 379 - 119
truckabilly replied to truckabilly's topic in WIP: Model Trucks: Big Rigs and Heavy Equipment
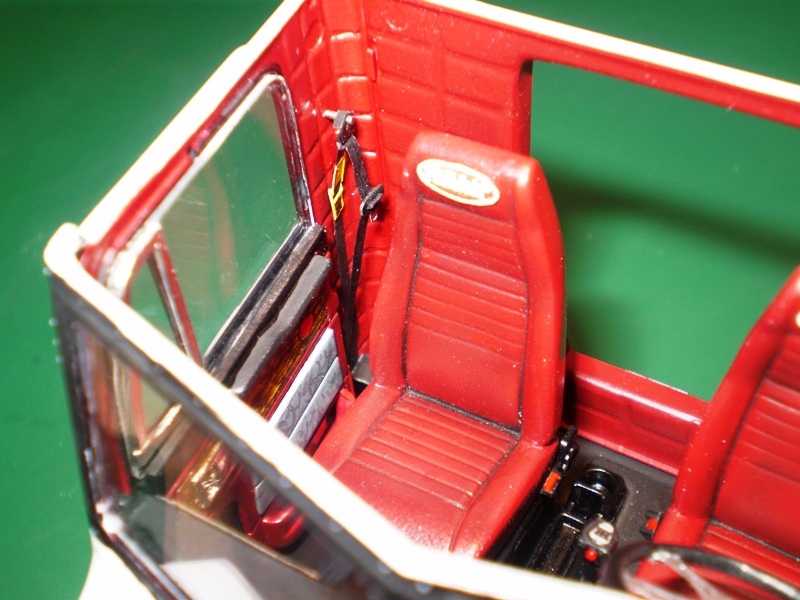
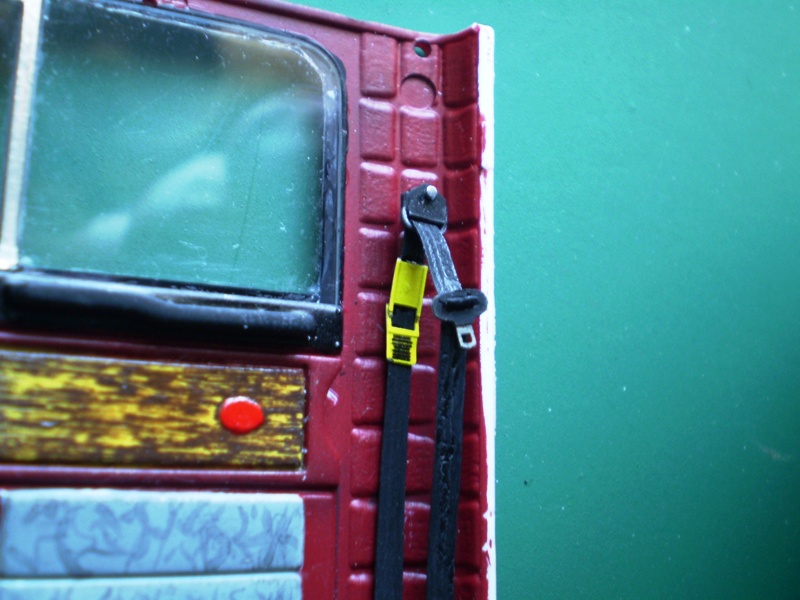
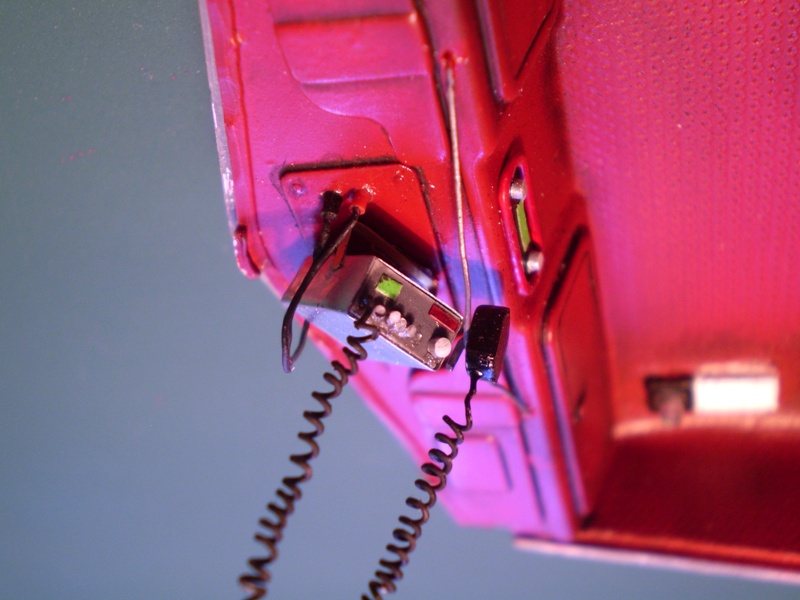
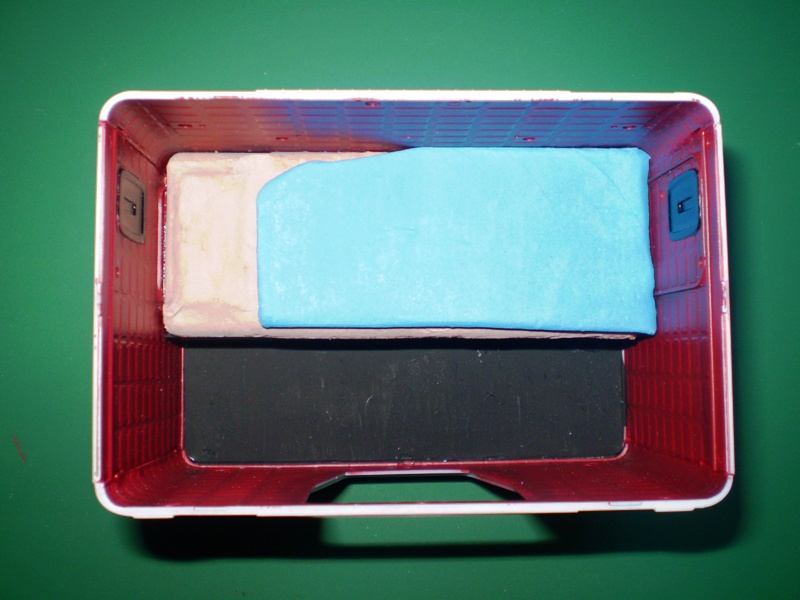
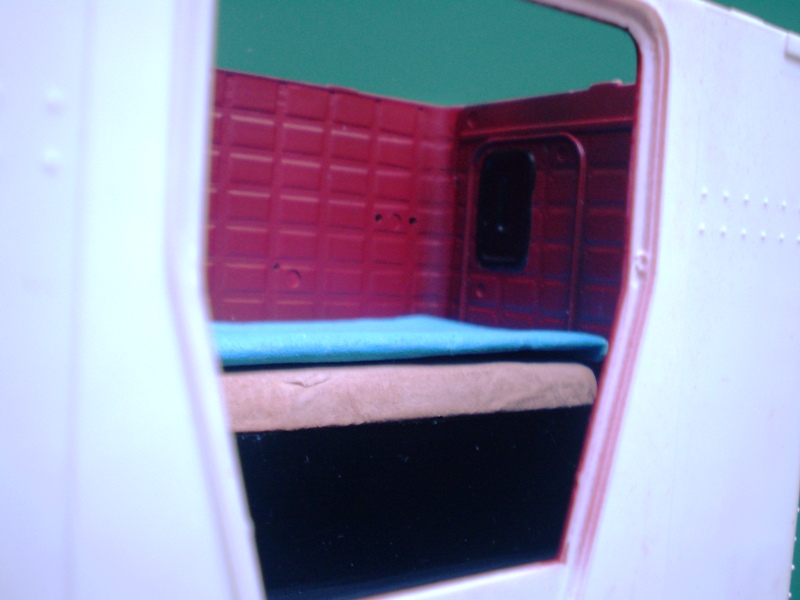
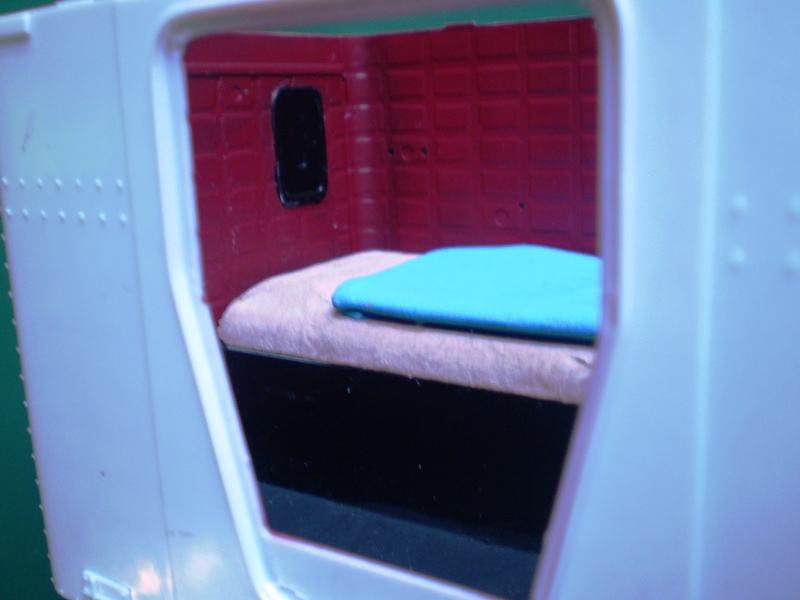
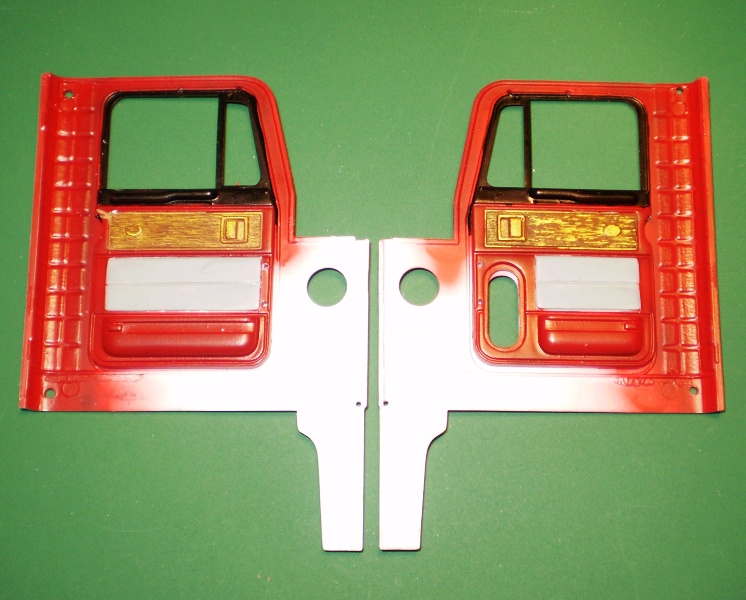
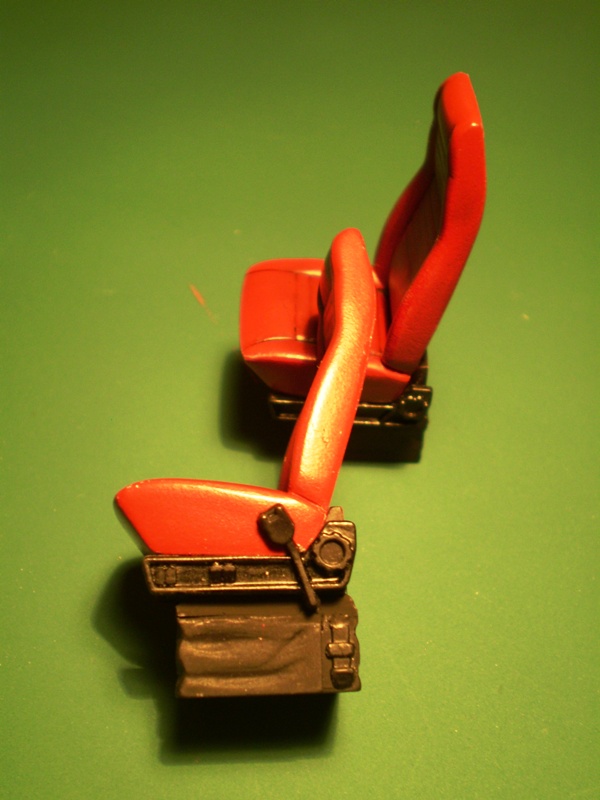
A little bit of progress on the interior. Another nice detail on the PE sheet for Peterbilt is a pair of the seat belt buckles and comfort latches. Unfortunately, the belt retractors and the shoulder sash guides are missing. So are the belts. I made mine out of paper painted black and scratch built the missing parts. The wood grain patterns that you can see on the door panels are painted brown over yellow using a sponge. I produced the red oval logos using decals as templates and placed them to the seats and the floor mat in front of the passanger seat. The PE sheet brings even such a tiny detail like the shifting pattern on top of the gear stick. I added a CB and FM radio to the interior details of the ultra-roof. I did not take too much care of the sleeper interior as I won´t open it. But I did not like the molded mattress, so I covered it with a sheet and blanket.
-
Long Hauler 379 - 119
truckabilly replied to truckabilly's topic in WIP: Model Trucks: Big Rigs and Heavy Equipment
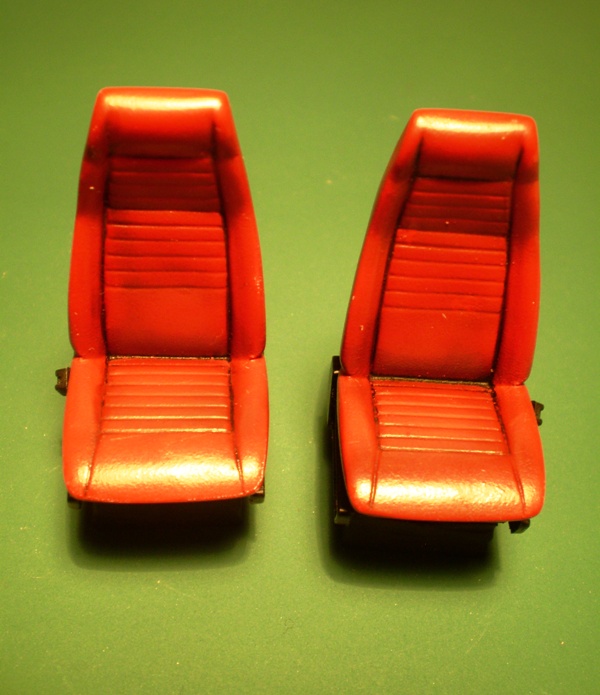
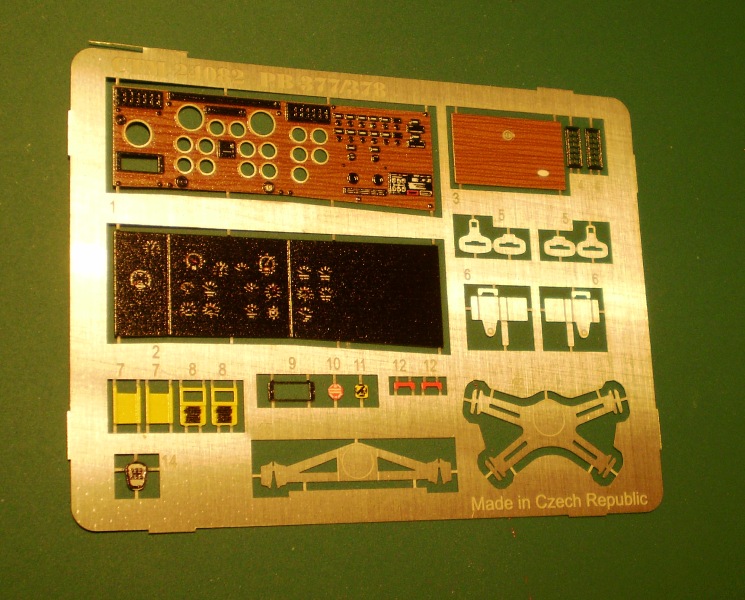
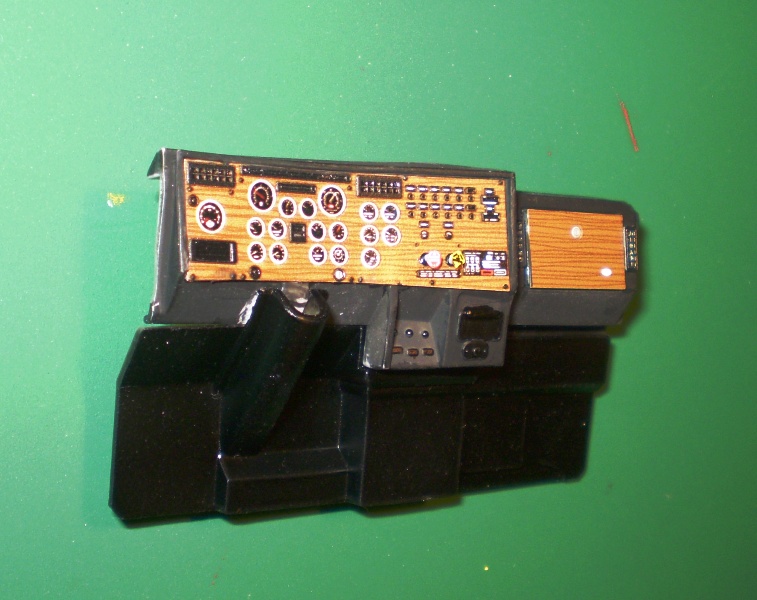
Hello everyone. The Long Hauler Pete is back. I left this project rest for a while and now I am kicking off with the other end of the truck. I was waiting for some items to arrive. Now the ultra roof and the coloured PE dashboard is on my work bench. So, there is no excusse for not carrying on. After spraying the London Bus interior I have some colour left. So, I used it for the Peterbilt interior as well. I got me these resin seats which I attached to the kit base. The seats will be a little higher which is very desirable for the box seats sit a bit too low in the Pete cab. The CTM released a new set of the photo-etched parts for the Italeri Peterbilt interiors. The set includes the coloured dashboard, two kinds of steering wheel spokes, the safety belts buckles and shifting pattern for the gear stick. The dashboard is georgeous. Not completely flawless, but surely the best that you can get. I took the pictures at night under my desk-lamp. It doesn´t do the justice for the CTM work of art. Check their offer to see the better pics. http://www.liaznavzdy.cz/nedtrans/pdf/04-2013.pdf
-
Another step forward - the ceiling. Two ceilings, actually. It is the first time that I took a shot at preshading. I have never done that before. Those of you who master this technique at the top level will probably laugh. But I am happy that I managed to hit the black lines at least this way. My effort will not be much visible on the down-facing ceilings. But I wanted to try my first preshading on something less exposed before I will dare to make it on a cab or something like that. Cheers.
-
Ladies and gentlemen, on board please! The upper deck has all the seats installed. I tried to fade them and shade them so that they would lose their brand-new shine. Unfortunatelly, the pics do not show this too well. The flash reduced the effect quite a lot.
-
A little more pictures:
-
The area under the driver´s cab seems to be a little empty comapared to the real Routemaster. So I made a steering box and placed it in its place. It will not be that much visible through the front mesh. But it fills the area a bit more anyway. I cannot stop thinking of the emergency exit through the floor of the upper deck. It is covered by a plate like this. This is my version. It will not be that shiny.
-
Since I will use the PE grill, I added a few details under the driver´s cab. This area is not complete yet. Also the stairway is assembled. The aluminium stripes will be covered with BMF.
-
Another phase of the seats saga began. The decals. I cut them out and organised two separate groups for the left and right side. Just as the seats and frames. The decals represent textile fabrics. No reflection is desired. Therefore I sprayed all the seats with Humbrol´s matt varnish No. 49. The photo flash produced some glare anyway but the seats look okay in normal light. I glued them to their frames.
-
I am back with a little bit of progress on the double-decker bus. I engraved the transmission cover on the floor of the lower deck. An emergency exit should be on the front left side of the upper deck. But the pictures of the real thing show only riveted floor mats and no visible cover. And a seat is located in that place too. So, I do not quite understand how the emergency exit is supposed to actually work. I left the the upper floor without any change. The wheels are very nice in the kit but the tires are not. No lettering on the sides and the only thing that holds them in place is the ribbing on the wheel´s perimeter. The rim is everything but tight. Fortunatelly it looks okay on the outside. But I have some reservations of the system as such. With a loose tire like that it is very easy to do this: Am I supposed to glue the tires to the wheels? Not per instructions, that´s for sure.
-
That is a very nice work. I like the dash and rivets. Can´t wait to seeing more.
-
Painting the seat frames is almost as amusing as cutting them off the sprue and cleaning. The frames are painted with chrome alclad and red humbrol. The alclad requires a black undercoat which I sprayed over the frames at once. I tried to minimize the waste of alclad colour, so I painted the frames one by one this time. And then I painted red humbrol with a brush. Two layers because the black undercoat made the red look a bit dull. I started painting the seats today. I will post pictures when they are finished. I hope I won´t mess the decals.
-
GMC Astro AMT 1:25
truckabilly replied to Pavel A.'s topic in WIP: Model Trucks: Big Rigs and Heavy Equipment
Nice job with the photo etched parts. I still do not have a bending tool. So far I have been able to shape the parts without it. But I believe that it is a great help and time saver too. -
Autocar Sleeper Cab
truckabilly replied to 20dakota04's topic in WIP: Model Trucks: Big Rigs and Heavy Equipment
That is a very nice build. I watch them pics over and over. I like the details and stains on the engine.