truckabilly
-
Posts
789 -
Joined
-
Last visited
Content Type
Profiles
Forums
Events
Gallery
Everything posted by truckabilly
-

Pair of 8V71T Detroit Engines
truckabilly replied to Old Albion's topic in WIP: Model Trucks: Big Rigs and Heavy Equipment
These are very nice engines. I like the different set up for each one of the two. -
Kenworth-Not my day!
truckabilly replied to signguy2108's topic in WIP: Model Trucks: Big Rigs and Heavy Equipment
My sympathy to you. Even though it must be annoying, like the others said - it can be fixed. It is clear that the model is nice. Just a little detour on its way to exhibition. Gonna be nice and shiny. -
Long Hauler 379 - 119
truckabilly replied to truckabilly's topic in WIP: Model Trucks: Big Rigs and Heavy Equipment
Photobucket has made some change. Even though they say that all my pics are safe, there is some problem, apparently. Everything is okay on my computer though. I am sorry if my pics do not work. Let me try it through the "attach files" feature.
-
Long Hauler 379 - 119
truckabilly replied to truckabilly's topic in WIP: Model Trucks: Big Rigs and Heavy Equipment
Now all the main parts are in surface primer. Now it is time to think about the colour. What colour of DTU would best match to a dark-blue truck? Yellow, red, orange or black? What do you, guys think? -
Nice details on the engine. The cable ties are cool. The belts in front look kinda rough though. Chris, have you tested the cab on the frame with the engine in place? I had problems with the firewall clearance once I added the tubing to the back side of the engine. But it was a Peterbilt kit with DD 60 Series in it. Just make sure your FLC does not have a problem of this kind.
-
Freightliner FLA question
truckabilly replied to truckabilly's topic in WIP: Model Trucks: Big Rigs and Heavy Equipment
Thank you Steve and everyone for your help. The information and explanation is very welcome and usefull. I hope it turns out in a good conversion at the end. If there is some more info, dimensions, detail pics... I am all ears. Thanks again, Jarda -
Can somebody tell me, please, what was the width of the 1990´s FLA cab? I mean this version. I wonder if it differes from the one represented by AMT White Freighliner model. Thank you.
-
Any Peterbilt of Italeri is a modeler friendly kit. I did not find any fit issue or incorrect shape of any part. There is a lot less work with cleaning the parts compared to RoG Peterbilts. The dashboard molding is not quite correct but the reissued version has a decal with the instruments correctly located. The seats in the cab should be a bit higher. The hubs on drives are just generic, far from being realistic. Other than that, it is a great kit. The other parts that you want to add like the pusher axle, headache rack and that, try to look for them at aftermarket casters. E-shops like KFS, A.I.T.M.... If you look around the forum, you will find some tips and links.
-
Long Hauler 379 - 119
truckabilly replied to truckabilly's topic in WIP: Model Trucks: Big Rigs and Heavy Equipment
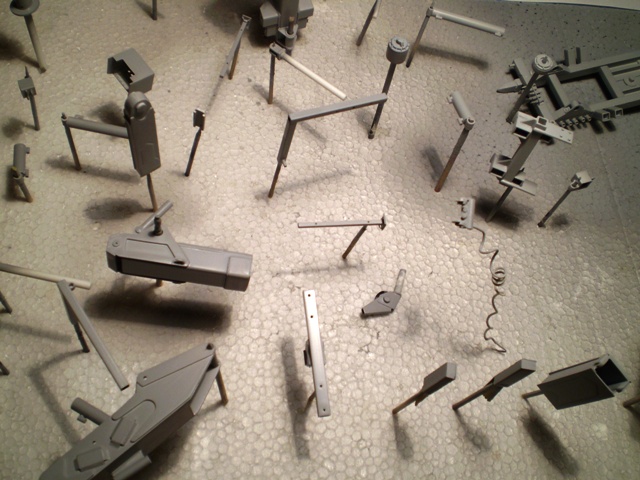
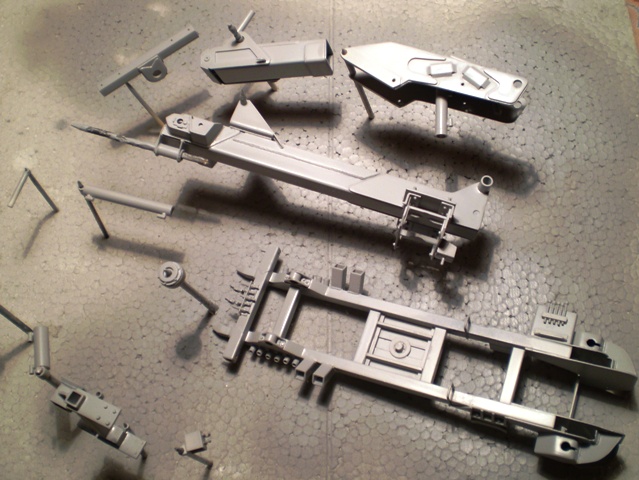
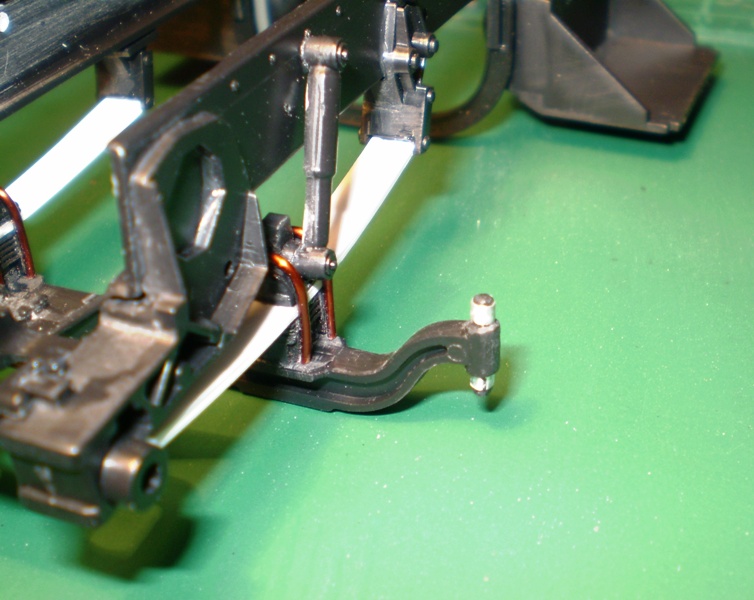
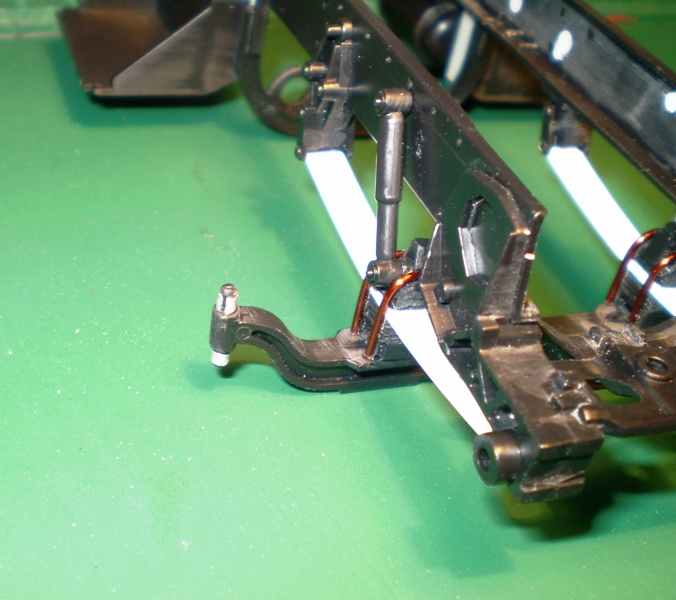
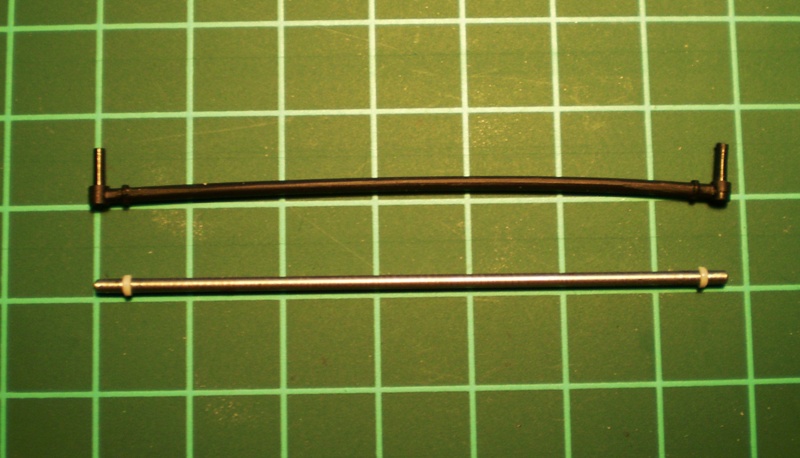
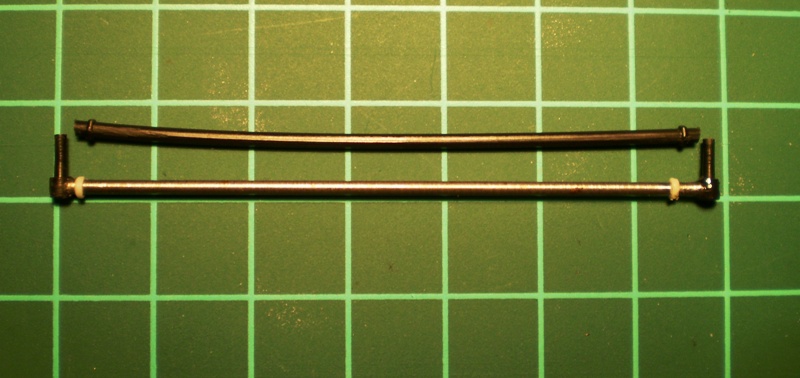
Thank you Gordon and Tony. Now I have all the main parts ready, so I tested them if they fit the way they are supposed to. Well, they don´t. I must have made a mistake somewhere. There is 5mm difference in the length of either the subframe or the boom. This resulted in the different angle of the hydraulic cylinders. The ones that lift the boom. So, I had to cut the subframe and extend it 5mm more. It was not glued yet when I took the pictures. Here is the frame cut with extending parts. They are still loose on the wires. Here you can see the extending parts in the rails. This is supposed to be the lower position of the boom. Will have to shorten the hydraulic cylinders to get the horizontal position. This is the underlift in full extend. With the subframe extended the tower fits better inbetween the guiding plates. These two pictures show the boom in the upper posotion. This is where I am now. I hope to have next update soon. -
It looks nice so far. I like the colour and stripes. And yes, Italeri hubs are horrible. They must think that all the big rig wheels are the same. I wonder what would happen if they tried this approach with the 1-35 scale military stuff. They would soon be out of bussines.
-
C-600 Dump truck
truckabilly replied to Mach1revo's topic in WIP: Model Trucks: Big Rigs and Heavy Equipment
Nice build. Shining cab, dull dump body. That´s how it goes with the work trucks. Cool. -
Long Hauler 379 - 119
truckabilly replied to truckabilly's topic in WIP: Model Trucks: Big Rigs and Heavy Equipment
Thanks a lot for your comments. The progress on the DTU is slow but steady. I have the boom assembled, the winch bed and the winch itself. Still a few details to add, though. I have two of the three telescopic parts of the low lift. They are simlified a bit and the end with the hole will be reshaped to match the real deal better. -
Revell "snap" W900 custom
truckabilly replied to BigBad's topic in WIP: Model Trucks: Big Rigs and Heavy Equipment
Looks like a beginning of a cool build. Nice job so far. -
1970 Peterbilt 352 Pacemaker
truckabilly replied to Old Albion's topic in WIP: Model Trucks: Big Rigs and Heavy Equipment
Impressive power plant! -
And isn´t it? It really does look that way. The truck is incredibly clean.
-
Peterbilt 359 WIP
truckabilly replied to Anirudh Arun's topic in WIP: Model Trucks: Big Rigs and Heavy Equipment
Nice and clean! The only thing is the yellow-red coding of the coil hoses (susie). These color codes are used in Europe. If your model represents a truck based in the USA you should have red and blue. Other than that... perfect. -
359 Peterbilt (customised)
truckabilly replied to Cool Hand's topic in WIP: Model Trucks: Big Rigs and Heavy Equipment
This is shaping up pretty nice. You are doing an excellent job. -
My breath stopped for while... that´s really impressive! Wow! Jarda
-
Long Hauler 379 - 119
truckabilly replied to truckabilly's topic in WIP: Model Trucks: Big Rigs and Heavy Equipment
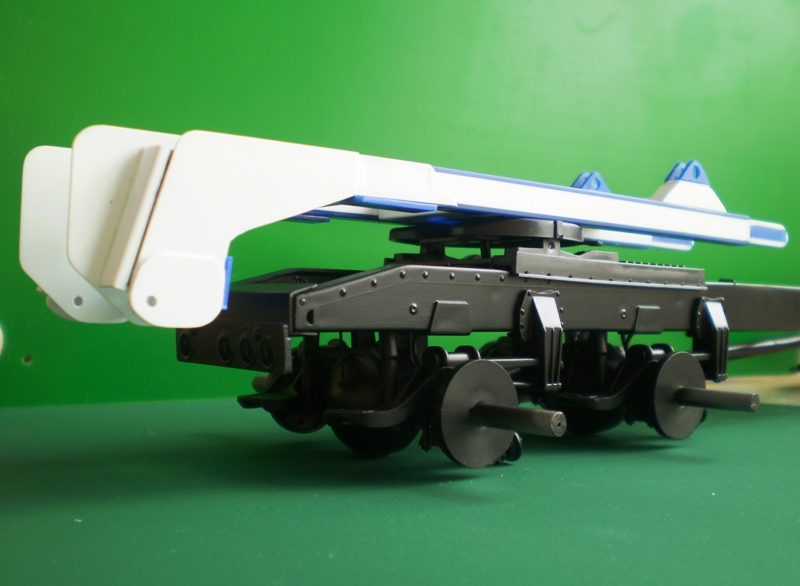
Thank you, Colin. Now I am looking for some info on the wet line kit. I guess I need one for a truck with the DTU. What do I need to replicate? 1. PTO - it is located on the bottom side of the transmission, right? 2. Hydraulic pump - is it attached directly to PTO? Or do I need a drive shaft? If so, where is the pump located? 3. A tank - sometimes it is mounted behind the cab, sometimes on the frame side, just like a fuel tank. Is there any rule for that? Any other important things? If someone has any knowledge about this, would you please share with me? I´m all ears. I tried to find a picture of those components mounted on a truck but all I found was the tanks. Thank you for any info. -
Long Hauler 379 - 119
truckabilly replied to truckabilly's topic in WIP: Model Trucks: Big Rigs and Heavy Equipment
Exactly right! I am sorry Colin, it was not meant to be a lowboy. Here is another picture of a real thing. This picture shows the unit standing on its own. A truck sneaks underneath it the same way as when coupling a trailer. The 5th wheel and four other mountings make a tight connection. There is probably more systems on the market from more manufacturers. I haven´t seen neither of them except for the pictures. The Holmes units (or similar) can be found on European trucks too. I found this picture on some Dutch model web sites but there was no comment on it. I don´t even know the scale. Maybe it´s a diecast model, I don´t know I hope I make mine just as nice. -
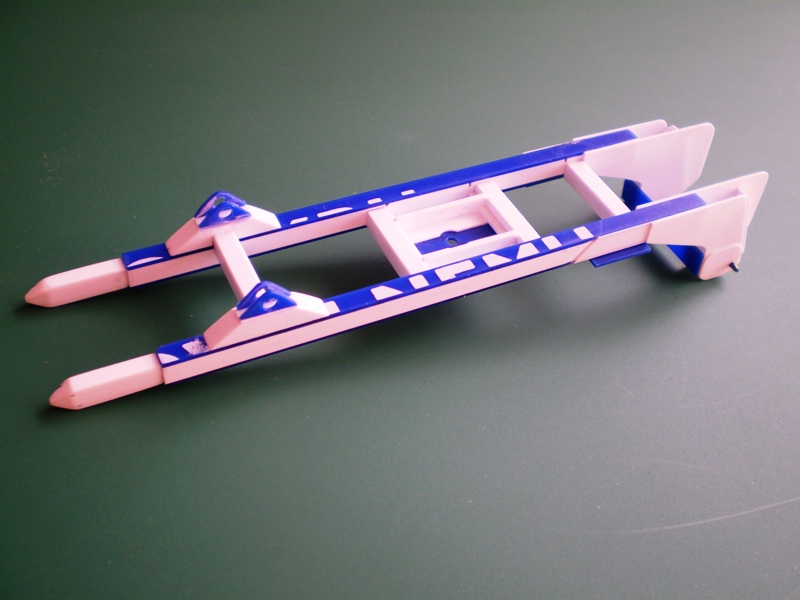
Long Hauler 379 - 119
truckabilly replied to truckabilly's topic in WIP: Model Trucks: Big Rigs and Heavy Equipment
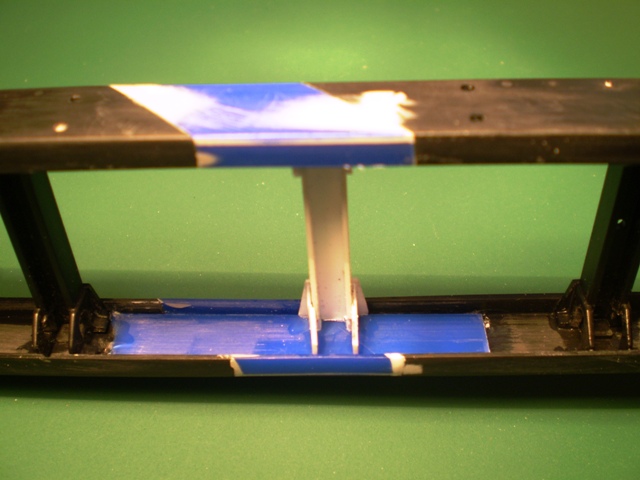
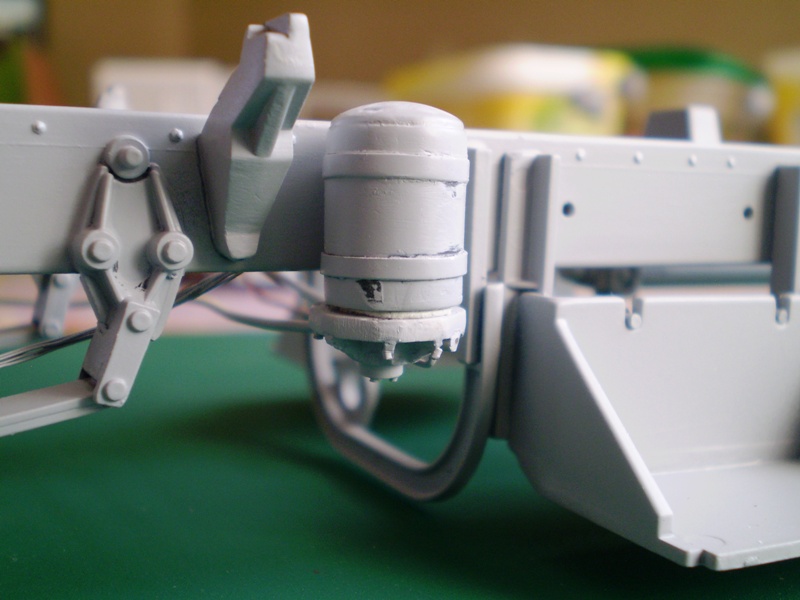
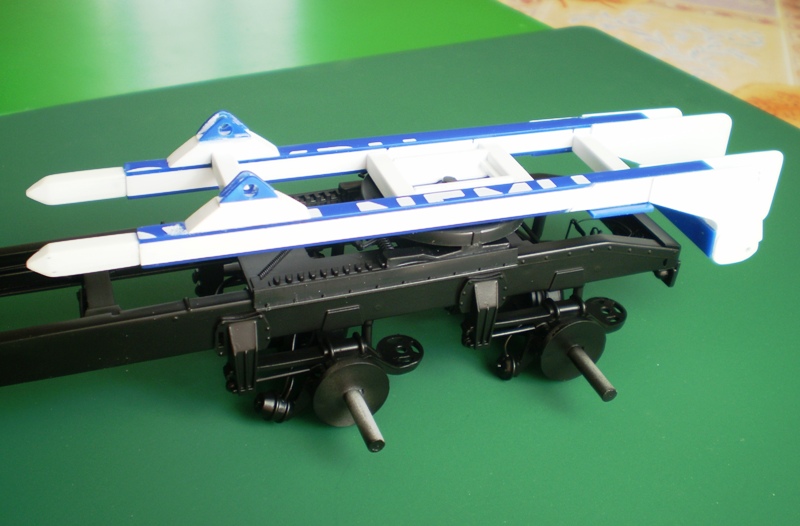
P.S. "Plastic People of the Universe" vis-a-vis The Velvet Revolution ! I would never expected something like this from your part of the world, John. Thank you very much for this reminder and also for your comment. The work continues with painting the frame. I was considering a different frame colour than the usual black for a while. But I want a dark blue cab so I think the black frame is the best choice after all. To make a liitle difference from a highway tractor I started working on a DTU. It is going to be a complete scratchbuild inspired by Holmes unit. Probably not 100% accurate as I have only a handfull of photos and a parts brochure. No dimensions, just my four-eyed judgement. I built a base of the unit using Evergreen channels and warning signs made of plastic... basicly 1mm plastic sheets. Still a few details to be added before it goes to the paint booth.
-
Autocar Sleeper Cab
truckabilly replied to 20dakota04's topic in WIP: Model Trucks: Big Rigs and Heavy Equipment
Nice work on the details and plumbing. I like the hinges too. -
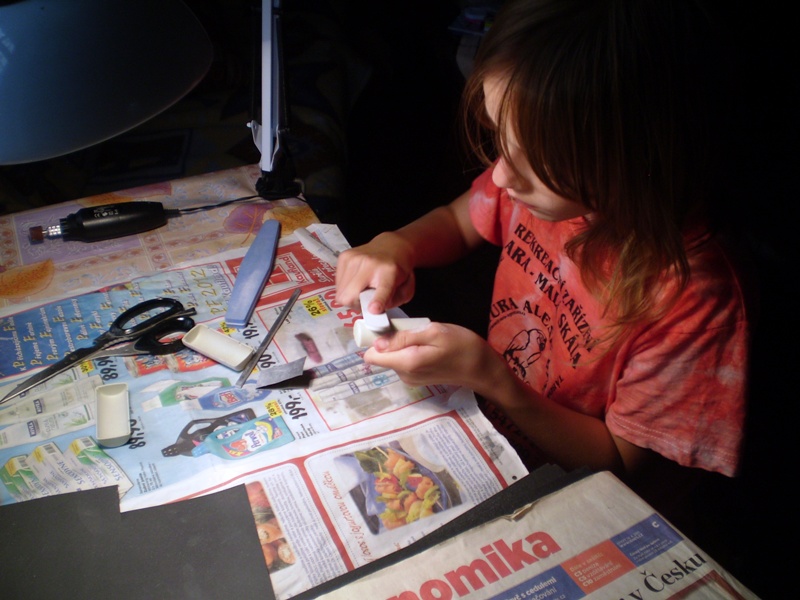
Long Hauler 379 - 119
truckabilly replied to truckabilly's topic in WIP: Model Trucks: Big Rigs and Heavy Equipment
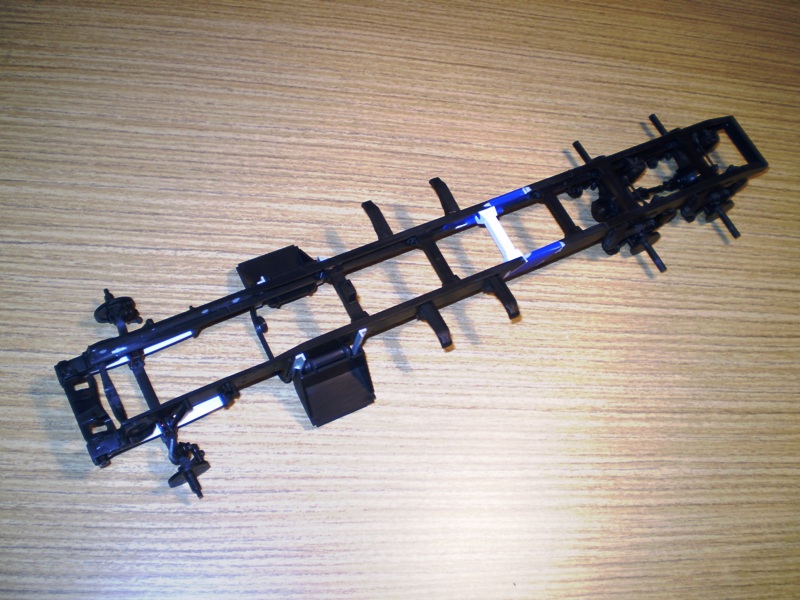
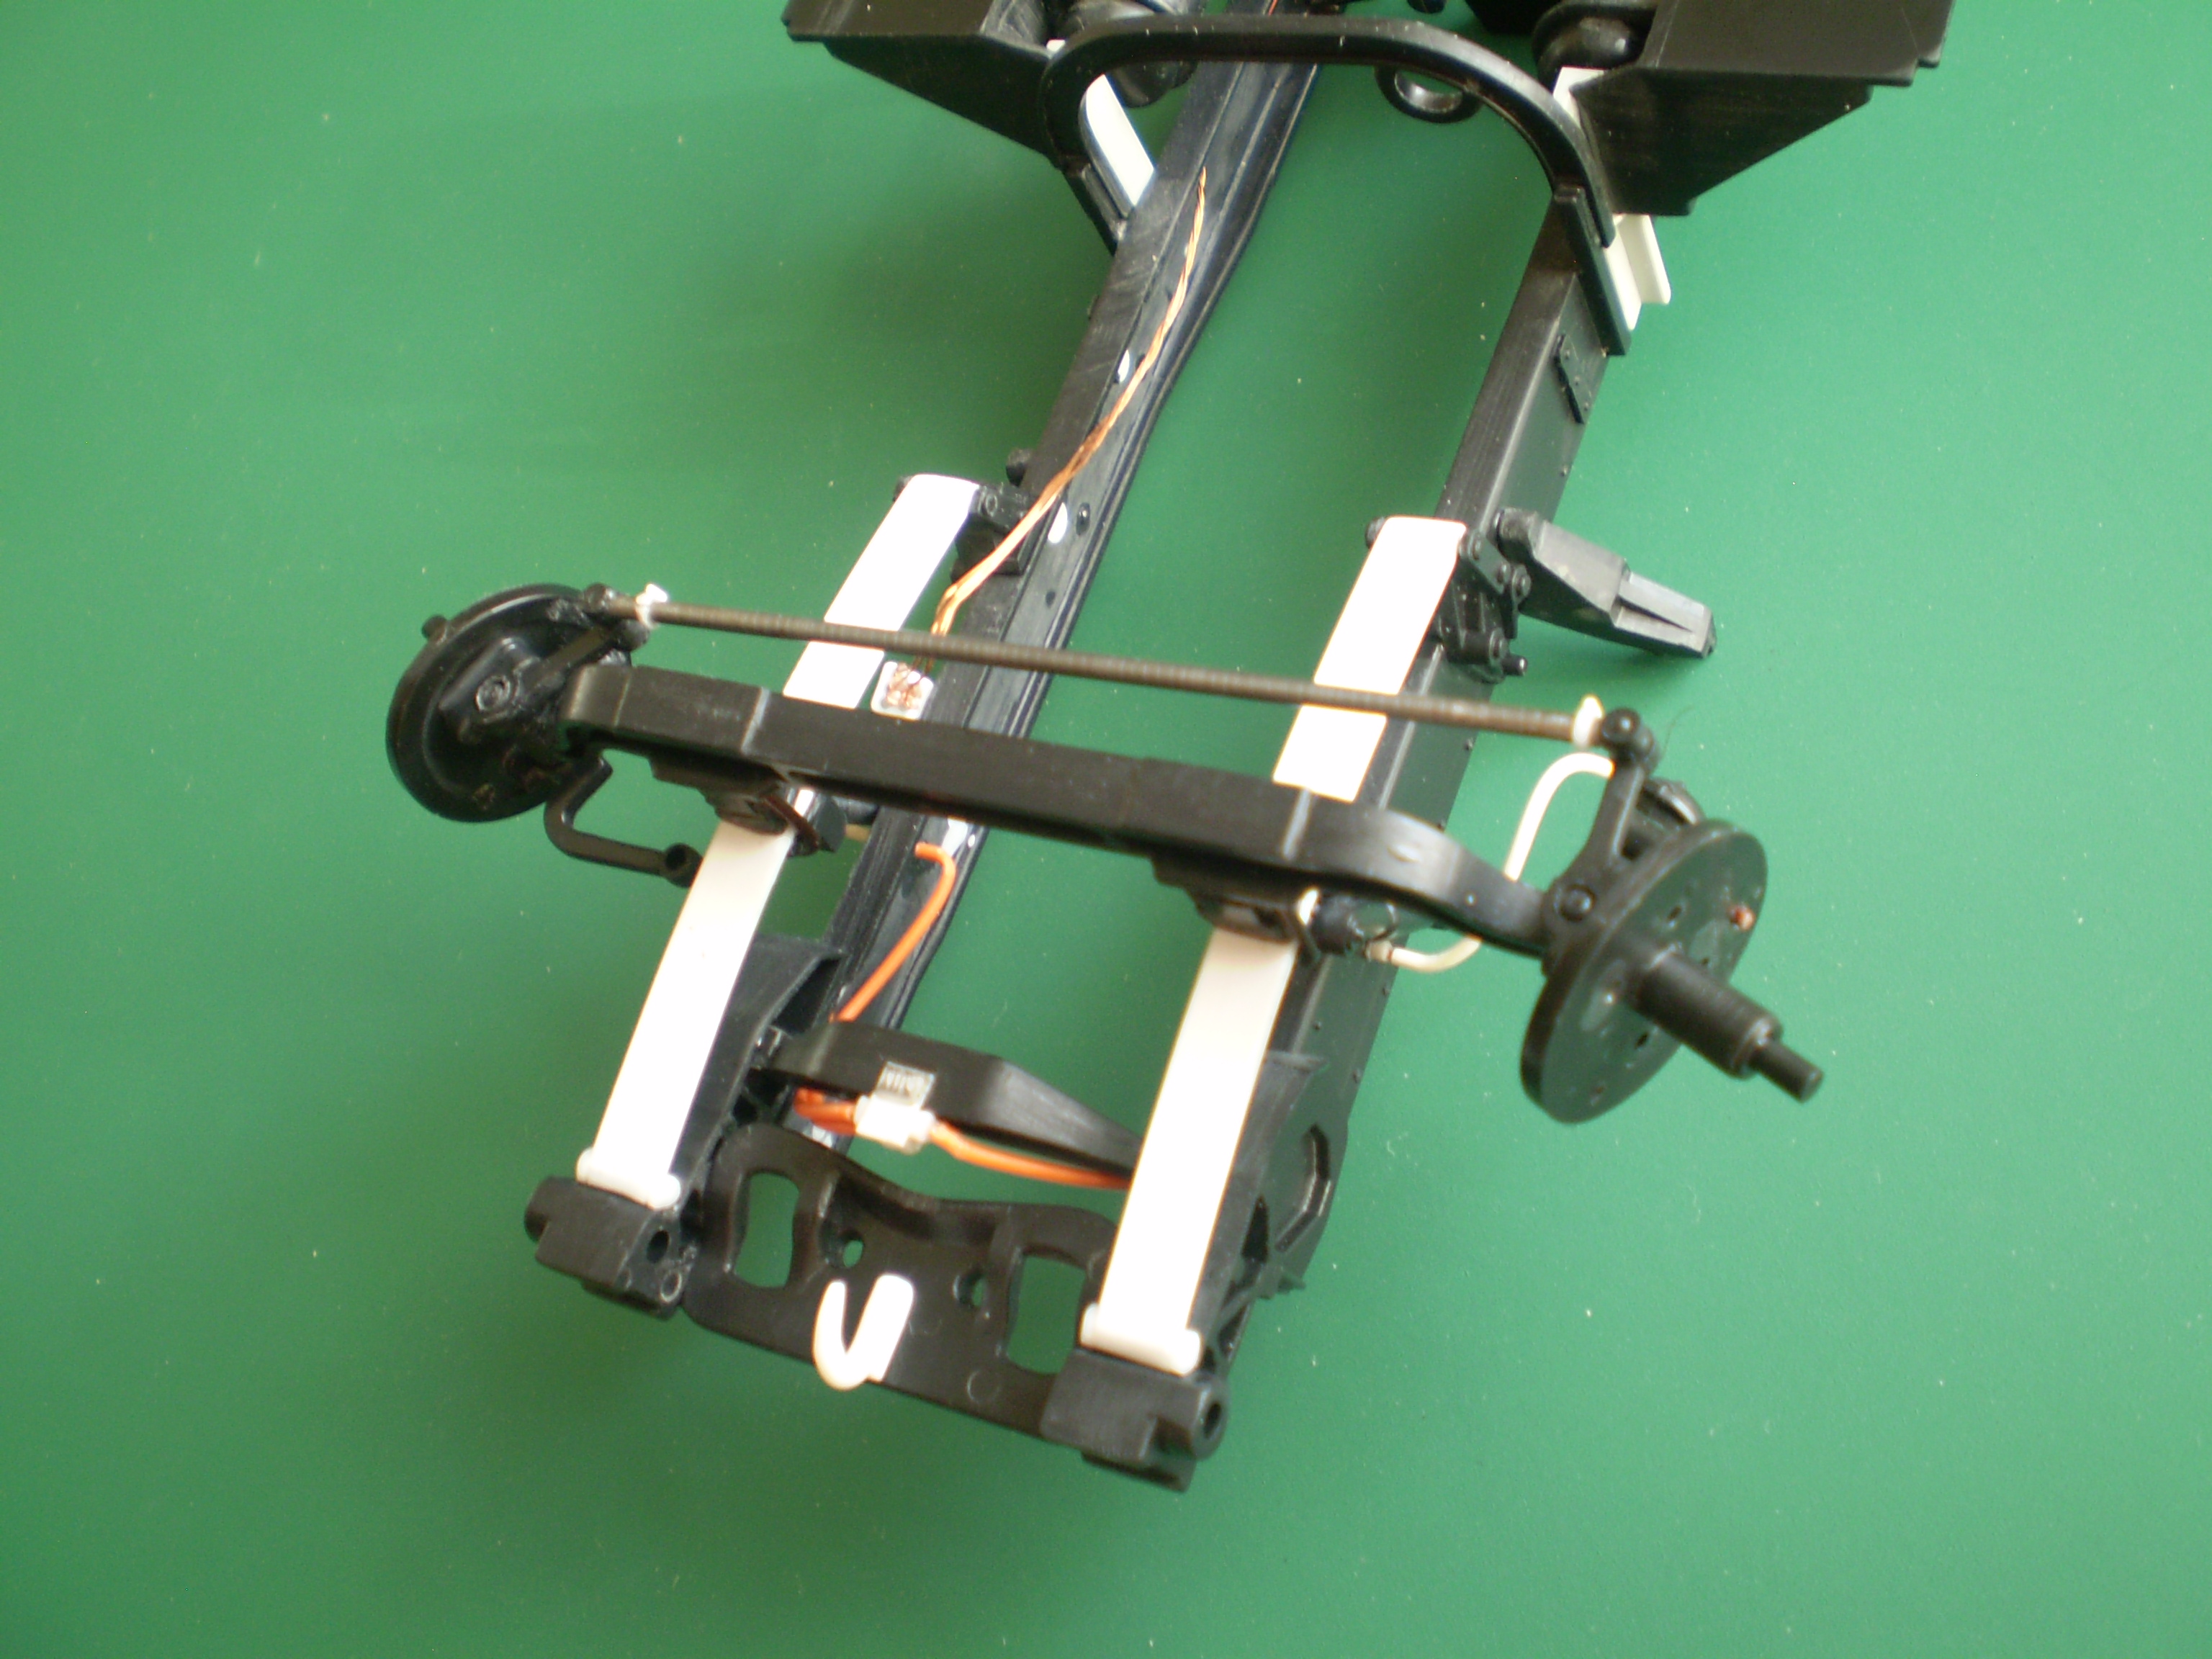
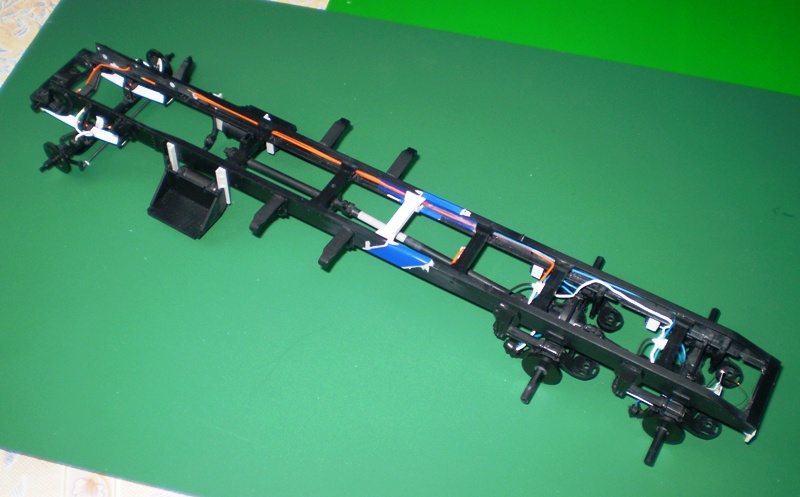
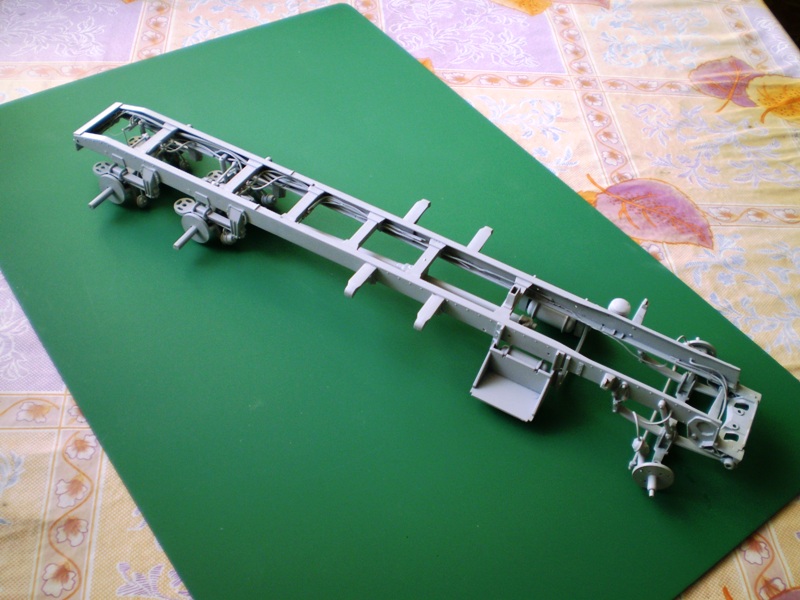
The whole frame... An unexpected help came from my daughter while I was working on the fuel tanks. She wanted to try some grinding too. She seemed to enjoy it. I hope she doesn´t plan to replace me behind the workbench. -
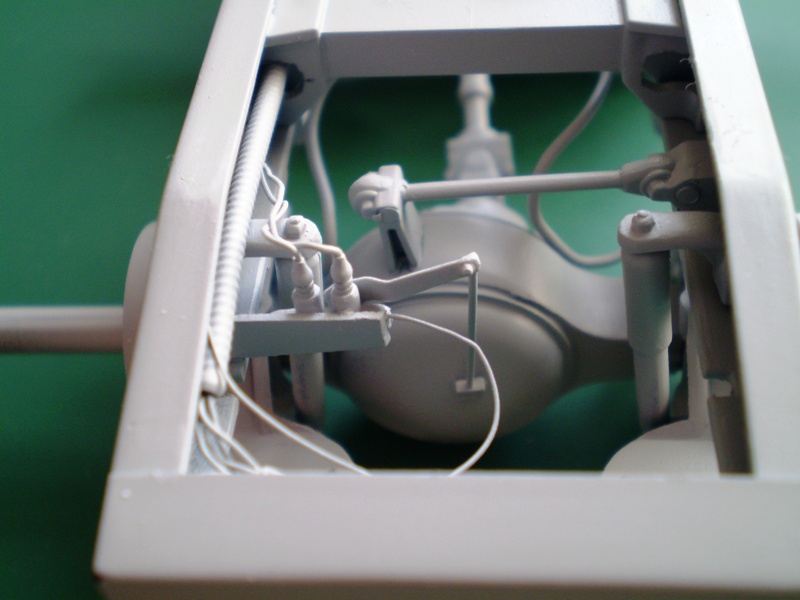
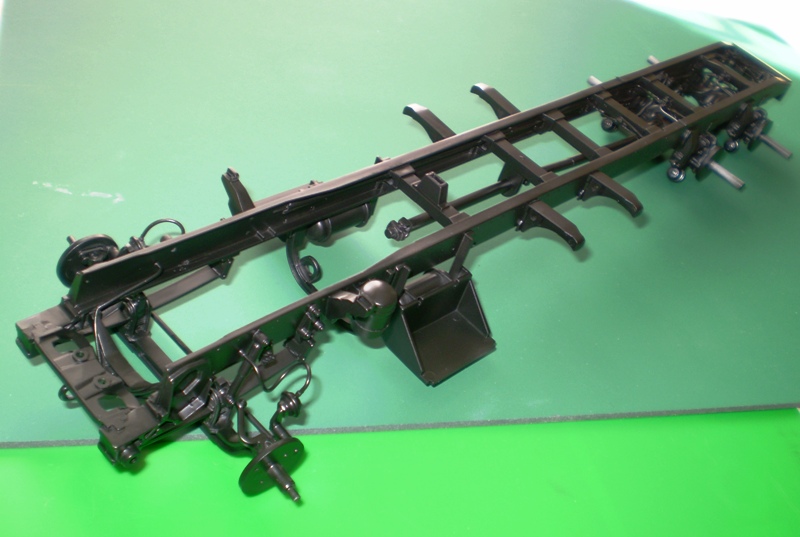
Long Hauler 379 - 119
truckabilly replied to truckabilly's topic in WIP: Model Trucks: Big Rigs and Heavy Equipment
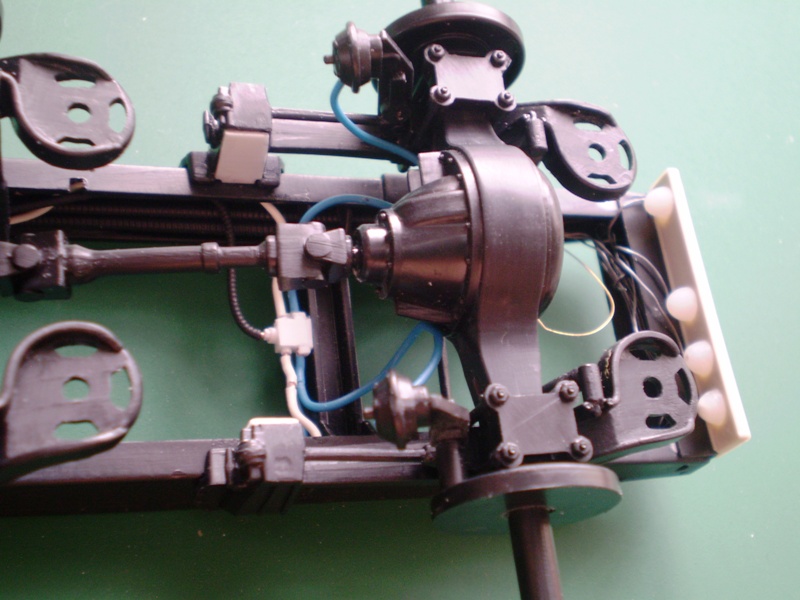
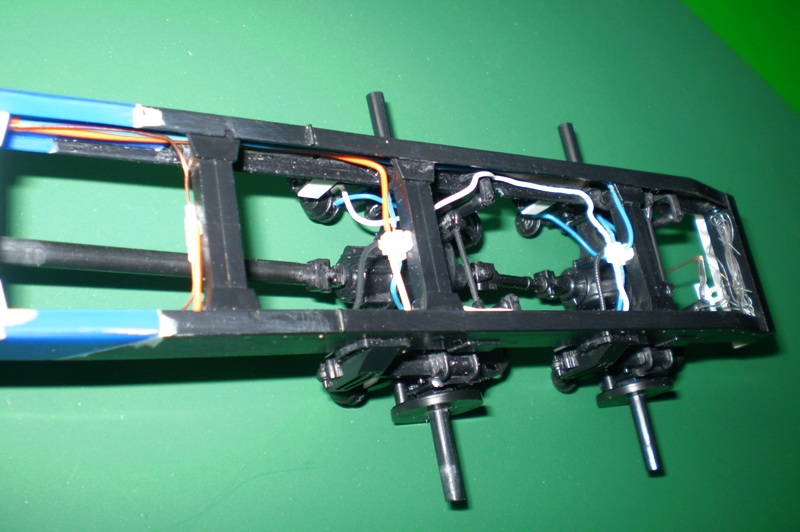
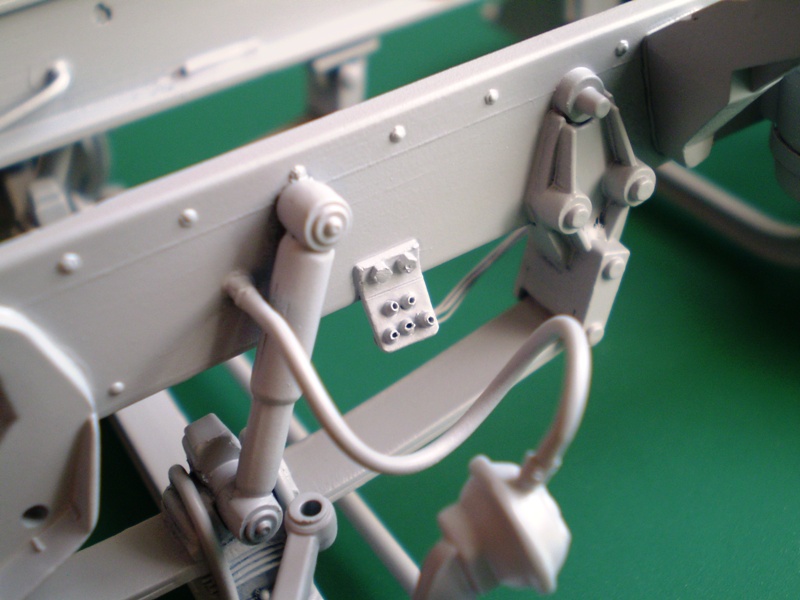
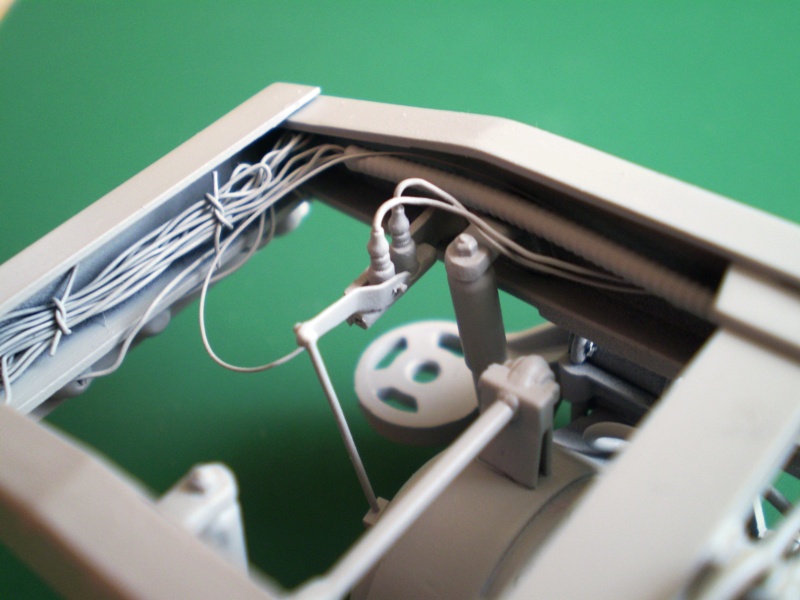
Now with the frame in primer I could take a bit better pictures of the details that I added. Details like tow hook, front quick release valve, remote lube, height control valve, and air dryer. -
Long Hauler 379 - 119
truckabilly replied to truckabilly's topic in WIP: Model Trucks: Big Rigs and Heavy Equipment
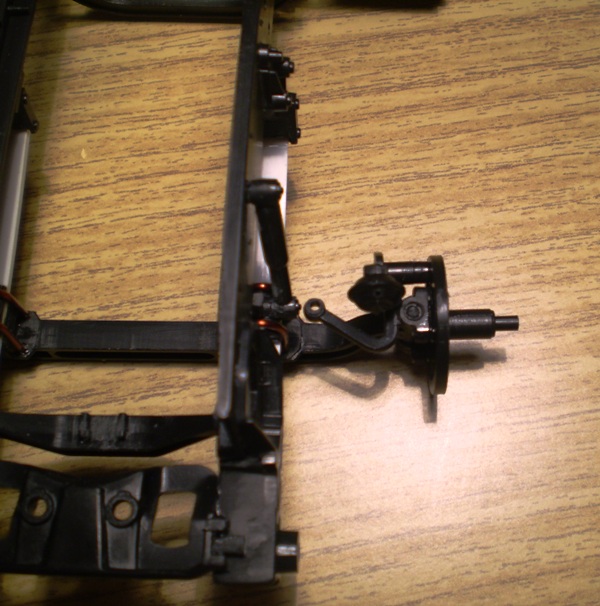
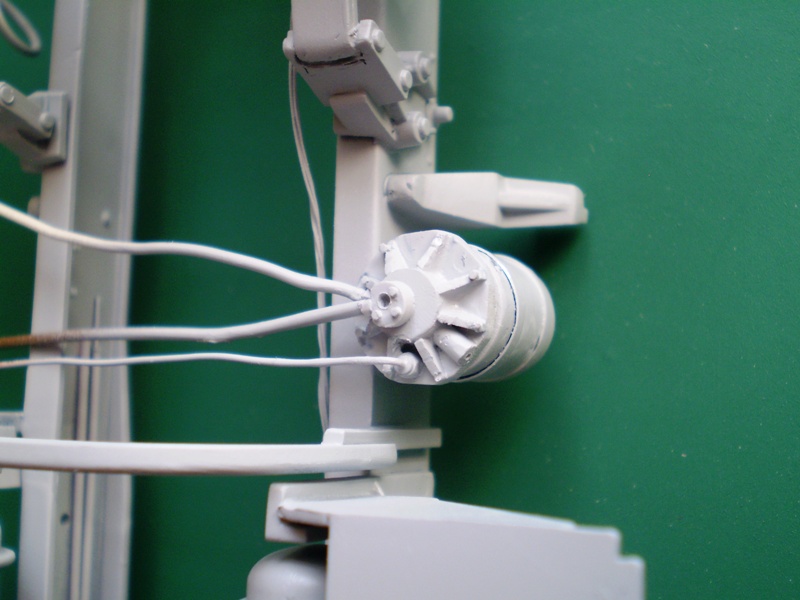
Thanks a lot Robert. I have also seen some diagrams. But still it is hard to tell the routing of the lines and where all the valves, relays, crossings and fittings are located on a real truck. Plus, I think it varies from truck to truck. A great help for me is the truckpaper and pictures that you can find there. Sometimes it is only an overall look of the truck. But then you can find a whole set of pics showing interesting details of the frame, engine, interior and such. My plumbing usually does not follow any particular diagram. I just try not to make anything non-sensical. Most of my wires come out from semewhere... and end up nowhere. But it´s okay if it´s hidden somewhere inside the structure.