truckabilly
-
Posts
789 -
Joined
-
Last visited
Content Type
Profiles
Forums
Events
Gallery
Everything posted by truckabilly
-

CLYDES II
truckabilly replied to truckabilly's topic in WIP: Model Trucks: Big Rigs and Heavy Equipment
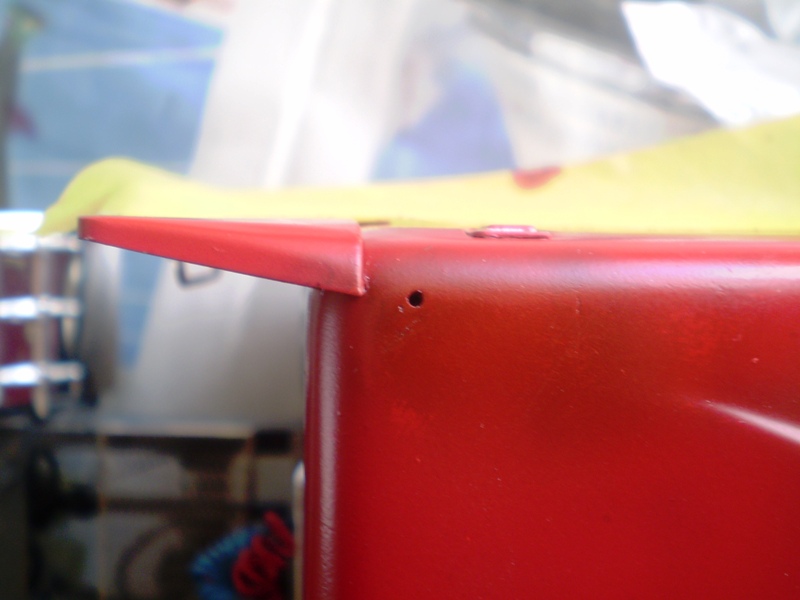
To repair the holes in the rails wasn´t that difficult. But I found another holes that I forgot to fill in. These were in the cab just behind the door. Again, I thought that grab handles should go in. And they do. But not in the holes. Now it was much more difficult as the cab was A) painted, decaled, C) mounted on the chassis. But I couldn´t just leave them where they were. Here is what I´ve done. I have to repair the damaged decals some way. Sharpie markers would be convenient but they are not available over here as far as I am aware. Gotta find something simillar. That´s it for now. -
CLYDES II
truckabilly replied to truckabilly's topic in WIP: Model Trucks: Big Rigs and Heavy Equipment
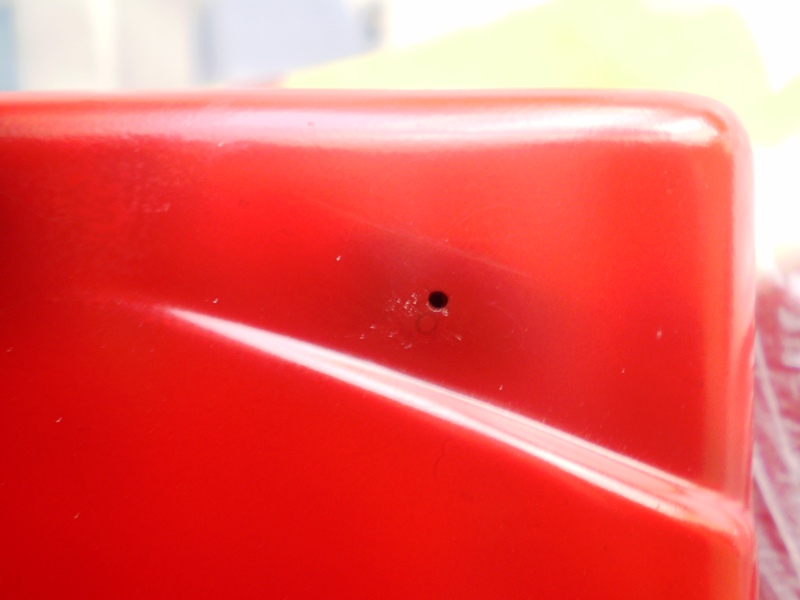
By this time I realised that something was wrong. The frame rails had a pair of extra holes each. I thought something must be attached here. But I was wrong. The holes should have been filled in earlier. So, I had to do it now. -
CLYDES II
truckabilly replied to truckabilly's topic in WIP: Model Trucks: Big Rigs and Heavy Equipment
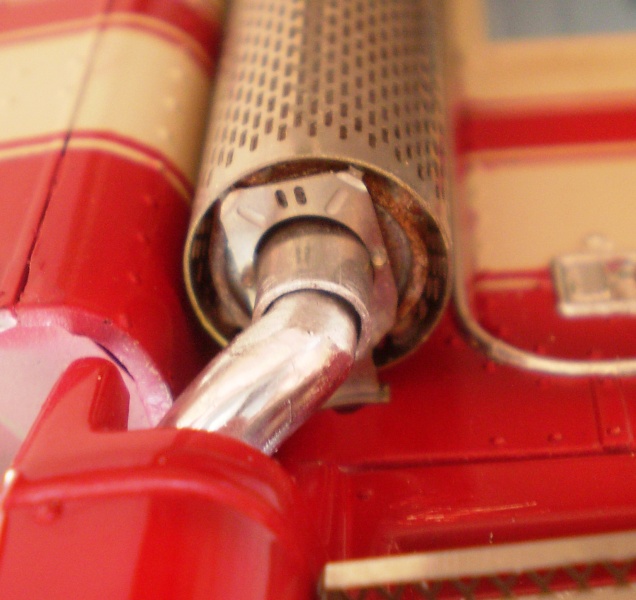
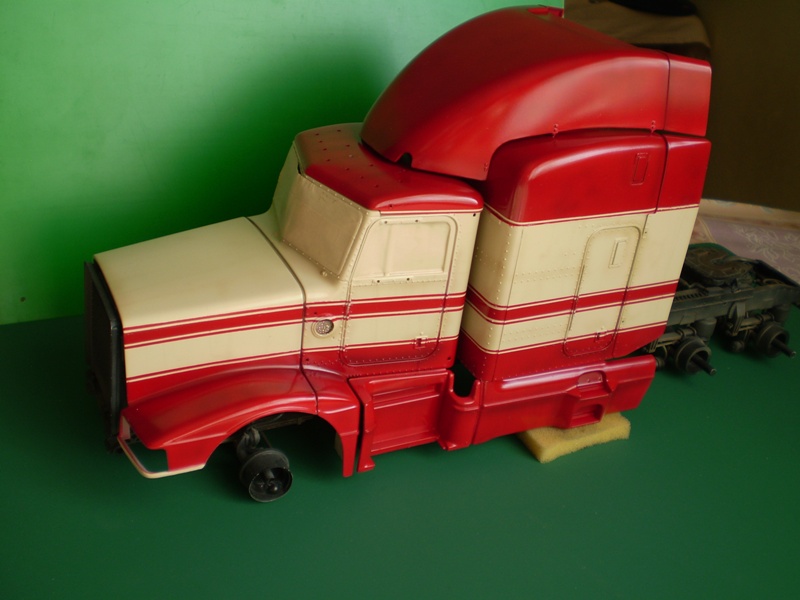
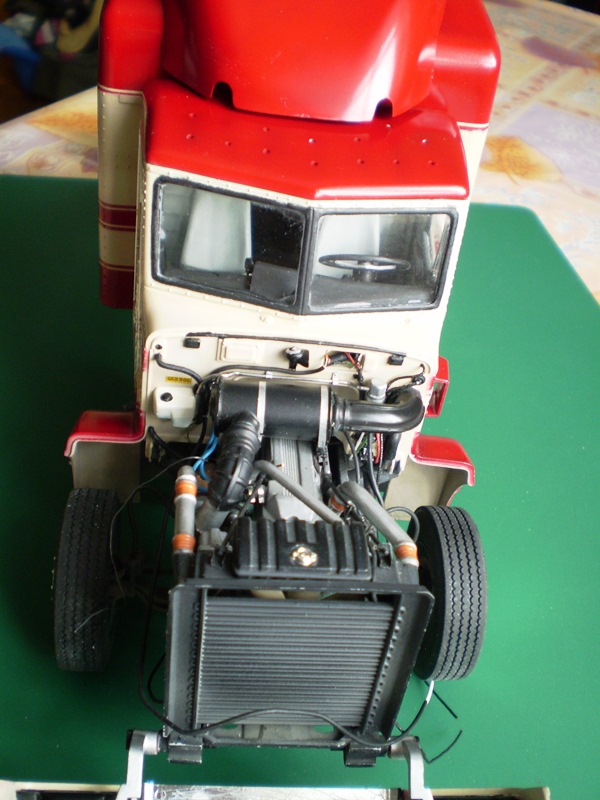
Okay, time to show some progress here. Well, it´s more struggle than progress. I tested the cab and hood alignment and guess what! The hood didn´t shut tight! With the hood inside details added and the radiator raised (to fit the fan wheel axis) and AC condenser added (to imitate the real deal) it just didn´t work. Sometimes I make modifications without thinking too much ahead. So, part of the inside hood details had to go and some changes to radiator had to be done. The radiator looks almost the same. Only the AC condenser is a bit thinner and the radiator sits a bit lower. The typical back alignment of the engine is gone. What a shame! But the hood closes okay now and the cab can be mounted onto the frame for good. Here it is with the tubing in the engine bay. I knew that the under frame part of the exhaust piping had to be shortened. But how much? Instead of taking the measure I cut the part in two and inserted the tube in the muffler in a telescopic way. This will fit to any gap. Here is a test. -
Teresi: "Dyno Drags" Semi-Truck
truckabilly replied to John Teresi's topic in Model Trucks: Big Rigs and Heavy Equipment
I don´t know how I could´ve missed this one. Took me two days to go through all the pics. I am absolutely blown away by this quality of modeling. I can´t remember ever seeing anything this awesome. Amazing. The attention to every possible detail is breath taking as well as the weathering on the frame and the testing bed floor. The kit´s simplified engine looks so so real... There are no words that I could express my feelings with. I´m stunned... absolutely stunned. -
Very nice scratch build. Jarda
-
Peterbilt 352
truckabilly replied to lapazleo's topic in WIP: Model Trucks: Big Rigs and Heavy Equipment
Great schooling, really! This goes beyond your Spotters Guide, Tim. I wouldn´t mind seeing something like this for some other old Peterbilt types as well. The Bubble Nose Pete, the 351, the 372... I know that no mainstream kits are available for these types. But I would still like to know something more about them. -
Moebius Models Great Dane reefer update
truckabilly replied to Dave Metzner's topic in Truck Kit News & Reviews
That´s awesome! Can you hear my hands claping? Wonderfull! Jarda -
CLYDES II
truckabilly replied to truckabilly's topic in WIP: Model Trucks: Big Rigs and Heavy Equipment
Thanks for the comments. Chad, you find the front wheels in the Bill Signs kit. The tires are Italeri 10 pcs. set of tires for trailers. The inside diameter of the tires matches perfectly to the Revell super single wheels (Bill Signs and Can Do Wrecker kits). The only modification I had to do was to create inner rims for each side of the wheel. The inner rims hold the tires in place. These pics show the rims I added. -
CLYDES II
truckabilly replied to truckabilly's topic in WIP: Model Trucks: Big Rigs and Heavy Equipment
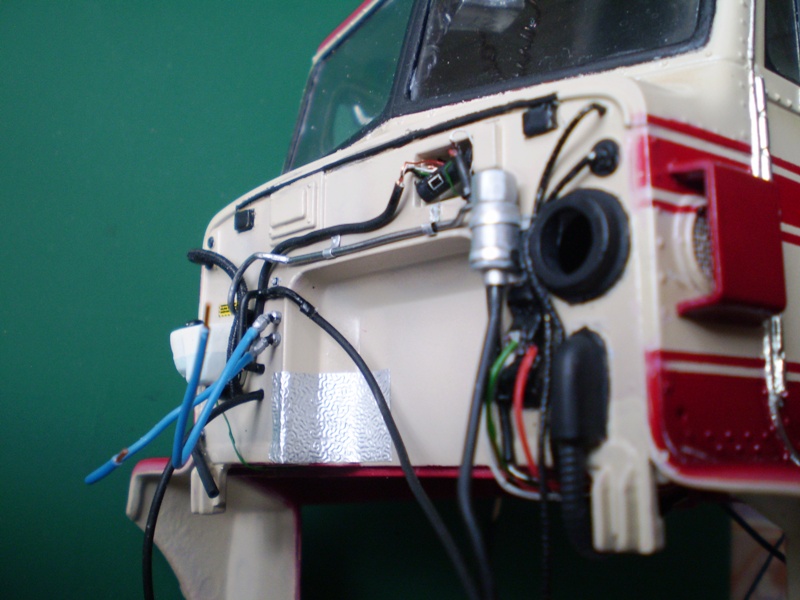
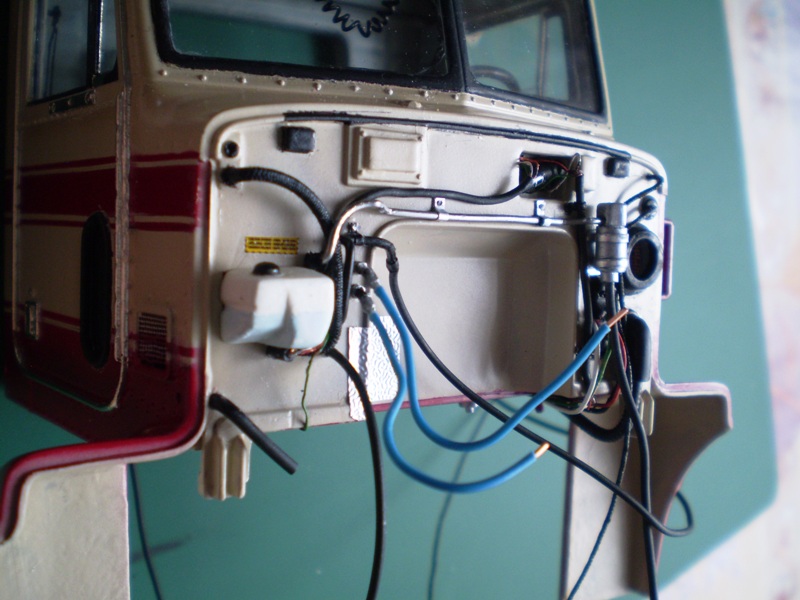
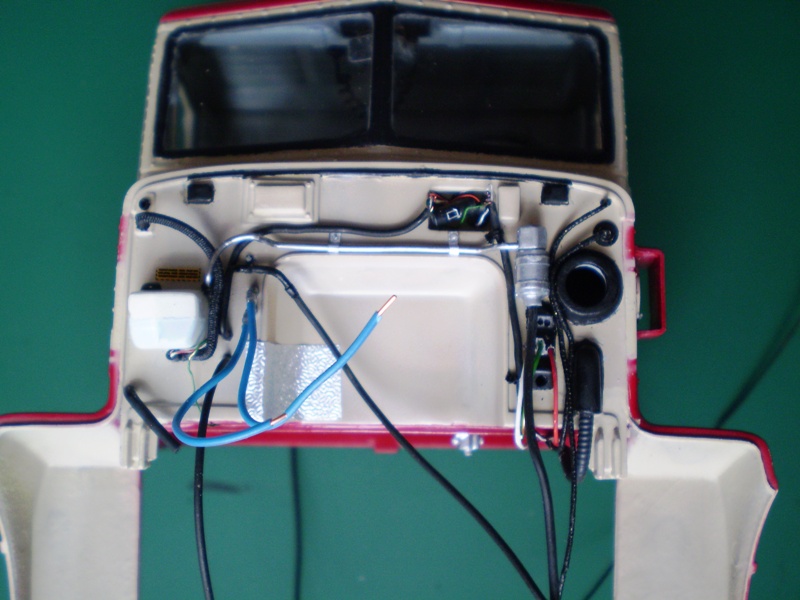
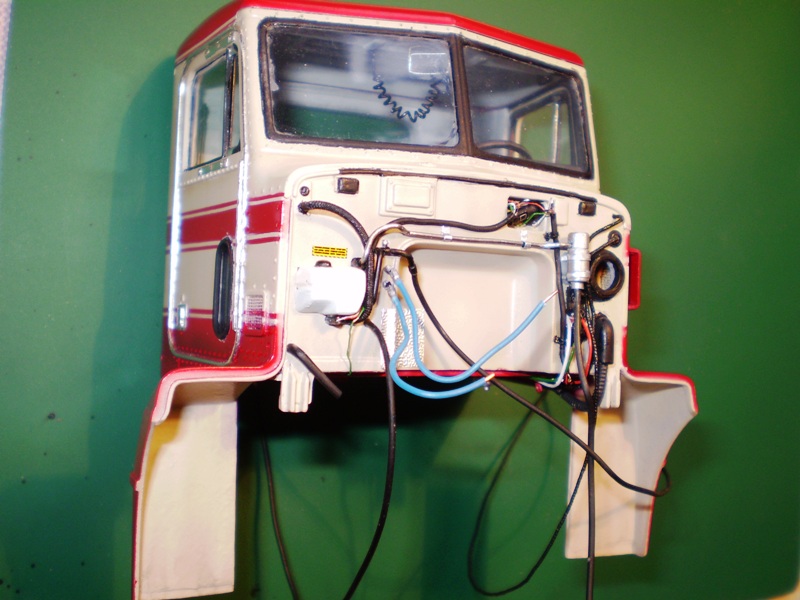
I added a few wires to the firewall so it would not be bare. The wire is an ordinary steel string painted flat black. The fittings are from a set made by local guys for 1/24 scale cars. I am sorry for the finger print on the sun visor. Will do something with it. It happens to me now and then no matter how carefull I try to be. I added the boxes to the rear part of the chassis. -
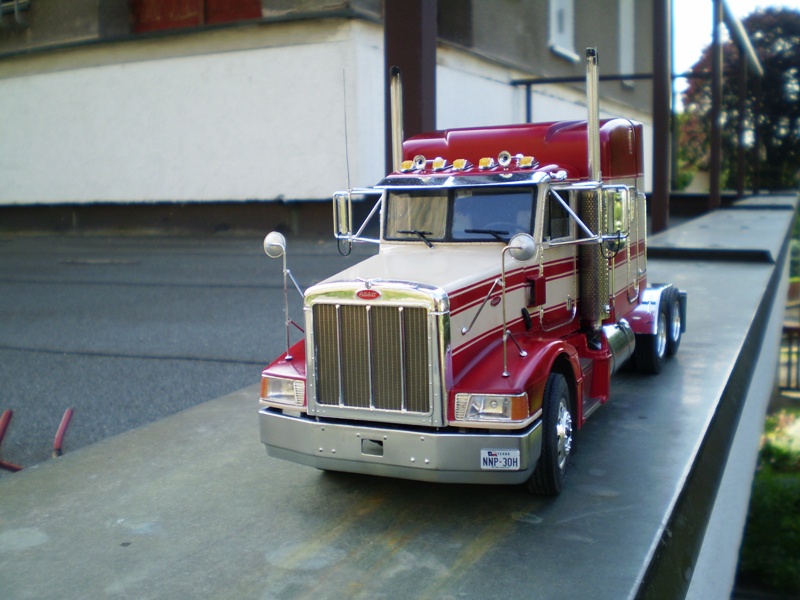
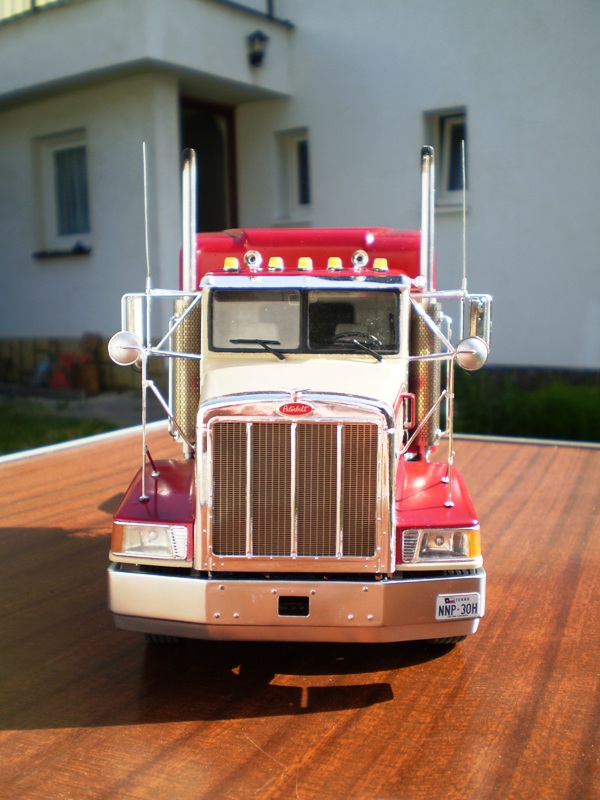
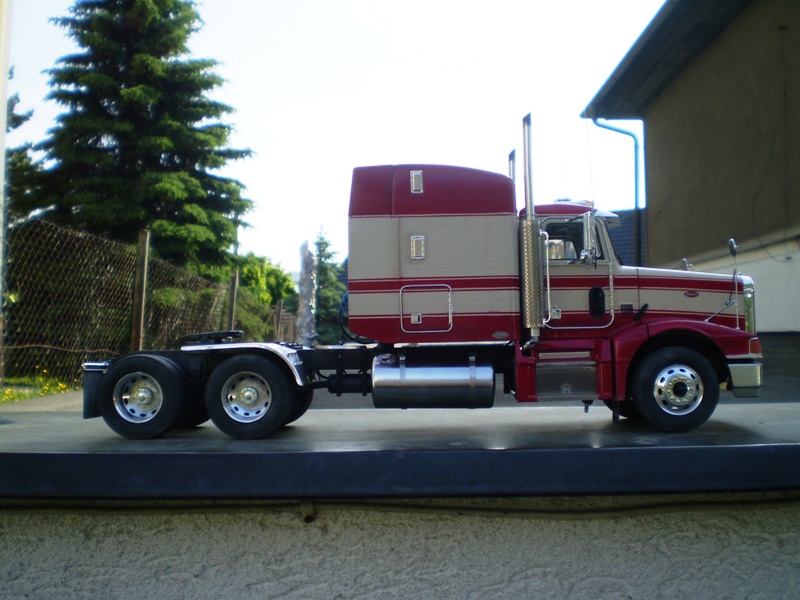
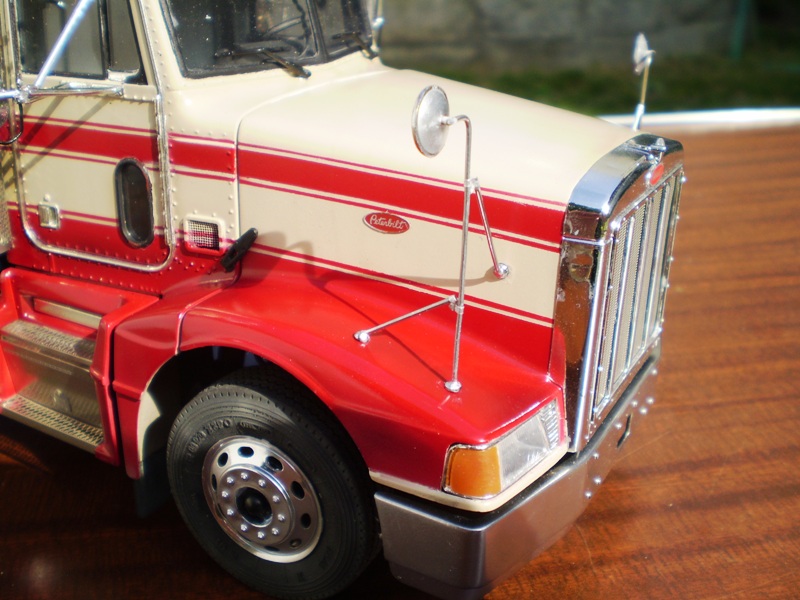
Aero Kit Pete
truckabilly replied to truckabilly's topic in WIP: Model Trucks: Big Rigs and Heavy Equipment
Thank you for your nice words, friends. I was building this model with a plan to display it either with the aero kit on or off. Two trucks in one so to say. I only took pictures of the coplete truck because I was in a hurry to pack it up for the Beskyd Kit Show. Now, finally, I took some pics of the model with the aero parts off. I also added the fender mounted mirrors. They are much too high I think. But let´s say that the driver is a Harley-Davidson fan.
-
CLYDES II
truckabilly replied to truckabilly's topic in WIP: Model Trucks: Big Rigs and Heavy Equipment
A little progress on Clydes II. The panel closing the opening on the back wall of the cab is bare on the inside while the real deal is upholstered. In the model, it is not much visible over the seats but I did not want to have a barewall in the back. I used a "poor man´s resin" again, the white paper glue. I poured a thick layer on the sleeper wall and let it dry for a few days. Then I peeled it off and cut to shape. I superglued this dry glue-piece to the panel and painted it light grey. Then I washed the surface with an oil color. These two pictures show the part before it was painted and after the paint and wash. The door of my cab will be open. So, it needs a fire extinguisher. I made it out of 5mm plastic rod. The valve is a 1.6mm (1/16") rod, the "jaws" on the upper end are made out of a soft tin and the hose is an electric wire. The extinguisher is strapped to a hanger made out of square plastic rod combined with the soft tin stripes. The decal is not authentic, no instructions on it. The roof clearance lights are too spiky in the kit. I made a little change in the shape. This is where I ended so far. -
Something you don't see every day
truckabilly replied to Fat Brian's topic in General Automotive Talk (Trucks and Cars)
I am not very keen of COE´s. Both sides of Atlantic that is. But this 372 has something that attracts me very much. I would love to build a model of one with the tilting up nose and all the gizmos behind it. But I can´t get much reference and have no idea as to what kit could be the best starting point. There is no resin cab available around as far as I know. What a shame, this is a perfect shape! Coupled to a streamline trailer it makes a dream design. Could a model beat the real deal in sales figures? What do you think? -
That´s a very nice snapper. I have this kit myself and I haven´t noticed that the grill looks so real. Is it just black washed?
-
Aero Kit Pete
truckabilly replied to truckabilly's topic in WIP: Model Trucks: Big Rigs and Heavy Equipment
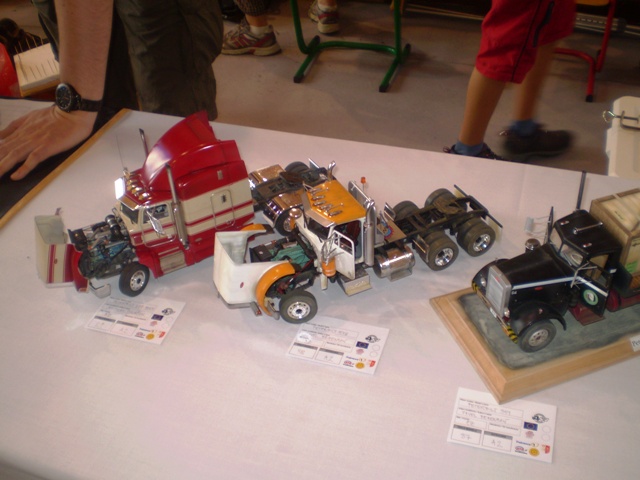
I took the model to the Beskyd Kit Show (Czech Rep.)last weekend. The 378 standing next to it is not mine. -
Aero Kit Pete
truckabilly replied to truckabilly's topic in WIP: Model Trucks: Big Rigs and Heavy Equipment
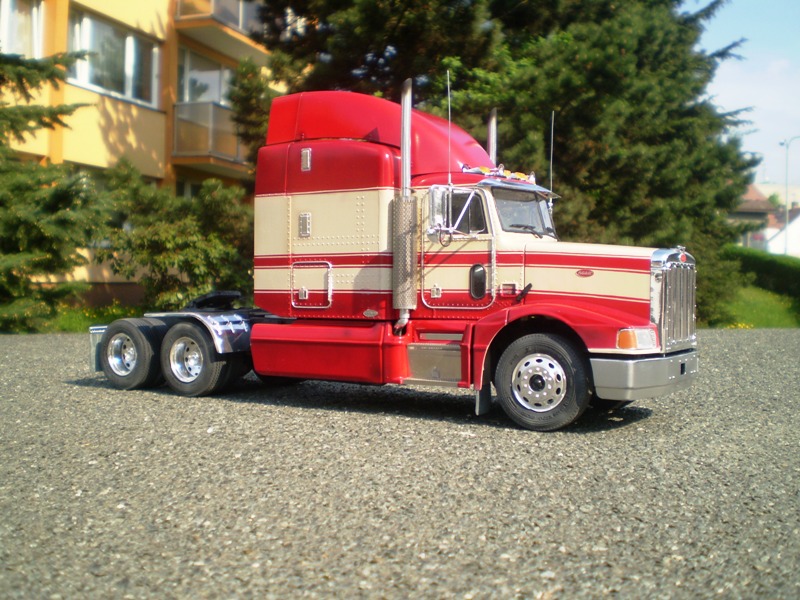
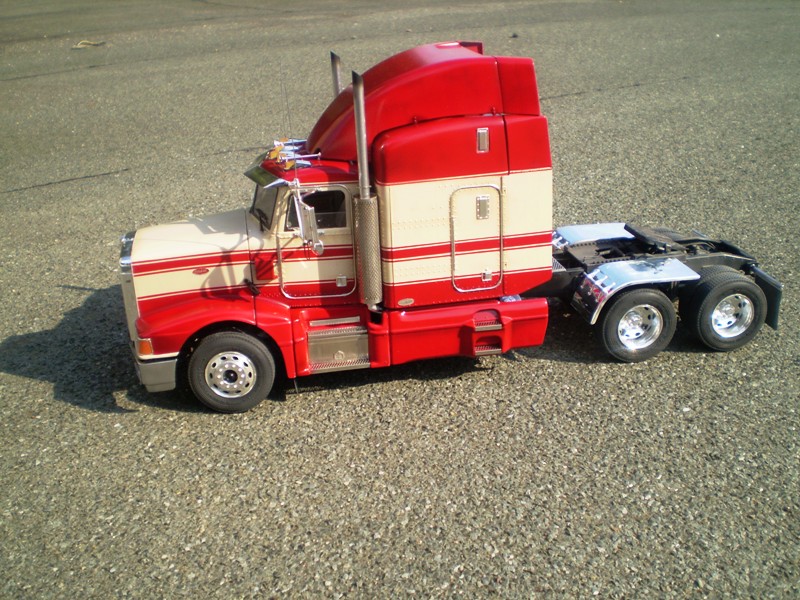
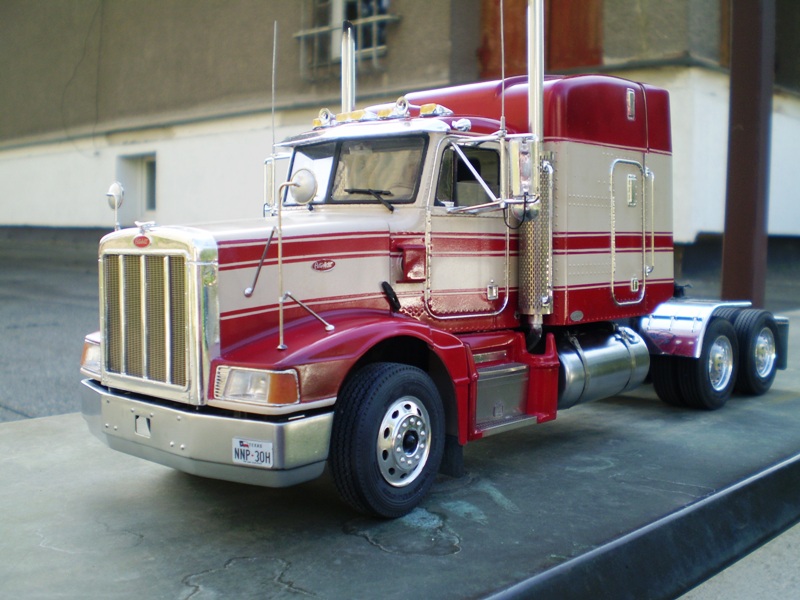
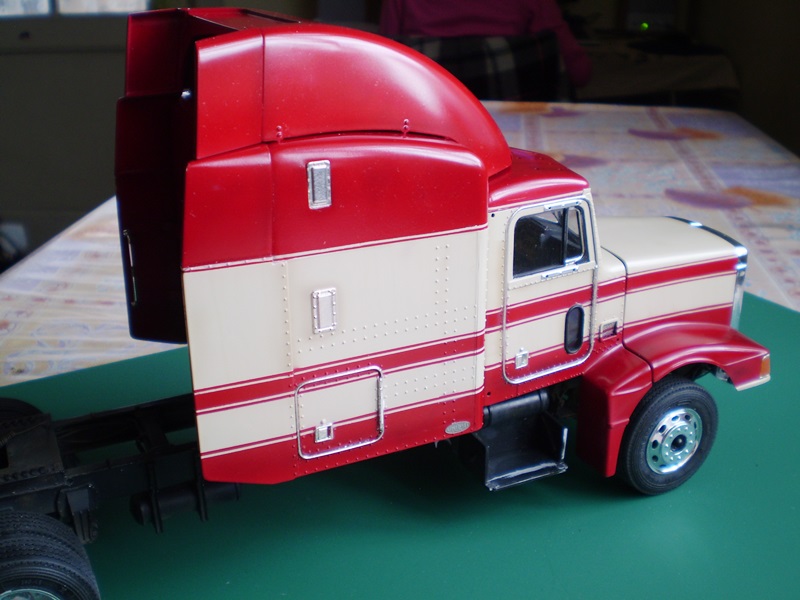
Thank you very much for your nice comments. Aero Kit Pete is finished. Just one last part is missing... the grab handle behind the sleeper door. I haven´t noticed that it is not there yet when I took the pictures. I will take more pictures later with the handle added. For now enjoy these: -
"The Trio"
truckabilly replied to pete3522's topic in WIP: Model Trucks: Big Rigs and Heavy Equipment
Nice movie heros. Thumbs up! -
Krupp Titan SWL 80
truckabilly replied to The Creative Explorer's topic in WIP: Model Trucks: Big Rigs and Heavy Equipment
That´s a very nice truck of old times. I believe the kit is builder friendly with a few excceptions maybe. The engine looks very beautiful. I like what I have seen so far. Look forward to seeing more. -
Aero Kit Pete
truckabilly replied to truckabilly's topic in WIP: Model Trucks: Big Rigs and Heavy Equipment
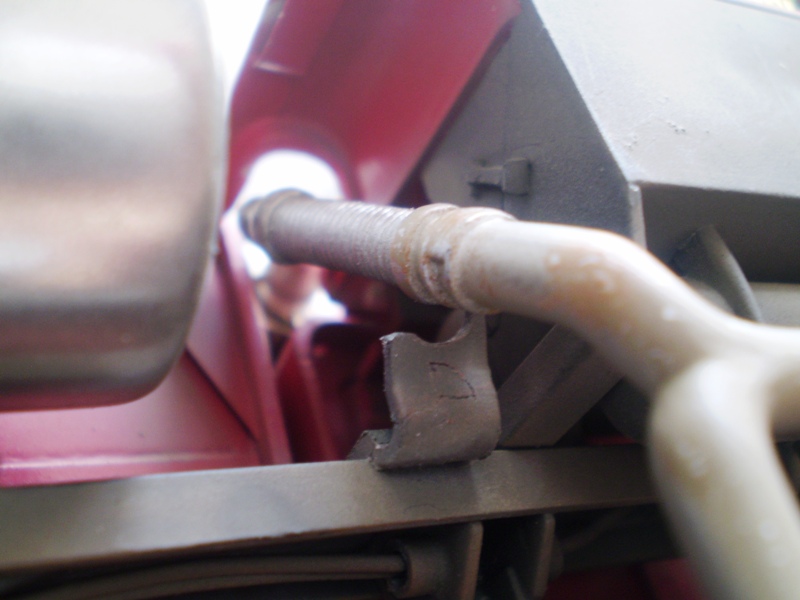
Thank you very much. The truck is getting to be complete. One of the last things I had to deal with was the exhaust piping under the frame. Even though I read the warning by Tim Ahlborn that brackets on the frame may play ugly tricks, I had to find out myself. And I got into a trouble. Again... The pipes were much too far from the brackets. So, I added a pair of tin stripes to make it look better. Here´s one of the bottom side slightly weathered. I used some photo etched parts. Here is the lower mount of the stack. I guess these were the last pictures before the model is complete. -
Detroit S60 ref. pics
truckabilly replied to skulls's topic in WIP: Model Trucks: Big Rigs and Heavy Equipment
Yes, they are. Thanks for posting. -
Aero Kit Pete
truckabilly replied to truckabilly's topic in WIP: Model Trucks: Big Rigs and Heavy Equipment
A few more: The repair is not perfect but I have learned a few new things and I will do better next time, if needed. -
Aero Kit Pete
truckabilly replied to truckabilly's topic in WIP: Model Trucks: Big Rigs and Heavy Equipment
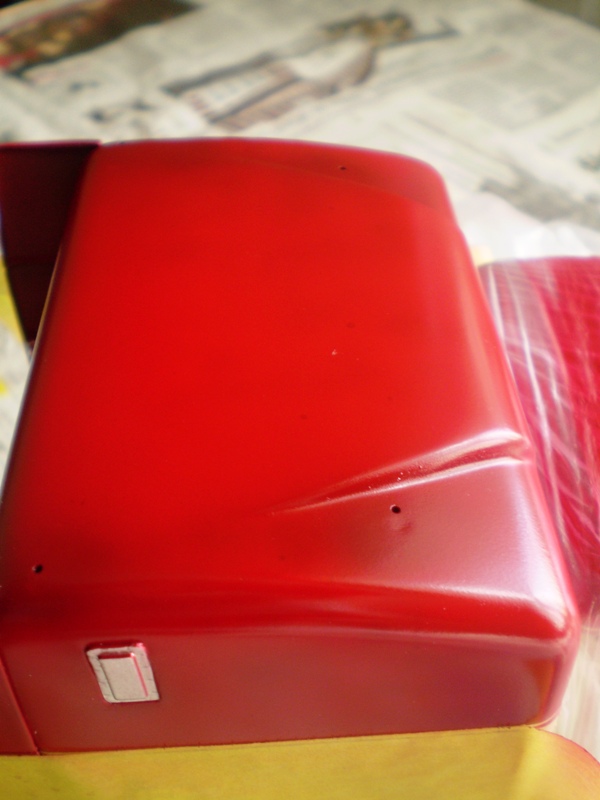
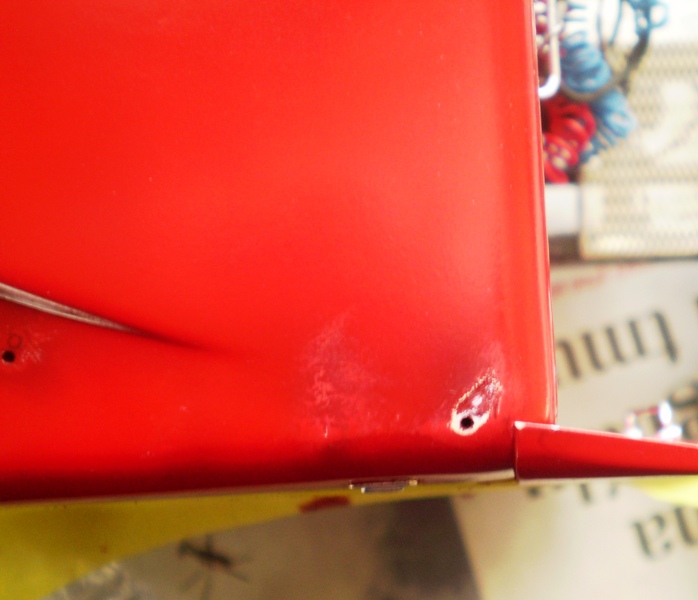
Thank you Leo. I was thinking about something like this myself. The question was... do I have the guts? Well, here is what have done. I superglued the styrene rods in the holes and cut the flush with the roof, just like you suggested. Then I tried to smooth sand the spots but the superglue was not willing to cooperate too much. So I used a bit rougher sand paper and I never got rid off the marks. My fault, I shouldn´t have worry too much about the size of the sanded spots. I used a darkened shade of the original colour for the first few layers. I needed that dark shade for better coverage of the white ends of the rods and the light spots from the sand paper work. I sparayed a few thin layers and smooth polished them with the GT31 finishing cloth of GSI. Then I lightened the shade again to prevent too much dark spots from building up. Again, I polished each layer with the GT31 cloth. Finally I added one layer of paint over the whole roof. This will be wax-polished after the paint cures. Here is a few pics.
-
Wow, that is impresive. I have never seen this kind of conversion. Great idea. Can you post more pics?
-
new member
truckabilly replied to lonebear43's topic in WIP: Model Trucks: Big Rigs and Heavy Equipment
Greetings to Manitoba. I like your old builds. Can´t wait to see the new ones. And welcome on board. -
Aero Kit Pete
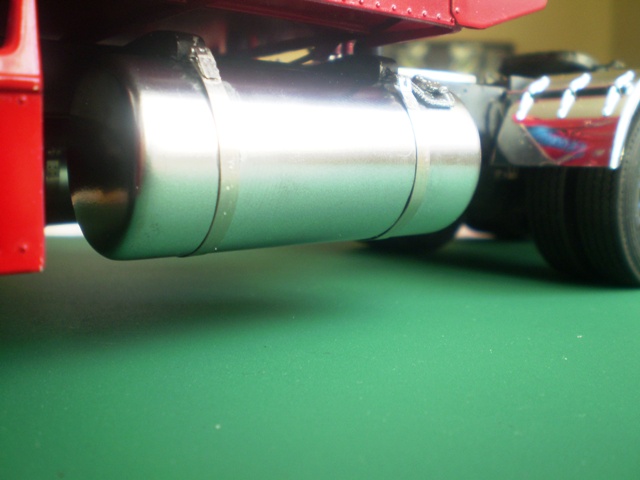
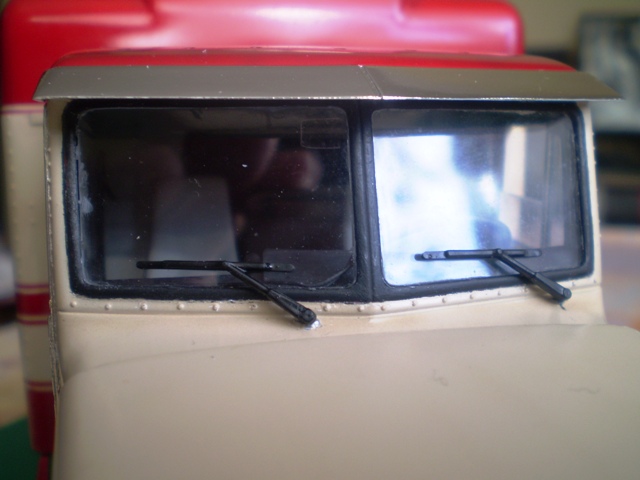
truckabilly replied to truckabilly's topic in WIP: Model Trucks: Big Rigs and Heavy Equipment
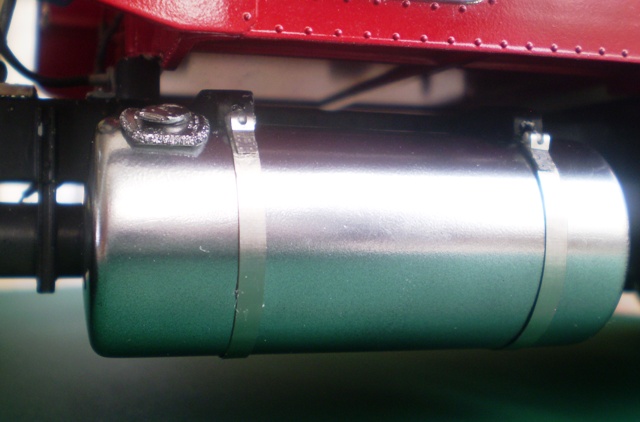
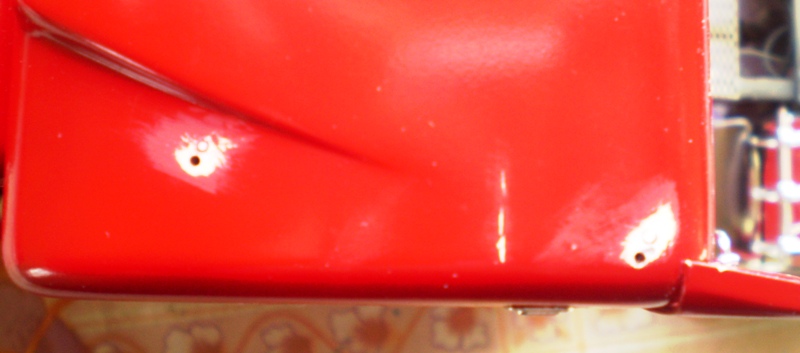
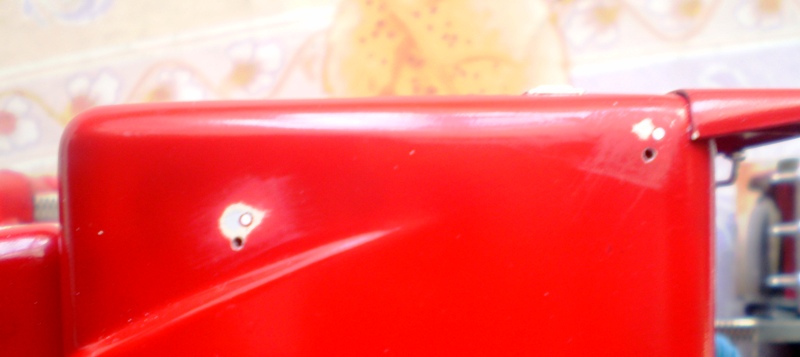
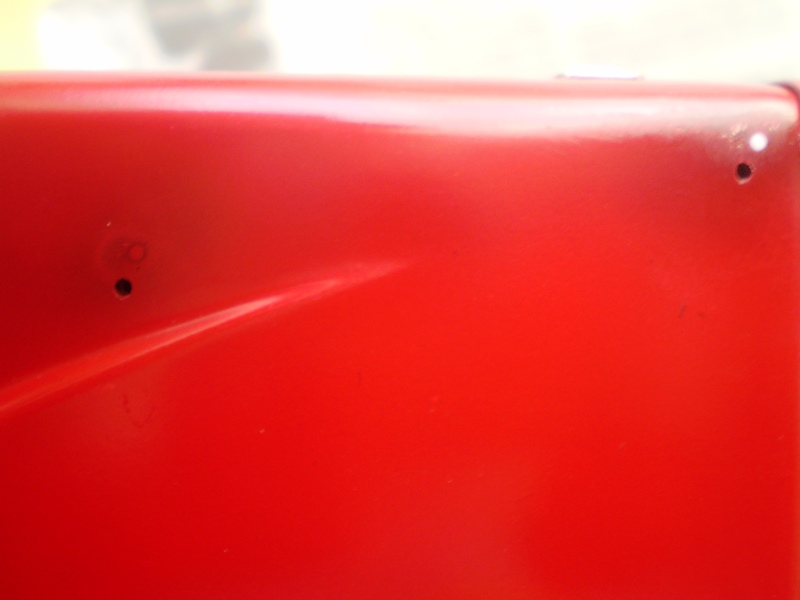
Also in place are the fuel tanks. The Alclad chrome should look better but some tricks I have yet to learn. The stripes are photo etched and have natural nickel finish. The rear fenders are in the kit´s chrome. They come from RoG 359. The wipers and sun visor: That´s all for now. Any ideas how to get rid off the extra holes?
-
Aero Kit Pete
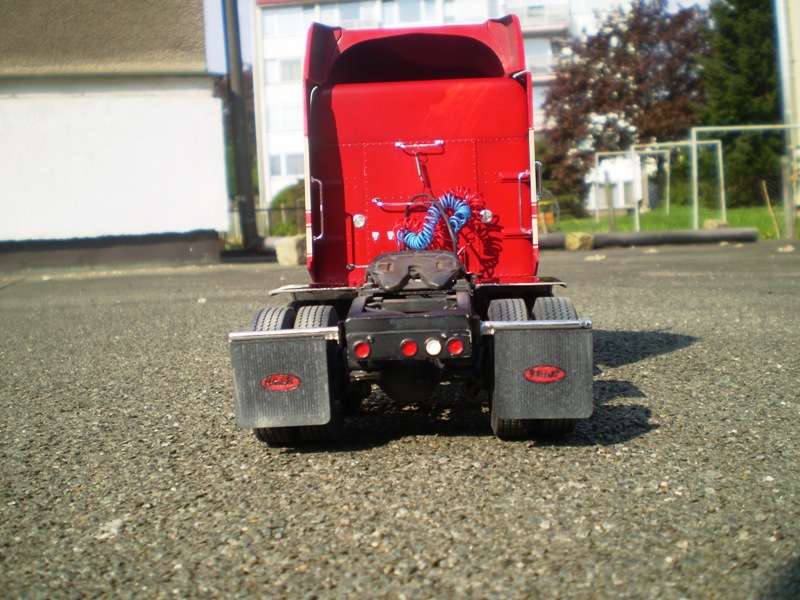
truckabilly replied to truckabilly's topic in WIP: Model Trucks: Big Rigs and Heavy Equipment
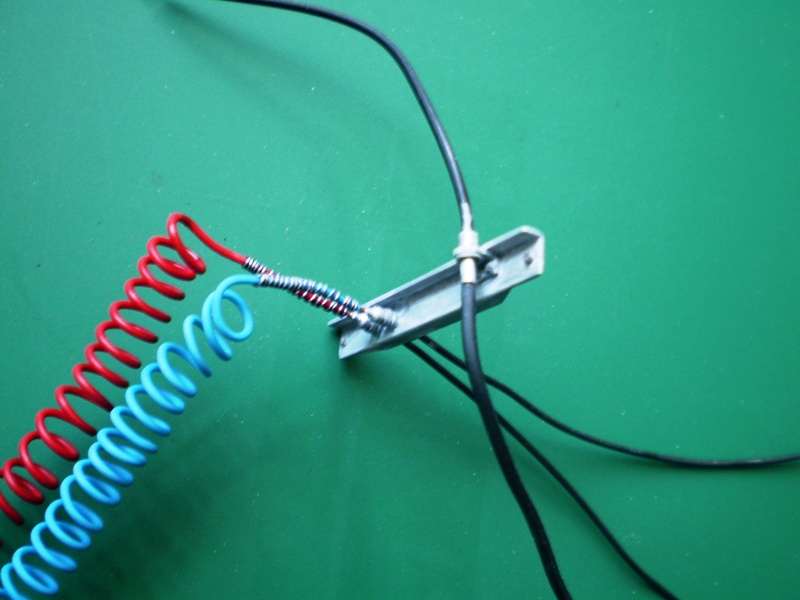
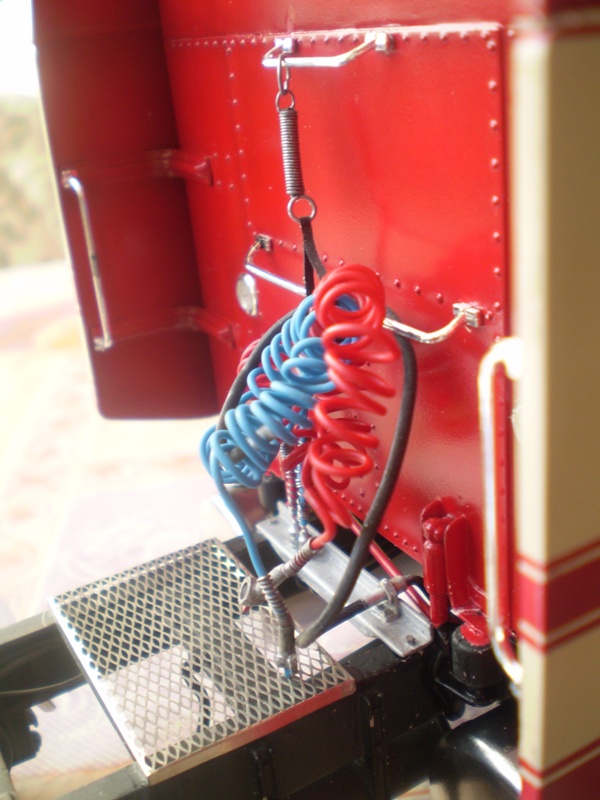
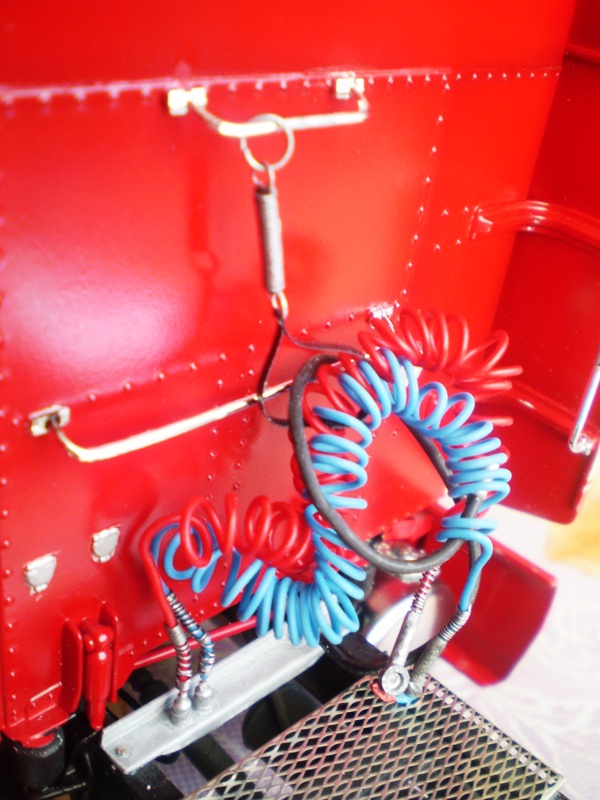
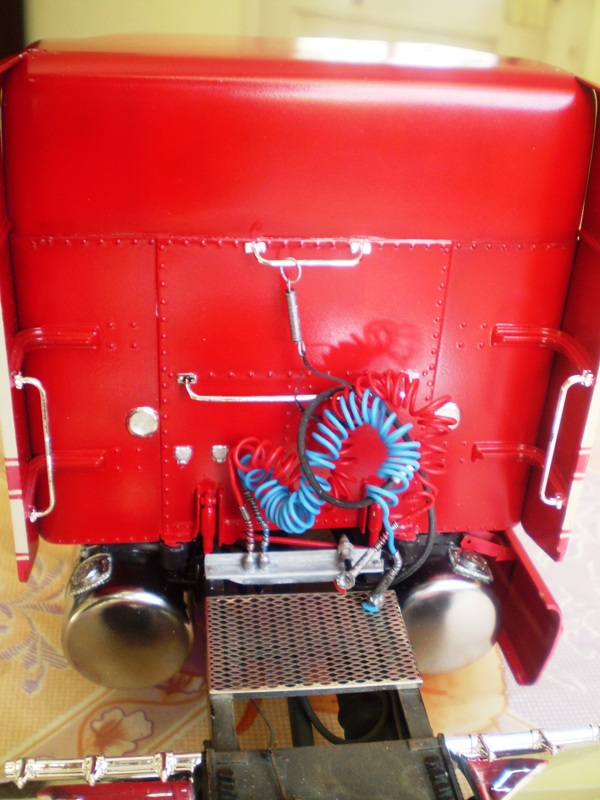
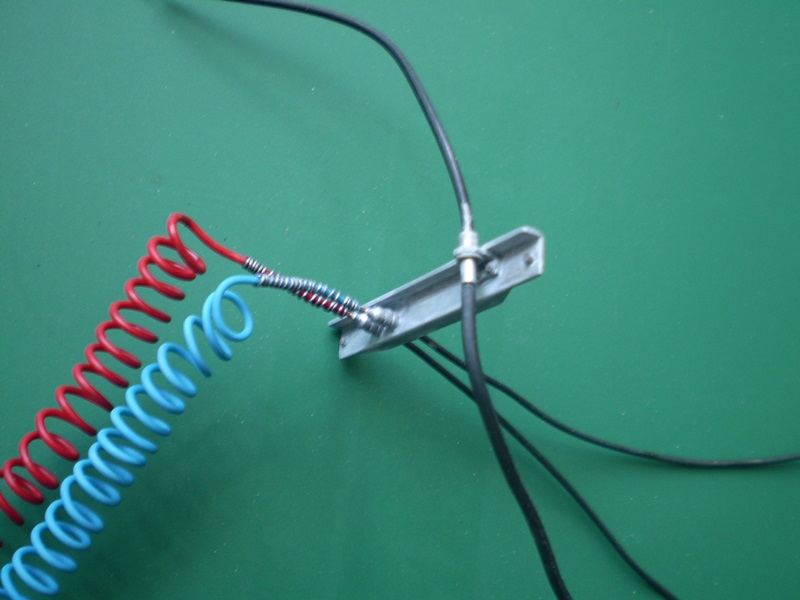
Now it fits a lot better. But what do I do with the extra holes? I am not sure if I can fill in the extra holes and repaint the spots without a trace. Someone advised me to install another horns in there. I don´t know. I´ve never seen it this way. Before I make the decision, there is a progress on another parts. I finished the coil cables for the trailer connection. I installed them onto the truck. The spring is a lead wire 0,4 mm winded around another wire. The loop holding the coil cables is an adhesive tape. I joined two layers with the sticky sides facing each other. The black hose is an electric line. The glad hands are scratch built.