59 Impala
-
Posts
1,734 -
Joined
-
Last visited
Content Type
Profiles
Forums
Events
Gallery
Everything posted by 59 Impala
-
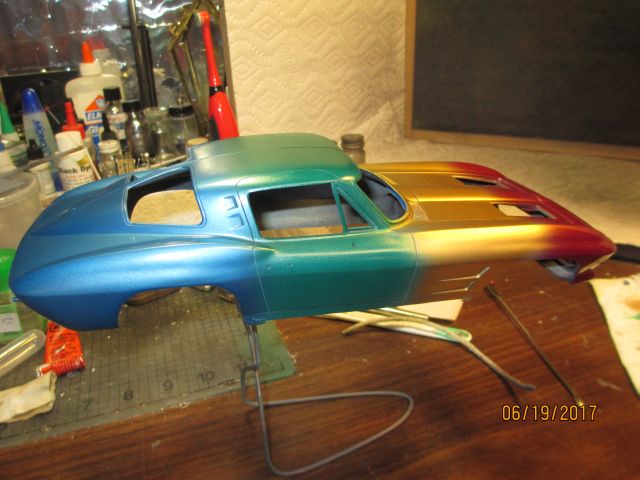
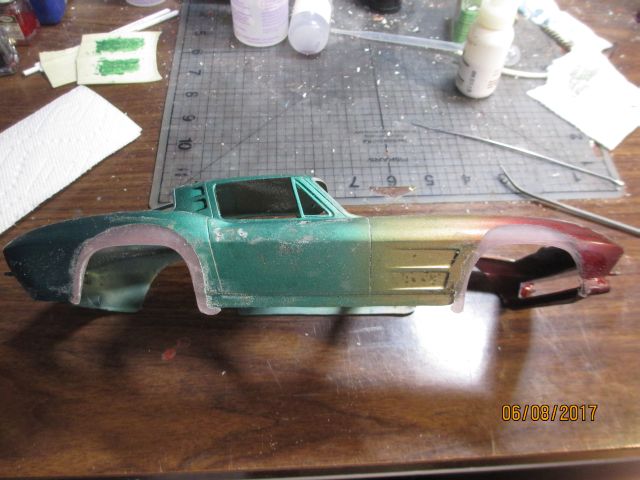
Got 'er primed with flat gray. I just finished the color coats a few minutes ago. It is as close as I could get it to the original colors. Dan This is the before picture

-
Thanks guys. I'm getting ready to spray another coat of primer on. I will be using Flat Gray over the Black. Then, if no more work is needed, I'll start the spraying the different colors. Dan.
-
Thanks Mike. I'm going for the stock fuel injection that comes in the kit. I have all the parts to build it as a static model and I'm sure glad that I do. I'm ready to spray another coat of primer on it and I'll do that Saturday. I will be spraying it flat gray and then if no more work is needed, I'll start with the different colors. The interior will probably be just the black plastic along with the frame. Not sure yet.
-
I got 'er stripped, sanded, first coat of primer, sanded again and filled in the bad spots. After drying I'll sand and prim again. Then I'll see what needs to be done after that. Dan
-
Thanks Mike. I've been wanting to do this for a very long time and Now, I have the parts to do it. Dan
-
Back in the 80's my brothers and I converted 1/16th scale cars into rocket cars and raced them. Well, I still have my car and I'm going to try and restore it to a static model once again. I think that I have enough parts to accomplish this and I've started the rebuilding process. I really cut up the fenders on this car and I have made mold copies of another car and used fingernail resin to fill in the fenders. It is now in the purple pond taking a bath. I plan on painting it the same as it is now. Here are some pics of this build. I hope ya like it. Dan
-
Thanks guys, and yes Curt, it sure is. I've built 9 different cars of ones that I've owned so far and I have 4 more to build. I've started a 76 Firebird next. Dan
-
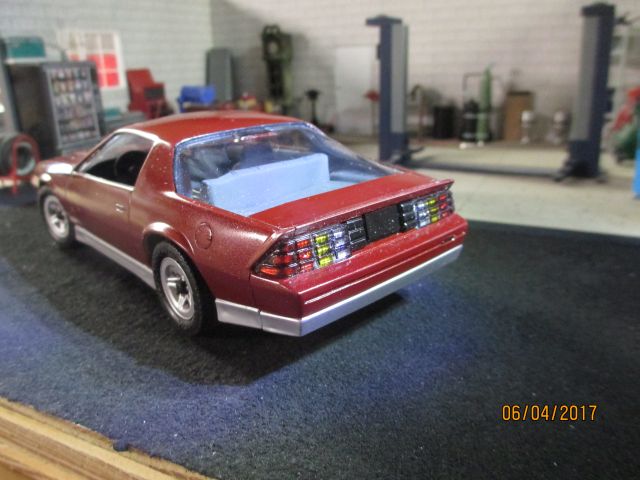
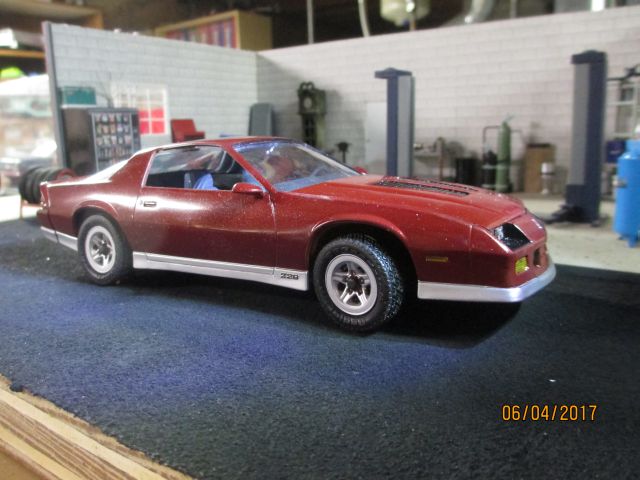
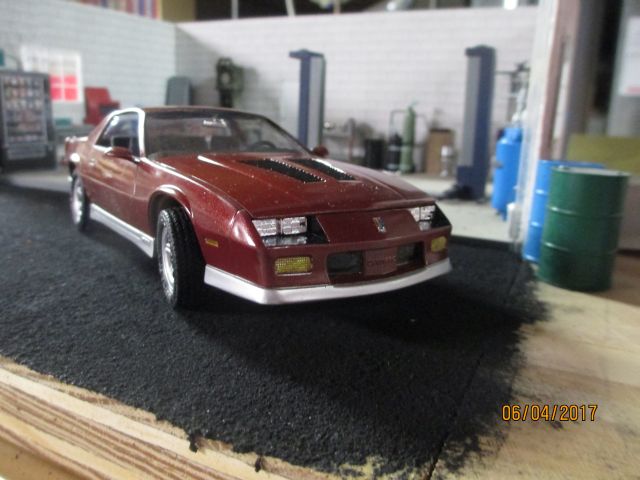
Here are some pics of the model of a 86 Z 28 that we used to have. Our car had a 4 barrel carb and not the injection setup, so I had to get a manifold and carb from the parts box. The kit is also a T-top kit and ours was not. I filled in the T-tops and had to remove the Tuned port injection letters from the body. I used Testors Ruby Red for the body. That is almost the exact color of the real car. The Silver is SNJ's powder mixed in clear. I had to paint the tail lights and marker lights. For that, I used Tamiya paints. The chassis didn't fit very good and I had to grind away stuff from the interior and chassis to get the front to set up inside the body. It didn't turn out to bad I guess. The wife likes it and that's all that matters. LOL. I hope ya like it. Dan
-
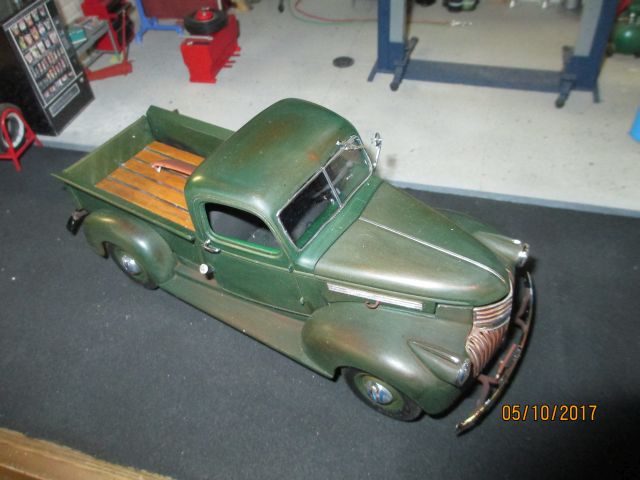
1941 Chevy pickup, well used
59 Impala replied to 59 Impala's topic in Model Trucks: Pickups, Vans, SUVs, Light Commercial
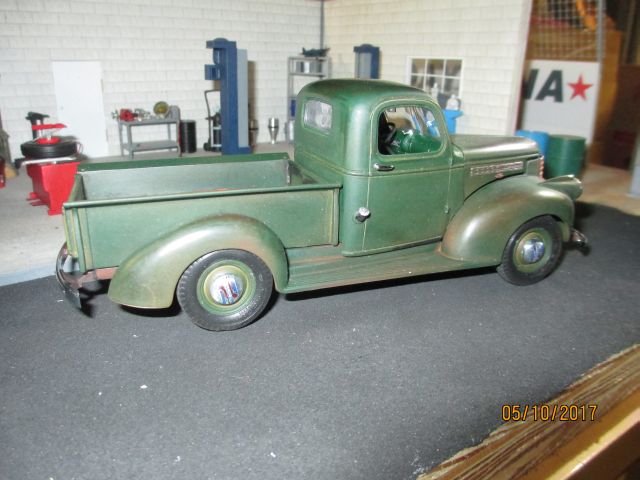
WOW, thanks guys for the kind comments. I didn't think that I was getting it to look just right. I didn't want a rusted out truck, just one that was well used. Yeah Charles, I'm going to print a license plate for it. Dan -
1941 Chevy pickup, well used
59 Impala replied to 59 Impala's topic in Model Trucks: Pickups, Vans, SUVs, Light Commercial
WOW, thanks guys for all the kind words. I enjoyed building this truck. The instructions are a little confusing on some of the assembly. It's not clear on when you install the radiator and I had to remove it and assemble the kit and then install it from the top down after everything was done. Some of the parts a tiny and big fingers don't help putting them together. Ha ha. Other than that, it went together pretty good. There is a lot of detail in this kit and it looks great after everything's put together. Even the steering wheel had a bulge on the top left side and I left it there because it looks like one of those knobs that were known as suicide knobs. I also painted the Red and Blue on the hubcaps and the Blue for the Chevrolet on the grill. I opened the grill from the back side and you have to be very careful not to break it as you do this. It looks much better than painting flat black between the bars though. I'd like to do another one some day. -
I just finished this a few minutes ago. This is a very nice kit, but the instructions are kinda sketchy on some of the assembly procedures. Especially the radiator. I figured it out and I like the was this turned out. It is a very good detailed kit. I built it as if it is a good 'ol used truck. I sprayed Testors rust first, then, flat black. Over this I sprayed a combination of Testors gloss green and flat beret green, Then I sanded most of the green off and into the black and rust colors. I also opened the grill from the back side so you could see thru the grill. This was very hard to do without breaking the grill. I hope you like it and thanks fer lookin. Dan
-
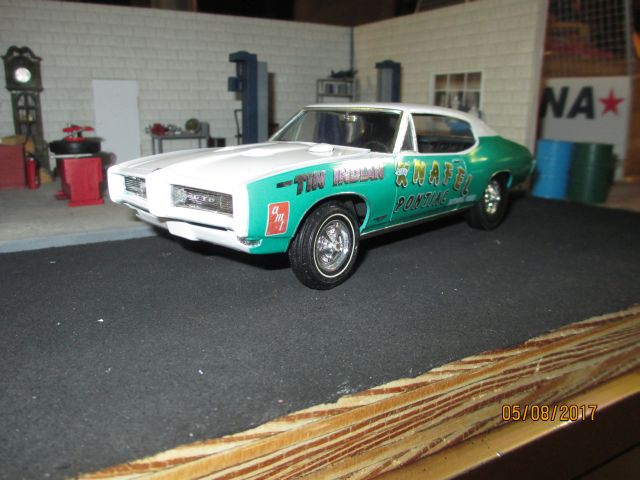
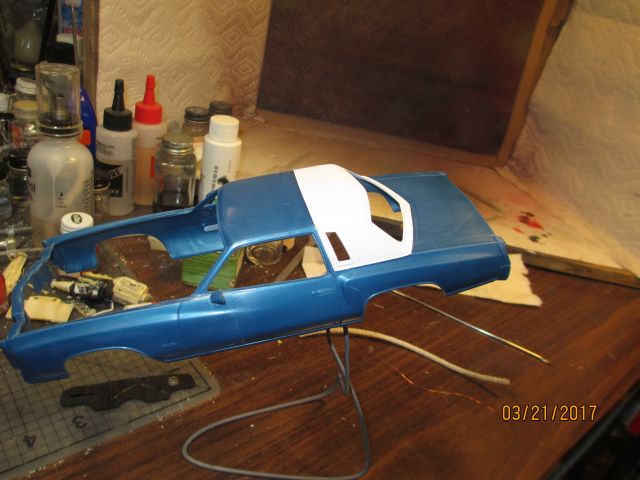
Thanks for all the kind words guys. I love buildin these "Tin Indians". I'm waiting for a friend of mine to make the decals for the 70 GTO and I can finish it. It's painted and just waiting. LOL. Dan
-
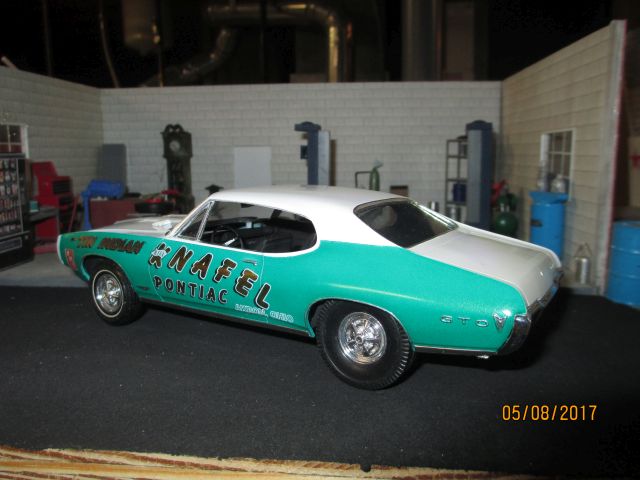
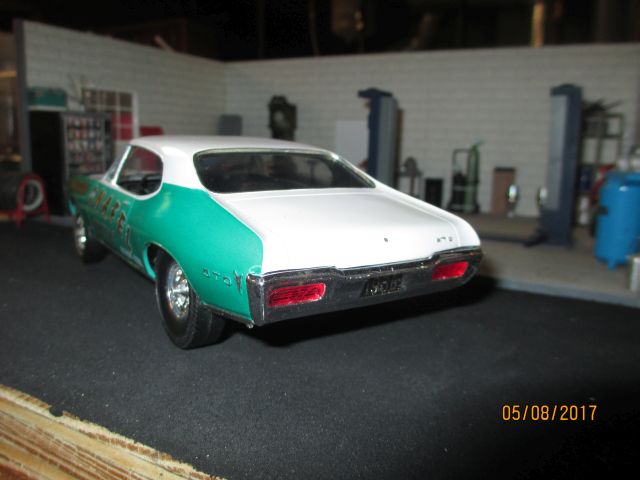
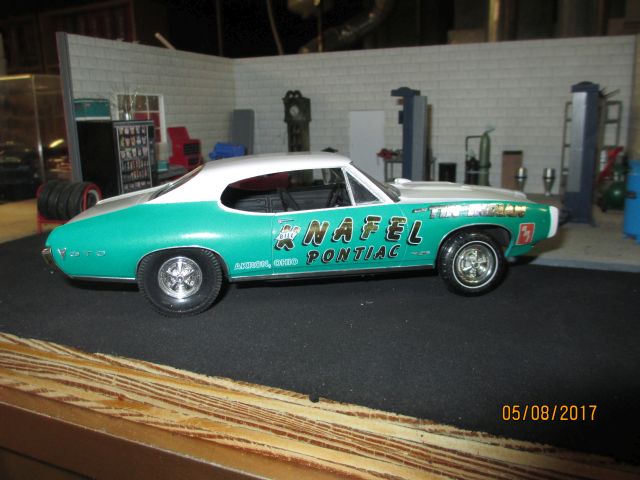
Here are some pics of the 68 GTO "Tin Indian" of Knafel Pontiac that I've been working on for awhile. I do need to get some sponsor decals for it, but other than that, she's done. I hope ya like it. So, now it's on to the 70 GTO and I'm waiting for the decals for this car to get-er-done. Thanks fer lookin. Dan
-
Thank you Jim. I just wish that I could get the Monte Carlo wheels, but no one makes them for the 77. Dan
-
Here are a couple of pics of the 77 when we went to Niagara Falls. I really miss it. Dan
-
WOW, thanks for the kind words Robert. Yeah, I really miss that car. The people who bought it from me really ruined it in a year. It didn't look like the same car after they tore it up. Dan
-
I hear ya David. I installed some mud flaps on this car like I had on my 1:1. I can get a picture up of that later. I have a club meeting to go to today and I'm gonna take this to show along with a couple of others I just finished. Dan
-
Thanks guys. David, only good memories are with this car. The only bad one was selling it to one of my co-workers and a year later it looked like a different car altogether. They didn't take car of it at all. Dan
-
WOW. Thanks guys for the kind words. I wish that someone would make one of these as a glue kit instead of a snap kit. Also, a 73 would be nice too. Dan
-
Thanks guys. I had fun building this and it brought back some very good memories for me also. Dan
-
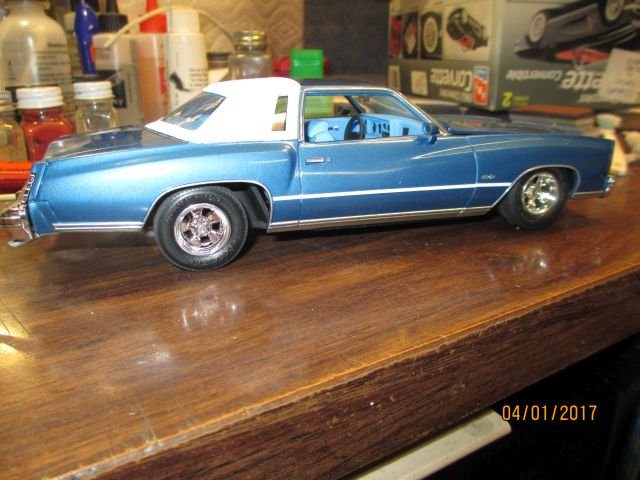
Here are some pics of the 77 Monte Carlo that I built as the 1:1 that I had back in the 80's. It's the snap kit and I used the front seat, chassis and engine from the 70 Impala. I had to move the gas tank forward 3/16th of and inch and also the sides of the rear frame. I also used the firewall and radiator from the Impala. I was going to use the 70 Monte Carlo parts, but they were a little short. The Impala parts fit much better. I also used some of the photo itch parts for some of the trim. I used the new chrome pens for the trim on the body and also bare metal foil. I wish that someone made the Monte turbine wheels, but, I used the mags instead. The colors are almost just right for the replica. I really enjoyed building this car. Thanks fer lookin and I hope ya like it. Dan For some reason, the pictures came out, out of sink.
-
Thanks Dan. This was a quick build I needed to do and now I can get back to my "Tin Indians" and a couple of customs that I'm working on. Oh yeah, I'm also building the 77 Monte Carlo as a full detail with engine like the one I used to own back in the day. Except mine didn't have a 454 in it. I'm using parts from the 70 Impala to build this car. Dan
-
Thanks for the kind words guys and Frank, that is what I was trying to accomplish. Looking like the real thing. Dan
-
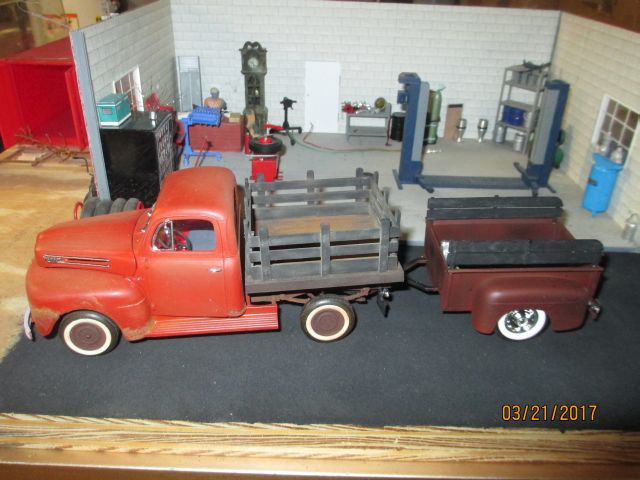
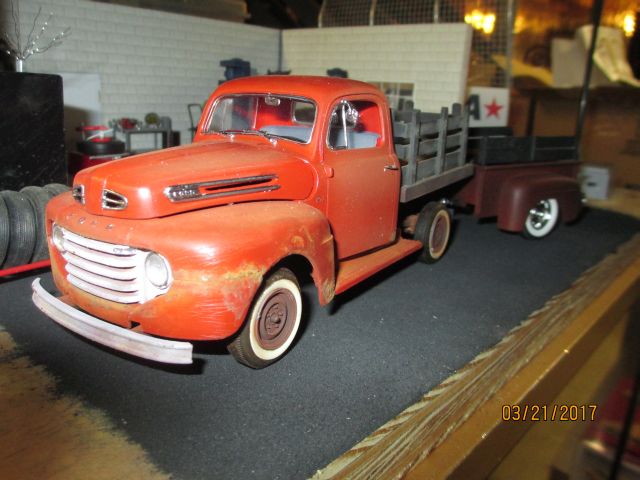
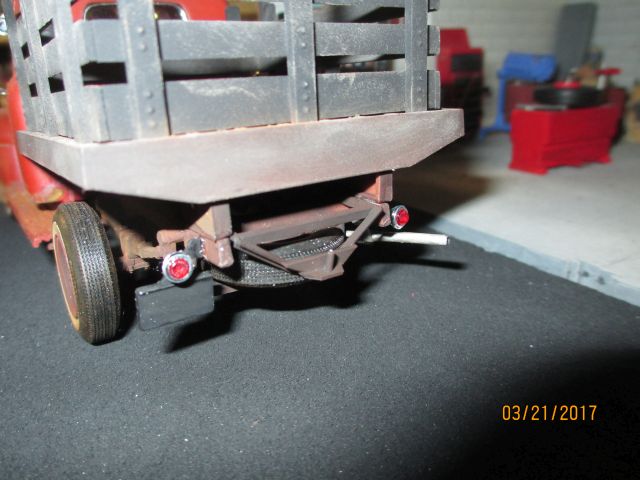
I converted the pickup into a stake bed. I used the stake bed from the 34 Ford kit and made a trailer out of the pickup bed. I had to scratch build the frame for the trailer and also the trailer hitch on the back of the truck. I used Sophisticated Finishes rusting solution for the rust. Also, I painted the truck flat red and rust with a touch of flat black. Same with the trailer. On the wheels of the truck I brushed some real rust on the white walls and then sprayed that with dull coat. For the chrome I used Alclad, kit chrome and the "new" chrome pen. The pen was used on the window trim and the FORD name on the front. The hood chrome is the Alclad and the rest is kit chrome. The tail lights on both the truck and trailer are from the parts box.I hope ya like it and thanks fer lookin.
-
Thanks guys and Snake, yer right Model on fer sure. Dan