Greg Wann
-
Posts
1,268 -
Joined
-
Last visited
Content Type
Profiles
Forums
Events
Gallery
Everything posted by Greg Wann
-
Chevy truck cab lights
Greg Wann replied to Greg Wann's topic in Truck Aftermarket / Resin / 3D Printed
OK, so this seemingly simple mold has been a real PITA!! I had left the mold under pressure over night. When I pulled it out it was still a bit sticky so I put it in the box that I warm clay in. When I pulled it out it had became bloated. I poked it with my exacto knife to see if there was a air pocket, this has happened before. It did not effect the lump so I started all over again. Once again I pressure cast it to a successful cure. I mixed a small amount of silicone to fill it up thinking that it might fully de air since it was not a very thick pour. But it failed as well. Those dark spots are air bubbles that have formed next to the part. This is why vacuuming or de airing the silicone is important in my book. Under pressure these parts might form small warts on the parts and I don't want that to happen. Now I will mix a small amount of silicone and put enough in to just coat the surface of the mold and let it mostly cure then add more to fill later
-
Chevy truck cab lights
Greg Wann replied to Greg Wann's topic in Truck Aftermarket / Resin / 3D Printed
My first attempt was a flop! Back to the drawing board. -
I have a question that I am hoping someone can answer. It has to do with cleaning the air in a paint room. Ok, so a few years ago I worked at Purdue University. I worked out of the facilities management shops that all the trades work from. There was a big paint shop. On one end of this shop was a floor to ceiling metal area that would circulate an oily substance that was supposed to act as a flowing curtain that was to attract particles of dust out of the air. I am curious if this was something they might have invented and used on their own or was built by a equipment supplier. I do vaguely remember replacing the big circulating pump but dont recall much more about it. They did a good amount of wood finish and stains in there. I had made one in miniature for a paint booth I built some time back but it needs worked on.
-
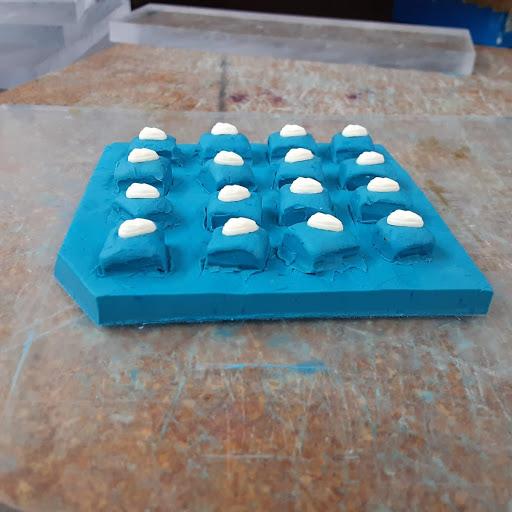
I am working on a project. These marker lights came out of my parts box of parts we had when I was a kid. One of the first models I built was a 68 or 69 Chevy pickup that was orange on the box art and had forestry service decals on it. It had some tools and a bedcover. This mold will make four sets. They will be made from a clear resin and I will add some HOK gold tint to the mix. I was informed by a Smooth-On rep that I might have a better chance of successfully casting clear if I pressurize the silicone to it's curing point. That means it will cure in a pressure pot and that means more work to learn a different way to hopefully get good parts made. clear resin is a real pita. I really dislike small parts that are cast on single sided molds or parts that are attached to a sprue. Flash around the part should be as thin as skin.
-
How many tires? Are they solid or hollow? Fireball Model works might help with 3D printing. He has made some nice master tires for me. I can make tires using PolyteK PT flex 70. I just add some black dye.
-
Need a Good Printer for Decals
Greg Wann replied to Miatatom's topic in Model Building Questions and Answers
https://video.search.yahoo.com/yhs/search?fr=yhs-arh-001&hsimp=yhs-001&hspart=arh&p=decal+pro+videos#id=1&vid=22d1bdc24c442c96513c4e644be0317a&action=click There are plenty of videos about this kit. Yes, there are a lot of steps and a learning curve to get to the actual decal made as there are a lot of steps and a learning curve to get a model built. Resin casting presents a huge learning curve too. This kit is only $90.00 bucks, that is really cheap for it's versatility. Don't underestimate it's usefulness around the house. You can make a temporary tattoo with it and apply a image on leather and cloth and even use this kit to make photo etch parts on brass. This company sells a fab in a box kit for electronic boards, that's how you can make PE parts, but both kits are mostly the same. Be sure you buy the laminator too.Yes, you can buy a used ALPS printer but the person mailing it to you really needs to know how to pack it properly. You might get something that does not work when you get it. I'm sure kids would really like the temporary tattoo thing as grownups seam to like permanent ones. -
Need a Good Printer for Decals
Greg Wann replied to Miatatom's topic in Model Building Questions and Answers
https://decalprofx.com/ Buy a laser printer and one of these kits. You can apply the image to decal paper and turn it into a waterslide decal. A very versatile kit. Just don't buy a Brother brand of printer. -
WOW!! These models are real beauty's . Someone sent a pair of mirrors to me that look somewhat like the ones on the dark red car. The red car has some nice mirrors. If I had some specific Mopar mirrors I could make molds of them. Adding a decent sized stem to insert into a hole in the body would be nice to have on a master. Most antennas on sprues look pretty crappy especially when plated. There are acupuncture needles that look like they would work great for police and other such vehicles in scale. Some have a long spring at the base. They are very sharp. I did acupuncture for awhile so I borrowed a few. They are somewhere in my shop.
-
I did make a mirrors mold, but I don't really like what is coming out of it. I need to remake the mold and add some mirrors to it. Mirrors are of course quite small and frail to make. Sometimes certain ones break just trying to get them out of the mold. This is why putting weight on a mold and putting it under pressure are important to get a good part out. It is not always easy to do. If I could do injection molding the process might be more accurate and consistent.
-
https://www.sulky.com/item/sulky-kk2000-temporary-spray-adhesive-42-oz-120g You might try using this glue to adhere your flocking material of choice on your part instead of Elmers glue.
-
I have a mold that makes a small block and big block hood but I don't know the year< I will have to find the mold.
-
https://decalprofx.com/ This kit can do PE in light brass. With this kit you can create all kinds of decals. You can apply the image to clear decal paper and seal it and then use like a regular waterslide decal. A very versatile kit.
-
Need help finding a product
Greg Wann replied to Modlbldr's topic in General Automotive Talk (Trucks and Cars)
http://www.automotiveforums.com/vbulletin/forumdisplay.php?f=927 I found my bottle of chroming powder. A few years ago there were several pages about this product in this forum.
-
Thanks, I did remove the chrome from this part and intend to make a mold of it and some other parts from this kit too. The tire mold was kind of a bust and I want to do it again. I need more mini me's. I do have Marty helping out too. Also I have a group of guys that are coming to my shop and help whip it into shape so productivity can be increased to. I am a horrible organizer!
-
Need help finding a product
Greg Wann replied to Modlbldr's topic in General Automotive Talk (Trucks and Cars)
I'm pretty sure I have a container that has had very little of the material used out of it. I will look when I get time. It was a hot item for a short time. I bought twenty of them . Made some good money off of them on Ebay and put a few in the Desert Scale contest raffle. I'm not sure if I have any unopened ones left though. The name of it reminds me of a sneeze. Also I don't think this is the same company that developed the CLEARVIEW 2000 product. You are to paint a part shiny black and rub, rub, rub the powder on. Some say it was graphite powder. I think there was a pair of rubber gloves and a cheap face mask in the box too. You might try super fine sanding a pencil lead to make a powder and see what that does no shiny black paint. -
Need a source for tires...
Greg Wann replied to porschercr's topic in Car Aftermarket / Resin / 3D Printed
http://www.fireballmodels.info/ Try Here for tires. -
Chrome plating services
Greg Wann replied to Nitrobarry's topic in Model Building Questions and Answers
https://www.instagram.com/metalrys_chroming/ I just had a guy that I do work for send me this link. The guy is in Poland. He will do a 8X11 rack for $25.00 but postage is not cheap. Greg -
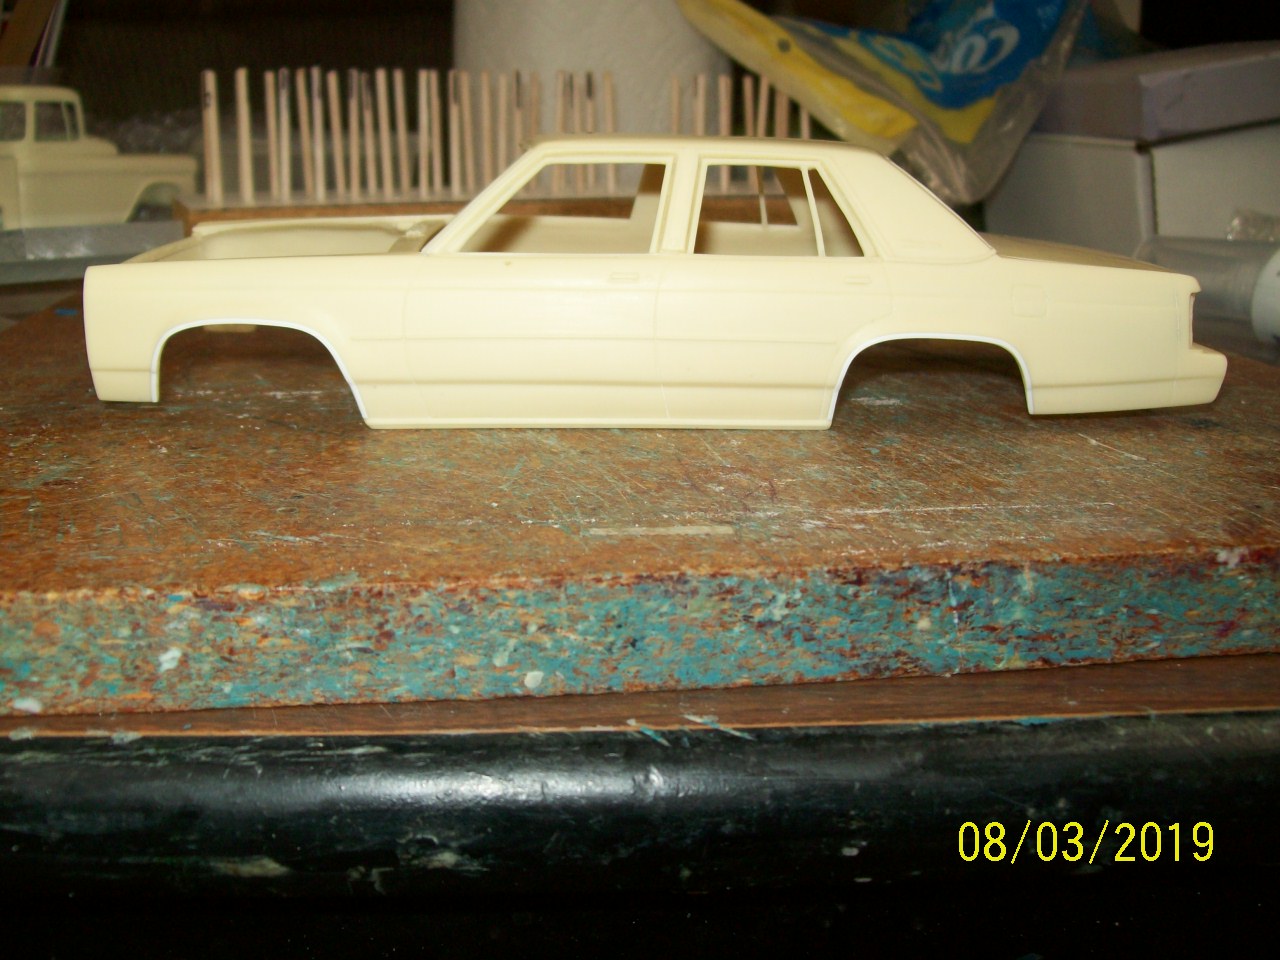
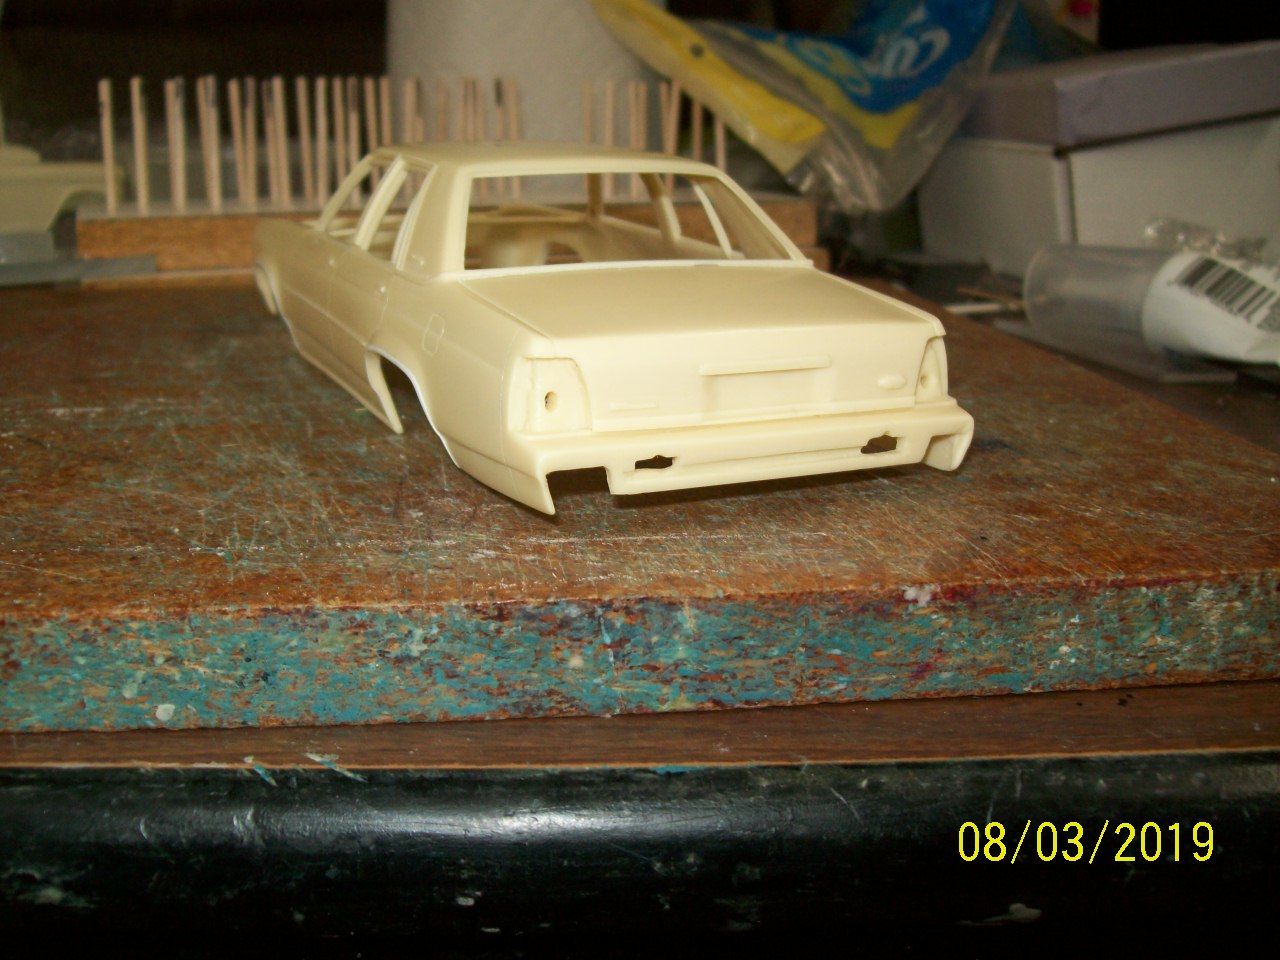
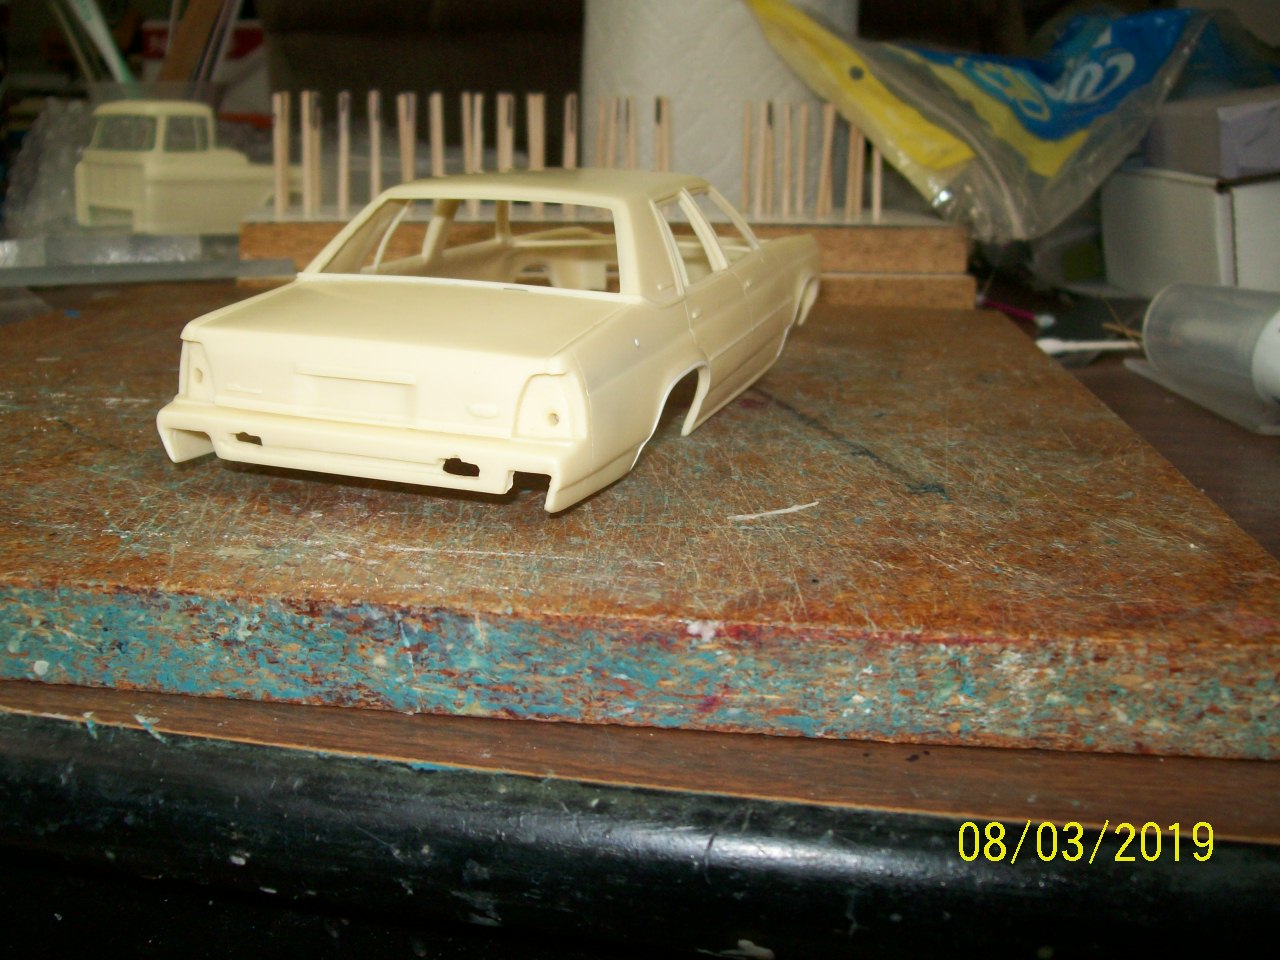
1988 - 1991 Ford LTD Crown Victoria Scratchbuild
Greg Wann replied to DEL's topic in Car Aftermarket / Resin / 3D Printed
We are looking forward to doing more projects with you, Dwayne. Your master making abilities are very, very good. -
1988 - 1991 Ford LTD Crown Victoria Scratchbuild
Greg Wann replied to DEL's topic in Car Aftermarket / Resin / 3D Printed
The body does look really nice. When this mold is done and working like I want I will get a copy prepped for another mold. This way I plan to have two good molds operational. We want a CV in every display case. -
1988 - 1991 Ford LTD Crown Victoria Scratchbuild
Greg Wann replied to DEL's topic in Car Aftermarket / Resin / 3D Printed
A new body mold is needed. Mike gave a new master a good going over. He added more vitamins and minerals and improved the taste too. Please give Mike a standing ovation for all he does for us, and another thank you to Dwayne too for creating this kit for the modeling community. I will be updating some molds for other parts too. I have another pair of hands in my shop to help out as well. Marty is helping when he has the time and lives closer to me than Mike does.
-
Mike Schnur wanted a copy of this hood made. So I am making a mold of it. I will give him several copies. I am trying out a new way of claying up a subject. I purchased some different clay in hopes I could give it a polished sheen on it's surface but my experiment did not work. So, I have plan #2. I am trying a thin plastic wrap on bare surfaces. with the idea of some science or fluid dynamics I'm pretty certain I can make a mold work more efficiently or less drag. I also made some tiny letters. I mounted them on three inch long wood sticks 1/8 inch diameter. By turning a couple of clock radios over, cleaning them, leveling them and pouring a small amount of silicone over them I got some great letter and number molds.. In order to make the letters I mix and pour some resin over them, squeegee the excess off and put it in the pressure pot with a toilet plunger cup set over it so the blast of air does not blow the resin out of the mold. I'm pretty smart like that. My wife calls the progression of such experimentation P.S.D.A., I think. Plan, Study, Do, Act. Well, I might have the words mixed up but you get the idea, we all pretty much do this changing of how something gets done.
-
Wow! Very nice. I like these Toronados. I would like to have one for a resin cast project. Is the Johan the best one to choose? I think AMT and MPC had 67 kits too.
-
http://enterprisemission.com/ https://www.nasa.gov/mission_pages/apollo/index.html What Nasa and Government are really up to.
-
Rubbery/Flexible Resin Castings
Greg Wann replied to BDSchindler's topic in Car Aftermarket / Resin / 3D Printed
The biggest enemy to resin is humidity. Here are a couple of photos of a vacuum chamber I built some time back. It was built out of a ten inch piece of PVC pipe I found in a dumpster at work. I added a interior LED light to better see what is going on inside. I use it to de air silicone before I pour it into a mold box and to remove humidity from my resin material. If you have attempted to try to make your own parts and the resin grows and starts to look like foam in a can it is full of humidity. Resin can reach a 160 degree temperature and the humidity will start to boil and foam up. After some time I bought a dehumidifier. After it was in use for 24 hours, the bucket was full. I could not believe how much moisture can still be in an enclosed shop even using air conditioning and also live in a dry state. A big problem with parts you may purchase that have dimples or warts on them might actually be from the silicone mold not having been de aired first. A silicone product may say that it does not need to be vacuumed but this is a CYA statement on their part. Many times I mix, vacuum and pour and vacuum again even on molds that are not very tall or thick, however you want to view it. Humidity and room temperature can effect the silicones ability to cure. I pour a small amount of silicone over a part with lots of detail like a wheel or grille or a dash and vacuum it. A small bubble can trap in detail crevices causing the part to come out with a wart on it. A small bubble can form just under the surface of the silicone next to a part too. Once pressure is applied that small area will get pushed in and a part can come out looking bad but to the eye the mold can look like there is no problem and from experience that can be frustrating to learn. Sometimes once the mold is inspected the problem is obvious but once it sets for awhile it can look normal again, A Jeckyl/Hyde affect. A air bubble tapped in silicone can be affected by normal air pressure too. if you notice a bump, stick a exacto knife blade in it to relieve the air pressure. The tubing you see has a drain valve attached to it. I usually just hold my gloved thumb over it so the vacuum draws down. The material will start growing and you want to make certain it does not go up and over the top of the container making a big mess. The front clear cover is about a half inch thick. I use a Robinair 2 stage 15500 vacuum pump. You can buy a 2 stage from Harbor Freight, but you should buy the warranty too, just to be safe.
-
In need of help repairing a car badge
Greg Wann replied to Hotrod 97's topic in General Automotive Talk (Trucks and Cars)
Once repaired, mount it on a nice piece of would that is shaped the same as the letters for a background. You could trace it and cut it out a bit bigger, then hang it on the wall. It might look nice .