Ace-Garageguy
-
Posts
38,173 -
Joined
-
Last visited
Content Type
Profiles
Forums
Events
Gallery
Everything posted by Ace-Garageguy
-
Great photos, Alan. Thanks. Helpful to have such good reference pix right in the thread.
-
 EXCELLENT
 -
67F here, with 31% humidity. Almost desert weather in the Swampeast mold and mildew capital of the world. Won't last, but I got a nice 2-hour hike in, opened up the house to air out, and will be heading for the bench as soon as I get a fresh pot of coffee going.
-
I think I’m done with Duplicolor
Ace-Garageguy replied to Brutalform's topic in Model Building Questions and Answers
That's possible too...in which case it's crazing, and as I said above, let it harden up, sand lightly with 800 (you really don't need to go to 3200 or whatever prior to paint, by the way), and respray. If I gave up on paint products or a particular paint job every time I had a problem, I would have quit doing this decades ago. The hood below is Duplicolor over Duplicolor primer. The primer crazed the plastic. It also lifted the bodywork where I took the hood peak off. Then, when I finally got the primer to behave, the color blushed badly and again ate into the softer plastic where I'd removed surface details. But with some effort, it now looks like this...WITHOUT getting horribly heavy paint on the thing. -
I think I’m done with Duplicolor
Ace-Garageguy replied to Brutalform's topic in Model Building Questions and Answers
Looks to me like all you have is some mild blushing. Put a little toothpaste on a finger and see it it polishes off. If it does, just wipe it all down again with alcohol and continue painting. Polish the blush off at the end. OR...if it's NOT blushing but crazing, the garbage plastic we're being given today is most likely the culprit. Some bottom-of-the-barrel Chinese cut-every-last-penny-of-cost-out goo that's not solvent resistant. Either way, it's probably not the paint's fault. And even if it IS crazing, you can let it harden up, sand it slick again with 800, and re-spray. Do this repeatedly, it will almost certainly eventually stay down. -
fmarrr zingrats Fmeep !!!
-
Glad you find it possibly useful. Glad you found it possibly useful too. I did a tutorial a while back where I go into a little more depth...and should be updating fairly soon.
-
What he said.
-
The Oddest Thing...
Ace-Garageguy replied to Straightliner59's topic in Model Building Questions and Answers
Interesting you mentioned that. Here's some more trickery I happened on at the same time I found the Tamiya X-22 reference...colored chalks. https://sonorandesertmodelbuilders.com/xp-47-technique.php -
A DeLorean... With a V8.
Ace-Garageguy replied to Lovefordgalaxie's topic in General Automotive Talk (Trucks and Cars)
Here's another one with a V8. -
zip doopah plubish
-
A DeLorean... With a V8.
Ace-Garageguy replied to Lovefordgalaxie's topic in General Automotive Talk (Trucks and Cars)
Agreed 100%. The 60O V6 in the recent Mustangs is good for something around 300HP too, if I remember right, and its torque wouldn't instantly shred the little Renault box either. -
All-knowing intrusiveness is all around us, all the time now. There simply is no such thing as privacy, and we've willingly let it happen. I've had items I've mentioned in emails...but have NEVER looked at online...start popping up. If Google is reading my mail, even if it is only an inanimate algorithm, I really do NOT like it. Look around online. There are other instances of smartphones that have apparently been listening to people's private conversations...even when the phones were supposedly turned off. As much dirty business as comes out fairly regularly, do you really think we're privy to EVERYTHING big tech is doing behind the scenes and behind our backs? Think again.
-
A DeLorean... With a V8.
Ace-Garageguy replied to Lovefordgalaxie's topic in General Automotive Talk (Trucks and Cars)
Nobody related the possibilities of mid-mounting the engine in a DeLorean to the car in the video to the best of my knowledge. Of course the DeLorean, as delivered, is REAR engined, and the car in the video is REAR engined. I simply said rear-mounting an LS in one of these things makes a car with marginal handling into a car with awful handling, and suggested that if one HAS to have a significantly heavier engine, hanging it out over the rear end isn't the smart thing to do. And if you don't think that hanging an additional 140 pounds all the way at the back of a car that's a tail-wagging-a-dog to start with is a bad idea...well, you should probably brush up on your principles of vehicle dynamics. But there's no question that a later model Porsche gearbox would be a vast improvement over the little Renault box, either. Of course, just because it didn't blow up for the TV show doesn't mean it's bulletproof. The big ZF trans in a Pantera and the last Shelby design would be a good choice as well, but dumping the clutch in one repeatedly will still get you a lot of expensive, oily parts on the ground. And far as Gas Monkey goes, we just happen to have their big old green '29 Packard in the shop too...for a full rebuild and paint. Everything about the car was decidedly mediocre at best...which is why the current owner is having everything done over. As an aside...an increasingly popular swap that's both cost-effective and results in a car that's actually worth having is an LS in a Porsche Boxster or Cayman. I haven't personally DONE one, but I've driven two, and they work as well as the car did originally...and go like stink. PS. Electric conversions rarely, if ever, live up to the breathless and overheated hype. Because the means of storing energy onboard is entirely different, electrics need to be designed from the ground up as electrics if their particular attributes are to be realized as a positive. Otherwise, all you usually really get is a glorified golf cart, suitable for Shriner's parades and not much else. -
I'll take the Stude. I'm absolutely burned out on belly-dragging slammer rods, and big-wheel cars too. Most of the former are still barely drivable even if they ARE shiny and the edges don't cut you, and the unsprung : sprung weight ratio on big-wheel hot-rods makes most of them ride like dump trucks.
-
A DeLorean... With a V8.
Ace-Garageguy replied to Lovefordgalaxie's topic in General Automotive Talk (Trucks and Cars)
Musta been downhill with a stiff tailwind. The DeLorean version only made about 130 HP, and not a lot of torque. Stock, in a DeLorean, it would be hard pressed to come even close to 140. And the LS is, of course, a V8, which makes it considerably longer than the 90o PRV V6, which weighs in at around 360 pounds and is roughly 20 inches long. The LS1, on the other hand, weighs around 500 pounds with the manual-gearbox flywheel, and is about 27 inches long with accessories. -
a pear tree
-
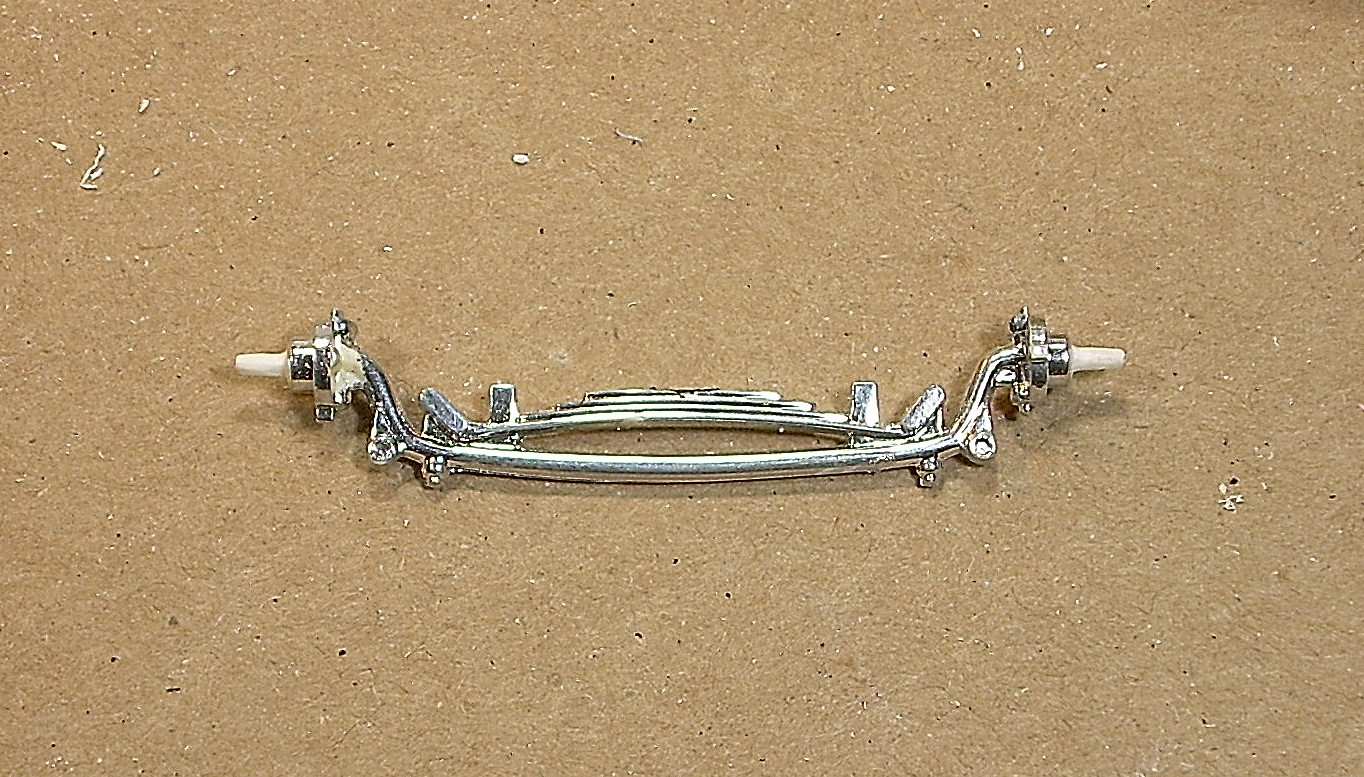
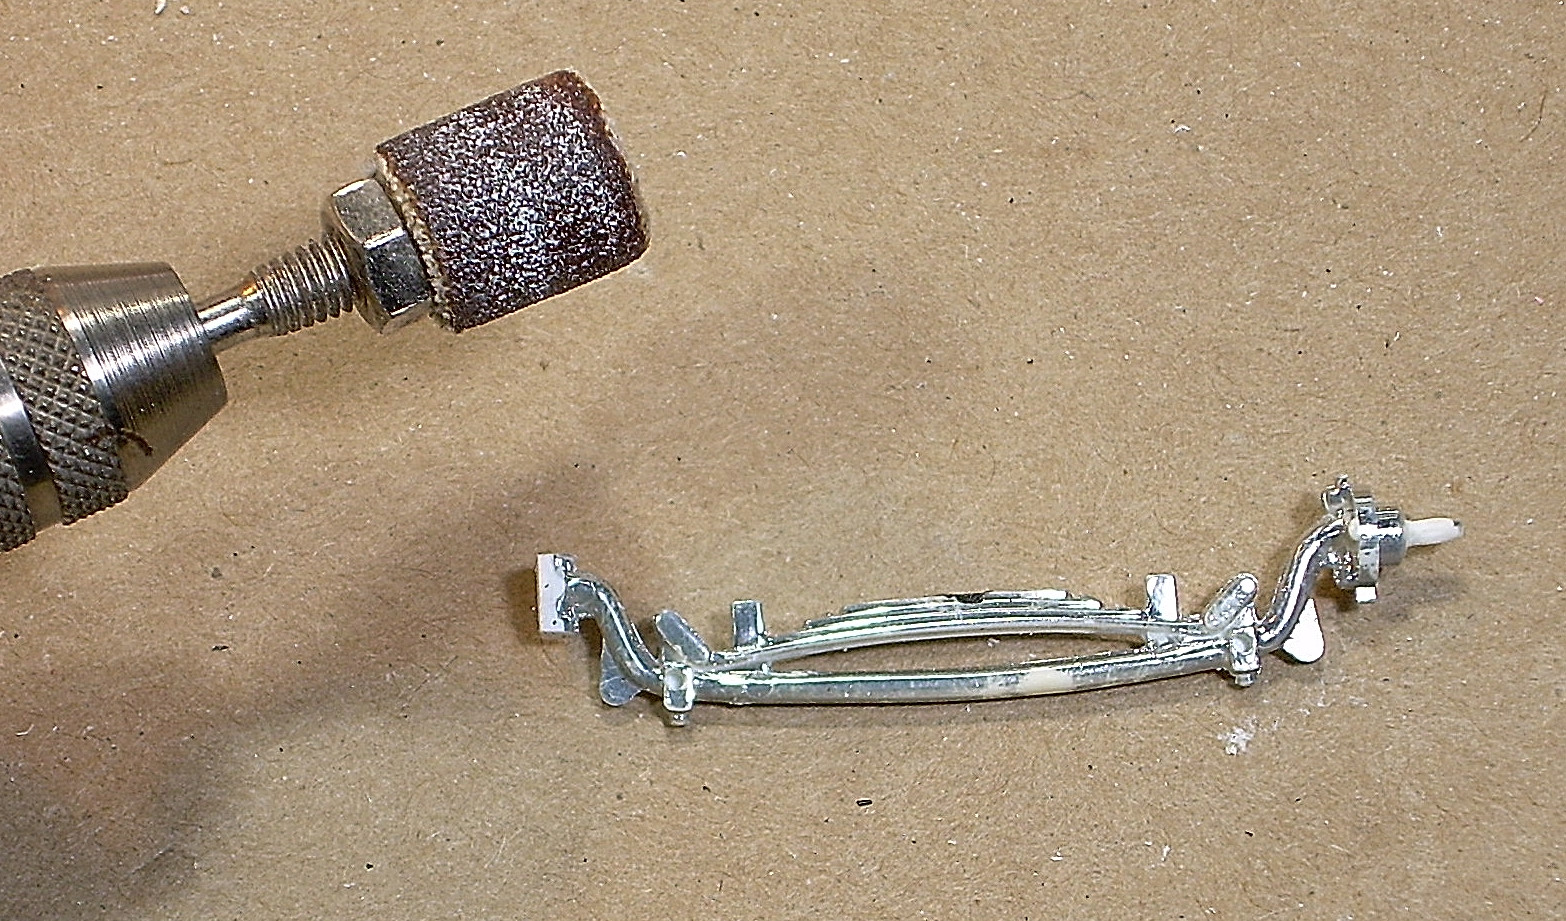
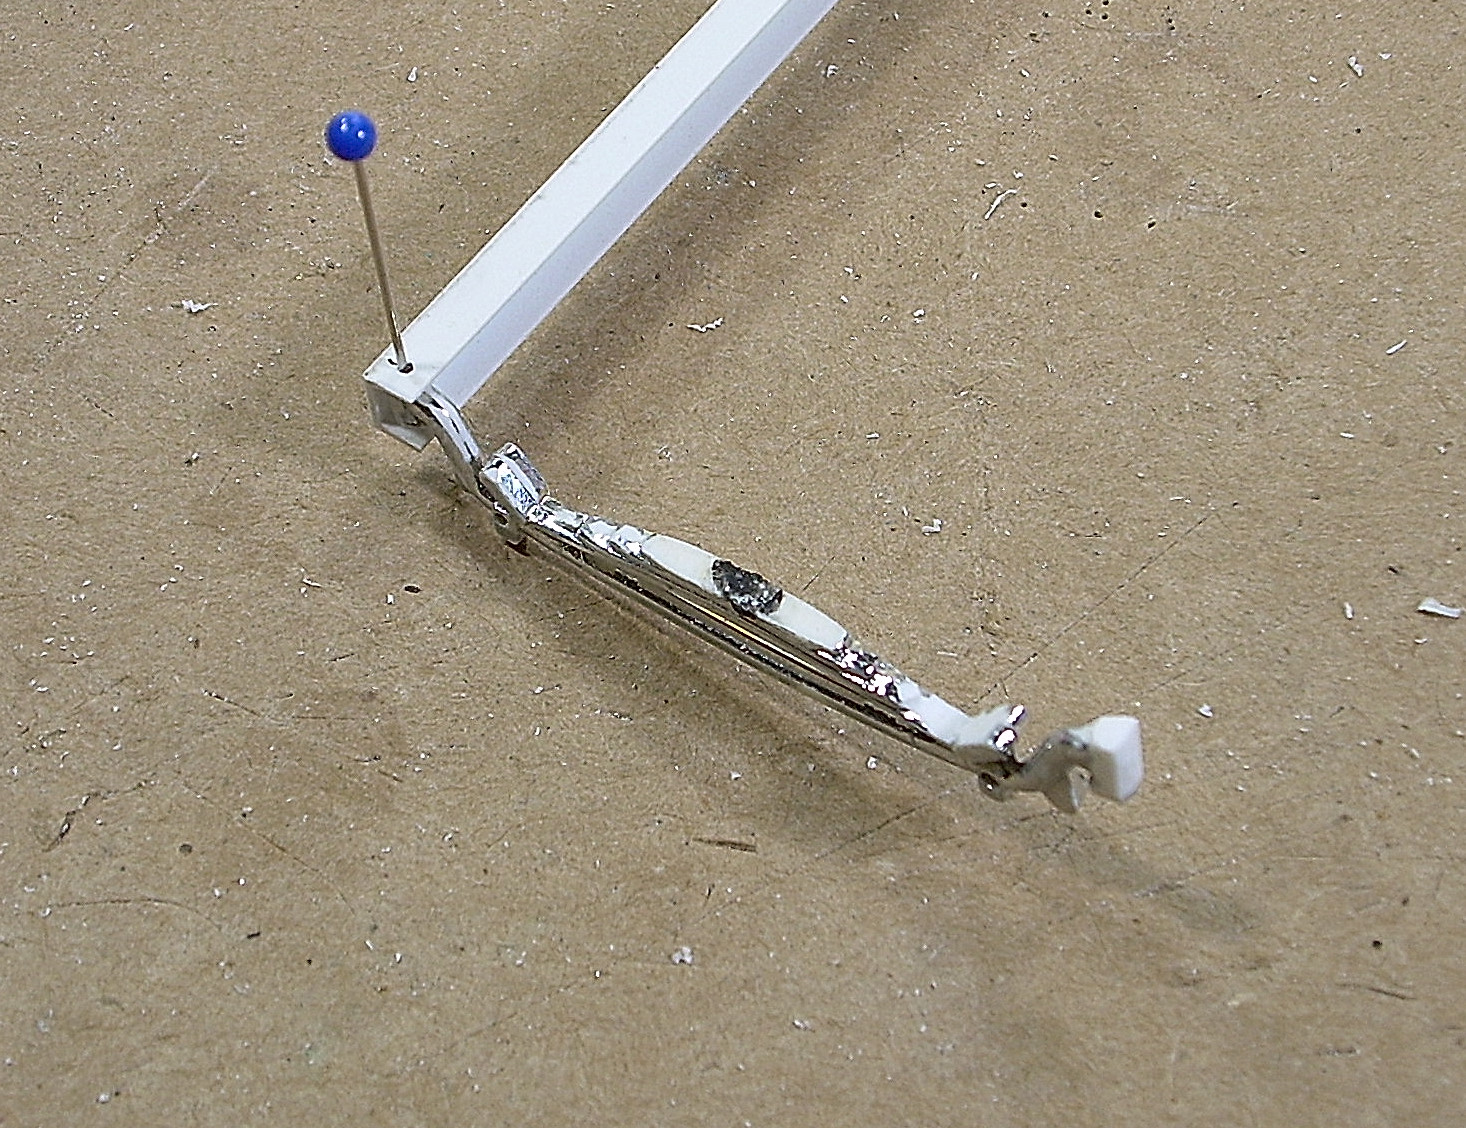
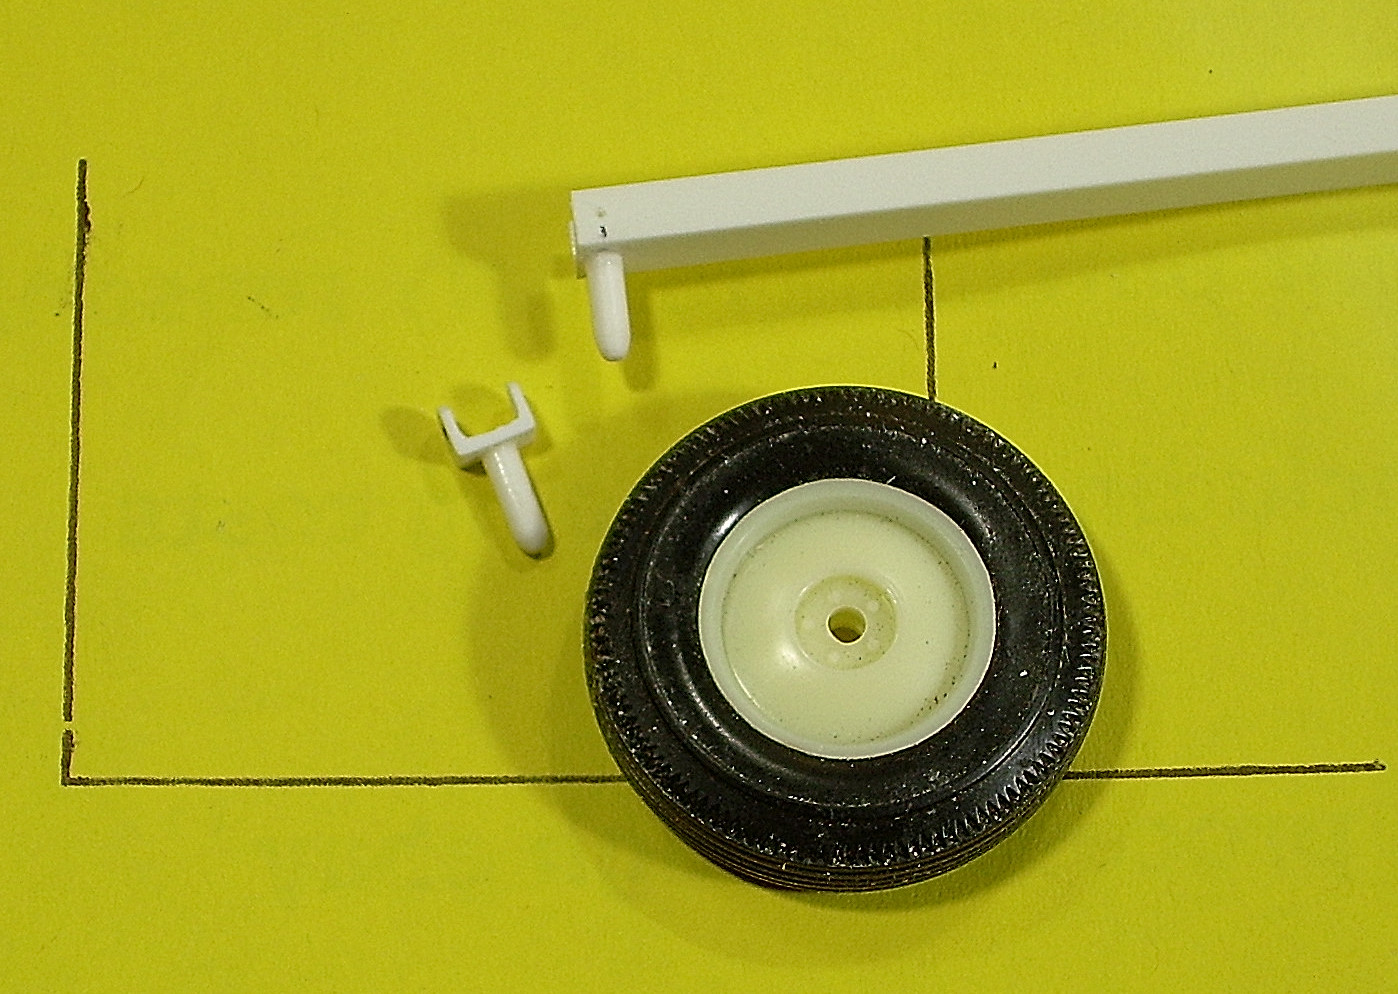
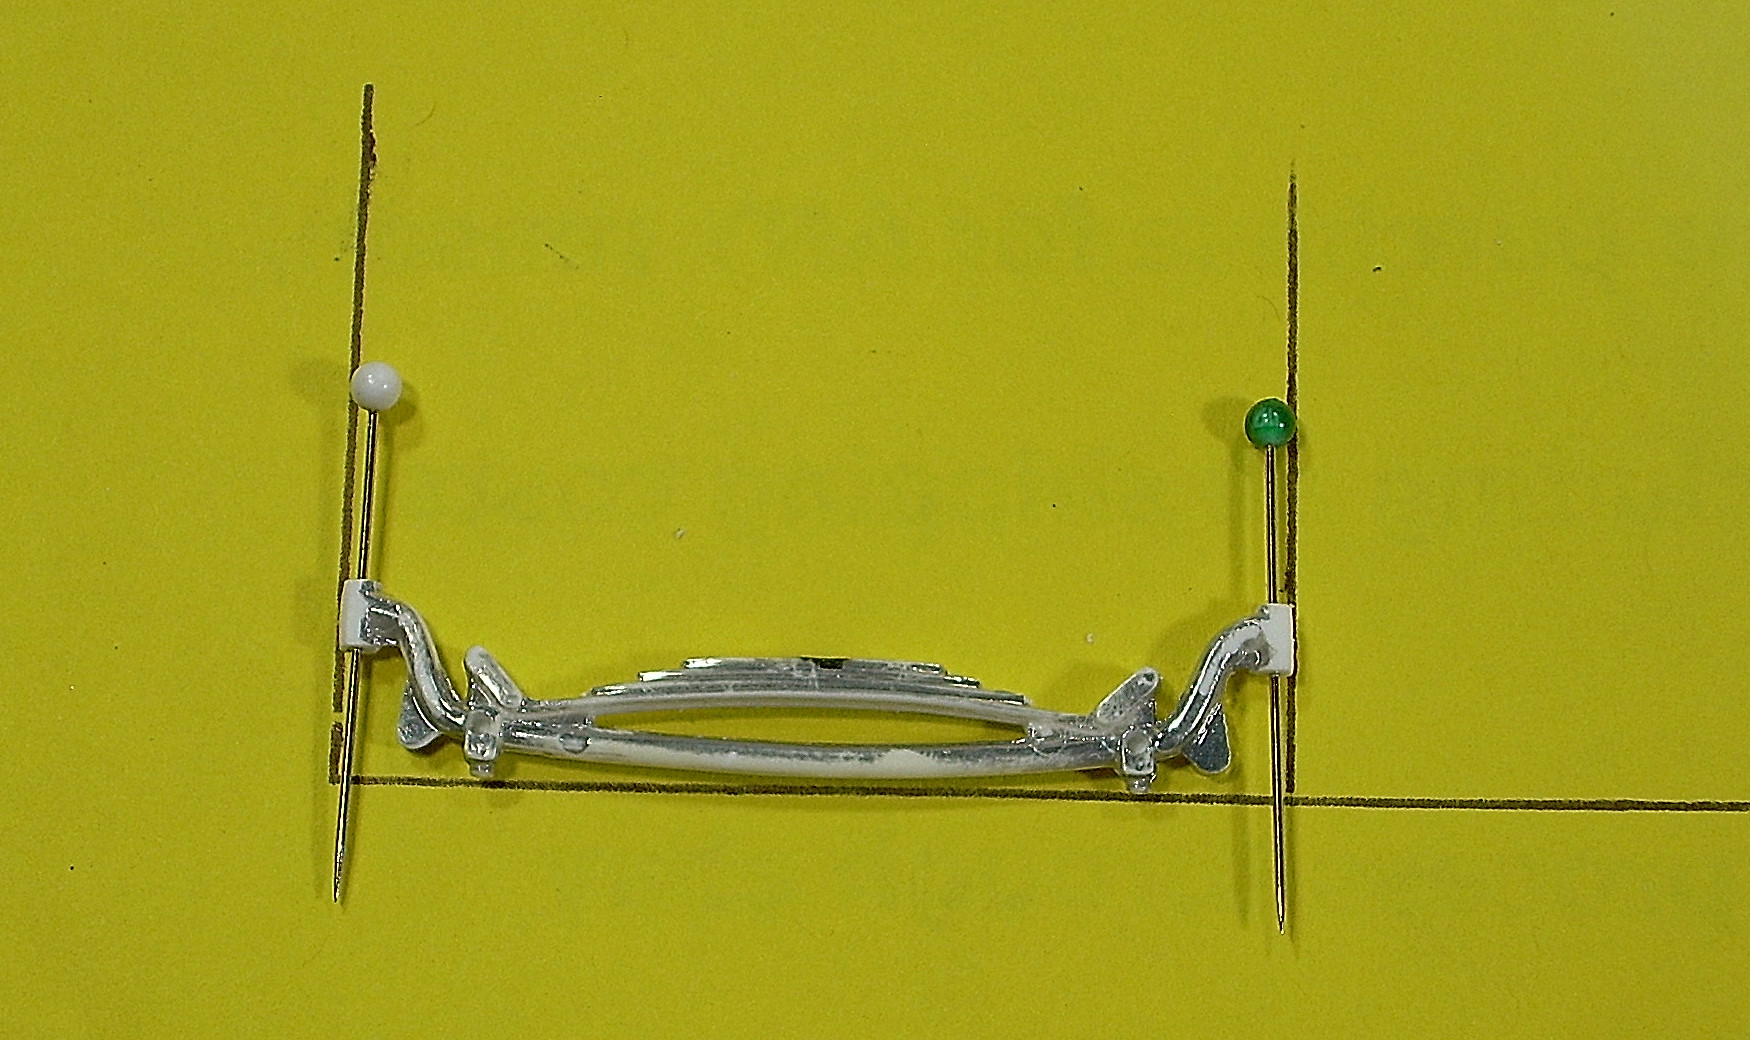
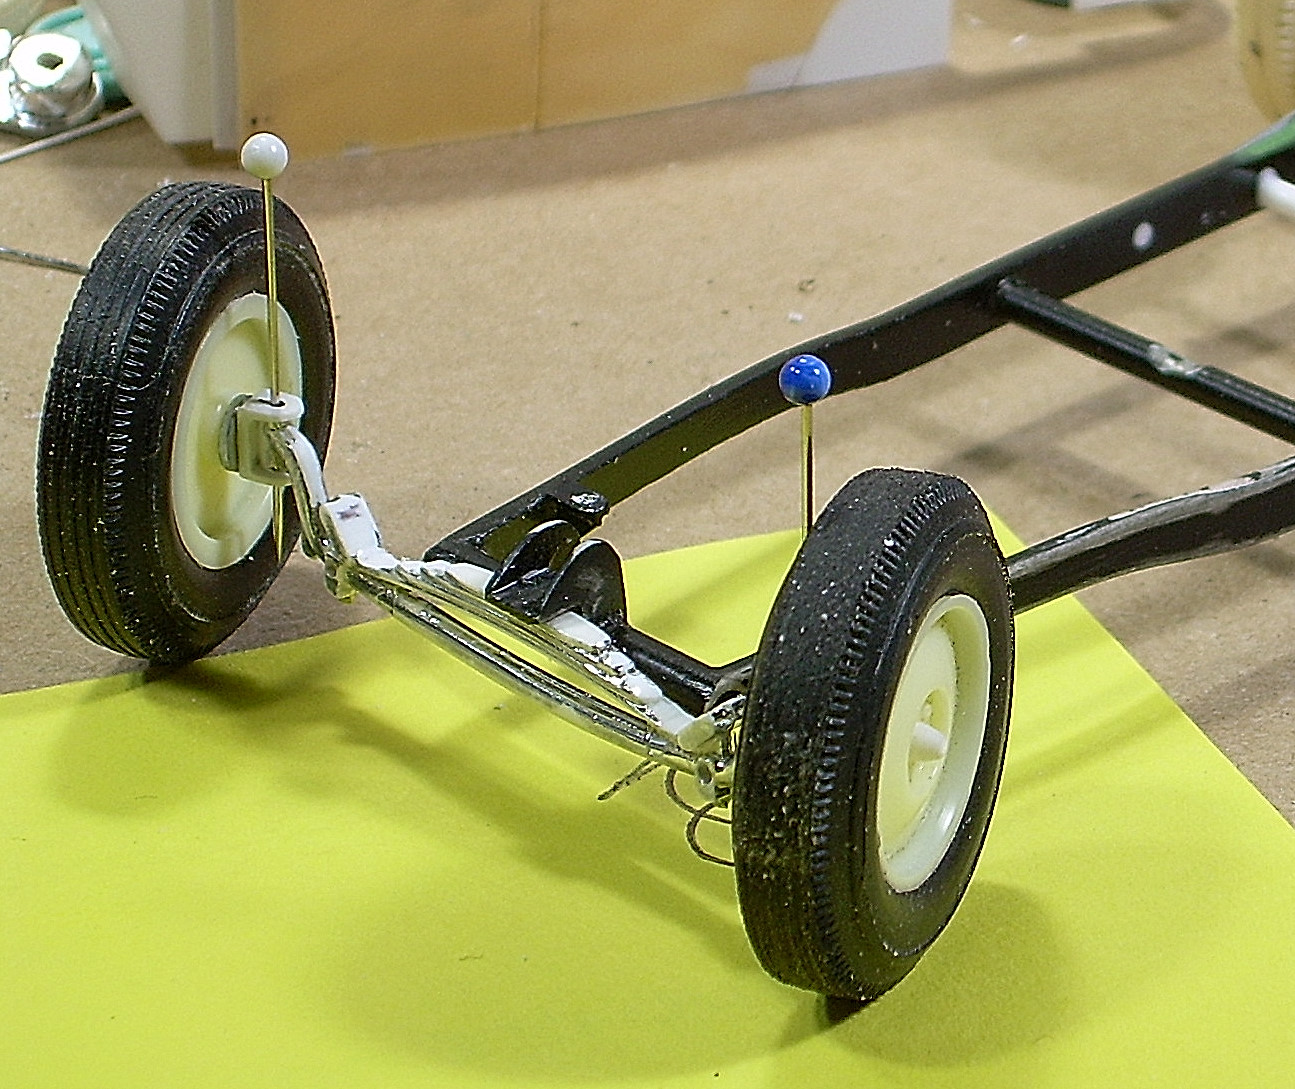
It's pretty much impossible for me to build anything anymore without it at least LOOKING like the steering works. Lotsa extra PITA, but to me, the improvement in first-glance realism is well worth it. And I've finally done enough different types so it goes pretty quickly...usually. Below is the dropped tubular axle familiar to everyone who's ever built a Revell '32 Ford kit. It's more-or-less period correct from the late 1940s up until the present. First trick is to surgically remove the spindles and stub axles. I start with a drum sander on the Dremel, and finish with files. All you want to leave is the king-pin boss at the end of the axle. Once the boss is cleaned up nice and square and round, it's drilled .020" with a pin vise. Work alternately from the top and bottom, paying close attention that the drill runs true in the center of the boss. Work carefully and the holes will meet in the center. Straight pin shafts, .020" steel, are used for the kingpins. They're plenty strong in this application. The spindles are made up from channel stock, with the axle ends carefully fitted inside. Spindles are shaped to look like spindles, and stub-axles are glued into centered holes. These stub-axles were sized to be a nice fit in the centers of the front wheels, and the ends tapered to represent dust caps for the wheel bearings. Below, you see the wheel installed on the stub axle, as the spindle is installed on the axle. Let the stub-axles dry at least overnight before you do this, and they'll be plenty strong to hold the weight of the model too. A Q&D check was made of the angles of the kingpins relative to each other. Pretty close, eh? Angle of the kingpins is close enough to reality for me. Final camber is determined by the angle the stub axles make with the spindles. And so...we have a front axle with poseable steering.

-
Thanks for your interest and kind comment. Yeah, I love making stuff from junk.
-
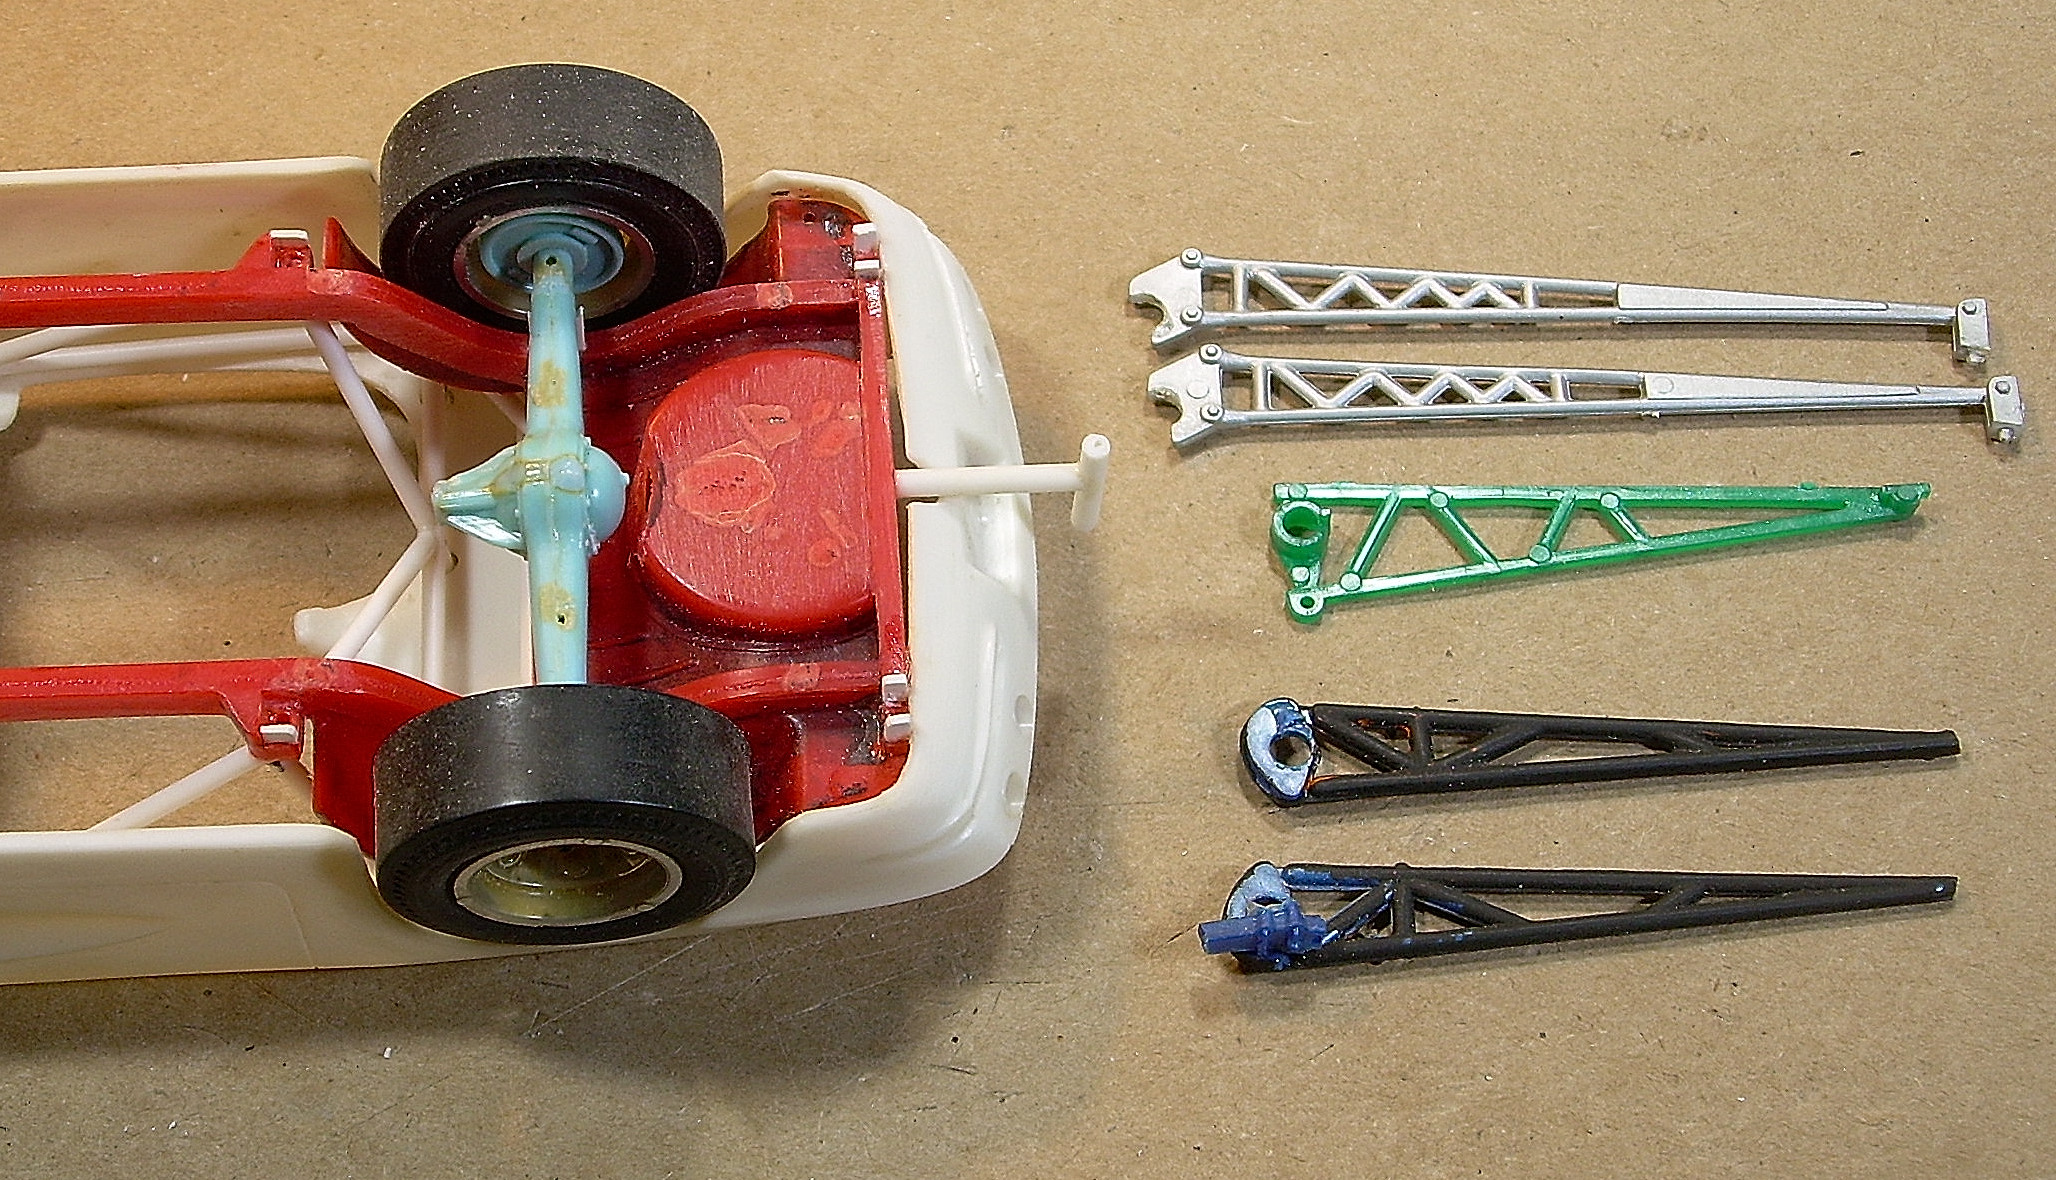
So...we gotta have some kind of "traction bars". Traction bars simply keep the rear end from rotating relative to the car during brutal acceleration. When the rear end "winds up", the tires usually dance around on the pavement, losing traction. Nasty launch characteristics and broken parts result if the rotation of the axle isn't controlled. I could use the old-school style that goes by that name, but they're a little lame for a serious, blown car. Ladder or lift bars will give more precise control, but they don't work well with parallel semi-elliptical springs unless you jump through some hoops. Because of the (usually) different distance between the axle and the forward end of the spring eye, relative to the distance from the axle to the forward ladder-bar pivot, binding in the suspension is inevitable, again with jumping, shuddering launch characteristics, and more broken parts. This can be alleviated by allowing the axle to slide and rotate somewhat relative to the springs, but keeping it closely controlled relative to the chassis by the ladder bars. Several ways are available to do this, and the parts are relatively small and difficult to fabricate cleanly in 1/25 scale. I've chosen a simple method to represent, but it won't be 100% accurate...it will simply give the impression of being there, just to keep the build honest, with thought given to function. The ladder bars I have to pick from are shown below. Because of constraints caused by the floor and the frame rails on this car, none of them really work acceptably well. But not to worry. The black ones, salvaged from a Revell SWC Willys gasser, can be modified. But first, I had to get the curve of the springs correct to maintain the previously established ride-height, taking into consideration the effect the axle "sliders" will have on height. Then I laminated additional leaves from strip stock. The ends of the single-leaves are only .020" styrene, and won't support the full weight of the model...but the shocks, when installed, will. I'd kinda wanted to have everything working back here, but if I do, I'll have to fab brass springs, shocks with sliding sections, and the thing will just go into limbo in the meantime...with all my other builds. So we're gonna fake it. This last shot shows how the modified Willys kit parts will fit. The axle end will be gusseted heavily, with an additional upper diagonal tube, and the forward end will be fitted with a pivoting eye that catches the frame just at the engine plate. Classic lift-bar design, and it will all clear the floors.
-
had a cheesecake
-
Cool. Reminds me of one of Fred Dibnah's machines.
-
Baaaa. Baaaaa. Baaaaa.
-
The Oddest Thing...
Ace-Garageguy replied to Straightliner59's topic in Model Building Questions and Answers
Here's an old thread on sealing and clearing metalizers... -
The Oddest Thing...
Ace-Garageguy replied to Straightliner59's topic in Model Building Questions and Answers
I have to strenuously disagree. I've been using this stuff for decades, and never had anything happen like what you have here. The "buffing" metalizer will simply turn to silver paint if it's clear-coated. but if it's allowed to dry thoroughly prior to buffing, and then allowed to dry very thoroughly without subsequent handling, it eventually gets hard enough to handle with no damage, and will maintain its "polished metal" appearance. I live in a habitually high-humidity environment, and shot this cowling (NOT the cockpit cover) about two years back. It still looks exactly like this. No clear, and can be handled with no fingerprints. EDIT: AFTER DOING SOME RESEARCH, I find that apparently Tamiya X-22 can be misted over buffing metalizers to seal them, without killing the effect, prior to decaling. This is said to be superior to using Future. I'll certainly be following this up with experimentation.