Monty
-
Posts
3,217 -
Joined
-
Last visited
Content Type
Profiles
Forums
Events
Gallery
Everything posted by Monty
-
Sorry I'm late to the party. I meant to compliment you on this when you first posted it, but somehow never got around to it. IMNSHO, your color choice paid off in spades because it's not only attractive, it's vastly different from what we usually see used on these builds, making it stand out in a crowd. Anyone not fully familiar with Oldsmobile's paint colors for that year might also assume it's a period-correct hue. In addition, your detailing around the grille area, the (Fireball?) door handles and whatever means you used to accent the depth of the door and trunk lines help lend to the overall realism. Pose a build like this in front of a garage diorama background like yours and...voila'.
-
I really like how this turned out. These cars look awesome in a number of colors, but I think they flat out rock in medium to darker reds. Question: would you mind sharing the P/N for the engine paint? I would've thought VHT paint might be too hot for styrene. Did you do anything special to prevent any damage, or did it just go on without any issues?
-
Another fantastic build, Mark! Did you actually build it straight OOB? I ask, having seen some of the amazing parts you've created for other builds.
-
There's not a LHS within 100 miles of me, so I have to rely on pics from the internet to get an idea of what to expect from a given color. These two colors look great to me, but I'd like to see builds with them side by side so I can see the difference. If possible, outside shots might even be better. TIA for all helpful replies.
-
They seem to have a decent line of RR colors, and if you scroll down further there are some car colors I might be interested in. Haven't done enough reading to determine what they're made of (acrylic, lacquer etc) so any experiences, pics etc would be appreciated. https://trucolorpaint.com/products/paint/
-
1/25 Revell 1969 Dodge Charger R/T body wip pics.
Monty replied to wisco8's topic in WIP: Model Cars
Don't mind me, I'm just going to camp here and stare in envy at that gorgeous paint. Fantastic work. -
I've never had a problem checking out his site before, but haven't been able to get on there over the last few days.
-
My first thought would be to mask and shoot the paint over the wheel arches, then do the straight body line. I'm guessing Tamiya's new-ish thin masking tape will be needed to get great looking results. I do have an airbrush so that should help some. An even bigger hurdle is trying to replicate that contrasting pinstripe. Any ideas there?

-
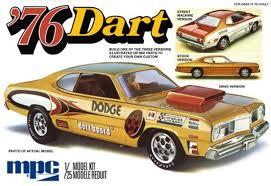
I'm relying on decades-old memories here but I believe the MPC '75ish Dodge Dart had those extractors as well as a set of Pontiac Firebird Honeycomb wheels as the "street machine" option. I remember seeing those as a teen and wondering what on earth would cause MPC to add GM stuff to a Mopar kit. I'd love it if one of our kit historians could explain that for us. Here's some box art I found with the Pontiac wheels. Doesn't look like they used the extractors on the box art builds, but I'd bet they're still on the sprues. Maybe you could try and get the earliest version of this kit to increase your chances of getting them.
-
This may be the best build of that kit I've seen. Your grille detailing looks great and the Tamiya tape was obviously worth every penny. Given how the body and interior turned out, I'm sure I'm not the only one who'd like to see some engine and chassis pics too. Just out of curiosity, would you mind telling us what paint you used on the body (ex: Testors #1265).
-
I've noticed that most model pics hosted by Photobucket are blurry and the Photobucket logo is fairly prominent, often covering a good portion of the subject matter. Since most people seem to be able to take acceptable pictures with phones or actual cameras, I have to assume it's the host causing the problem. If memory serves, p/b caused a furor a number of years ago when they jacked up their price, which I think backfired. Are these bleary pictures their way of trying to get people off their free hosting and pay for better pictures? Kinda sad to see so many nice reference pictures ruined...
-
I think this kit is often overlooked, which is probably why we don't see a lot of them built. Between this and your other post, it looks like you did a nice job on it. A few questions: 1) Did yours come with clear headlight lenses or did you add those. Mine kit is buried somewhere in storage, waiting to be built, but I'd swear it has headlights cast as part of the grille assembly (chromed, not clear). 2) Would you mind telling what red paint you used? (ex: Testors #1203) 3) It looks like you did some detail work on the engine (wiring). Any shots of it in the engine bay? Thanks!
-
I've tried to post this in a number of these airbrush queries, but it seems to get ignored more often than not. We have a board member who has reviewed most of the airbrushes mentioned in these threads. It couldn't hurt to check it out: https://sites.google.com/site/donsairbrushtips/
-
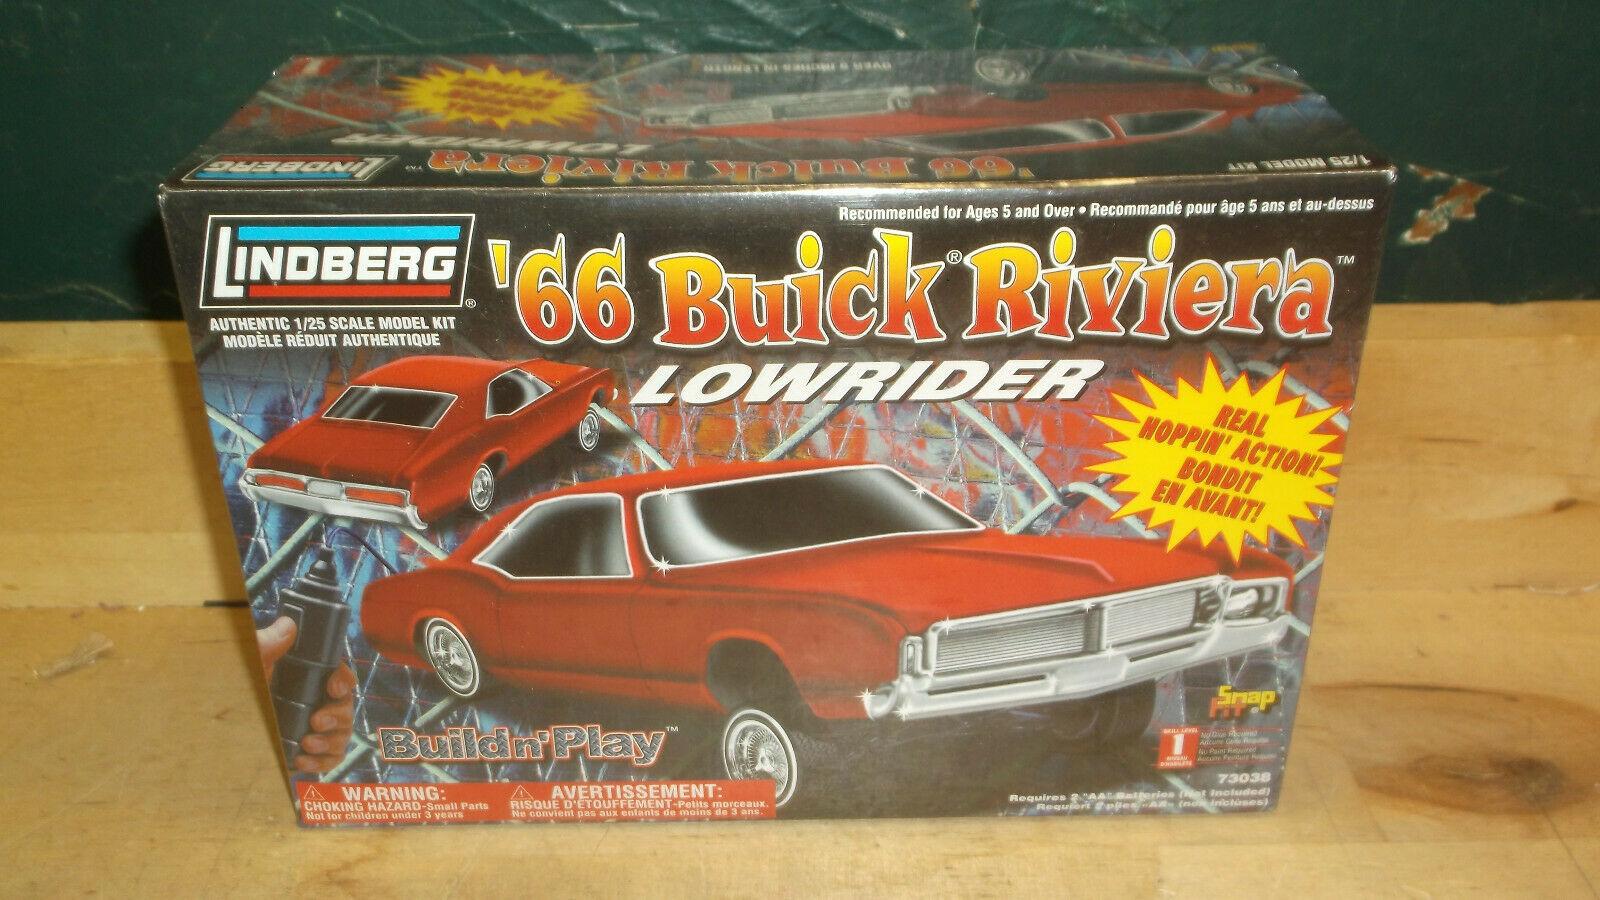
After what I'd call some encouraging success in the '90s, ('67 442, '66 Chevelle, '53 Ford) Lindberg came out with a line of 1/25 cars (and a van) with working hydraulic components they originally called Hoppin' Hydros. The ones I saw looked like direct ripoffs of AMT stuff, such as this Riviera a '64 Chevy and an early '70s Chevy van. There may have been others, but I haven't seen them. To my way of thinking, these couldn't have been created without leasing AMT's molds. Anybody have any inside info?
-
Kudos on a great build and color choice. Any chance I could talk you into posting some engine and chassis pictures? I've got this kit warming up in my on-deck circle and I'd like to see what it looks like assembled.
-
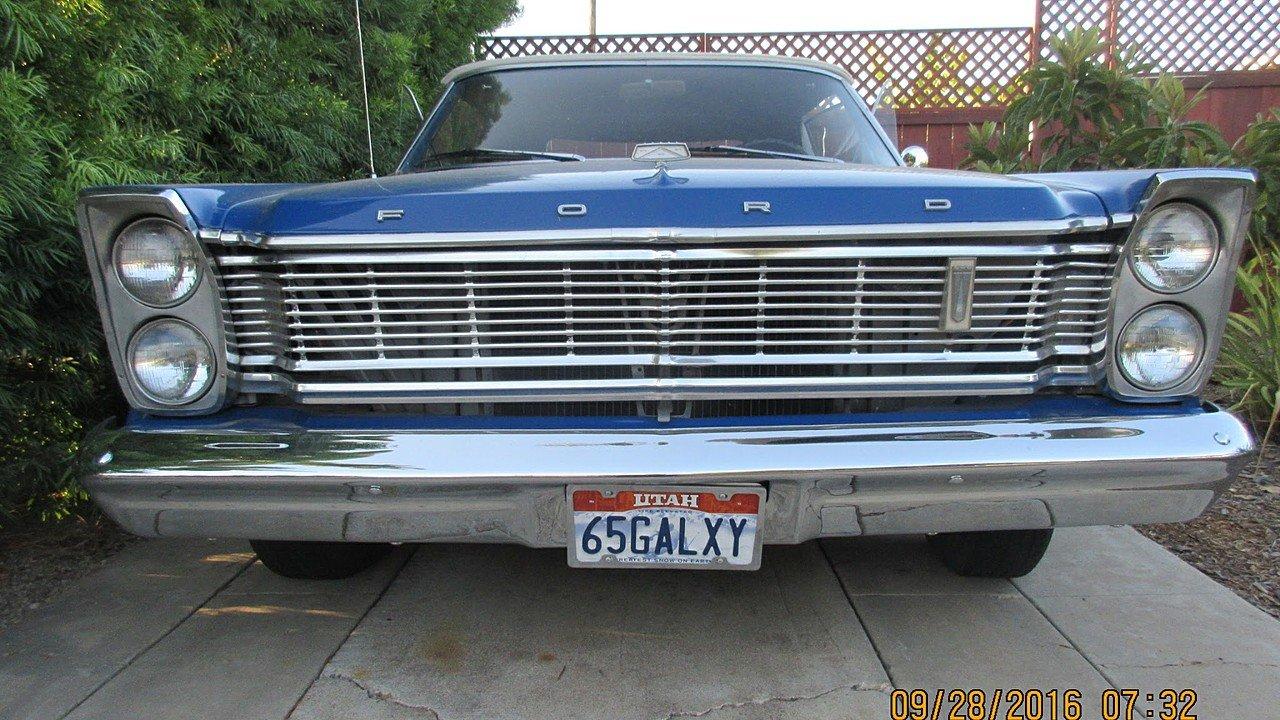
Unfortunately, due to circumstances I can't control, my '65 Galaxie won't be finished until long after you and Brutalform are done with yours, but I love the fact that you're comparing notes and looking for ways to improve your builds. I don't know if you saw what I posted in Brutalform's thread, but one of the biggest issues with this kit is the headlights. Someone at AMT really got the bezel area wrong as there are "rings" that are a scale 1/2 inch high around each headlight opening. As you can see here, the actual item does not have them. For the sake of accuracy, I recommend fully drilling the headlight holes out and getting rid of the rings. I look forward to seeing your future posts and following your progress.
-
Now ya tell me. Notice my missing arm? Thanks loads.
-
Weird. Don't see any offensive words or anything that should've triggered a block. I got around it by cutting and pasting some of the material, leaving nothing out, and it worked. Go figure.
-
The last time I looked into buying a Dremel (5 years ago?) I was surprised by the number of people who cautioned me that they generally spin at RPMs high enough to melt plastic, which to me kind of limits their usefulness. OTOH, some had gone as far as to wire rheostats into their Dremels so they could dial the RPMs down. Just curious if anything had changed, i.e. is there a Dremel that has a built-in control that will allow more low-end operation? Seems like they offered a 6-speed unit at one time. Would that obviate the need for a rheostat? As is probably blazingly obvious, I don't know much about these tools, so any helpful links to items of interest would be appreciated.
-
You've made a very generous offer, and I appreciate it, but I'm going to try and replicate your results using my Humbrol paints. I'm pretty sure they offer the same two shades as the Revell paints you used. For some reason, Revell doesn't offer their paints in the US or even Canada, IIRC, which is unfortunate for me 'cuz I'm a paint hog who'd like to own 3 of every shade ever made, and Revell seems to have some colors I'd really like to try. I will say, from seeing your pictures, they seem to spray very nicely. What did you use to reduce yours?
-
I've been trying to respond to a new member's posts and can't. Just curious why.
-
That's an amazing color you've created, and one of the many reasons I like using airbrushes over rattle cans. Too bad it's such a pain to get Revell enamels here.
-
Any idea what black they used on the block and heads?
-
BrutalForm, your post couldn't have come at a better time, as I am going to be doing a very similar project starting with swapping the R-code engine from the '60 Skyliner into an otherwise stock '65 Galaxie. It'll be billed as an owner's attempt to get more power as opposed to a numbers-matching factory product. (I like 'em, but I couldn't replicate those headlight covers at gunpoint). Here are a few areas where I wouldn't mind some input from you or the other members. 1) I'll be watching as you guys remove the exhaust systems from your cars. I know the RPMs are usually higher than what we want for plastic, but would a Dremel be worth using for knocking off most of the exhaust? If not, what would work best? 2) This'll sound a little silly, but I'm curious how much difference in color you guys are making between, say, the inner fenders and the engine itself. Some pictures I've seen indicate both are semi-gloss variants. If Ford used different shades, I'd like that to be evident. Glad to see someone else addressing the headlight issue. Why AMT chose to make mounting rings that rise above the bezels I'll never know. I do know they look ridiculous when you build it that way 'cuz I built my first one that way when I was 12. Maybe someone at AMT liked Bugeye Sprites... TIA for any advice, and I'll keep watching yours as I'm excited to what you can do with it.