Modlbldr Posted October 27, 2017 Posted October 27, 2017 This is very cool and creative! Beautiful weathering. I'd love to build something in a similar vein someday. I have a ton of parts that are not particularly useful anywhere else.Later-
Cpt Tuttle Posted October 28, 2017 Posted October 28, 2017 I loved this one from the start, I like when fantasy and imagination is allowed to flow free more than I like rivet counting.
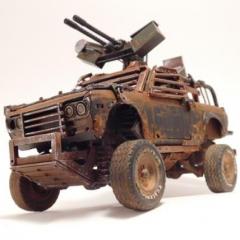
Daxman Posted November 27, 2017 Author Posted November 27, 2017 I wasn't %100 satisfied with the blue and white combo. 3 paint jobs and a month later and I'm very happy with it. I hope to have it finished soon.
misterNNL Posted November 28, 2017 Posted November 28, 2017 Model creativity at it's best! Thanks for sharing.
Spex84 Posted November 29, 2017 Posted November 29, 2017 Love it So creative, and visually striking. Some say "Star Wars", but really it's "Fifth Element". "You have...1 point left on your license" The red was a good choice, well done!
Daxman Posted December 4, 2017 Author Posted December 4, 2017 I came up with a solution for the rear side-thrusters this weekend. They fit snug inside the rim, which allows them to pivot slightly. I'm very happy with the results! I have hoses and wires hanging from the undercarriage. I hope to make them more visible. I also have plans to make retractable landing skids that will be tucked up between the frame and the front suspension. They will not be articulated, but they will be visible. I'm not too excited about starting the interior and windows. Thank you for all of the positive comments! More grime and weathering to continue....still learning as I go.
Crankenstien Posted December 4, 2017 Posted December 4, 2017 remind's me of a 57 chevy that was in heavymetal years ago interesting piece for sure might use gundam part's for the venting parts you needed
WolfmanJedd Posted December 4, 2017 Posted December 4, 2017 This is so inspiring! I'm going to do something like this with a '57 Chevy that I found was missing parts. I just love it! So creative! Great weather too.
Daxman Posted December 4, 2017 Author Posted December 4, 2017 2 hours ago, Crankenstien said: remind's me of a 57 chevy that was in heavymetal years ago interesting piece for sure might use gundam part's for the venting parts you needed My son has quite a few old Gundam models. The thought didn't even cross my mind.......I was racking my brain for weeks, trying to come up with something. I'll be sure to look through his scrap bin on my next build. The more I look at the photos of the rear end, the more I dislike the "fake" vent inside the center exhaust. I might have to come up with something new. That's one thing I hate on new cars of today. Fake plastic vents. Fake hood scoops.... One more thing that I feel that I need to clarify! The 2 pipes coming off the right side of the vehicle. These are heat shields for the fuel lines that feed the 2 rear engines. I wanted to accentuate the fact that the car was asymmetrical. It needed something extra on that side of the car. They look like exhaust pipes, but if you look under the frame, there's a large diameter hose coming out of each pipe feeding the rear engines.
Crankenstien Posted December 4, 2017 Posted December 4, 2017 scifi kit's have a world of interesting part's as do old armor kit's just depend's on what your doing
DeadInside Posted December 4, 2017 Posted December 4, 2017 Have you thought about blackening or putting some sort of soot color/texture behind the rear-side thrusters? Overall amazing, amazing build and concept. I made an account just to comment
Belugawrx Posted December 4, 2017 Posted December 4, 2017 I like it, looks like a chunk of flying metal.. A little jet exhaust as per Jerry, would suit it nicely Cheers Dax
Daxman Posted December 5, 2017 Author Posted December 5, 2017 Yes....soot, grime and rust are soon to follow. A layer of soot trailing everything behind the front jets.
DeadInside Posted December 5, 2017 Posted December 5, 2017 1 hour ago, Daxman said: Yes....soot, grime and rust are soon to follow. A layer of soot trailing everything behind the front jets. awesomeeeee
Daxman Posted December 6, 2017 Author Posted December 6, 2017 We have front landing gear! Here's a few pictures of the fuel tank under the hood. The two pipes leading under the frame will lead into the two rear engines. I also threw in a picture of what's in the trunk. There's a bunch of pipes and hoses I need to add. I want it to have excessive hoses and hydraulic lines everywhere. It's not glued together yet. Hopefully everything lines up well in the end. I'm having issues with the way that the hood meets up to the body. Even before I started all of the heavy modifications, I had trouble with the way they fit.
Daxman Posted December 7, 2017 Author Posted December 7, 2017 I removed the false exhaust vent at the rear and put in some hinged flaps. Not sure what I'm going to do with the inner workings in that exhaust cavity. Maybe more I'll add some inner fins. Lots of soot!
DeadInside Posted December 7, 2017 Posted December 7, 2017 If you add fins inside in the cavity, is there a way you could make them look mangles or damaged in some way? like an old ac unit? or like damaged window blinds?
Mr Dedo Posted December 7, 2017 Posted December 7, 2017 Wow. I wish you could have seen the first time my grandson saw these pictures. He went nuts. Diesel punk...superb ideas. Thanks for sharing. Inspiring!!!
Daxman Posted December 9, 2017 Author Posted December 9, 2017 Thank you for the great comments! Here's the finished center exhaust. I added 5 slats where the fake vent was. Looks so much better! I'm adding a flight computer that will be installed under the hood. I took the navigation dashboard controls out of a Ford Raptor kit that I was never going to build. I have a thin piece of transparent blue acetate that I plan on using for the monitor screen, to give it some depth. Hopefully it works.
Daxman Posted December 12, 2017 Author Posted December 12, 2017 Started on the interior last night. It's looking good. Getting excited about the interior now, even though it will barely be seen. Here's a few pictures of the flight computer and wiring.
Recommended Posts
Create an account or sign in to comment
You need to be a member in order to leave a comment
Create an account
Sign up for a new account in our community. It's easy!
Register a new accountSign in
Already have an account? Sign in here.
Sign In Now