Mattilacken Posted October 29, 2024 Posted October 29, 2024 Looking forward to your progress! Keep it up! 1
David G. Posted October 31, 2024 Posted October 31, 2024 It's nice seeing this one back on the bench, keep up the fabulous work! David G. 1
JohnH1973 Posted November 27, 2024 Posted November 27, 2024 Great job looking forward to seeing Eleanor finished 1
adamelvis Posted February 23 Author Posted February 23 Top Studio has some very highly detailed rivets and washers (which you don’t have to cut out and come attached to a sticky cellophane). You can use these to make door locks for your door panel. TCB, Adam 5 1
adamelvis Posted March 3 Author Posted March 3 Added some Detail Master Muffler Clamps. Good way to secure those “floating exhaust pipes” to your undercarriage. Will add some panel line accent and splash a little Vallejo Earth tone on there for weathering effects. TCB, Adam 6
Csaba aka felhasznaaloo Posted March 6 Posted March 6 Wow. Nice little details. I'm always surprised how much detailing stuff is available that I'm not aware of.
adamelvis Posted March 12 Author Posted March 12 On the left is the stock AMT shock/spring unit. I made my own coil-over with 3/32” plastic tube and aluminum wiring (wrapped around a drill bit to create the spring). Using the same wire to put it all together and also will be able to adjust the height during installation. TCB, Adam 4
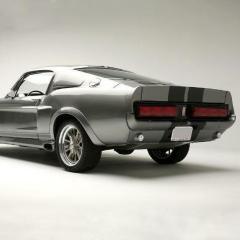
adamelvis Posted March 16 Author Posted March 16 Brake Lines for the Front & Rear are completed. Also added brake calipers to the backside of the wheels, so I can connect the brake lines. TCB, Adam 3
Csaba aka felhasznaaloo Posted March 19 Posted March 19 Nice progress. I am doing something similar, not this nice, on my Bullitt build. 1
adamelvis Posted March 23 Author Posted March 23 Work finally begins on the custom Total Control Products - Adjustable Shock Tower Brace. 4
adamelvis Posted April 13 Author Posted April 13 Work begins on final assembly. Drive shaft and rear axle First, then exhaust pipes Second. The remainder of the Total Control Suspension for the rear and sub frame will be added later. TCB, Adam 3
adamelvis Posted April 15 Author Posted April 15 Front suspension completed. Rear suspension still needing the Total Control 4-Link suspension, Watts Link and Sub-Frame connector installed. As I don’t want to risk damaging the remaining components, I will install them in the final days of completion. FYI, the masking tape over the aluminum fuel tank will also be removed in final days. The aluminum paint on this part is very easily scratched! TCB, Adam 3
adamelvis Posted April 15 Author Posted April 15 Some nice overall engine photos before the body gets in the way. Throttle linkage wire and Master Cylinder vacuum hose to be installed. All wiring and hoses get attached once body is attached. - Up Next: Completion of Front Strut Tower Bracing. Interior Flocking and Assembly. Roof Liner and Window Install. TCB, Adam 4
adamelvis Posted April 17 Author Posted April 17 The flocking on this one turned out great ! The photo may not show it correctly, but it is not too thick, not clumpy in sections. Very even and smooth. FYI, what I do is mask off the areas not to be covered, like the spots that need parts glued to it, ie: door panels, seats & gear shifter. Next I give the area a generous coat of Matt Black (spray can) and then quickly grab the strainer and flocking and shower it over the area. I then very lightly tap the flocking down into place and let it dry accordingly. Afterwards, I then turn it upside down and tap the excess flocking off the part. What you are left with should be a nice even coat that is securely laid down. Any spots that were missed could easily be touched up with a brush of paint and repeat the flocking process again. TCB, Adam 3
adamelvis Posted April 30 Author Posted April 30 The BMF was damaged when test fitting the windshield, so I had to replace the top trim. Very close to completion on this one… Stay Tuned ! 3
adamelvis Posted May 4 Author Posted May 4 Interior assembly is all completed, aside from the roof liner, rear view mirror and sun visors. This will be installed on the inside of the Eleanor body. TCB, Adam 3
adamelvis Posted May 4 Author Posted May 4 A few highlights of the interior! Detail Master Parts Used: Seat Belts, Hurst Shifter & Boot Plate, Fire Extinguisher, NOS Bottle& Hose Clamps. The interior NOS switch panel & light were scratch built, along with the aluminum battery box. The clear hose from the fuel cell was heated & bent into shape and the ends painted matte black. TCB, Adam 6
Recommended Posts
Create an account or sign in to comment
You need to be a member in order to leave a comment
Create an account
Sign up for a new account in our community. It's easy!
Register a new accountSign in
Already have an account? Sign in here.
Sign In Now