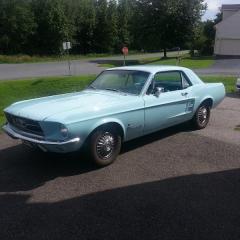
Chuck Kourouklis Posted October 24, 2023 Author Posted October 24, 2023 SO. In case any of you was wonderin' if the Creamsicle was just left to melt, may I assure you it was not. "Slump-buster". NINE. months. after the fact. Yaaayyy me... And what in the Habitat For Humanity is going on with those whitewall decals? Yeah, it appears I spoke without caveat, several months too soon. More to come. 1
Chuck Kourouklis Posted October 24, 2023 Author Posted October 24, 2023 Again, backtracking 'cause I'm apparently soooo infatuated with that narrative device: So as I looked to keep some momentum going (slug's pace, yes, but hey, forward) I pondered what to keep box-stock - body shell and chassis, as you've seen, sure. Interior? Absolutely, why not. (Did I remember to polish off that overspray on the right card? carp, I'll hafta look...) Engine? NOT ON YER LIFE. We're CAR MODELERS, we don't leave engines alone! 'Specially not in rods with plug wires flopping around in the breeze! Detail Master to the TA-DAAAAA, wired in Nailhead order or as close as I could manage. Orange wires, of course. Turns out this mill didn't have a coil though. But the kit did - just clip out one of those sprue reinforcements between matching but separate parts - headlight buckets, iIrc? - even had a starting dimple to drill! Fit behind the passenger's cylinder head as if designed for it, plenty of room between block and firewall. 3
Zippi Posted October 24, 2023 Posted October 24, 2023 Looking pretty sharp there Chuck. Engine looks nice.
David G. Posted October 24, 2023 Posted October 24, 2023 Super cool build! Excellent color combination and a great narrative to go with it all. David G.
redscampi Posted October 24, 2023 Posted October 24, 2023 11 hours ago, Chuck Kourouklis said: SO. In case any of you was wonderin' if the Creamsicle was just left to melt, may I assure you it was not. "Slump-buster". NINE. months. after the fact. Yaaayyy me... And what in the Habitat For Humanity is going on with those whitewall decals? Yeah, it appears I spoke without caveat, several months too soon. More to come. The decals look like dirty whitewalls. Nothing a bit of elbow grease and Comet won't fix!
NOBLNG Posted October 24, 2023 Posted October 24, 2023 Beautiful work Chuck!?? I have one of these, and you are making me want to tear into it…even though I have half a dozen others on the go.?
bobthehobbyguy Posted October 24, 2023 Posted October 24, 2023 Absolutely love it. Great color choices.
Chuck Kourouklis Posted October 25, 2023 Author Posted October 25, 2023 16 hours ago, Zippi said: Looking pretty sharp there Chuck. Engine looks nice. 16 hours ago, David G. said: Super cool build! Excellent color combination and a great narrative to go with it all. David G. 15 hours ago, redscampi said: The decals look like dirty whitewalls. Nothing a bit of elbow grease and Comet won't fix! 13 hours ago, NOBLNG said: Beautiful work Chuck!?? I have one of these, and you are making me want to tear into it…even though I have half a dozen others on the go.? 12 hours ago, SpikeSchumacher said: Nicely done Chuck! ? 9 hours ago, bobthehobbyguy said: Absolutely love it. Great color choices. Thanks, Gentlemen, each one of you, very much! It's not quite turning out as well as I'd hoped, so your kind feedback is especially appreciated.
Chuck Kourouklis Posted October 25, 2023 Author Posted October 25, 2023 And as it happens, Gary gives me a perfect segue into one of two major vexations I've had over this project. Did I really have to tempt Bitch Goddess Fate by waxing so effusively, so early on about the WW decals? I'm showing this angle because it highlights the one whitewall that hasn't turned to flypaper over the past few months, the passenger rear. That's right, three of these four decals have behaved so much like paint, they're apparently reacting with the tire vinyl now after several months. They were perfectly dry up through, like, July, then started turning. Why that sole exception? Best I can figger: 'member from the opening post how I wasn't even sure I got the first decal sticky-side down? I'm wondering now if I did reverse it, and the outer surface of the carrier has formed enough of a protective barrier to prevent the reaction afflicting the other 3 decals. Annoying, and now a caveat for anyone who might want to use these. I'm hoping you'd be alright giving the sidewalls a a few light coats of flat or semigloss acrylic after the decals dried, or maybe, installing them outside-in might be an actual answer - but this BS is a shame after they conformed so nicely at the beginning. You might notice an oddity or two at this angle. Fluted tailpipes, by way of f'rinstance: I looked at the intended exhaust tips, found them a bit underwhelming. Not terribly defined, nor even particularly centered for their openings. But lucky me, I opted for those nice, busy carburetors over the fuel injection... the stacks of which I found vastly superior as tailpipe tips! The Semple mirror paint has proven to be a nice chrome touch-up for handbrushing, especially if you're sure you won't be handling the area. You might see it made a nice effect for the inner grill shell area surrounding the radiator and WAAAAAIIIIIITAMINIT, waitaminit, wait. a. minute: Okay, well, first I'll be coming back around to redo that alternator bracket now that I've extolled the virtues of Semple touch-up. But second, yes! You're seeing an orange radiator hose. Did some online research to see just what kind of color spectrum might be covered by silicone hoses and orange was indeed included - more in the motorcycle and diesel world on the first sweep, but why should two- and eighteen-wheelers have all the fun?
bobthehobbyguy Posted October 25, 2023 Posted October 25, 2023 On the subject of the whitetails. I know Tim Boyd did shoot clear on the tires before adding the decals. Maybe he could confirm if that prevented the tire interaction you experienced. 1
Chuck Kourouklis Posted October 26, 2023 Author Posted October 26, 2023 Now that you mention it, Bob, I remember that! Wonder if he's had the same experience then, guess I'll have to search his content a bit and see what I can excavate...
Mr. Metallic Posted October 26, 2023 Posted October 26, 2023 17 minutes ago, Chuck Kourouklis said: Now that you mention it, Bob, I remember that! Wonder if he's had the same experience then, guess I'll have to search his content a bit and see what I can excavate... @tim boyd 1
tim boyd Posted October 26, 2023 Posted October 26, 2023 Craig and Chuck....I did shoot clear (I think it was Tamiya Semi-Gloss) before applying the whitewalls, primarily to give the decals a panted surface to adhere to. I'm not aware of any degradation...it's been nine years since I built it - but I will check it out and get back to you all....TB 1 1
tim boyd Posted November 1, 2023 Posted November 1, 2023 On 10/26/2023 at 5:59 PM, tim boyd said: Craig and Chuck....I did shoot clear (I think it was Tamiya Semi-Gloss) before applying the whitewalls, primarily to give the decals a panted surface to adhere to. I'm not aware of any degradation...it's been nine years since I built it - but I will check it out and get back to you all....TB On 10/26/2023 at 2:44 PM, Chuck Kourouklis said: Now that you mention it, Bob, I remember that! Wonder if he's had the same experience then, guess I'll have to search his content a bit and see what I can excavate... Craig, Chuck, and Bob: Today I checked on the Roadster (built in 2015) and the Five Window Coupe (built in 2021?) that used the whitewall decals. On the 2015 build (where I had to use a ton of MicroSol to get the rar whitewalls to settle down), there were a few spots where the decal had pulled away ever so slightly from the tire, and the front whitewall decals had some minute wrinkles that were not there originally, but it both cases you had to look really hard to see them. In the 2021 build, the decals looked fine but in handling the model, the rear whitewalls have developed a sticky surface of sorts. Neither situation would be enough to keep me from doing this process again, but does suggest that there may be a few mid-long term tradeoffs of sorts....TIM 1 1
Chuck Kourouklis Posted November 1, 2023 Author Posted November 1, 2023 Thanks very much, Tim! Yep, on future ventures I'll probably put a semi-gloss barrier coat on the sidewall first. I'm also of a mind to try deliberately applying one outer surface-in, just to see if that might be what happened with the one wheel that isn't tacky. It was a lot of solution in my case too, but they conformed so nicely they deserve another shot with some troubleshooting in mind. I'll stand by the rest of my observations about current Revell decals.
Recommended Posts
Create an account or sign in to comment
You need to be a member in order to leave a comment
Create an account
Sign up for a new account in our community. It's easy!
Register a new accountSign in
Already have an account? Sign in here.
Sign In Now