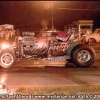
dragcarz Posted June 25, 2023 Share Posted June 25, 2023 I’m calling this one finished. It’s not perfect but for the most part I’m satisfied with it. I learned a lot about this kit during the building. Some experimenting went on with this one. Windshield needed the bottom trimmed as the interior didn’t fit and now the chassis isn’t squared with the body so the front right tire isn’t sitting on the ground. I added the headlights after painting, big mistake as the attachment points were buried in paint, and it made placement really hard. The superglue I used to mount the door handles fogged the black paint. Comments, criticism welcome. Thanks for looking. 13 Quote Link to comment Share on other sites More sharing options...
carrucha Posted June 25, 2023 Share Posted June 25, 2023 Sweet gasser. Nice black paint job. I like how the blue in the decals matches the slicks. Quote Link to comment Share on other sites More sharing options...
Zippi Posted June 25, 2023 Share Posted June 25, 2023 Great build Roger. The blue line tires and the blue on the decals just brings it all together. Nice detail work. Quote Link to comment Share on other sites More sharing options...
Rattlecan Dan Posted June 25, 2023 Share Posted June 25, 2023 That came out really Nice! Smooth and clean. Good job. Thanks for posting. Quote Link to comment Share on other sites More sharing options...
dragcarz Posted June 25, 2023 Author Share Posted June 25, 2023 Thanks everyone, greatly appreciated! Quote Link to comment Share on other sites More sharing options...
M W Elky Posted June 26, 2023 Share Posted June 26, 2023 A great rendition of my favorite Chevy gasser of of amt’s finest kits Quote Link to comment Share on other sites More sharing options...
Mopar2 Posted June 26, 2023 Share Posted June 26, 2023 She really came out nice...Great job... Quote Link to comment Share on other sites More sharing options...
larman Posted June 26, 2023 Share Posted June 26, 2023 Nice job! I like the engine mods you did, a big improvement over the kit parts! Quote Link to comment Share on other sites More sharing options...
bondo bill Posted June 26, 2023 Share Posted June 26, 2023 looks good Quote Link to comment Share on other sites More sharing options...
slusher Posted June 26, 2023 Share Posted June 26, 2023 Looks Great! Quote Link to comment Share on other sites More sharing options...
dragcarz Posted June 27, 2023 Author Share Posted June 27, 2023 On 6/25/2023 at 9:03 PM, larman said: Nice job! I like the engine mods you did, a big improvement over the kit parts! Thanks Larry, most of the engine is kit parts, I sanded the ribs off the oil pan ,swapped the injector from the parts box and valve covers from the Revell 67 Chevelle kit. Quote Link to comment Share on other sites More sharing options...
echo Posted June 29, 2023 Share Posted June 29, 2023 Nicely done, the '37 Chevys make nice gassers and yours is no exception, clean building style and paintwork. You as the builder see the flaws but to me it's a very nice model. Quote Link to comment Share on other sites More sharing options...
thatz4u Posted June 30, 2023 Share Posted June 30, 2023 nice ...I like it Quote Link to comment Share on other sites More sharing options...
James2 Posted July 2, 2023 Share Posted July 2, 2023 Outstanding rendition, that paint it smooth, and you added just enough detail. Well done... Quote Link to comment Share on other sites More sharing options...
dragcarz Posted July 9, 2023 Author Share Posted July 9, 2023 I came across a couple more shots of the 37. 2 Quote Link to comment Share on other sites More sharing options...
customline Posted July 10, 2023 Share Posted July 10, 2023 Roger, this thing is awesome. You can paint, sir! You should be very proud of this gorgeous gasser. CONGRATS! When I have items like those headlight pods or mirrors and handles that must be attached post paint, I will pre-drill the body before paint and use .020 brass wire to "pin" them on afterward (just run the bit through the holes to clean out the paint.) That way you get a good positive attachment using only the tiniest bit of CA. If I can drill it, I pin it. Mirrors and handles can be tricky but if the item is big enough to drill with a #75 bit, you're in business. (You can go smaller if you have those small bits but I can't keep those below #75 - I just break them 😔.) I will also do this with rear spoilers too. Try it! 1 Quote Link to comment Share on other sites More sharing options...
dragcarz Posted July 10, 2023 Author Share Posted July 10, 2023 Thanks Jim, I’m going to start pinning more of my parts. I thought the location marks for the headlights would show through the paint and while one was faint,the other disappeared. Same for the tail lights, the instructions said to drill out the holes indicated under the body, but there were none. There was locating holes for the door handles which I really appreciated. A little more prep before painting would save me a lot of headaches. Thanks for the advice! Quote Link to comment Share on other sites More sharing options...
Rattlecan Dan Posted July 10, 2023 Share Posted July 10, 2023 That is good info. I feel overly critical saying this but with such a beautiful smooth paint job have to find a way to get off all the dust. Sorry. It's a beautiful build. Quote Link to comment Share on other sites More sharing options...
jdhog Posted July 10, 2023 Share Posted July 10, 2023 Slick! Great job! Quote Link to comment Share on other sites More sharing options...
TransAmMike Posted July 10, 2023 Share Posted July 10, 2023 Terrific looking '37, looks soooo good in black. 👍 Quote Link to comment Share on other sites More sharing options...
bluestringer Posted July 12, 2023 Share Posted July 12, 2023 Great looking gasser. Nice work. Quote Link to comment Share on other sites More sharing options...
dragcarz Posted July 17, 2023 Author Share Posted July 17, 2023 Thanks everyone, for the kind words. I’ve not been on here in a week or so, so I apologize for the late response. Work and life keep me pretty busy and I am spending as much free time I have on my Hornet build, wanting to get it completed. Quote Link to comment Share on other sites More sharing options...
ChrisR Posted July 17, 2023 Share Posted July 17, 2023 Very nice! Quote Link to comment Share on other sites More sharing options...
Andrew McD Posted July 27, 2023 Share Posted July 27, 2023 You pointed out the problems with the build but the end product is excellent! Well done. Quote Link to comment Share on other sites More sharing options...
PappyD340 Posted July 29, 2023 Share Posted July 29, 2023 Looks great! Quote Link to comment Share on other sites More sharing options...
Recommended Posts
Join the conversation
You can post now and register later. If you have an account, sign in now to post with your account.
Note: Your post will require moderator approval before it will be visible.