TheBEAUMONTGURU Posted January 30 Author Share Posted January 30 Jerry, thanks. i just used various strips and thicknesses of evergreen strip to build up the grill bars. usually .010- .030 thicknesses Quote Link to comment Share on other sites More sharing options...
TheBEAUMONTGURU Posted February 6 Author Share Posted February 6 A little more progress. lots of upgrades to the original, made some door panel lines, decals for the embossing pattern. a GTO grill from another kit. had to fabricate the latch for the spare tire as well as the rear gate handle. scribed all the panel lines better, and made some trim strips for the tops of the doors, still need to chrome them tho. also made some decals for the waffle patterned metal panels on the rear seat and tailgate, the effect worked well. still lots to do, handles, armrests, belts, etc. the paint is the SEM vinyl dye from my real car. My car also has a black carpet front and rear, not correct for the purists, but its how my real car looks. 5 Quote Link to comment Share on other sites More sharing options...
kelson Posted February 6 Share Posted February 6 Great level of detail!! Quote Link to comment Share on other sites More sharing options...
TheBEAUMONTGURU Posted February 13 Author Share Posted February 13 Got the interior finished. Lots of added details, photoshop decals for the gauges, and a 4 speed shift pattern. Bumpstops for the back seat, seatbelts, door lock knobs. Some scratch built armrests, radio delete plate, 4 speed steering column and some added pedals from the parts bins. I got all the foil work done on the body, and detailed out my scratch built tail lights TECH TIP: the front windshield from the revell 65 Z16 chevelle works way better and is way thinner. it fits like a glove with NO trimming needed and has molded in sunvisors that work perfect. I used clear Acetate sheet for the rest of the glass. the kit stuff is WAY too thick and looks terrible. 3 Quote Link to comment Share on other sites More sharing options...
Steve H Posted February 13 Share Posted February 13 Fantastic work Dave. The interior details look spot on. Crisp foil work on the body too. Looking very nice indeed. Cheers, Steve 1 Quote Link to comment Share on other sites More sharing options...
TheBEAUMONTGURU Posted April 2 Author Share Posted April 2 getting back on this project. Its almost finished. here i am mocking up the stance. wheels are fireball 15x7 and 15x6 just like the real car. fabricated the proper looking tailpipes and added a sway bar and raised the rear end a bit, built my own shocks from scratch. 2 Quote Link to comment Share on other sites More sharing options...
TheBEAUMONTGURU Posted April 2 Author Share Posted April 2 (edited) here is the L-79 327 installed. still lots of details left, but is getting there. I used the 66 nova engine and transmission, a parts box intake that i modded lots and lots! built the thermostat housing, fireball carb, made all my own fan spacers, alt brackets, hoses, throttle linkage and brackets, built my own coil and bracket. modded the rad spacer and craddle to accept my new grill, etc, etc. The 65 Z-16 engine compartment fit in really well to the AMT crappy wagon body. i even made a pretty convincing cowl tag from a piece of foil. i used the dual master cyl from a 67 chevelle kit, as my real car has the dual cyl upgrade. Edited April 2 by TheBEAUMONTGURU typo 8 Quote Link to comment Share on other sites More sharing options...
espo Posted April 2 Share Posted April 2 Great looking engine detailing. That basic kit body dates back to the last century, so yes, there are a few fit and finish issues. Quote Link to comment Share on other sites More sharing options...
Bainford Posted April 3 Share Posted April 3 Nice detailing. Quote Link to comment Share on other sites More sharing options...
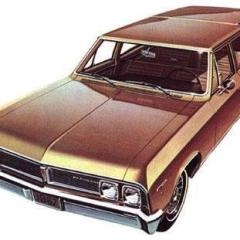
TheBEAUMONTGURU Posted April 3 Author Share Posted April 3 Finished! 3 Quote Link to comment Share on other sites More sharing options...
doggie427 Posted April 4 Share Posted April 4 Gorgeous! Always loved Beaumonts, had a beater ‘67 conv. In the late 70’s. 1 Quote Link to comment Share on other sites More sharing options...
charger74 Posted April 4 Share Posted April 4 Beautiful 1 Quote Link to comment Share on other sites More sharing options...
Nazz Posted April 4 Share Posted April 4 The wagon turned out great! Well done. Makes me want to finish my '68. Jerry 1 Quote Link to comment Share on other sites More sharing options...
Mike Slapattack Posted April 4 Share Posted April 4 This is awesome! I'm hoping to do a '69 Beaumont in the future based on the Revell Chevelle kit. This is very inspirational. 1 Quote Link to comment Share on other sites More sharing options...
Bills72sj Posted April 5 Share Posted April 5 That engine bay looks 1:1! Great job! 1 Quote Link to comment Share on other sites More sharing options...
deuces wild Posted April 5 Share Posted April 5 😎👍 Quote Link to comment Share on other sites More sharing options...
Steve H Posted April 5 Share Posted April 5 Looks fantastic all finished up Dave. The engine compartment is full of great detail work, and the interior is equally impressive. Very nice build indeed! Quote Link to comment Share on other sites More sharing options...
NOBLNG Posted April 5 Share Posted April 5 Beautifully done conversion there Dave!👍😎 Quote Link to comment Share on other sites More sharing options...
TheBEAUMONTGURU Posted April 7 Author Share Posted April 7 Thank you everyone! i really enjoyed this project. stay tuned for more Beaumont conversions in the future! Quote Link to comment Share on other sites More sharing options...
dino246gt Posted April 7 Share Posted April 7 Amazing attention to detail, such a great conversion, love it! Quote Link to comment Share on other sites More sharing options...
Recommended Posts
Join the conversation
You can post now and register later. If you have an account, sign in now to post with your account.
Note: Your post will require moderator approval before it will be visible.