gtx6970 Posted April 8 Author Posted April 8 (edited) While relaxing watching basketball last nite I decided if I could fix a few tiny snafus in the paint. So dove in with some 2000 grit wet and dry . Then polish , polish and polish some more. I have to pat myself on the back here. I think this is the best paint job I've done in my life. And Im amazed on how well it slicked up and shined up like no other before it.,,,,ever in my lifetime. . This is not something I usually strive for. This is all Tamiya colors with Duplicolor 1K clear, All rattle cans. All very light coats untill maybe the last 1 or 2 passes with clear. Those went on quite wet. And the car shined up real well . But I had some tiny dust bunnies in prominent areas I didt care for . So after a few days to cure. Out came the sand paper and polish . I used 1mm Tamiya tapes to lay out the stripes . Then very light passes to get color on the body. End result is I have practically zero edge lines between the colors Needless to say Im thrilled beyond belief I do have some silvering around some of the decals. Deep down , Im not real surprised. As the kit is getting old ( Ive had it since they first came out ) BUT,,,,,I can live with it Interior is just a mock up , Im waiting on some aftermkt parts to make seat belts out of before gluing it all together Edited April 9 by gtx6970 6
gtx6970 Posted April 15 Author Posted April 15 Interior is now done Added some photo etch seat belts. And the correct shifter Sat down for several hours and knocked out the BMF work. That was fun. Ok. Not really My neck and shoulders paid the price. I'll spend the rest of the day with a heating pad on me. 5
wrenchr Posted April 15 Posted April 15 Very nice paint!! I just got the S&M revell kit yesterday from my brother.
gtx6970 Posted April 16 Author Posted April 16 (edited) Thanks all. This one is shaping up far better than I ever expected . Or strive to achieve actually So am trying my best to take my time. Waiting on some engine detail supplies before I go any further Edited April 16 by gtx6970 4
gtx6970 Posted April 21 Author Posted April 21 (edited) Back at it for a day or so Engine details are all done,, and about ready to go into the chassis for the last time Engine is kitbashed with various Revell pieces to replicate a wedge engine and retain the 4spd trans Painted duplicolor old Ford engine blue, A carb from Fireball. Prewired dist from MAD Fuel line from the carb to the fuel pump. home made carb return spring and brcket Spark plug wire clips from MCG ( thank god for lighted magnifiers btw ) Headers are from the hemi , only heated and bent to work on the wedge motor edit, Now that I look at it in pictures. I think the red battery cable to starter wire is a bit too thick I may have to change that before it goes in the chassis Edited April 21 by gtx6970 2
Brutalform Posted April 22 Posted April 22 Very nice paint work. Yes, those Tamiya tapes are the bomb. That engine looks great too, Bill.
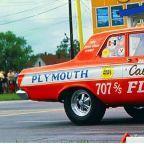
dwc43 Posted April 22 Posted April 22 17 hours ago, gtx6970 said: Back at it for a day or so Engine details are all done,, and about ready to go into the chassis for the last time Engine is kitbashed with various Revell pieces to replicate a wedge engine and retain the 4spd trans Painted duplicolor old Ford engine blue, A carb from Fireball. Prewired dist from MAD Fuel line from the carb to the fuel pump. home made carb return spring and brcket Spark plug wire clips from MCG ( thank god for lighted magnifiers btw ) Headers are from the hemi , only heated and bent to work on the wedge motor edit, Now that I look at it in pictures. I think the red battery cable to starter wire is a bit too thick I may have to change that before it goes in the chassis The starter wire does look big in the pic. I built and raced mostly dirt and asphalt circle track cars, but I did drag race in the beginning. With 2 batteries in the trunk and no alternator for power we used a very large 00 ga wire. With alternator we ran 0 and with the battery behind the driver's seat we dropped down to a 1 or 2 ga wire. 00 is like welding cable size and it's very big. There's a chart below. Maybe you can figure out how to scale the wire that you need. Hope that helps some. Tell me that Road Runner drag car of mine does not look the 70's typical nose down rear up big drag slick car. lol And there's nothing like sliding sideways at a buck twenty with the LF 6 to 8 inches off the ground under full power coming of the corner. 1
6bblbird Posted April 22 Posted April 22 On 4/2/2025 at 11:08 AM, AmericanMuscleFan said: Thank you for educating me Bill, it is very interesting and it demonstrates the particular character traits of each of these master mechanics from this beautiful era of automotive history. This forum is so relevant when members take the time to share their knowledge and experience. 👍 I believe that main reason S&M engines and even the cars through ‘69 were painted with Ford paint is that they had so much of it. When the team requested paint from Ford back in 1964, they were sent a truckload from Michigan. It was part of their sponsorship agreement. They had enough paint to last for years even though the sponsorship was over a few months after it started. That is the story I got from a former S&M team member.
gtx6970 Posted May 8 Author Posted May 8 (edited) small update Been working on a 1/1 projects so Model bench time is a bit slower I got in some wheels and wheel backs to fit the car and Using a Dana axle . All from the Revell 68 Charger ( gotta be accurate if I can ) So a general mockup had to be done just to see how its gonna set on the tires . And I think I like it . Not too high, not too low all the way around edit, Better pictures Edited May 8 by gtx6970 4
Bills72sj Posted May 8 Posted May 8 (edited) Very nice build so far. I suggest you take the time to detail the Keystone Klassics with semigloss black. I shook my bottle of paint and used a round toothpick dabbed in what paint sticks to the lid. Edited May 8 by Bills72sj 1
gtx6970 Posted May 8 Author Posted May 8 (edited) 14 minutes ago, Bills72sj said: Very nice build so far. I suggest you take the time to detail the Keystone Klassics with semigloss black. I shook my bottle of paint and used a round toothpick dabbed in what paint sticks to the lid. Oh I will. This is just a stance ck I'm not sure yet if I'm even using these tires Edited May 8 by gtx6970
catpack68 Posted May 9 Posted May 9 (edited) If you look at the Keystones in these two pics of the two S&M GTXs,the wheels do not appear to be black but more like a dark sliver/ gray color the recess of the wheels. I wonder if the earlier Keystone Klassic wheels were like that and what year did they start doing black in the recesses? I also noticed the white interior and head rest in the 1st pic.Really nice work on replicating the S&M 440 GTX Bill and I can’t wait to see it finished. Edited May 9 by catpack68 2
gtx6970 Posted May 10 Author Posted May 10 (edited) Cking for final stance. Im torn between using the kit no name rear tires and the recent MPC blue streaks Mpc redlines front tires are a lock I think the blue streaks are a little more correct in both stance AND appearance wise for THIS particular car. So I'm 90% certain I'm using them Plus they just look cool Edited May 11 by gtx6970 3
gtx6970 Posted May 10 Author Posted May 10 Quote If you look at the Keystones in these two pics of the two S&M GTXs,the wheels do not appear to be black but more like a dark sliver/ gray color the recess of the wheels. I wonder if the earlier Keystone Klassic wheels were like that and what year did they start doing black in the recesses? I also noticed the white interior and head rest in the 1st pic.Really nice work on replicating the S&M 440 GTX Bill and I can’t wait to see it finished. Many Thanks But I agree , I've been looking at wheel pictures of this particular car and Im leaning more towards a dark silver grey color for the rim recesses 1
gtx6970 Posted June 5 Author Posted June 5 (edited) Done Headed to Under Glass I'll get some finished pictures tomorrow Thanks all for comments and following along Edited June 5 by gtx6970 3
keviiin86 Posted June 5 Posted June 5 Looks good! Only thing I'd be a stickler over is the headers. I know you used the hemi headers but the inside exhaust ports and primary tubes on a wedge/440 mopar are siamesed like a small block chevy. 1
gtx6970 Posted June 6 Author Posted June 6 On 6/5/2025 at 8:39 AM, keviiin86 said: Looks good! Only thing I'd be a stickler over is the headers. I know you used the hemi headers but the inside exhaust ports and primary tubes on a wedge/440 mopar are siamesed like a small block chevy. Agreed But i went thru just about every mopar kit I had with a wedge - headers . I wanted to use the set from the lindberg series....but couldn't get them to fit the engine compartment / chassis and still look reasonable. Even tried too heat the hemi headers up and squish the 2 center tubes together....that failed miserably and ended up in the trash can The only one that actually fit both the engine and chassis Was from the Landy SS/E Dart kit. But rather not part one of those kits out .. that kit is getting expensive. 1
R. Thorne Posted June 6 Posted June 6 Another thoughtful, accurate, respectful build. Thanks for posting. As I build a lot of NHRA class cars, realistic looking headers are usually the toughest thing to find. 2
Recommended Posts
Create an account or sign in to comment
You need to be a member in order to leave a comment
Create an account
Sign up for a new account in our community. It's easy!
Register a new accountSign in
Already have an account? Sign in here.
Sign In Now